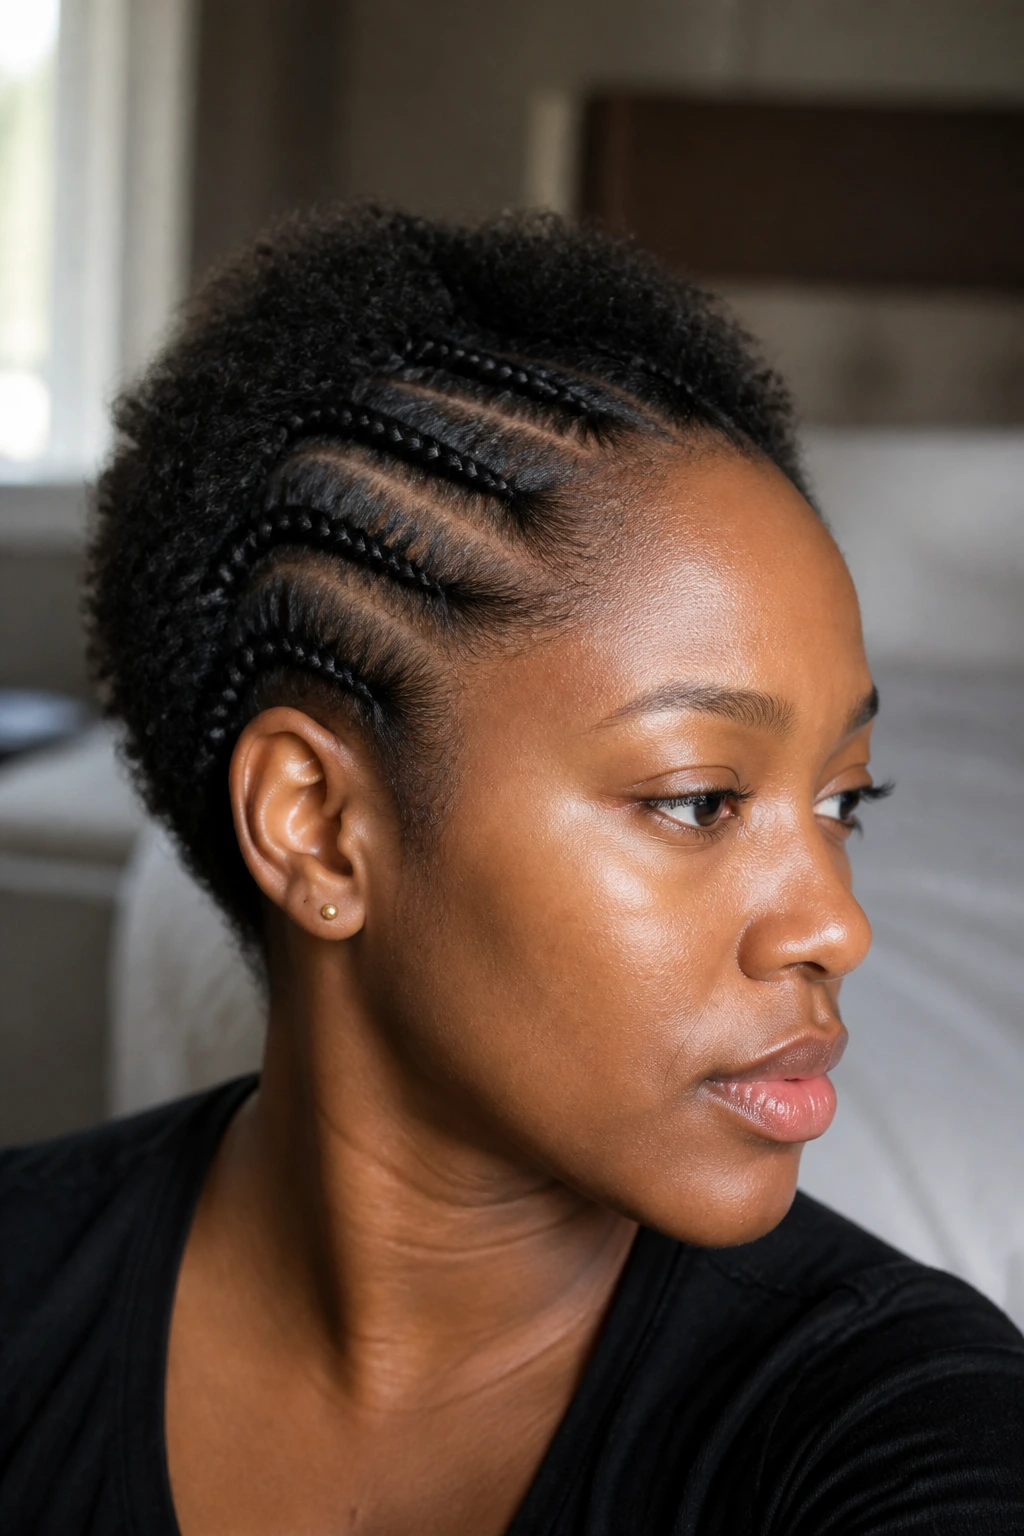
Fine 4C hair and Dutch braids have a better relationship than most people give them credit for. The braid sits on top of the scalp instead of sinking into it, so even a slim plait can read as polished and full without asking your strands to carry extra weight.
The catch is that fine hair needs less drama, not more product. Heavy extensions, chunky sections, and tight roots can make the style collapse by lunchtime or leave the hairline sore before dinner. A cleaner part, a little stretch, and a braid that starts small at the front usually do more than another squeeze of gel ever will.
The looks below lean into that reality. Some are bare, some use a touch of added hair, and a few borrow from twists, puffs, buns, or ribbon work so the braid pattern stays interesting even when the hair itself is fine. The point is not to hide the texture. It’s to make the texture look deliberate.
Why These Braids Work on Fine 4C Hair
- Low tension wins here: Narrow sections at the hairline keep the braid from feeling heavy and help the style sit flatter against the scalp.
- Stretching changes the whole outcome: Fine 4C strands braid cleaner after banding, twist-stretching, or a low-heat blow-dry, because the parts stay visible instead of springing shut.
- Parting does half the styling: Zigzags, triangles, diagonals, and side parts create the illusion of fullness before the first crossover even happens.
- You do not need a mountain of hair: A few of these styles work beautifully with your own strands, which matters when you want shape without extra weight.
- Accessories pull their weight: Cuffs, ribbons, beads, and tucked ends give the braid a finished look without forcing the root area to work harder than it should.
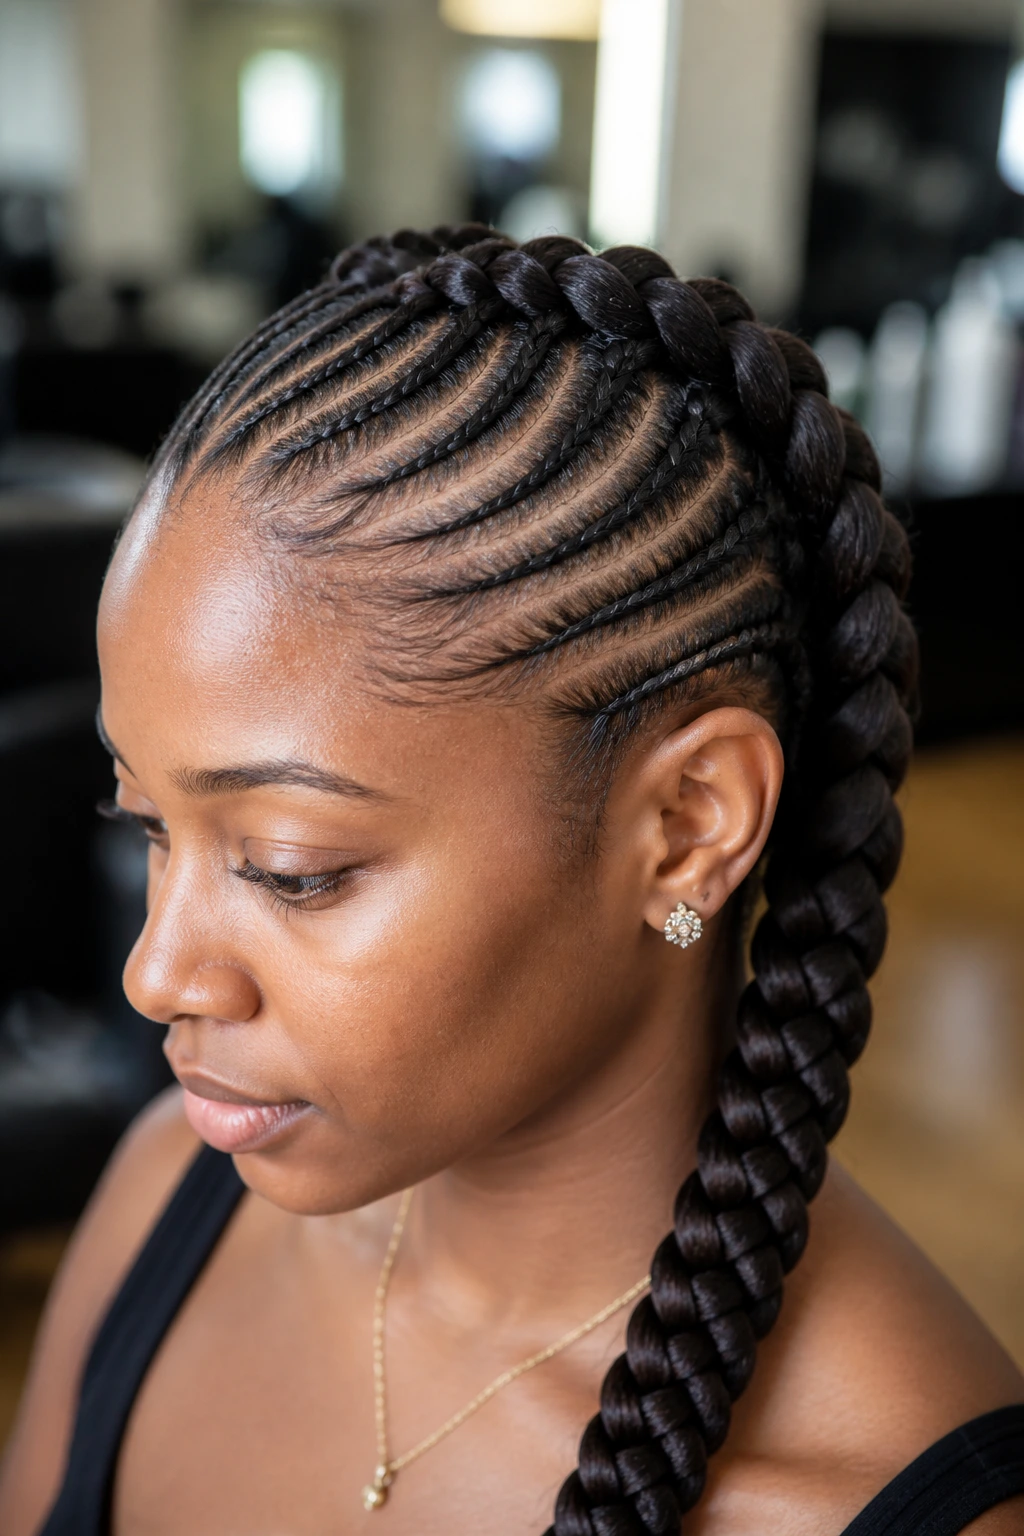
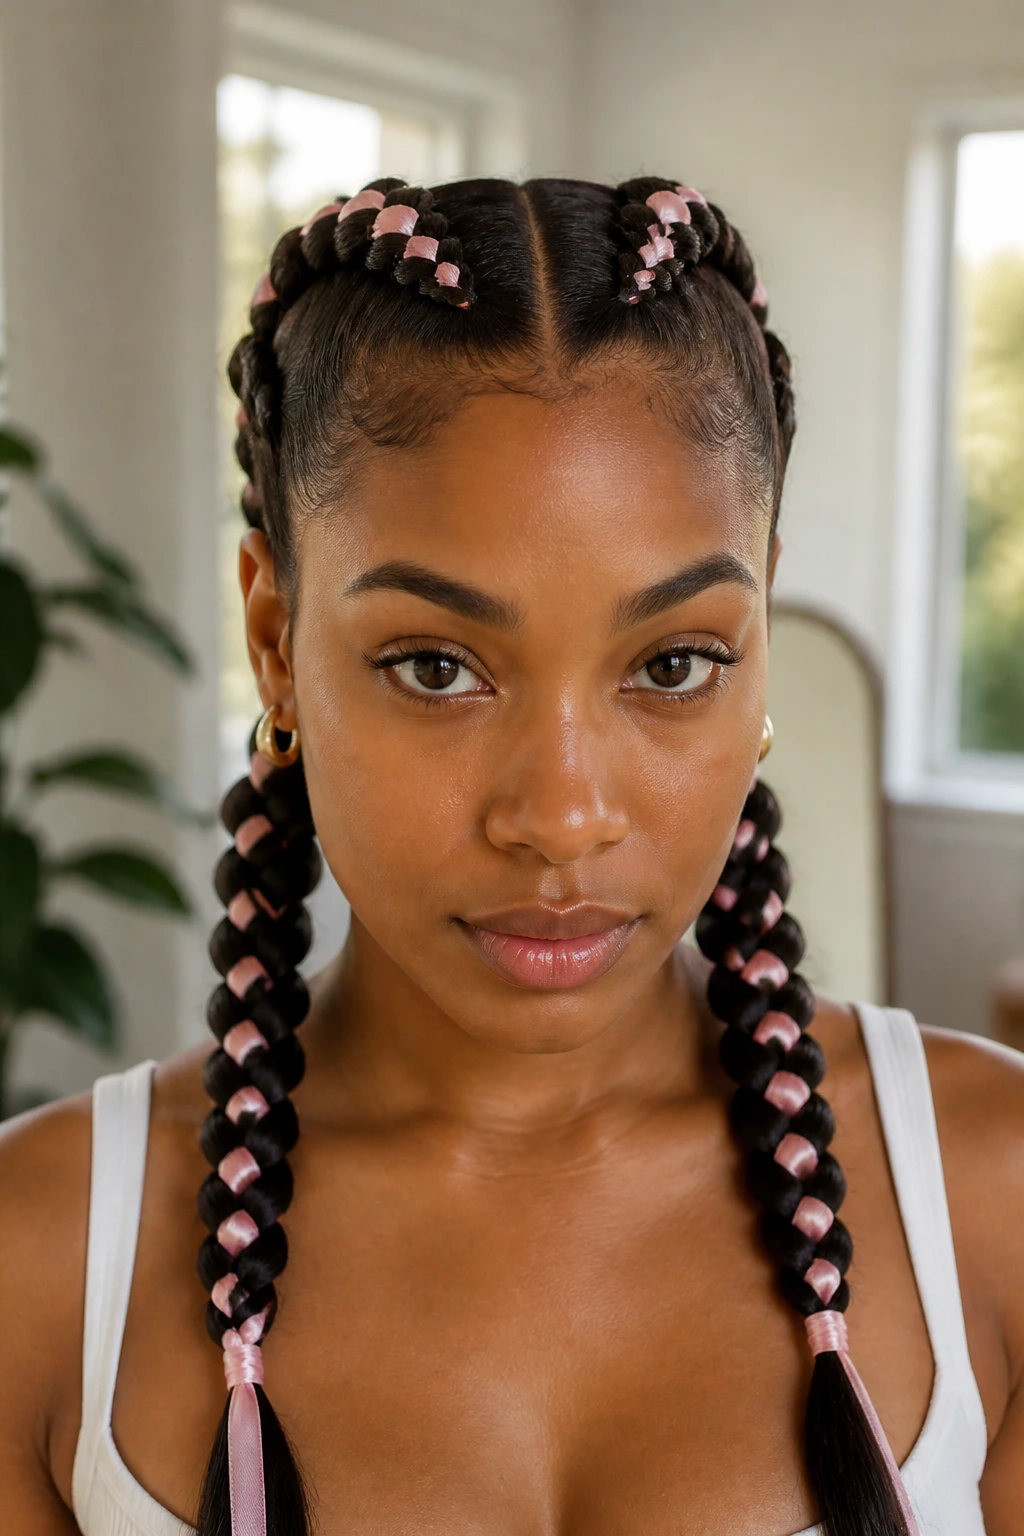
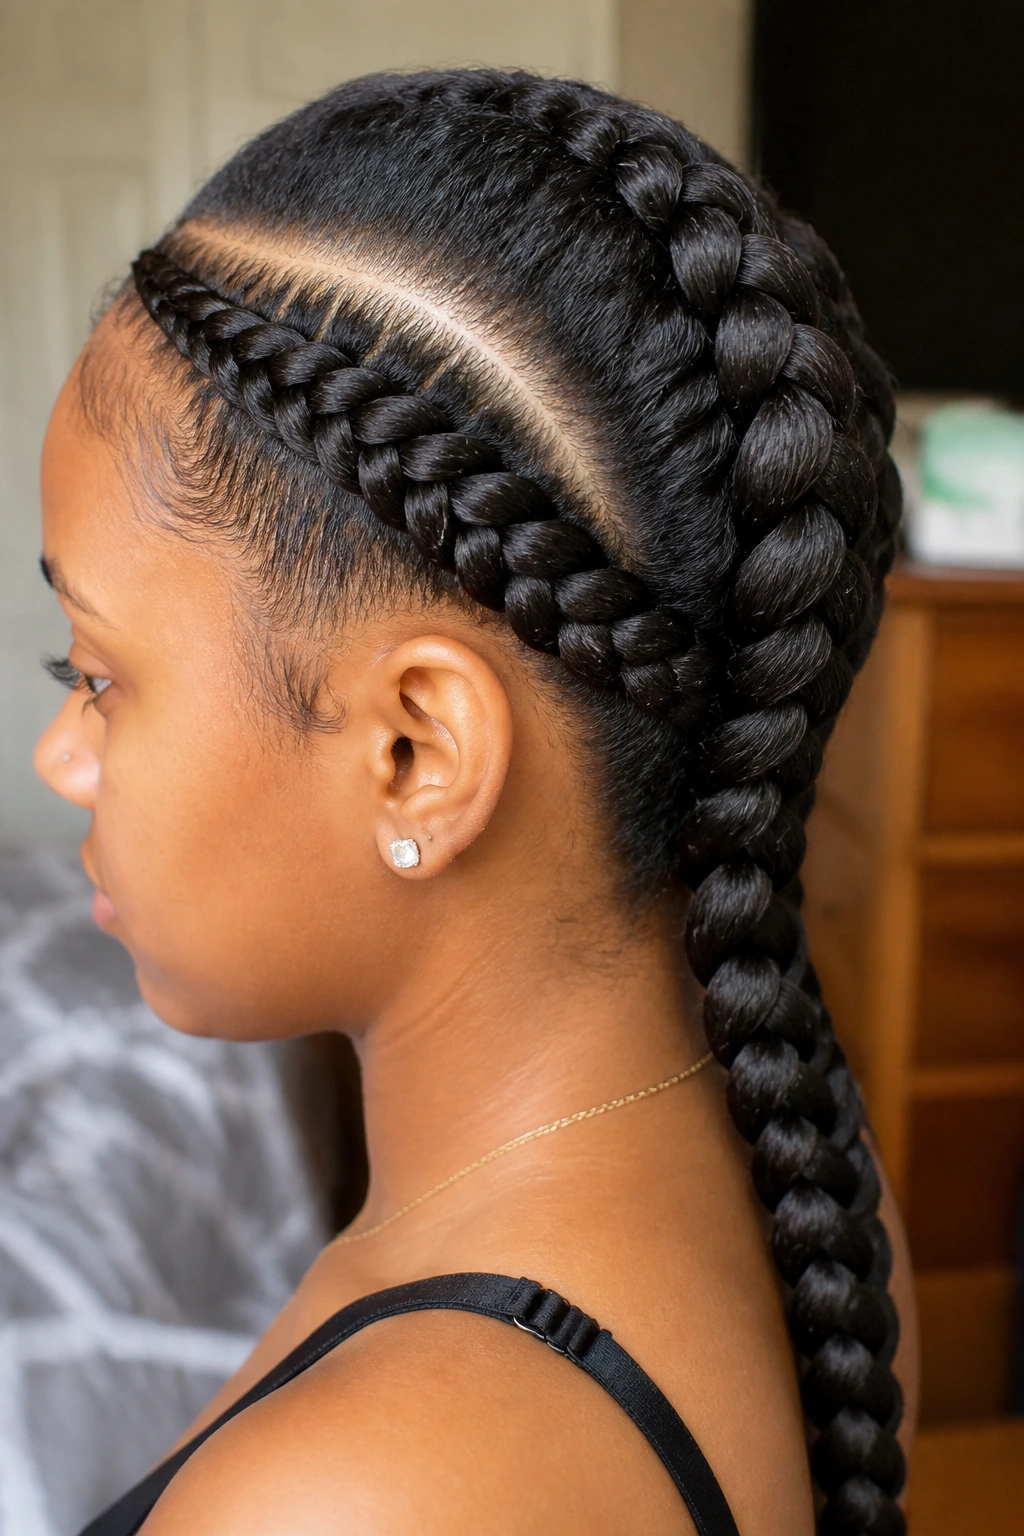
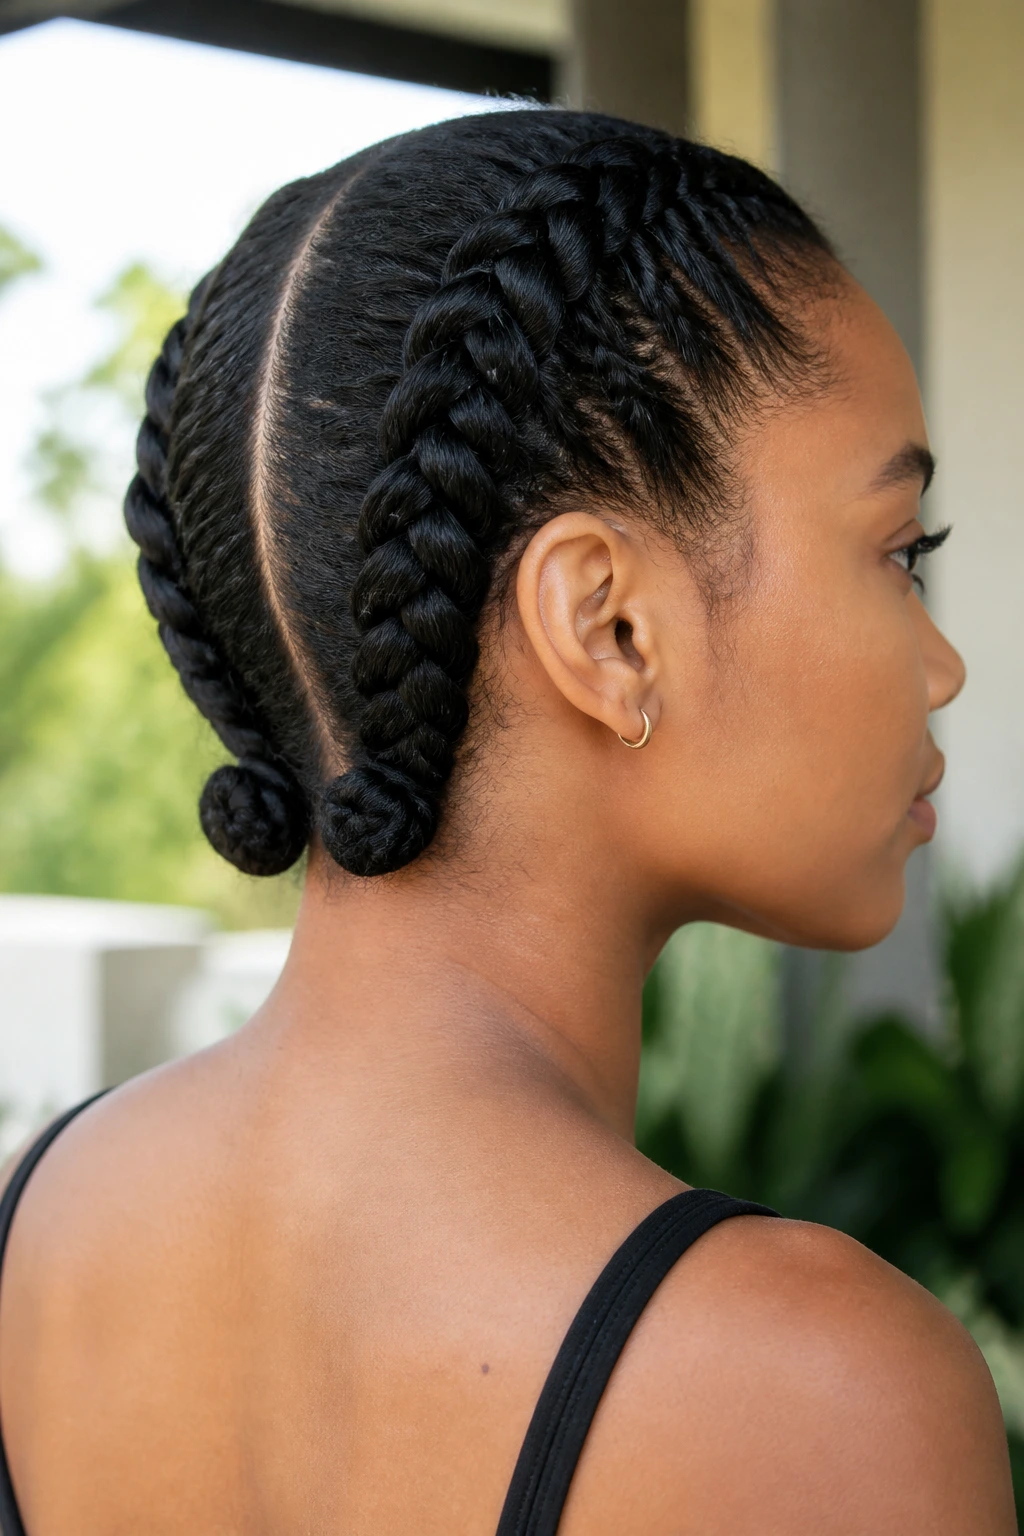
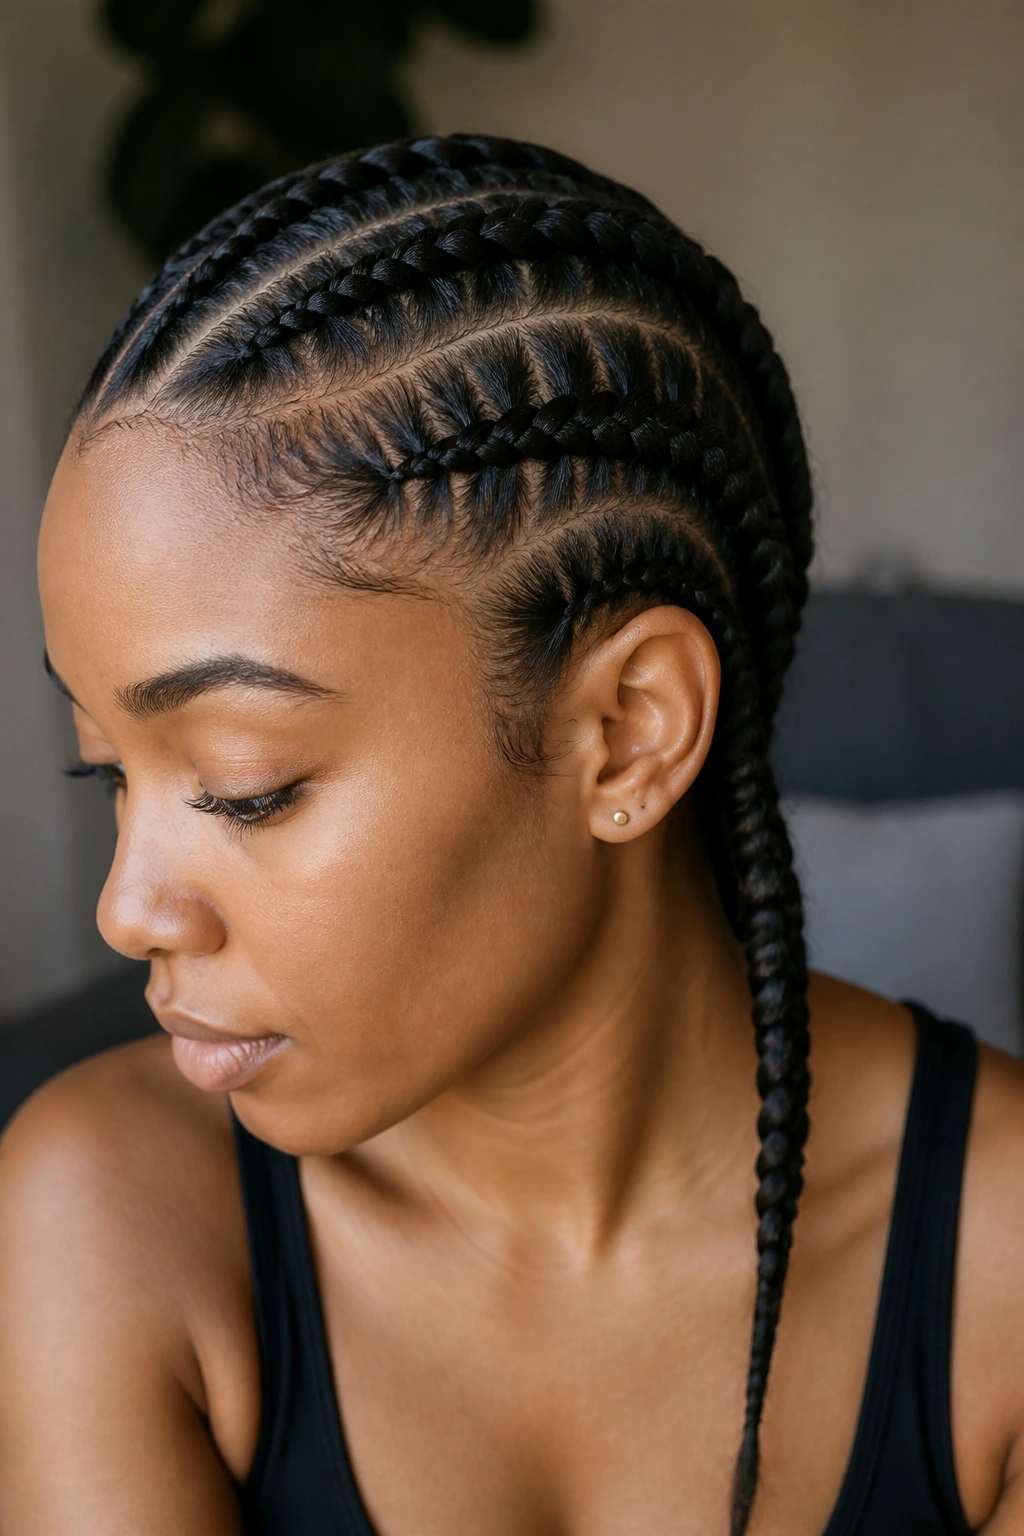
1. Center-Part Twin Dutch Braids with Tucked Ends
A clean center part gives fine 4C hair structure fast. Twin Dutch braids keep the visual weight balanced instead of letting one side swallow the other, and that balance matters when the strands themselves are slim and springy. I like this version best on stretched hair—banded, blow-dried on low heat, or set from a braid-out—because the roots sit flatter and the sections do not puff before you finish.
Tuck the ends into two small knots or fold them under with mini elastics. It keeps the style tidy and keeps the ends from rubbing against collars. Keep the front sections narrow, then let them widen a touch as you move toward the nape. That slight change makes the crown look fuller without putting extra pull on the hairline.
2. Side-Swept Dutch Braid into a Low Puff
Want more lift at the front? Start on the side. A side-swept Dutch braid lets the braid do its job while the rest of the hair gathers into a low puff, which is one of the easiest ways to keep fine strands from looking flat on top. The braid creates a strong line; the puff brings back softness at the back.
This is one of those styles that looks more expensive than it is. The trick is to keep the braid close and neat at the temple, then stop overworking the puff with your hands. If you stretch the hair first, the puff lands with shape instead of frizz. A light mousse at the ends keeps the transition smooth.
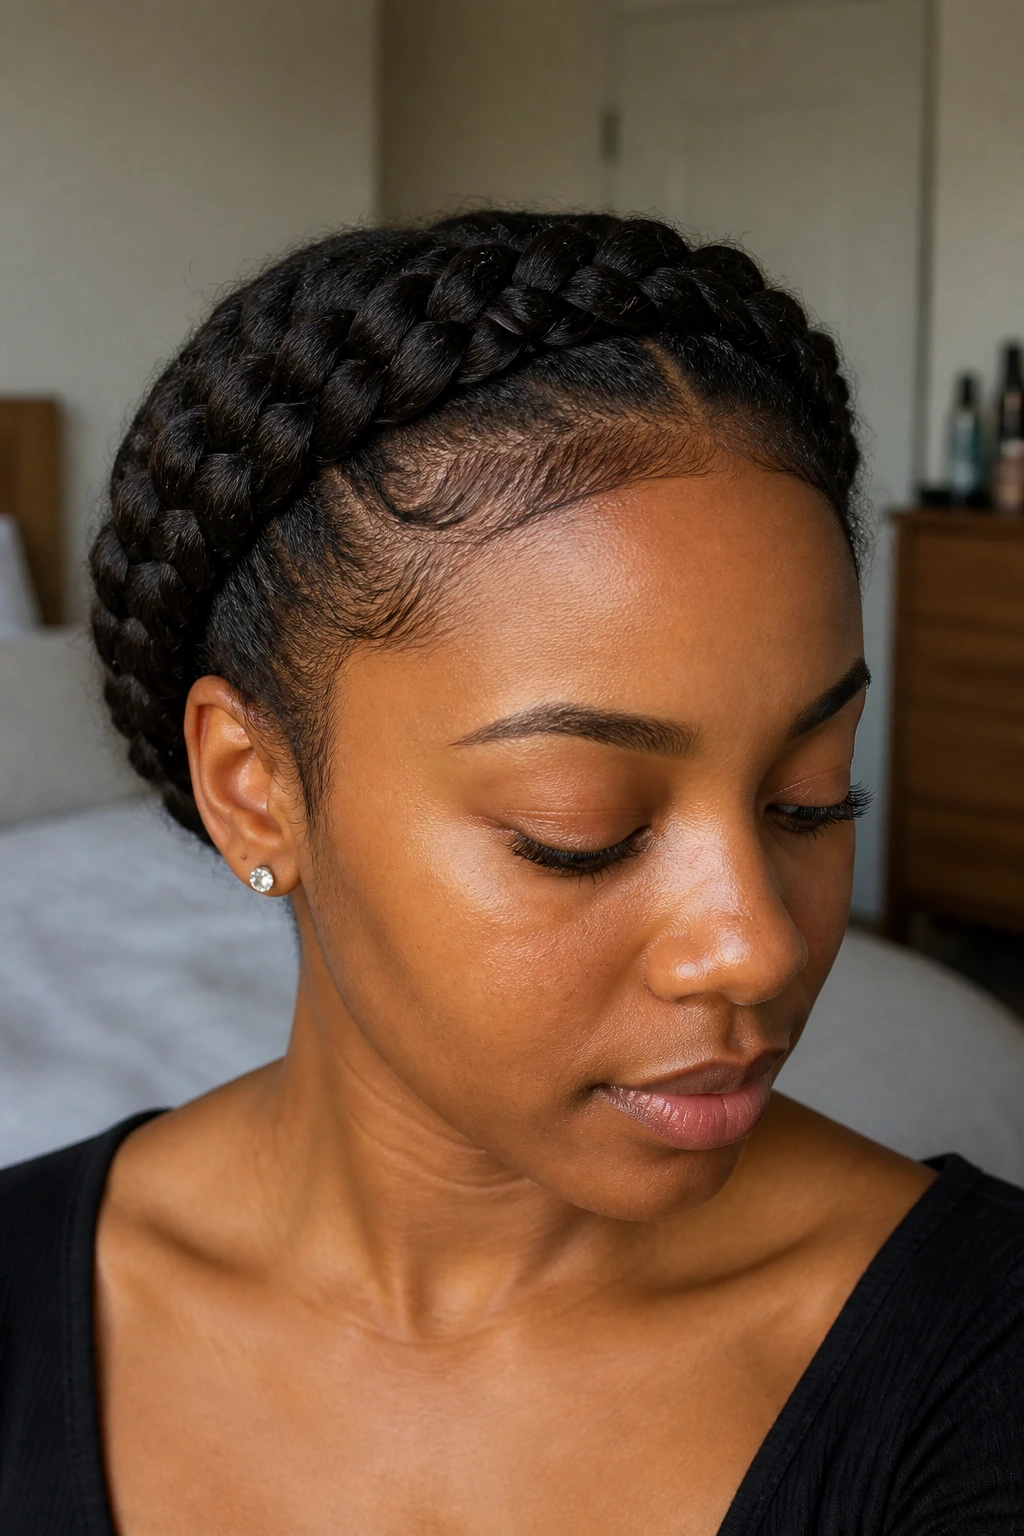
3. Halo Dutch Braid Circling the Hairline
Halo braids are the style I reach for when the hairline needs a break. The braid wraps the perimeter, so the pressure stays distributed and the face opens up cleanly. On fine 4C hair, that shape is useful because it gives the illusion of fullness around the crown without forcing you to build a huge braid.
The detail that matters most is placement. Keep the braid just behind the hairline, not on top of it, and keep the parting tight enough to look deliberate but not so sharp that it feels carved into the scalp. A halo braid looks especially good with small earrings and an open neckline. It has that calm, finished look people notice even before they can name why it works.
4. Two Dutch Braids with Beaded Ends

Beads change the whole mood. Two Dutch braids with a few beads at the ends feel playful, but they still sit neatly on fine hair if you keep the bead count low and the sizes light. Heavy bead stacks can drag on slim strands, so I would choose a few medium wooden or acrylic beads rather than a long row of dense hardware.
This style works because the braid itself stays simple and the ends do the talking. If your hair is shoulder length or shorter, tuck the last inch under the beads instead of leaving a wispy tail. It keeps the finish cleaner. A dab of mousse on the ends before beading helps them lie smooth instead of fraying out like little springs.
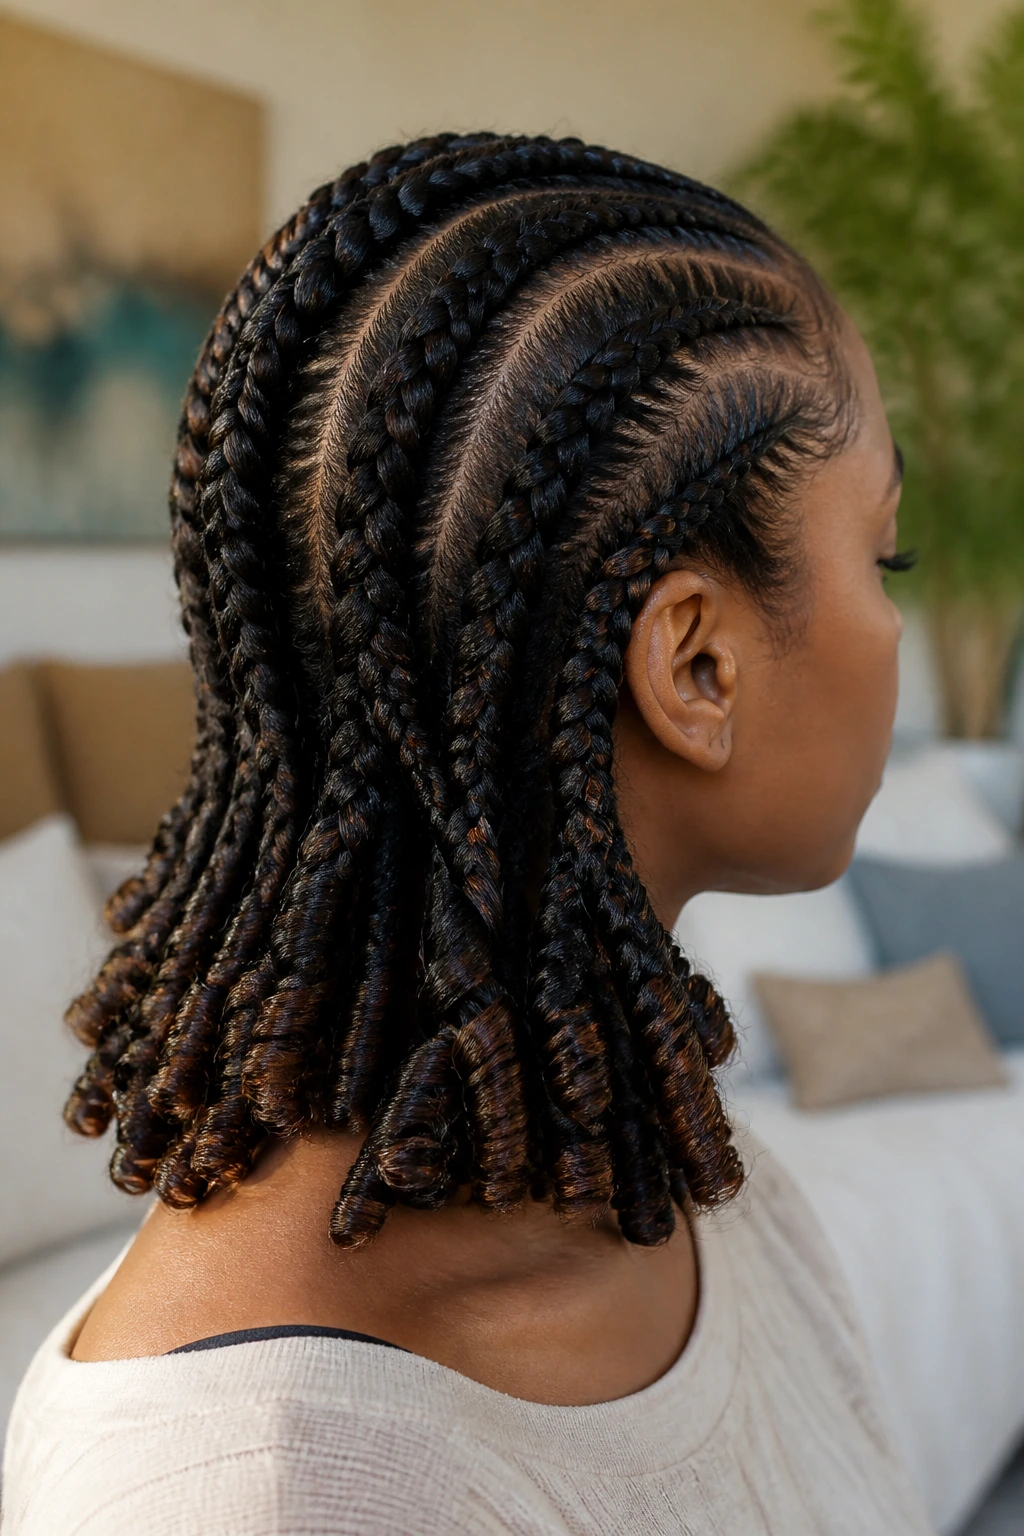
5. Feed-In Dutch Braids with a Slim Root Line
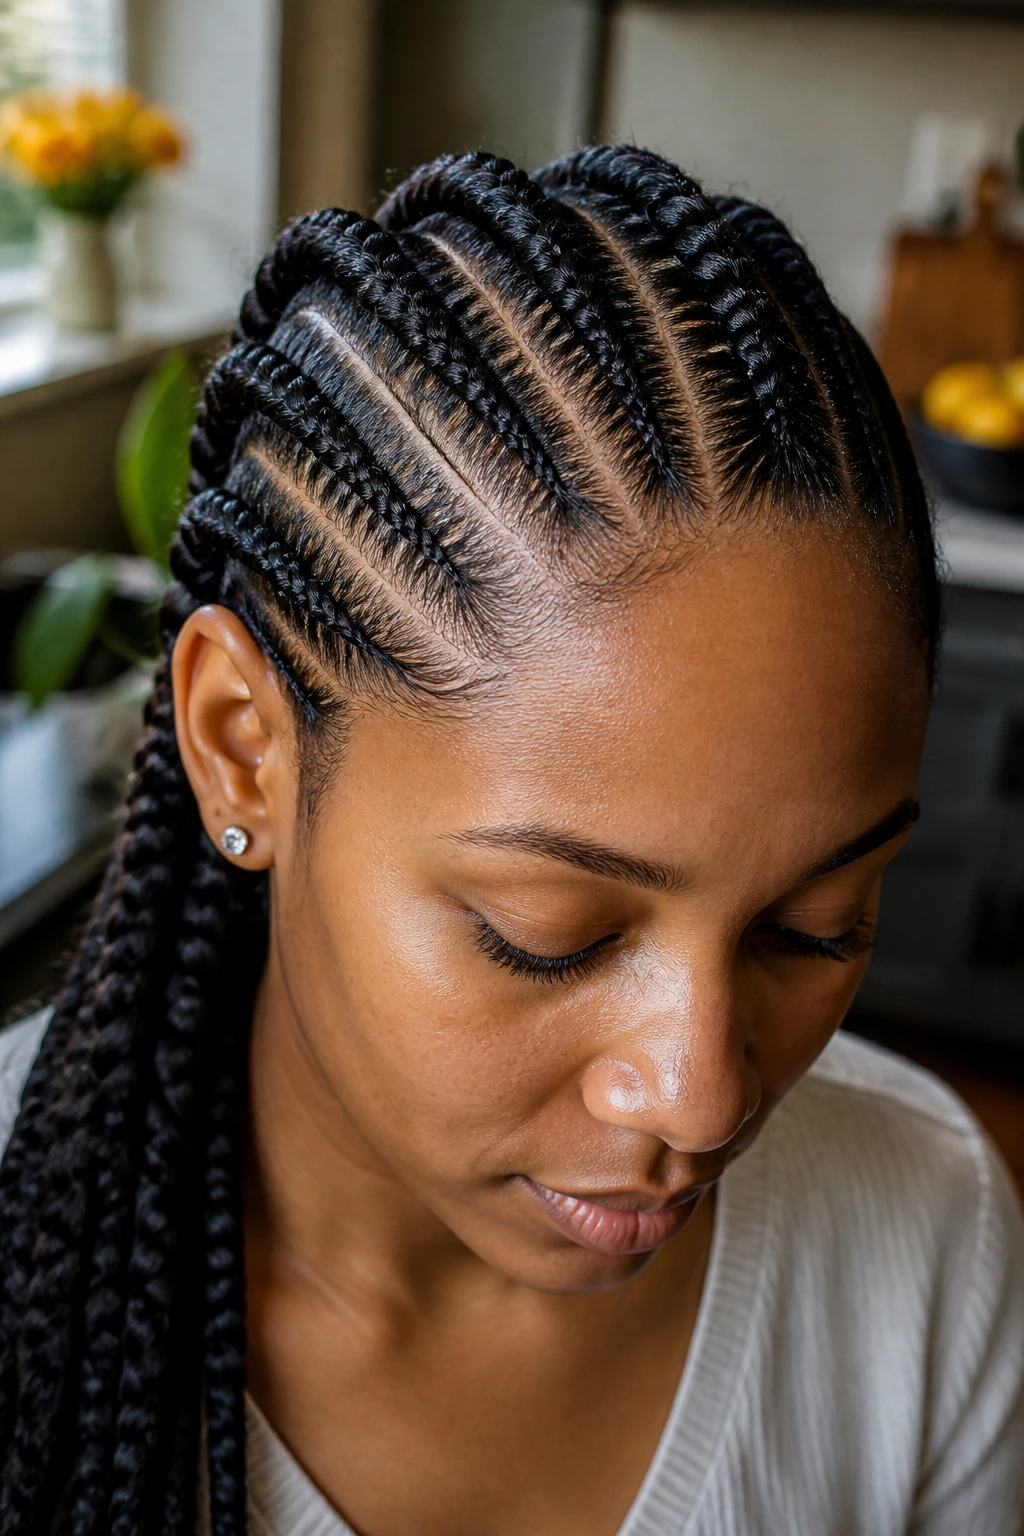
Feed-in braids are smart when you want the braid to look fuller without getting bulky at the scalp. Start with a tiny section, then add in hair gradually so the root line stays slim and controlled. On fine 4C hair, that gradual build keeps the braid from looking lumpy where the part begins.
If you use extension hair, pre-separate it into tiny pieces before you start. That step saves your wrists and keeps the sections even. I would not overpack the braid; the goal is a smooth transition, not a rope around your head. Feed-ins look best when the first inch is neat enough to disappear into the pattern and the fullness shows up farther down.
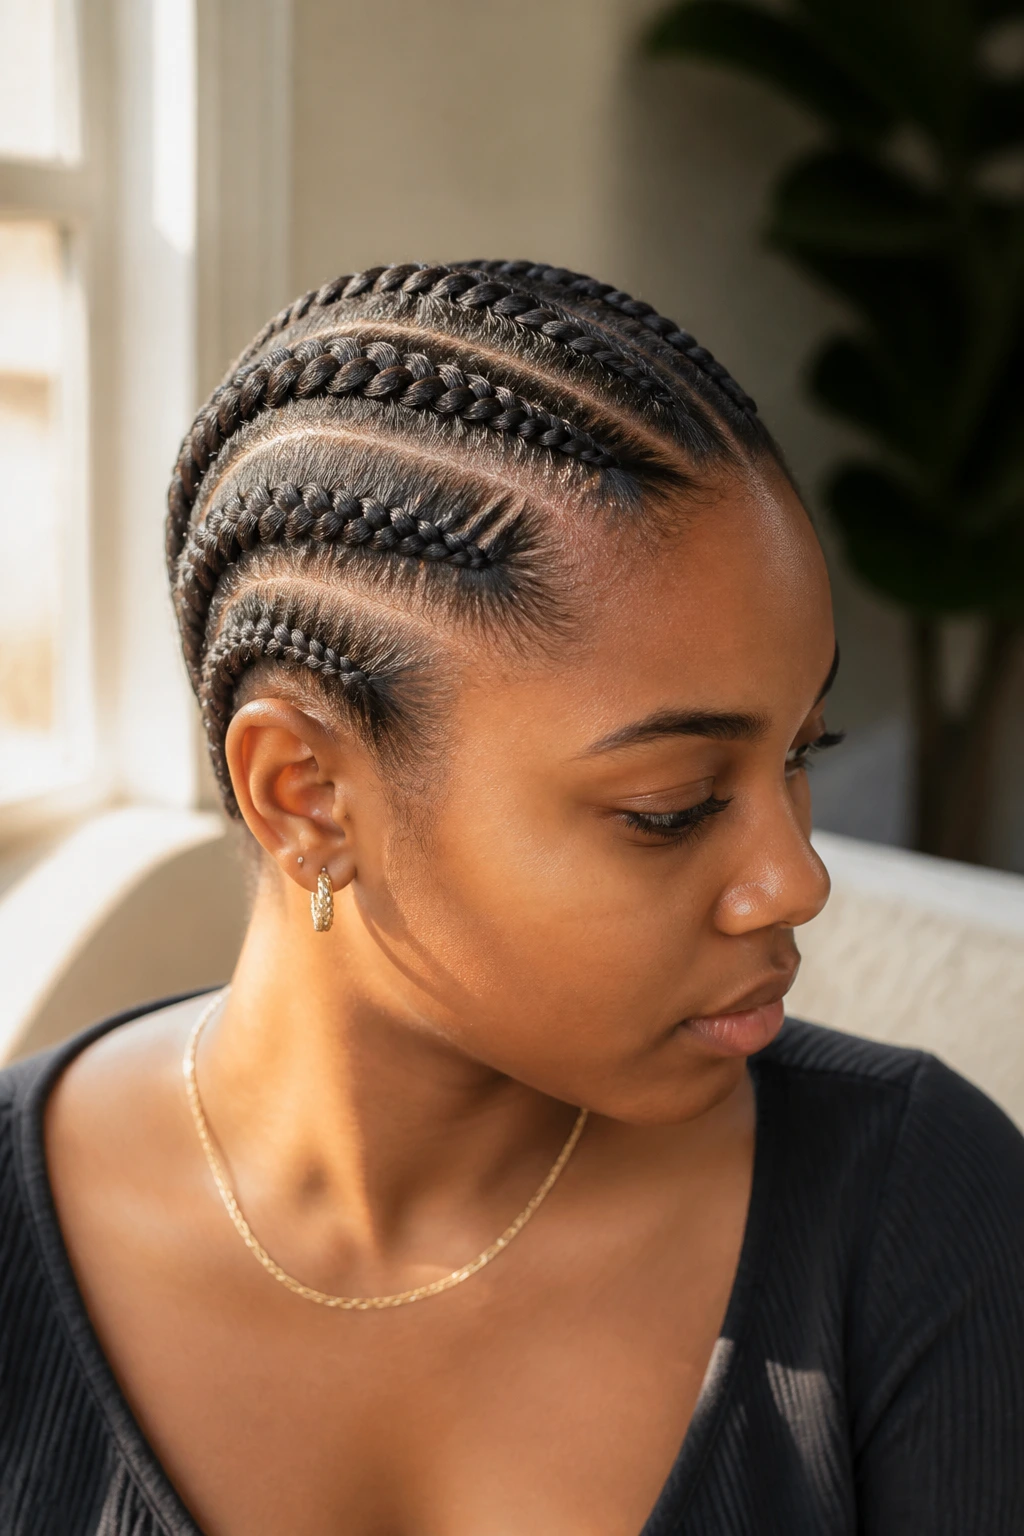
6. Zigzag-Part Dutch Braids with Crisp Corners
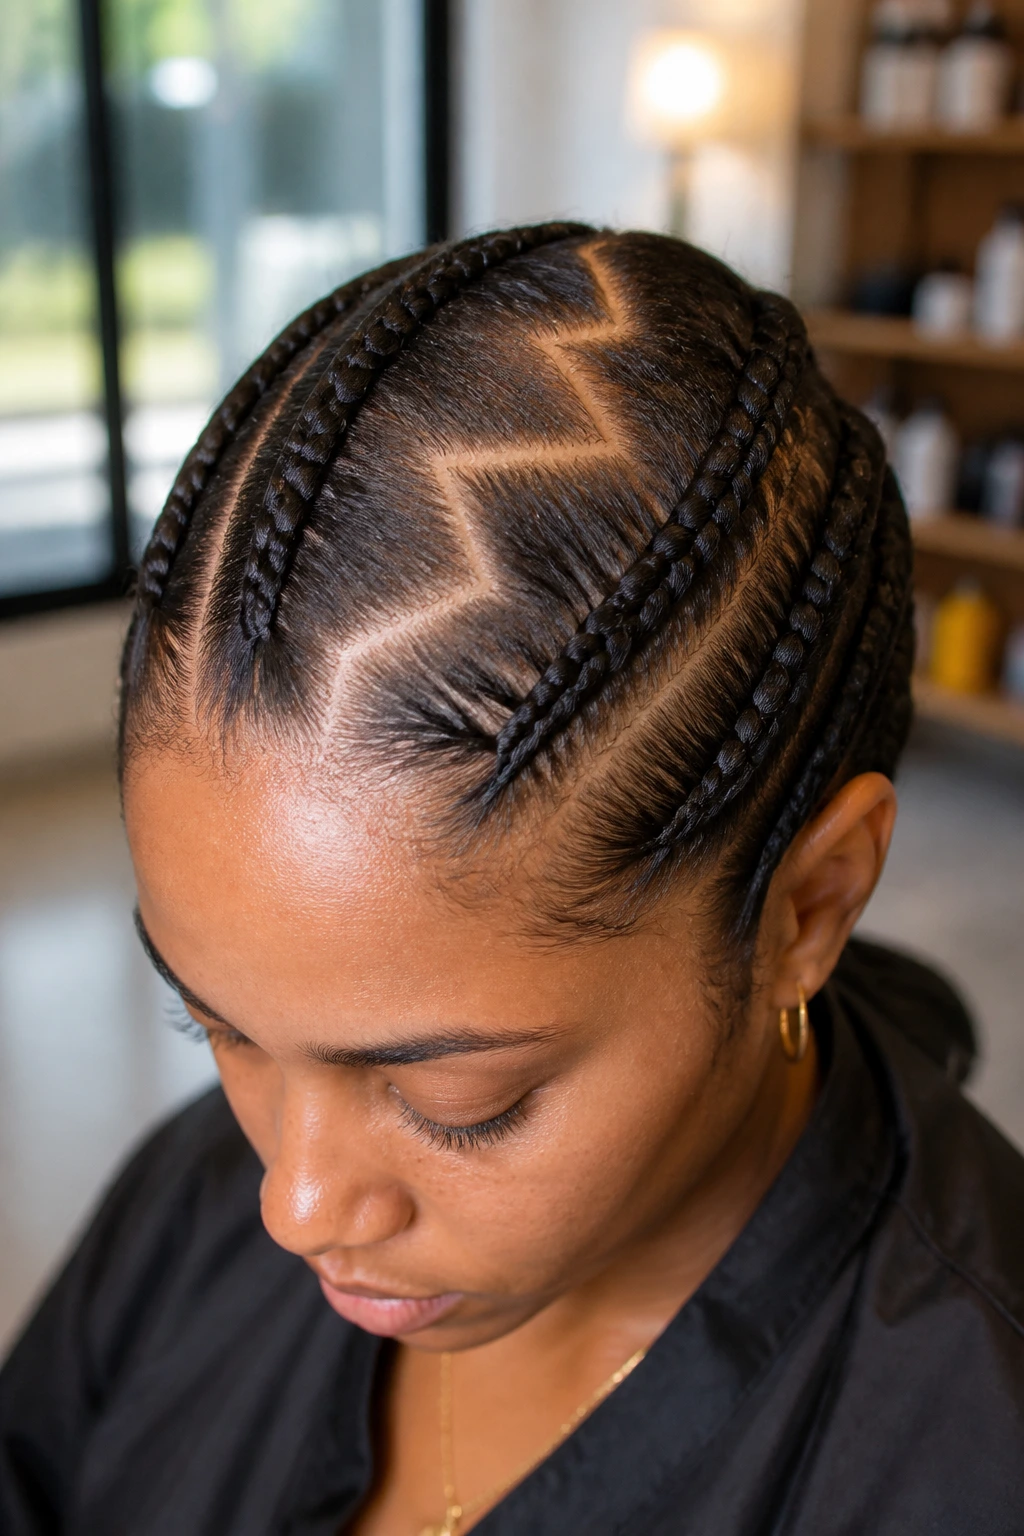
Zigzags are not just cute; they cover thin spots with intention. A straight part can expose every little scalp gap on fine hair, while a zigzag or wavy part breaks up the line and makes the style look planned. It also gives the braid a little visual movement before the braid itself even starts.
Use a rat-tail comb and take your time with the corners. Sloppy zigzags look messy fast, especially on fine strands that already lie close to the scalp. A light foam or setting mousse helps the part stay visible while you braid. If you want this style to feel sharp, keep the plaits slim and the parting crisp. That contrast is the whole point.
7. Dutch Braid Mohawk with a Fluffy Center Puff
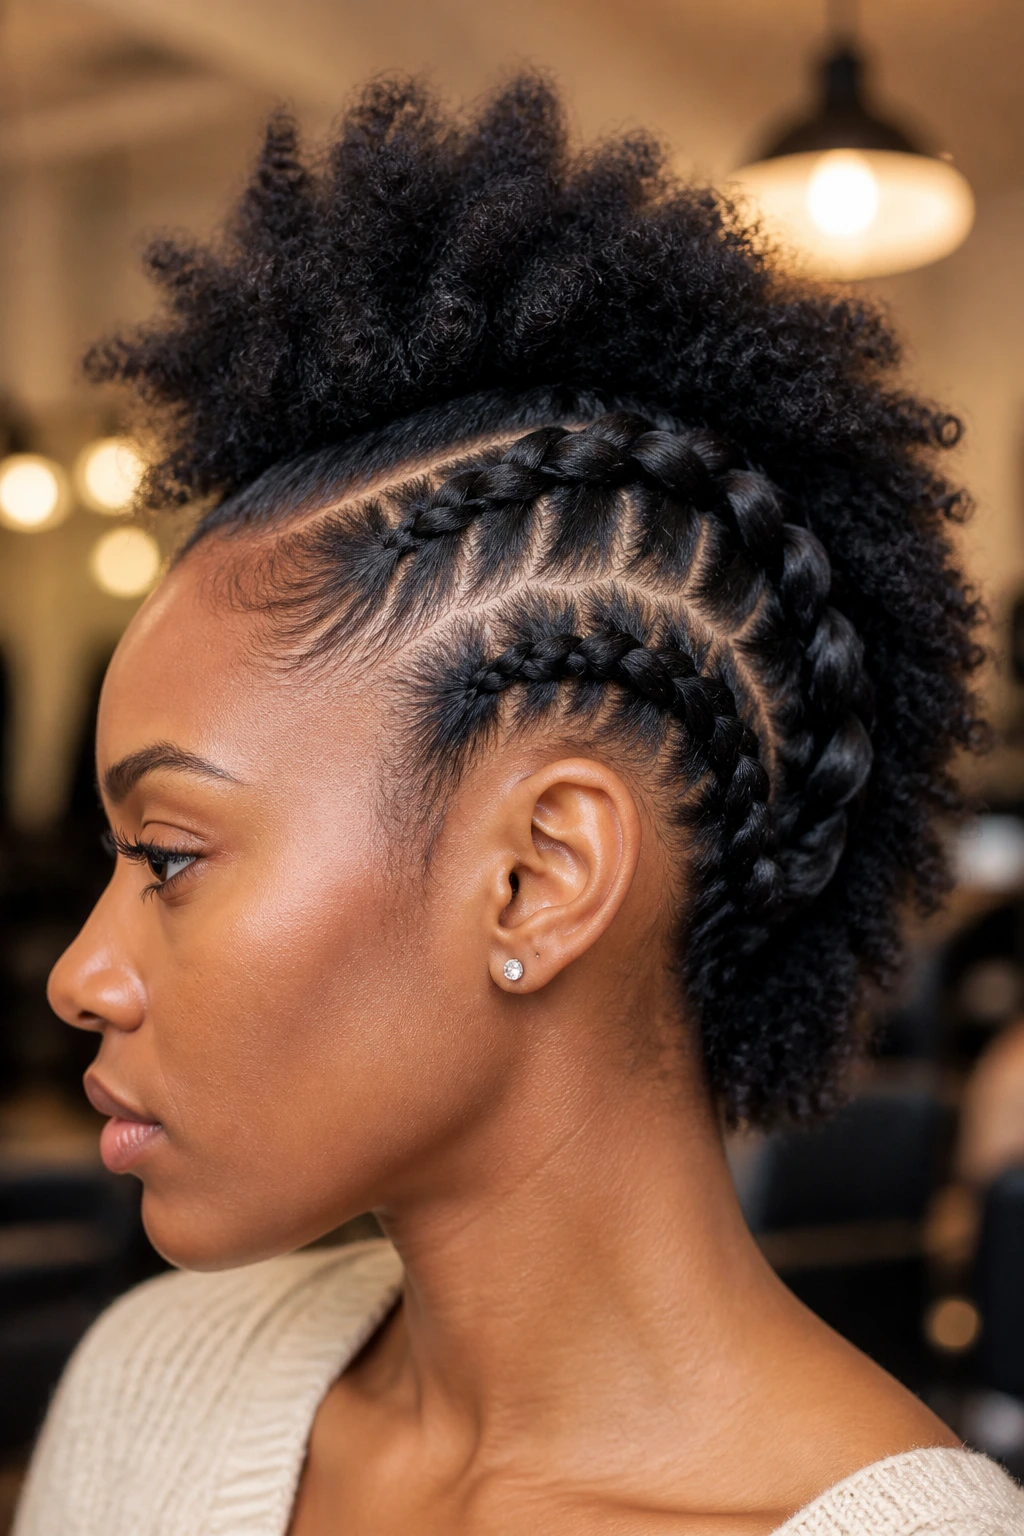
If your crown wants volume, this is the one. Braided sides with a fuller middle puff create height without forcing the hairline to take the weight, which is a nice trade for fine strands that need a break from heavy styles. The mohawk shape gives the eye something to follow, and the puff keeps the look from feeling too severe.
The center section can be stretched with banding, twist-outs, or a gentle blow-dry before braiding the sides back. That way, the puff lands with body instead of puffing out in every direction. Keep the side braids close and low tension, then fluff the middle with your fingers only after the braid work is done. Too much poking early on turns the puff frizzy fast.
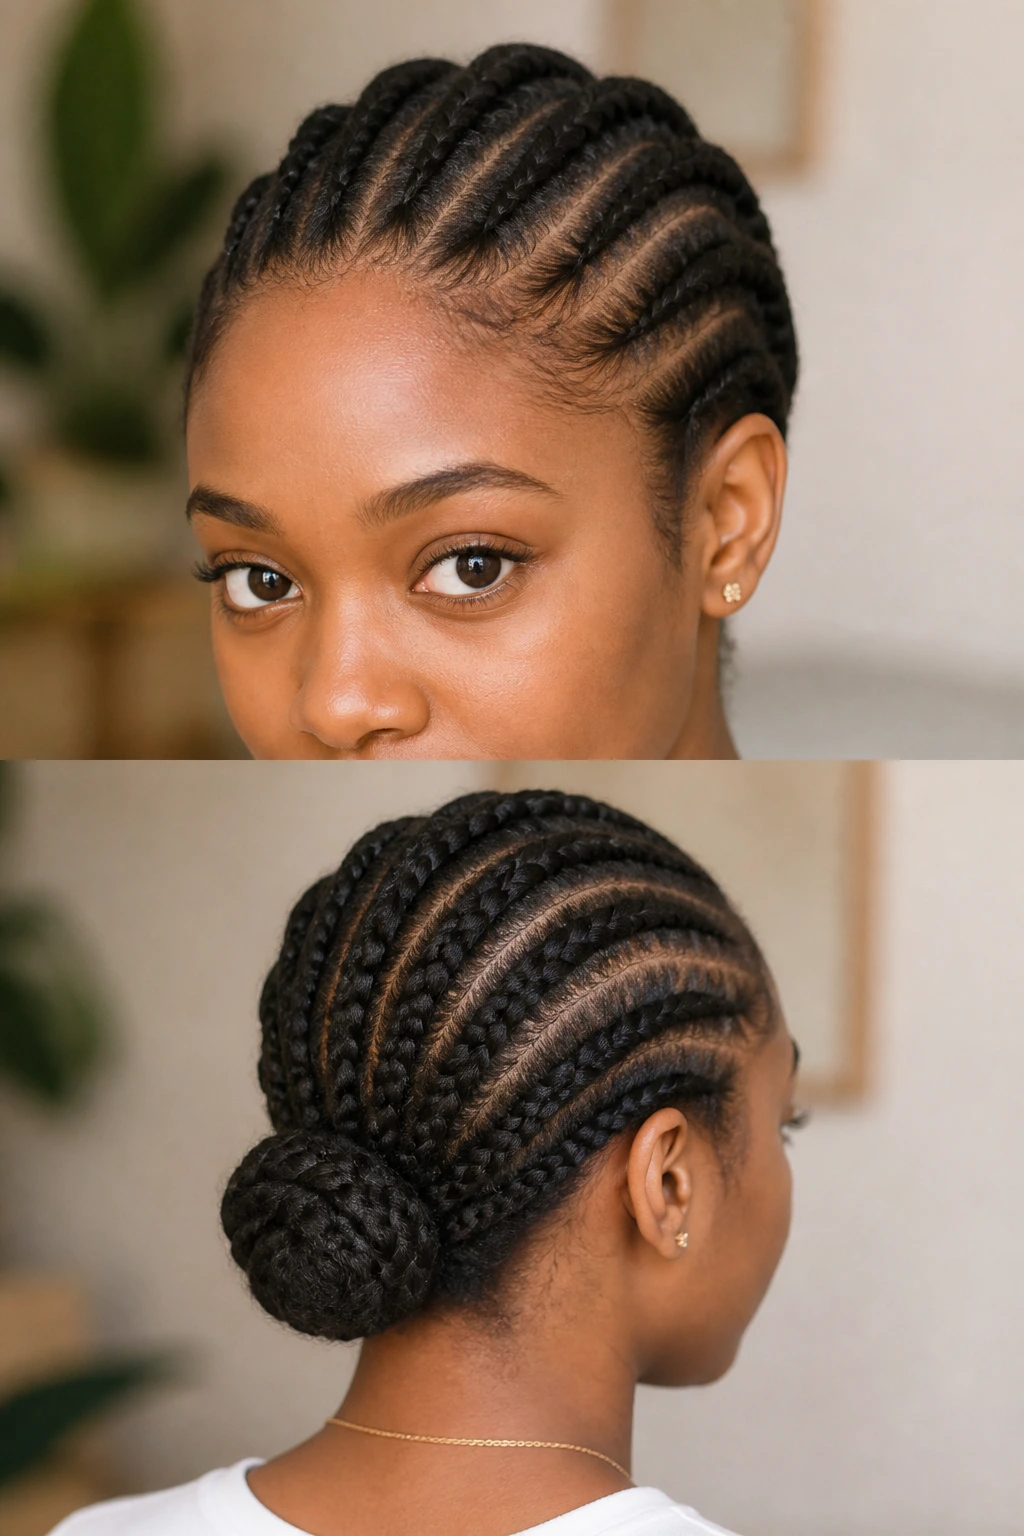
8. Cornrow-to-Dutch Hybrid Rows
Hybrid rows are for the days when the hair is not the same length everywhere. A front section can start as a neat cornrow, then shift into a raised Dutch braid once there’s enough length to work with. That mix gives fine 4C hair a lot of flexibility, especially if the crown is shorter than the back or the ends are uneven.
I like this style when a client wants order but not stiffness. The cornrow at the front lays flat against the head, while the Dutch section gives the braid some lift and texture. Keep the transition point clean so the style does not look patched together. It should feel like one braid pattern that simply changes its mind halfway through.
9. Dutch Braids Folded into Space Buns
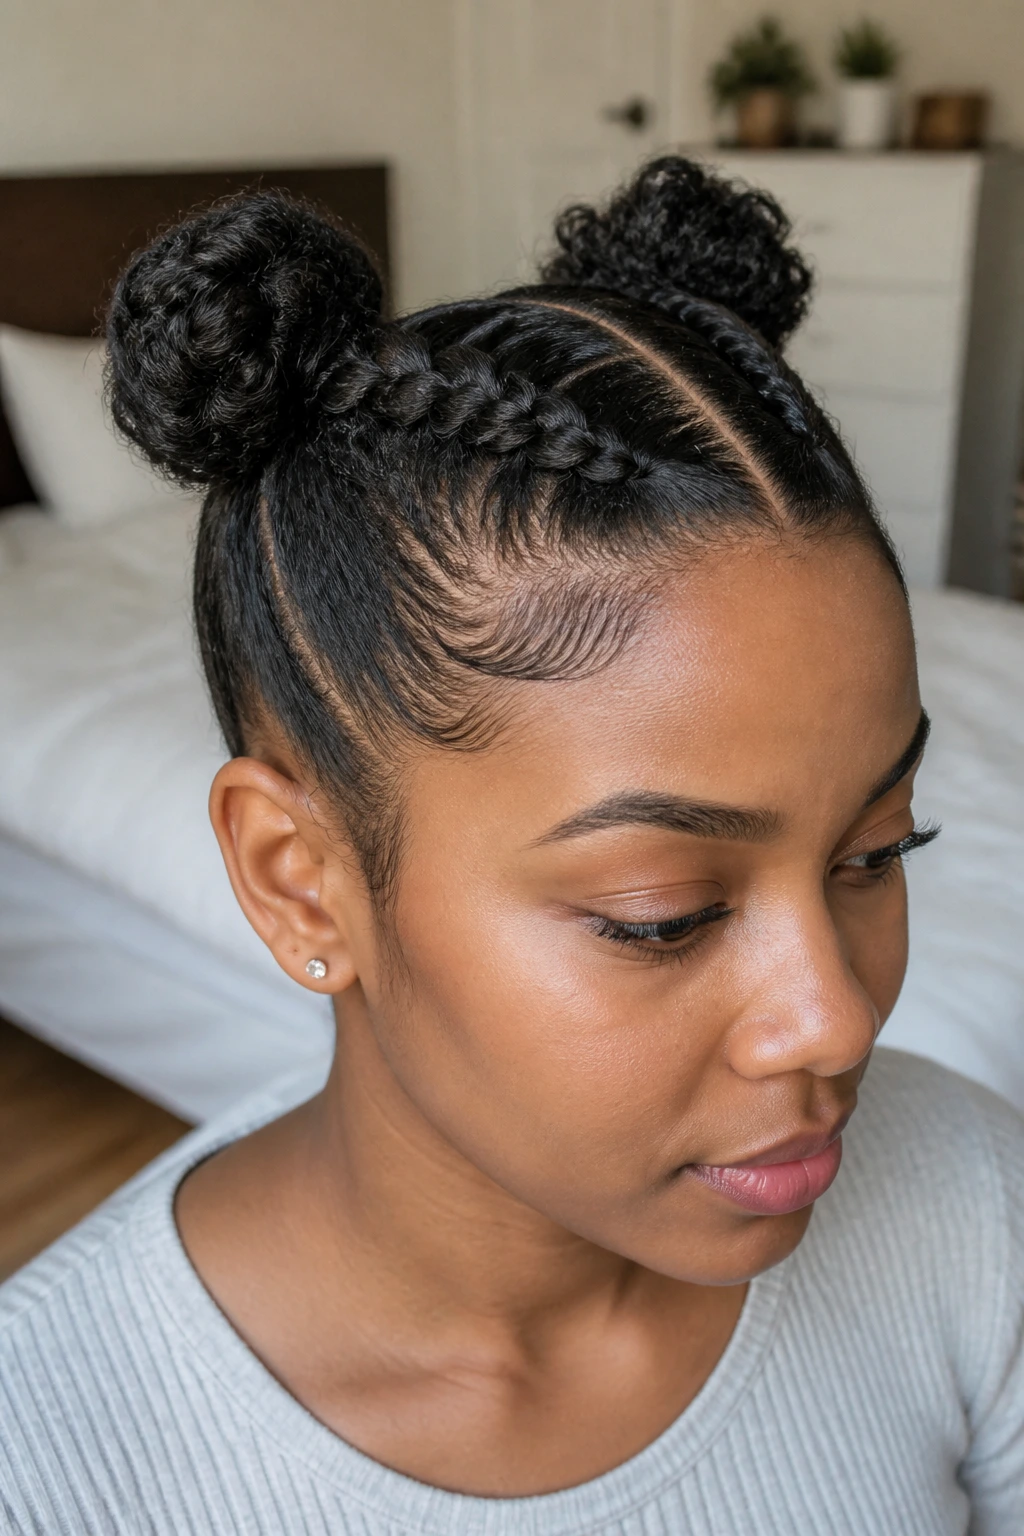
Space buns give fine hair a useful trick: they put the ends up and out of the way while making the style look fuller from the front. Two Dutch braids can roll straight into small buns at the crown or back of the head, and the buns do not need to be huge to read well. That is the part people miss.
The key is not over-tightening the buns. Fine hair can look pinched if you crank the elastic too hard, and the shape loses its softness. Leave a little airy texture in the braid before you wrap it. A few tucked-in ends and one or two pins are usually enough.
10. Diagonal Dutch Braid Dropping into a Low Bun
A diagonal line changes the whole face shape. Instead of a braid running straight back, angle it from one temple toward the opposite nape and let it finish in a low bun. The diagonal gives movement, and the bun keeps the ends tucked so the style stays neat on fine strands.
This one works especially well when you want something polished without a lot of extra parts or accessories. Keep the parting soft at the front and a little tighter through the middle so the braid holds its line. If your hair tends to shrink hard, stretch it first; otherwise the diagonal can disappear into fluff before the bun even gets a chance to shine.
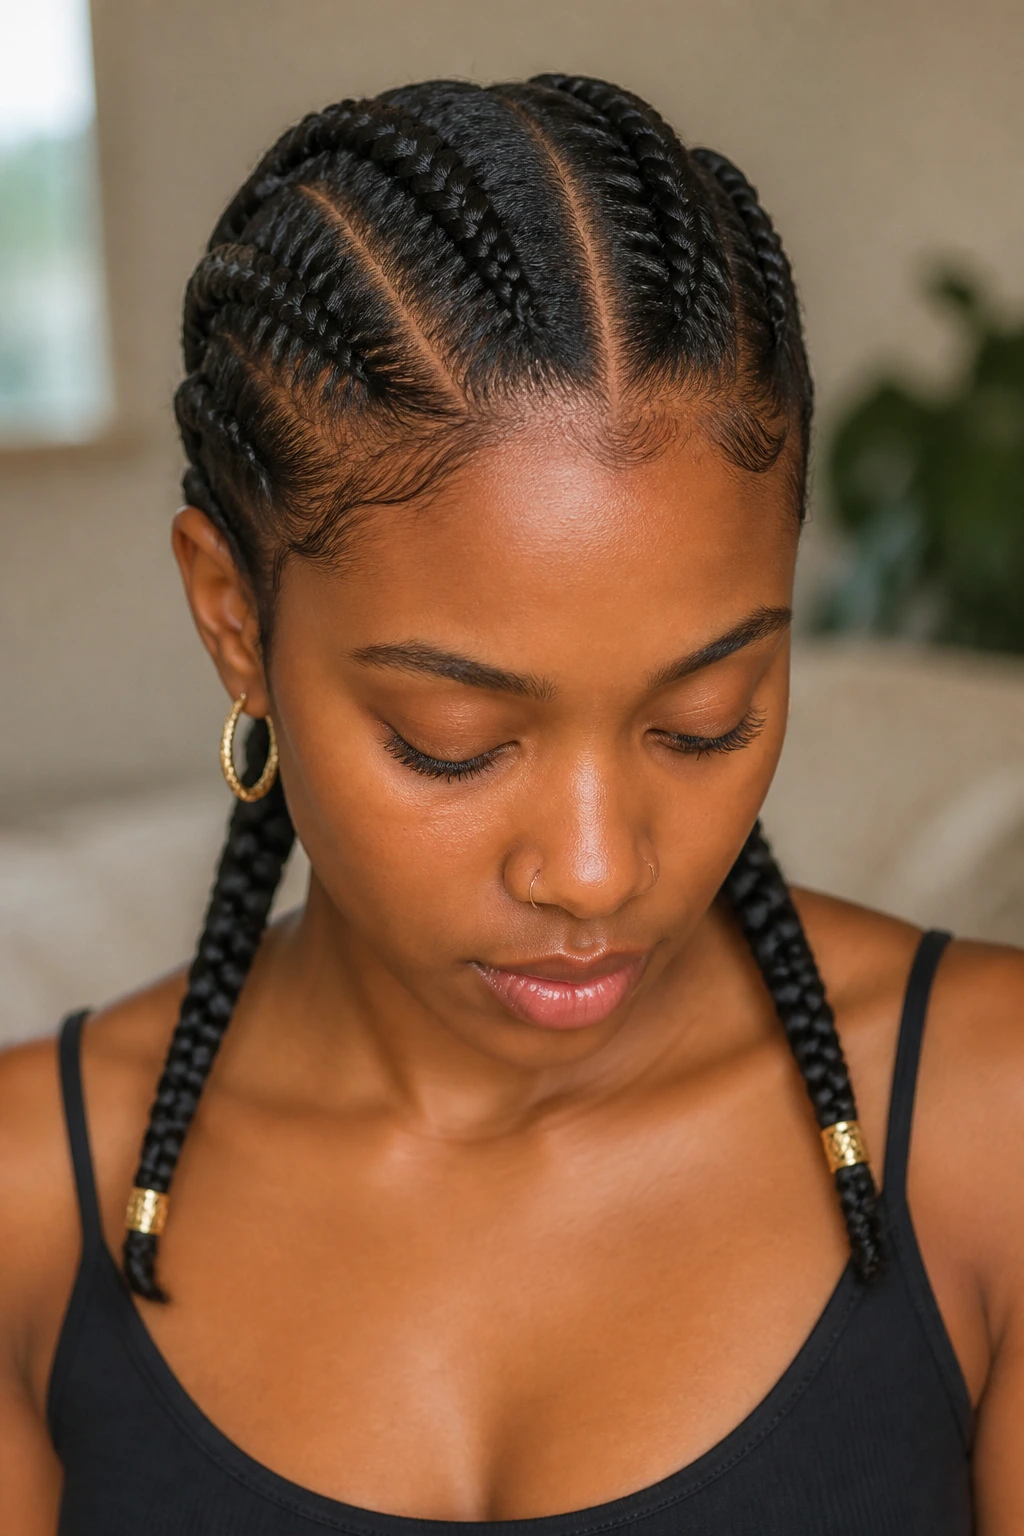
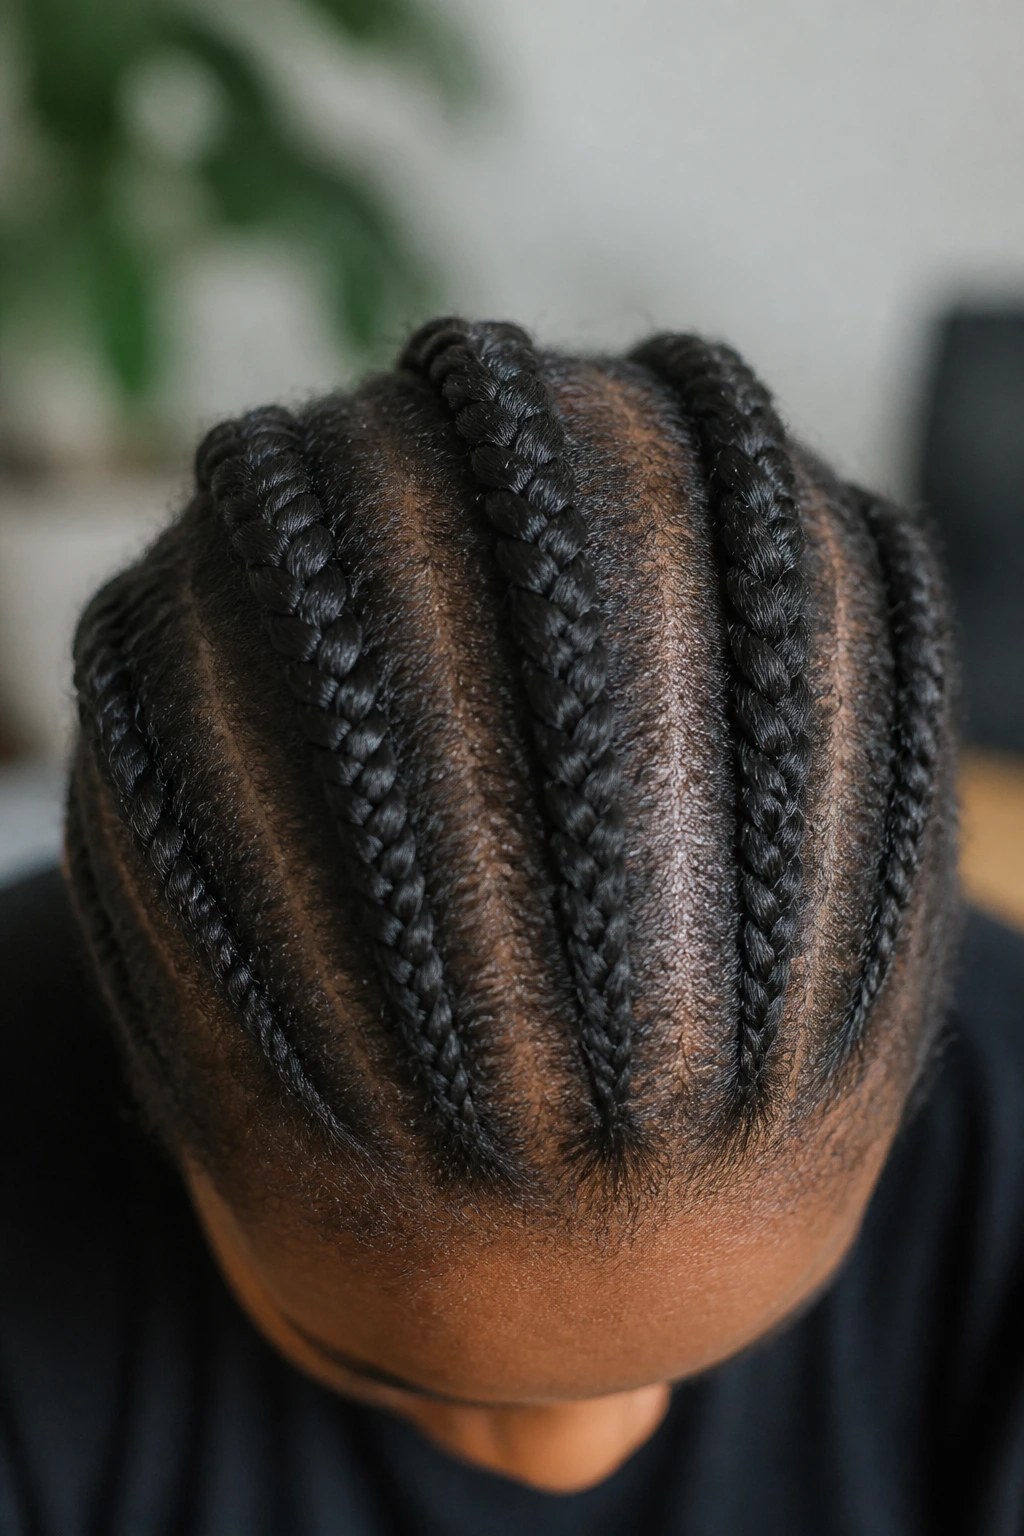
11. Four Slim Dutch Braids for Shorter Fine Hair
Four slim braids often look better than two chunky ones on shorter fine hair. The smaller sections give the scalp pattern more presence, and the whole head reads as styled instead of forced. On short lengths, that matters a lot.
This is also one of the friendliest choices if your hair is uneven after a trim or grows in different layers. Keep each braid narrow and consistent from root to end. If you add accessories, keep them minimal—a few cuffs or small elastics are enough. Too much decoration can swallow the braid and make the style look busier than it needs to be.
12. Chunky Front Dutch Braid with a Loose Back Puff

One front braid can do more than a whole head of heavy plaits. A chunky Dutch braid along the hairline frames the face, while the back stays soft in a puff or stretched cloud of texture. That contrast is what makes it work on fine 4C hair: the front looks intentional, the back keeps the style relaxed.
The front braid should start just off the part and stay smooth over the crown. If you braid it too loosely, the shape will puff out faster than you want. The back can be left alone or gathered with a band. I prefer a loose puff here because it gives the braid something to lead into without stealing the show.
13. Dutch Braided Crown with Curly Leave-Out

A braided crown and loose curls have a softer finish than a full head of tight plaits. The crown braid frames the top and sides, while the leave-out keeps texture visible around the ends or nape. On fine hair, that mix is useful because it avoids the all-over flatness that can happen with larger braided styles.
This look works best when the leave-out is set first. Flexi rods, braid-outs, or a twist-set give the loose sections enough shape to stand beside the braid. Keep the crown braid neat and modest in size. If it gets too thick, it starts to fight the softness of the curls, and the whole style loses its balance.
14. Double Dutch Braids Threaded with Ribbon
Ribbon turns a plain braid into something people notice. Threading satin or grosgrain through two Dutch braids adds color without adding weight, which is a nice trade for fine hair that does not need extra bulk hanging from the ends. I like ribbon best when the braid itself stays simple and the color does the talking.
Choose a ribbon with enough body to hold its shape but not so much stiffness that it sticks out. Satin glides cleanly; grosgrain has more grip. Either one works, depending on the finish you want. Keep the braid snug at the root and let the ribbon peek through in even intervals. Too much ribbon feels fussy. One clean color is enough.
15. Dutch Braid Ponytail with a Wrapped Base
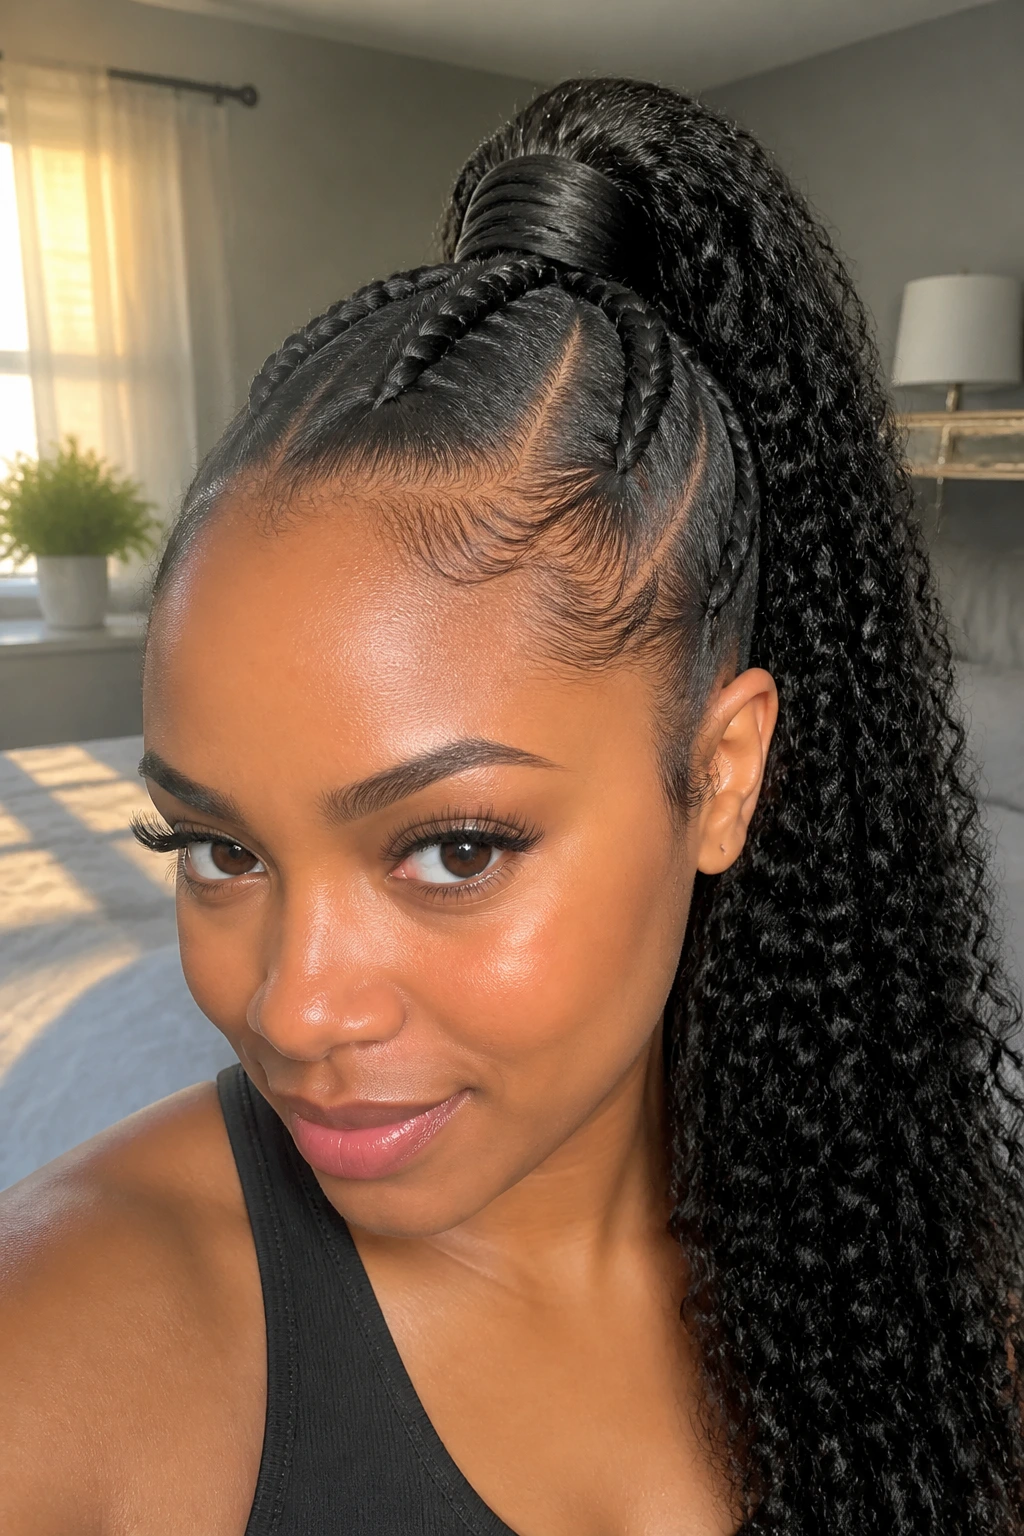
A braid leading into a ponytail keeps the ends up and the profile clean. This style is a good answer when you want the neatness of Dutch braids but do not want a full head of braids. Fine hair benefits from the lift at the crown, and the wrapped base hides the elastic so the finish looks smoother.
I usually recommend this when the hair is stretched first, because the ponytail will sit higher and the braid will hold its line better. Wrap a small strand or a thin piece of extension hair around the base if you want a cleaner finish. Keep the wrap tight enough to hide the elastic, not so thick that it turns into a second ponytail.
16. Triangle-Part Dutch Braids on a Sharp Grid
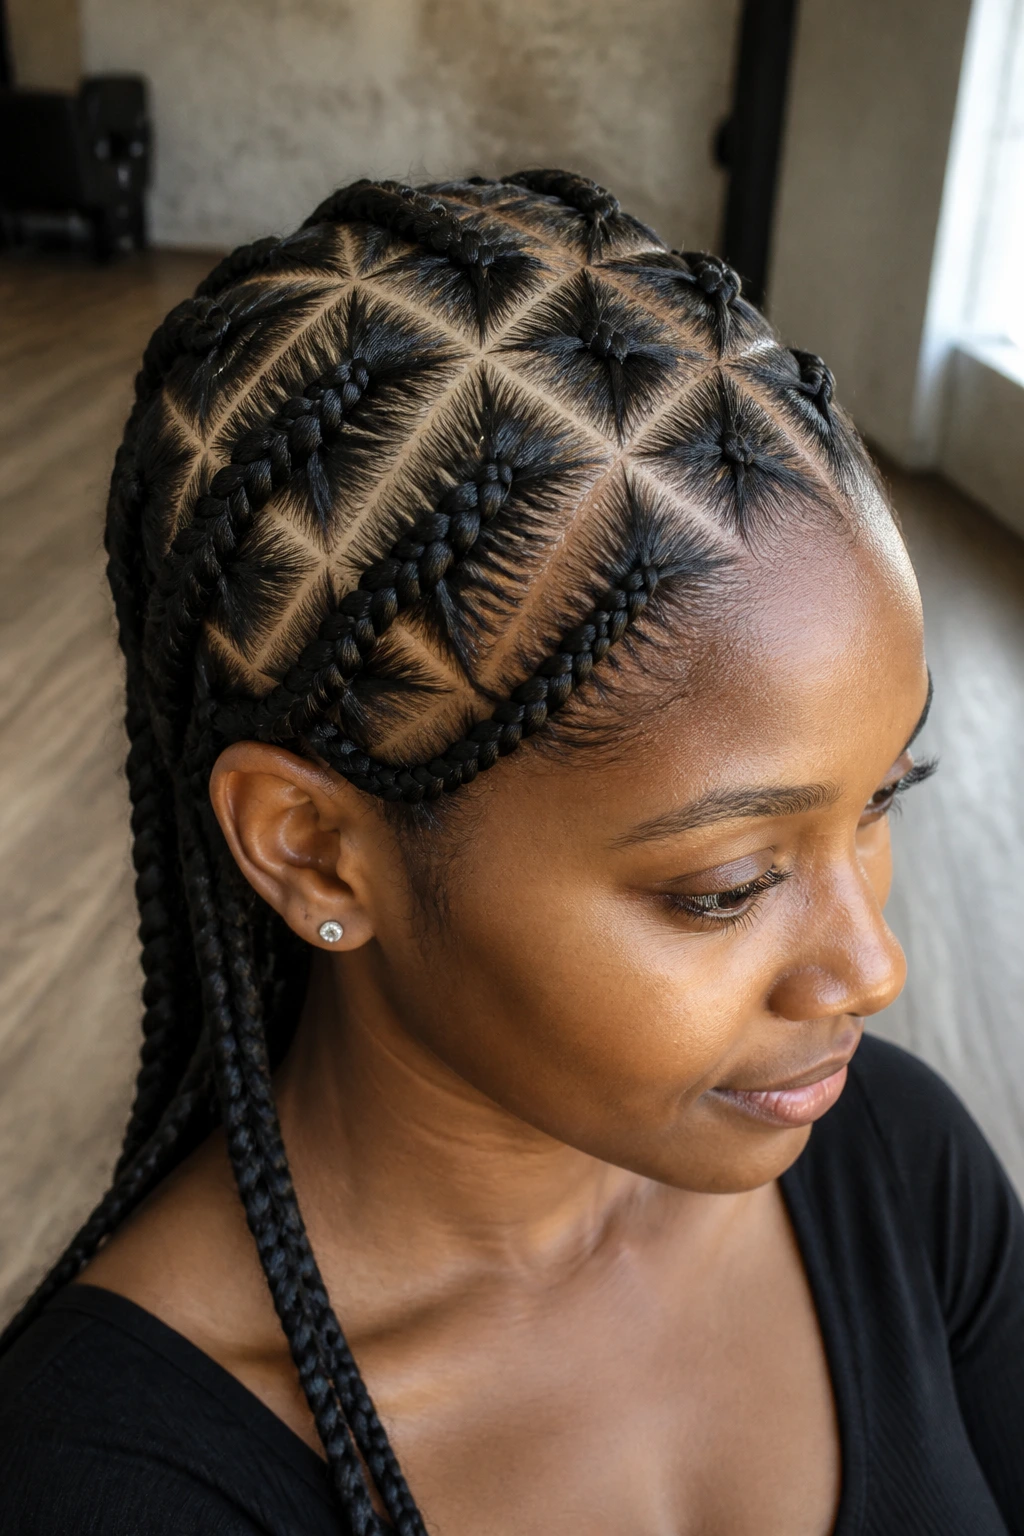
Triangle parts create a grid that makes fine hair look intentional. The shape breaks up the scalp in a way that feels more styled than a plain row pattern, and that matters when the strands themselves are soft and easy to flatten. Triangle parts also give you a little extra visual width without forcing the braid to get bulky.
This style is for someone who likes the parting almost as much as the braid. Use a tail comb, clean triangles, and a light hand with product so the scalp does not get greasy before the braid is done. The finished look is tidy and graphic. It has that salon-fresh feel even when the braid count stays modest.
17. Half-Up Dutch Braid on Stretched 4C Hair

Half-up styles are the easiest way to keep length visible. A Dutch braid across the crown clears the face and leaves the rest of the hair out, which is good when you want to show off texture instead of tucking everything away. On fine 4C hair, the half-up shape gives the braid enough support while letting the lower section keep some body.
The key is stretch. If the loose half is too shrunken, the style can collapse into a puff at the back and lose the clean line at the top. A twist-out, banded stretch, or blown-out base helps. Keep the braid relatively slim so it does not overpower the back section.
18. Dutch Braid and Flat-Twist Combo

Flat twists solve a real problem: sometimes the crown hair is short or uneven, and forcing it straight into a Dutch braid makes the style look choppy. Starting with flat twists at the front and switching to a Dutch braid farther back gives you a clean transition and a softer root area. It is one of the more forgiving looks on fine hair.
This combo also keeps the front from getting overloaded. If your roots are tender, flat twists place the pressure in a broader pattern before the braid takes over. I like this on hair that has been stretched but not blown out. The contrast between the twist and braid is subtle, which is exactly why it works.
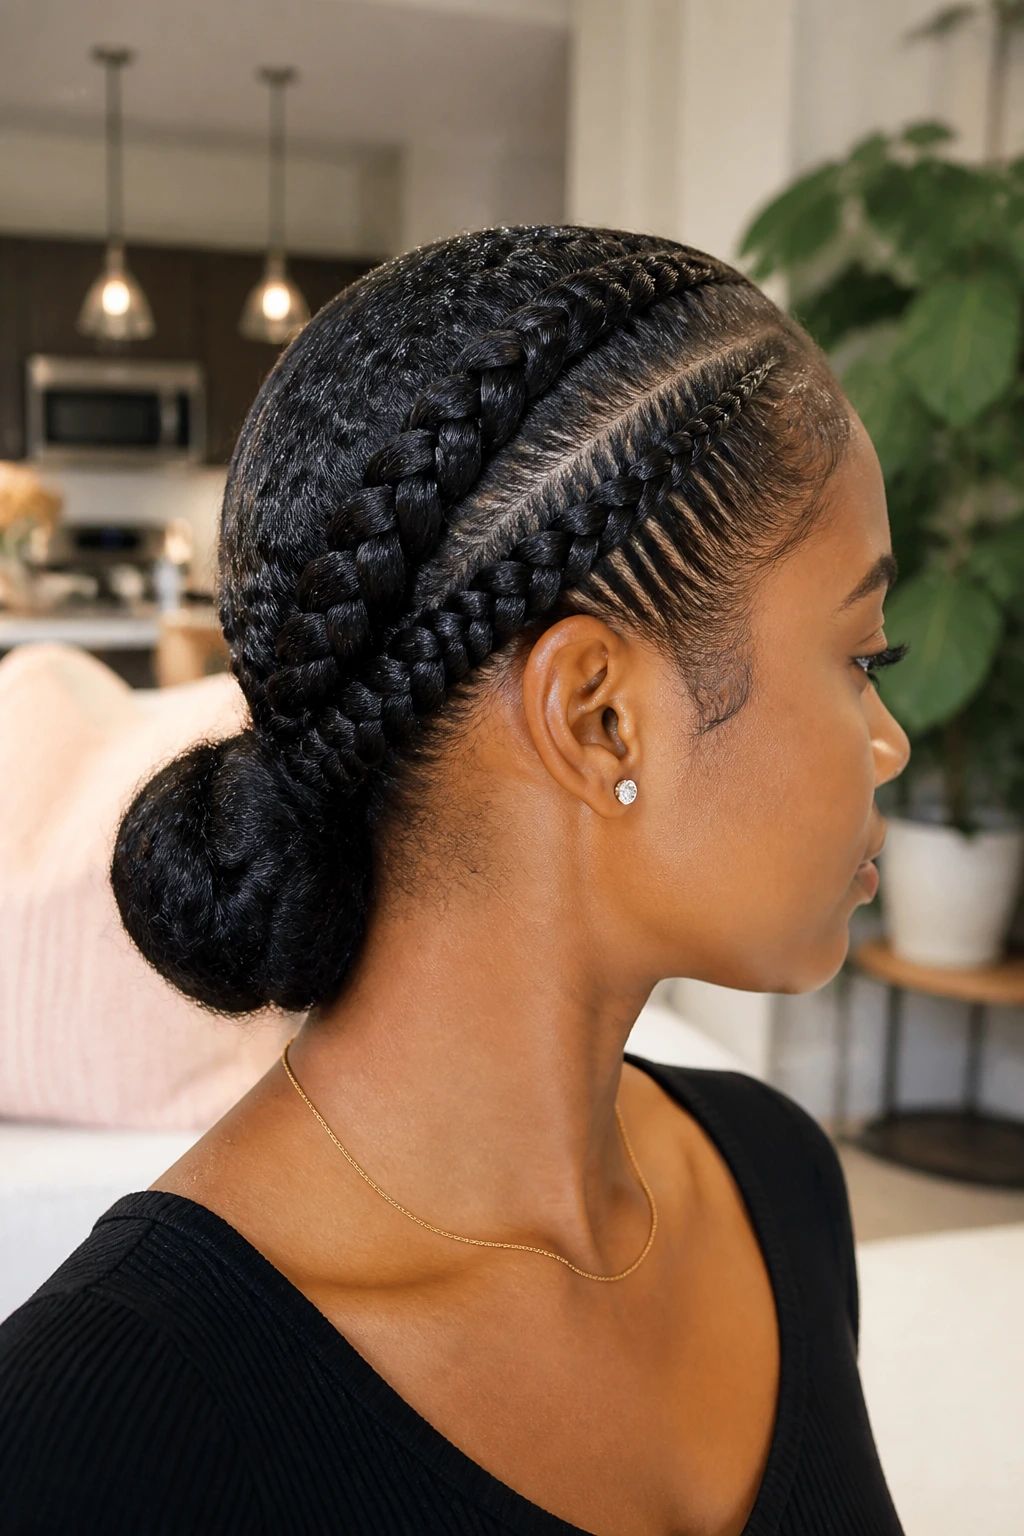
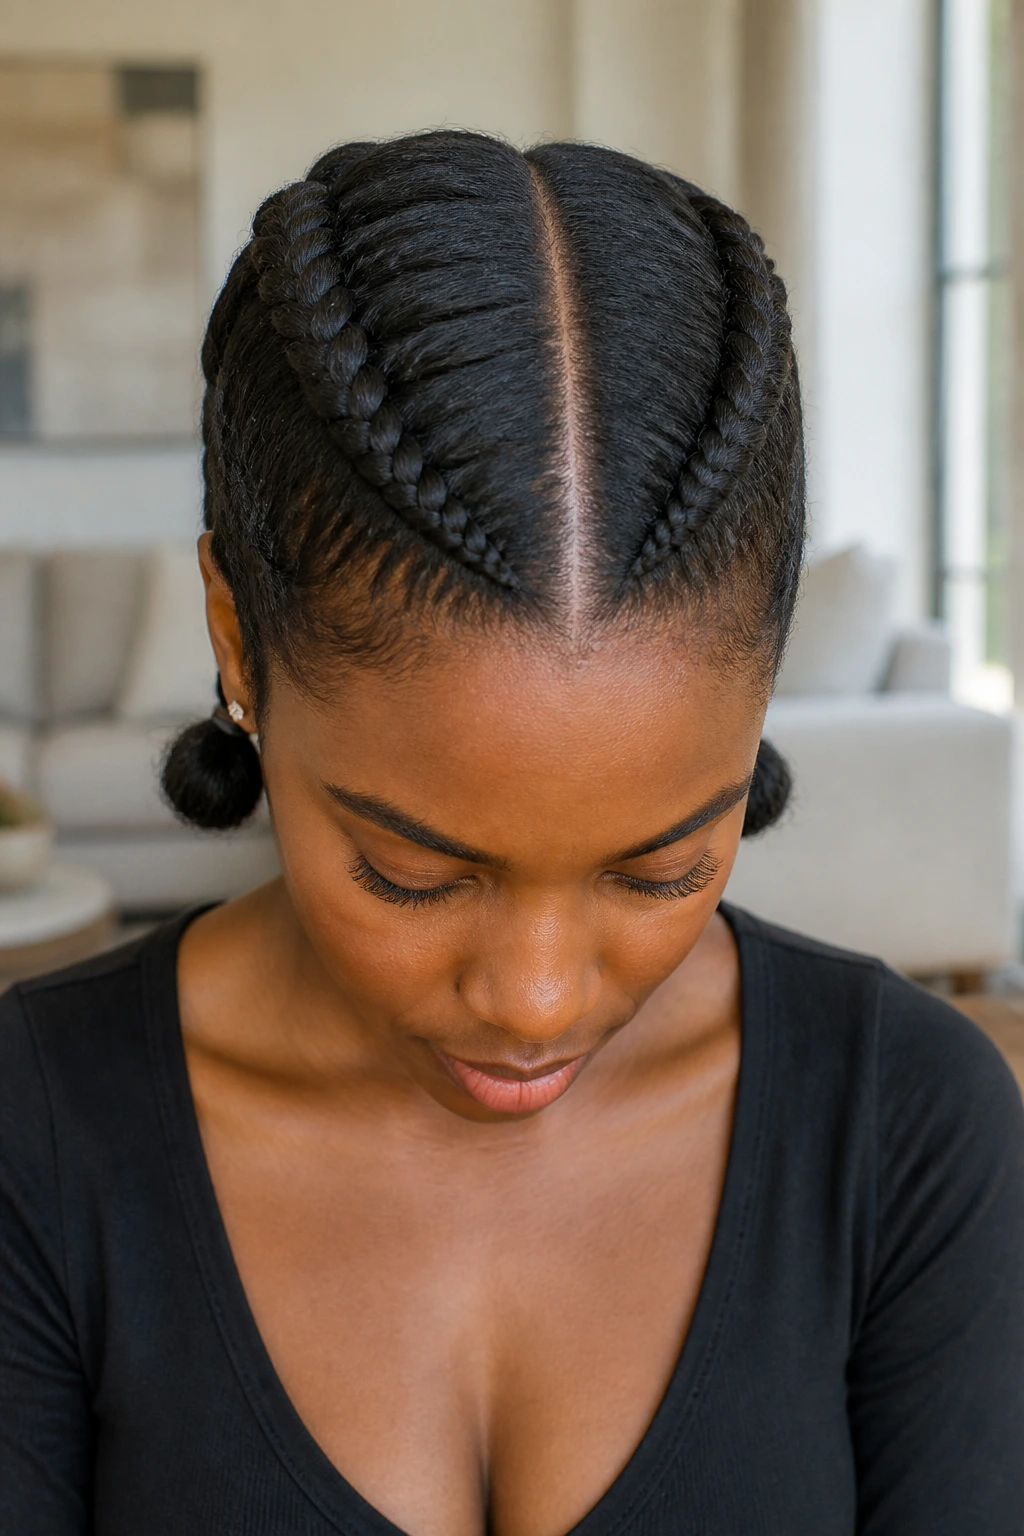
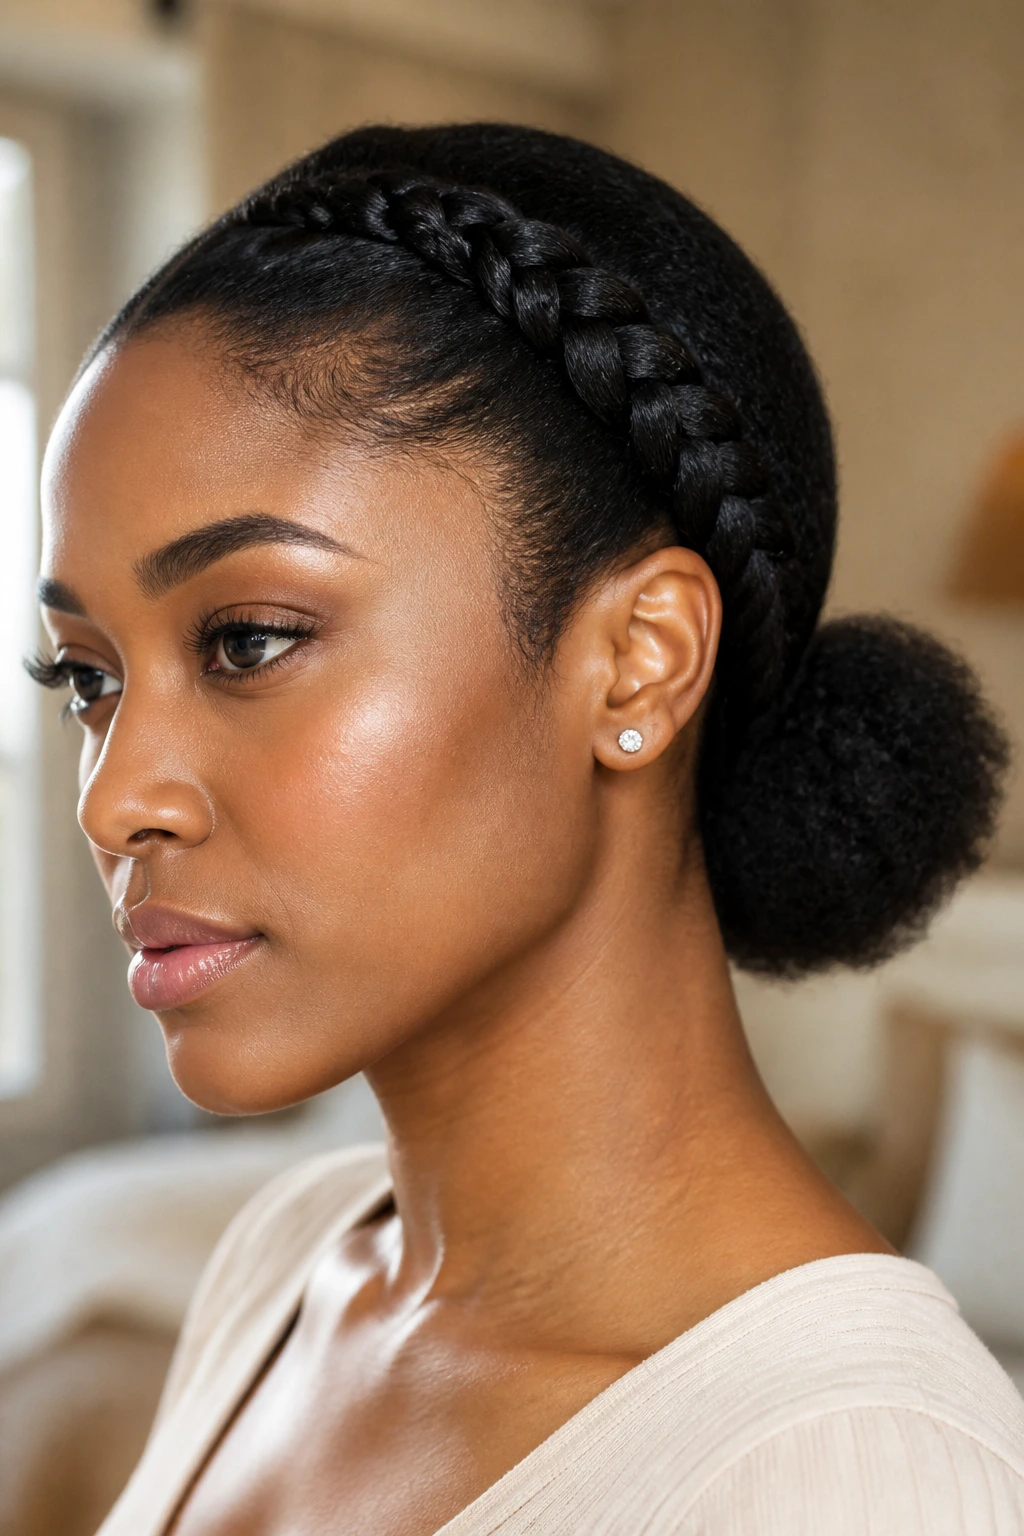
19. Low Dutch Braided Bun with Soft Edges
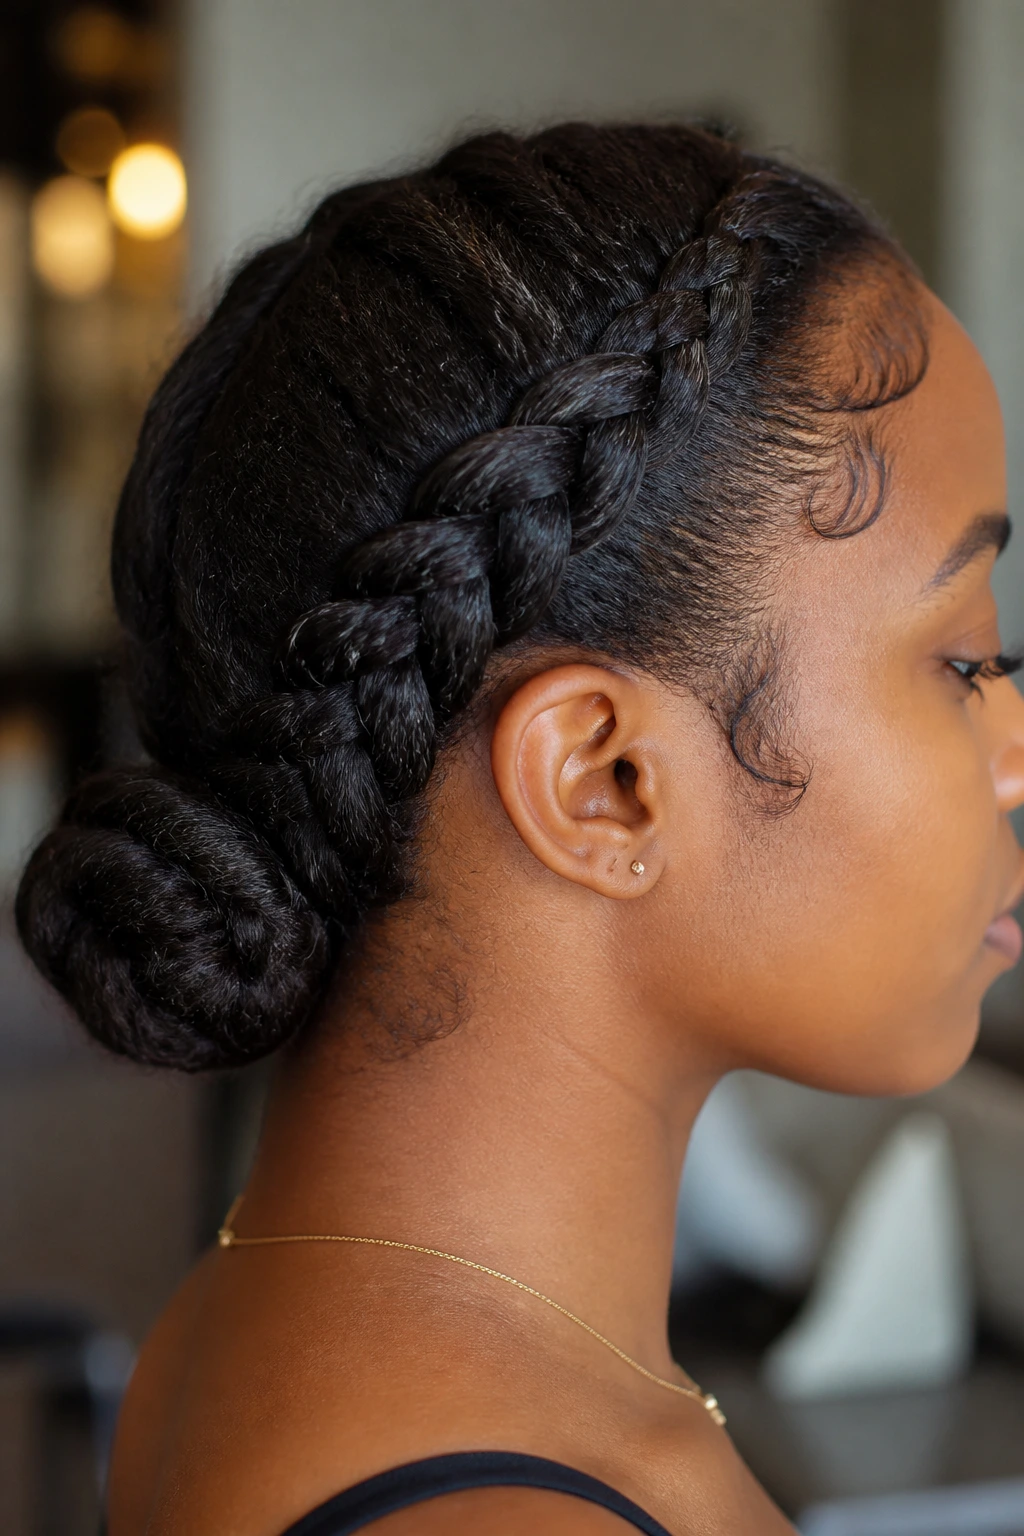
Low buns are calm, secure, and kinder to fine hair than giant top knots. A Dutch braid that feeds into a bun at the nape keeps the silhouette neat and keeps the hairline out of the stress zone. If you need a style that stays in place without looking stiff, this is a strong option.
Do not over-slick the front. Fine hair can look stringy if you pile on thick gel, and the bun will start to show every line in the scalp. A light mousse or a small amount of edge control is enough. The braid should do the main work, while the bun finishes the shape without adding height you do not need.
20. Side Corners Feeding into One Thick Dutch Braid
Two side braids feeding into one center braid create more shape than the name suggests. The side sections help guide the eye inward, and the single braid down the back gives the style a fuller look without needing huge sections. On fine hair, that center line often looks better than several bulky plaits.
This works best when the side braids stay tight enough to hold their route but not so tight that they pull the temples. Once the sections meet, keep the main braid a little wider so it reads as a statement piece. If the hair is very short in some spots, this style also hides that unevenness better than a straight-row design.
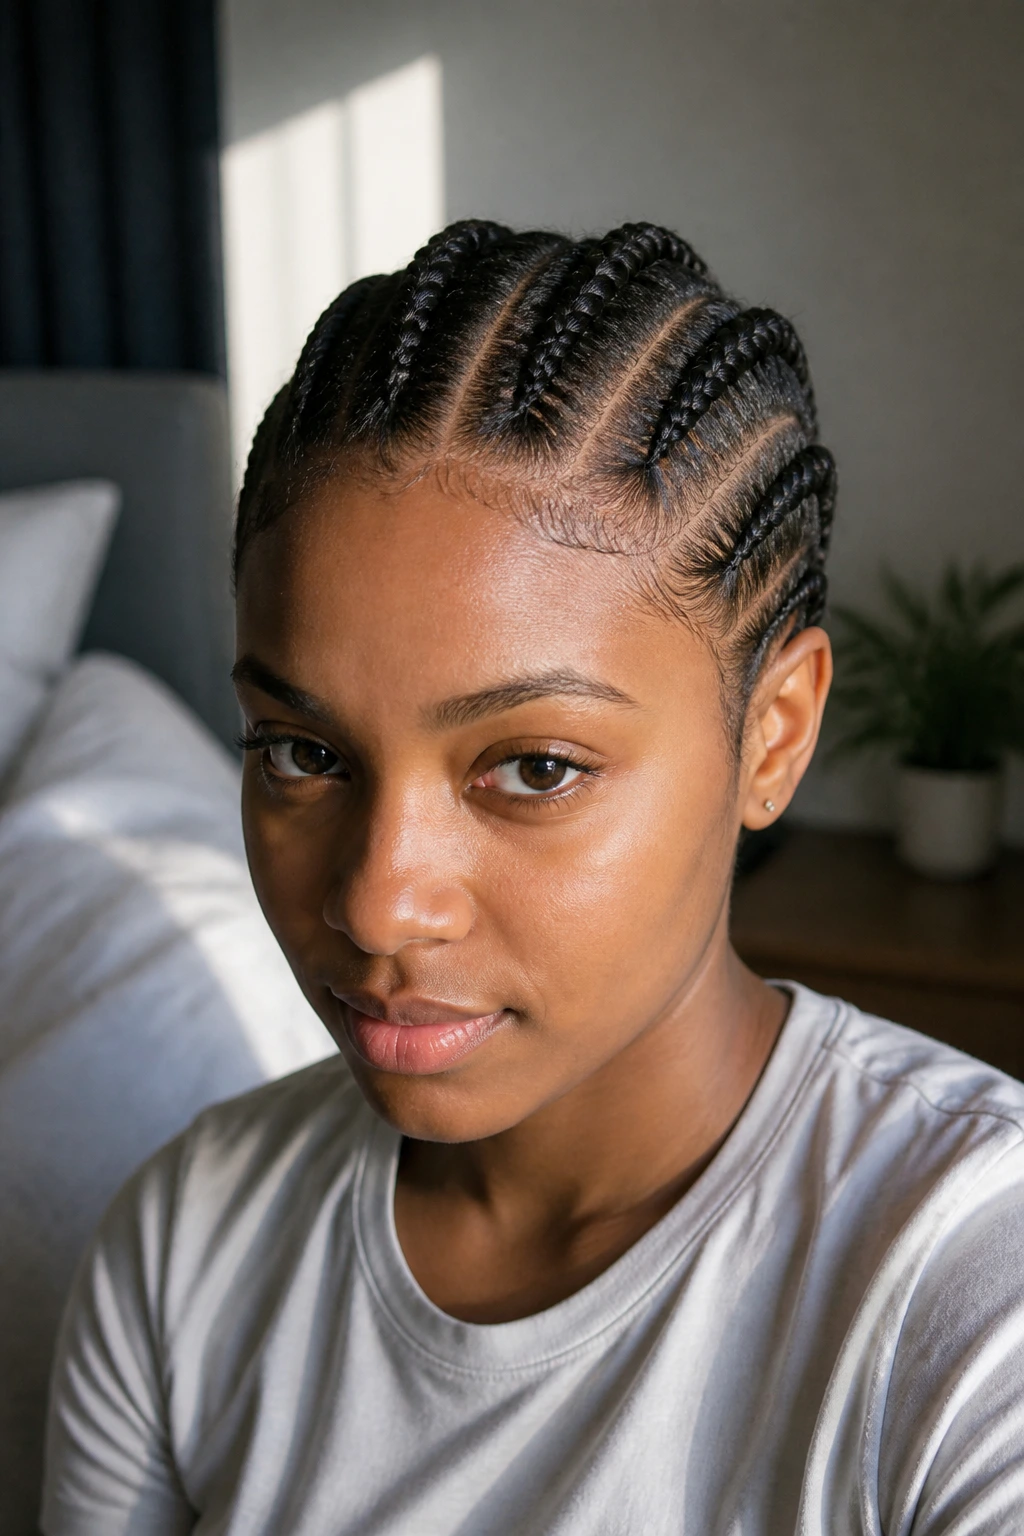
21. Micro Dutch Braids with Tiny Parts

Micro braids are not the only long-wear option, but they do need a lighter hand. Tiny Dutch braids with very small parts can last well on fine hair when the tension is controlled and the sections are even. The look is detailed and deliberate, which is why people reach for it when they want a fuller scalp pattern.
The warning is simple: do not make the parts tiny just because you can. Fine hair can be stressed by too much sectioning if the roots are already fragile. Keep the braid size tiny, yes, but leave enough scalp room that each row has some breathing space. A clean line beats a crowded one every time.
22. Dutch Braids with Curled Ends on Flexi Rods
Curled ends keep the braid from reading too narrow. Once the Dutch braid reaches the lower half, set the ends on flexi rods or perm rods so the finish has bounce instead of a thin tail. That small move gives fine hair a little more visual weight at the bottom, where it often needs it most.
I like this when the braid itself is neat but you want something less severe than a tucked end. The curls can be tight or loose, depending on the rod size, but keep them consistent so the finish looks intentional. A little mousse on the ends before rolling helps them hold their shape and keeps them from unraveling halfway through the day.
23. V-Part Dutch Braids Framing the Face

A V-part gives you a little more room up front. Instead of a blunt middle line, the part opens into a soft wedge that lets the braids frame the face and keeps the crown from looking too flat. Fine hair benefits from that extra shape because it adds depth without adding bulk.
This style looks especially good when the braids taper slightly near the front, then widen toward the back. That shift creates a smoother outline. If you like a center part but want something less ordinary, the V-part is the cleaner answer. It has more personality than a straight line and less fuss than a zigzag.
24. Asymmetrical Dutch Braid Swept Over One Shoulder

Asymmetry can be a friend. A single Dutch braid that sweeps over one shoulder creates movement and keeps the back from looking overly symmetrical or stiff. On fine hair, that side sweep helps the braid feel fuller because the eye follows the line across the body.
This is a good choice when you want a style that works with earrings, high necklines, or a plain tee that needs one strong detail. Keep the braid snug at the base so it does not slip, then let it relax a bit as it falls. The shoulder sweep makes the braid look longer and softer than a straight-down version.
25. Dutch Braids with Gold Cuffs and No Extra Bulk
Gold cuffs work best when the braid itself stays simple. A clean set of Dutch braids with a few cuffs placed at the mid-length or near the ends gives fine hair a finished look without forcing the braid to become thicker than it should be. That is the balance I like: a plain base, then one sharp accent.
Keep the cuffs spaced out. Too many pieces of metal can weigh down slim strands and make the braid feel crowded. One on each side, or a small cluster on one braid, is usually enough. If the braids are narrow and neat, the cuffs read as intentional instead of decorative clutter.
26. Crisscross Dutch Braid Pattern
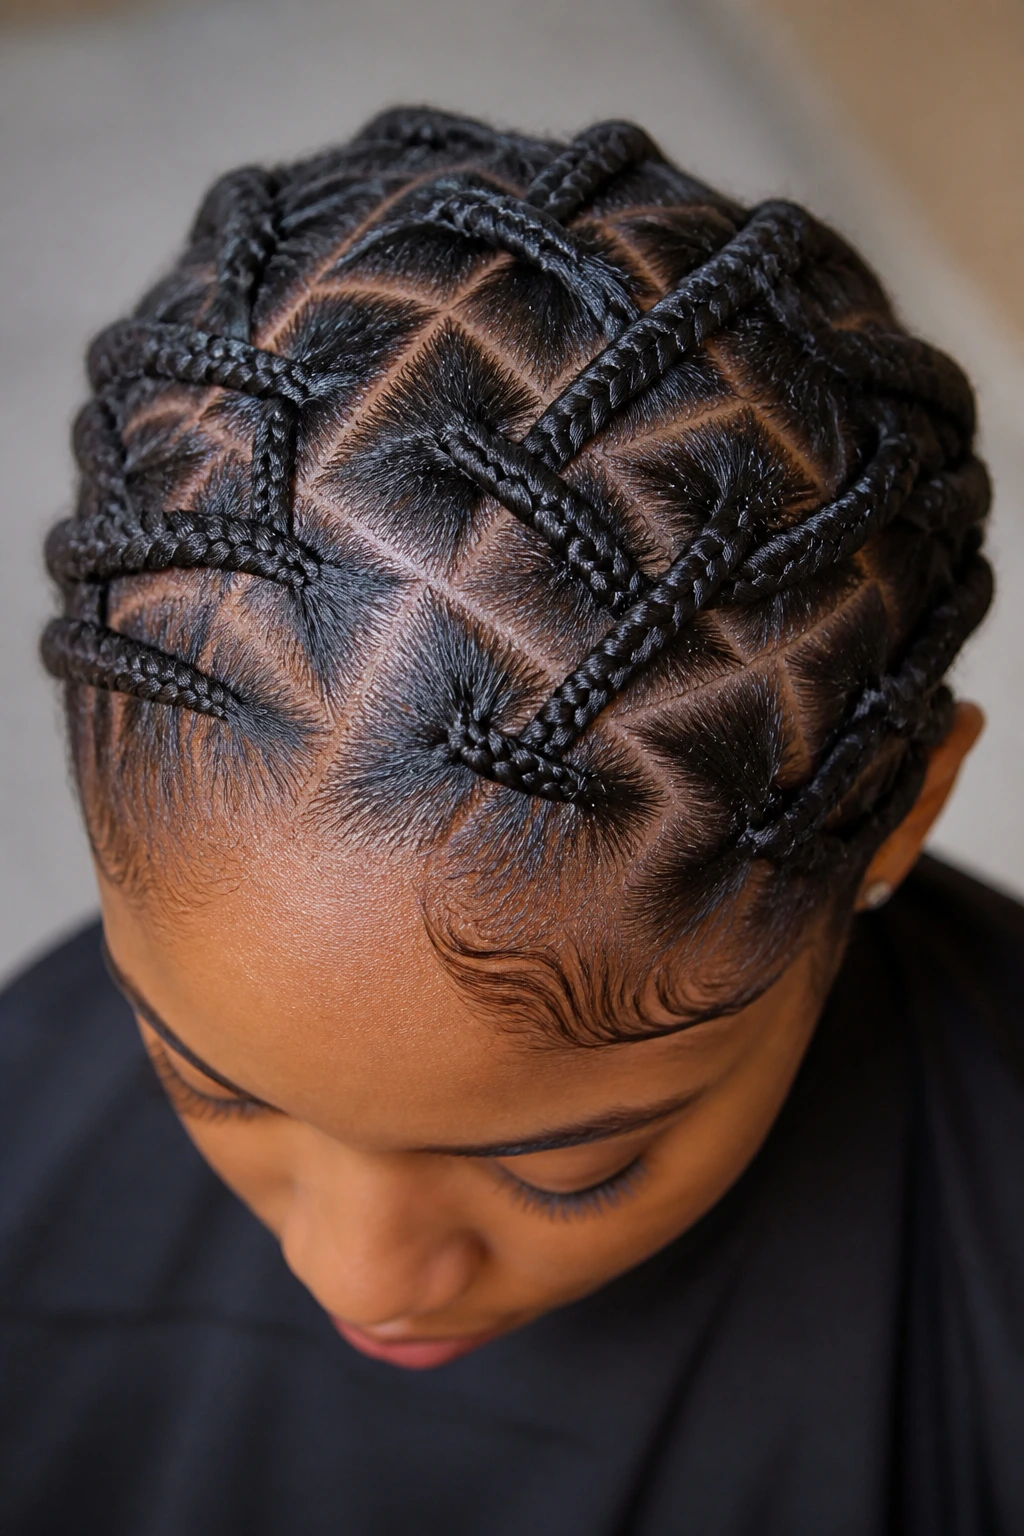
Crisscross patterns are for people who like geometry. Braids crossing over each other create a visual grid that gives fine hair a fuller, more complex look without demanding giant sections. The pattern does a lot of the work for you, which is useful when the hair itself is soft and easy to flatten.
This style needs patience at the parting stage. If the lines are sloppy, the whole look loses its charm. Use clips to hold each section, map the crossings before you start, and keep the braid tension even. The result feels smart and graphic, not overdone.
27. Dutch Braids Built for Humid Weather and Long Days
Humidity changes the rules, so the braid has to stay close and controlled. A style built for long days should keep the roots neat, the ends tucked or secured, and the parting simple enough that frizz does not ruin the shape by noon. Fine 4C hair can still hold up well here, but only if the base is not overloaded with product.
I would choose a middle or side part, low-profile braids, and a finish that stays out of the neck and shoulders. That last part matters more than people think. If the style rubs too much, the ends start to fuzz and the braid line softens fast. Keep it close, keep it light, and let the humidity work against a shape that was already built to hold.
28. Stretched Dutch Braids Keeping a Twist-Out Alive

If you love a twist-out, you do not have to give it up. A stretched base with a Dutch braid at the front or along one side lets the braid add structure while the rest of the hair keeps its texture. It is a hybrid style, and that is the point. Fine 4C hair often looks best when it is not forced into one mood all over the head.
Use this when you want a little braid detail without hiding the texture you spent time creating. The braid should sit neatly against the front or side, while the twist-out keeps movement through the back and ends. A light oil on the loose sections keeps them from looking dry beside the braid. The contrast between braid and texture is what gives this style its charm.
Why Dutch Braids Make Sense on Fine 4C Hair
Dutch braids sit on top of the scalp, so they show pattern even when the strand size is small. That raised shape is a gift for fine hair. It means you can get visible structure without piling on heavy extension hair or turning the style into a helmet.
The other advantage is grip. 4C texture holds onto braid patterns well once the hair is stretched and detangled, which is why the prep matters so much. A small amount of foam, a clean part, and section sizes that stay consistent from front to back can make the difference between a braid that lies flat and one that balloons halfway through the day.
Stretch First, Braid Second
Banding, twisting, or a low-heat blow-dry makes the braid line cleaner. The hair does not have to be straight. It just needs enough stretch that your part stays visible and your sections do not spring back before you finish the last crossover.
Fine Hair Needs Lighter Hands
Fine strands show stress sooner than coarse ones. If the roots sting, the braid is too tight. If the braid feels bulky at the scalp, the section is too large or the added hair is too heavy. Both of those problems are easier to fix at the start than after the style is finished.
Essential Tools for These Looks
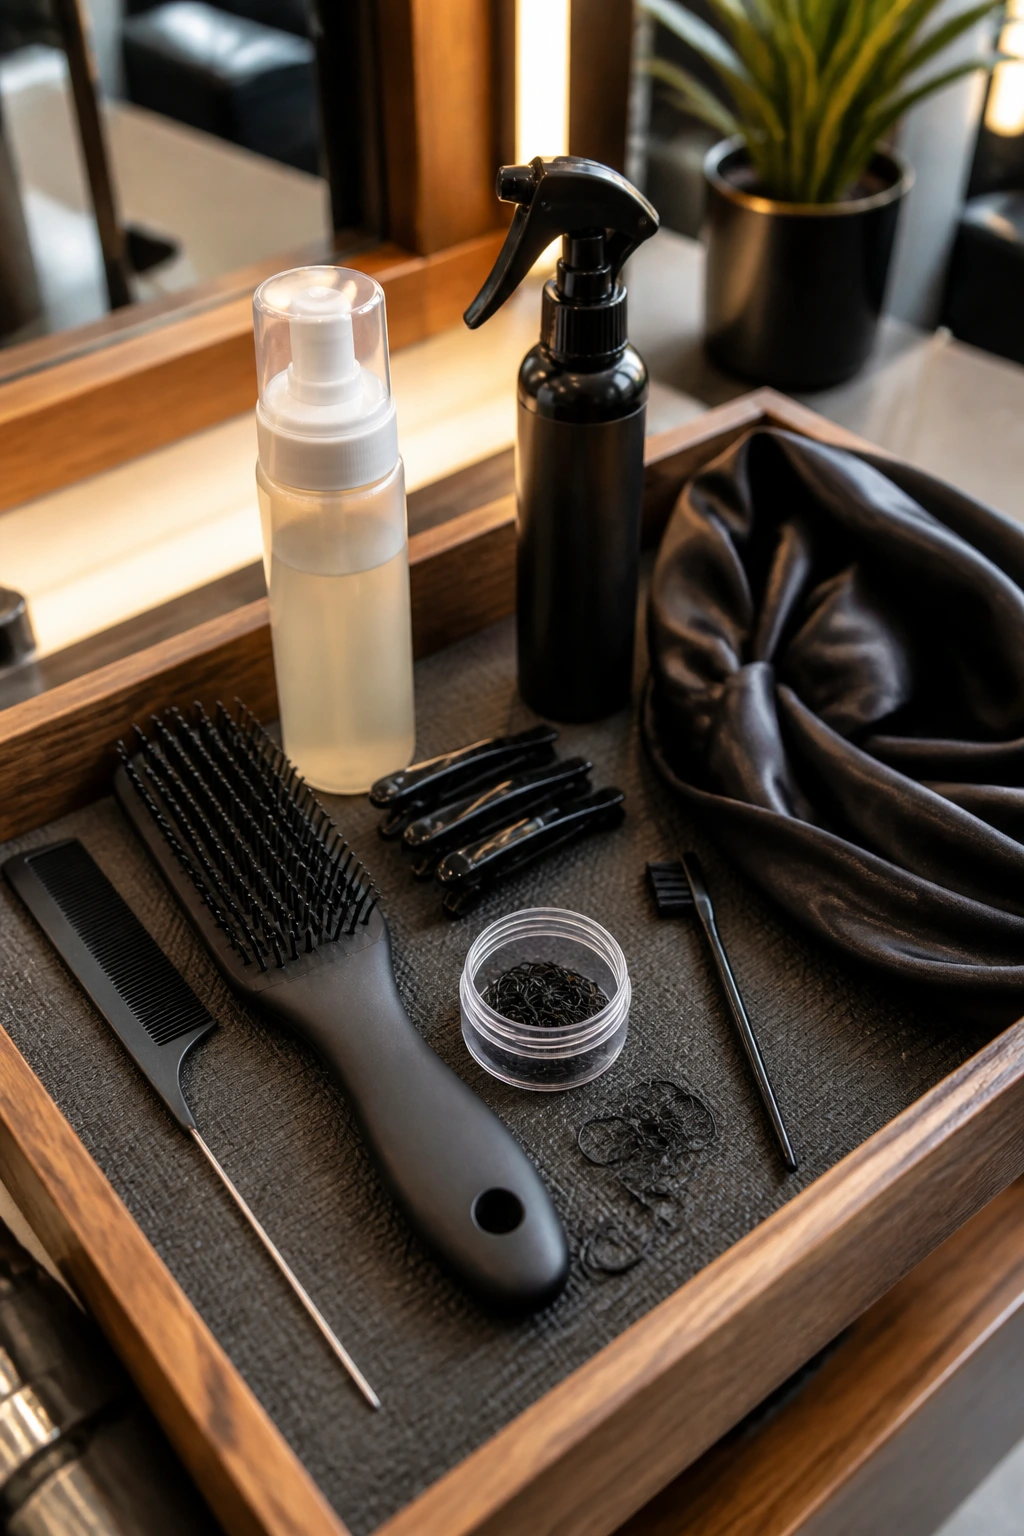
- Rat-tail comb: For clean parts, zigzags, triangles, and any braid pattern that depends on a sharp line.
- Detangling brush or wide-tooth comb: Use it on stretched hair so the sections stay smooth before you braid.
- Lightweight mousse or setting foam: Helps control frizz without turning fine strands sticky or stiff.
- Braid spray or light leave-in: Keeps the hair pliable while you section it; go easy so the roots do not get greasy.
- Small elastics: Useful for tucked ends, puffs, buns, and section control on shorter hair.
- Edge brush: Handy for smoothing the perimeter without pressing the hairline flat.
- Hair clips: Keep unused sections separated so the part lines stay clean.
- Satin scarf or bonnet: Protects the style at night and keeps the braid line from rubbing apart.
- Optional extension hair: Use only if you want added fullness; pre-section it into slim pieces first.
- Hand mirror: Essential for checking the back of the head and making sure the braids land evenly.
How to Prep and Part Fine 4C Hair Before Braiding
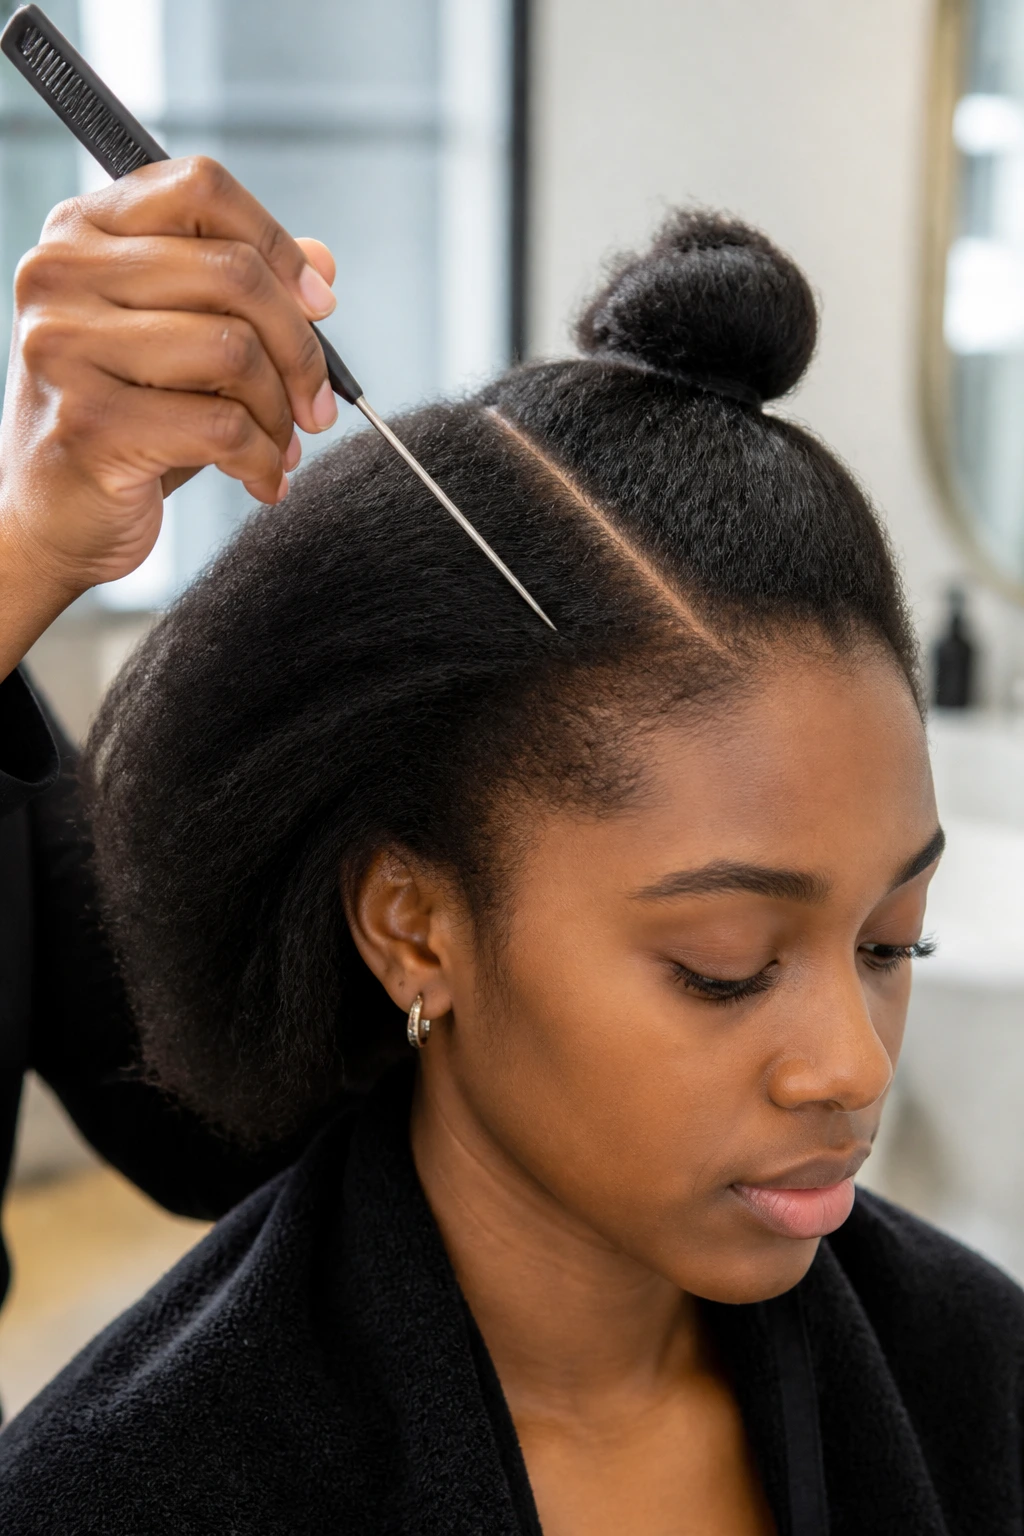
Start on hair that has been fully detangled and lightly stretched. That is the part a lot of people skip, then they wonder why the braid puffs up before lunch. Fine 4C hair can braid beautifully, but it wants the sectioning to be clean before the first crossover. A little prep saves a lot of fighting later.
Use product the way you would season food: enough to help, not enough to drown it. A light leave-in or braid spray on each section is enough for most styles, and mousse is usually better than heavy cream when you want the part to stay neat. If you are adding hair, separate the extension hair into small pieces before you start. The smaller the pieces, the easier it is to keep the root line slim.
Make the Parts First
Draw the parting pattern before you braid. Clip every unused section away so the lines do not blur. Fine hair can hide mistakes for a minute, then the flaws show up from across the room.
Keep the First Inch Clean
The first inch of each braid carries the whole style. If the roots are loose there, the braid looks fuzzy fast. If they are too tight, the scalp complains. Aim for clean, even tension and stop tugging once the braid has grip.
How to Wear and Accessorize These Braids
Workday polish: Clean center parts, side parts, and low buns look sharp with small hoops, studs, or a plain blazer. Fine hair tends to look best when the accessories are one notch quieter than the braid itself.
Weekend ease: Space buns, side sweeps, and half-up styles are good when you want movement without too much fuss. A soft sweatshirt, hoop earrings, and a braid that sits close to the head keep the look relaxed.
Dress-up move: Gold cuffs, ribbon threading, and a braided crown do a lot of work when the outfit has a simple neckline. Open collars, slip dresses, and crew necks all leave room for the braid pattern to show.
Accessory rule: If the braid is already narrow, do not cover it with too many clips or beads. One accent usually lands better than five. The style should still read as a braid, not a hardware display.
Extra Tips and Personalization
Fullness Boost: After braiding, pinch the outer edges of the braid loops gently with your fingertips. Do not yank; just widen the braid enough that it looks fuller without fraying apart.
Shine Boost: Put a single drop of lightweight oil on the braid lengths after the style is finished. Keep it off the roots. Fine hair looks better with a clean sheen than with a greasy top.
Edge-Friendly Finish: If your hairline is delicate, leave baby hairs mostly alone. A soft brush and a trace of edge control are enough. Over-slicking thin edges tends to make the whole front look hard.
Make-It-Yours: Add one ribbon, one cuff line, or one tucked bun detail. On fine hair, a single strong accent usually beats a pile of extras. The braid should stay the main event.
Night Care, Refreshing, and How Long the Braids Last

Protective styles only stay protective if you sleep in them properly. A satin scarf or bonnet keeps the braid surface from fuzzing up against pillows, and a loose wrap helps the part lines stay clean. If your braids are tucked into buns or ends, pin any loose corners before bed so they do not rub against the pillow seam all night.
For no-extension styles, I usually expect the cleanest look to last about 5 to 7 days before the roots start to puff enough to change the shape. Feed-in styles, tucked ends, and braided buns can stretch farther, often into 10 to 14 days if the scalp stays comfortable and the front is not pulled too tightly. Fine hair does not always enjoy being left alone for too long, so watch the scalp as much as the style.
How to Refresh Without Starting Over
A light mist of braid spray or water-and-foam mix on the roots can settle frizz. Smooth the part with your fingers or a tail comb, then let the hair dry fully before you sleep again. If the ends look tired, re-secure them with a small elastic or a few rods for ten minutes while they dry.
Washing and Scalp Care
If product builds up, clean the scalp with a nozzle bottle and a diluted shampoo mix every 7 to 10 days. Pat dry with a microfiber towel or a T-shirt, then let the braid air-dry fully before wrapping it up. Damp braids are not a shortcut. They just smell like one.
Variations and Adaptations to Try
No-Extension Minimalist: Keep the braid entirely on your natural hair and make the parts smaller instead of adding bulk. This is the best route if your fine strands get tired fast or if you want a lighter feel around the scalp.
Soft-Volume Stretch Prep: Band or blow-dry the hair first, then braid on a stretched base so the braid lies smoother and the loose sections keep more shape. This version works well when shrinkage is the enemy.
Ribbon and Cuff Finish: Add a single ribbon through the braid or a few cuffs at the ends. Choose this when you want the style to look dressed up without adding weight at the root.
Sensitive Hairline Version: Keep the front sections larger, the tension looser, and the braid start farther back from the edge. A little extra space around the temples is worth more than a perfect-looking part.
Twist-Out Hybrid: Pair braids at the front or sides with a twist-out or braid-out in the back. It gives you movement and keeps the whole style from feeling too uniform.
Short-Hair Friendly Mini Rows: Use four or more narrow Dutch rows instead of two large braids. Smaller rows often sit better on short fine hair and stay cleaner through the day.
Common Mistakes to Avoid
- Braid tension that bites at the hairline: If the scalp aches, pulls, or leaves red marks after ten minutes, the braid is too tight. Redo it looser; the style should sit, not fight.
- Using extension hair that is too heavy: A braid that feels thick at the root and droops by the ends is carrying too much hair. Break the extension into smaller pieces or skip it altogether.
- Starting on un-stretched hair: Fine 4C strands shrink fast, and the braid will start puffing almost immediately if the base is too fluffy. Stretch first so the part and the braid stay visible.
- Drowning the roots in product: Too much gel or cream makes the hair slippery, sticky, or flaky. Use a light hand and smooth the section with the comb, not your fingers alone.
- Ignoring part symmetry: If one side is wider than the other, the whole style looks off even when the braid work is neat. Part first, check in the mirror, then braid.
- Sleeping uncovered: Pillow friction fuzzes the braid surface and loosens the part lines. Satin or silk is not optional if you want the style to last.
Frequently Asked Questions
Can you do Dutch braids on fine 4C hair without extensions?
Yes, and in many cases that is the cleaner choice. Fine hair often looks better when the braid size stays modest and the roots do not have to carry extra weight, so natural-hair versions can actually look neater than overfilled ones.
Should I blow-dry my 4C hair before braiding?
You do not have to, but some stretch helps a lot. A low-heat blow-dry, banding, or a stretched braid-out makes parts easier to see and reduces the puff that can make Dutch braids look uneven.
How do I keep Dutch braids from slipping on fine hair?
Start with clean, stretched hair and give the first inch of each braid enough grip. A small amount of mousse or braid spray helps, but the real fix is section size and tension control. If the root is too loose, the braid will slide no matter what product you use.
Are Dutch braids protective for Black hair?
They can be, if the tension is low and the hairline is respected. Protective style or not, a braid that hurts the scalp, pulls at the edges, or stays in so long that the roots tangle is not helping the hair.
How long do these styles last on fine hair?
No-extension styles usually look their cleanest for about 5 to 7 days. Feed-ins, tucked buns, and styles with better root control can last longer, but once the scalp starts itching or the base turns fuzzy, it is time to refresh or take them down.
What products work best without making fine hair stiff?
Light mousse, braid spray, and a small amount of leave-in are usually enough. Thick creams and heavy gels can build up fast on fine strands and make the braid feel greasy or flaky.
Can I wash my scalp while wearing Dutch braids?
Yes. Use a diluted shampoo mix in a nozzle bottle and apply it to the scalp in small sections, then pat the roots dry well. Do not soak the whole style unless you have the time and patience to dry it completely afterward.
What if my edges start to hurt after braiding?
Take the style down. Soreness at the hairline is your cue that the braid is too tight or the sections are too small for the amount of tension used. Fine hair gives feedback fast, and it is better to listen on day one than regret it on day three.
Braids That Respect Fine Strands
The best thing about these styles is that none of them asks fine 4C hair to become thicker, longer, or tougher than it is. They work because the braid pattern does the heavy lifting, while the hair stays protected, controlled, and still recognizably textured.
That is the part I like most. Clean parts, polite tension, a little stretch, and one sharp detail—those are usually enough. Pick the version that fits your length and your patience, and let the braid do what it does best.