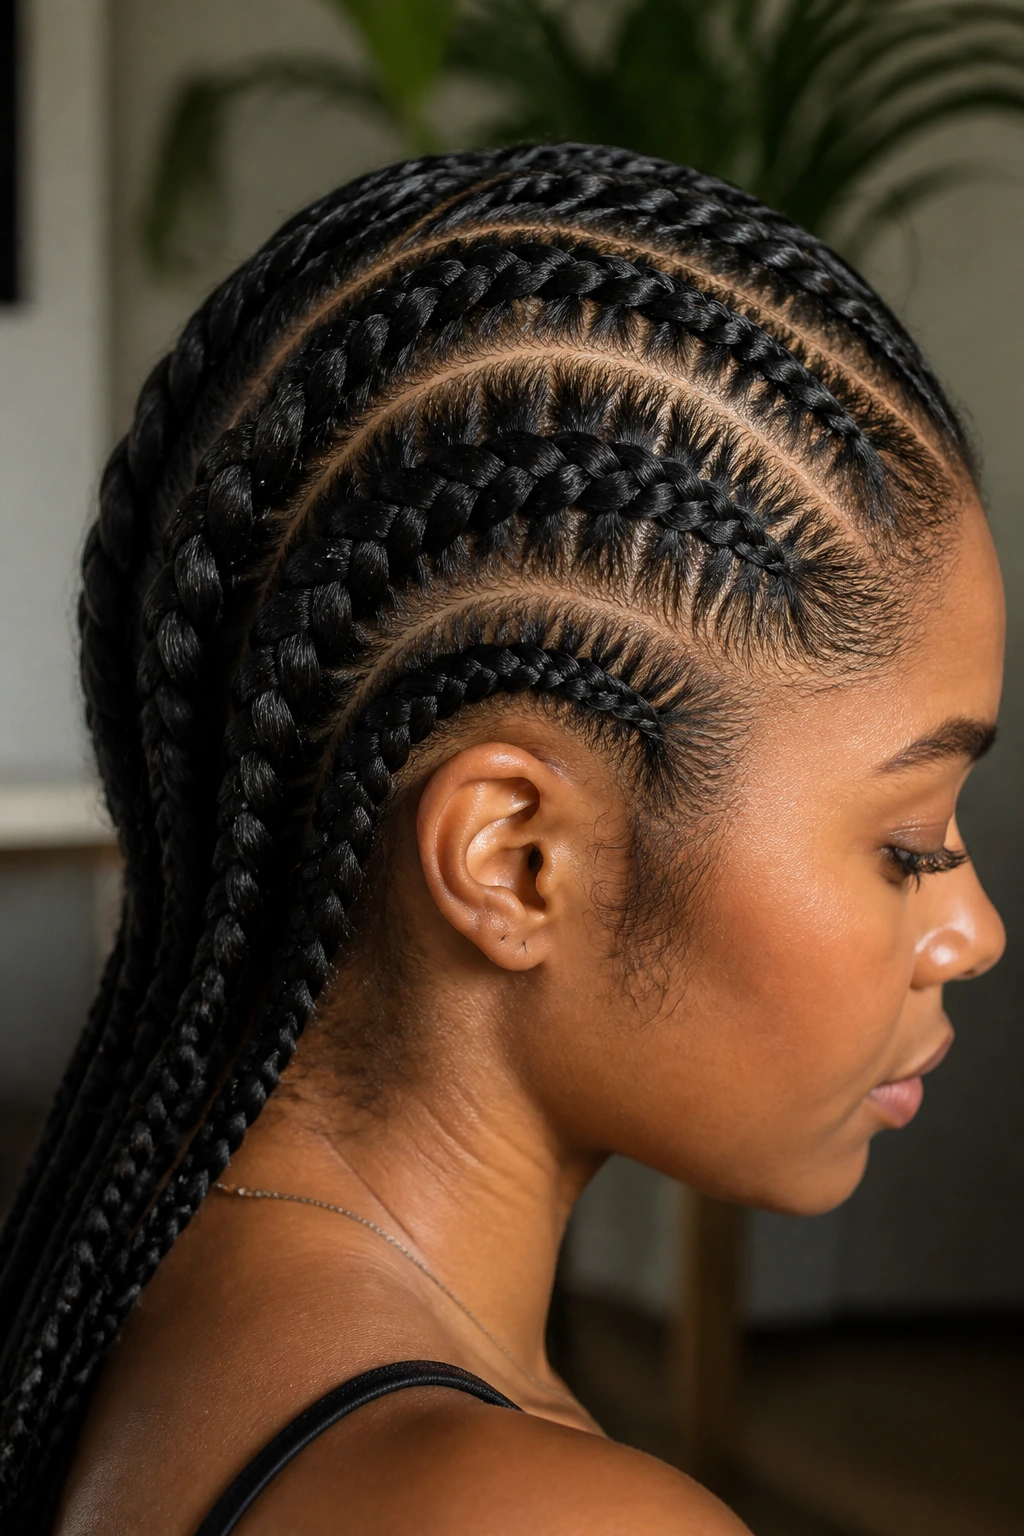
Black Dutch braids have a specific kind of presence: the braid sits proud on the scalp, the parting looks deliberate, and coily texture gives the whole thing lift instead of letting it collapse flat. On Black hair, that raised ridge reads crisp and sculpted, which is why Dutch braids can look neat without looking stiff.
Done well, they do more than look tidy. The hair stays close, the ends can be tucked or braided down, and the style gives your hands a break for several days — assuming you prep the hair first and do not yank the roots into submission. That last part matters. A braid that hurts by dinner is already a bad braid.
The nicest thing about this style family is range. You can keep it basic with two straight-back braids, throw it into a low bun, wrap it around the head, add beads, or build a whole updo without losing the protective feel. The range is the point.
Why These 25 Black Dutch Braids Earn Their Spot
- Low manipulation, when done right: A clean Dutch braid keeps fingers out of the hair all day and cuts down on constant re-twisting, re-brushing, and re-gel-ing.
- Scalp access stays possible: Unlike a closed sew-in or a full wig install, these styles still leave enough room to oil the scalp lightly and check the roots.
- They work with different lengths: Short natural hair, stretched hair, and extension hair all fit somewhere in this braid family.
- The shape reads clearly: The raised braid ridge shows up even when the hair has texture, a little frizz, or natural shrinkage at the roots.
- You can dress them up or keep them plain: Cuffs, beads, scarves, buns, and clean parts change the mood fast without changing the base braid.
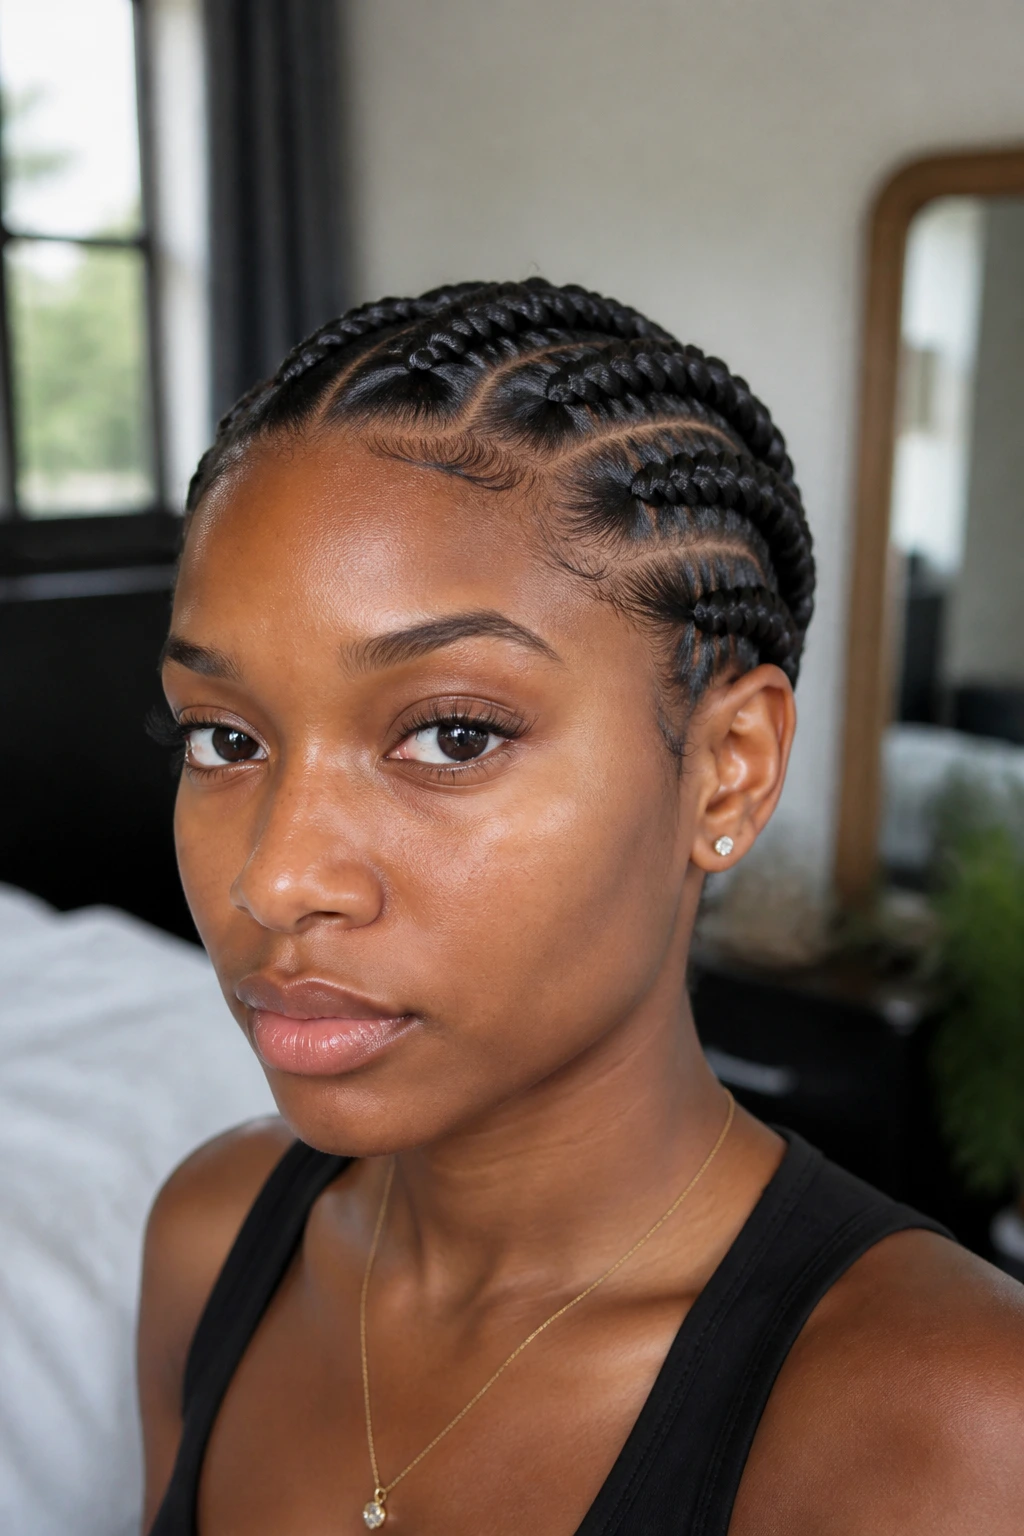
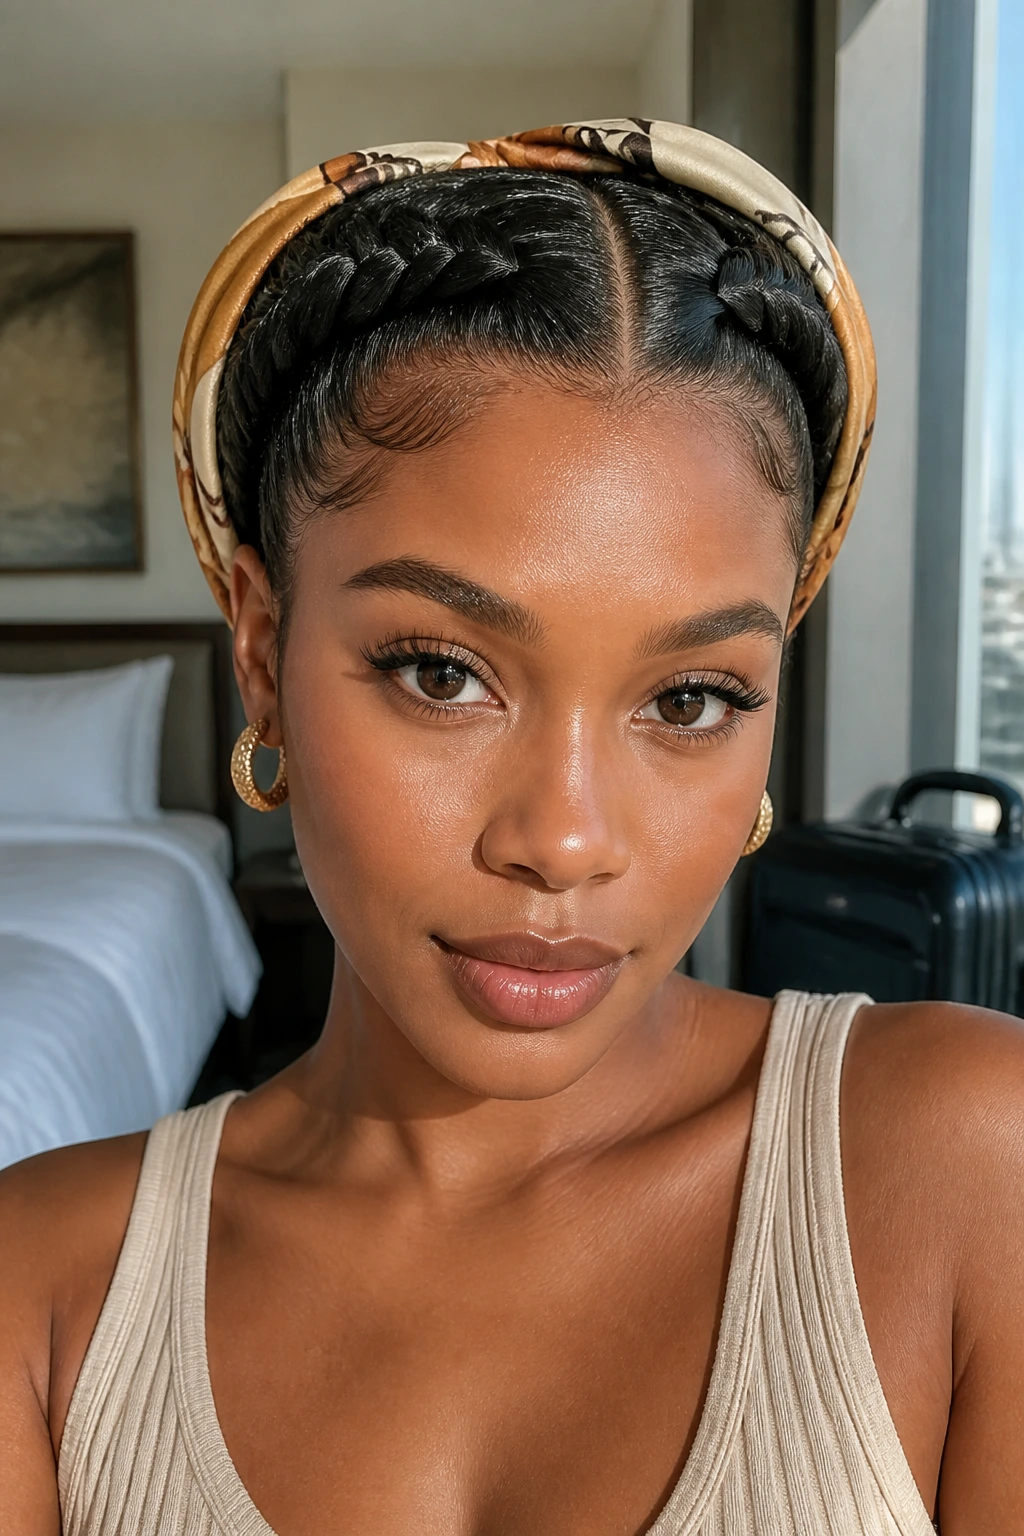
1. Center-Part Twin Dutch Braids
If you want the cleanest place to start, twin Dutch braids are it. The center part gives the whole style balance, and on Black hair the raised braid looks especially neat when the sections are even and the surface has a little grip.
Why It Works:
This version keeps tension spread across two sides, so the style feels steady without needing tiny parts everywhere. The braid hugs the head, but the underhand cross makes the braid sit on top instead of disappearing into the hair.
Key Ingredients:
- 1 clean, stretched head of natural hair
- 1 tablespoon leave-in conditioner
- 1 tablespoon mousse
- 1 teaspoon styling gel at the roots
- 2 snag-free elastics
- Optional: 1 teaspoon lightweight oil for the scalp after styling
Quick Steps:
- Part the hair straight down the center with a rat-tail comb and clip one side away.
- Smooth a light layer of leave-in and gel through the front section on the first side.
- Split that section into three strands, cross the side strands under the middle, and add a small piece of hair each time you braid down.
- Repeat on the other side, braid to the nape, and secure the ends with elastics. Smooth the surface with mousse and tie it down for 10 to 15 minutes.
Tools for This Style:
- Rat-tail comb for the part
- Sectioning clips
- Edge brush
- Hand mirror for checking the back
- Satin scarf to set the finished braid
How to Wear It:
This looks sharp with hoops, a plain tee, or a structured jacket. I like it best when the part is clean and the braids are the focus, not a heavy pile of extra accessories.
Pro Tips for This Style:
- Stretch the hair first if you want the braid to lie flatter and last longer.
- Keep both sides the same size or the style will start to lean.
- Stop tugging at the front hairline. Neat is good. Tight is not.
Variations on This Style:
- Braided Ends: Leave the last few inches as smaller three-strand braids for a softer finish.
- Feed-In Length: Add small amounts of extension hair as you braid if you want longer hanging ends.
- Beaded Finish: Thread a few clear or gold beads onto the ends for a little movement.
Common Mistakes to Avoid with This Style:
- Crooked center part: If the part drifts, the whole style looks off. Redraw it before you braid too far down.
- Too much product at the root: Thick grease or heavy wax makes the sections slippery and dull.
- Pulling the front too hard: If your temples ache, the braid is too tight.
2. Side-Part Low Dutch Braids
A side part changes the whole mood without changing the braid pattern. This version feels softer, especially when one braid sweeps a little more around the temple before it drops toward the nape.
Why It Works:
The off-center part gives the face a bit of shape, and the lower finish keeps the braids from looking boxy. On coily hair, that side bias also makes the texture feel intentional instead of symmetrical to the point of stiffness.
Key Ingredients:
- 1 deep side part
- 1 tablespoon mousse
- 1 tablespoon gel
- 2 small elastics
- 1 satin scarf for setting
Quick Steps:
- Make a deep side part and clip the heavier side away first.
- Starting near the front hairline, braid underhand along the side and add hair as you move toward the nape.
- Repeat on the other side, keeping the second braid slightly lower so the two meet neatly.
- Smooth the crown with mousse, secure both ends, and set the style under a scarf for 10 minutes.
Tools for This Style:
- Rat-tail comb
- Tail end of a clip for precise sectioning
- Soft brush
- Satin scarf
- Small elastics
How to Wear It:
This is the braid version I’d wear with a side-swept earring, a blouse, or anything with an open neckline. It leaves the front of the face a little softer than a strict center part.
Pro Tips for This Style:
- Make the heavier side slightly fuller so the part looks balanced.
- Keep the first few inches close to the scalp or the braid starts to wobble.
- If your crown is puffy, smooth it with a tiny bit of mousse on your hands, not more gel.
Variations on This Style:
- Low Braided Bun: Twist the ends into a bun at the nape.
- Loose Side Tendrils: Leave two small face-framing pieces out if you want a softer line.
- Long Feed-In Side Braid: Add hair for more length and a heavier hang.
Common Mistakes to Avoid with This Style:
- A side part that’s too shallow: It can look accidental instead of styled.
- Uneven braid size: One braid should not feel twice as thick as the other unless that is the goal.
- Dragging the braid too far down the forehead: That tight pull shows fast on the hairline.
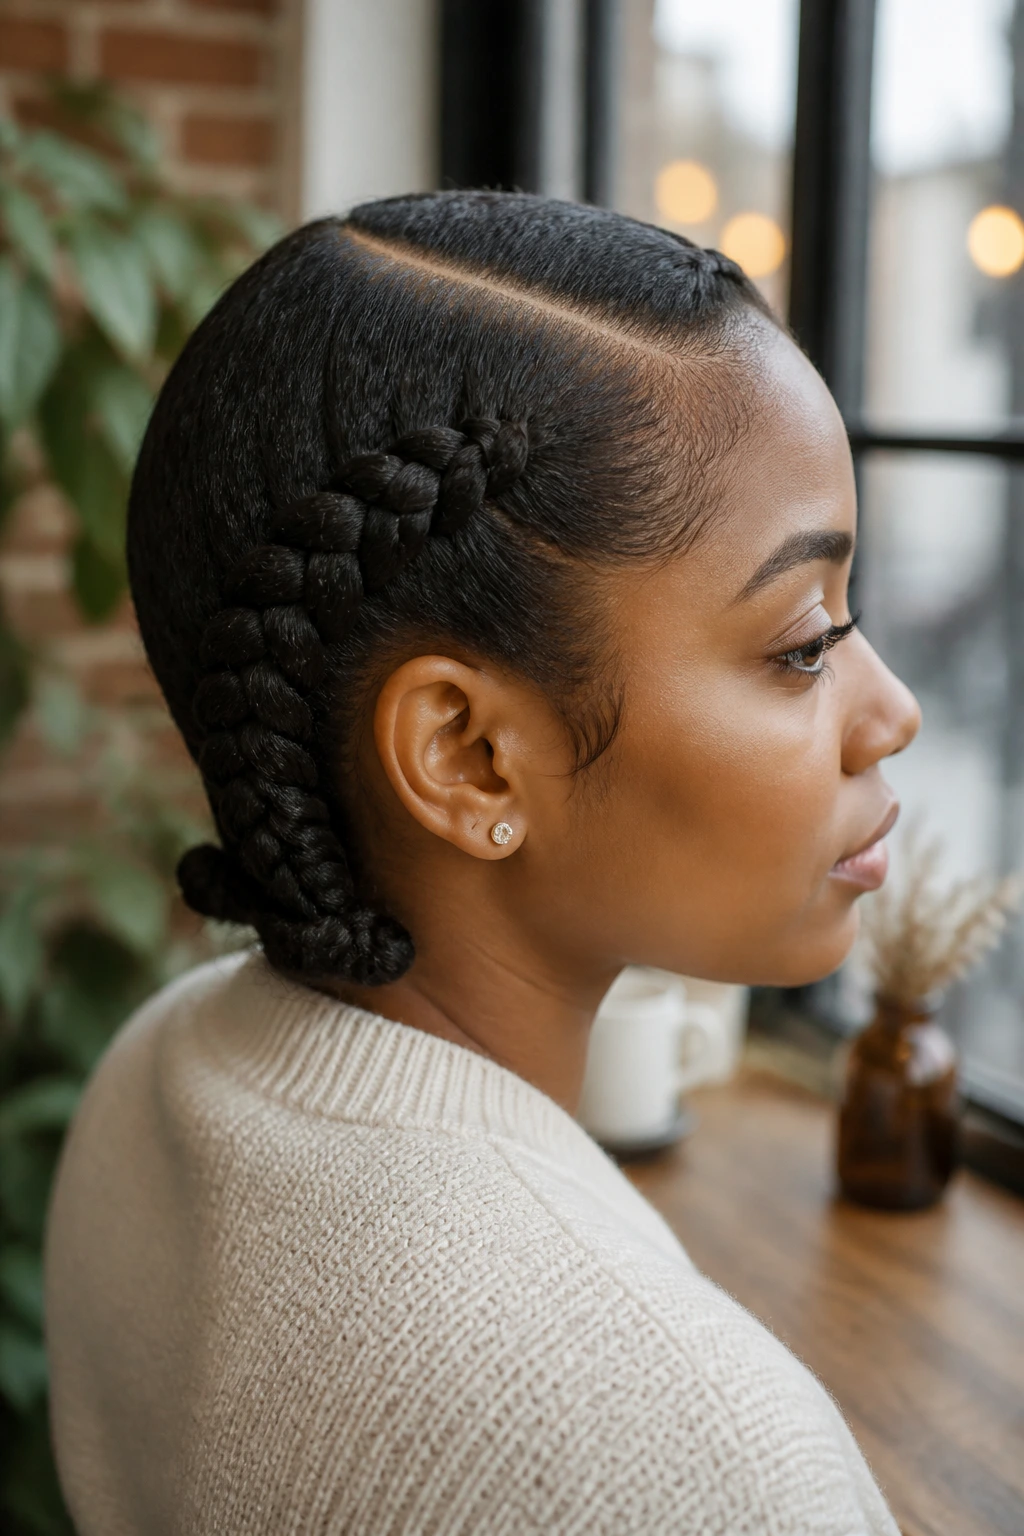
3. Dutch Braids Into a Low Bun
Low Dutch braids into a bun are what I reach for when I want every end tucked away. It is neat, it is practical, and it holds a little more polish than loose ends bouncing around all day.
Why It Works:
The braids do the control work, and the bun locks the ends in place. That means less friction on the tips, less snagging on collars, and less chance of waking up with one braid flattened on one side.
Key Ingredients:
- 2 Dutch braids to the nape
- 1 bun donut or 1 twist-in bun base, optional
- 4 to 6 bobby pins
- 1 tablespoon mousse
- 2 snag-free elastics
Quick Steps:
- Braid both sides straight back to the nape and secure the ends.
- Wrap the braid tails together into a low bun, or coil them separately around a bun base.
- Pin the bun flat against the head with crisscrossed bobby pins.
- Smooth flyaways with a small amount of mousse and set the style with a scarf for 10 minutes.
Tools for This Style:
- Rat-tail comb
- Bobby pins
- Small elastic bands
- Satin scarf
- Medium brush
How to Wear It:
This sits well with collared shirts, jackets, and earrings that need some space. The bun keeps the shape tidy from every angle, which is useful if you hate hair brushing the back of your neck.
Pro Tips for This Style:
- Pin the bun lower than you think you need to. High buns tend to loosen.
- Use pins in a crisscross pattern so the bun grips instead of sliding.
- If your hair is thick, split the braid tail into two coils before pinning.
Variations on This Style:
- Braided Knot Bun: Twist the tails into a compact knot instead of a loose coil.
- Wrapped Bun: Use one braid to wrap around the base of the other for a smoother finish.
- Scarf-Bound Bun: Add a silk scarf around the bun for color and extra hold.
Common Mistakes to Avoid with This Style:
- Pinning only the surface: A bun can look secure and still slip if the pins do not anchor underneath.
- Leaving the ends loose inside the bun: Loose tails poke out fast.
- Over-tightening the crown: A snug bun is fine; a pulling bun is not.
4. Crown Dutch Braid Halo
A crown braid doesn’t just sit on the head — it wraps the head. That makes it one of the prettiest ways to keep Black hair tucked while still showing off the braid line.
Why It Works:
The halo shape keeps the ends out of the way and keeps the braid away from collars, bags, and sleeves. It also makes the parting part of the look, which is useful when you want the style to feel deliberate without adding extra pieces.
Key Ingredients:
- 1 side-to-side braid path around the head
- 1 to 2 tablespoons mousse
- 4 to 6 bobby pins
- 1 small elastic
- Optional: braid cuffs for the visible front section
Quick Steps:
- Start the braid behind one ear and braid underhand around the hairline.
- Keep adding hair as you move toward the opposite ear, hugging the head but not pressing hard.
- Tuck the tail under the braid path at the back and pin it flat.
- Smooth the crown and set the style with a scarf so the wrap keeps its shape.
Tools for This Style:
- Rat-tail comb
- Bobby pins
- Sectioning clips
- Hand mirror
- Satin scarf
How to Wear It:
This is one of the dressier options in the whole group. It works with open necklines, simple earrings, and dresses or tops that leave the face and collarbone clear.
Pro Tips for This Style:
- Pin the hidden tail before you fuss with the visible front braid.
- Keep the braid close enough to show the halo shape, but not so close that it pinches.
- If the back starts to puff, tuck that section under one more pin rather than adding more gel.
Variations on This Style:
- Loose Halo: Leave a little softness around the edges for a less formal look.
- Side Crown: Stop the braid halfway and tuck it to one side instead of all the way around.
- Cuffed Halo: Add a few metal cuffs to the front arc only.
Common Mistakes to Avoid with This Style:
- A halo that sits too high: It starts to look detached from the head.
- Pins that show: Hidden pins matter here. Visible ones break the line.
- Ignoring the nape area: That tucked tail has to be secure or the whole crown loosens.
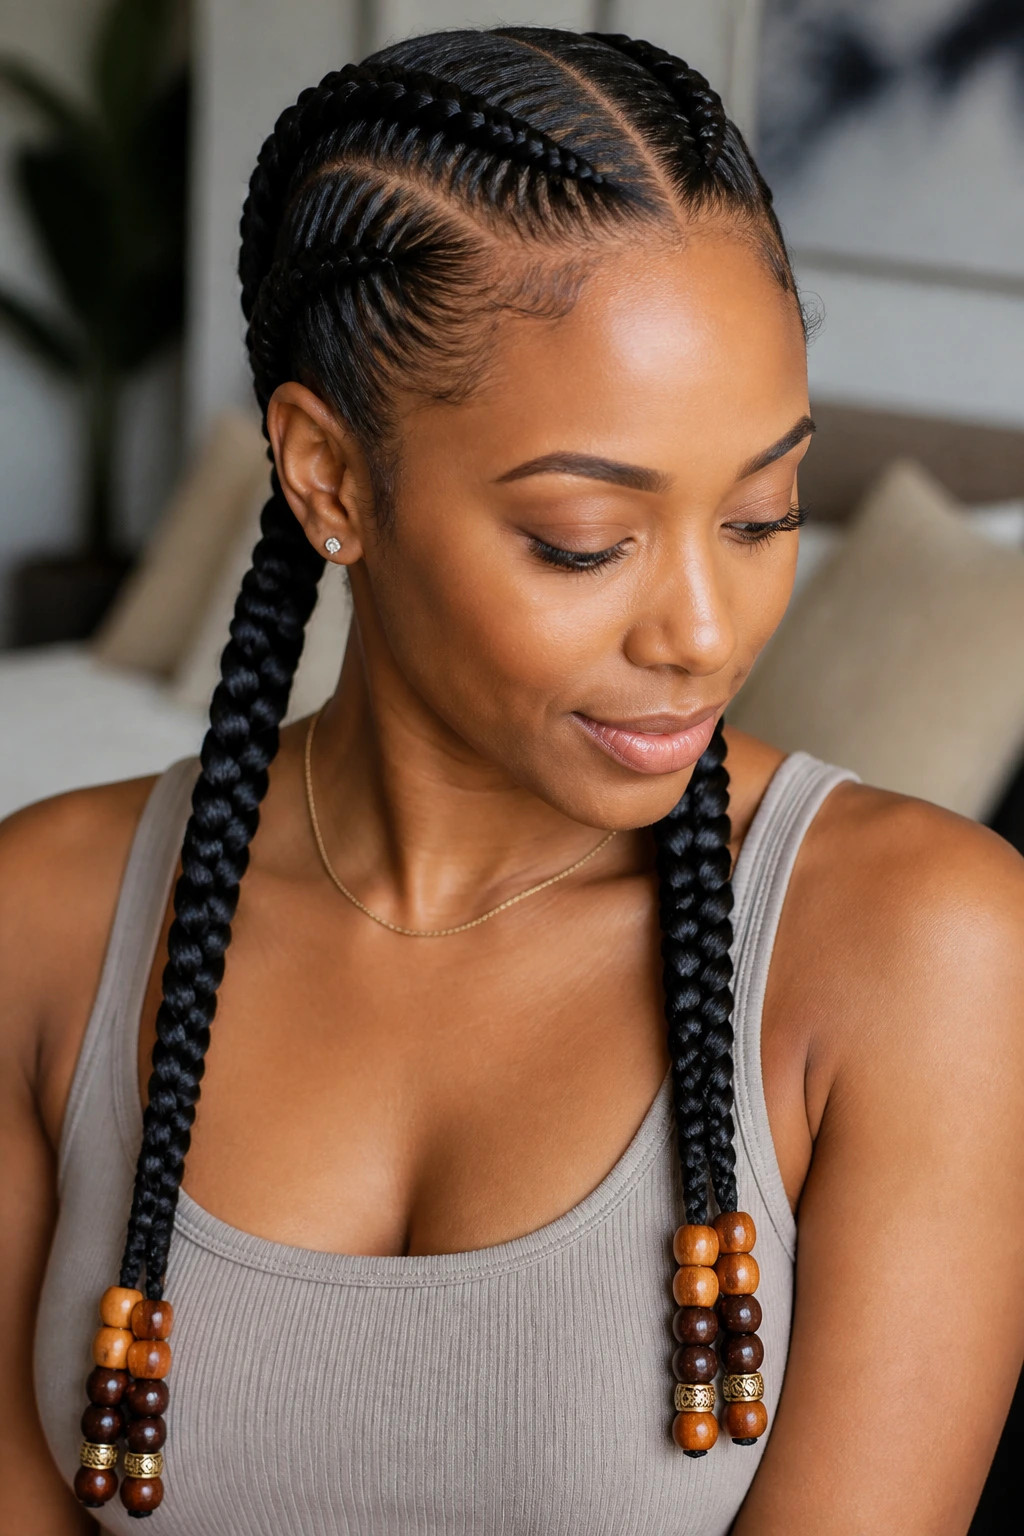
5. Dutch Pigtails With Braided Ends
Pigtails can be grown-up when the sections are neat and the ends are controlled. This version keeps the playful shape but gives it enough structure to work as an actual protective style.
Why It Works:
Two braids split the weight, which is useful if your hair is dense or your scalp gets tired fast. Leaving the ends braided instead of loose means the style holds its shape better overnight and does not fray as quickly on the shoulders.
Key Ingredients:
- 2 Dutch braids from the front to the nape
- 2 small elastics
- 1 tablespoon mousse
- 1 teaspoon light oil
- Optional: 6 to 10 beads total
Quick Steps:
- Part the hair into two equal halves and clip one side away.
- Braid the first side from the hairline down, keeping the sections even and the braid snug.
- Repeat on the other side, then continue each braid a few inches past the nape so the ends stay defined.
- Seal the ends, smooth the surface with mousse, and set the braids for a few minutes under a scarf.
Tools for This Style:
- Rat-tail comb
- Brush
- Small elastics
- Satin scarf
- Optional bead tool or threading hook
How to Wear It:
This works with hoodies, denim jackets, errands, the gym, and any day you want a style that stays in place. It looks especially clean when the part is sharp and the ends are neat, not fuzzy.
Pro Tips for This Style:
- Keep both braids low enough that they do not pull the temples.
- If you want beads, place them at the very ends so the braid line stays light.
- A little mousse goes farther than a lot of gel here.
Variations on This Style:
- Beaded Ends: Add beads to each tail for movement and sound.
- Braided Buns: Coil the ends into two small buns instead of leaving them hanging.
- Slim Pigtails: Make the sections smaller if your hair is short or fine.
Common Mistakes to Avoid with This Style:
- Uneven parting: If one side is bigger, the whole style feels off.
- Loose braiding at the nape: That’s where pigtails unravel first.
- Heavy accessories on weak ends: Too many beads can drag the braid down.
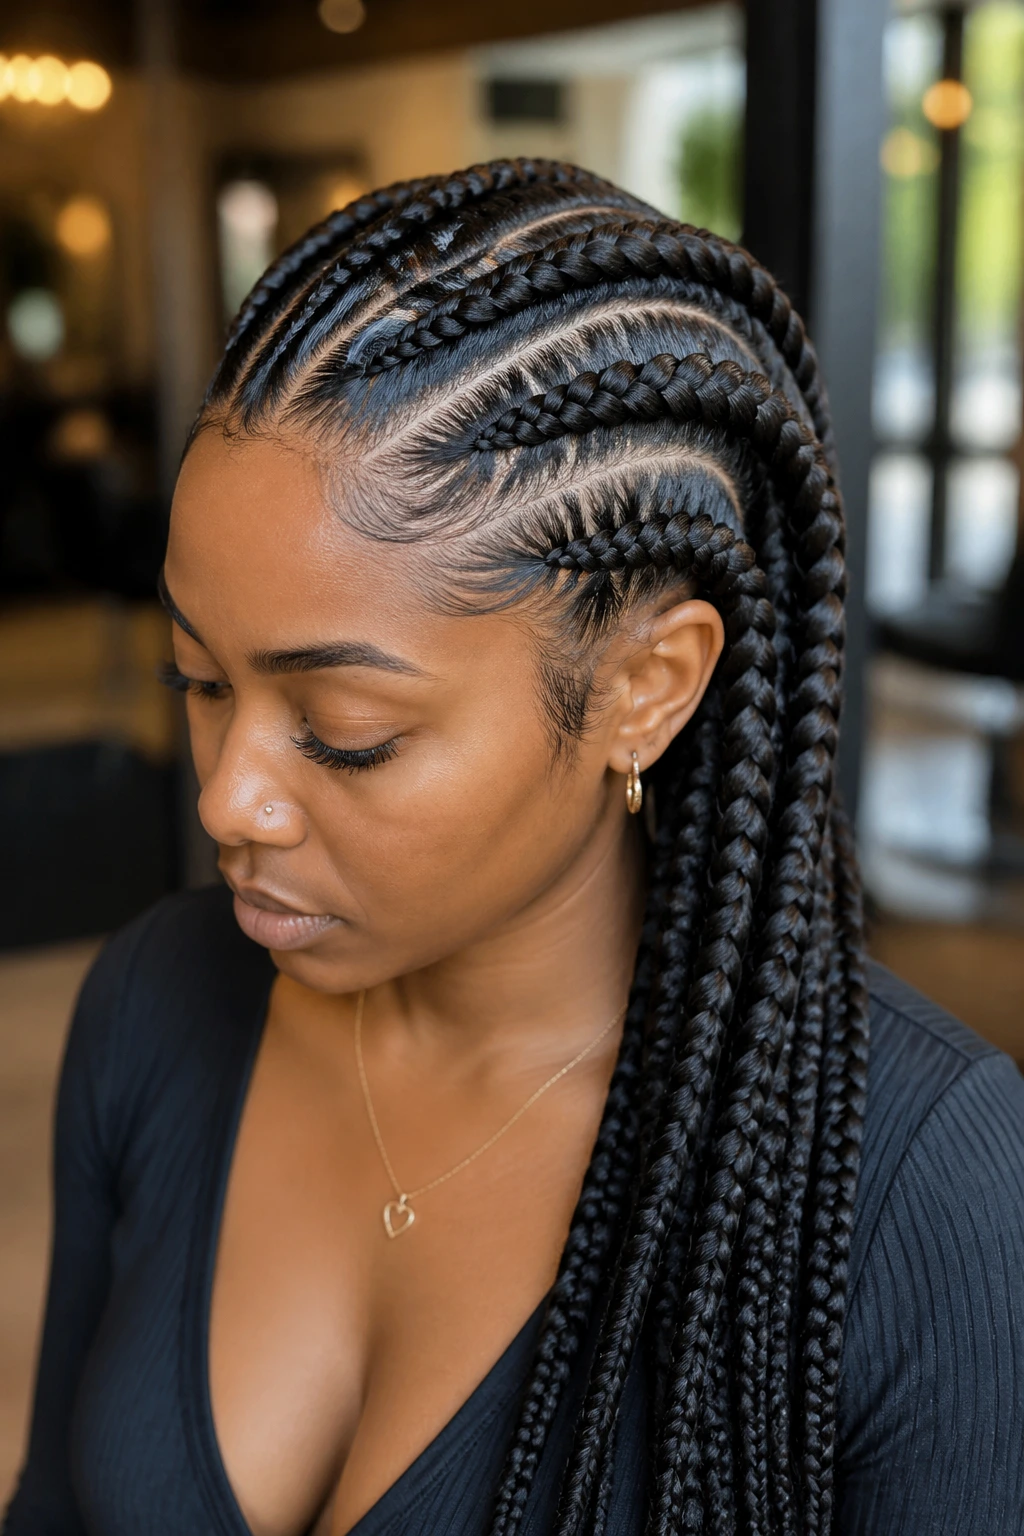
6. Feed-In Dutch Braids With Extensions
Feed-in Dutch braids with extensions buy you length fast. If your natural hair is short or you want the braids to fall lower and fuller, this is the version that gives you that extra reach without forcing your own hair to carry all the weight.
Why It Works:
The extension hair is added in small pieces as you braid, which keeps the base from looking bulky. That gradual build makes the braid look smooth at the root and fuller down the length.
Key Ingredients:
- 1 to 2 packs pre-stretched braiding hair
- 1 clean, stretched base of natural hair
- 1 tablespoon braid gel
- 1 tablespoon mousse
- 4 to 6 small elastics
- Optional: 1 lightweight scalp oil after styling
Quick Steps:
- Part the hair cleanly and section off the first braid path.
- Begin with your natural hair, then feed in small amounts of extension hair every inch or so.
- Keep the added hair even on both sides so the braid does not bulge.
- Braid to the end, seal it, and dip or finish the tail if the extension hair needs it.
Tools for This Style:
- Rat-tail comb
- Sectioning clips
- Edge brush
- Spray bottle
- Braiding hair and small elastics
How to Wear It:
This is one of the most flexible options if you want a full, long look. It takes well to cuffs, beads, or a bun at the end, but it also stands up fine on its own when the braid lines are clean.
Pro Tips for This Style:
- Match the extension color to your root shade, not the lightest piece in your hair.
- Add extension hair in small amounts or the root will look lumpy.
- Keep your natural hair stretched first so the feed-in stays smooth.
Variations on This Style:
- Long Feed-In Pair: Go extra long if you want the braids to hang past the shoulders.
- Cuffed Feed-In: Add cuffs at the midpoints for a cleaner finish.
- Low Bun Feed-In: Tuck the extensions into a bun for less swinging weight.
Common Mistakes to Avoid with This Style:
- Adding too much hair at once: It makes the braid thick at the root and hard to control.
- Tight feed-in tension: That can pull the hairline hard and leave soreness.
- Skipping a good stretch on natural hair: The braid slides less when the base is ready.
7. Jumbo Dutch Braids on Stretched Hair
Jumbo Dutch braids are the style I pick when the week is already busy and the scalp needs a break. Fewer sections, bigger shape, faster install. That is the whole appeal.
Why It Works:
The larger braid size means less parting time and less total manipulation, which makes it useful when you want to keep the hair under control without spending ages in the chair. On stretched hair, jumbo braids sit cleaner and move less.
Key Ingredients:
- 1 head of blow-dried or band-stretched hair
- 1 to 2 tablespoons mousse
- 1 teaspoon gel along the parting
- 2 snag-free elastics
- Optional: 2 to 4 bobby pins if you tuck the ends
Quick Steps:
- Divide the hair into two large sections or four if you want a more controlled braid line.
- Braid each section underhand, keeping the sections broad and the tension even.
- Continue to the ends and secure them with elastics.
- Smooth the surface with mousse, then wrap the style for 10 minutes so the braid sets.
Tools for This Style:
- Wide rat-tail comb
- Clips
- Medium brush
- Satin scarf
- Blow-dryer with comb attachment, optional
How to Wear It:
Jumbo braids look best when the rest of the outfit is relaxed too. A hoodie, a tank, a soft knit, or a plain button-up all work because the braid already carries a lot of shape.
Pro Tips for This Style:
- Stretch the roots more than the ends so the braid does not puff at the base.
- Keep the sections broad, not sloppy; jumbo still needs structure.
- If one braid starts to feel heavier, stop and redistribute the hair before continuing.
Variations on This Style:
- Jumbo Low Bun: Coil the tails into a low bun for a cleaner finish.
- Single Jumbo Braid: Merge both sides into one thick braid down the back.
- Beaded Jumbo Ends: Add a few large beads if the braid is long enough to hold them.
Common Mistakes to Avoid with This Style:
- Using jumbo size on very short hair: It slips faster than a smaller braid.
- Skipping the stretch: Shrinkage makes jumbo parts look fuzzy.
- Overloading with product: Too much gel can make the braid feel sticky and heavy.
8. Half-Up Dutch Braids With Loose Curls
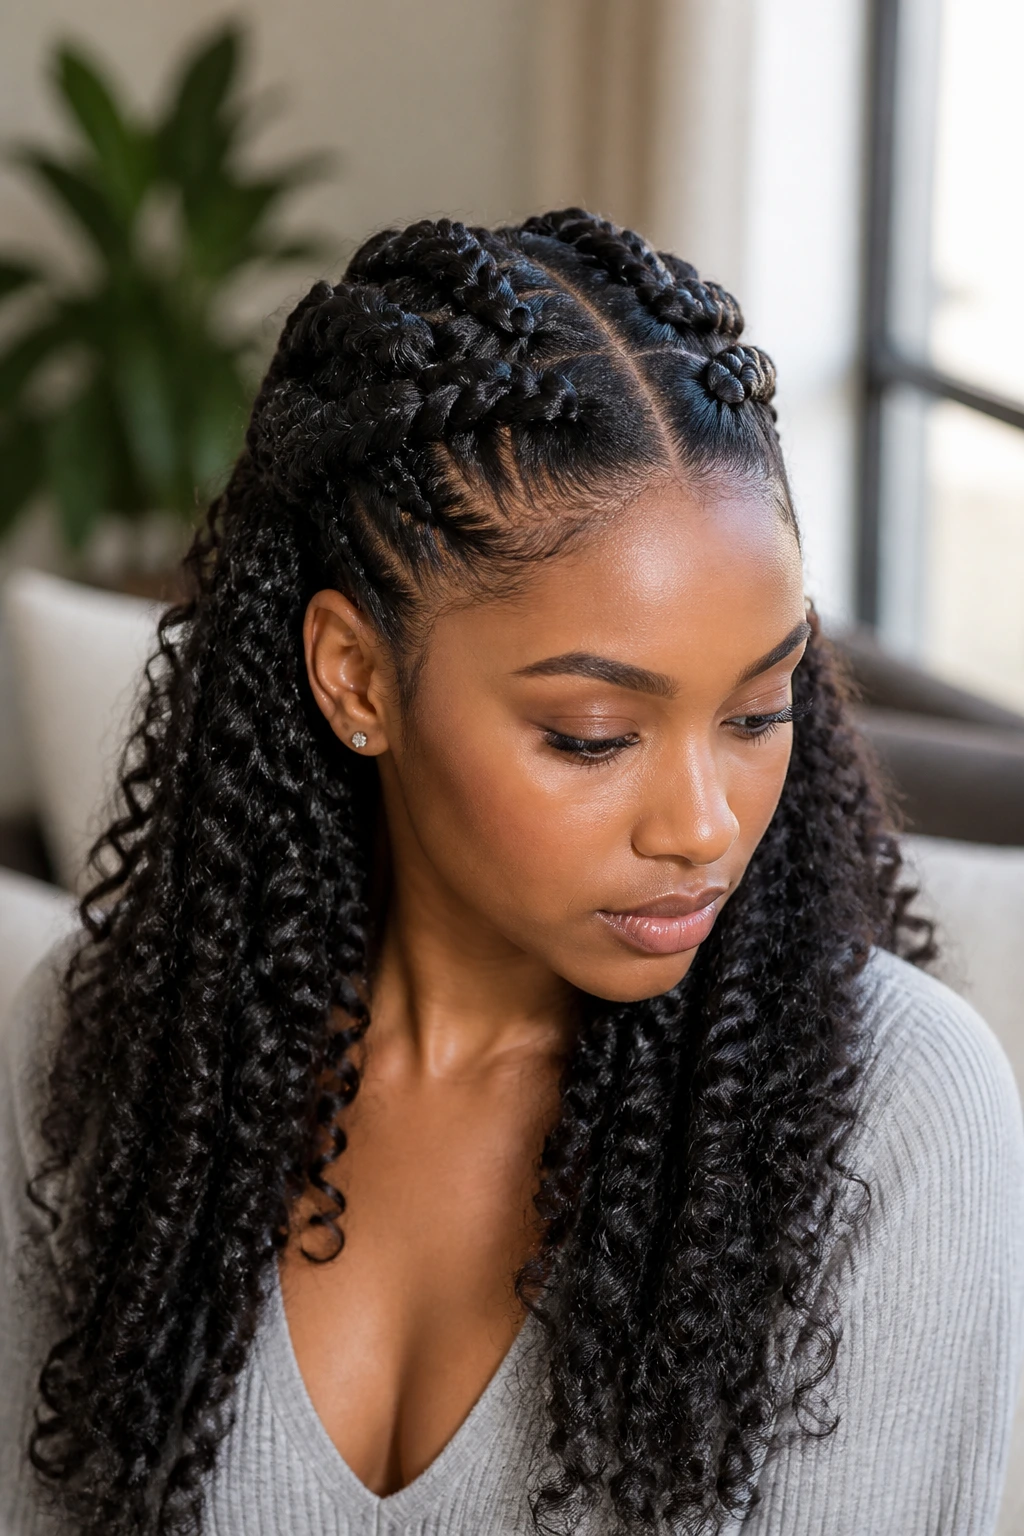
Half-up braids leave a little curl out front, which softens the whole look. It’s not the most locked-down version in the bunch, but it is one of the easiest ways to mix protection with movement.
Why It Works:
The top half is controlled and tucked, so the crown and hairline get a break from constant handling. Leaving the lower length loose keeps the style from feeling too severe, which is useful if you want something that reads a little dressier.
Key Ingredients:
- 2 Dutch braids on the top half of the head
- 1 to 2 tablespoons mousse
- 2 small elastics
- Optional: flexi rods or a curl cream for the loose ends
- Optional: 4 bobby pins
Quick Steps:
- Section off the top half of the hair from temple to temple.
- Braid two Dutch rows from the front back to the crown and secure them.
- Leave the lower hair out in curls, stretched coils, or lightly defined ends.
- Blend the top and bottom with a little mousse and pin any loose spots flat.
Tools for This Style:
- Rat-tail comb
- Clips
- Small elastics
- Curling rods if you want extra shape
- Satin scarf
How to Wear It:
This is the one I’d choose for brunch, dinner, or a day when you want the braid to feel finished without being strict. It sits well with earrings because the lower hair and the braids both get room.
Pro Tips for This Style:
- Keep the top braids close enough to hold, but not so tight they flatten the crown.
- Define the loose hair after braiding, not before, so it does not get mashed.
- If your curls frizz fast, mist them lightly and stop touching them.
Variations on This Style:
- Curly Pony Half-Up: Pull the loose hair into a pony instead of leaving it down.
- Braided Crown Half-Up: Bring the top braids farther back for a wider frame.
- Pinned Half-Up: Tuck the lower hair into a low twist for more control.
Common Mistakes to Avoid with This Style:
- Leaving the half-up section too small: It looks accidental instead of balanced.
- Making the lower hair too loose and undefined: The style loses shape fast.
- Forcing perfect curls: A soft bend is enough; ringlets are not required.
9. Dutch Braids Into Space Buns

Space buns turn a protective style into something playful without losing the braid base. The Dutch braid gives the buns structure, and the buns keep the ends tucked high and out of the way.
Why It Works:
By moving the braid upward into buns, you keep a lot of the hair off the neck and away from collars. That can make the style feel lighter, especially when you are active or the weather is warm enough to make loose hair annoying.
Key Ingredients:
- 2 Dutch braids from the front into the crown
- 2 elastics
- 4 to 6 bobby pins
- 1 tablespoon mousse
- Optional: edge brush for the hairline
Quick Steps:
- Braid each side up toward the crown instead of straight back.
- Secure the braid tails high on the head and coil each tail into a bun.
- Pin the buns flat and even so they sit at the same height.
- Smooth the hairline and set the style with a scarf for a few minutes.
Tools for This Style:
- Rat-tail comb
- Bobby pins
- Small elastics
- Edge brush
- Satin scarf
How to Wear It:
This is casual, sporty, and a little cheeky in the best way. It works with oversized tees, gym clothes, or a simple dress when you want the hair to carry some personality.
Pro Tips for This Style:
- Place the buns a touch lower if you want the shape to feel less cartoonish.
- Wrap the tails tightly enough that the buns hold, but not so tight they shrink.
- Use pins under the bun instead of only around the rim.
Variations on This Style:
- Low Space Buns: Move the buns down toward the sides for a calmer look.
- Braided Buns: Keep each braid tail braided inside the bun for a denser finish.
- Cuffed Buns: Add one cuff to each braid before you coil it.
Common Mistakes to Avoid with This Style:
- Uneven bun height: It throws off the whole shape.
- Too much loose tail inside the bun: That causes popping and sliding.
- Over-smoothing the front: The style needs a little texture to feel alive.
10. Dutch Braids With Beaded Ends
Beads change the sound of a braid as much as the look. A little click at the ends can be fun, but the key is restraint — enough beads to feel intentional, not enough to make the braid sag.
Why It Works:
The bead weight pulls the ends down in a neat line, which helps the tails stay visible instead of puffing into little frayed tufts. On Black hair, that can make a simple braid look finished without adding a lot of extra work.
Key Ingredients:
- 2 Dutch braids or 1 braid pair
- 6 to 10 beads total
- 2 snag-free elastics
- 1 tablespoon mousse
- Optional: bead stopper or threading tool
Quick Steps:
- Braid the hair to the ends and secure each tail tightly.
- Thread the beads onto the finished ends, spacing them evenly.
- Seal the tail under the last bead or knot it below the bead stack if the bead style allows it.
- Smooth the root area with mousse and set the braids to dry fully.
Tools for This Style:
- Rat-tail comb
- Bead threading tool
- Small elastics
- Scarf
- Edge brush
How to Wear It:
This one works when you want the hair to make a small statement. Keep the rest of the outfit simple or the beads will compete with everything else.
Pro Tips for This Style:
- Test the weight by lifting the braid once the beads are on.
- Use fewer beads on fine or short braids.
- Make sure the tail is sealed well so the beads do not slide off.
Variations on This Style:
- Mixed Bead Stack: Use two bead sizes on the same braid for a more layered look.
- Clear Beads: Keep the braid light-looking if you do not want color contrast.
- Accent Beads Only: Add beads to the front pieces and leave the back plain.
Common Mistakes to Avoid with This Style:
- Too many beads: Heavy tails can pull down the ends and strain the braid.
- Loose tail ends: If the ends are not sealed, the beads slide.
- Noisy overloading: If the braid bangs hard against the shoulder, you probably need fewer beads.
11. Zig-Zag Part Dutch Braids
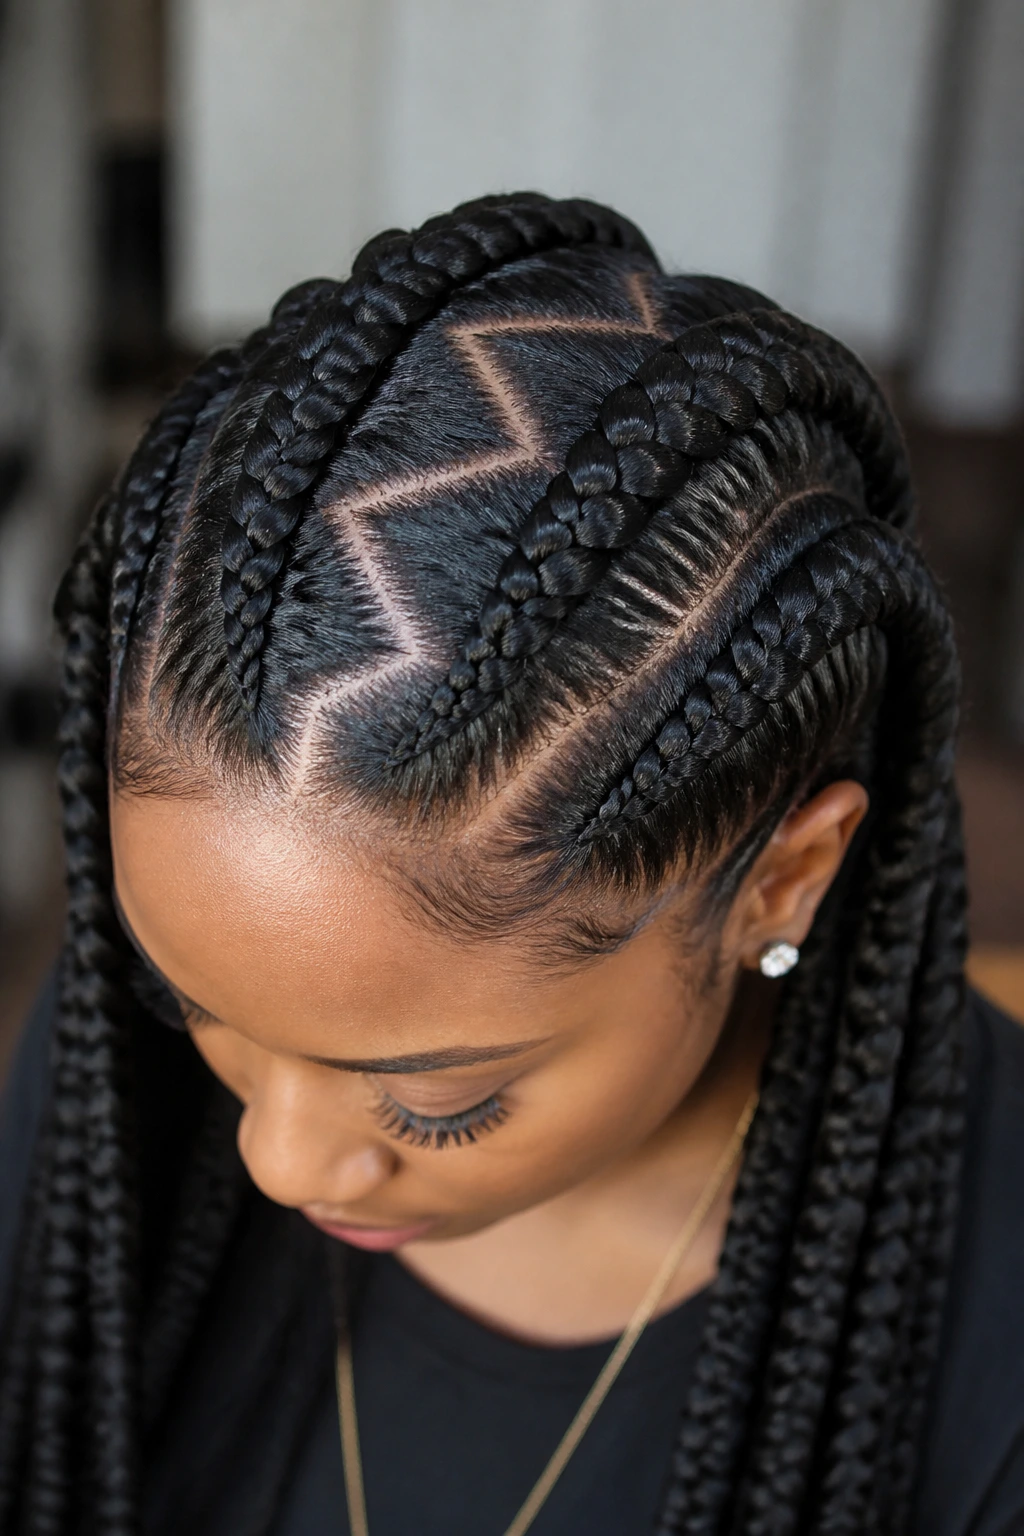
A zig-zag part does more visual work than another row of product ever will. It gives the scalp pattern its own rhythm before the braids even start moving.
Why It Works:
The part itself becomes part of the style, which is useful if you want something a little more playful without changing the actual braid technique. On textured hair, zig-zag lines can break up the scalp line and make the design feel less severe.
Key Ingredients:
- 1 zig-zag parting map
- 1 to 2 tablespoons mousse
- 1 tablespoon gel at the part lines
- 2 elastics
- Optional: a light sheen spray
Quick Steps:
- Use the pointed end of a rat-tail comb to draw the zig-zag route before braiding.
- Clip each section away so the lines stay visible.
- Braid each section underhand, keeping the braid close to the scalp.
- Set the parts with a thin line of mousse and wrap the style for 10 minutes.
Tools for This Style:
- Rat-tail comb
- Sectioning clips
- Small mirror
- Brush
- Scarf
How to Wear It:
This style shines when the part is visible — simple tops, open collars, and earrings all help. I would not pile on accessories here; the parting is already doing enough.
Pro Tips for This Style:
- Draw the zig-zag first and braid second. Do not try to improvise the part mid-braid.
- Keep the angles even so the pattern reads cleanly.
- A soft hold mousse beats thick gel on the lines.
Variations on This Style:
- Sharp Zig-Zag: Make the turns more angular for a graphic finish.
- Soft Zig-Zag: Use gentler curves if you want a subtler look.
- Zig-Zag Crown: Carry the pattern into a halo braid for more drama.
Common Mistakes to Avoid with This Style:
- Wobbly lines: Uneven parts look accidental fast.
- Too much product on the scalp: It blurs the zig-zag edges.
- Rushing the parting: This style lives or dies by the sectioning.
12. Mohawk Dutch Braid With Tucked Sides
Mohawk Dutch braids bring height to the center and keep the sides quiet. If you want a braid that reads bold from the front and stays close to the head, this is a strong choice.
Why It Works:
The central braid creates a clear line down the middle, which helps the style look structured without needing a lot of length. Tucked sides keep the face open and reduce the amount of hair rubbing against the ears and temples.
Key Ingredients:
- 1 central braid path
- 2 tucked side sections or side braids
- 1 tablespoon mousse
- 4 bobby pins
- Optional: 1 pack of extension hair for extra height
Quick Steps:
- Section off a center strip from forehead to nape and clip the side sections out of the way.
- Braid the center strip underhand, keeping it raised and even.
- Tuck or flat-braid the side sections back toward the nape.
- Pin the side sections flat and smooth the central braid with mousse.
Tools for This Style:
- Rat-tail comb
- Clips
- Bobby pins
- Scarf
- Optional extension hair
How to Wear It:
This style likes strong lines, so it works with jackets, hoops, and anything that matches the braid’s shape. It feels especially good when you want the hair to look intentional from the crown down.
Pro Tips for This Style:
- Keep the center strip no wider than you can comfortably braid straight.
- Pin the sides low or they will start to puff upward.
- If you use added hair, make the center braid fuller, not heavier at the root.
Variations on This Style:
- Full Mohawk Braid: Leave the side sections in tiny flat braids instead of pinning them.
- Pinned-Side Version: Tuck the sides completely with pins for a cleaner finish.
- Tall Center Feed-In: Add extension hair gradually for more height.
Common Mistakes to Avoid with This Style:
- Sides left half-tucked: They pop out and ruin the line.
- Center braid too tight: Height is good; strain is not.
- Ignoring the back pinning: The nape needs anchor points too.
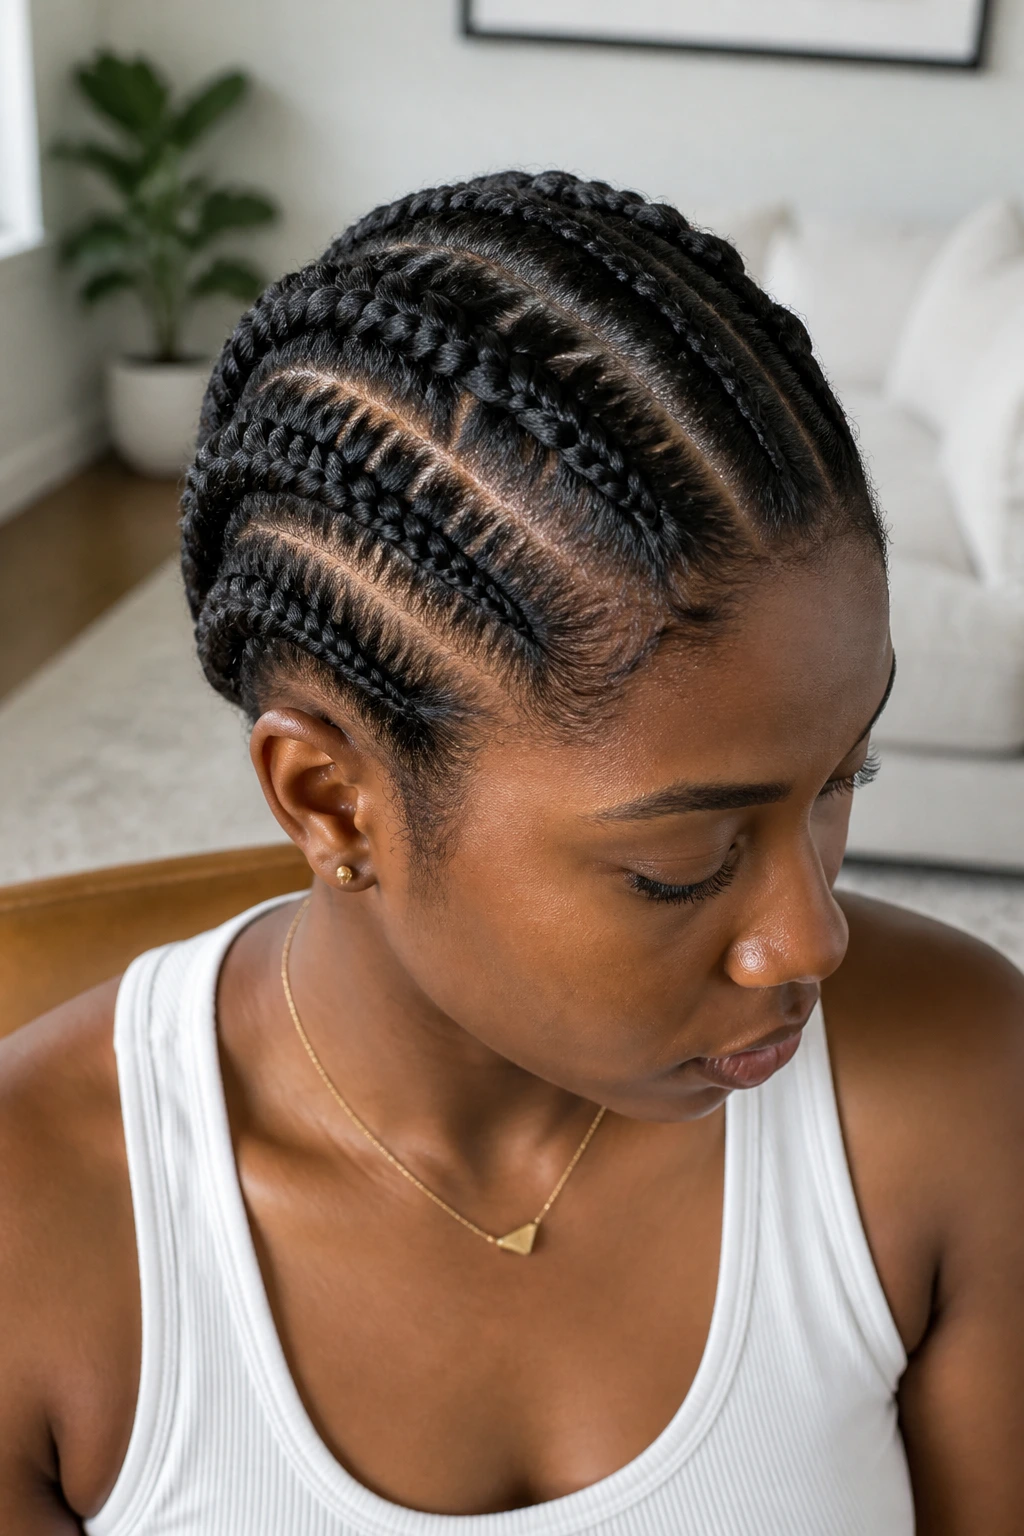
13. Four Slim Dutch Braids
Four slim braids spread the load out better than two heavy rows. They give more scalp coverage, which is handy when you want a style that stays neat longer without feeling bulky.
Why It Works:
Smaller braids keep more sections controlled, so the roots do not puff as quickly. The thinner size also makes it easier to braid shorter or denser hair without fighting a giant section in your hands.
Key Ingredients:
- 4 equal sections of stretched hair
- 1 to 2 tablespoons mousse
- 4 small elastics
- 1 teaspoon gel along each part
- Optional: braid cuffs on the front pair
Quick Steps:
- Part the hair into four even sections from front to back.
- Braid each section underhand from the hairline to the nape.
- Keep the braid tension consistent so all four rows sit at the same level.
- Secure the ends and smooth the parts with mousse.
Tools for This Style:
- Rat-tail comb
- Sectioning clips
- Small elastics
- Edge brush
- Hand mirror
How to Wear It:
This is one of the best options for travel or a long work week because the style stays orderly without a lot of daily fuss. It reads neat and practical, but the four-row pattern still has enough structure to feel styled.
Pro Tips for This Style:
- Make the front two braids slightly smaller if you want them to frame the face better.
- Keep the part lines clean — with this style, the parting is half the look.
- If the hair is thick, braid one section at a time so your hands do not tire.
Variations on This Style:
- Two Front, Two Back: Place the front braids tighter to the hairline for more face framing.
- Cuffed Front Pair: Add cuffs only to the front rows for a lighter finish.
- Bundled Ends: Gather the four tails into two low bundles at the nape.
Common Mistakes to Avoid with This Style:
- Sections that are not equal: The braids will sit at different weights and heights.
- Rushing the center part lines: Messy lines stand out more with four rows.
- Braiding too loosely: Slim braids need enough grip or they fray quickly.
14. Dutch Braided Ponytail
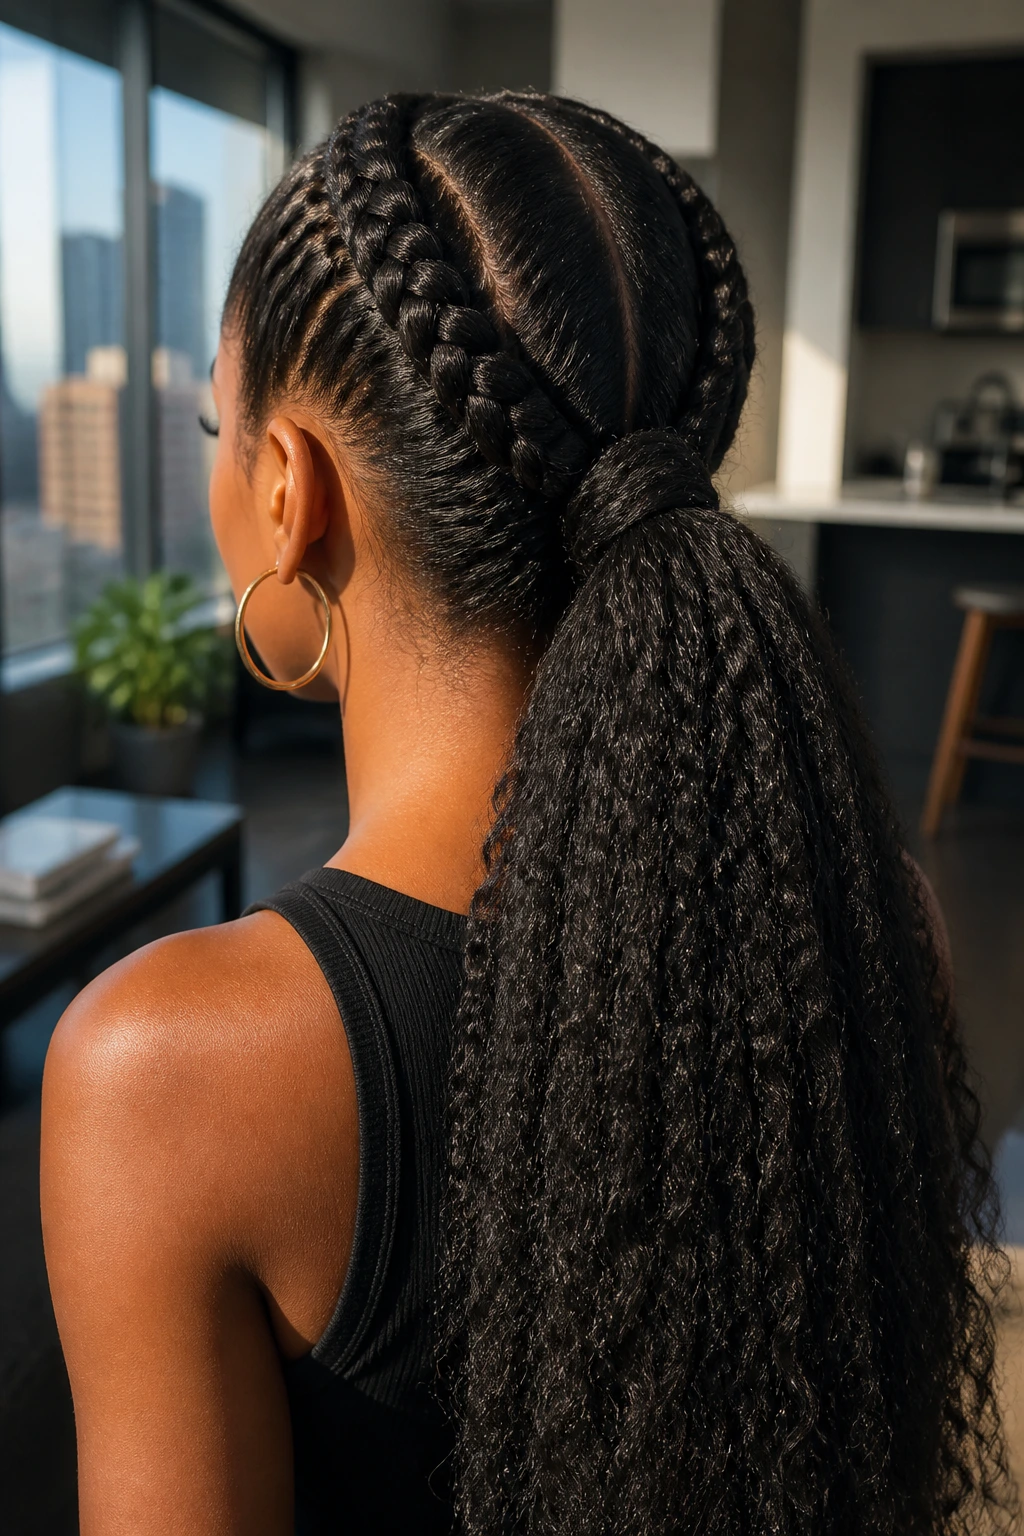
A braided ponytail is the clean answer when you need the hair up and off the neck. It keeps the braid line visible, but the tail gives you movement, so it does not feel as locked down as a full bun.
Why It Works:
The top braids control the scalp area, and the ponytail anchor keeps the length in one place. That is useful if you want something that can handle movement without the ends swinging everywhere.
Key Ingredients:
- 2 Dutch braids feeding into 1 ponytail
- 1 strong elastic
- 1 tablespoon mousse
- 2 to 4 bobby pins
- Optional: 1 strand of hair to wrap the base
Quick Steps:
- Braid the front sections back toward the crown.
- Join the two braids and any loose hair into a single ponytail at the nape or crown.
- Wrap a small strand around the elastic if you want a cleaner finish.
- Smooth the top with mousse and pin any loose pieces flat.
Tools for This Style:
- Rat-tail comb
- Brush
- Elastic band
- Bobby pins
- Optional hair-wrap strand
How to Wear It:
This is one of the best styles for a busy day because it stays out of the way and still looks finished. It works with denim, workouts, travel, and even a clean office outfit if the parting is neat.
Pro Tips for This Style:
- Place the ponytail base where the head naturally curves; that keeps it from tipping.
- If your hair is thick, split the ponytail into two wrapped coils for better hold.
- A little mousse at the crown helps the top braid lie flatter.
Variations on This Style:
- High Ponytail: Move the anchor up for more lift.
- Low Ponytail: Keep it near the nape for a calmer finish.
- Braided Wrap Pony: Wrap the ponytail itself into a braid for extra control.
Common Mistakes to Avoid with This Style:
- Elastic too tight: It creates a hard line and can stress the roots.
- Ponytail base too high on a heavy braid: It can sag fast.
- Leaving the braid join bulky: The merge should sit flat.
15. Dutch Braids With Curly Ends
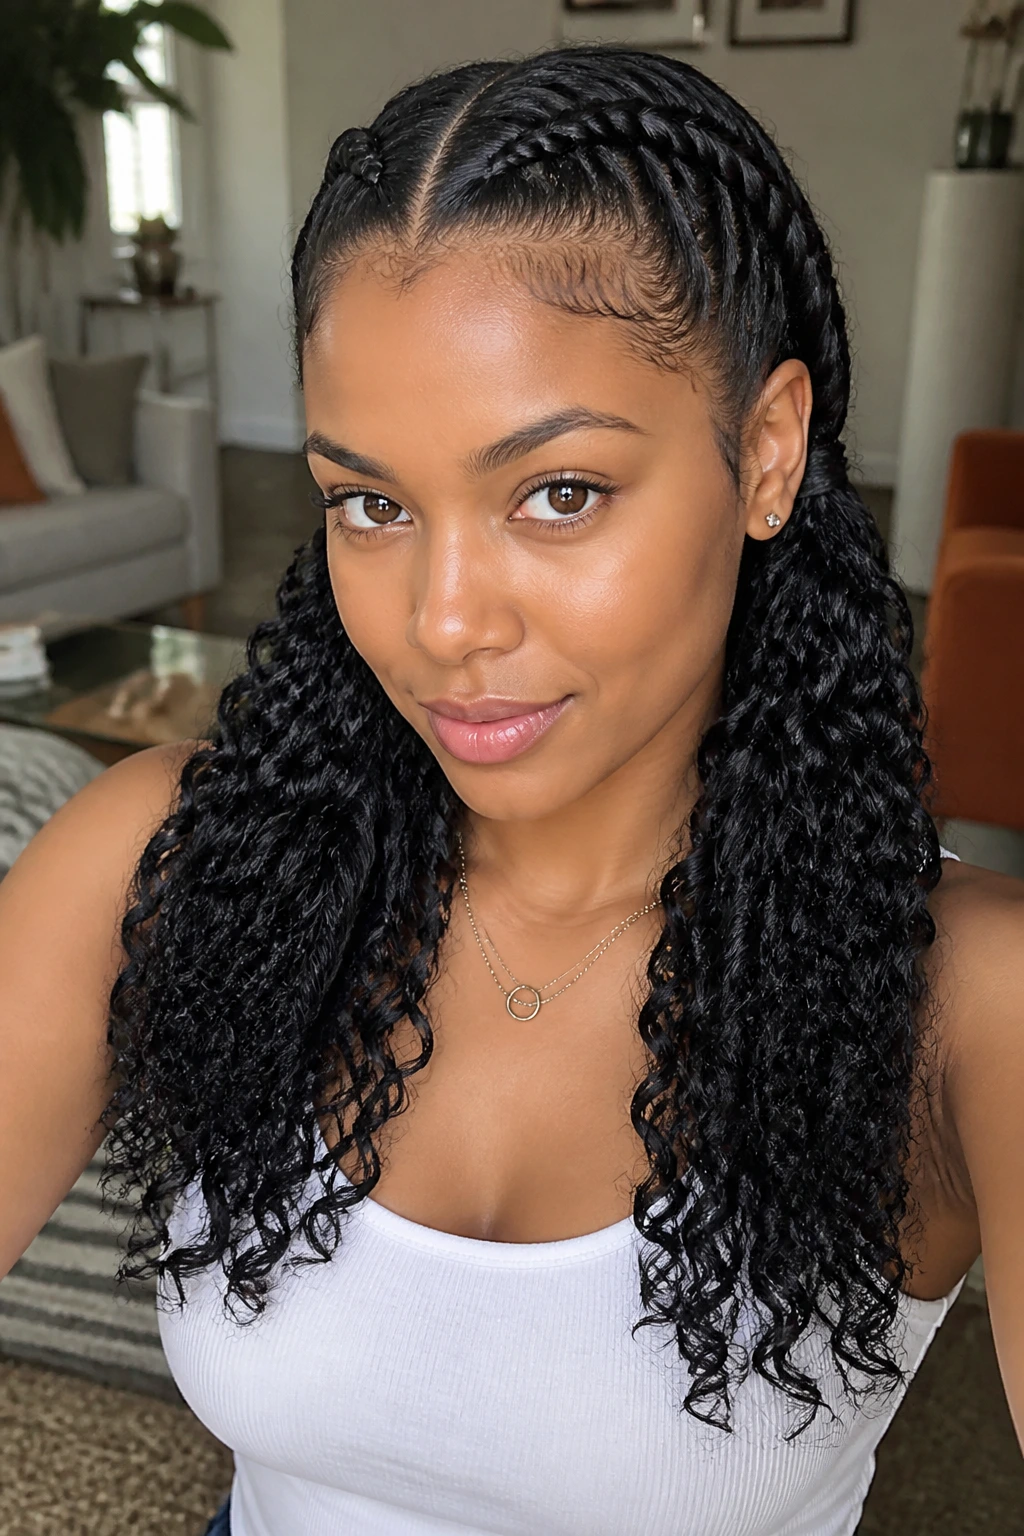
Curly ends keep the braid from feeling too formal. The braid does the control, and the curls at the bottom soften the line so the style moves instead of just sitting there.
Why It Works:
The braid protects the roots and mid-lengths, while the curled ends add shape where the eye usually lands first. If your ends are fragile or prone to splitting, this finish keeps them from rubbing as hard against clothes.
Key Ingredients:
- 2 Dutch braids or 1 side braid
- 6 to 8 flexi rods or perm rods
- 1 tablespoon mousse
- 2 small elastics
- Optional: curl cream on the last few inches
Quick Steps:
- Braid the hair down to the point where you want curls to start.
- Leave the last few inches loose and roll them onto rods, or twist them into small wrapped curls.
- Let the ends set fully before removing the rods.
- Smooth the braid roots with mousse and shape the curls with your fingers.
Tools for This Style:
- Rat-tail comb
- Rods or flexi rods
- Small elastics
- Satin bonnet
- Sectioning clips
How to Wear It:
This one looks good when you want a softer, dressier finish without giving up the security of a braid. It sits well with dresses, layered tops, or anything where the ends can rest on the shoulders.
Pro Tips for This Style:
- Let the rods set completely or the curls will fall flat fast.
- Use a light hand with product near the ends or the curl pattern gets sticky.
- A little finger separation is enough; do not pick the curls apart.
Variations on This Style:
- Soft Bend Ends: Use larger rods for a looser finish.
- Defined Ringlets: Use smaller rods if you want tighter curl shape.
- One-Sided Curl Drop: Keep all the curled ends on one side for asymmetry.
Common Mistakes to Avoid with This Style:
- Curling the ends before the braid is secure: The braid will unravel at the last minute.
- Too much cream on the ends: It can weigh the curls down.
- Removing the rods too soon: The curl needs time to hold.
16. Dutch Braids With a Scarf Wrap
A scarf wrap is the easiest way to make the same braid look fresh. It also gives you a fast fix on days when the roots need a little extra help and you do not want to redo the whole style.
Why It Works:
The scarf adds color, covers rough spots near the part, and protects the braid surface from rubbing. That makes it especially useful when you are traveling or sleeping and want the braid to stay neat between washes.
Key Ingredients:
- 2 Dutch braids or 1 crown braid
- 1 silk or satin scarf, about 20 x 20 inches
- 1 tablespoon mousse
- 2 elastics
- Optional: 4 bobby pins
Quick Steps:
- Braid the hair in your chosen pattern and secure the ends.
- Fold the scarf into a band and tie or wrap it around the base of the braids.
- Let one corner trail if you want a softer look, or tuck everything in for a cleaner line.
- Smooth the front with your hands and set the style under a bonnet at night.
Tools for This Style:
- Satin or silk scarf
- Rat-tail comb
- Bobby pins
- Edge brush
- Small elastics
How to Wear It:
This is useful when you want the braid to feel styled without more manipulation. It pairs well with simple earrings and plain tops because the scarf already carries the color.
Pro Tips for This Style:
- Use satin or silk, not cotton. Cotton grabs the braid surface.
- If the scarf slips, pin it at the nape before tying the knot.
- Choose a scarf color that either matches the outfit or gives you one strong accent.
Variations on This Style:
- Headband Wrap: Fold the scarf into a narrower band.
- Full Tie: Cover more of the crown for a bolder look.
- Bow Finish: Leave the scarf ends tied into a small bow on top or at the side.
Common Mistakes to Avoid with This Style:
- A scarf that is too slippery: It slides off before the day is done.
- Wrapping over damp braids: That traps moisture and can dull the finish.
- Hiding the whole braid line: The braid should still be part of the look.
17. Triangle-Part Dutch Braids
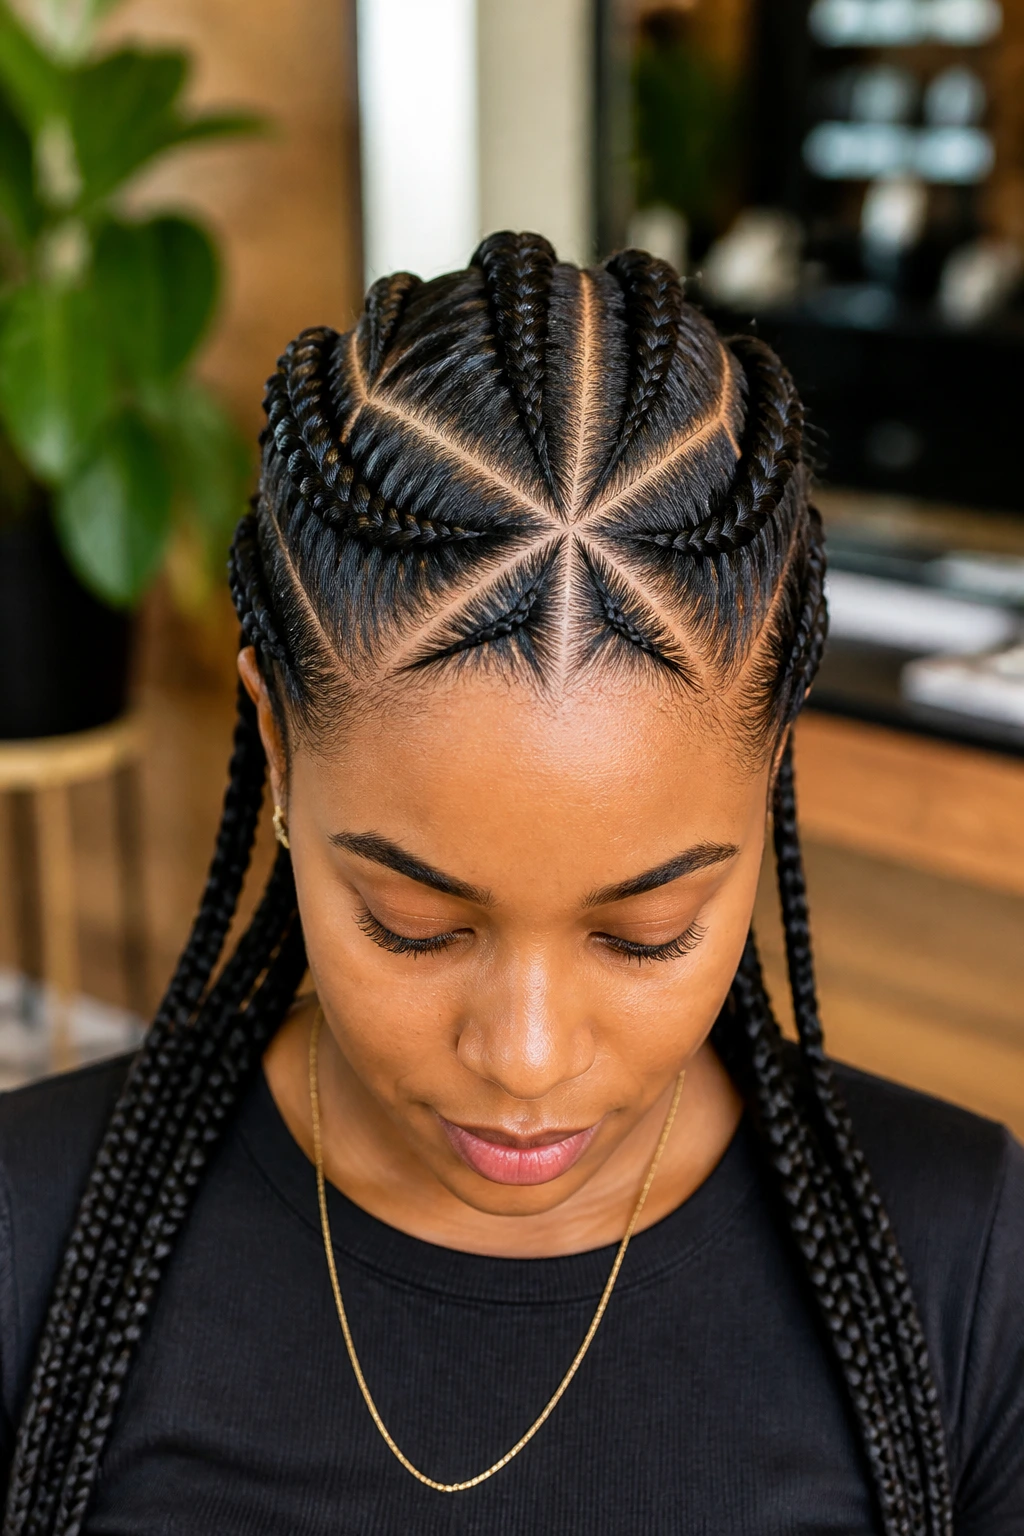
Triangle parts are for the days when the sections themselves should be part of the design. They sharpen the whole look before the braid even starts moving.
Why It Works:
Triangle sections break the head into cleaner visual pieces than standard squares or straight lines. That can make the braids feel more modern and give the scalp pattern a little more personality.
Key Ingredients:
- 1 triangle parting map
- 1 to 2 tablespoons mousse
- 1 tablespoon gel
- 2 to 4 elastics
- Optional: cuffs on the front sections
Quick Steps:
- Map the triangle parts with the pointed end of a comb before you start braiding.
- Clip each triangle away so the lines stay crisp.
- Braid each section underhand with even tension from root to end.
- Smooth the part lines with a thin layer of mousse and let the style set.
Tools for This Style:
- Rat-tail comb
- Sectioning clips
- Small mirror
- Soft brush
- Scarf
How to Wear It:
This style shows better when the part lines are visible, so it likes simple clothing, open collars, and not much else near the face. Let the scalp design do the talking.
Pro Tips for This Style:
- Make each triangle the same size if you want the rows to echo each other.
- Keep the braid tension steady or the part lines will look uneven.
- A thin layer of product is enough; thick buildup hides the geometry.
Variations on This Style:
- Large Triangles: Use bigger parts for a bolder grid.
- Small Triangles: Use tighter sections for a denser scalp pattern.
- Mixed Triangle Rows: Vary the size on purpose if you want an irregular, hand-drawn feel.
Common Mistakes to Avoid with This Style:
- Triangle points that wobble: The pattern reads messy fast.
- Inconsistent braid size: The parts and the braid need to match.
- Too much shine product: It blurs the section lines.
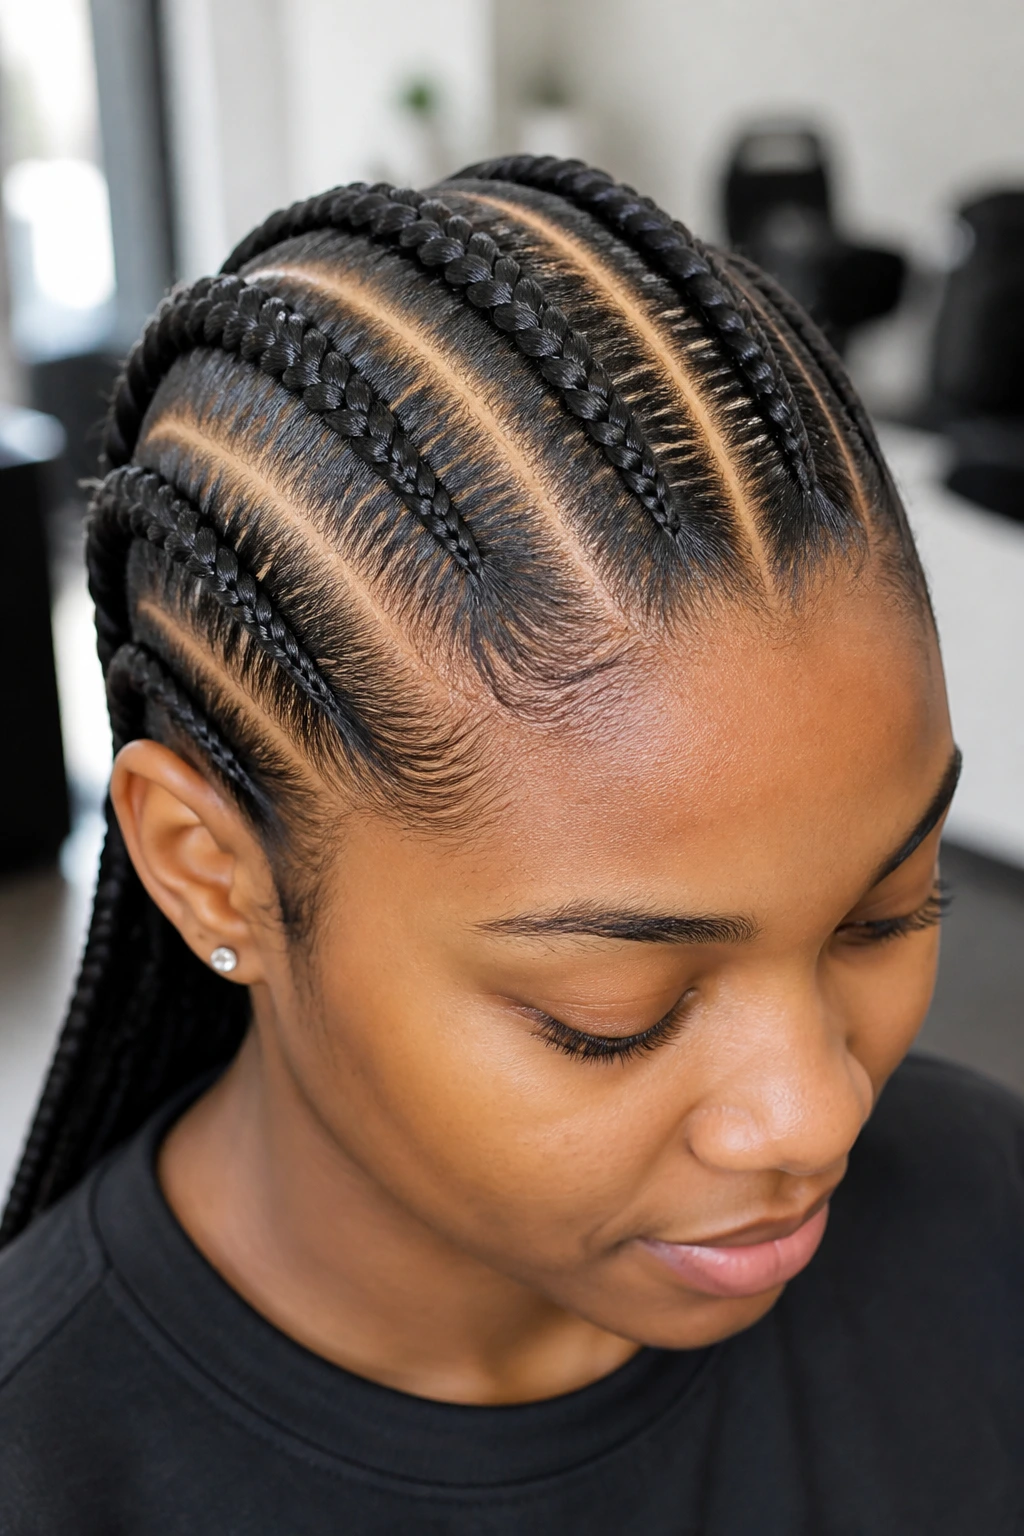
18. Stitch-Detail Dutch Braids
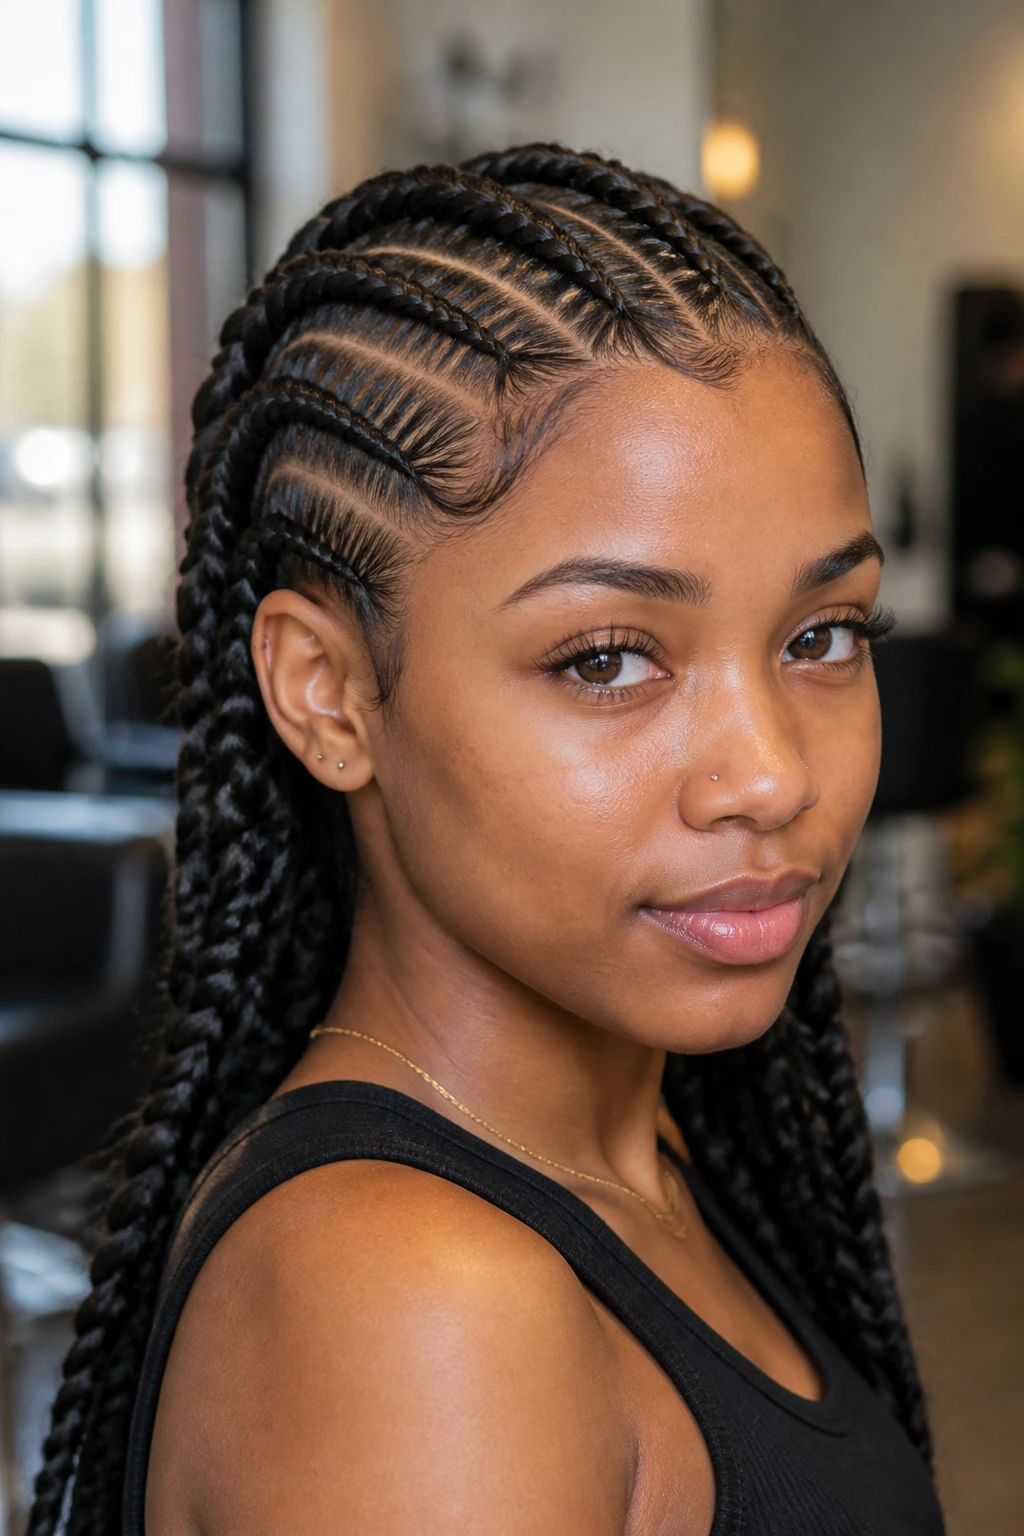
Stitch-detail braids are neat in a way that catches the eye at the scalp. The section lines look almost stitched together, which gives the braid a sharper, more controlled finish.
Why It Works:
The braid is built with regular, small additions of hair, so the surface looks even and intentional. That regularity matters on Black hair because it keeps the braid from ballooning at random points.
Key Ingredients:
- 2 to 4 narrow braid sections
- 1 tablespoon strong-hold gel
- 1 tablespoon mousse
- 4 small elastics
- Optional: braid cuffs for the tail ends
Quick Steps:
- Part the hair into narrow rows and clip each one cleanly.
- Braid underhand with very even additions so the surface stays flat at the root.
- Keep the stitch-like spacing consistent all the way down.
- Finish the ends neatly and smooth the parts with mousse.
Tools for This Style:
- Rat-tail comb
- Clips
- Edge brush
- Small elastics
- Hand mirror
How to Wear It:
This is a good choice when you want the scalp design to be the main feature. It works with sleek outfits, clean makeup, or any look where you want the braid pattern to feel deliberate.
Pro Tips for This Style:
- Slow down near the front hairline so the stitch lines stay tidy.
- Keep product away from the braid body; too much shine softens the detail.
- If one stitch row starts to bulge, release and redo it before moving on.
Variations on This Style:
- Sleek Stitch Rows: Use more gel for a sharper line.
- Soft Stitch Rows: Let a little texture stay in the braid body.
- Stitch-and-Cuff: Add one small cuff to each tail for a clean accent.
Common Mistakes to Avoid with This Style:
- Uneven feed amounts: That breaks the stitch effect.
- Rushing the part lines: The scalp design has to be clean before braiding starts.
- Letting product cake up: Build-up hides the detail.
19. Two Dutch Braids Into One Long Braid
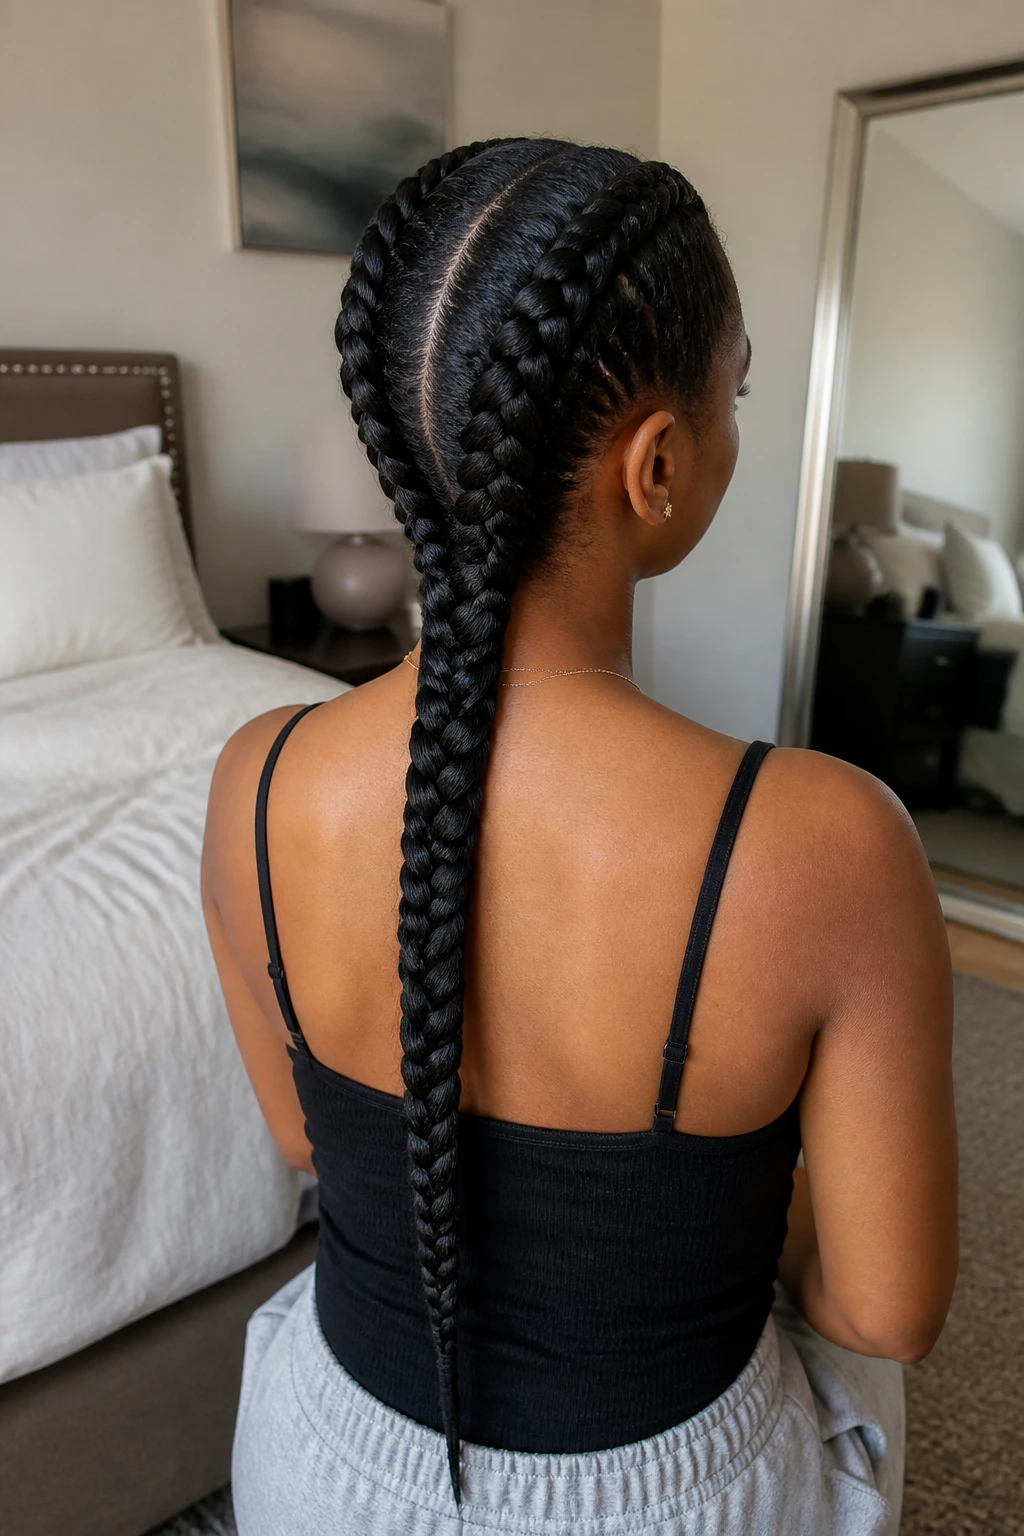
Two braids joining into one long braid feel tidy without going flat. You get the control of two rows up top and the movement of one long tail once the lines merge.
Why It Works:
This style keeps the crown orderly and the back simplified. It also helps if you like the look of long hair but do not want two separate braids hanging near your shoulders all day.
Key Ingredients:
- 2 Dutch braids that meet at the nape
- 1 small elastic at the join
- 1 tablespoon mousse
- 2 bobby pins
- Optional: extension hair for extra length
Quick Steps:
- Braid both sides from the front to the nape.
- Tie the two braid tails together where they meet.
- Continue the joined hair as one long braid down the back.
- Smooth the top with mousse and pin the join flat if needed.
Tools for This Style:
- Rat-tail comb
- Small elastics
- Bobby pins
- Brush
- Satin scarf
How to Wear It:
This is a calm, useful style for days when you want the hair controlled but not heavy. It works well with longer backs on shirts or jackets because the braid sits right down the spine.
Pro Tips for This Style:
- Make the join at the nape, not higher, or the merge looks bulky.
- Keep the two braids even before you join them.
- If the tail feels thin, add a little extension hair before the final braid.
Variations on This Style:
- Low Join: Place the merge lower for a softer shape.
- High Join: Merge closer to the crown for a more lifted profile.
- Wrapped Join: Cover the join point with a small braid wrap or cuff.
Common Mistakes to Avoid with This Style:
- A join that sits lopsided: It shows immediately in photos and mirrors.
- Uneven braid tension before the merge: That creates a twist at the nape.
- Skipping the pin at the join: The merge needs one anchor point.
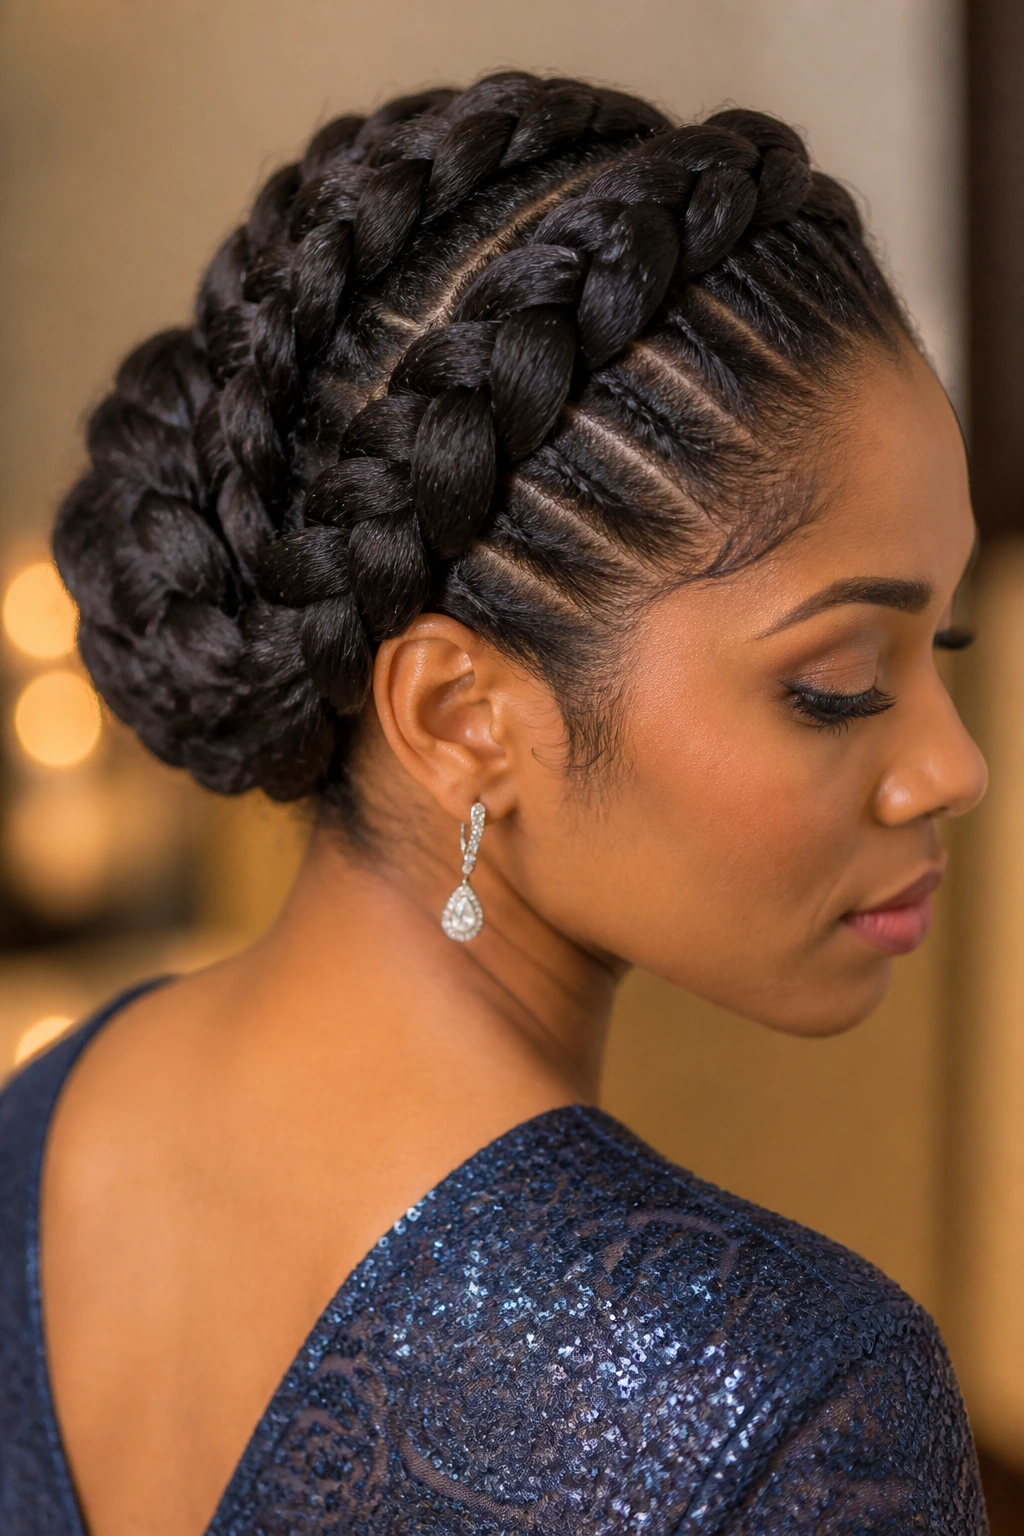
20. Dutch Braided Crown With a Low Knot

A braided crown with a low knot gives you the polish of an updo and the comfort of braids. It is a nice middle ground when you want the hair up but still want the braid shape to read clearly.
Why It Works:
The crown keeps the perimeter controlled, and the knot keeps the ends tucked. That makes the style feel finished from every angle — front, side, and back.
Key Ingredients:
- 1 crown braid path around the head
- 1 low knot or chignon base
- 4 to 8 bobby pins
- 1 tablespoon mousse
- Optional: small decorative pins
Quick Steps:
- Braid around the head in a crown path and stop at the nape.
- Coil the remaining length into a low knot.
- Pin the knot flat and secure the crown so the line flows into the bun.
- Smooth the crown with mousse and wrap it for a few minutes.
Tools for This Style:
- Rat-tail comb
- Bobby pins
- Elastic band
- Small brush
- Scarf
How to Wear It:
This is one of the better choices for dressier settings. It looks calm with a neckline that leaves room for the braid and works especially well if you like a cleaner profile at the back of the head.
Pro Tips for This Style:
- Build the knot low enough that it does not fight the crown braid.
- Pin the knot first, then refine the crown.
- If the braid line is frizzing, smooth the top lightly instead of adding more product at the roots.
Variations on This Style:
- Braided Chignon: Make the knot more compact and tucked.
- Loose Crown: Leave a little softness around the temples.
- Pinned Accent: Add one decorative pin where the crown meets the knot.
Common Mistakes to Avoid with This Style:
- A knot that sits too high: It breaks the crown line.
- Loose crown sections: They pop away from the head fast.
- Over-pinning the same spot: Too many pins can make the head hurt.
21. Side-Swept Single Dutch Braid

One side-swept braid can look calmer than two braids and still hold shape. It is especially useful if you want one strong braid line instead of a pair of rows.
Why It Works:
The braid follows the natural sweep of the head and falls over one shoulder, which keeps the style from feeling overly rigid. It also leaves one side of the face open, which softens the whole look.
Key Ingredients:
- 1 deep side part
- 1 Dutch braid path across the head
- 1 elastic
- 1 tablespoon mousse
- Optional: extension hair for length
Quick Steps:
- Create a deep side part and start braiding near the front hairline on the heavier side.
- Bring the braid diagonally across the head and continue toward the opposite shoulder.
- Secure the tail and pull it forward over the shoulder.
- Smooth the part and crown with mousse and set the braid in place.
Tools for This Style:
- Rat-tail comb
- Clip
- Soft brush
- Elastic
- Scarf
How to Wear It:
This is a nice match for off-shoulder tops, jackets, or a shirt with a clean neckline. Because the braid lives on one side, earrings become part of the styling instead of fighting the braid.
Pro Tips for This Style:
- Keep the first section close to the front edge so the braid does not slide back.
- If the braid feels like it wants to twist, loosen the front slightly and rebalance the sweep.
- A little shoulder-length movement looks better than a braid that is pulled stiff.
Variations on This Style:
- Long Side Sweep: Add length with extensions.
- Loose Side Sweep: Let a few soft pieces stay out around the front.
- Wrapped Shoulder Braid: Add a small wrap or cuff near the tail.
Common Mistakes to Avoid with This Style:
- A braid that starts too far back: It loses the side-swept look.
- Pulling too hard across the forehead: That strains the front.
- Ignoring the shoulder side: The braid should land naturally, not fight the body.
22. Dutch Braids With Gold Cuffs
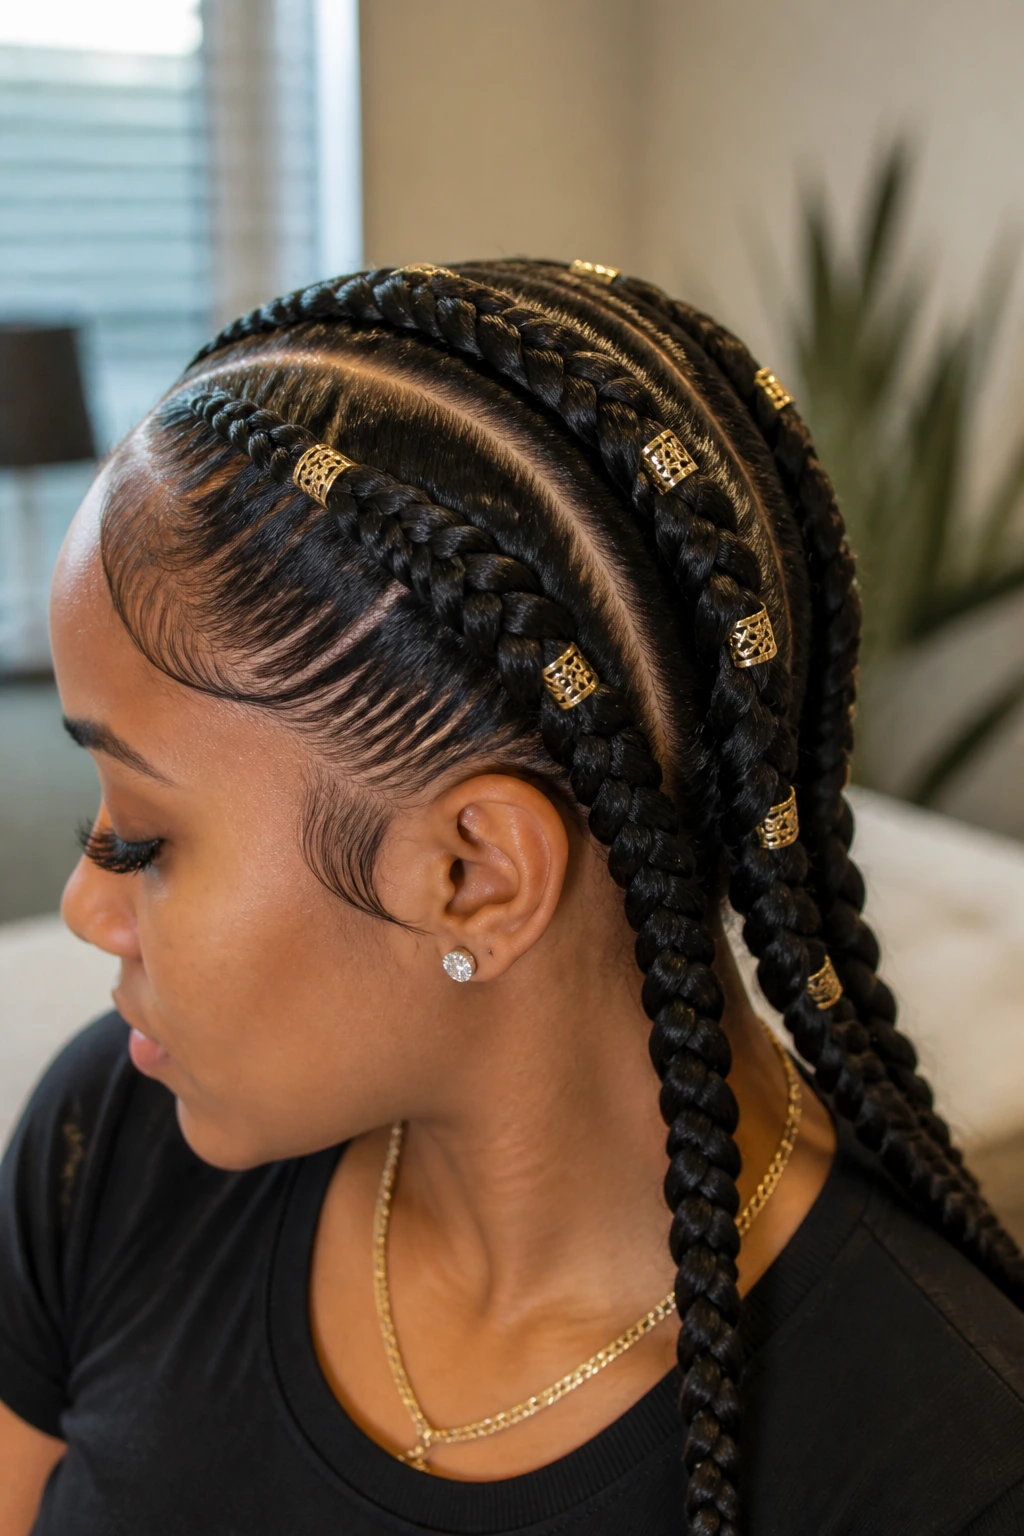
Gold cuffs are tiny, but they change the whole finish. A simple pair of Dutch braids can look dressed up fast once a few metal accents catch the light along the length.
Why It Works:
The cuffs break up the braid visually, which is helpful if you want a basic style to feel less plain without changing the braid pattern itself. They also let you dress up a low-manipulation braid without adding extra hair or extra tension.
Key Ingredients:
- 2 Dutch braids or 4 slim rows
- 8 to 12 gold cuffs
- 2 small elastics
- 1 tablespoon mousse
- Optional: tiny braid rings
Quick Steps:
- Braid the hair in your chosen pattern and secure the ends.
- Place the cuffs along the braid where the shape looks most even.
- Space the cuffs out so the braid does not look crowded.
- Smooth the roots with mousse and set the style under a scarf.
Tools for This Style:
- Rat-tail comb
- Cuff tool or fingertips
- Small elastics
- Satin scarf
- Edge brush
How to Wear It:
This is one of the easiest ways to move a braid from casual to polished. It works with plain outfits, because the cuffs give just enough shine to stand out.
Pro Tips for This Style:
- Use fewer cuffs than you think you need. A few good placements beat a crowded braid.
- Put cuffs where the braid surface is most even.
- If the cuff slips, close it gently rather than squeezing the braid.
Variations on This Style:
- Mixed Metal Cuffs: Combine gold and silver if you want a less matched look.
- Front-Only Cuffs: Keep all the accents near the face.
- Cuff Cluster Ends: Place two cuffs near the tail for a stronger finish.
Common Mistakes to Avoid with This Style:
- Too many cuffs: The braid loses shape under the metal.
- Cuffs on frizzy sections: They slip faster.
- Placing them before the braid is set: Let the braid settle first.
23. Dutch Braids on Short Natural Hair
Short natural hair does not have to sit out the Dutch braid family. You just have to be honest about the length and shape the braid around what the hair can actually do.
Why It Works:
Smaller sections and a closer braid pattern let shorter hair stay anchored instead of popping loose. On a tighter cut, the braid can still create a clean raised line even if the tail is shorter than you planned.
Key Ingredients:
- Hair stretched to at least 3 to 4 inches, if possible
- 1 tablespoon gel
- 1 tablespoon mousse
- 4 to 6 small elastics
- Optional: 1 pack of added hair for the ends
Quick Steps:
- Stretch and detangle the hair so the sections are easier to catch.
- Make smaller braid rows than you would on longer hair.
- Braid close to the scalp and keep the first few passes firm but gentle.
- If the ends are too short, tuck them with a mini elastic or add a little extension hair.
Tools for This Style:
- Rat-tail comb
- Clips
- Small elastics
- Edge brush
- Spray bottle for light misting
How to Wear It:
This is a smart everyday option when you want shape without pretending the hair is longer than it is. It looks tidy with simple clothes and feels especially good when the braid is matched to the hair’s real length.
Pro Tips for This Style:
- Stretch first. It makes everything easier.
- Use smaller sections than you think you need.
- Keep the ends secure; short hair slips fastest at the tail.
Variations on This Style:
- Mini Dutch Rows: Use several tiny braids instead of two large ones.
- Added-End Length: Attach a small amount of braiding hair to finish the tail.
- Short Crown Braid: Turn the style into a halo if the back length is limited.
Common Mistakes to Avoid with This Style:
- Forcing a huge section: It will not hold on short hair.
- Skipping stretch time: Shrinkage makes the braid uneven.
- Leaving the ends loose: Short ends pop free almost immediately.
24. Dutch Braids With Mini Twists at the Ends
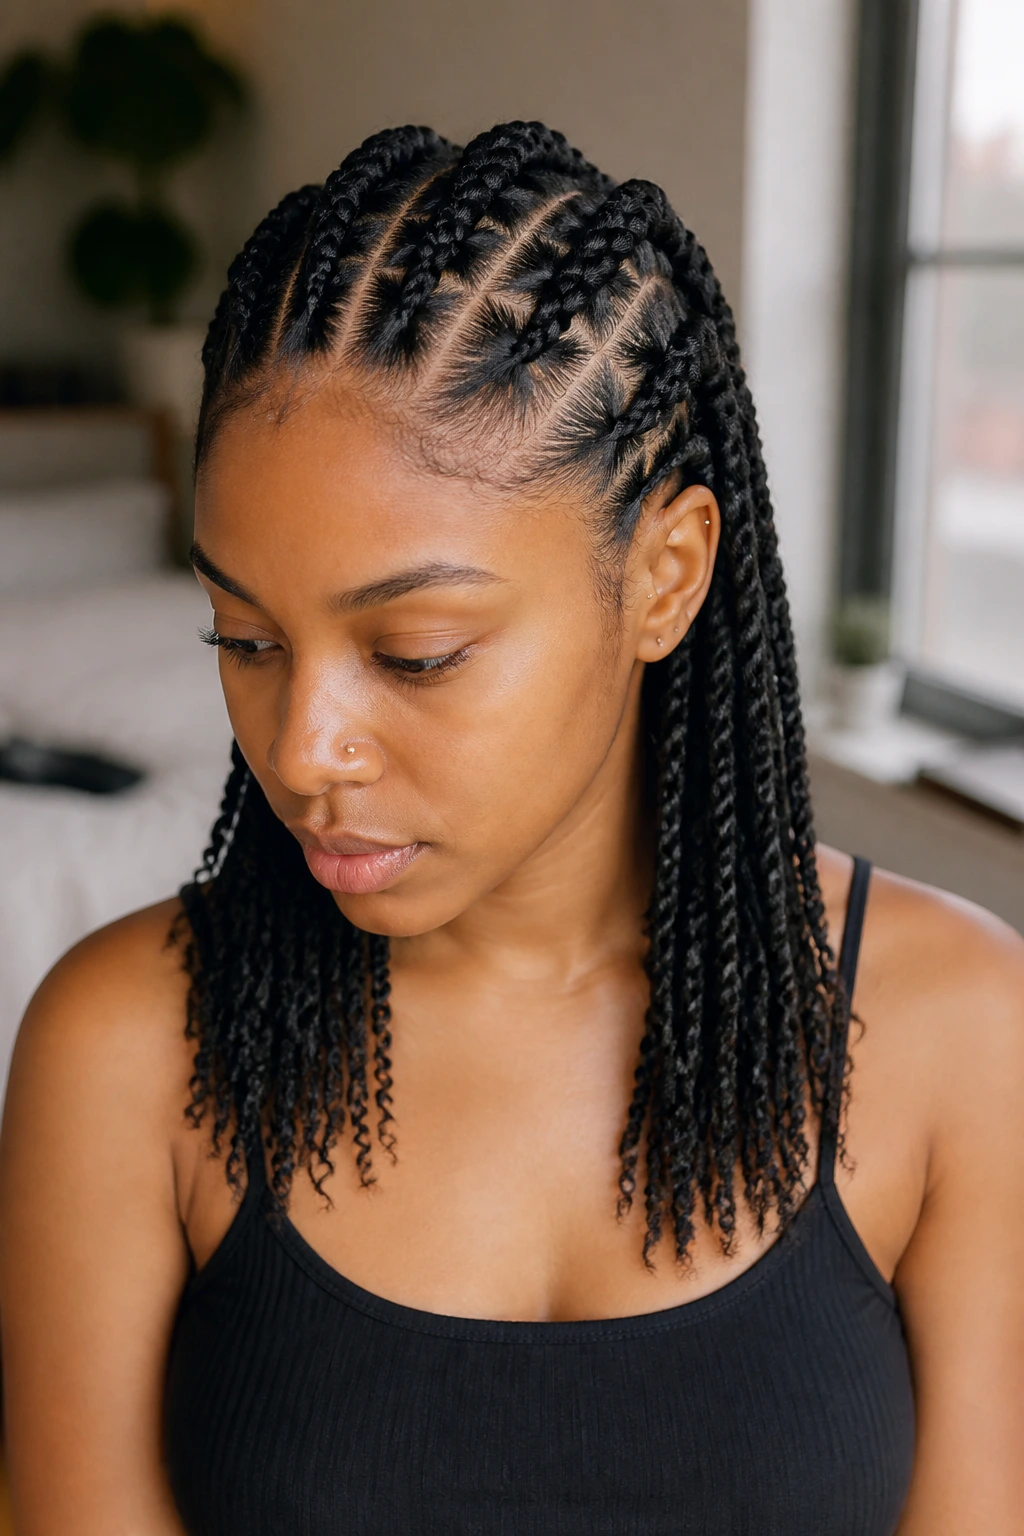
Mini twists at the ends are a smart way to lighten the last few inches. They keep the braid from feeling too heavy at the tips and give fragile ends a softer finish.
Why It Works:
The braid does the control work up top, while the twist finish reduces bulk at the very end. That matters if your ends are dry, thin, or prone to fraying against clothing.
Key Ingredients:
- 2 Dutch braids
- 1 tablespoon mousse
- 2 small elastics
- Optional: curl cream or twist cream for the last few inches
- Optional: 4 bobby pins if the style is pinned up
Quick Steps:
- Braid each section down until only a few inches remain.
- Split the remaining hair into two strands and twist to the ends.
- Seal the twists with a small elastic if needed.
- Smooth the roots with mousse and let the style set before touching it.
Tools for This Style:
- Rat-tail comb
- Small elastics
- Sectioning clips
- Satin scarf
- Edge brush
How to Wear It:
This finish feels softer than a straight braid tail and works well when you want a little texture at the ends without full curls or beads. It can be casual or dressy depending on how tight the root braid is.
Pro Tips for This Style:
- Twist lightly; overtwisting makes the ends look stiff.
- Keep the transition from braid to twist smooth so it does not bulge.
- This is a good finish for brittle ends because it reduces friction.
Variations on This Style:
- Twist-and-Cuff Ends: Add a small cuff where the twist begins.
- Loose Twists: Leave the twists softer for a less structured finish.
- Pinned Twist Updo: Pin the twisted ends upward for a compact look.
Common Mistakes to Avoid with This Style:
- Switching to twists too early: The braid loses its shape.
- Twists that are too tight: They look wiry and can snap.
- Forgetting to seal the tips: The ends will fray.
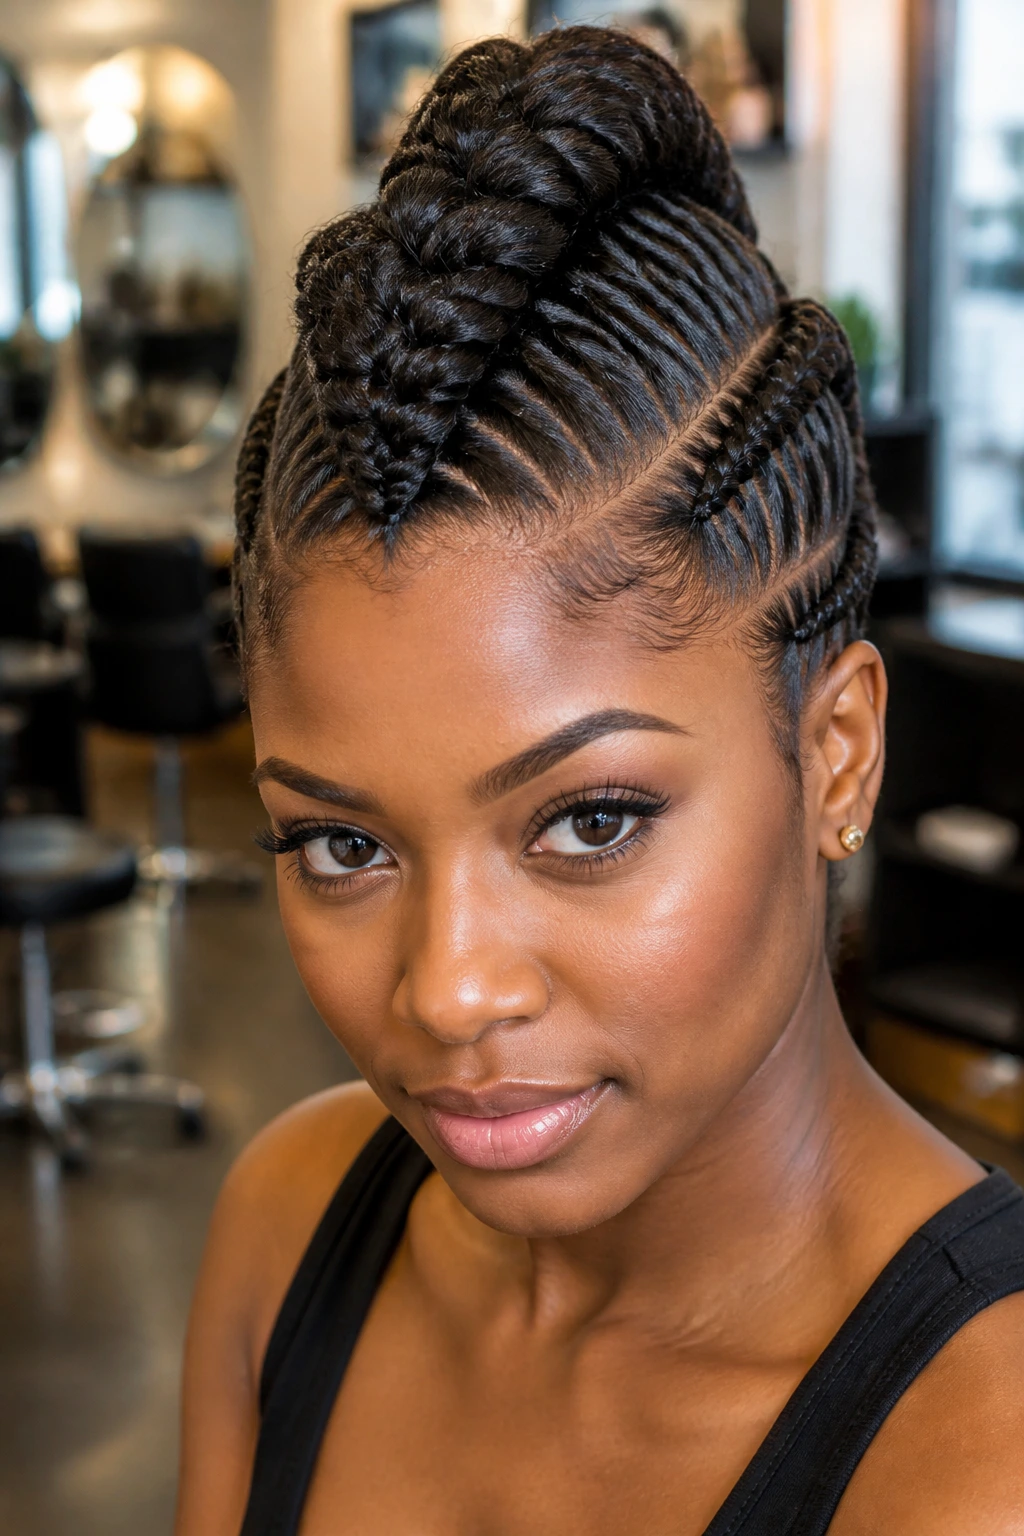
25. Dressy Dutch Braided Updo
A dressy Dutch braided updo is what I’d choose when the outfit needs a hairline with some structure. It looks polished, keeps the ends hidden, and still feels like braids instead of a stiff formal bun.
Why It Works:
The braid pattern creates a built-in frame, and the updo turns that frame into a compact finish. It is one of the cleanest ways to wear Dutch braids when you want the hair out of the way but still want texture at the scalp.
Key Ingredients:
- 2 Dutch braids or 1 wraparound braid
- 6 to 8 bobby pins
- 1 elastic
- 1 tablespoon mousse
- Optional: shine spray or a few decorative pins
Quick Steps:
- Braid the hair toward the back or around the head, depending on the shape you want.
- Tuck the braid tails into a low bun, roll, or folded knot.
- Pin the updo from the inside out so the pins do not show.
- Smooth the surface lightly and set the whole style under a scarf for a few minutes.
Tools for This Style:
- Rat-tail comb
- Bobby pins
- Elastic band
- Small brush
- Satin scarf
How to Wear It:
This suits dinners, ceremonies, photos, and any moment where you want the hair to look more intentional. It pairs well with earrings and necklines that leave the braid shape visible.
Pro Tips for This Style:
- Anchor the bun or knot first, then refine the braid line.
- Use pins in a crisscross pattern so the shape holds.
- Keep the shine product light; too much will flatten the braid detail.
Variations on This Style:
- Low Chignon: Tuck the tails into a soft knot at the nape.
- Side-Set Updo: Shift the updo slightly to one side for a calmer profile.
- Pinned Accent Finish: Add one or two small decorative pins near the crown.
Common Mistakes to Avoid with This Style:
- A bun that sits too high: It fights the braid frame.
- Visible pins everywhere: That makes the style look unfinished.
- Too much smoothing product: It can erase the braid texture you wanted.
Why Dutch Braids Hold Their Shape on Natural Hair
A braid that stays neat for five days starts before the first cross. The sectioning, the moisture level, and the tension all matter more than the finished picture in the mirror.
The braid sits on top, not flat inside
That underhand cross is the whole reason Dutch braids feel a little bolder than regular braids. The braid rises above the surface, which gives coily hair shape instead of flattening it into the scalp. On Black hair, that usually means the braid reads more like a line of rope than a line of string.
Tension should feel firm, not harsh
Snug is useful. Pain is not. When the braid sits close to the scalp without dragging at the edges, it lasts longer and feels better at the end of the day. I would rather see a braid with a tiny bit of softness near the temples than one that looks sharp for six hours and then starts to sting.
Protective only works when the hair is actually prepared
Dry, tangled hair does not suddenly become protected because you braided it. A light leave-in, good detangling, and a sensible stretch on wash day make the braid easier to form and easier to take down later. If you need heat, use the lowest setting that gets the job done. If you do not need heat, even better.
Essential Tools for Clean Parts and Smooth Braids
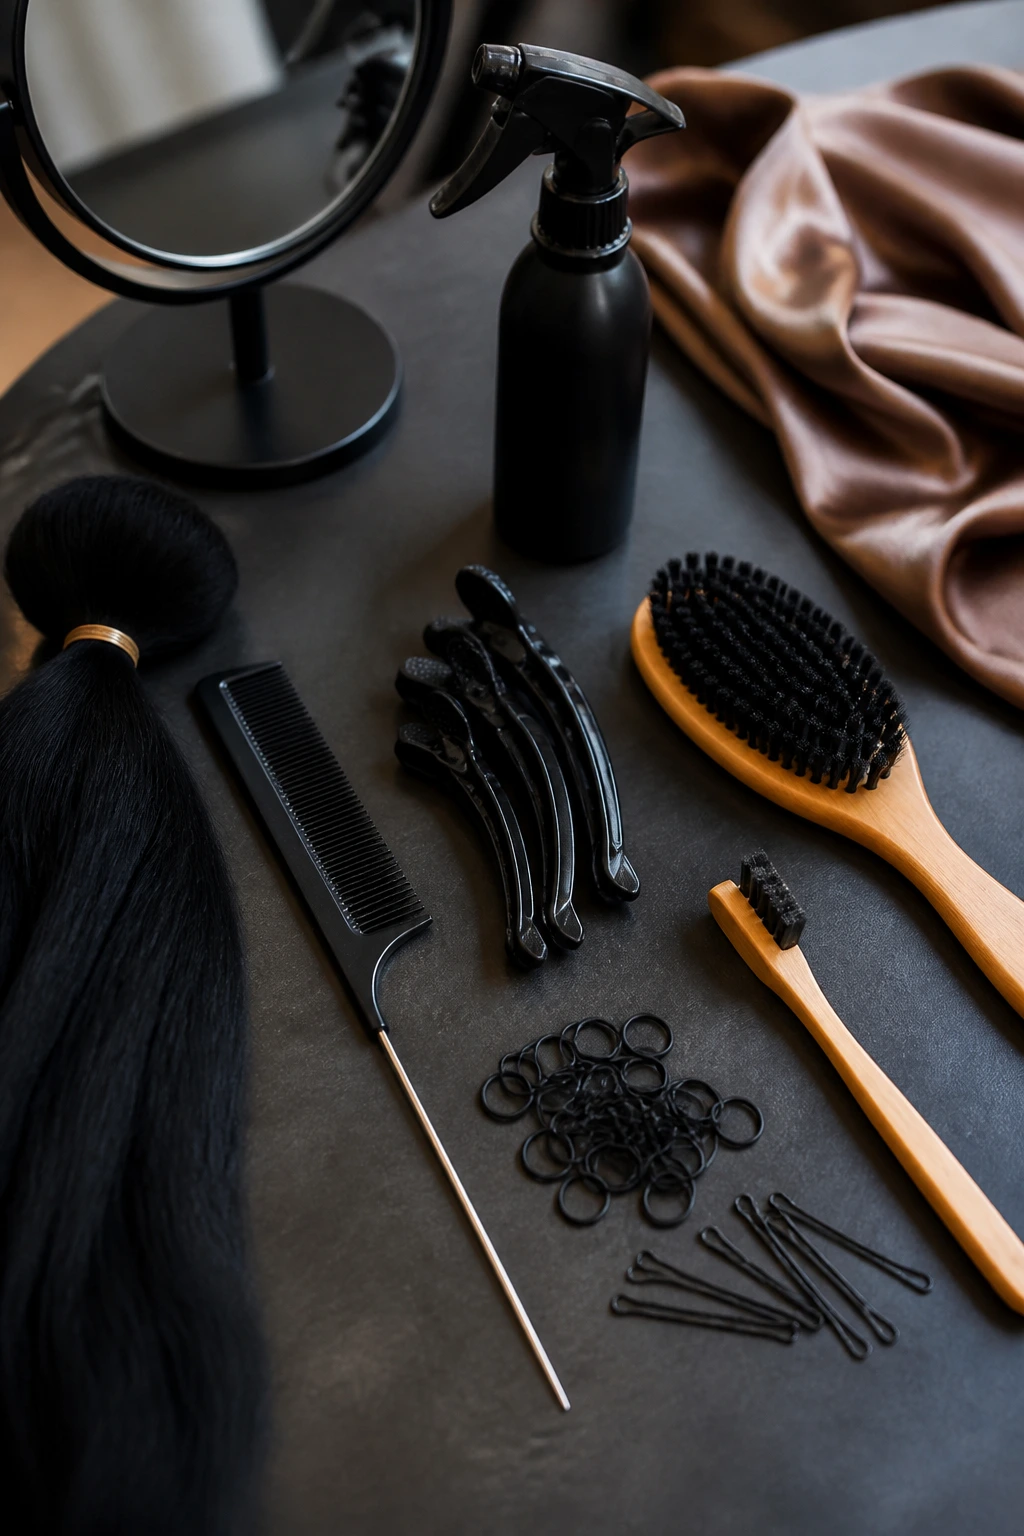
- Rat-tail comb: The pointed tail draws clean parts and helps you keep the braid rows even.
- Sectioning clips: These keep the rest of the hair out of the way while you braid one section at a time.
- Soft brush: Good for smoothing the surface before the braid starts.
- Edge brush: Useful for the hairline if you want a gentle, finished frame.
- Spray bottle: A light mist helps with detangling, but do not soak the hair.
- Small elastics: Snag-free bands hold the ends without chewing them up.
- Bobby pins: Needed for buns, crowns, wrapped styles, and tucked finishes.
- Satin scarf or bonnet: Keeps the braid from rubbing, linting, and puffing overnight.
- Hand mirror: Handy for checking the back so the parting does not drift.
- Optional braiding hair: Useful for longer, fuller feed-in styles or shorter hair that needs extra length.
What to Buy for Less Frizz and Better Hold

Start with a light leave-in conditioner that sinks into the hair instead of sitting on top of it. Heavy creams can make the braid slippery, and slippery braids start to puff sooner because the sections do not grip each other well.
For hold, a water-based mousse or soft gel is usually enough. I prefer mousse on the braid body and a thinner gel along the parts and hairline. Thick edge control can work, but only in a thin line. A big scoop of it turns into residue, and residue is the fastest way to make a fresh braid look tired.
If you plan to use added hair, buy pre-stretched braiding hair in a shade that matches your root color. That matters more than people think. A good match keeps the feed-in smooth and saves you from a sharp color jump at the base. For cuffs, beads, and scarves, pick the accent after the braid plan is set, not the other way around.
How to Wear the Finished Braids
Presentation: Keep the part lines crisp enough to read from a normal conversation distance, but do not chase a glassy, shellacked finish. A little texture makes the braid look like hair, not molded plastic.
Outfit Pairing: Twin braids sit well with crew necks and hoops. Crown braids like open necklines. Buns and tucked styles work best with jackets, collars, and anything that would otherwise catch loose ends.
Occasion Fit: Plain twin braids or four slim rows suit errands, workouts, and travel. Beads, cuffs, and scarf wraps read more dressed up. Updos and halo styles belong to events where you want the head and shoulders to look clean from every angle.
Longevity: Simpler styles usually stay neat for 3 to 7 days on natural hair if you wrap them nightly. Extension-heavy or tucked updo versions can last longer, but the scalp still needs to feel comfortable. If the style starts hurting, it is done. No braid is worth a sore hairline.
Small Changes That Make the Style Feel New

Part Size: Smaller parts give you more rows and more control, while jumbo parts make the braid feel softer and faster to install. I reach for smaller sections when I need longer wear and bigger sections when the week is already packed.
End Shape: You can tuck the ends into a bun, leave them braided, curl them, twist them, or add beads. That last inch changes the mood more than people expect.
Hairline Finish: A clean center part feels calm. A side part feels softer. Zig-zags and triangles bring more design into the scalp pattern, which is handy when the braid itself is simple.
Accessories: Gold cuffs, a silk scarf, or a few beads are enough. You do not need all three at once. Honestly, the braid looks better when one accent gets to speak.
Texture Balance: More mousse gives a sleeker surface. Less product gives a softer, more lived-in braid that can survive a little wind without turning fuzzy. I prefer the second one on most days.
Night Care, Refreshing, and How Long They Last

The first night matters more than the third. Once the braids are in, let them set for several hours before you start pushing them around, tying them down, or piling them under a hat. A satin scarf or bonnet keeps the surface smooth and cuts down on lint at the roots.
For the next few days, use your fingers before you use more product. If the braid line looks dry, mist your hands lightly with water or a diluted leave-in mix and smooth the surface. Do not spray the braid until it drips; wet braids puff strangely as they dry, and the roots can lose shape.
Most simple Dutch braid styles on natural hair stay neat for about 3 to 7 days if you sleep on them properly. Styles with extensions or tucked buns can stretch beyond that if the scalp stays comfortable and the nape is not grinding against collars. If you notice buildup at the roots, clean it with a damp cloth or a cotton swab instead of scrubbing the braid body.
Take the style down when the hairline feels sore, the parts have started to collect lint, or the roots begin to mat together. Waiting too long usually makes the takedown slower, not prettier.
Common Mistakes That Make Dutch Braids Puff Up Too Fast

- Starting on tangled hair: If the hair is not detangled first, the braid catches unevenly and the surface starts to look lumpy. Fix it with a slow detangling pass and a little stretch before you braid.
- Using too much heavy product: Thick grease or too much edge control leaves residue that flakes and breaks the braid surface apart. Use a light leave-in, a modest layer of mousse, and only a thin line of gel where you need it.
- Braiding too tight at the hairline: Tightness can make the front look sharp for an hour and sore for the rest of the week. Keep the tension firm enough to hold, but loose enough that your temples do not ache.
- Skipping night wrap care: Cotton pillowcases and open sleeping rub the braid apart fast. A satin scarf or bonnet keeps the style in better shape and cuts down on friction.
- Leaving styles in too long: Once the roots start matting and the nape gets rough, the braid stops being low-maintenance. Taking it down on time saves the ends.
Questions People Ask Before Braiding Natural Hair
Can I Dutch braid 4c hair without blow-drying it?
Yes, but the braid usually goes easier if the hair is stretched first, even if that stretch comes from bands, twists, or a low-heat dry. Very dense shrinkage can make the braid hard to guide and easier to puff.
How tight should Dutch braids feel?
They should feel snug, like the braid has shape and support, not like it is pulling at the skin. If the scalp hurts, the braid is too tight, plain and simple.
How long do Dutch braids last on Black hair?
Simple braids on natural hair usually look neat for 3 to 7 days. Feed-in styles, buns, and tucked updos can last longer if the scalp stays comfortable and you cover them at night.
Can I add extensions to Dutch braids?
Yes. Feed them in slowly so the root stays smooth, and match the added hair to your natural shade as closely as you can. Small additions look cleaner than giant chunks.
Are Dutch braids better than cornrows for a protective style?
They are just different. Dutch braids sit raised on top of the hair, while cornrows lie flatter against the scalp. The better choice is the one that matches your length, your tension tolerance, and how long you want to wear the style.
What if my parts are not perfect?
A slight wobble is not a disaster. Side parts, zig-zags, and triangle parts hide small errors well, and once the braid is built, most people notice the line, not the tiny parting mistake.
Can I work out with Dutch braids?
Yes, especially with pigtails, low buns, or four slim rows. Wrap the style after sweating so the surface does not puff from friction and salt.
How do I take Dutch braids out without breakage?
Use your fingers first, then a light oil or detangling spray if the braid resists. Start from the ends and work upward. Pulling from the root is how strands snap.
Braids That Still Feel Like Hair

The best Dutch braids on Black hair are the ones that make sense the next morning, not just in the mirror. If the part is clean, the tension is kind, and the ends are tucked in a way that suits your day, the style earns its keep.
Start with the version that matches your hands and your schedule. A simple twin braid can be enough. So can a crown, a bun, or a beaded pigtail set when you want a little more personality without giving up the protective feel.
Pick the one that fits your week, and let the braid do the work.