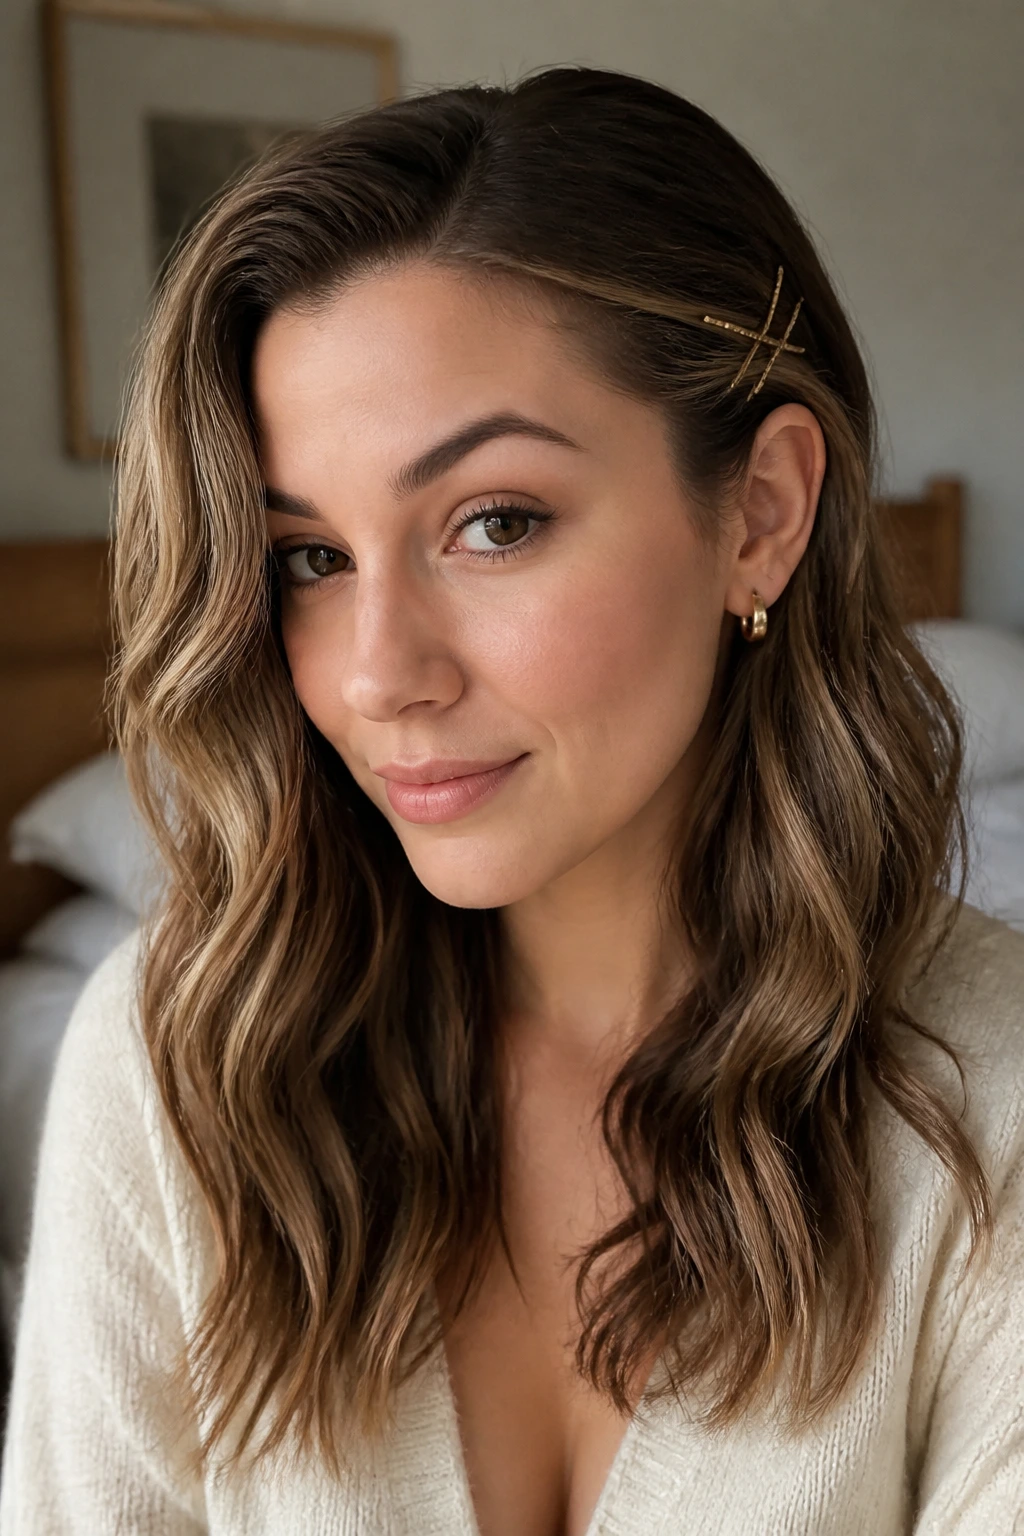
Lowlights give you more to work with on a rushed morning. A flat, one-tone ponytail can look like you gave up; a ponytail threaded with mocha, chestnut, or caramel depth reads as deliberate even when you spent five minutes on it. If you need bday hair that survives coffee, keys, and a late train, that extra shadow is doing quiet work.
The trick is choosing styles that let the darker ribbons show instead of smearing them into a single block of color. Tight slick-backs can look sharp, but they compress the dimension. Twists, bends, braids, and a little separation give the light somewhere to land, and that’s where lowlights earn their keep.
I like styles that look neat from the front and a little more interesting once you turn your head. That’s the sweet spot for birthday mornings: quick, forgiving, and not so overworked that you spend ten minutes fixing the back in a bathroom mirror. Start with the simplest shape and let the color do the heavy lifting.
Why These Styles Work Better With Dimensional Hair
Built for speed: Most of these looks need one elastic, a handful of pins, or one accessory, which matters when your alarm has already won the argument.
They show off lowlights instead of hiding them: Twists, loops, braids, and loose bends create little pockets of shadow, so the darker pieces look intentional rather than buried.
They forgive second-day hair: A touch of grit gives bobby pins and claws something to grab, and lowlighted hair usually looks better with a bit of lived-in texture anyway.
They travel well from casual to dressed up: The same low ponytail can look office-clean in the morning and birthday-ready with a ribbon or a pair of earrings later.
They work across textures: Straight, wavy, curly, fine, and thick hair all have a version here. The shape changes; the idea stays the same.
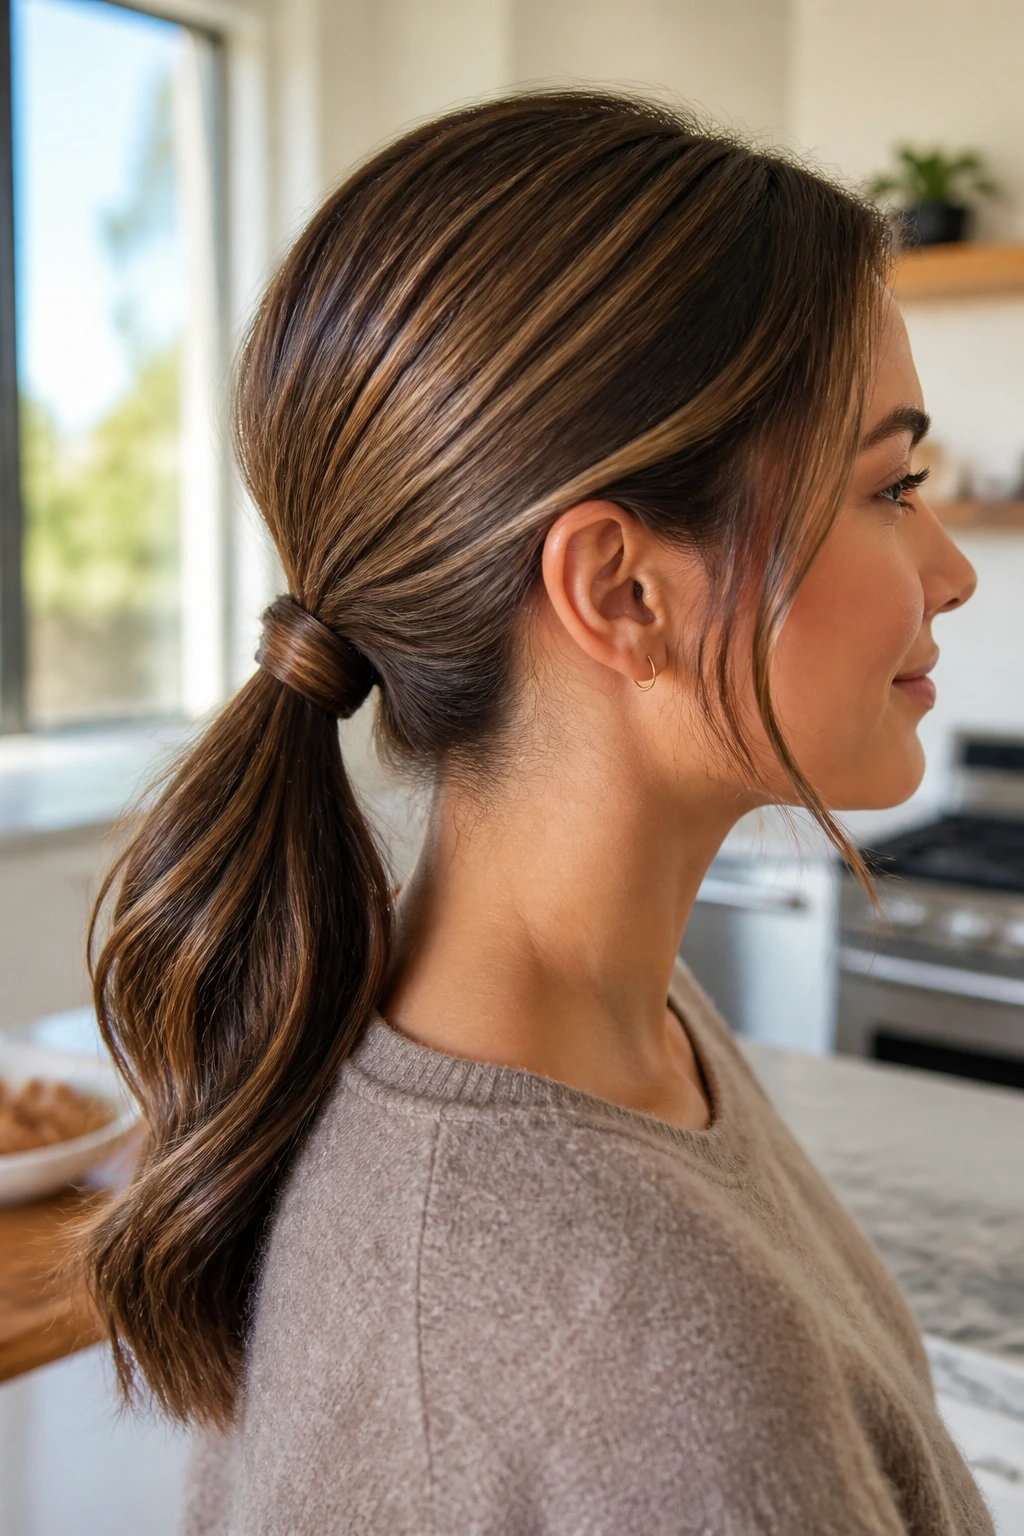
1. Wrapped-Base Low Ponytail
A low ponytail is the quiet overachiever of quick hair. On hair with lowlights, it lets the darker strands gather together so the depth reads like a ribbon running through the tail, not a flat sheet of color. Add a wrapped base and it stops looking like an afterthought.
I like this one best when the morning is rude. Smooth the crown, gather the hair at the nape, secure it with a snag-free elastic, then wrap a small strand around the band and pin it underneath. Keep the ends slightly bent with a quick pass of a flat iron if they need shape.
Best for: Straight to wavy hair that needs polish in under 5 minutes.
Why the lowlights show: The tail hangs as one continuous line, so the darker pieces peek through every time the hair moves.
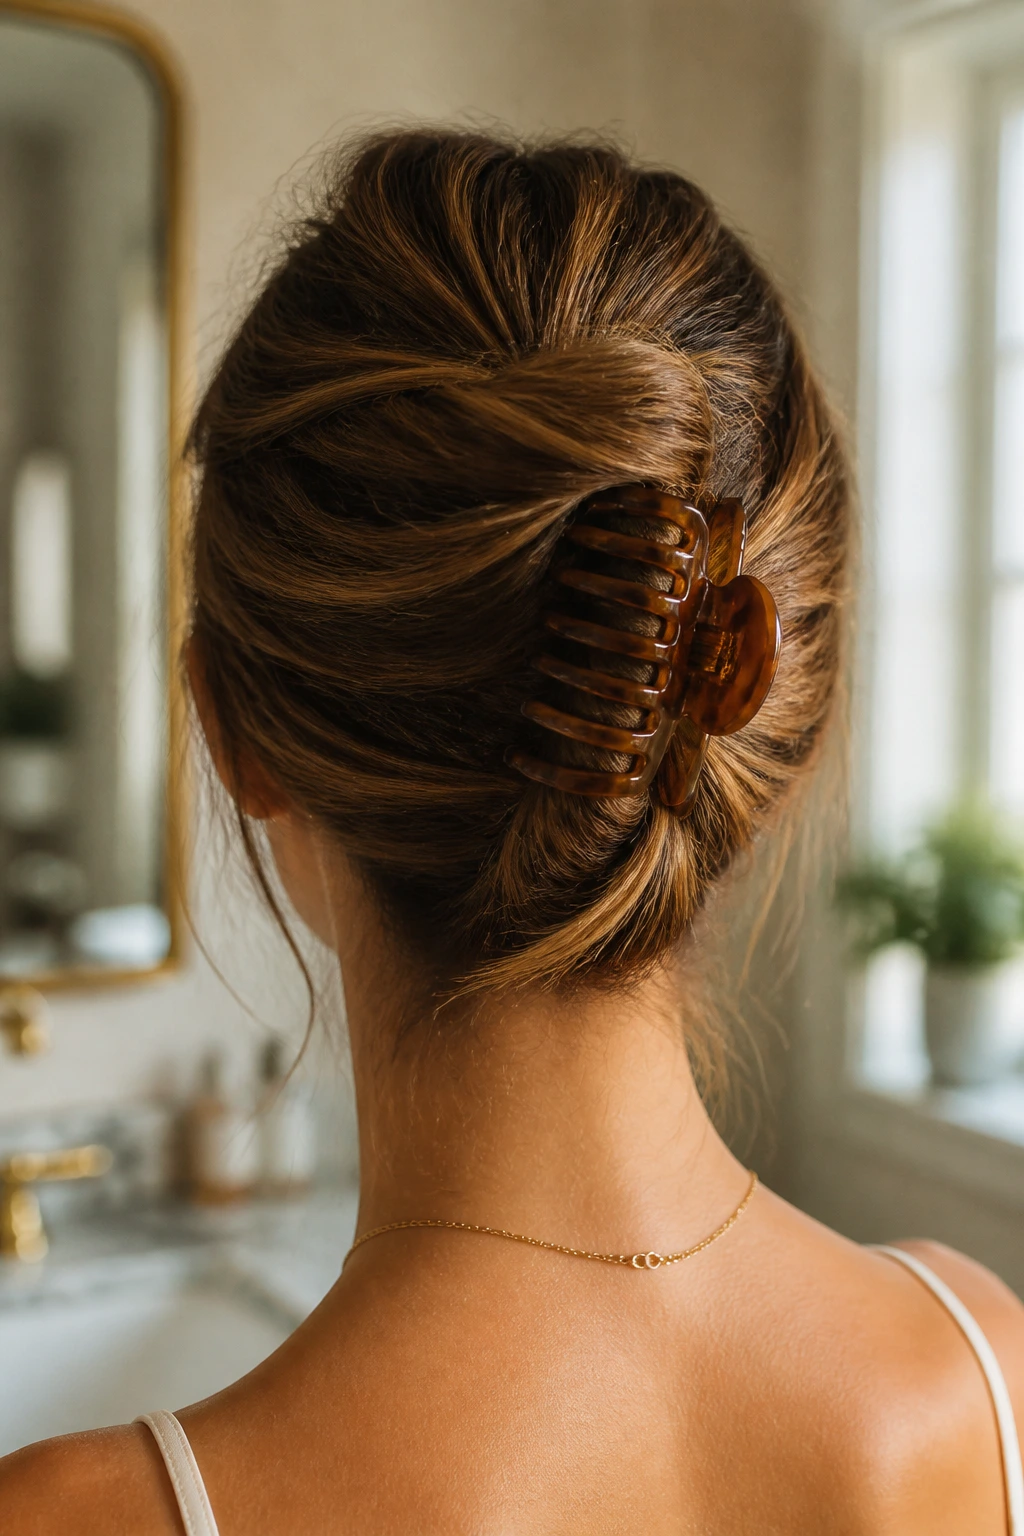
2. Claw Clip French Twist
A claw clip French twist is the style I reach for when I want the lowlights to stay visible around the shell of the twist. It takes less time than finding the matching sock, and it does not require perfect sections.
Twist the length upward, fold the ends under, and clip the whole thing low at the back of the head. Leave a few ends loose if your hair is thick; that little bit of spill keeps the style from looking stiff. A medium claw clip usually holds medium-length hair better than the tiny decorative ones.
Shortcut note: If the twist feels slippery, mist the roots with dry shampoo first.
Color payoff: The folded layers create narrow shadows, so ash brown or caramel lowlights look deeper instead of hidden.
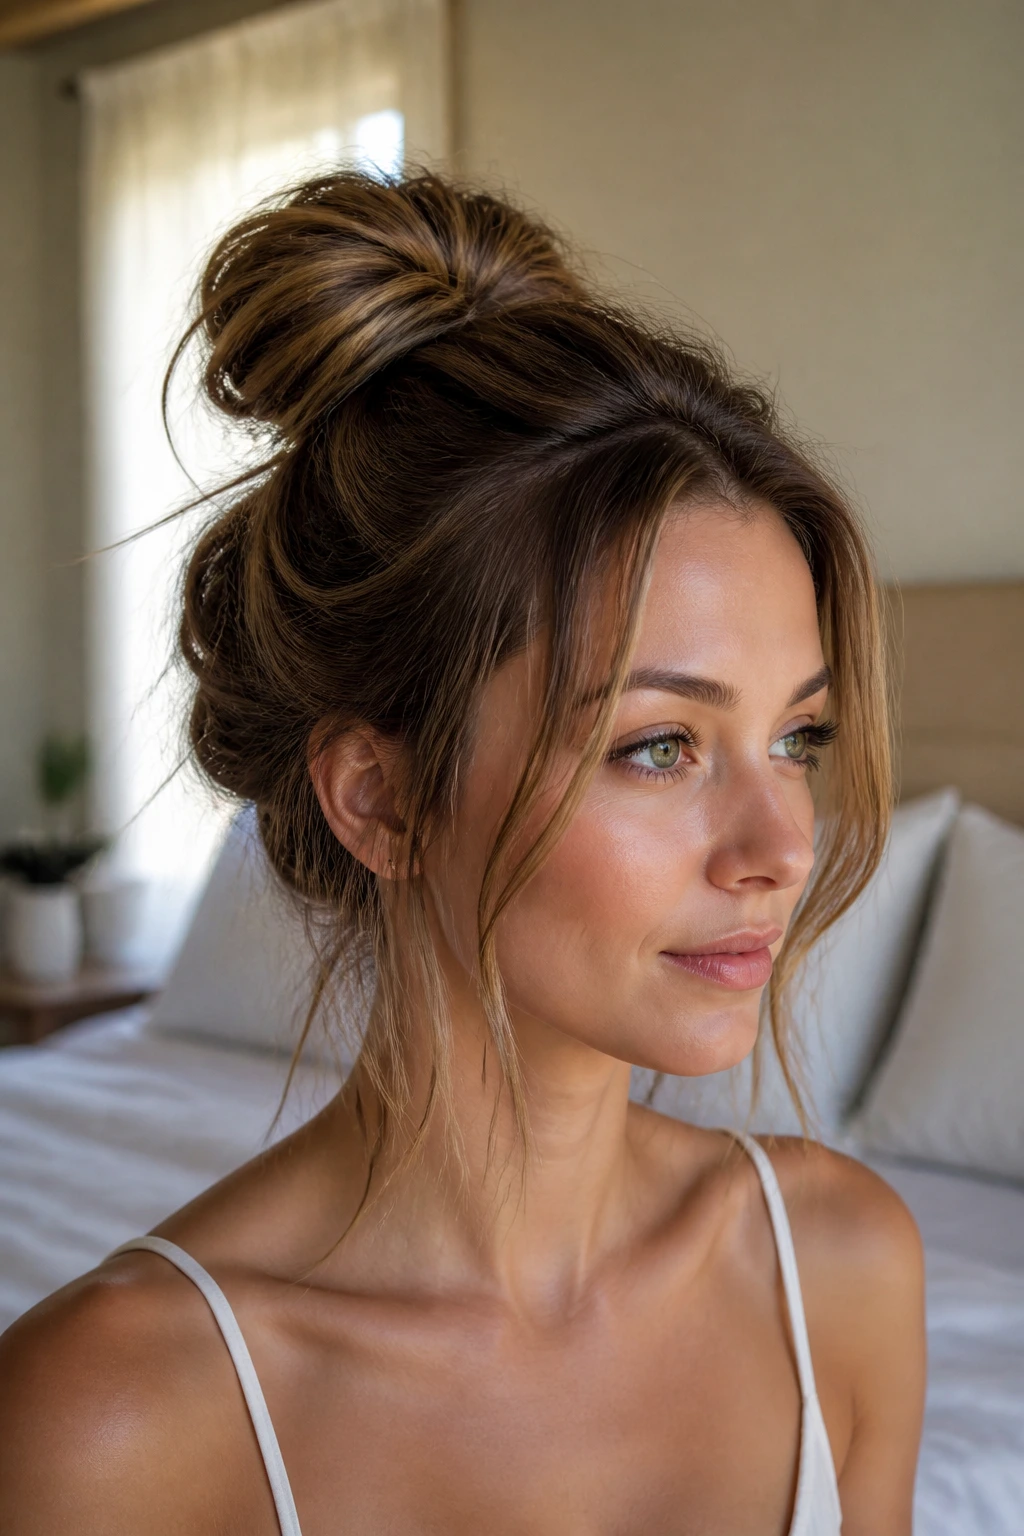
3. Messy Bun with Face-Framing Pieces
This is the style for people who do not want to look like they tried very hard, but also do not want to look forgotten by the mirror. A messy bun gives lowlights movement around the crown and ends, especially when you leave two slim pieces out near the cheekbones.
Pull the hair into a loose ponytail, twist it once or twice, and pin it into a knot without smoothing every strand flat. Tug the bun a little wider with your fingers. Then free two face-framing pieces and bend them with a curling iron if they’re stubborn.
The thing that matters here is restraint. Too much product turns the bun into a helmet. A light mist of texture spray is enough.
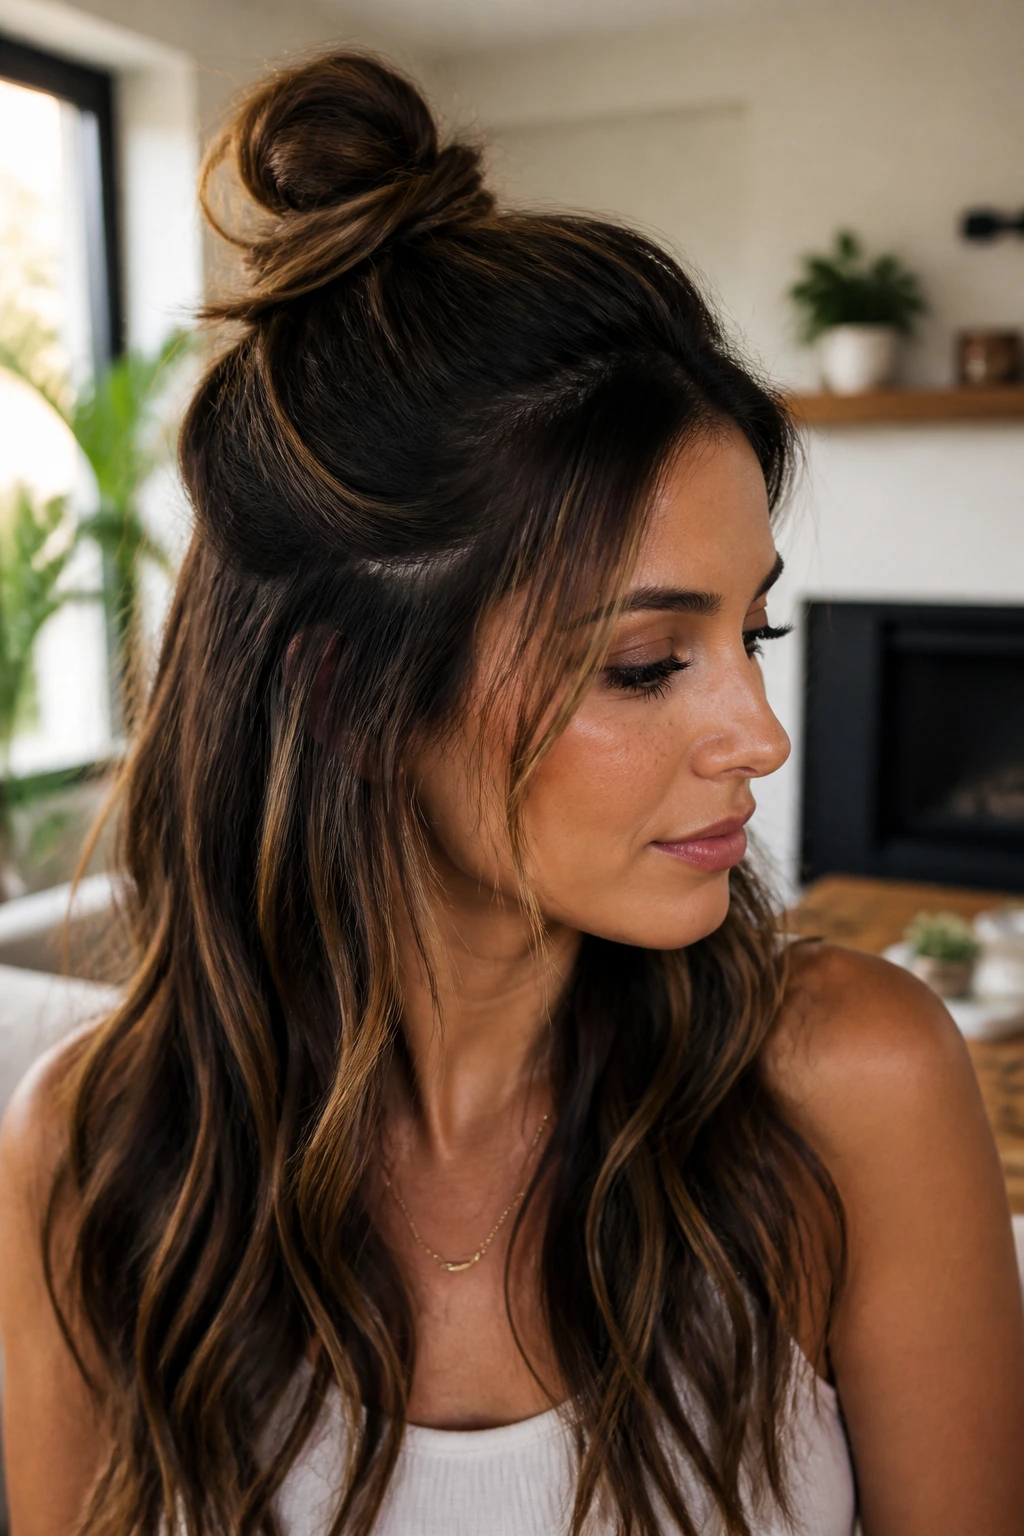
4. Half-Up Knot
A half-up knot is a small style with a useful trick: it keeps the crown off your face while leaving the lowlights in the lower half to do their glossy, dimensional work. The top knot gives the shape, and the loose lengths give the color.
Take the top third of your hair, twist it once, and secure it into a compact knot at the back of the head. Don’t pull it too tight. The lower section should keep some movement, because that’s what makes the lowlights read as depth rather than streaks.
If your hair is fine, backcomb the crown just once before you tie it. Tiny lift. Big difference.
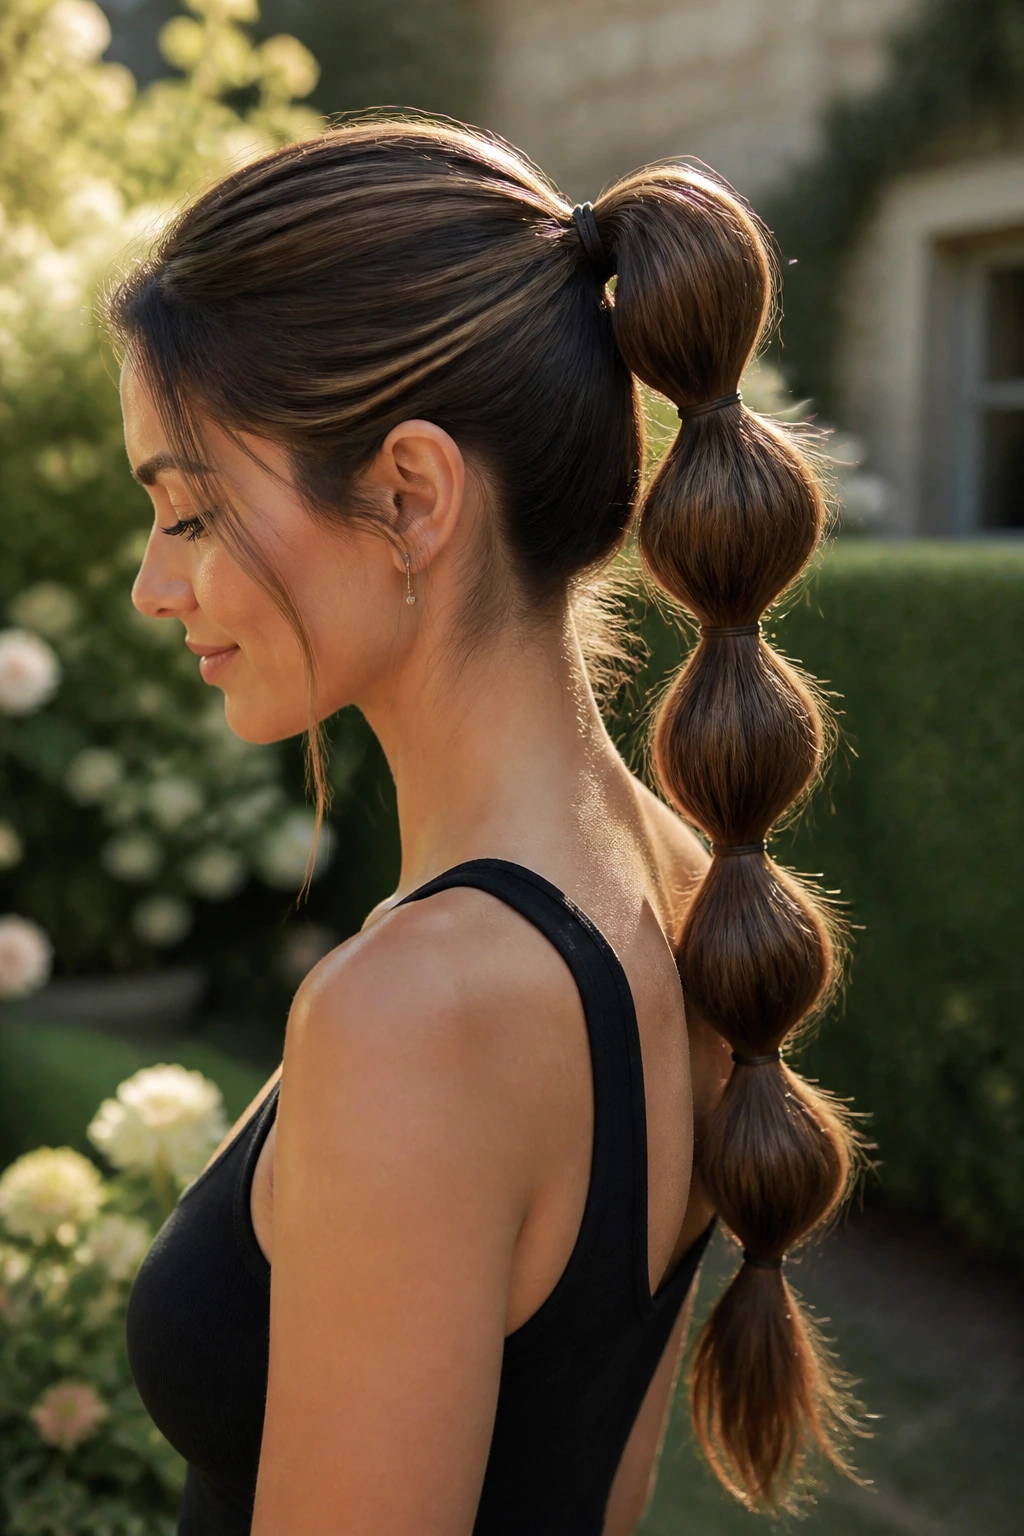
5. Bubble Ponytail
Bubble ponytails look more complicated than they are, which is exactly why they belong in a morning rush. They’re also one of the best ways to show off lowlights, because every bubble creates a little band of shadow and shine.
Make a regular ponytail first. Then add elastics every 1½ to 2 inches down the length, pulling each section outward until it puffs into a rounded bubble. Use clear elastics or ones that match your root color; a loud band breaks the line.
The style works especially well on medium to long hair. On very long hair, you may need four or five sections. That’s fine. The whole point is that it looks intentional with very little actual fuss.
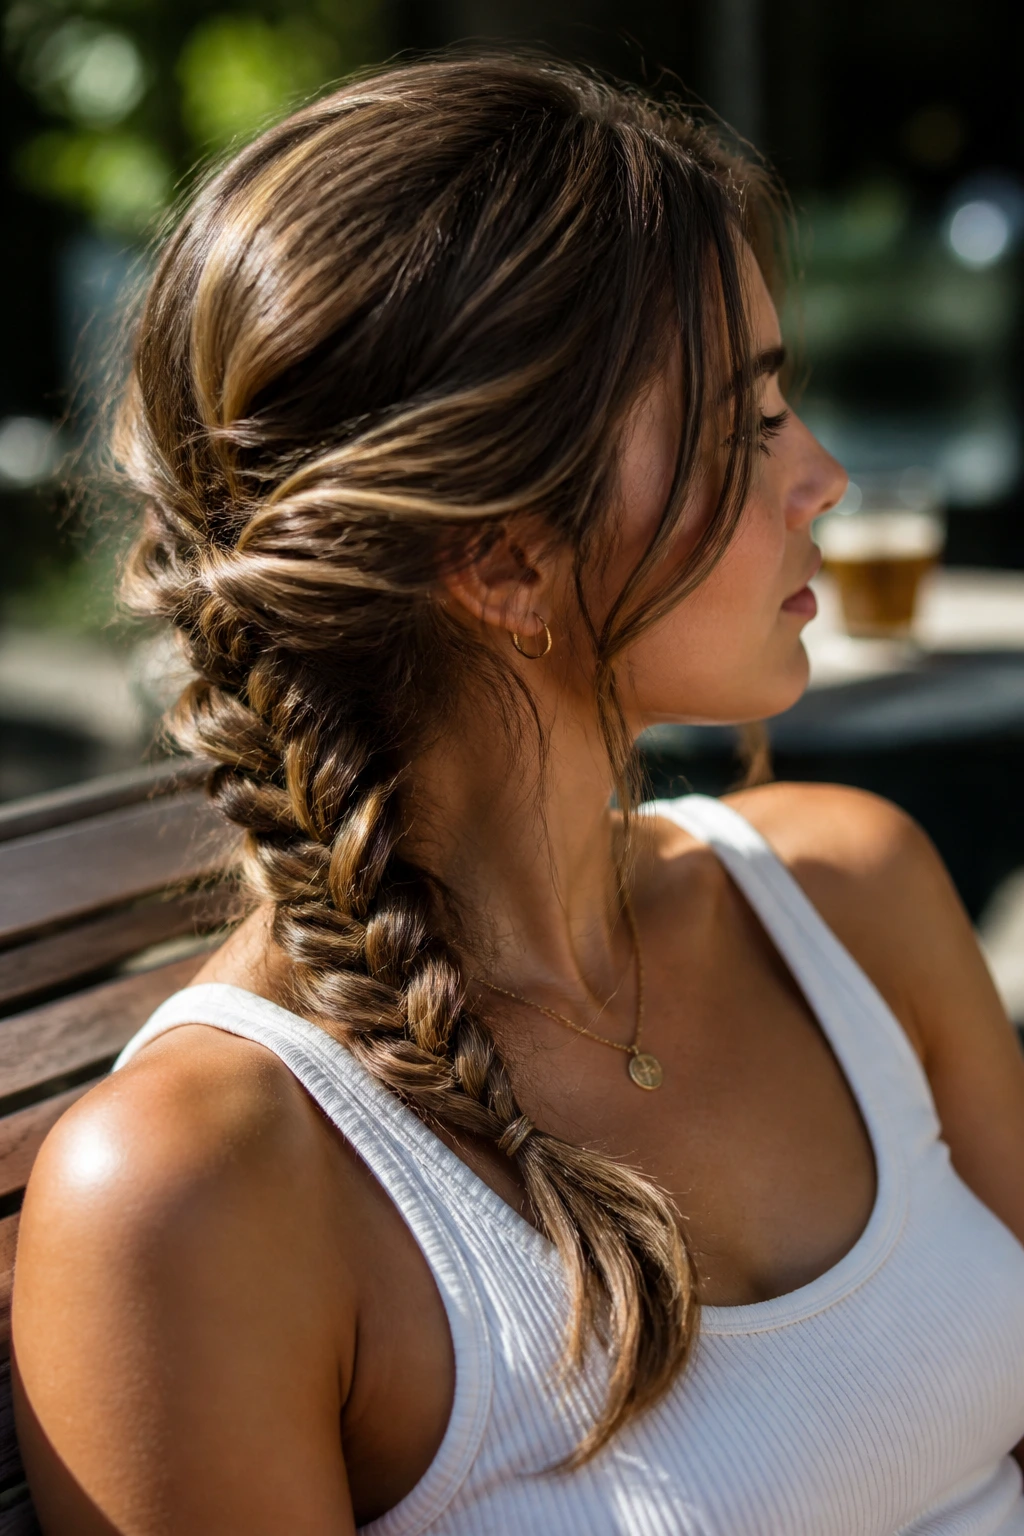
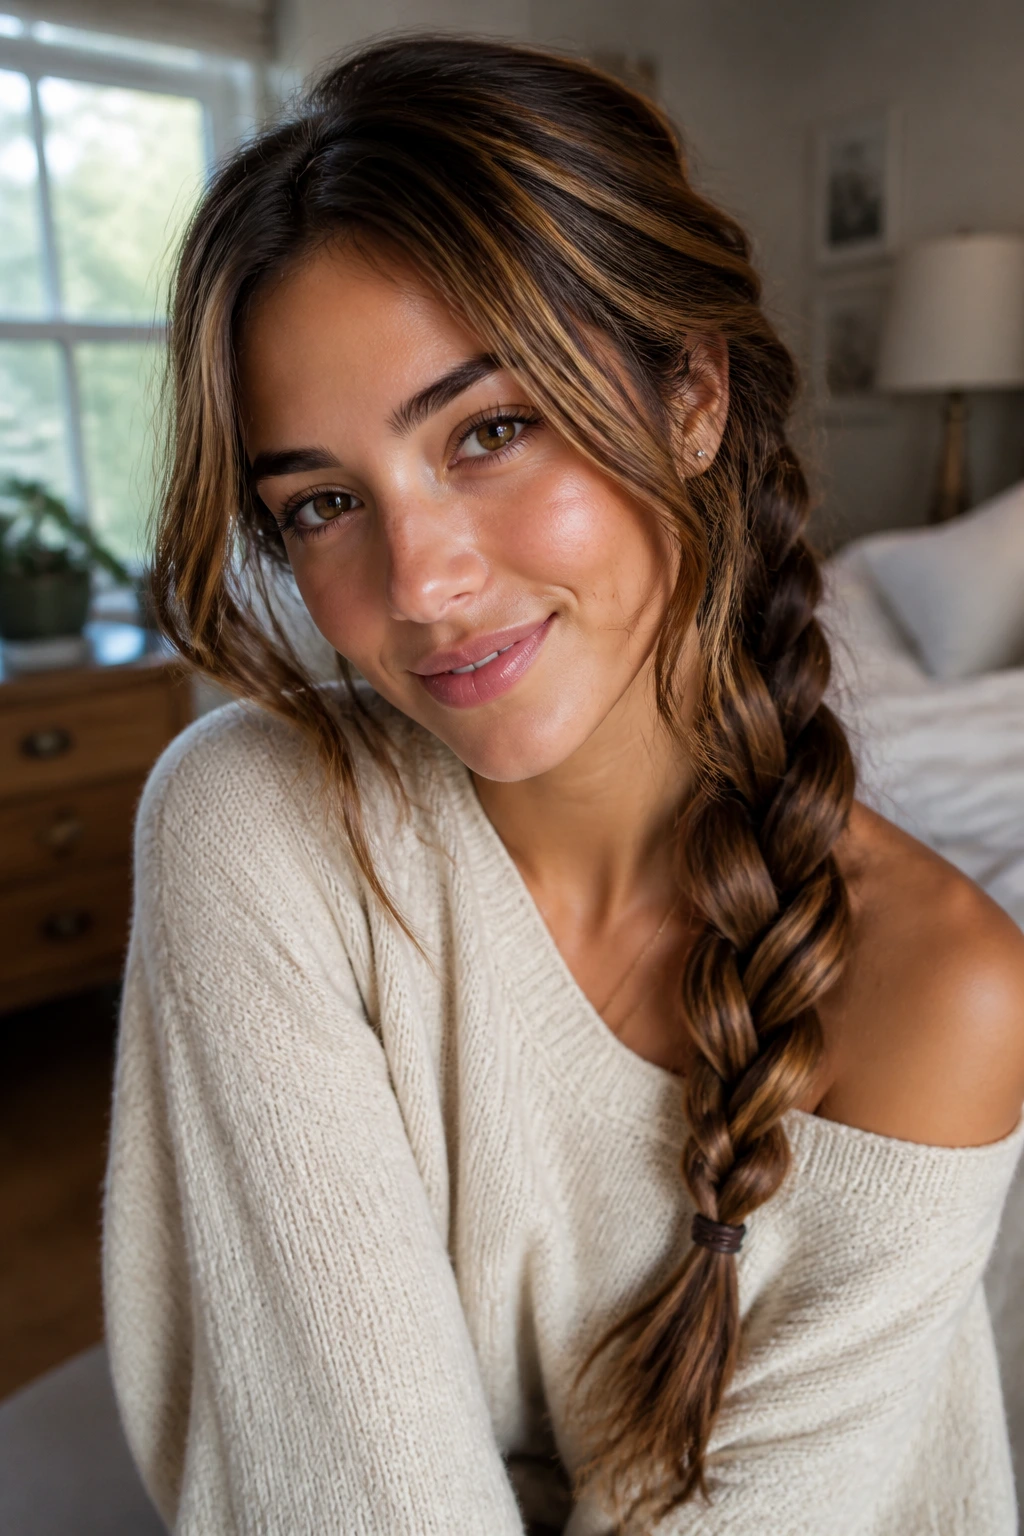
6. Loose Side Braid
A side braid is one of those styles that looks softer when the color has dimension. Lowlights show beautifully in the weave, because each cross-over moves a darker strand next to a lighter one.
Sweep the hair to one side and braid loosely from just below the ear. Keep the outer pieces a little fluffy, not tight and rope-like. If your hair is freshly washed, add texture spray first so the braid doesn’t slide apart.
I prefer a side braid over a center braid on lowlighted hair. The angle makes the contrast feel more natural, almost like the color was placed there on purpose for the braid.
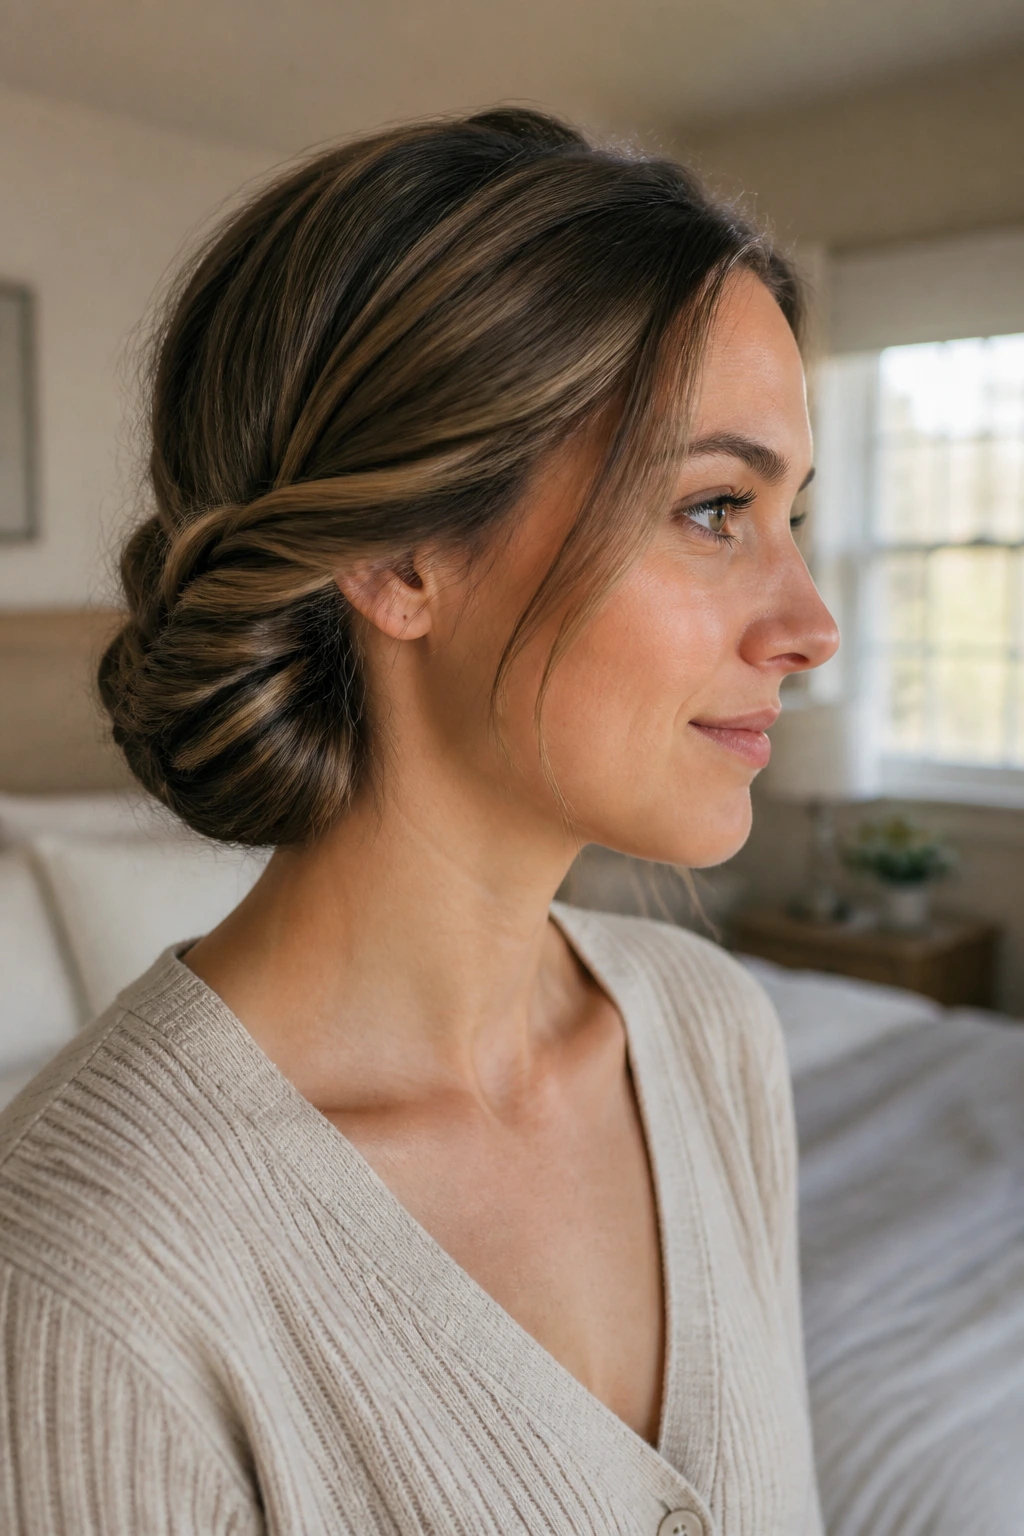
7. Low Twisted Chignon
A low twisted chignon is a good answer when you want birthday polish without the drama of a full updo. It sits at the nape, which is where lowlights tend to look rich instead of stripy.
Split the ponytail into two sections, twist them together, and coil the twist into a compact bun. Pin through the center, then add one or two U-pins around the edges if the shape feels loose. The result should look soft, not engineered.
This one is especially nice if your lowlights are chocolate or mushroom brown. The twists stack the color in little arcs, and that makes the style look more expensive than it really is.
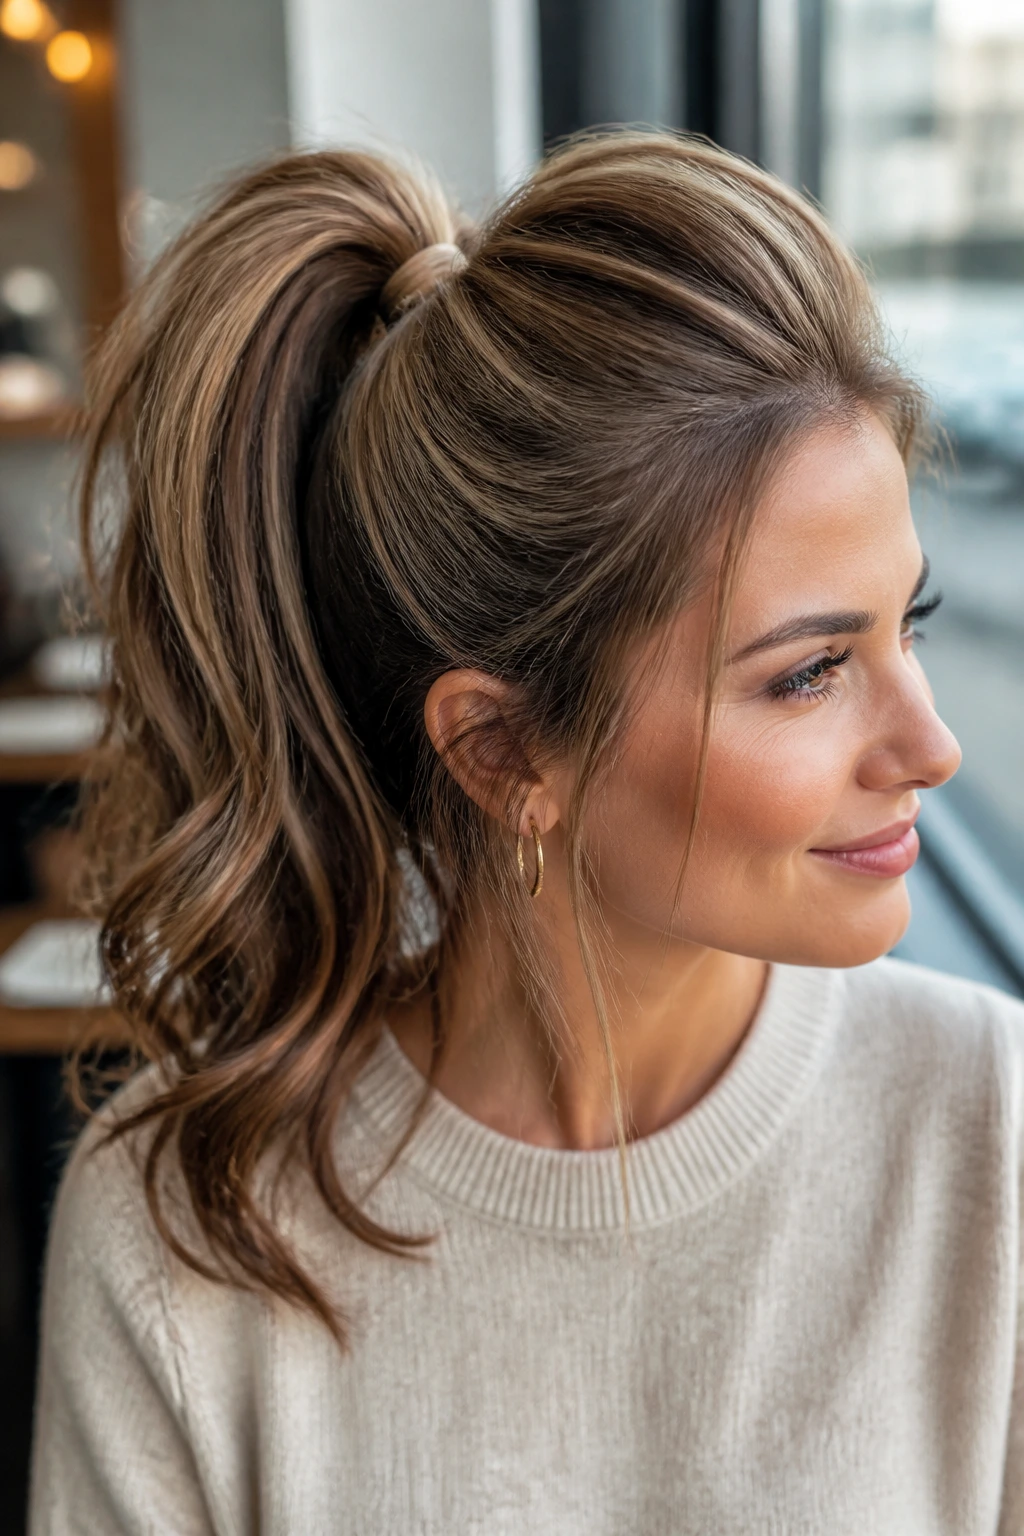
8. High Ponytail with a Teased Crown
A high ponytail can work on lowlighted hair, but only if you give the crown some lift. Otherwise it can look too flat, and all the dimension gets shoved into one long tail.
Tease the crown lightly, smooth the top layer over the lift, and secure the ponytail high but not at the absolute top of your head. Wrap a small strand around the base for a cleaner finish. If your hair is thick, anchor the elastic with two bobby pins crossing underneath.
The tail itself does the showing off. Those darker strands flick in and out as it moves, which is nice if your lowlights are placed through the ends rather than only around the face.
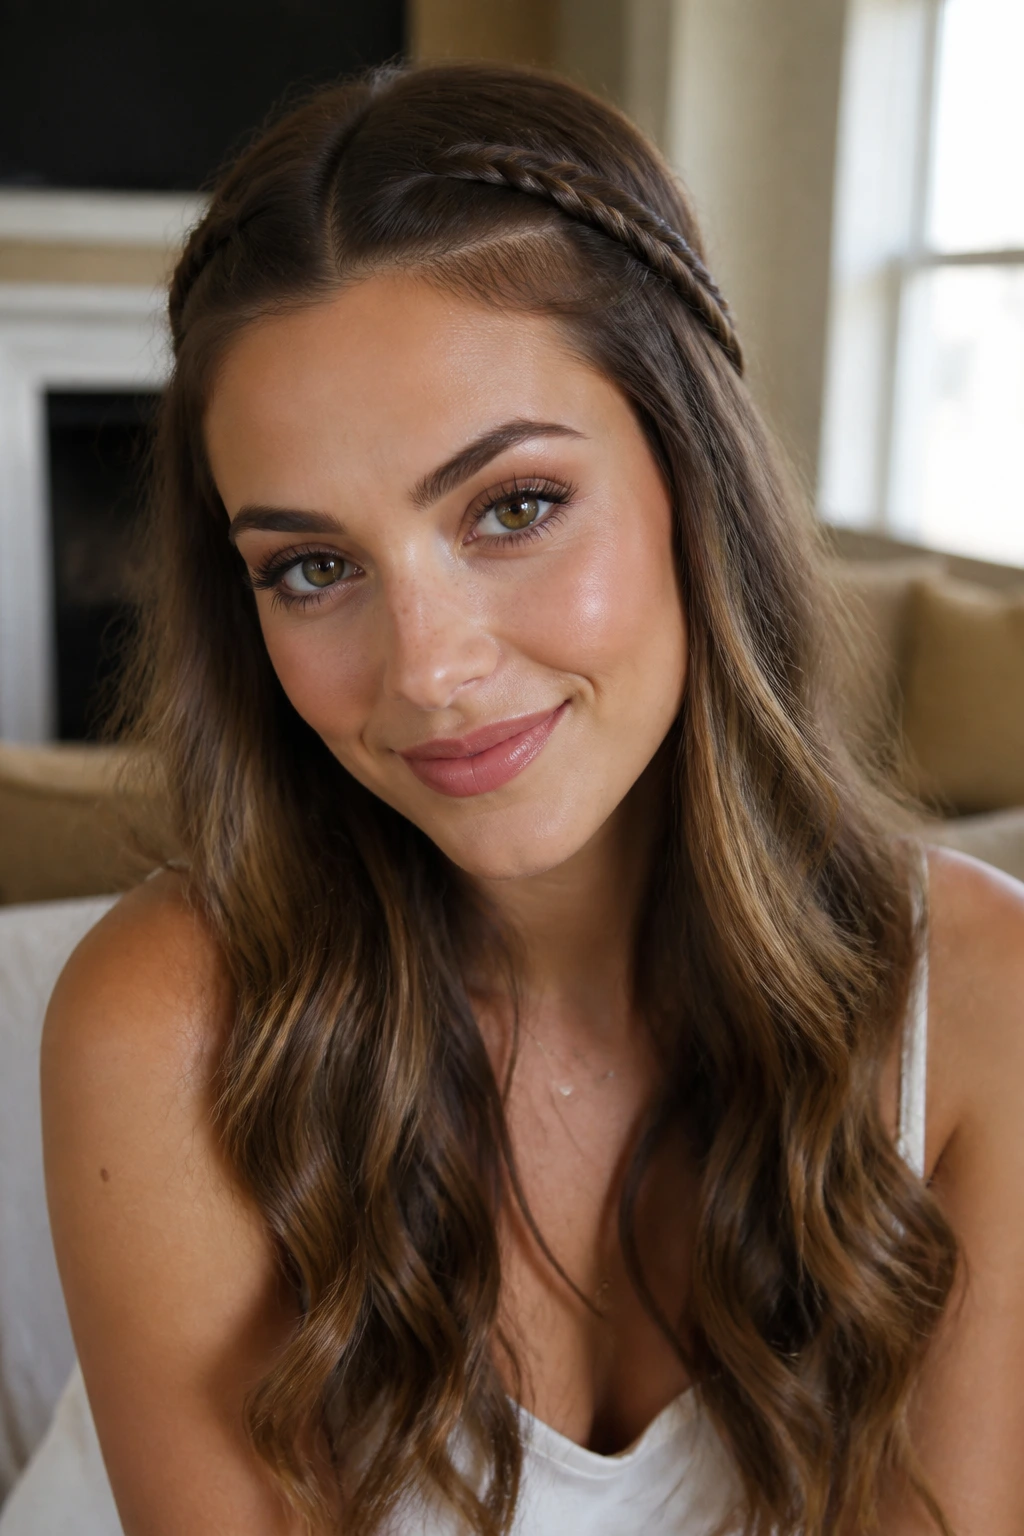
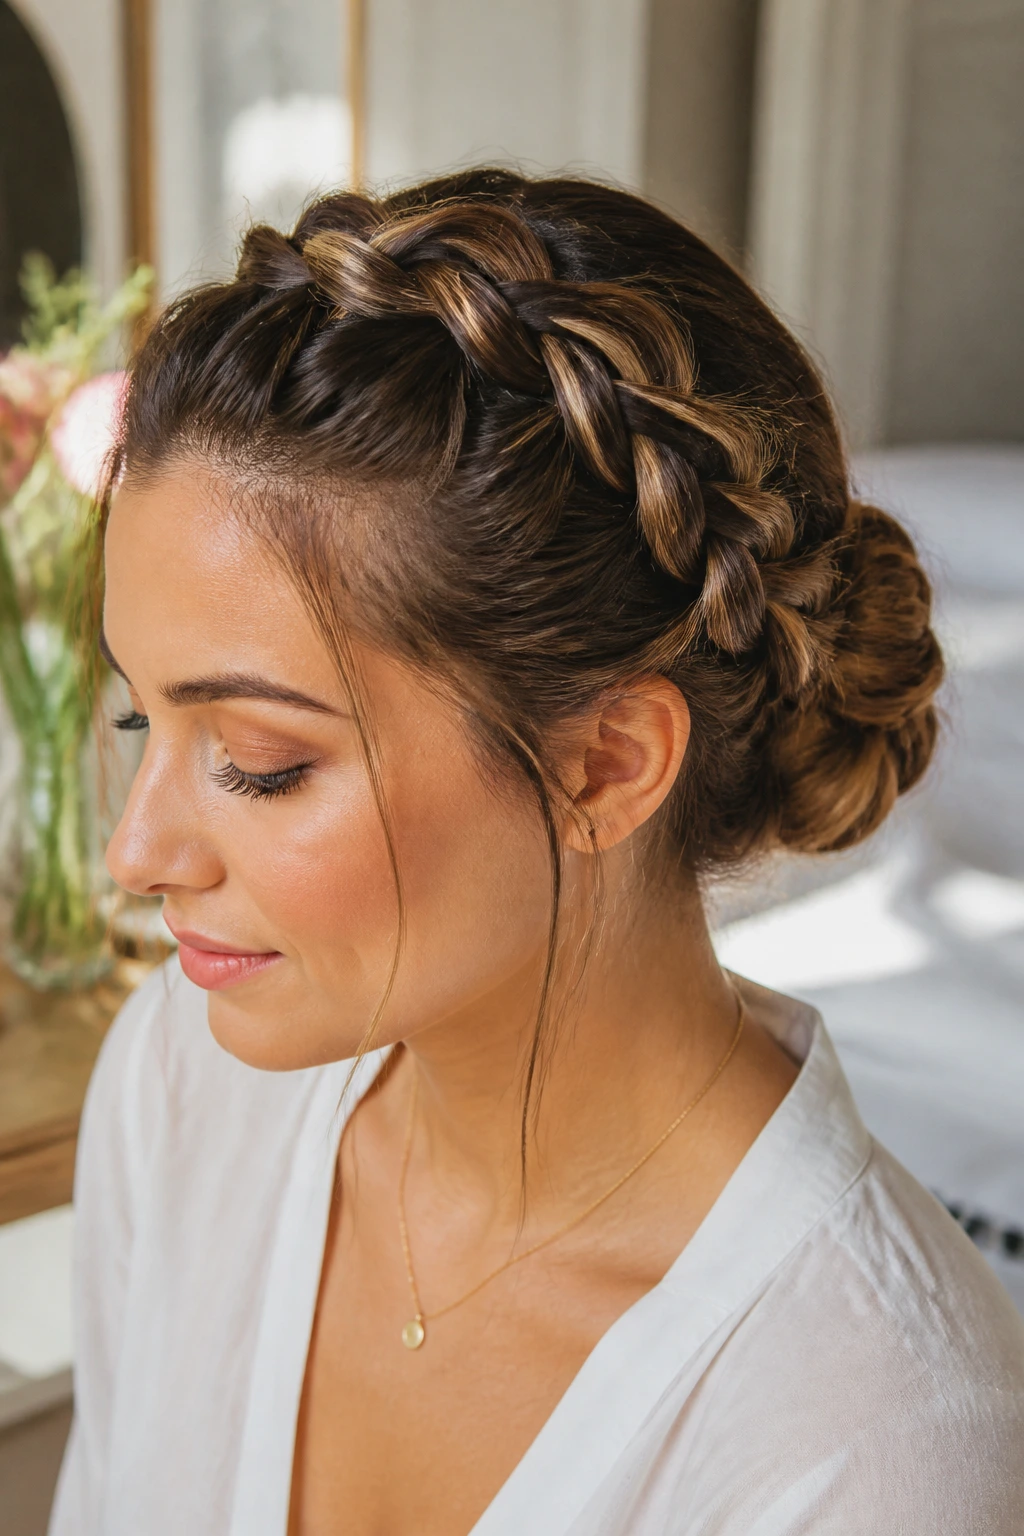
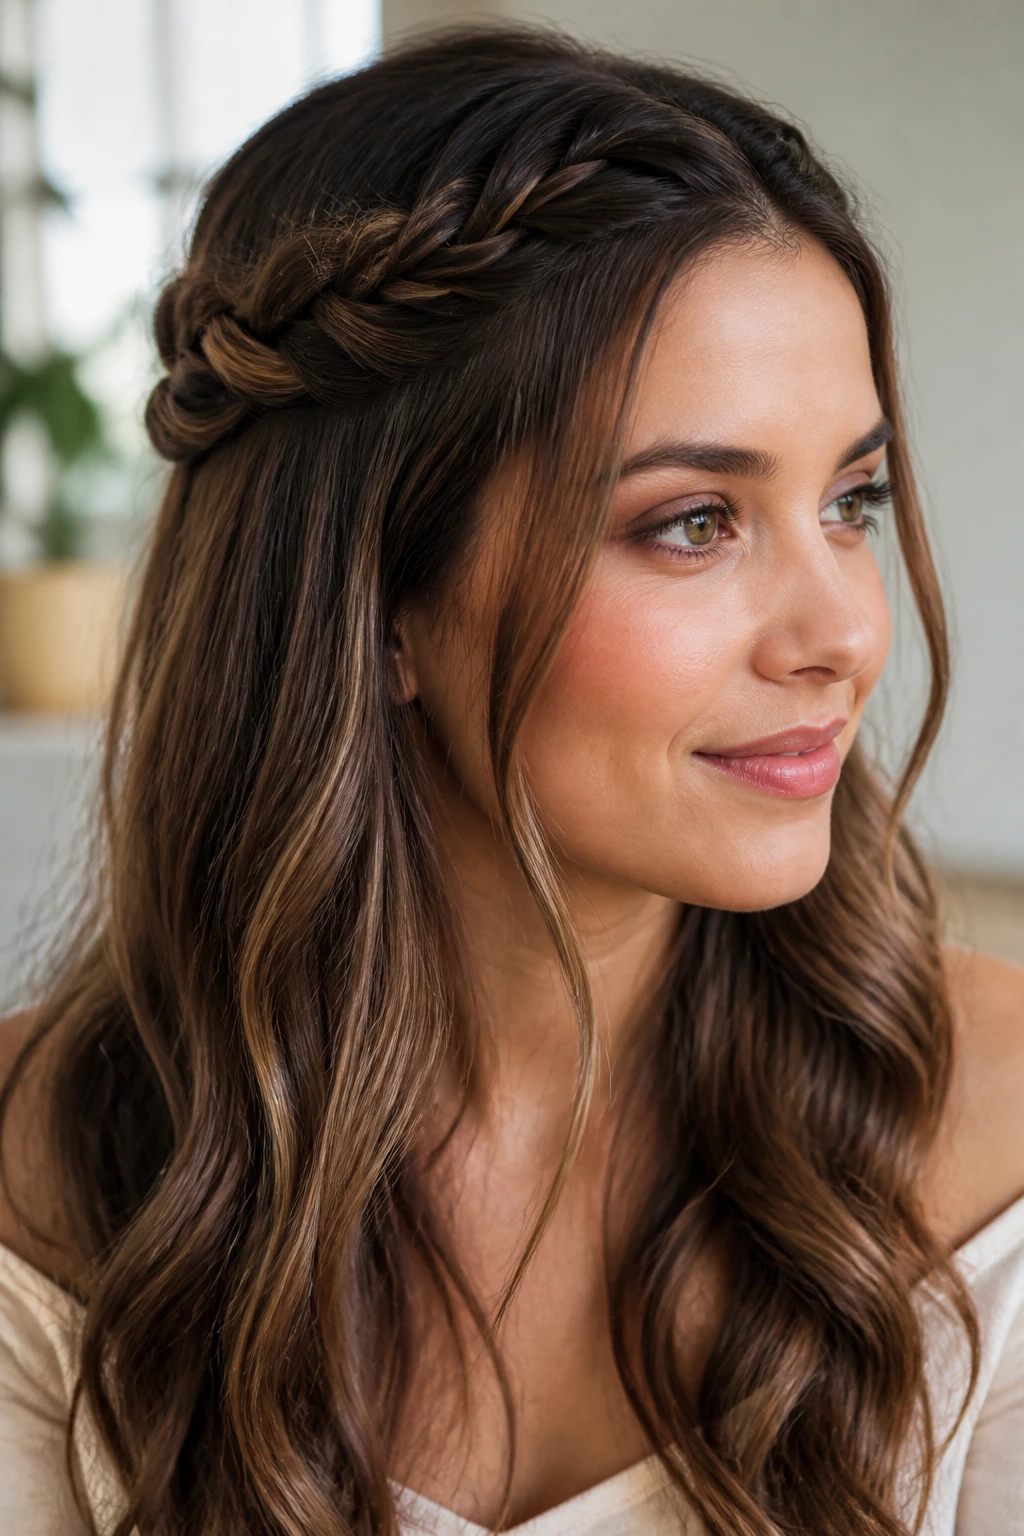
9. Braided Crown Half-Up
A braided crown half-up style gives lowlights a good frame. The braids sit around the head like a border, and the loose lower section keeps the color from disappearing into a single pinned shape.
Braid two sections from each temple, bring them back, and pin them together at the back of the head. Leave the rest of the hair down, brushed through but not over-polished. If you want it softer, pull a few tiny loops loose from the braids after pinning.
This one works nicely for birthday brunch hair because it feels a little dressed up without demanding a full hour. And yes, it holds up better than it looks like it should.
10. Headband Tuck
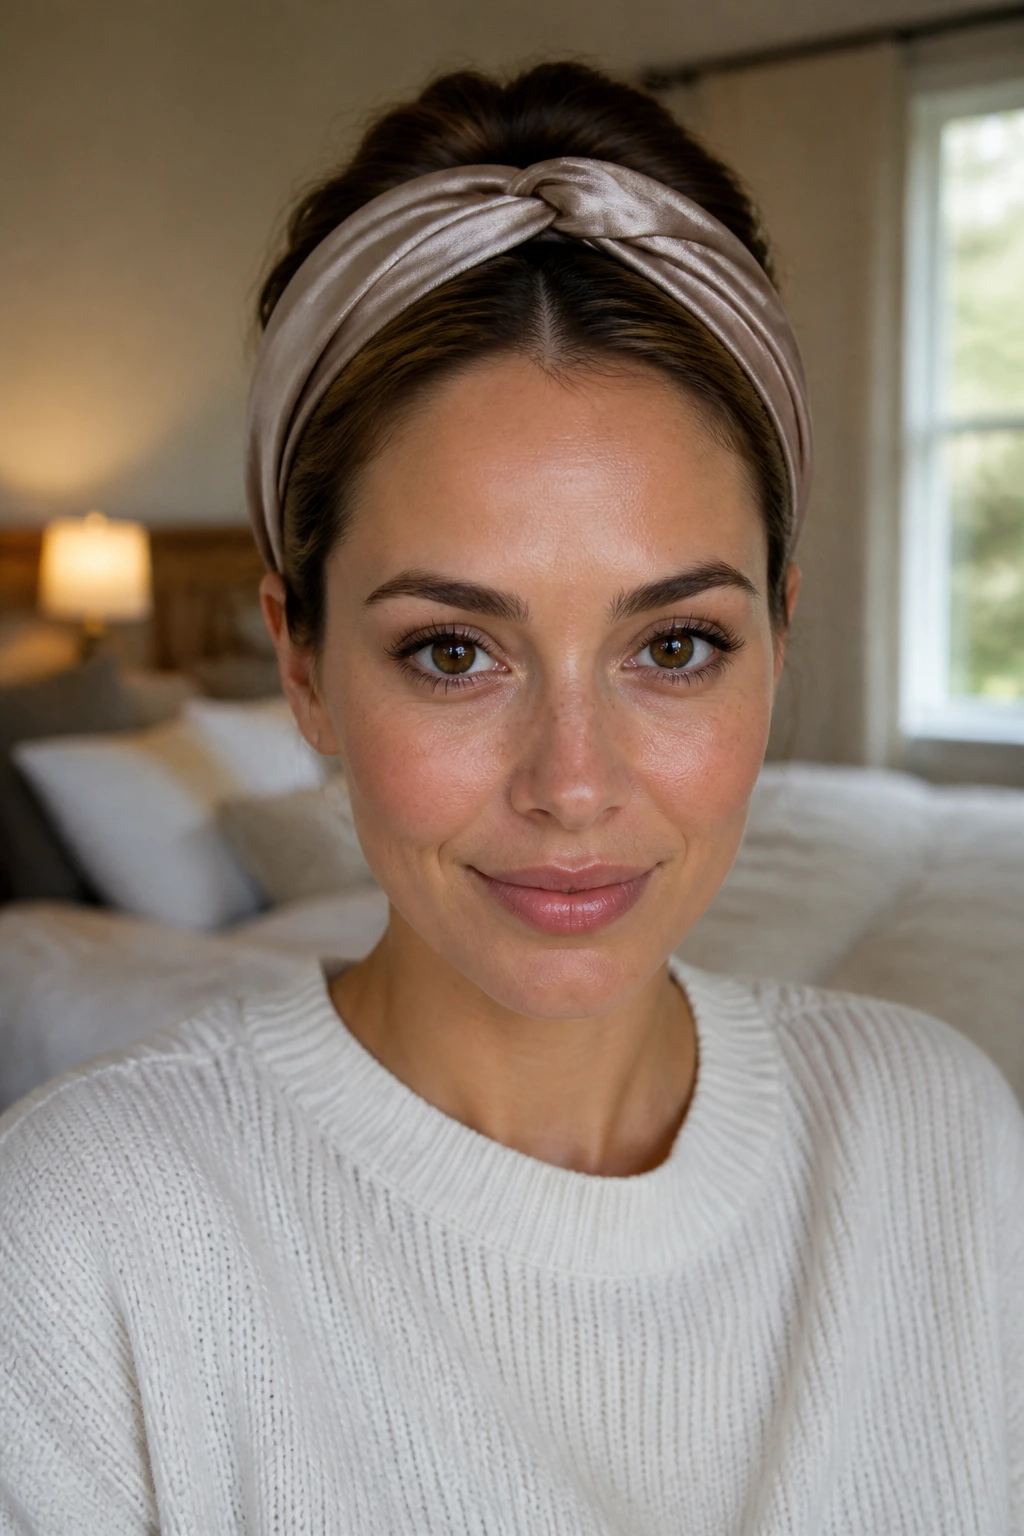
If you have a stretchy headband and ten minutes, you have a hairstyle. The headband tuck hides messy ends, keeps the front off your face, and lets the lowlights show in the folded sections.
Place the band over the hair like a crown, then tuck the lengths up and over the band until they roll under at the nape. Secure the tuck with a couple of pins if your hair is slippery. A satin or velvet band looks better than a hard plastic one; it bends the style instead of fighting it.
This is one of the best picks for second-day hair. Grease at the roots? Fine. Dry ends? Better. The shape does all the work.
11. Rope-Braid Ponytail
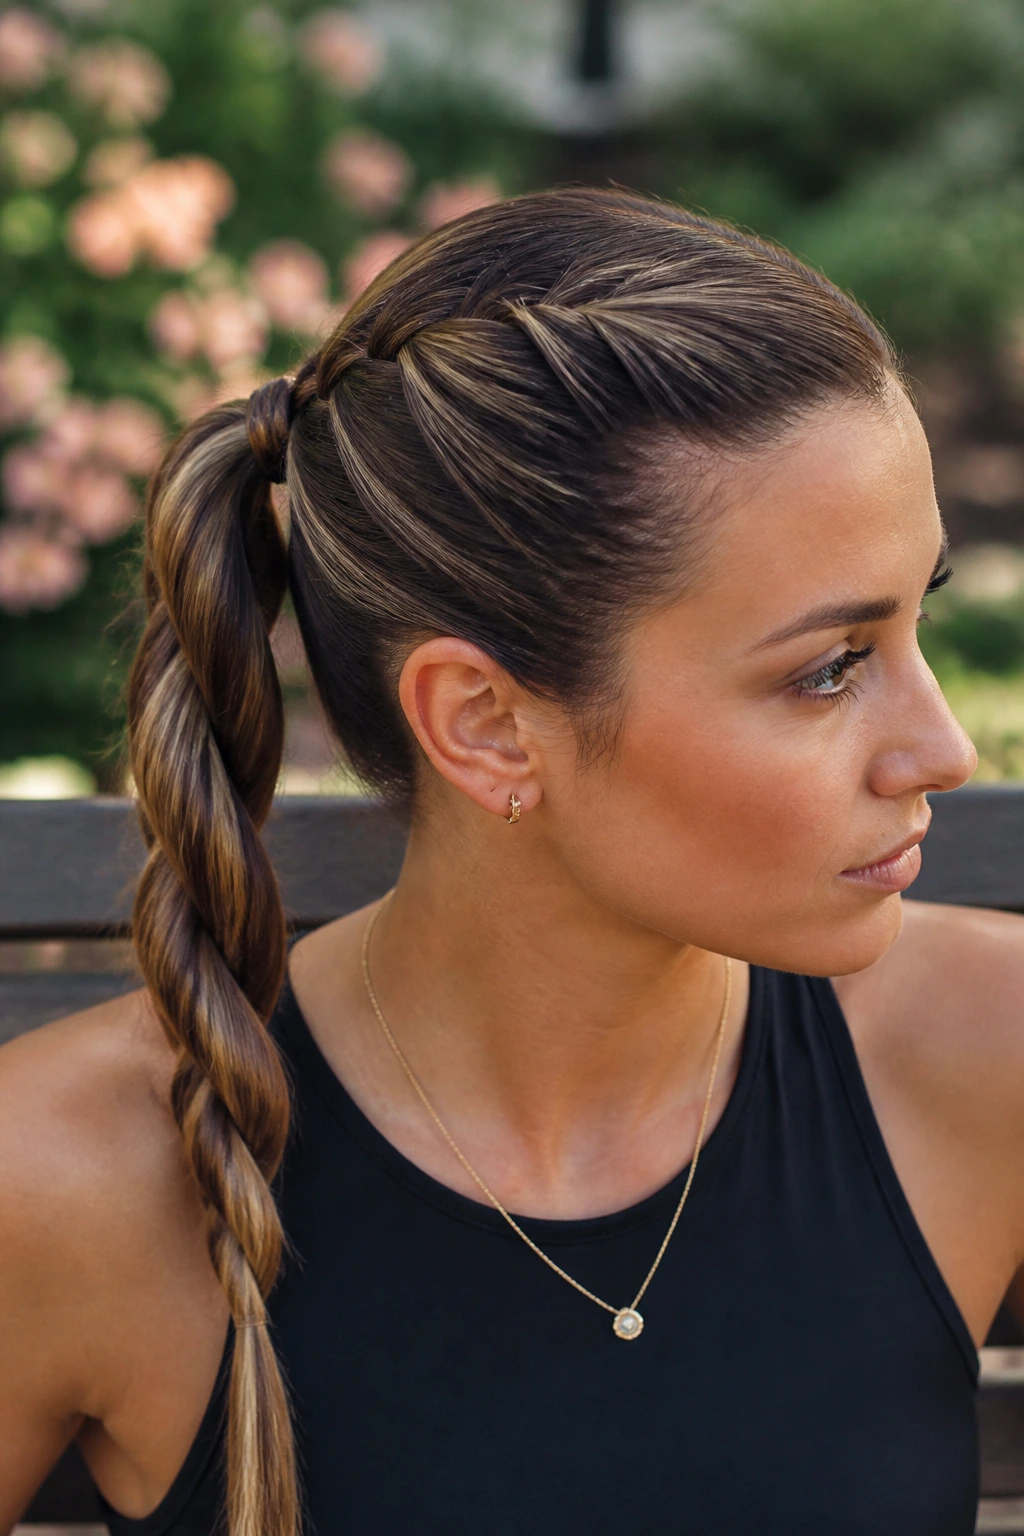
A rope braid is the low-maintenance cousin of the regular braid. Two twisted sections wrap around each other, and the motion shows off lowlights in a cleaner, more graphic way than a three-strand braid.
Secure the hair into a low or mid ponytail, split it into two pieces, twist each piece in the same direction, then wrap them around each other in the opposite direction. It sounds fussy. It isn’t. Once you’ve done it once, it’s faster than you’d think.
I like this style on hair with darker lowlights because the spiral line makes the depth obvious. It looks neat in photos, too, which is not nothing.
12. Pinned-Back Waves
Sometimes the answer is not a whole new shape. Sometimes it’s just one side pinned back and the rest left to do its thing.
If your hair already has a little bend, curl only the front pieces, then pin one side behind the ear with two crossed bobby pins or a decorative clip. Leave the other side loose. The contrast between pinned and free hair lets the lowlights move across the surface instead of sitting in one static layer.
This is one of my favorite “I’m late but I’m trying” styles. It works best when the waves are loose, not tight. Tight curls can swallow the color; soft bends let it breathe.
13. Double Mini Braids
Two small braids near the front can save a rushed morning. They keep hair off the face, add a little birthday energy, and give lowlights a tiny stage near the temples.
Part out two thin sections from the front hairline, braid them back, and secure each braid behind the ear or at the crown. Leave the rest down, ponytailed, or clipped back depending on how much time you have. The braids do not need to be perfect. A little unevenness reads as texture.
This style is especially good for short or shoulder-length hair, where a full updo can feel heavy. Two braids and a little gloss spray go a long way.
14. Sleek Middle-Part Bun
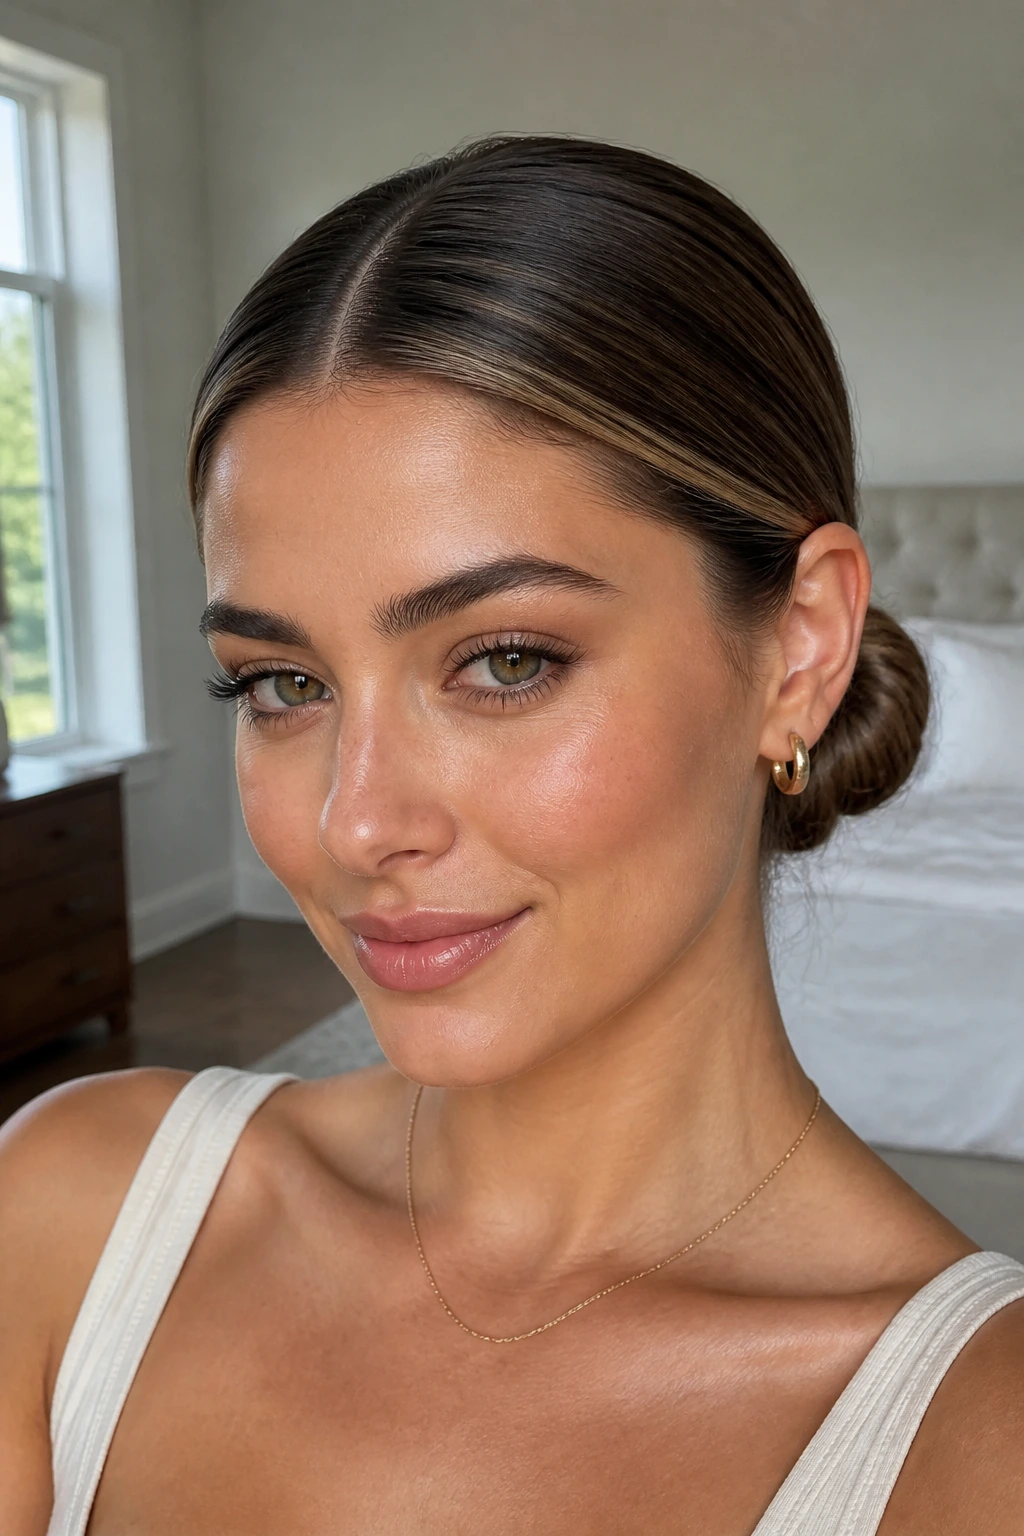
A middle-part bun is clean, sharp, and much more flattering on dimensional color than people expect. The lowlights sit along the sides and at the nape, which keeps the bun from looking like a dark lump.
Draw a clean center part, smooth the hair back with a brush, and secure a low bun at the nape. Keep the bun compact, but not so tight that the scalp looks stretched. A tiny dab of serum on the surface helps the style catch light without turning greasy.
I’m picky about this one. It needs a little softness around the hairline, or it can look severe. A fine mist of hairspray and a toothbrush-sized edge brush usually fix that.
15. Loose Fishtail Braid
A fishtail braid is slower than a regular braid, but it pays you back in texture. On lowlighted hair, the woven pattern makes every shade show up more clearly because the strands sit so close together.
Split the hair into two sections, then pull small pieces from the outer edge of each section into the opposite side. Keep the braid loose. Once it’s secure, tug the edges outward a little so the braid looks fuller and the lowlights separate into visible ribbons.
If your hair is fine, start with dry shampoo or texture powder. The braid needs grip. Otherwise it slides and shrinks, and nobody needs that on a morning with too much happening already.
16. Scarf-Woven Ponytail
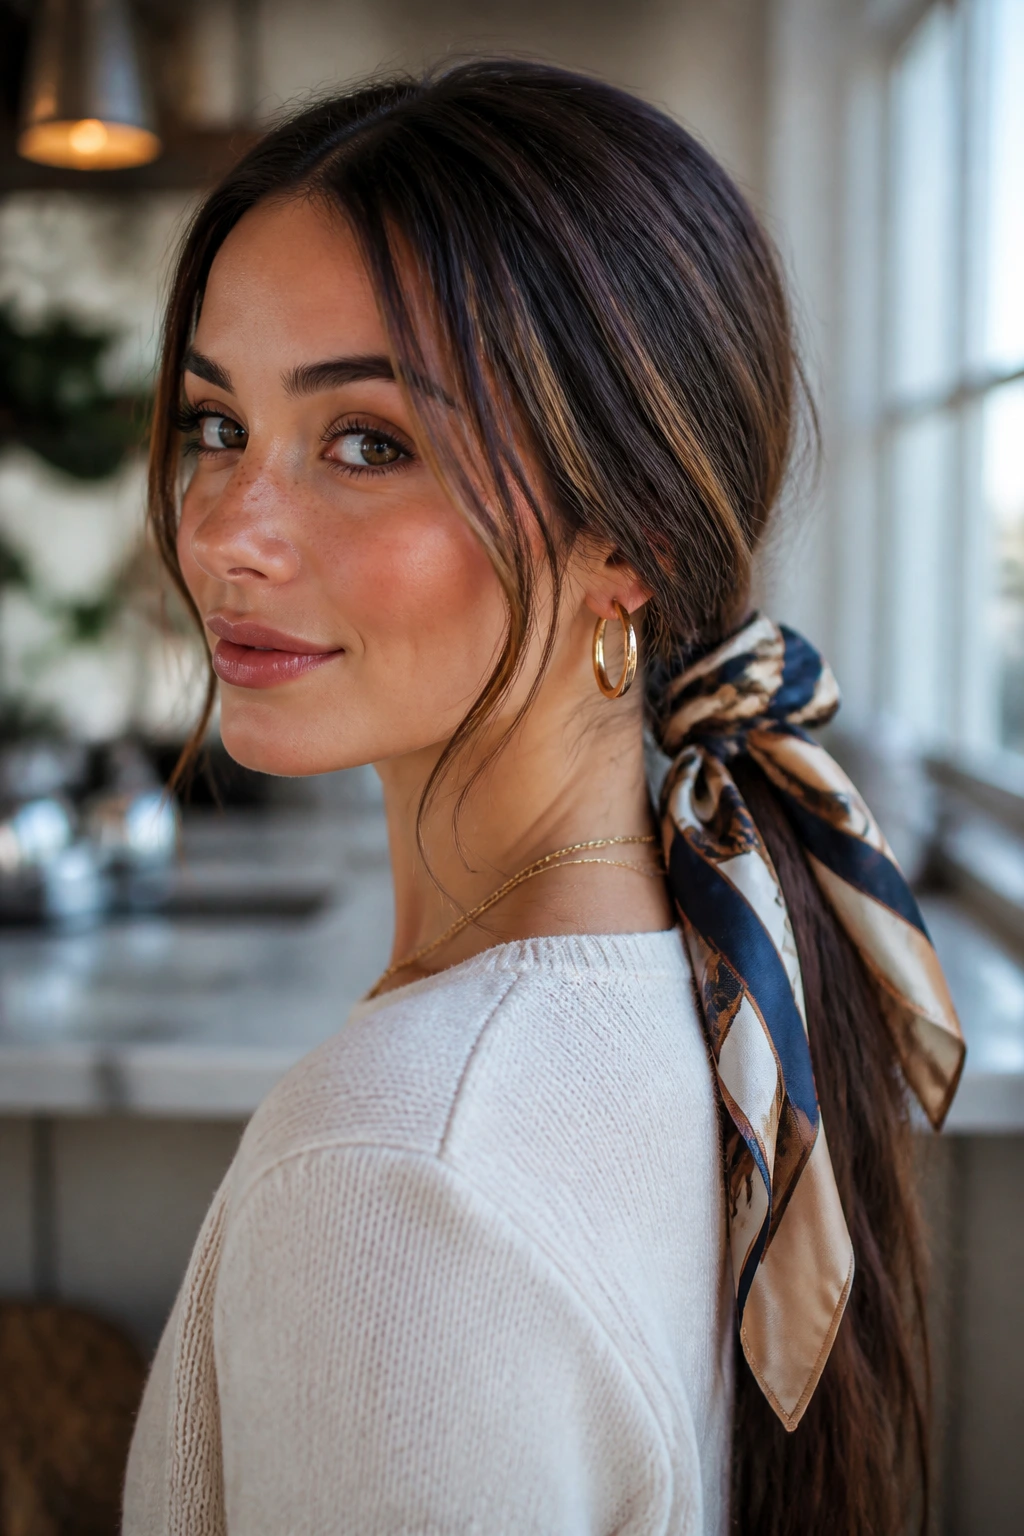
A scarf can rescue a ponytail that feels too plain. It adds color, hides the elastic, and gives lowlights a soft frame instead of forcing them to do all the work on their own.
Tie the hair into a low ponytail, then wrap a silk or satin scarf around the base and let the ends hang loose, or weave it through a braid if you want more structure. Choose a scarf that echoes one of the deeper tones in your hair—warm gold for caramel lowlights, slate or wine for cooler brunette shades.
This is a good one for birthdays because it looks intentional with almost no extra skill. Which, frankly, is the best kind of style trick.
17. Voluminous Blowout with Tucked Sides
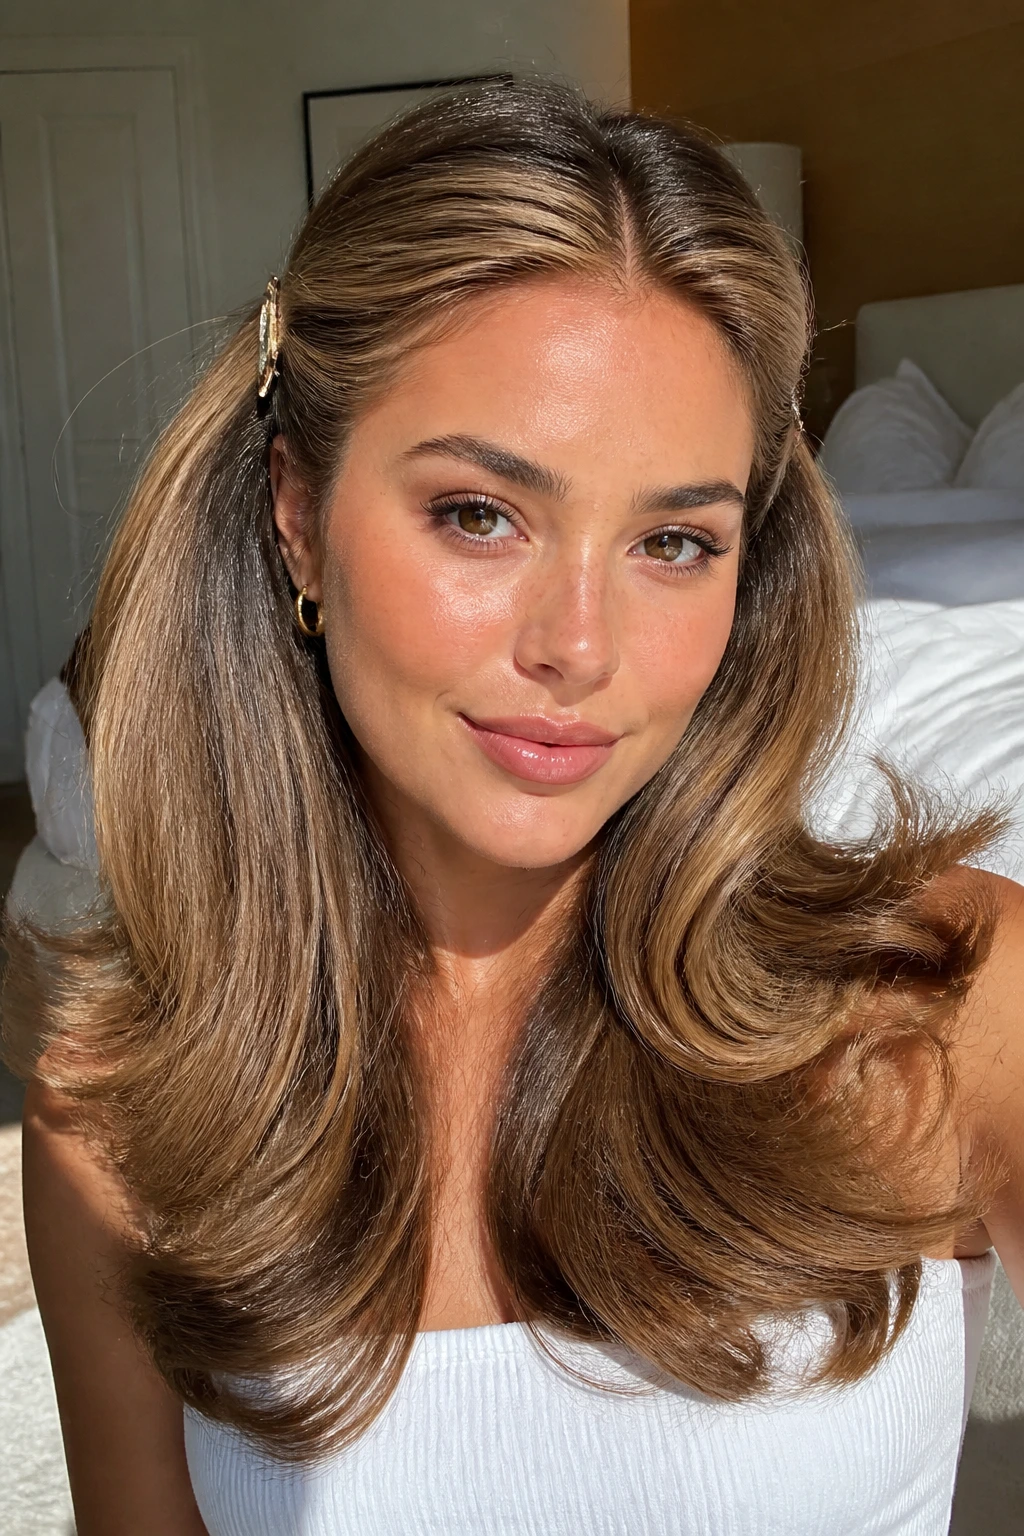
A smooth blowout with tucked sides is not the fastest thing on this list, but it is one of the prettiest ways to show dimensional color. Lowlights need movement, and a bend through the mid-lengths and ends gives them exactly that.
Rough-dry the roots, then use a round brush or a large curling brush to bend the ends under or outward. Tuck one or both sides behind the ears and secure them with a small clip if needed. The ends should feel soft, not shellacked.
If you have medium to long hair, this style can do a lot with very little. It’s also one of the best choices if your lowlights run through the bottom half of the hair, because the movement sits right where the color is strongest.
18. Gibson Tuck
The Gibson tuck has old-school charm, but it is not fussy if you keep it loose. Roll the lengths upward into the nape and pin them in place, letting the folds show a little shape.
This works well when you want the lowlights to appear in soft layers rather than sharp lines. The rolled edges create tiny bands of contrast, which makes brunette and auburn lowlights look deeper. If the hair is too clean and slippery, add a touch of dry texture spray first.
I like this one for slightly longer hair. On shorter lengths, the tuck can feel crowded. On longer hair, it stays neat and looks more complicated than it is.
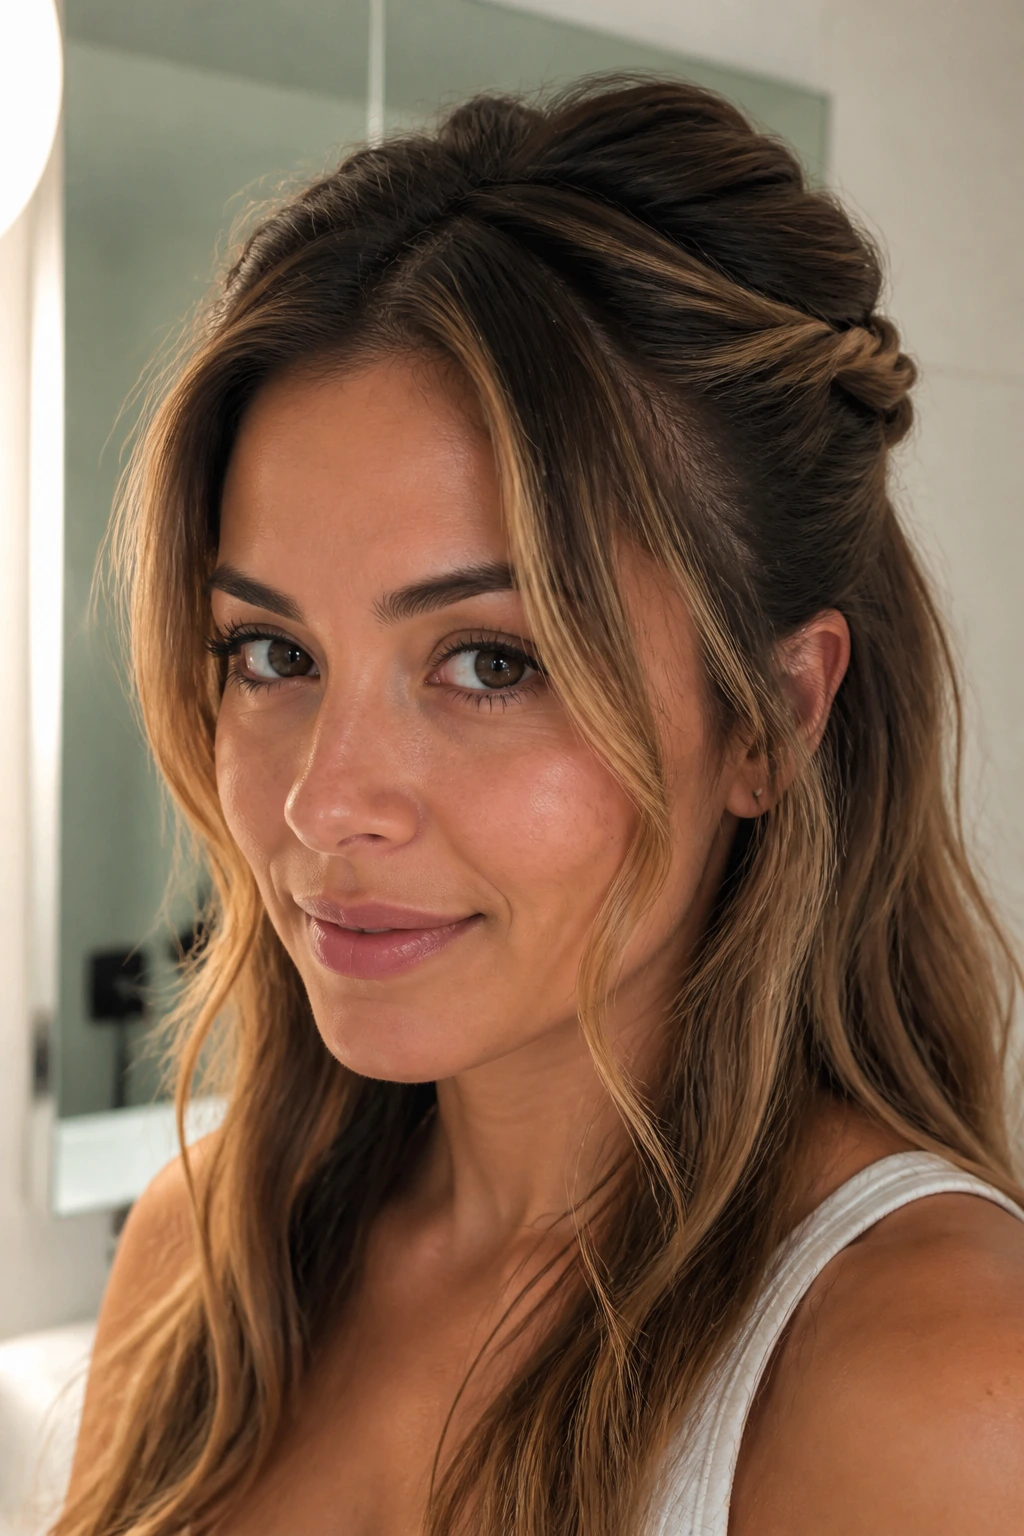
19. Half-Up Top Knot
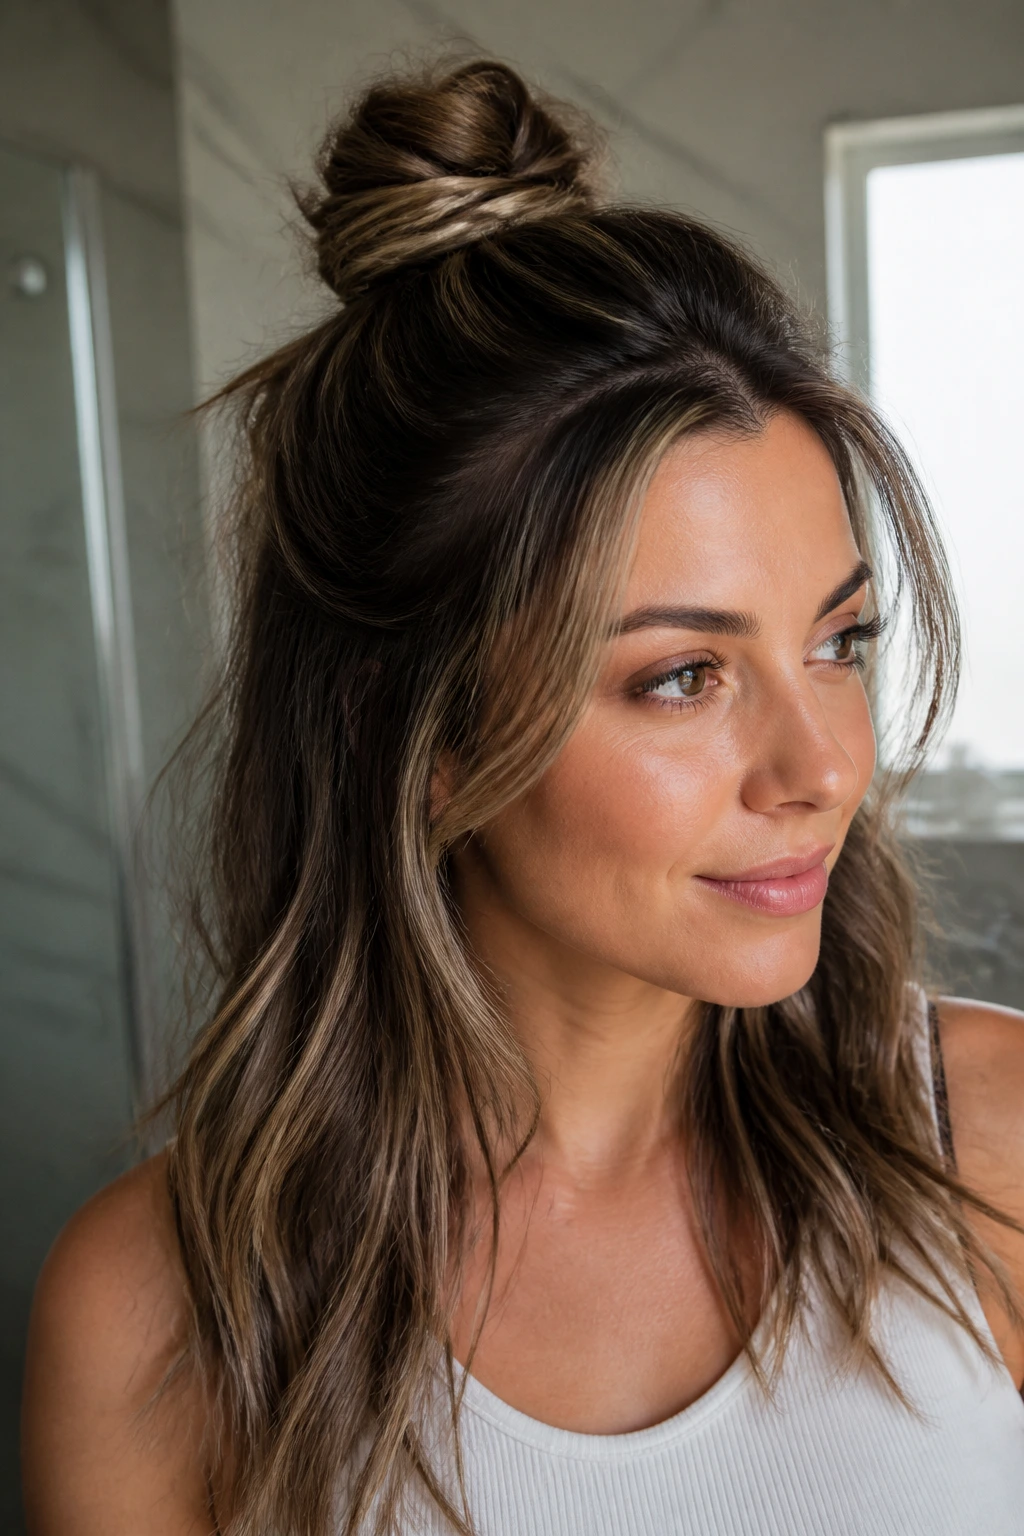
A half-up top knot is the “I gave this some thought” style that still takes maybe four minutes. The top knot keeps the crown under control, while the bottom half shows the lowlights in all their loose, layered movement.
Take the top section from temple to temple, twist it into a small knot, and pin or tie it in place. Leave the lower lengths down and separated with your fingers rather than a brush. If your hair is curly, this is especially useful because it preserves the shape underneath.
This is the one I’d choose when I want the look to feel relaxed but not lazy. That line matters.
20. Dutch Braid Into a Bun
A Dutch braid into a bun gives you structure at the top and softness at the bottom. Because the braid sits raised on the surface, the lowlights catch at the edges of each stitch, which is exactly what you want.
Braid from the hairline down the center or one side of the head, then gather the remaining hair into a bun at the nape. Secure everything with pins rather than one giant elastic. The braid should look slightly lifted, not pressed flat against the scalp.
This is a good option for active mornings or humid days. It stays put better than a loose braided style, and the bun keeps the ends out of the way when you are running from one thing to the next.
21. Soft Curly Ponytail with Curl Cream
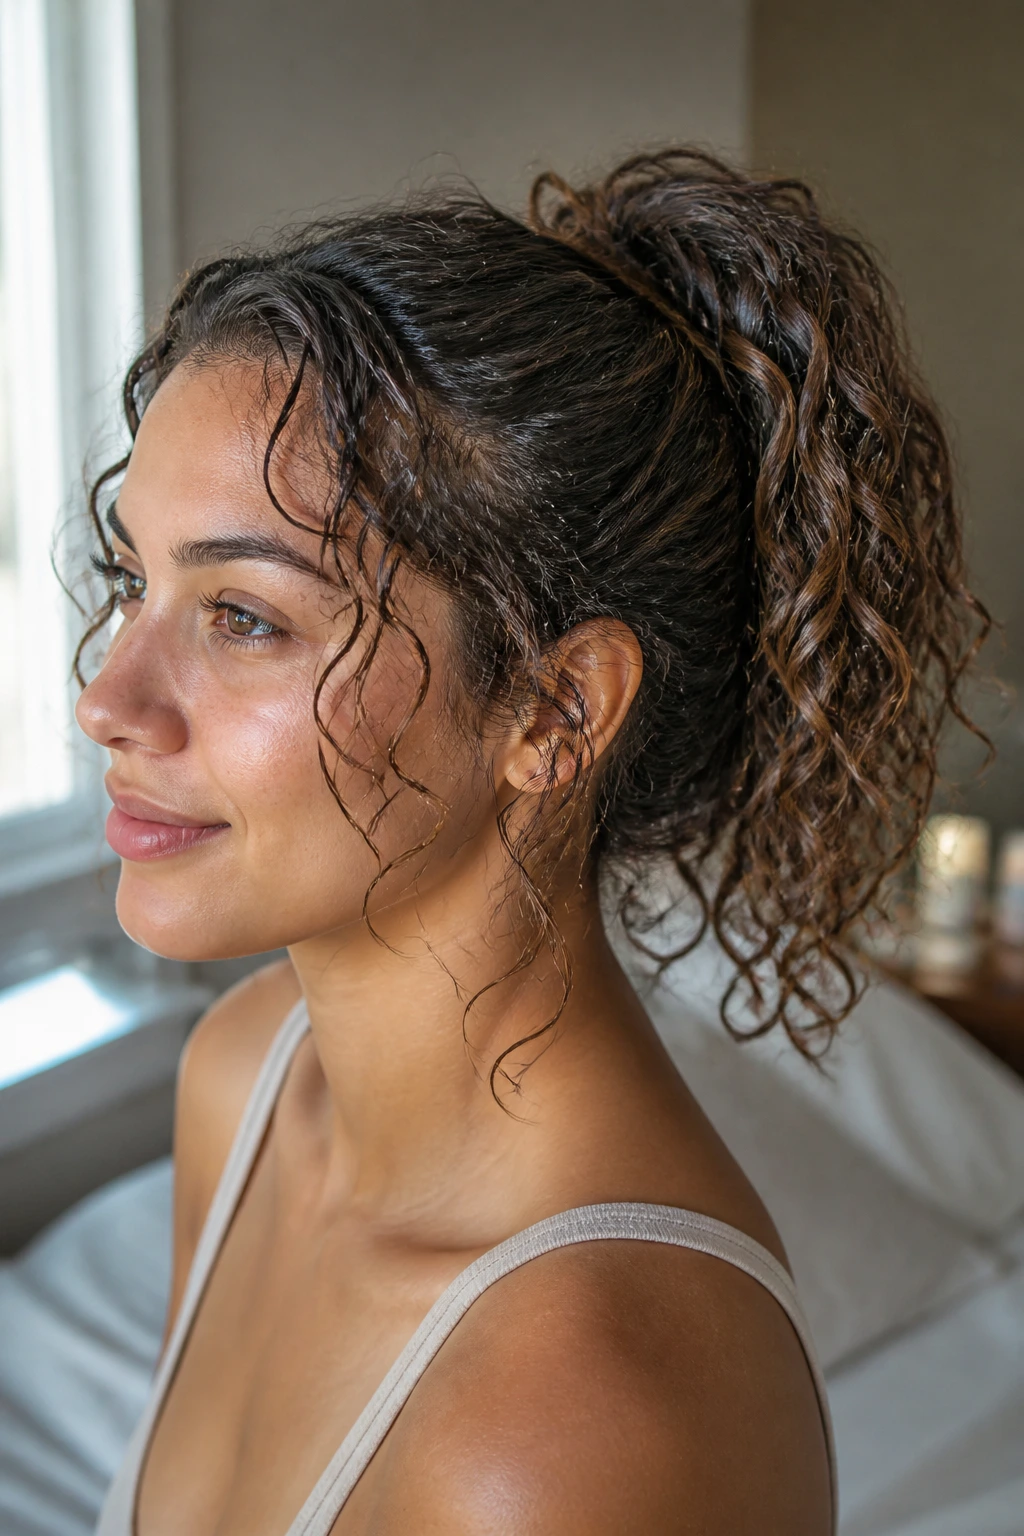
Curly hair shows lowlights in a different, better way. The curves create tiny pockets of light and shadow, so a simple ponytail can look rich without much effort.
Work curl cream through damp hair, scrunch, and let the curls form before gathering them loosely at the crown or just above the nape. If you brush curly hair dry, you lose the shape. Don’t do that. Use your hands or a wide-tooth comb instead.
A curly ponytail works especially well when the lowlights sit through the mid-lengths and ends. That’s where the curl pattern opens and closes, and it makes the color look deliberate instead of painted on top.
22. Ribbon-Tied Low Ponytail
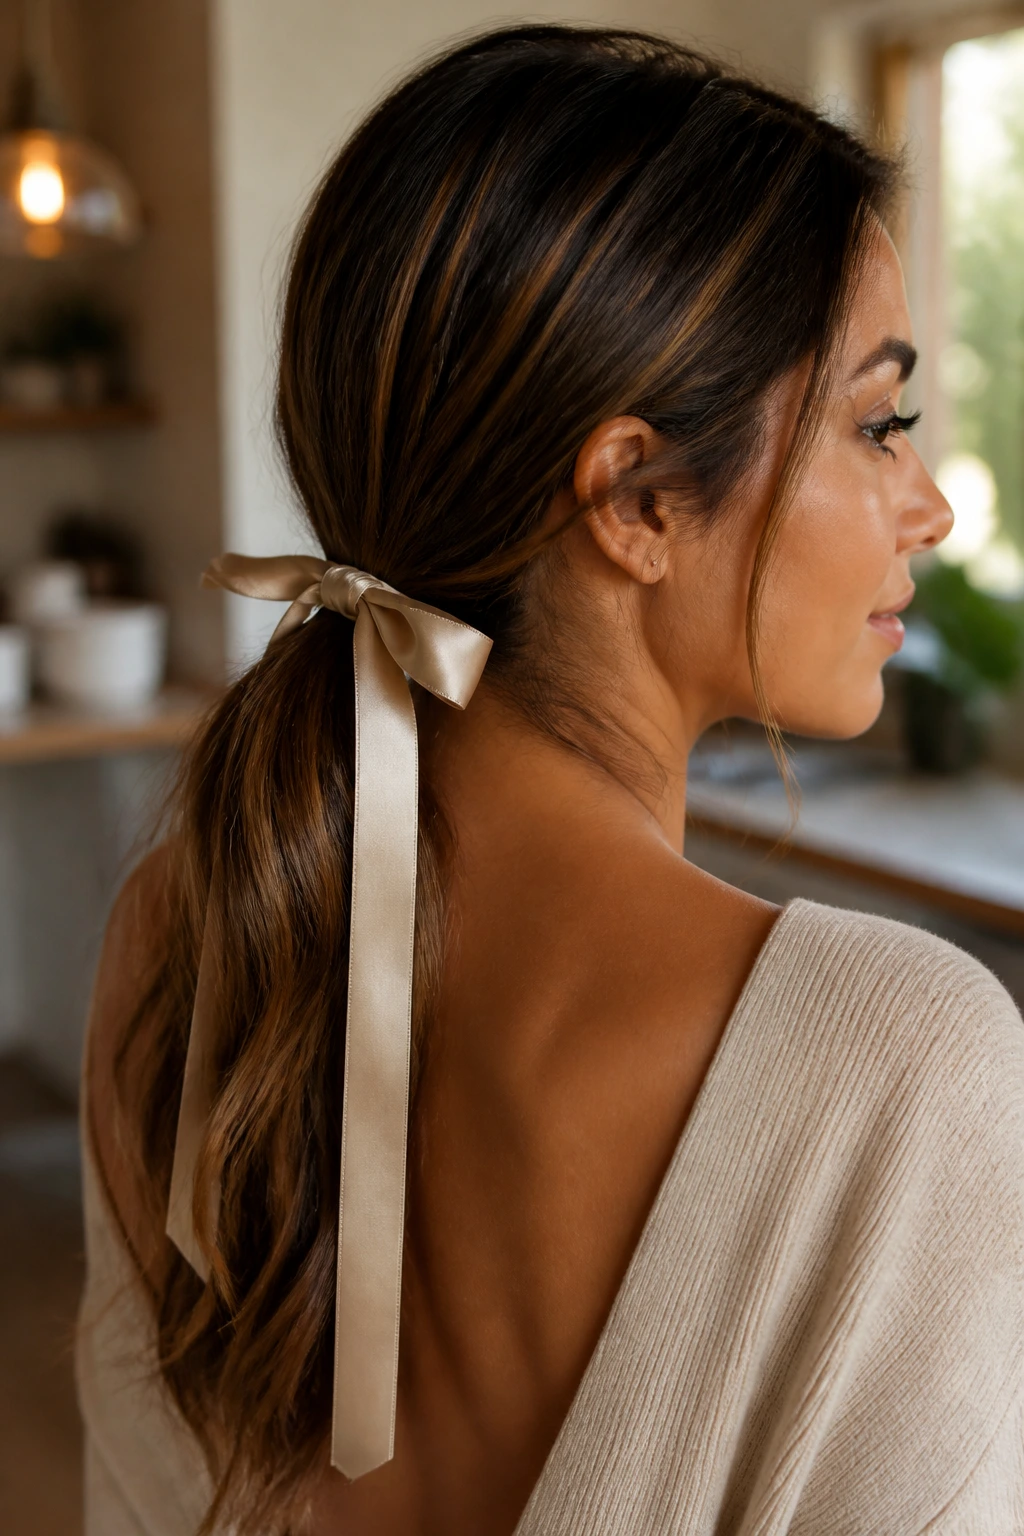
A ribbon tied around a low ponytail changes the whole mood of the style. Without the ribbon, it’s a ponytail. With the ribbon, it becomes birthday hair.
Keep the ponytail simple and smooth, then tie a ribbon around the base and let the ends trail down the back. Satin feels softer; velvet looks richer. If your lowlights are warm, I prefer cream, burgundy, or deep brown ribbon. The contrast is gentler than black.
This style is almost laughably easy, which is part of why I love it. The hair can stay plain, and the accessory does the talking.
23. Deep-Side Wave Sweep

A deep side part plus soft waves gives you instant shape. The swept front section frames the face, and the lowlights move in long arcs instead of sitting in one straight line.
Use a 1-inch curling iron or a flat iron to make loose bends through the lengths, then shift the part deeply to one side and pin the heavier side back if needed. Don’t curl every section the same way. Alternate the direction a little so the hair falls naturally.
This is one of the best birthday looks if you want polish without an updo. It feels a bit glam, but not so formal that you need the rest of your outfit to keep up.
24. Wet-Look Bun
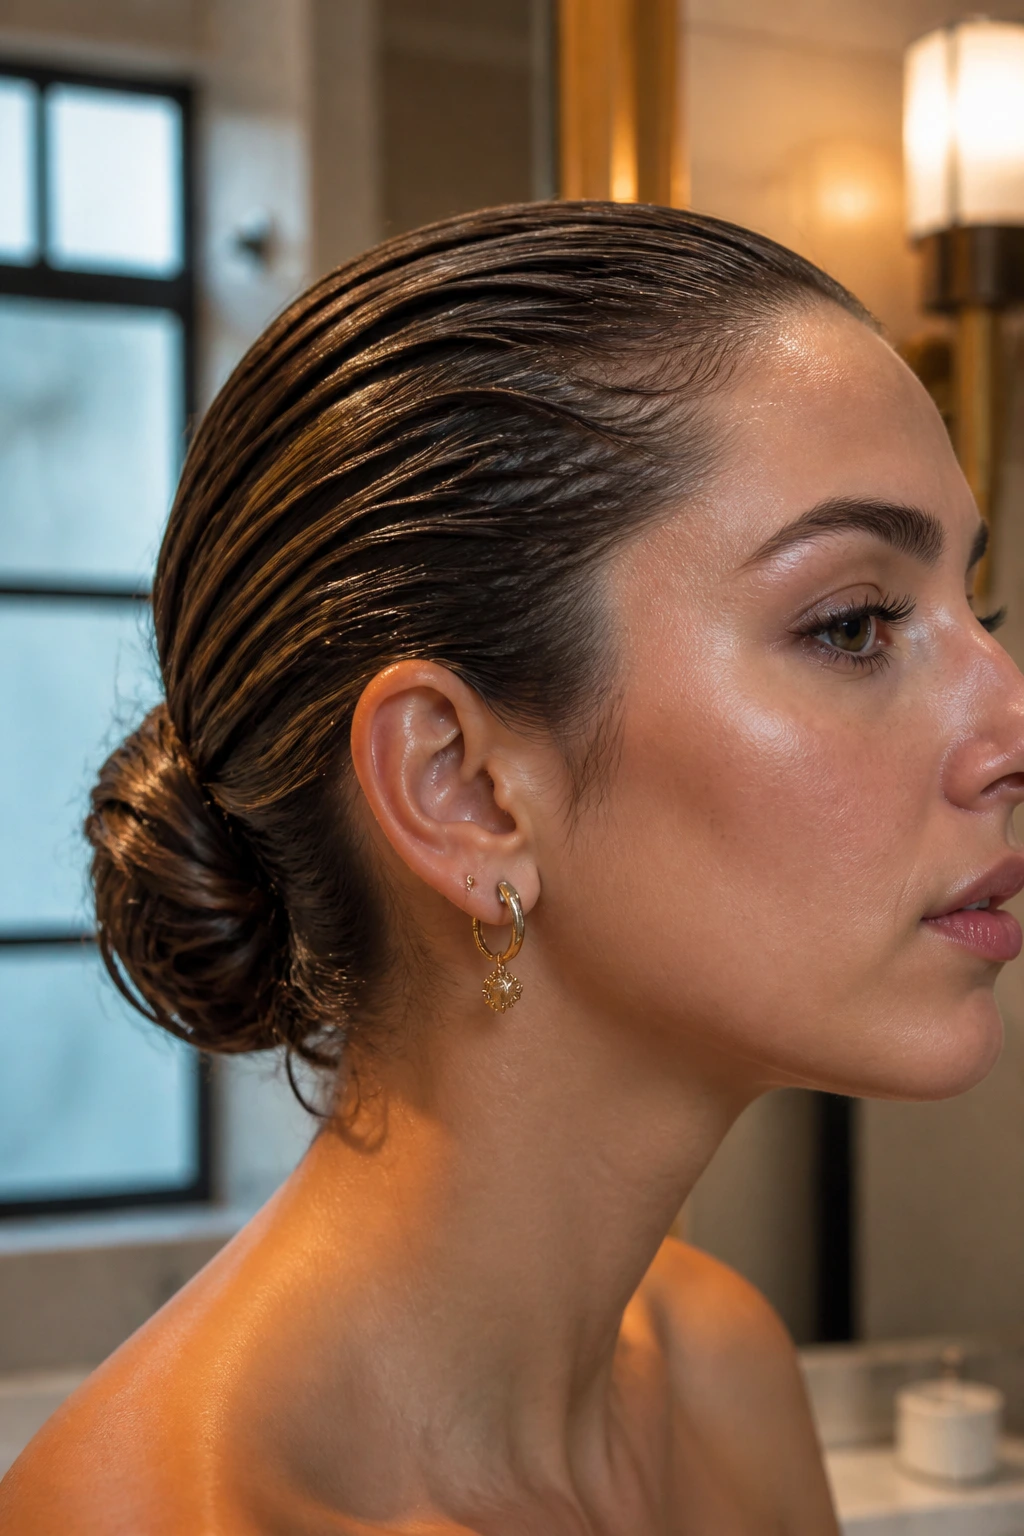
A wet-look bun is not for everyone. I love it on lowlighted hair because the gloss turns every darker strand into a deliberate line, especially around the crown and sides.
Apply gel or styling cream to damp hair, brush it back smoothly, and secure a low or mid bun. The finish should look sleek and shiny, not crunchy. Use only enough product to hold the surface down; too much turns the bun sticky and hard.
This style works best when your lowlights are neat and blended. If the color placement is chunky, the wet look can feel harsh. Soft placement, sharp bun. That’s the sweet spot.
25. Mini Bubble Half-Up
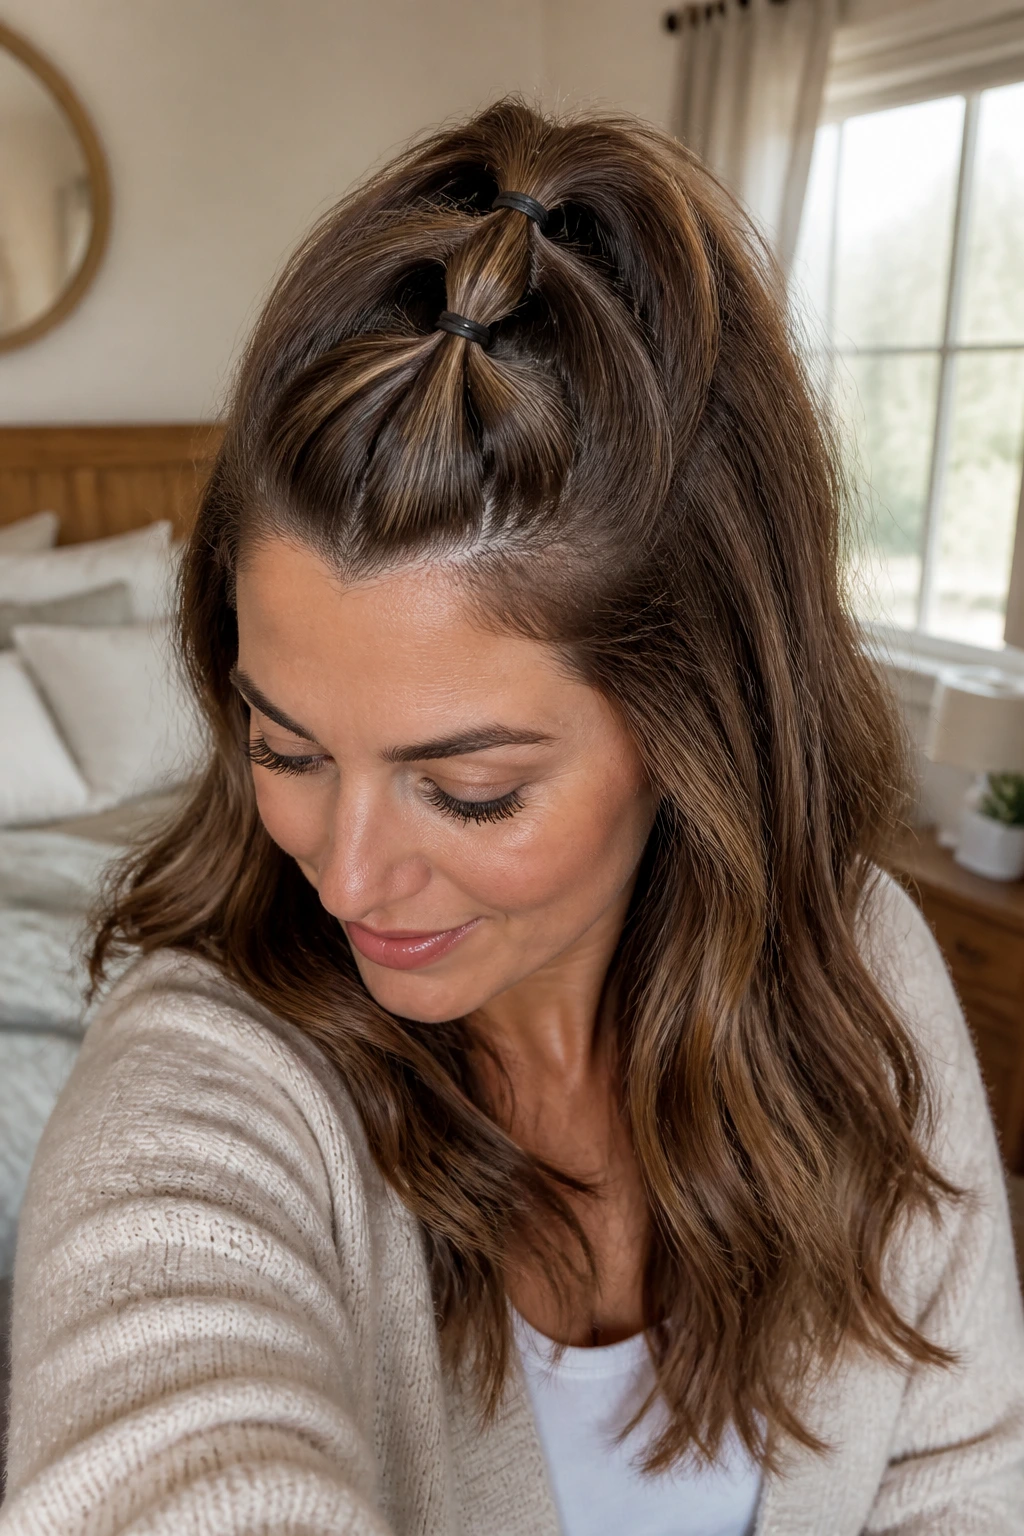
A mini bubble half-up is playful without getting childish, which is a useful line to walk on a birthday morning. It’s also a smart way to use lowlights, because the little bubbles make the darker pieces appear at each elastic point.
Take the top half of the hair, secure it into a small ponytail, then add one or two more elastics down the section, puffing out each part into a rounded bubble. Leave the lower half loose and brushed through with your fingers. If you want more shape, curl just the ends.
This works well on shorter hair, second-day hair, and hair that refuses to behave. In other words: most mornings.
Why Lowlights Make Quick Hairstyles Look Richer
A good lowlight placement does half the work for you. If the darker tones sit one or two shades deeper than the base, they create the sort of shadow that braids, buns, and waves can actually use. Flat color needs more styling to look interesting. Dimensional color can survive a five-minute ponytail and still read as styled.
The same thing happens with texture. A simple bend in the hair opens up the lowlights and lets them separate from the base. That is why loose waves, twisted ends, and soft braids often look better on dimensional brunettes than stiff, over-smoothed styles. The movement is the point.
I’d rather see a slightly undone twist on hair with good lowlights than a painfully sleek style that flattens everything into one tone. Clean is fine. Lifeless is not. And if your hair color already has depth, you should let it show.
Tools That Save You Time Before Coffee
-
Snag-free elastics: Clear or hair-matched bands hold ponytails and braids without that rubbery breakage at the ends.
-
Bobby pins and U-pins: Use the plain ones with good tension; decorative pins are nice, but they are not always strong enough for thick hair.
-
Claw clip: A medium clip is the fastest path to a French twist, a half-up hold, or a lazy-but-good morning bun.
-
Tail comb: The pointed end makes clean parts and helps tuck flyaways without over-brushing the style flat.
-
Texture spray or dry shampoo: This gives pins something to grip and helps second-day hair stay useful instead of slippery.
-
Light-hold hairspray: A mist over the finished shape is enough. You do not need a shell.
-
Smoothing serum: One or two drops on the ends keeps frizz in check, especially around lowlights that tend to show dryness.
-
Curling iron or flat iron: A 1-inch barrel is enough for face-framing bends, wave touch-ups, and the ends of ponytails.
-
Satin scarf or pillowcase: These matter more than people think. They keep the style from swelling into fuzz overnight.
Product Picks and Shade-Safe Shopping Notes
Lowlights deserve styling products that don’t strip the color or leave a chalky film behind. A sulfate-free shampoo is a good default if your hair is color-treated, and a light conditioner keeps the darker strands from going dull at the ends. If your hair leans warm, caramel, chestnut, or copper lowlights tend to look richest when the hair is hydrated, not coated in heavy oil.
For accessories, match the mood of the hair rather than forcing contrast. Tortoiseshell clips, gold pins, cream ribbons, and matte brown elastics tend to blend nicely with dimensional brunette shades. Cool ash-brown lowlights usually look cleaner with black, silver, or graphite accessories. Neon clips can be fun, but they pull attention away from the color story.
Dry shampoo matters here too. Pick one that disappears without a white cast, especially if your roots are deep brown. If you are styling on second-day hair, a little grip is useful. If your hair is too clean, twists slide and braids open.
How to Wear These Looks From Desk to Dinner
Presentation: Keep the finish near the face a little softer than the back. That way the lowlights show in the parts that people actually see, and the style won’t look helmet-tight in photos.
Accompaniments: Small hoops, a clean neckline, a ribbon, or a simple clip can do a lot here. Busy morning hair looks more finished when the accessory color echoes one of the deeper tones in the hair.
Portions: One style usually works per head, but thicker or longer hair may need two elastics, extra pins, or a slightly larger clip to hold the shape without slipping. Fine hair often needs the opposite: smaller sections and less bulk.
Beverage Pairing: Coffee, iced tea, or sparkling water all fit the same easy morning energy. If it’s a birthday brunch, choose the style that stays neat when you tuck one side behind your ear.
Extra Touches That Wake Up the Hair
Gloss Boost: A pea-sized drop of serum on the ends can make lowlights look deeper, but keep it off the roots unless you want the style to go limp by lunch.
Texture Boost: Dry shampoo at the crown before braiding or twisting gives the hair enough grit to stay put. That’s especially helpful on very smooth, freshly washed hair.
Accessory Move: A satin ribbon, a skinny velvet bow, or a tiny claw clip near the base of the style adds polish without making the hair feel overdone.
Shortcut: If you know the morning will be messy, prep the shape the night before with a loose braid, bun, or half-up knot. In the morning, all you need is a quick finger-fluff and a little edge smoothing.
Make-It-Yours: For a softer look, pull out two tiny pieces at the temples. For a sharper look, smooth those pieces back and let the color placement do the talking.
Keeping the Style Fresh Overnight
Braids, buns, and twists usually last the longest. If you sleep in one, wrap the hair with a silk scarf or use a satin pillowcase, then release it in the morning with your fingers instead of a brush. That keeps the lowlights from turning muddy and the ends from puffing up.
Loose waves and blowouts need a little more care. Clip the front pieces loosely away from the face before bed, or twist the lengths into two soft sections so the bend doesn’t collapse. On the next day, dry shampoo at the roots and a 5-second pass of the iron on only the front pieces is usually enough.
Wet-look buns and sleek ponytails are best worn the same day. They can survive overnight, but they tend to lose the crisp surface and pick up dents from sleep. If you need to refresh them, mist the top with water, smooth a tiny amount of gel or cream over the crown, and rewrap the elastic base.
Easy Swaps for Length, Texture, and Face Shape

Short-Hair Swap: If your hair won’t make a full ponytail, use mini braids, headband tucks, pinned-back waves, or a half-up knot. These hold better on bobs and lobs than styles that demand too much length.
Curly-Hair Swap: Keep the curls intact and work with them. A curly ponytail, half-up puff, or loose pineapple with a clip shows lowlights better than brushing the pattern out.
Fine-Hair Swap: Choose styles with some lift at the crown and avoid too much oil. Bubble ponies, half-up knots, and side braids add shape without weighing hair down.
Thick-Hair Swap: Use stronger pins, bigger elastics, and styles that anchor at the nape. Low twists, Dutch braids, and claw-clip updos hold better than tiny accessories that cannot keep up.
No-Heat Birthday Swap: Rope braids, headband tucks, scarf ponies, and low buns all work without a curling iron. The trick is letting the hair have a little texture first.
Common Mistakes That Flatten the Dimension
Using too much smoothing cream: The hair turns slippery, the pins slide, and the lowlights disappear under a sheen that looks more greasy than glossy. Use only a small amount on the surface and leave the roots alone.
Pulling every style too tight: A tight crown can make the hair look severe, especially if the lowlights are dark. Leave a little softness at the hairline so the color placement still reads.
Choosing accessories that fight the hair color: A clip that clashes with the lowlights can hijack the whole look. If your hair is warm, use warm-toned accessories. If it is cool, keep the metal and fabric tones muted.
Braiding hair that has no grip: Freshly washed, slippery hair loves to escape. Add dry shampoo, texture spray, or a little root powder before you braid or twist.
Skipping the face-framing pieces: A perfectly slick look can work, but on many faces it steals too much softness. A few loose strands around the temples change the whole tone of the style.
Questions About Lowlights and Fast Styling
Which hairstyle shows lowlights the best?
Loose waves, braids, and twisted ponytails usually show the most dimension because they separate the strands. If you want the lowlights to be obvious in photos, choose styles that bend or weave the hair instead of flattening it.
Do lowlights look better in updos or down styles?
Both can work, but updos often show the depth around the edges and at the nape, while down styles show it through movement. I’d pick a half-up style first if you want a little of both.
How do I keep a sleek style from looking greasy?
Use product sparingly and keep it on the surface, not the roots. A tiny bit of serum on the ends plus light-hold spray is enough for most styles.
Can these hairstyles work on curly hair?
Absolutely. Curly hair shows lowlights in a natural, broken-up way, which is perfect for ponytails, puffs, half-up shapes, and pinned styles. Just do not brush the curls out unless that is the look you want.
What if my hair is too short for a ponytail?
Use mini braids, a headband tuck, clipped-back waves, or a small half-up knot. Those styles need less length and often look better on a bob than a forced ponytail.
How long do these styles usually last?
A sleek pony or bun can last a full day if it starts on dry hair and gets a light mist of spray. Braids and waves often carry into the next day with a bit of refresh work.
Should I match my accessories to my lowlights or highlights?
Match to the deeper tone if you want the accessory to blend in. Match to the lighter tone if you want the clip, ribbon, or pin to stand out a little more.
A Fast Finish for Dimensional Hair
The nicest thing about lowlights is that they buy you breathing room. You do not need a perfect blowout or a three-tool styling session to make the hair look intentional. A simple twist, braid, ponytail, or tucked shape can do enough, as long as it lets the darker pieces move.
That is the real trick with bday hair on a busy morning: pick a shape that respects the color already in your hair. The lowlights will do their part if you do not crush them flat. Give them a little bend, a little shine, and a clean line at the front, and the rest tends to fall into place.