Traditional Dutch braids for long hair with thick hair have a built-in advantage: the braid sits on top of the section instead of disappearing into it, so the pattern stays visible even when the hair itself feels heavy enough to tug at your scalp. That sounds like a small detail until you’ve spent ten minutes building a braid that turns into a dark rope halfway down your back. Dense hair does that. It swallows weak sectioning, it punishes sloppy parts, and it makes cheap elastics slip if you blink at the wrong time.
The upside is that thick hair also gives you something most braid styles beg for: clean volume. Each crossover has enough body to read from across the room, and the braid can hold a shape that finer hair sometimes can’t keep without constant pinning. The trick is respecting the weight. Start with smaller sections at the hairline, keep your grip even, and stop trying to force a tiny braid on a big head of hair. That never ends well.
What follows is a set of braid placements and finishes that actually work on long, full hair. Some are polished enough for a workday, some are the kind you throw on before a long drive or a sweaty walk, and a few are there for the days when you want the braid to look intentional without needing half an hour and a second pair of hands.
Why These Braids Earn Their Keep on Thick Hair
-
The braid pattern stays visible: Dutch braids pop because the outer strands cross under, which lifts the braid off the scalp and keeps each rung readable even on dense hair.
-
The weight is spread out: Long, thick hair can feel top-heavy in a ponytail; a braid distributes that load across the head and down the length, so the style feels more balanced.
-
The scalp gets a break: A well-planned Dutch braid keeps layers from sliding into your face and reduces the daily tug of loose hair catching on collars, straps, and seat belts.
-
They buy you time between wash days: Thick hair usually has enough natural grip by day two that braid sections hold better, and a Dutch braid can look cleaner on slightly lived-in hair than on hair that’s freshly conditioned.
-
The finish can go from tight to soft: Pull a braid snug for a clean, secure look, or pancake it gently for wider loops and more visual volume. Same braid. Very different mood.
Why Dutch Braids Stay Visible in Dense Hair
A Dutch braid is basically a braid that sits on top of the hair instead of tucking into it. That one difference matters a lot when the hair is long, heavy, and full of texture. With thick hair, a French braid can sometimes sink into the base and lose its shape. A Dutch braid keeps its ribs lifted, so the braid reads cleanly even when the tail gets weighty.
There’s also a practical side people forget. Thick hair needs cleaner sectioning at the start than at the end. If the first half-inch is too big, the braid looks clumsy fast. If it’s too tight, the scalp complains. The sweet spot is a small, tidy top section and firm, even tension through the sides. That balance keeps the braid centered and stops it from wandering left or right by the time you reach the nape.
One more thing. Dense hair often hides mistakes better than fine hair, which is nice until it isn’t. A crooked part, a fuzzy crown, or a sloppy crossover can disappear into the mass and then reappear in the mirror when you’re already late. Clean parts, a little product, and patient finger placement make the braid read as deliberate rather than merely contained.
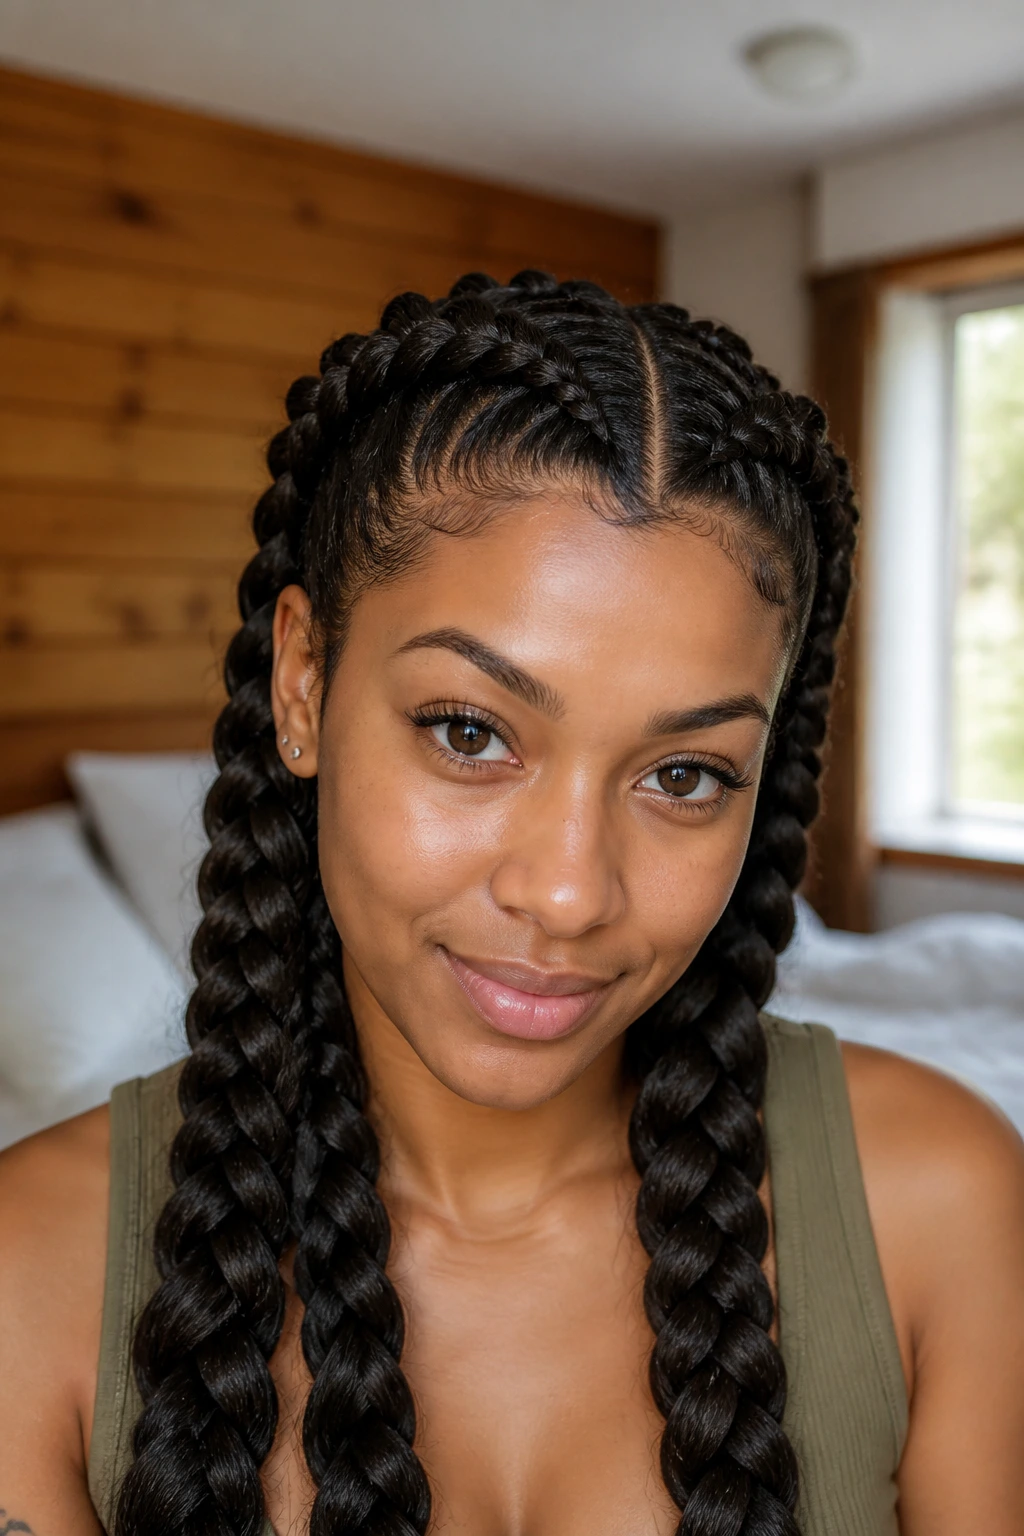
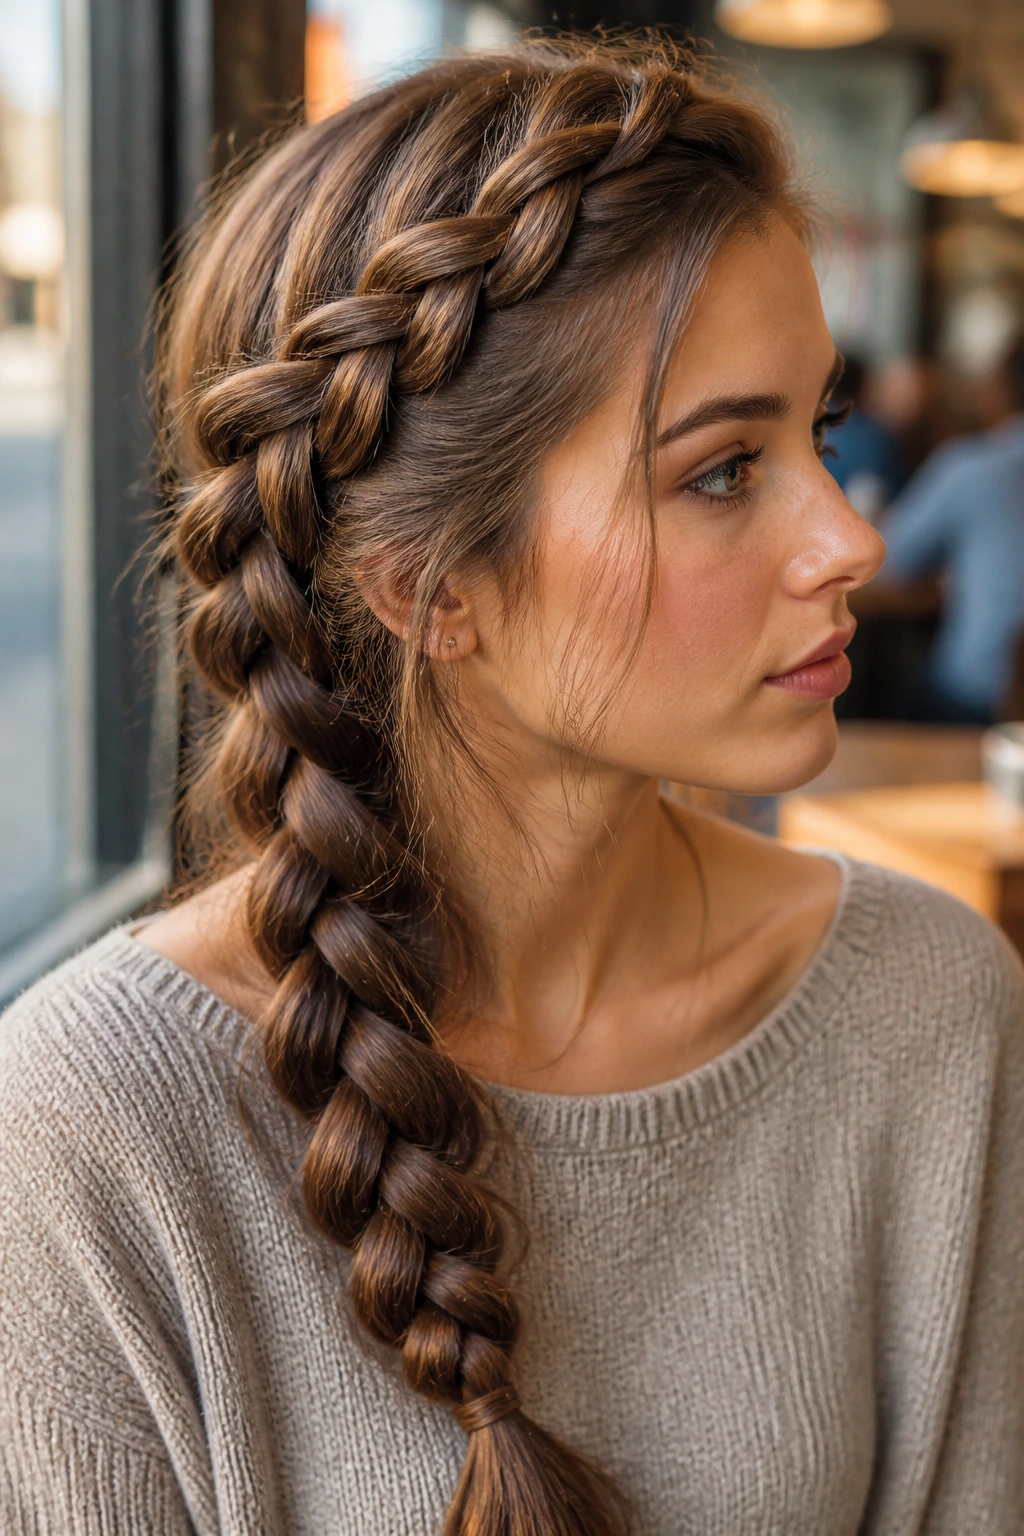
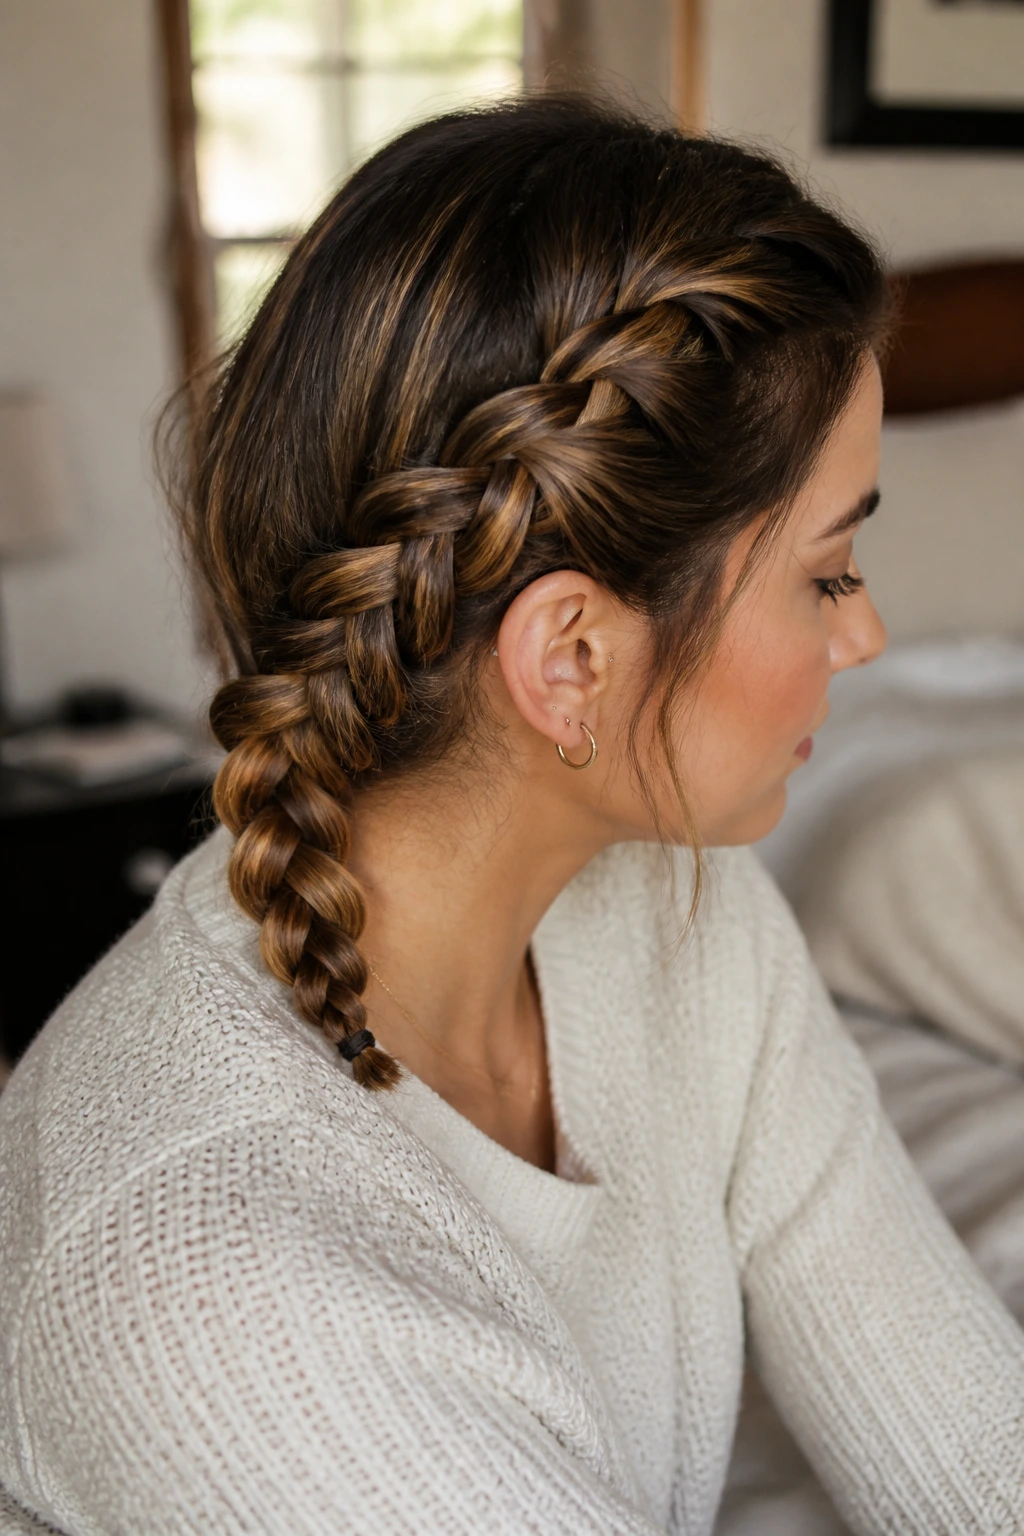
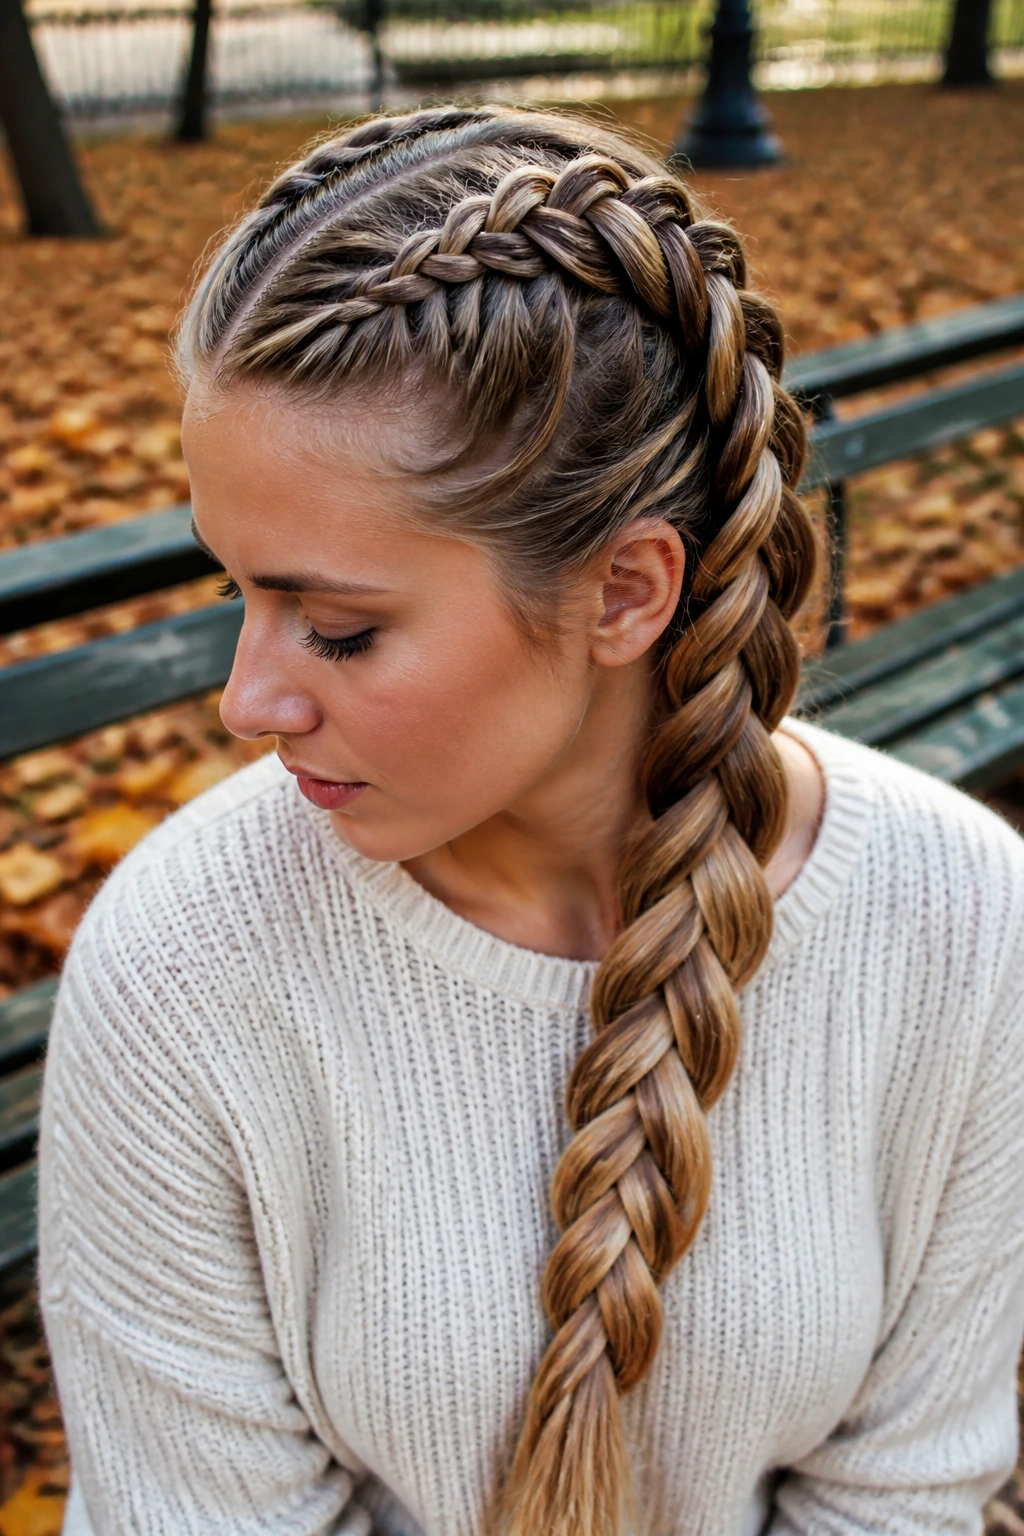
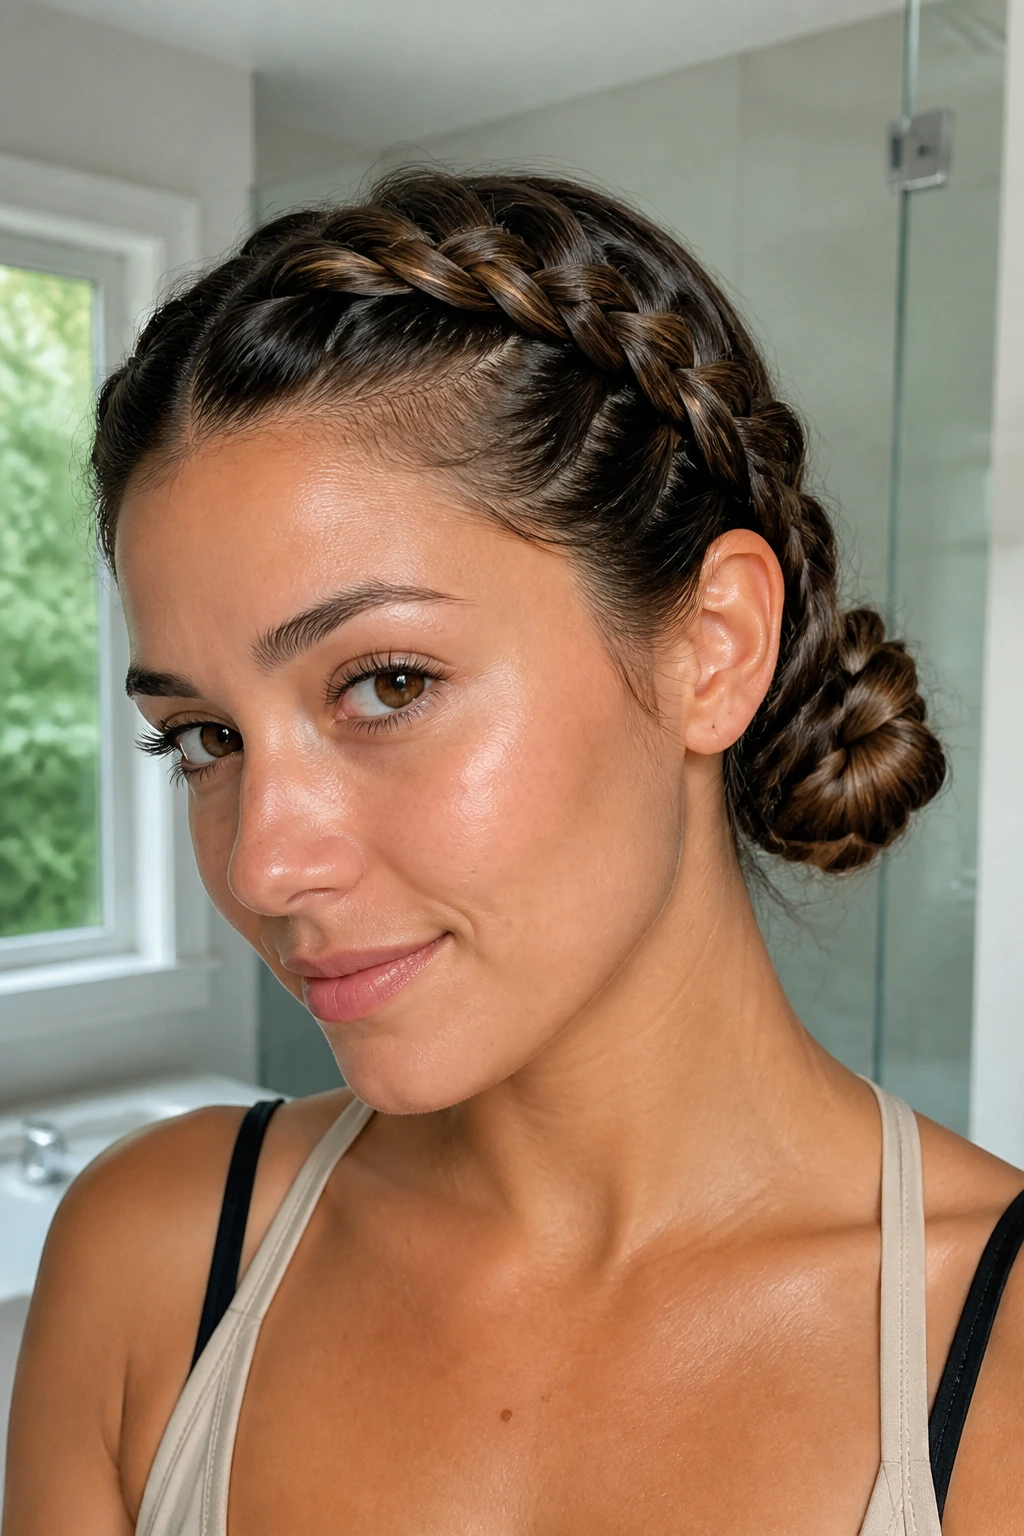
1. Classic Center Dutch Braid
This is the one that teaches the rest of the family how to behave. A straight-down-center Dutch braid gives long, thick hair a single clear line, and that line looks especially satisfying when the braid reaches below the shoulder blades. On dense hair, the trick is to keep the top section narrow at the crown so the braid doesn’t start off looking chunky.
Why It Works
The center part acts like a spine. Once that line is clean, the braid can sit evenly on both sides, which matters when your hair has enough bulk to drift. I like this version on second-day hair, lightly misted with water or a texturizing spray so the strands don’t slide through my fingers.
Quick things to watch
- Keep the first three crossovers tight and tidy.
- Use a small elastic at the end before you decide whether to pancake it.
- If the nape gets bulky, smooth the side sections with your palms before crossing them in.
A classic center braid is plain in the best possible way. No drama. No fuss. Just a braid that does its job and still looks good at the end of the day.
2. Twin Dutch Braids with a Clean Middle Part
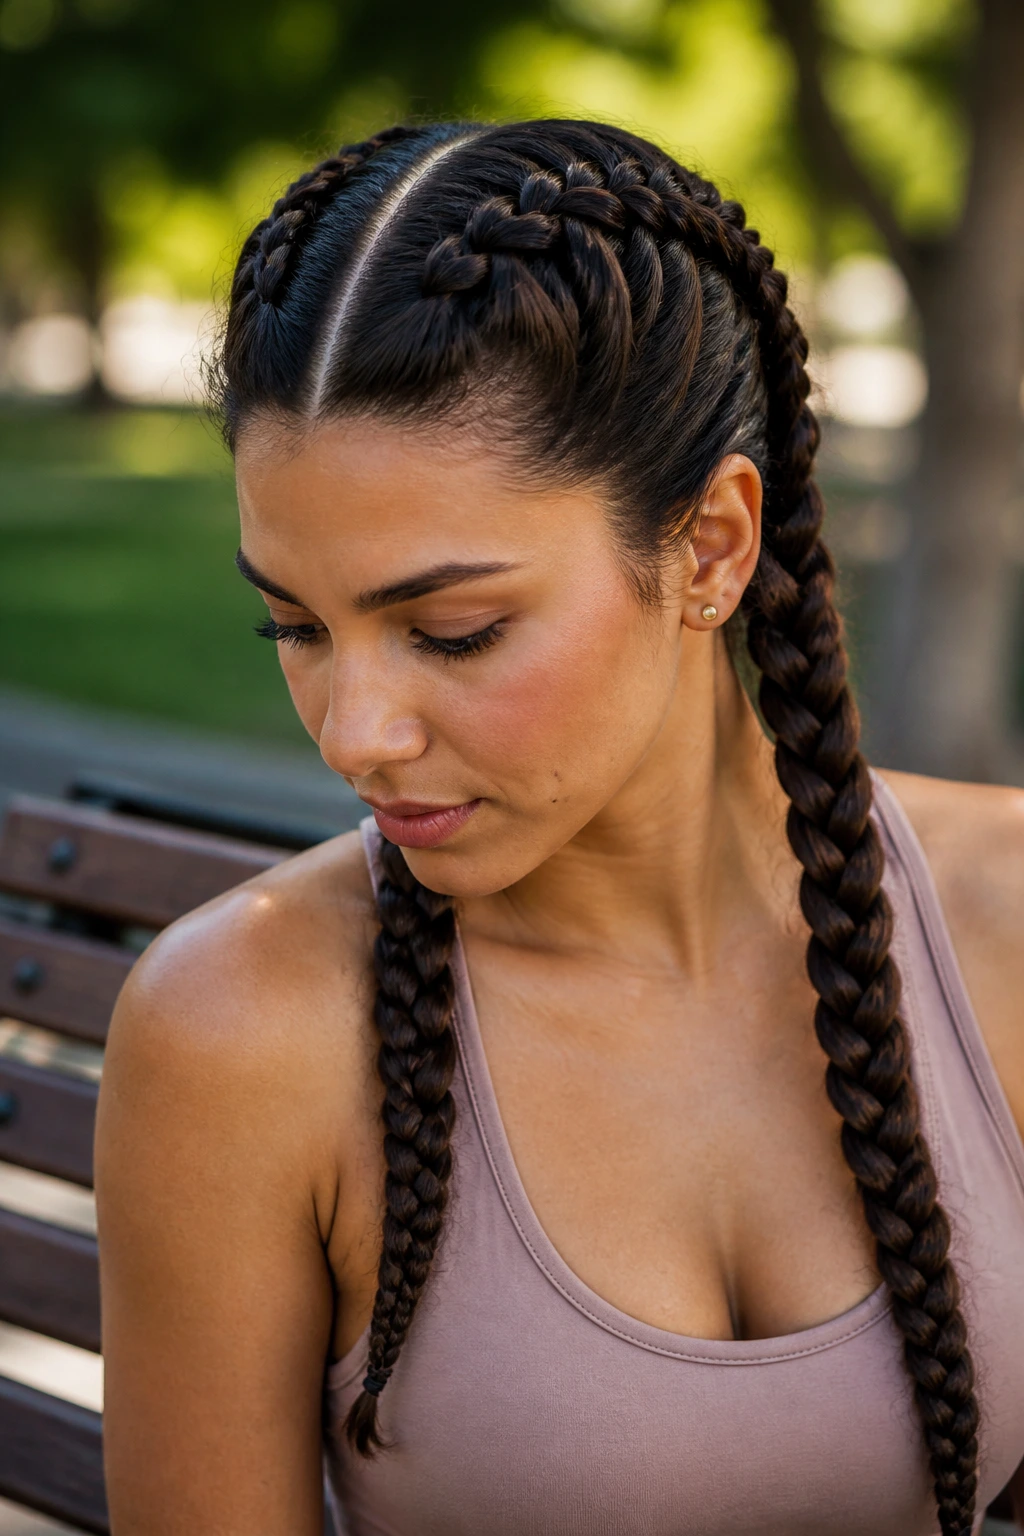
Twin Dutch braids split the weight in half, and that makes a bigger difference on thick hair than people expect. One heavy braid can drag; two braids balance each other out and keep the scalp from feeling pulled to one side. If you’ve ever worn one braid all day and ended up adjusting it every hour, this version fixes that problem fast.
How I’d wear it
I make the middle part sharp with the tail of a comb, then clip one side away before starting the first braid. On thick hair, that part has to go all the way to the nape, not just the crown, or the braids start looking uneven from behind. Tie each braid low or leave the ends loose if you want a softer finish.
- Best on hair with a little grip
- Cleaner than loose waves when you need your hair out of the way
- Easy to dress up with small hoops, ribbon ties, or a satin bow
The pair reads sporty, but not childish. On long hair, the ends hang with enough weight to keep the braids from looking skimpy.
3. Side-Swept Dutch Braid
A side-swept Dutch braid changes the whole feel of the style without changing the braid technique much. Instead of going straight down the center, the braid starts near the temple and travels diagonally across the head. Thick hair benefits from that angle because the braid can use the natural bulk near the crown to create a stronger visual line.
The part doesn’t need to be dramatic. A deep side part is enough if your hair likes to fall that way anyway. Keep the braid snug near the scalp, then let the tail fall over one shoulder. That shoulder placement matters. It keeps the length visible and stops the braid from getting crushed flat against the back of your jacket.
This is the braid I reach for when I want hair off my face but don’t feel like wearing a full updo. It has enough shape to look styled, and enough looseness to avoid the “I’m heading to spin class” vibe if that’s not what you’re after.
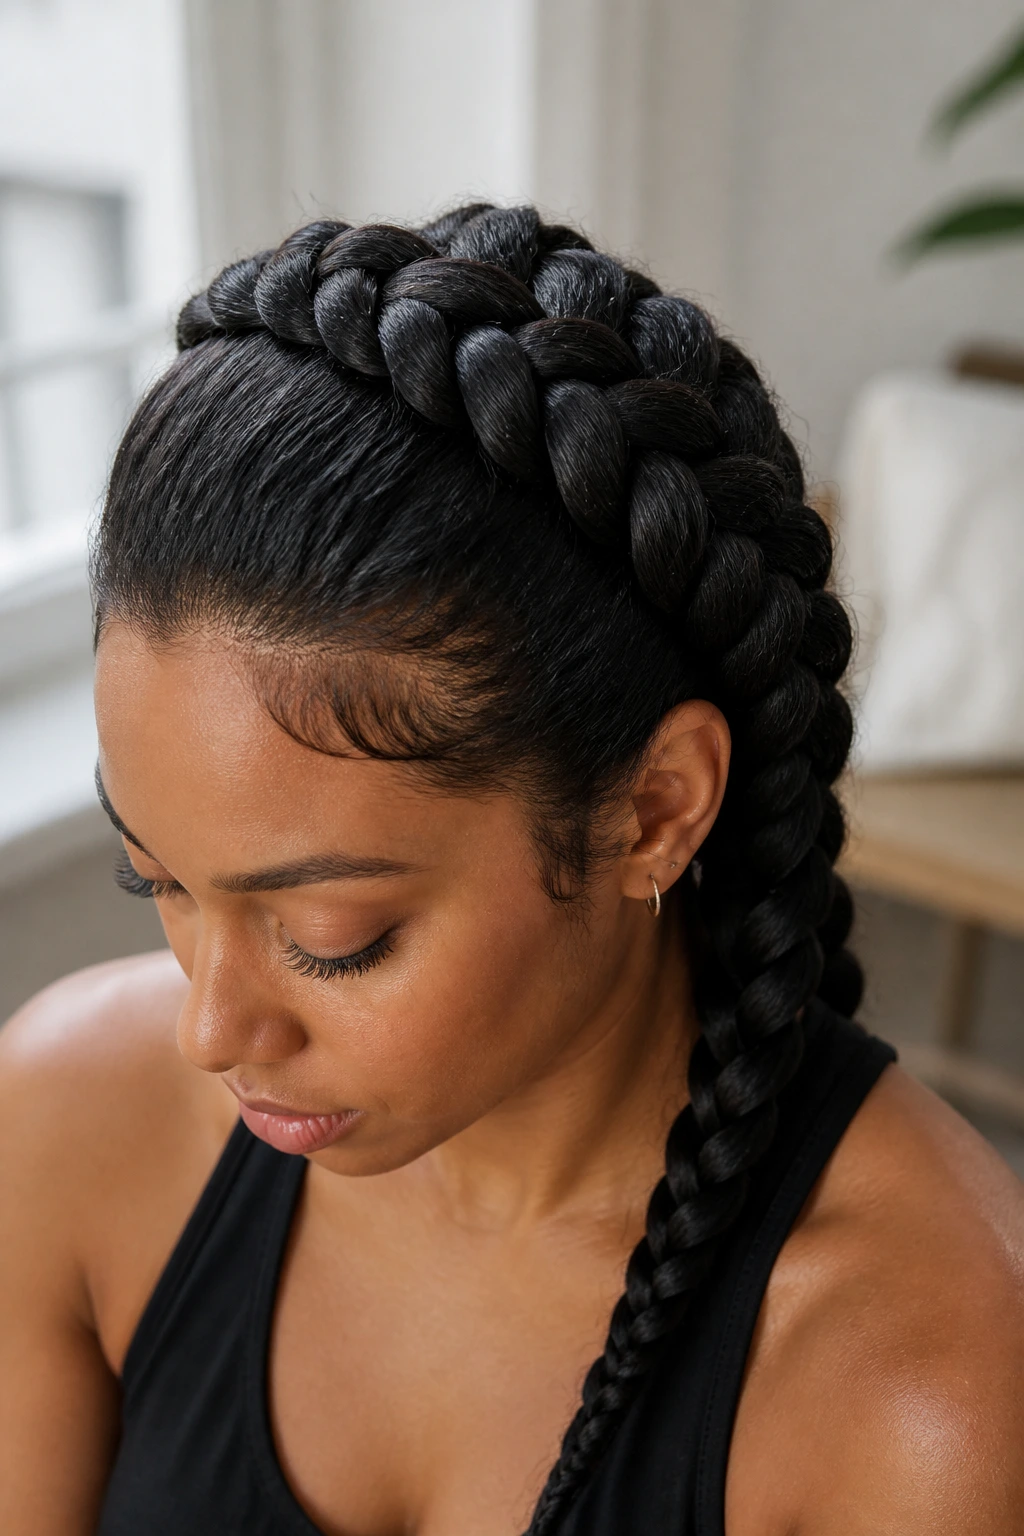
4. Dutch Braid into a Low Ponytail
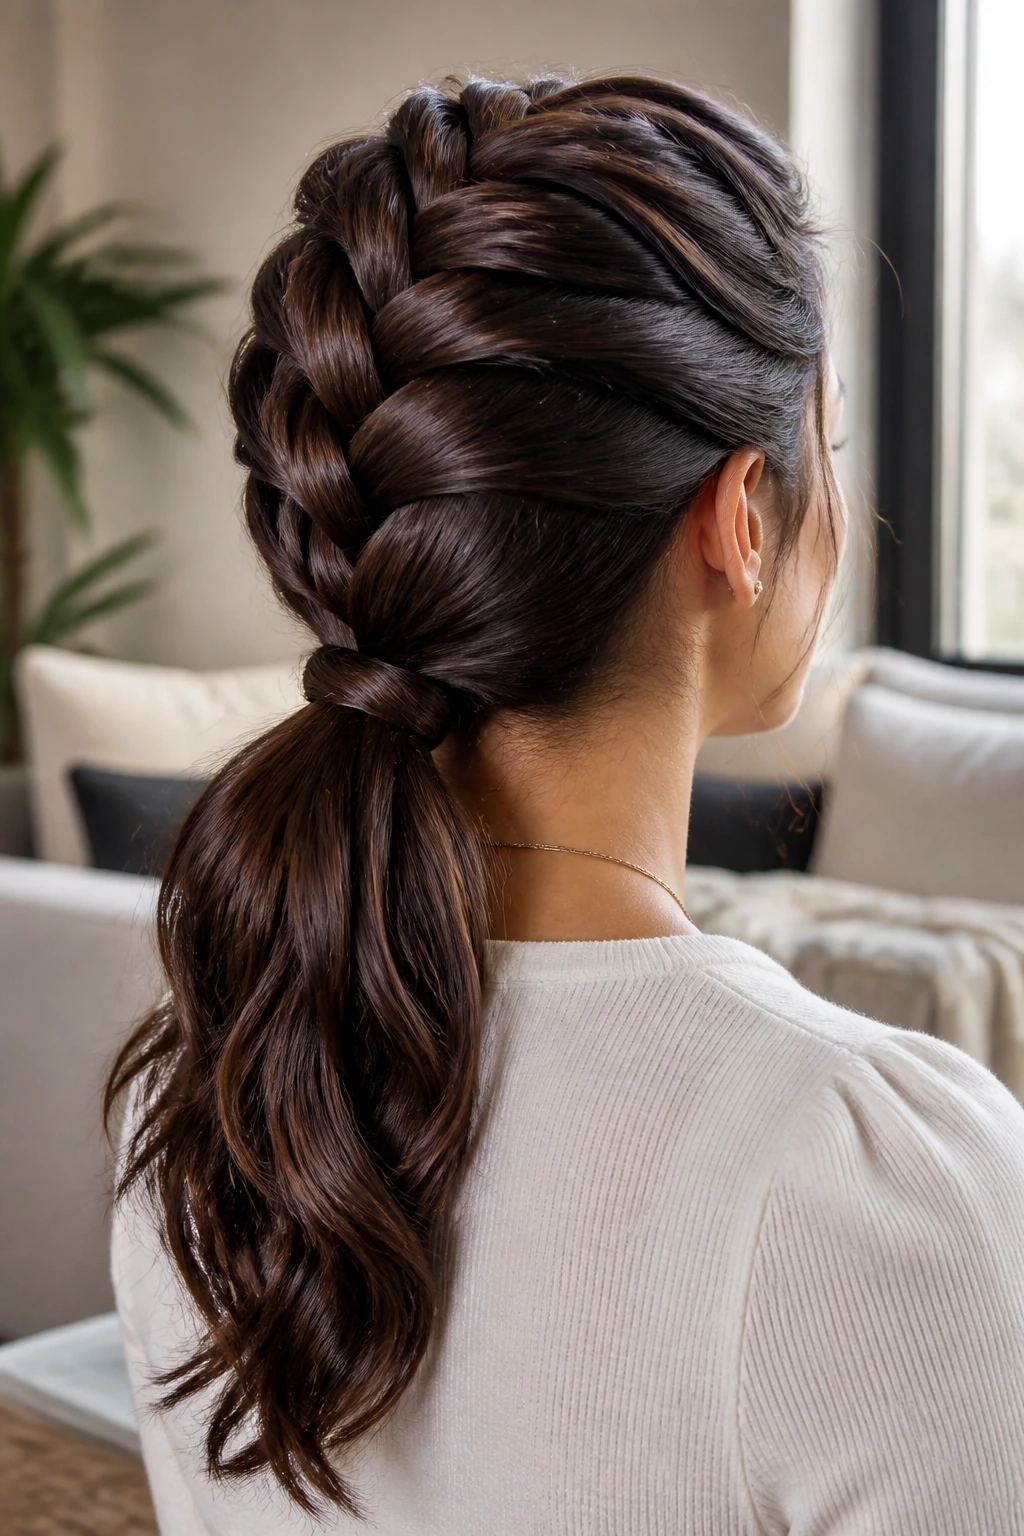
A Dutch braid into a low ponytail is one of the smartest ways to manage long, thick hair because it controls the top section and leaves the rest free. You get the clean scalp line of a braid, then the swing of a ponytail below it. That combination works especially well when the hair is too heavy for a high tie but still needs to stay off the neck.
Why It Works
The braid acts like a harness. It pulls the bulk back from the hairline and holds the crown flat, which keeps the ponytail from slipping forward. On dense hair, I prefer a strong elastic at the ponytail base and a second one a few inches down if the length is extra heavy.
Small styling note
A low ponytail can look flat if the braid stops too high, so bring the braid all the way to the upper nape before tying it off. A little hair oil on the tail can keep the ends from fraying.
This one is practical without looking plain. It’s also forgiving, which is rare enough to mention.
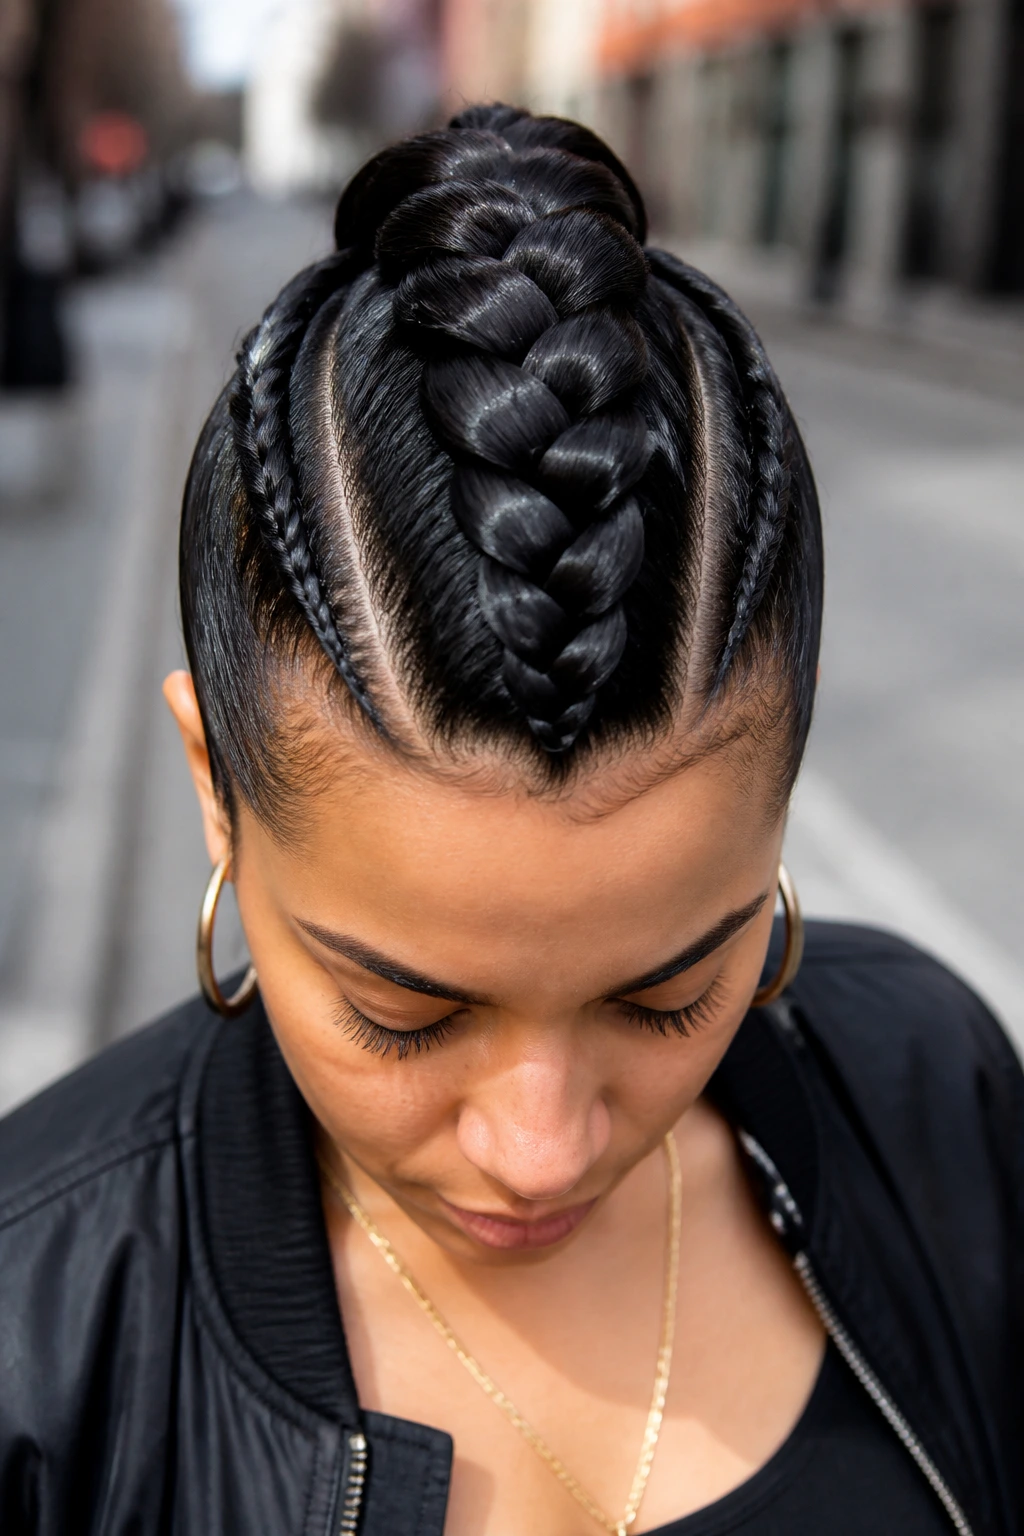
5. Dutch Crown Braid

The crown braid has a different energy. It circles the head and puts the braid in the spotlight, which is useful when your hair is long enough to feel unruly but still beautiful when it’s tucked in a clean shape. Thick hair makes a crown braid look substantial instead of wispy, and that fullness is the point.
The braid should sit close to the hairline without pressing into it. Too tight and it starts to feel like a helmet. Too loose and the crown collapses by noon. I like to braid from one side, travel around the back, and finish near the opposite ear before pinning the tail under the braid. That gives the style a clean seam instead of a messy wrap.
It’s a little more effort than a straight-back braid, sure. But the result frames the face in a way that long, thick hair doesn’t always do on its own.
6. Dutch Braid Bun at the Nape
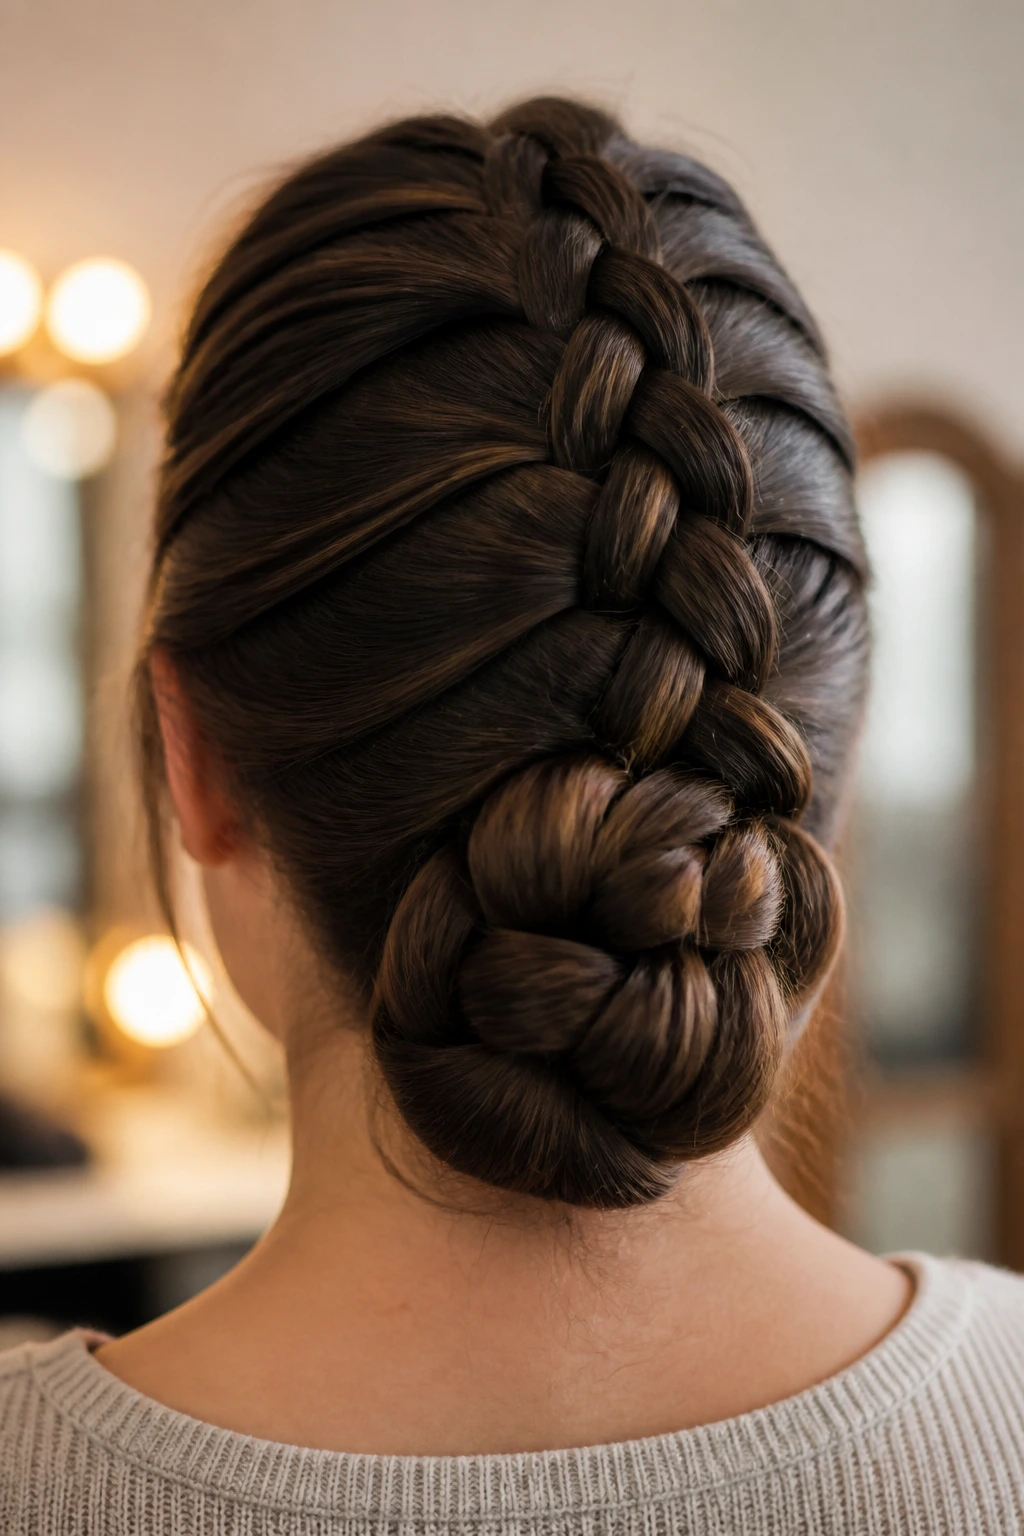
A Dutch braid bun at the nape is the answer when you want your hair secured but not flattened into submission. The braid starts at the crown or just behind it, then gathers into a bun low on the neck. Thick hair makes the bun look full and cushioned, which is useful because a tiny bun on dense hair can get lost.
Why It Works
The braid base stops the top layers from slipping. That’s the whole point. Once the hair is anchored, the bun can be wrapped without requiring six dozen pins. I use a handful of U-pins or two crossed bobby pins to hold the knot steady, especially if the hair is heavy or layered.
If your ends are dry, tuck them into the bun rather than wrapping them on the outside. It keeps the finish neater and avoids that fuzzy tail that appears after an hour of movement.
This is one of those styles that looks more complicated than it is. Good news for mornings. Better news for sore arms.
7. Half-Up Dutch Braid
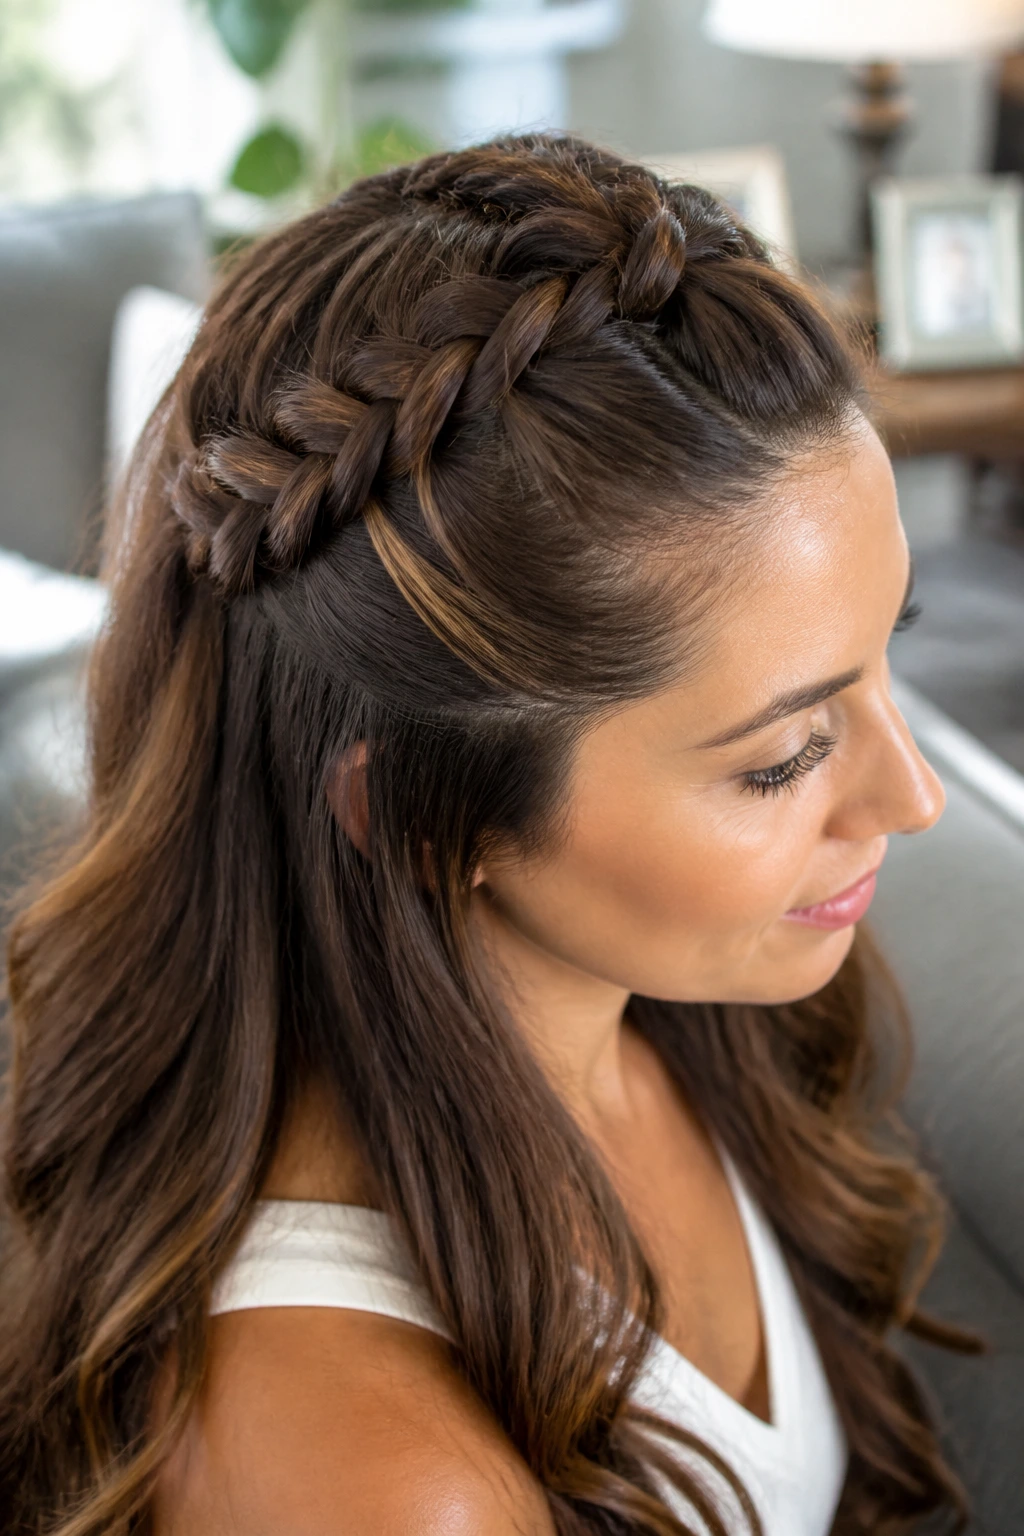
Half-up Dutch braids are what I recommend when you want to keep the front and crown under control but still show off the length. On thick hair, full-up styles can feel like too much. Half-up gives you breathing room. It removes some weight from the face while leaving the lower half loose and swinging.
A useful detail
The braid should start with a narrow section at the front and widen only slightly as it travels backward. If you take too much hair too soon, the half-up section eats the whole head and stops being “half-up.” Keep the braid secure with a small elastic, then let the loose hair below it stay smooth or curled.
A half-up Dutch braid also plays nicely with layers. Face-framing pieces can stay out on purpose, which softens the shape and keeps the look from feeling too severe.
If you like a braid that doesn’t overcommit, this is the one.
8. Diagonal Dutch Braid from Temple to Nape

A diagonal Dutch braid is a tidy way to break up the width of very full hair. Instead of marching straight back, the braid moves from one temple down toward the opposite side of the nape. That diagonal line is flattering on long hair because it draws the eye across the length instead of just down the center.
The sectioning matters here more than anywhere else. Use the tail of a comb to set the starting point near the temple, then keep the braid close to the scalp as it crosses the back of the head. Thick hair can make diagonal braids look bulky in the middle if the hand tension changes, so keep each crossover the same size.
It’s a nice option for side parts, too. The braid can feel a little more relaxed than a center style without losing structure.
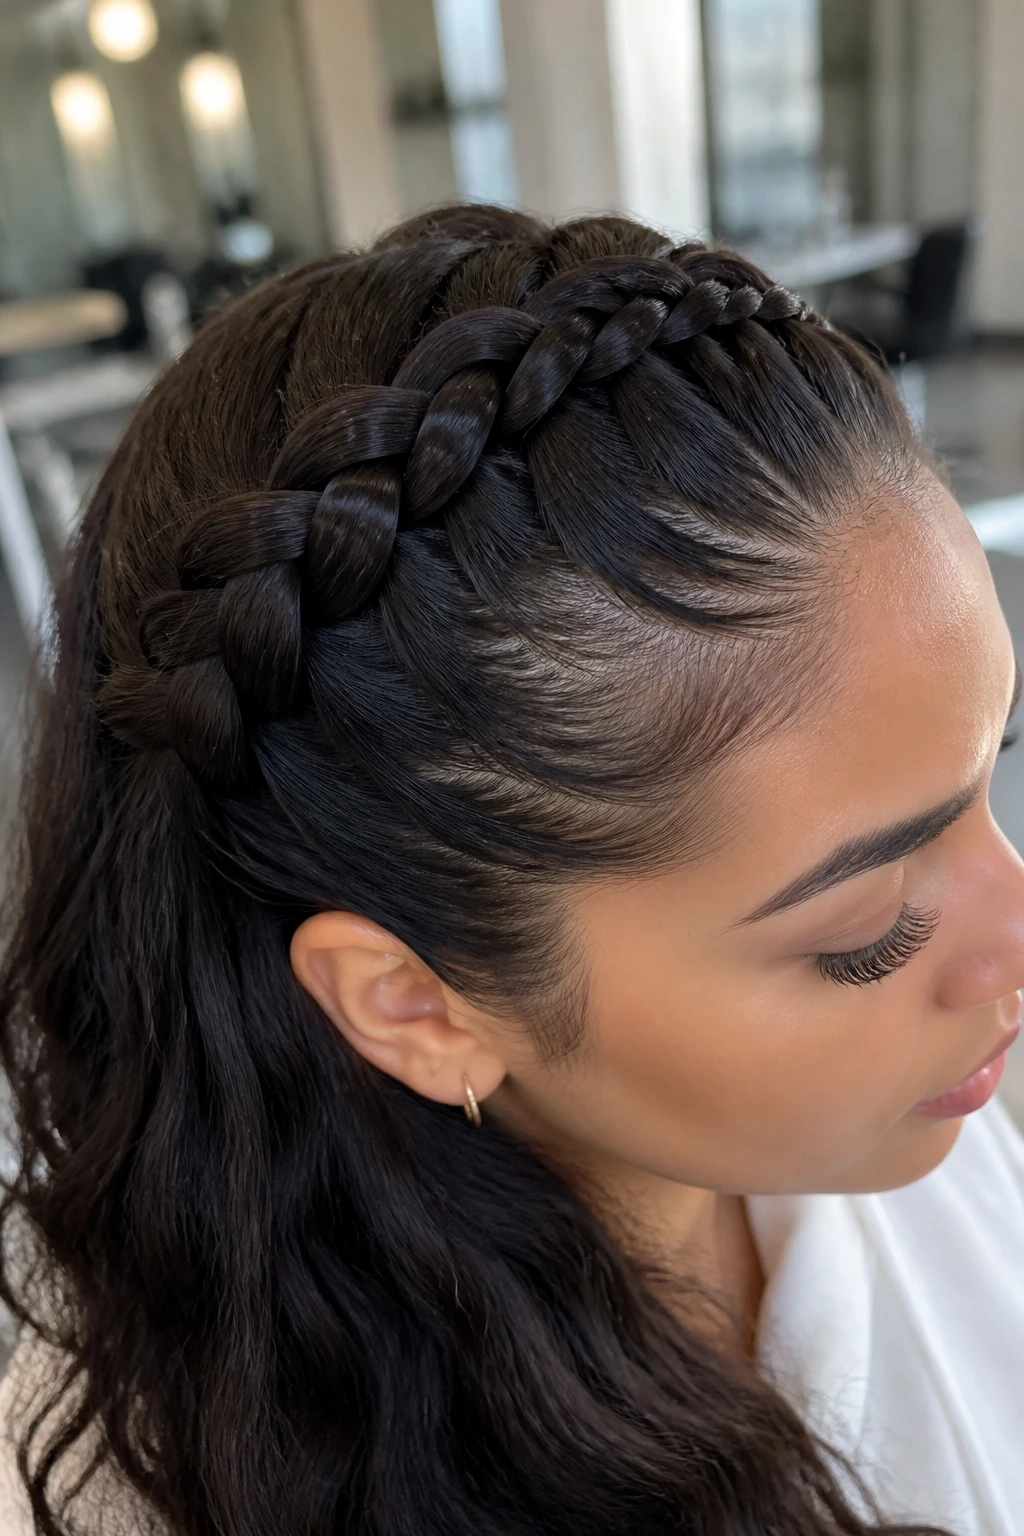
9. Dutch Braid Headband
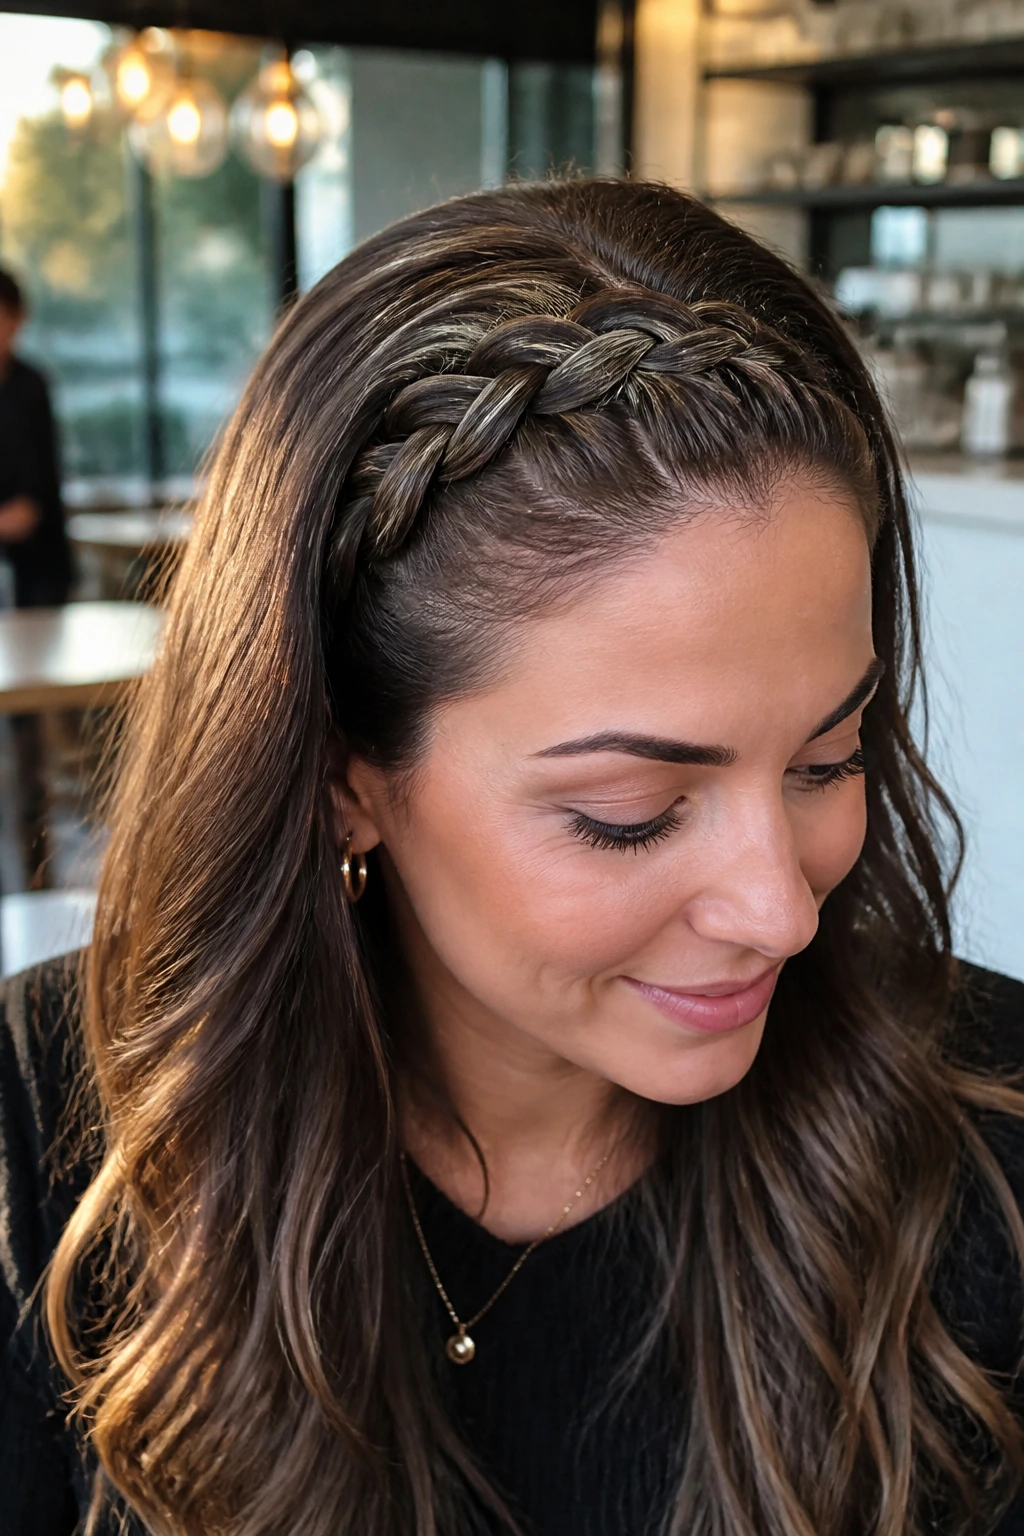
A Dutch braid headband is one of the cleanest ways to handle front bulk on thick hair. The braid runs across the hairline like a band, while the rest of the hair stays loose behind it. That means you keep the volume where you want it and remove it where it gets annoying — right in your eyes, right on your forehead, right where bangs would normally fight you.
How to use it
Take a slim section from above one ear, braid along the front hairline, and pin it behind the opposite ear. The rest of the hair can stay straight, waved, or curled. I like this with a little texture at the root because a headband braid needs grip to stay put.
- Ideal for second-day hair
- Good for growing-out bangs
- Handy when you want loose length without flyaways in your face
It’s one of the easiest braids to wear with glasses, which people almost never mention. Glasses plus heavy hair can get crowded fast.
10. Braided Mohawk Dutch Braid
The Dutch braid mohawk is bold without being fussy. A center ridge runs from front to back, while the side sections are smoothed down, pinned, or braided into the main line. On thick hair, the mohawk shape works because it uses all that density to create height rather than trying to hide it.
What makes it different
A regular center braid lies neatly. A mohawk braid has attitude. The top section is usually wider, and the side hair is controlled tightly so the braid looks like a raised spine. If you have a lot of length, let the tail fall long and straight — that keeps the style from getting top-heavy.
This one is especially useful if your hair tends to puff at the crown. By directing volume into one intentional line, the style reads cleaner than a loose, spread-out braid ever will.
It’s a little dramatic. That’s part of the fun.
11. Low Nape Dutch Braid
The low nape Dutch braid sits flatter than the center braid and feels a little more understated. It starts lower on the head, often just behind the ears or at the upper nape, and hugs the neck before dropping into a tail. Thick hair benefits from this because the weight stays close to the scalp instead of lifting the braid upward.
The shape is especially good on days when your hair is freshly brushed and too slippery for a high braid. A low start gives the sections more control and keeps the braid from riding up as the length pulls on it.
I like this style with a clean middle or side part, depending on how the rest of the hair falls. Either way, the lower anchor point makes the braid feel settled. Less effort. Less fuss.
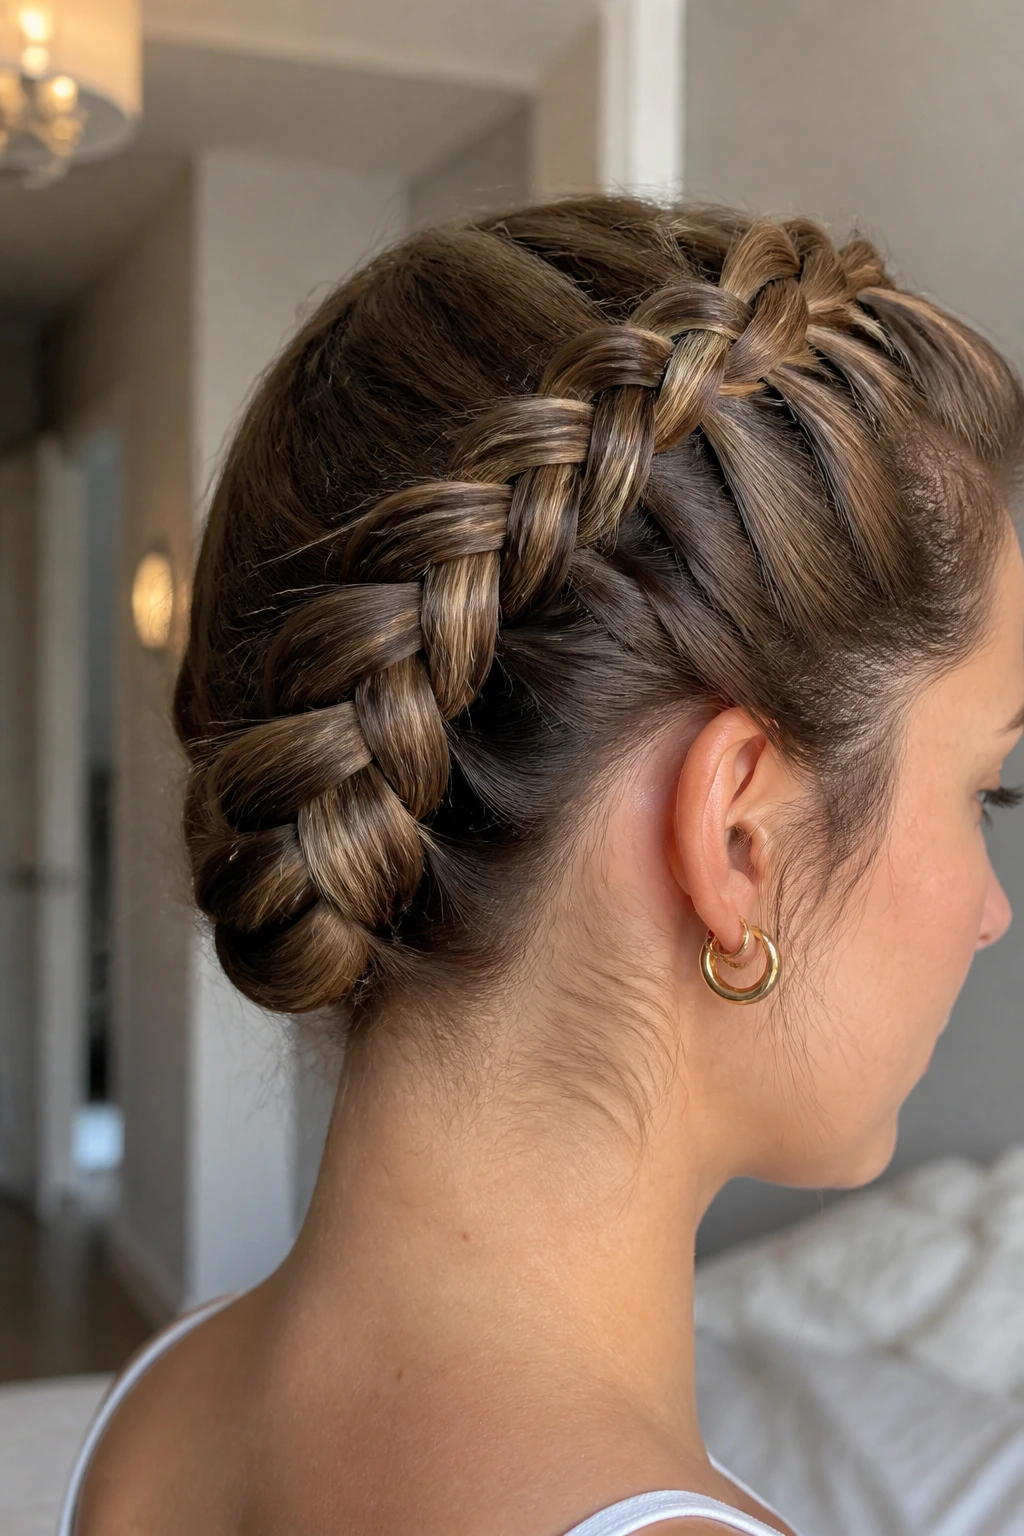
12. Pancaked Dutch Braid for Extra Width
Pancaking is the move that turns a regular Dutch braid into something broader and more sculptural. You gently tug the outer loops of each crossover after the braid is secured, widening the braid without completely unraveling it. On thick hair, that extra width looks deliberate rather than puffy.
Why It Works
Dense hair already has body. Pancaking just spreads that body out so the braid reads from a distance. The important part is patience: pull each loop a little, then move to the next one. If you yank the braid all at once, you flatten the pattern and create frizz.
- Pancake after the elastic is in place
- Start at the bottom and work upward
- Use both hands so one side doesn’t get wider than the other
This finish is the one I use when I want the braid to look full and soft, not tight and severe. It’s especially nice on long hair because the width makes the braid feel balanced against the length.
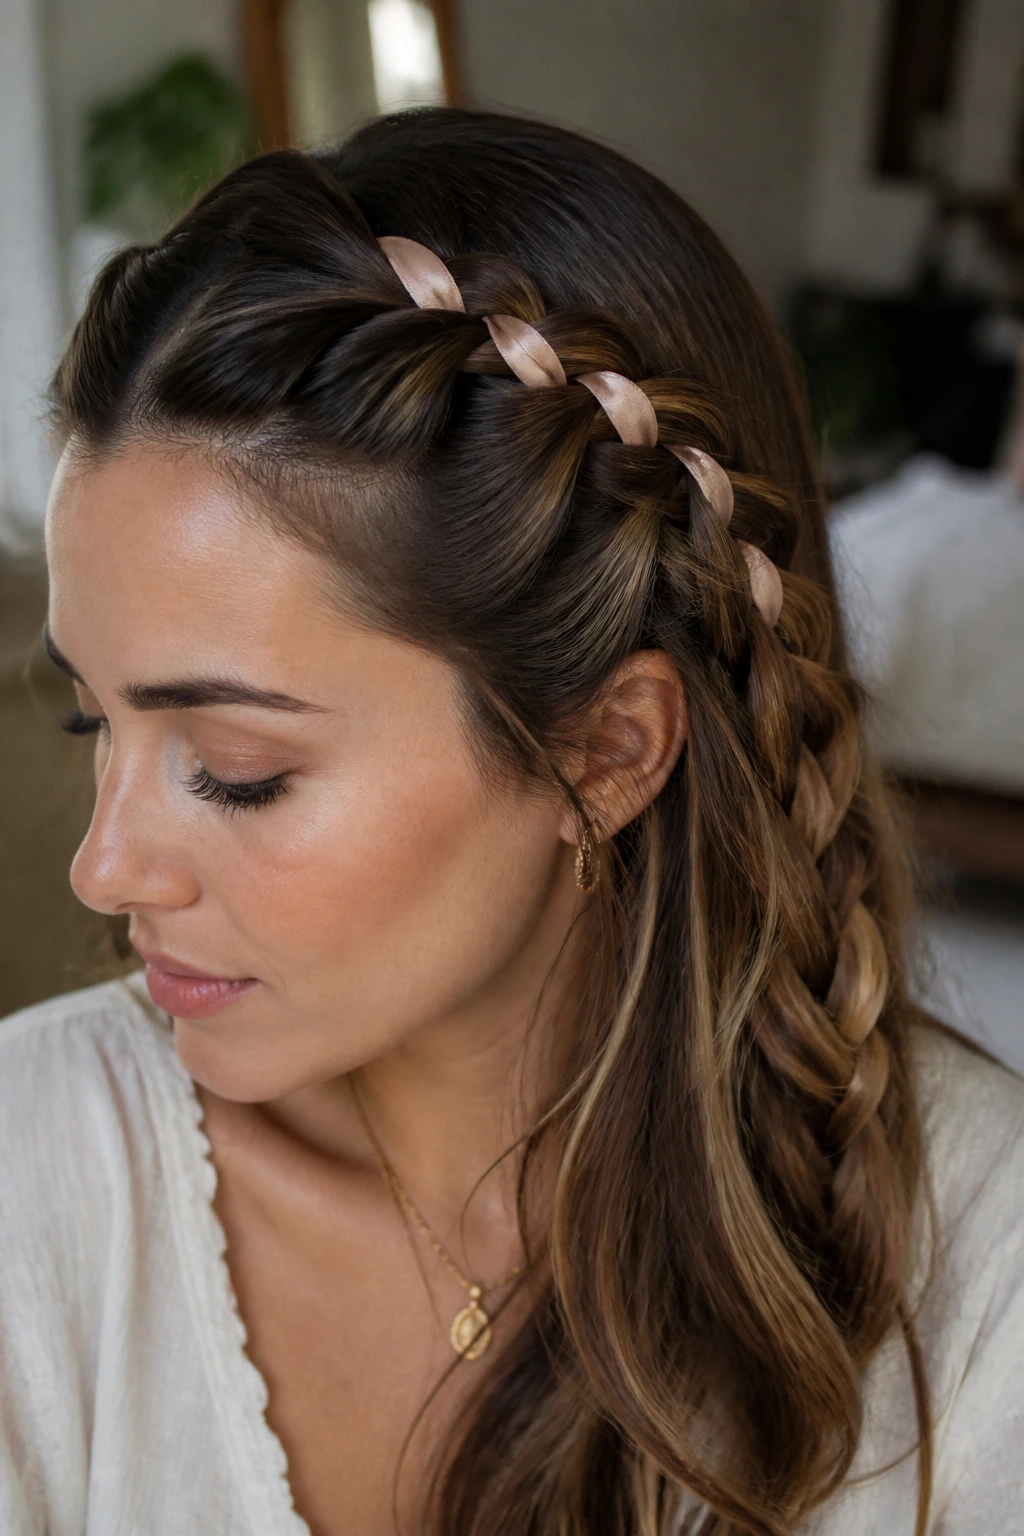
13. Ribbon-Woven Dutch Braid
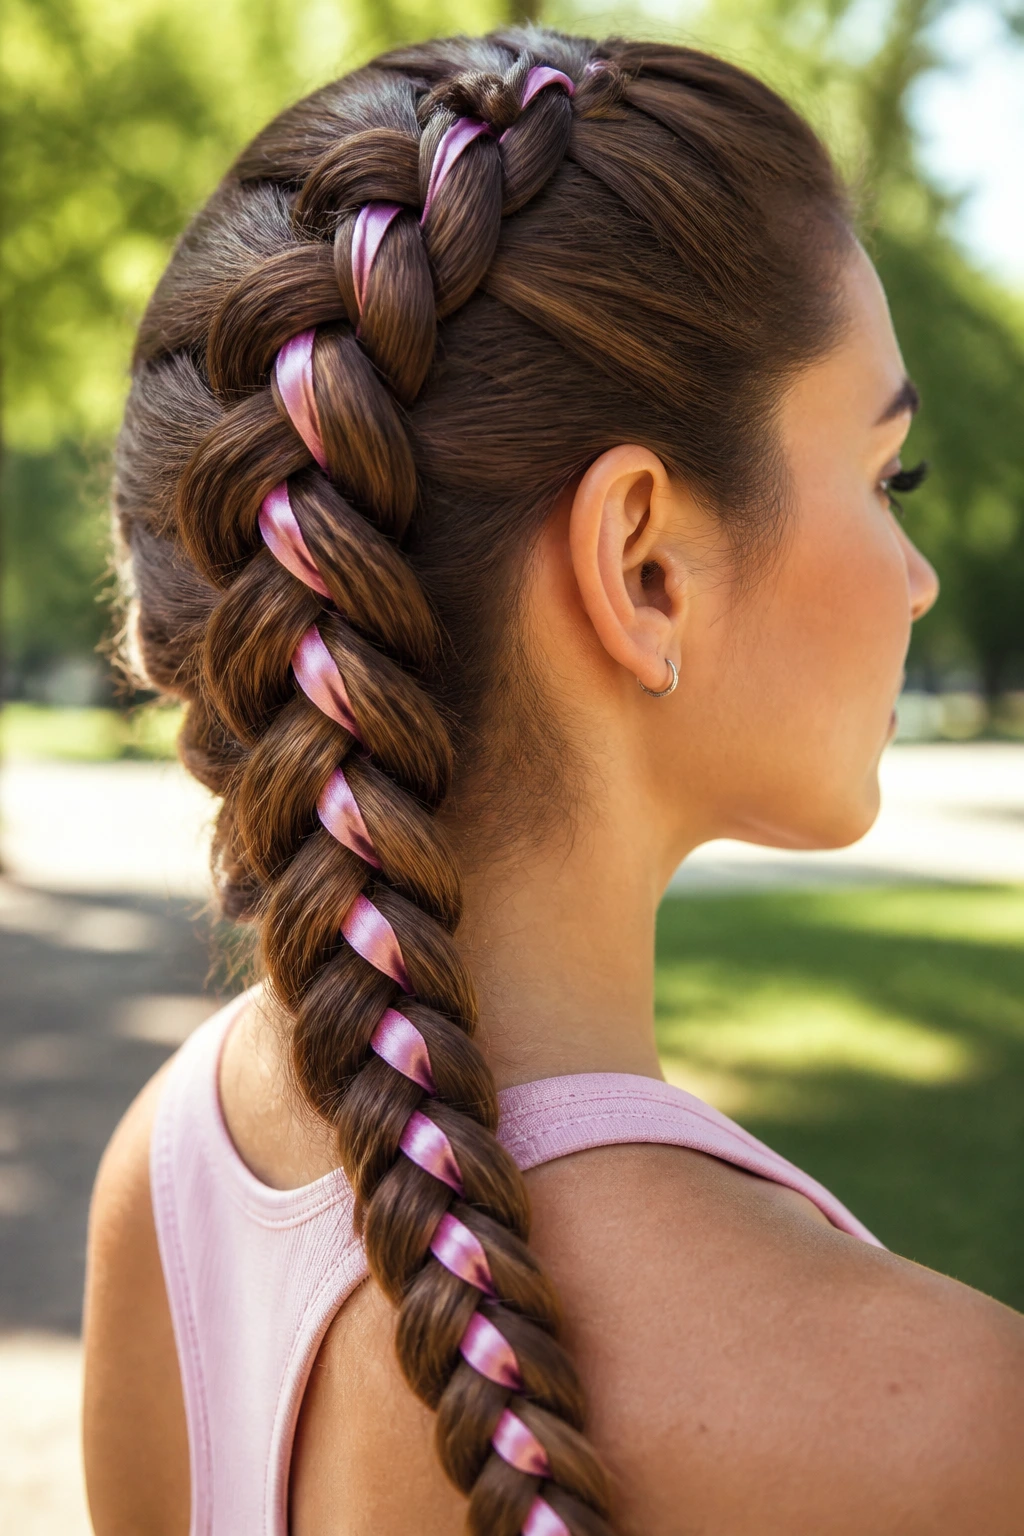
A ribbon-woven Dutch braid is a small change that makes a big visual difference. Threading a ribbon through the braid adds color, shine, and a little structure around all that dense hair. The braid itself stays traditional; the ribbon just gives it a sharper edge.
Pick a ribbon that’s narrow enough to sit inside the braid without bunching. About a quarter-inch wide works well. Satin looks polished, but it can slide, so I prefer a slightly matte ribbon if the hair is very smooth. Tie the ribbon at the base and let it ride alongside one strand as you braid.
This version is lovely for long hair because the ribbon can continue all the way down the tail. It also helps the braid read more clearly if your hair is a very dark color and the plait tends to disappear in low light.
14. Scarf-Tied Dutch Braid
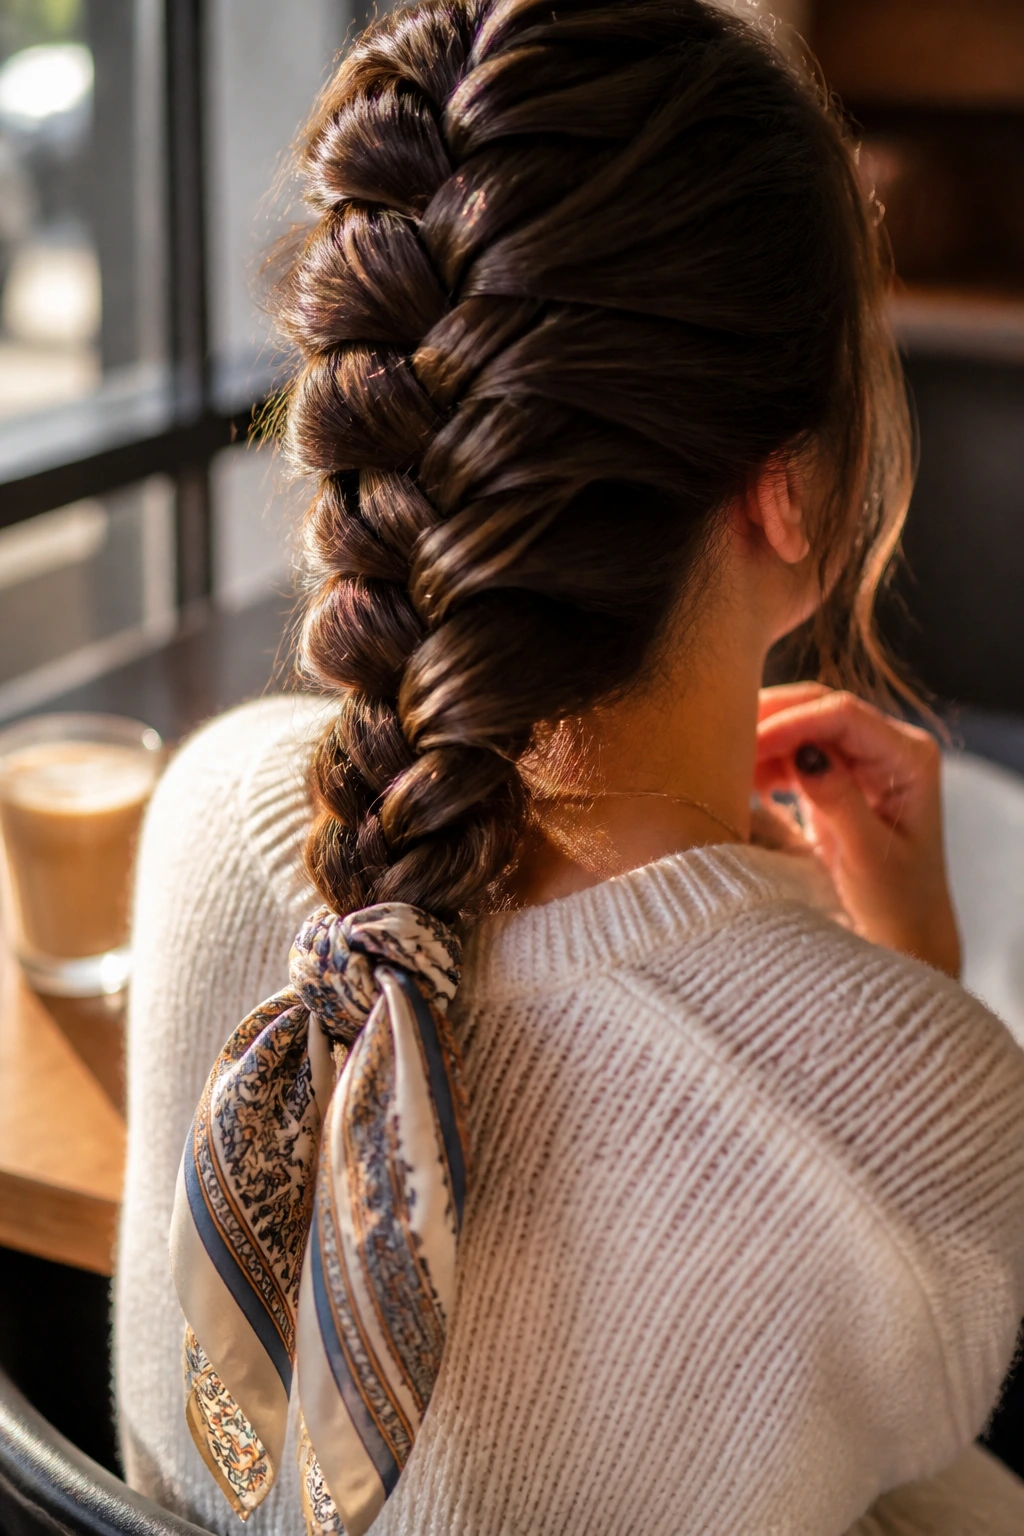
A scarf tied into a Dutch braid does two jobs at once: it softens the look and keeps the tail from fraying visually. I’m partial to this one on long, thick hair because the scarf gives the braid a finish point. Without it, the end can feel like a heavy rope hanging there. With it, the whole style feels finished.
Use a silk or satin scarf if you want drape, or a cotton scarf if you want more grip. Tie it at the base of the braid or weave it through the tail once the braid is established. A scarf that’s too wide tends to bulk up the braid in a way that fights the shape, so keep it narrow.
It’s a simple fix, but it changes the mood fast. The braid goes from “held back” to “styled.”
15. Dutch Braid with Face-Framing Pieces
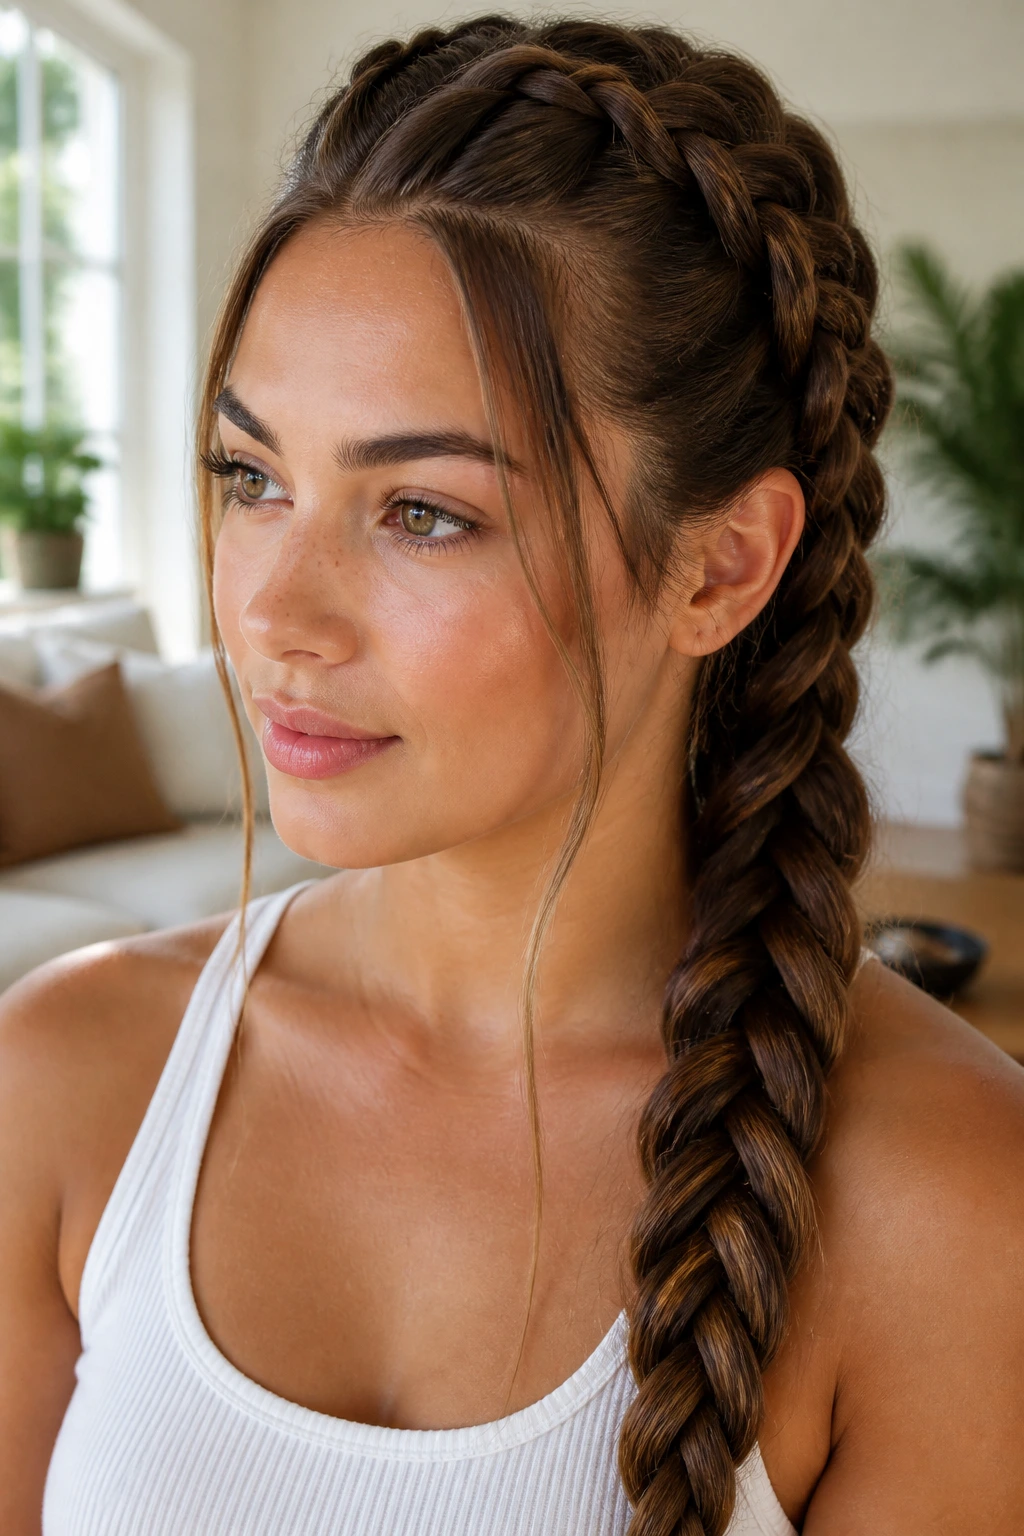
Face-framing pieces make a Dutch braid feel less strict, which is useful on long, thick hair because heavy lengths can make the whole style look severe. Leave out two slim sections near the temples before you start braiding. Not giant chunks. Slim. Think pencil-width, not thick curtain bangs.
The parting trick
Clip the front pieces away first so they don’t get trapped in the braid. Then braid the rest back as usual. Once the braid is tied, smooth the loose pieces with a drop of styling cream or a tiny bit of serum so they bend instead of frizzing outward.
This is the style I use when I want the braid to do the controlling without swallowing the face. It looks good with earrings, and it keeps the braid from feeling like a hard line across the head.
A lot of people overdo the face-framing bits. Don’t. A little softness goes a long way.
16. Two-Into-One Dutch Braid
Two Dutch braids that merge into one can feel a little technical, but on thick hair it solves a real problem: too much bulk at the top, too much weight at the bottom. Starting with twin braids gives structure near the crown, then joining them into one braid lowers the visual heaviness as the hair gets longer.
The merge should happen around the mid-back or just above the shoulders. Too high and the braid looks like it gave up halfway. Too low and the braid starts to spread out. When you combine the two sections, cross them together as if they were one larger braid, then continue down with steady tension.
It’s a clever choice for long hair because it keeps the top neat without making the whole style feel oversized. Clean at the roots, manageable at the ends. That’s a nice trade.
17. Dutch Braided Pigtail Buns
Dutch braided pigtail buns are the answer for days when you want all the hair up and almost none of it moving. The braid starts on each side of the head, travels down close to the scalp, and wraps into buns behind the ears or at the nape. Thick hair makes these buns look full, not tiny, which is exactly what you want.
I like this style for errands, gym days, or long work sessions where loose hair would be a nuisance. Secure the braids with small elastics first, then wrap the lengths into buns and pin them at the base. If your hair is especially heavy, anchor the pins into the braid, not just the bun.
It’s practical, but it still looks deliberate. That matters more than people admit.
18. Dutch Braid into Bubble Ends

Bubble ends are a nice compromise when you want the polish of a braid and the visual weight of a ponytail. Braid the hair down most of the way, then finish the tail with small elastics every few inches and gently puff the spaces between them. On thick hair, those bubbles look rounded instead of flimsy.
How to keep it neat
Use clear elastics or ties that match your hair color. Space them evenly, then tug each section just enough to round it out. If you over-pull, the tail turns fuzzy and loses its shape.
This style works because it lets the braid do the hard work at the scalp while the tail brings a little movement. It’s a good option if your ends are a bit dry or layered and you want to hide that fact without tucking everything away.
19. Zigzag-Part Dutch Braid
A zigzag part is one of my favorite tricks for thick hair because it breaks up a plain center line and makes the braid feel more styled right from the front. You draw the part with the tail of a comb in short angled moves instead of one straight line. It takes a minute longer, maybe two, and the payoff is worth it.
The braid itself can stay classic. That’s the beauty of it. The zigzag just adds detail at the roots so the style doesn’t look like you ran a comb down the middle and stopped there. On long, dense hair, that little bit of visual movement helps keep the top from looking flat under the weight.
If your crown tends to puff, the zigzag part also disguises it better than a hard center line. It gives the eye somewhere else to go.
20. Tucked-End Dutch Braid
A tucked-end Dutch braid is the neat finish people wish they’d learned sooner. Instead of letting the tail hang, you fold the end under the braid or coil it into a low tuck and pin it flat. Thick hair benefits from this because dry or layered ends can make a beautiful braid look messy at the finish.
This is where U-pins or long bobby pins earn their keep. Slide them into the tucked section at different angles so the weight is supported from more than one direction. If the tail is especially thick, use a small clear elastic first, then tuck and pin the bundle.
The look is clean, compact, and a little old-school in the best way. It also stays out of the way better than a free-hanging braid if you’re wearing scarves or structured collars.
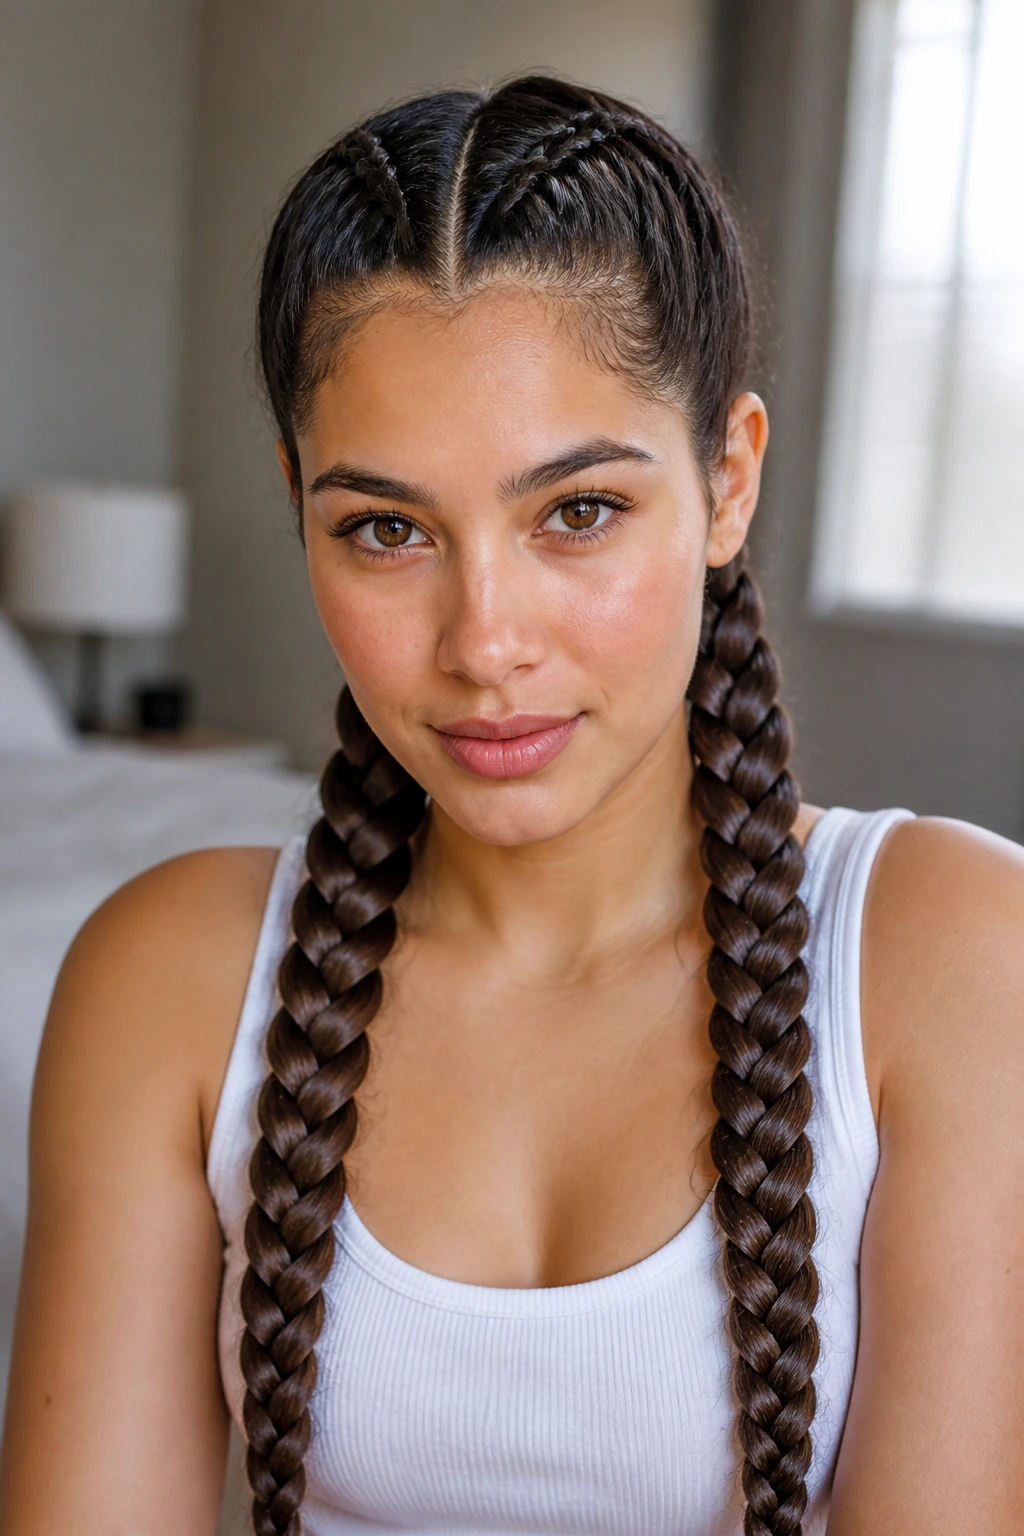
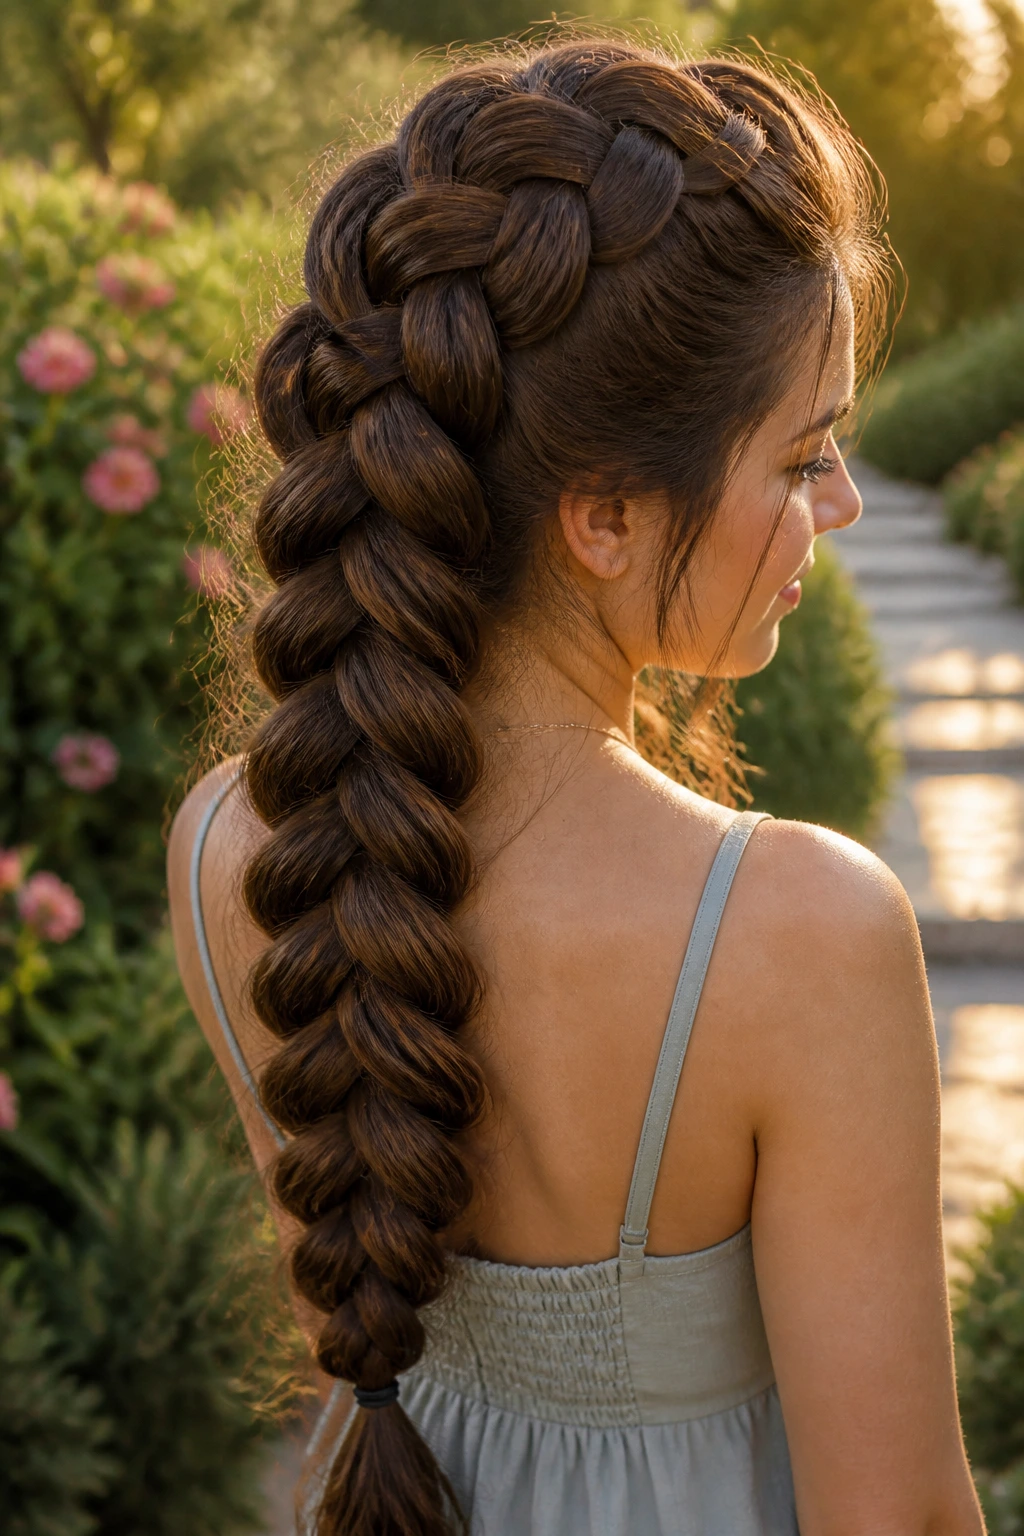
21. Long Tail Dutch Braid
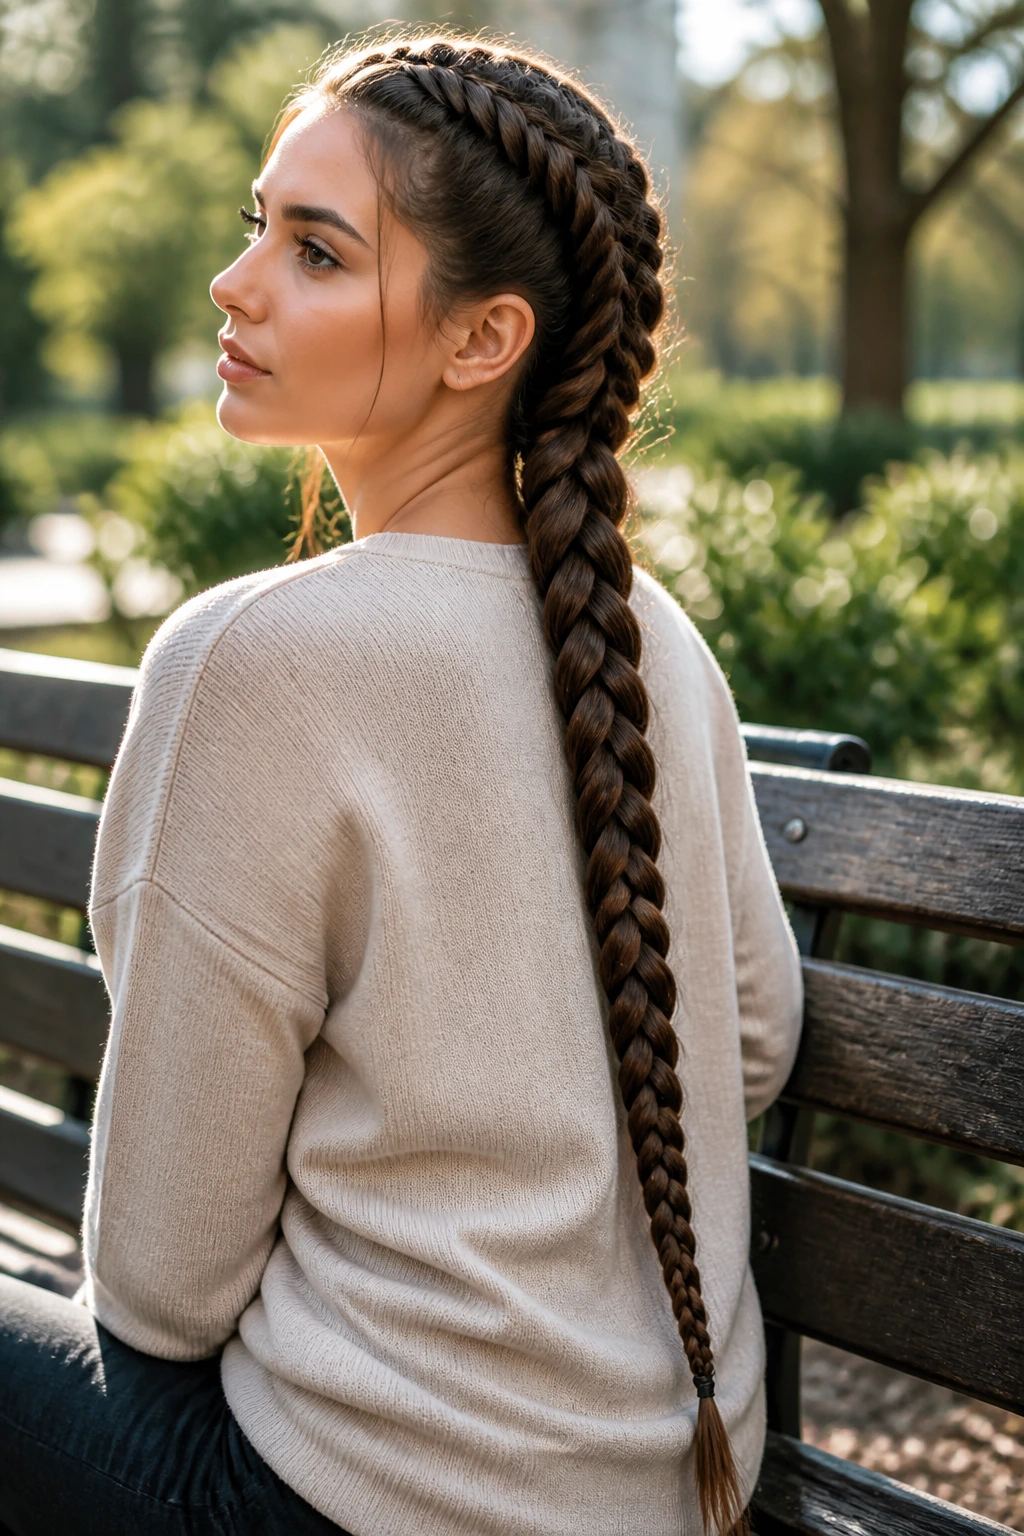
Sometimes the best move is to let the braid do what long hair wants to do anyway: hang. A long tail Dutch braid keeps the full length visible from top to bottom, which is satisfying if you’ve spent years growing your hair and don’t want to hide it in a bun. Thick hair makes this look rich and grounded instead of thin and stringy.
The key is to keep the braid firm at the roots and slightly softer as you move down the length. That keeps the tail from looking like a rigid rope. Once it’s tied, smooth the last few inches with a drop of light oil if the ends are dry or prone to frizz.
This version is simple, but it’s not boring. Long hair plus a clean braid line is a strong combination on its own.
22. Protective Sleep Dutch Braid
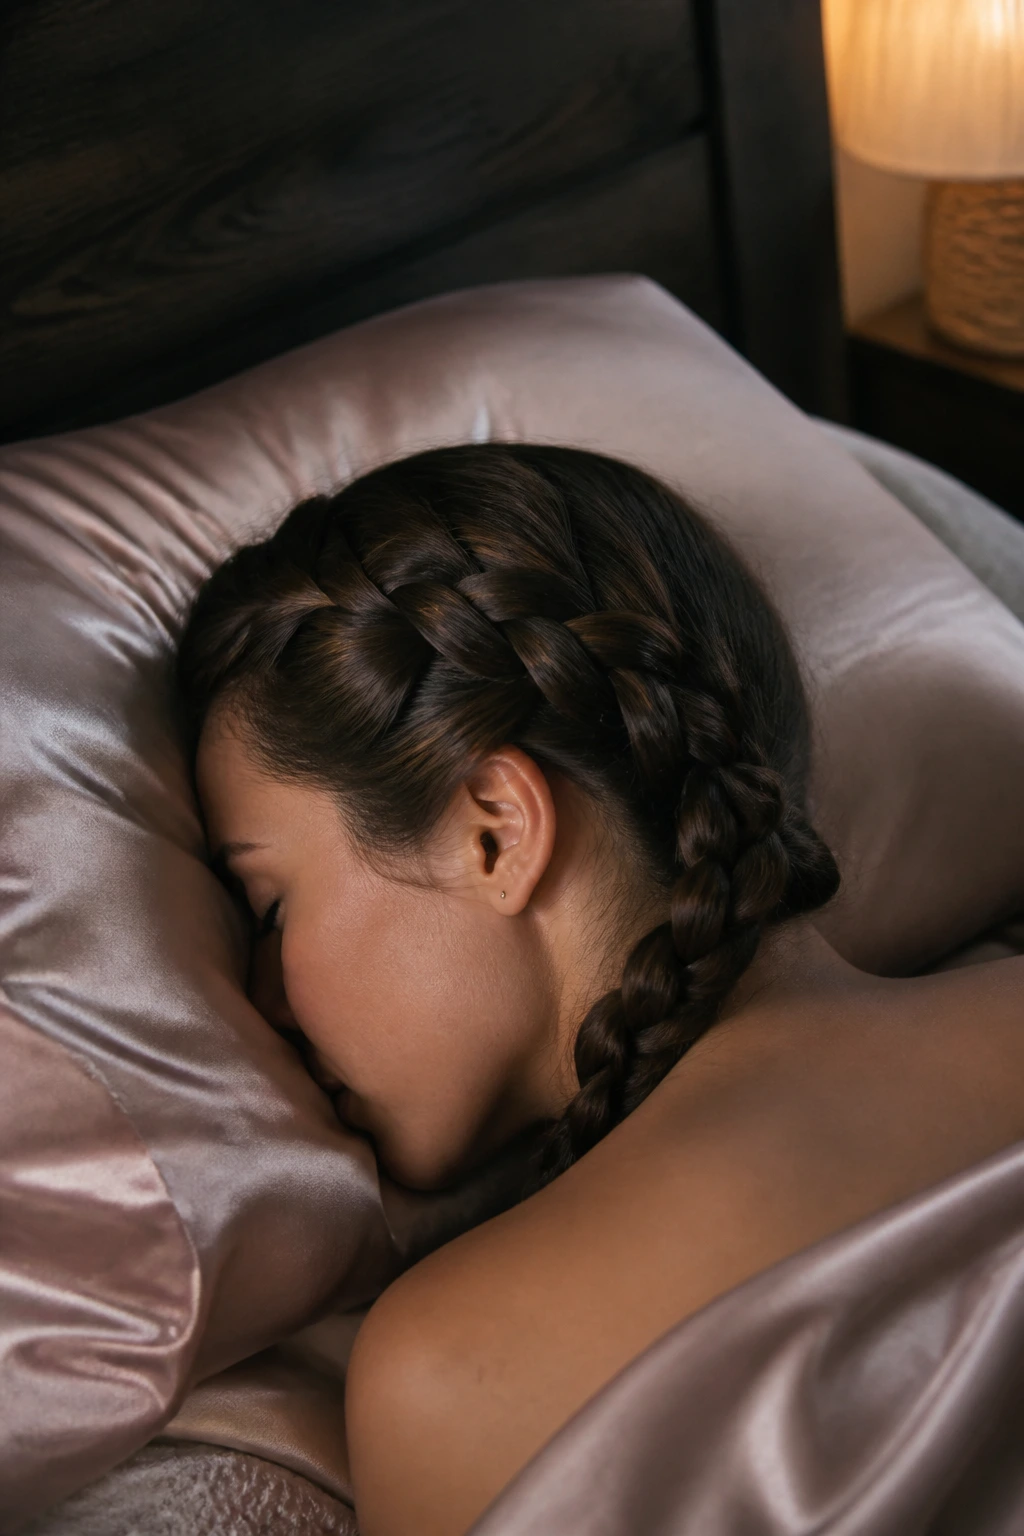
A protective sleep Dutch braid isn’t the most glamorous entry on the list, but it might be the one you use most. A single loose braid or twin braids keep long, thick hair from knotting at the nape while you sleep. The Dutch structure helps the braid stay put better than a loose three-strand braid, especially if the hair is heavy.
Keep the braid a little looser than you would for daytime wear. Tight braids at night can leave dents or scalp soreness by morning. Tie the ends with a soft elastic, then wrap the length into a silk bonnet or sleep on a satin pillowcase. Dry hair only. Wet braids overnight are a bad idea unless you enjoy weird bends and a damp pillow.
It’s practical, quiet, and worth the five minutes it takes.
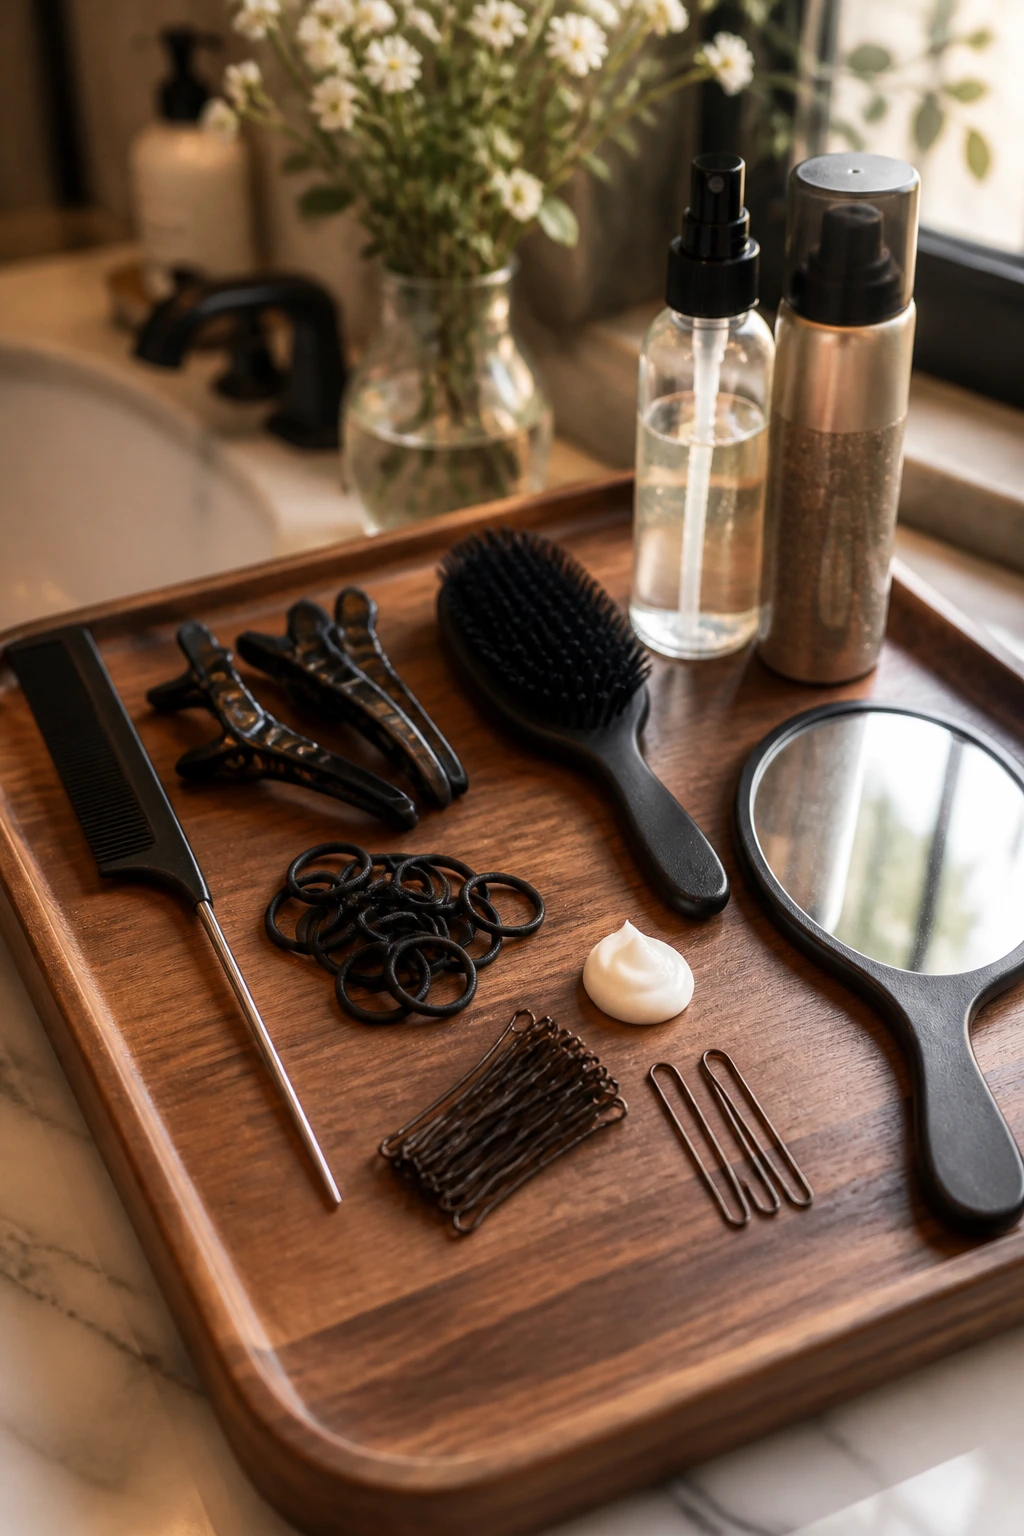
Essential Tools for Clean Partings and Happy Hands
-
Rat-tail comb: The skinny tail makes a clean center part and neat diagonal sections without digging into the scalp.
-
Sectioning clips: Thick hair gets in the way fast; clips keep the rest of the hair from sliding into your working section while you braid.
-
Small snag-free elastics: Clear or hair-matched elastics hold ends without tearing through dense strands.
-
Smoothing brush: A boar-bristle or mixed-bristle brush helps tame the top layer before you start, which matters when the braid has to sit flat at the crown.
-
Texturizing spray or dry shampoo: A light dusting gives slippery hair enough grip to stay in your fingers.
-
Hand mirror: Useful for checking the back of the braid, especially on crown, diagonal, or mohawk styles.
-
Bobby pins and U-pins: These save buns, crowns, and tucked finishes; use long pins for heavy hair so the weight has somewhere to go.
-
Light styling cream or serum: A pea-sized amount calms the front and stops flyaways from escaping around the hairline.
Smart Prep and Product Choices for Dense, Long Hair
Thick hair braids better when the surface has a little grip. Freshly washed hair can be too slippery, especially if the conditioner went anywhere near the roots. I usually prefer braid day on hair that’s been washed the day before or two days before, depending on how fast the scalp gets oily. There’s a sweet spot where the hair still feels clean but no longer slides through your fingers like silk.
Product choice matters, but not in a fussy way. A light mousse at the roots can help the braid hold shape, and a touch of dry shampoo at the crown gives cleaner parting lines. Don’t pile on heavy cream before braiding. Thick hair already has volume; too much product just turns that volume sticky and dull.
If the ends are dry, treat the last few inches separately. A drop of serum or oil on the tail is enough. The braid itself should stay grippy, not greasy. That split approach keeps the roots controlled while the length stays soft instead of puffy.
The other thing worth doing is brushing the hair in the direction it will be braided before you start sectioning. That sounds too basic to matter. It matters. It saves you from fighting small knots halfway through the first crossover, and with dense hair, little knots turn into big delays fast.
How to Wear These Braids From Errands to Evening

Placement: Keep the braid low and centered if you want it to disappear into the outfit, or pull it higher and tighter if you want the braid pattern to read as the main event. Thick hair looks best when the parting and braid placement are deliberate, not accidental.
Pairings: Small hoops, a simple collar, satin ribbons, and soft scarves all work well because they don’t fight the size of the braid. A giant statement necklace can crowd a crown braid. A clean neckline lets the braid breathe.
Wear Time: A secure Dutch braid on long hair usually holds through a full day, and twin braids or a low braided bun can stretch longer if you sleep on a satin pillowcase. The more body the style has, the more you’ll want to check the nape and the ends after a few hours.
Best Moments: These styles do their best work on school runs, office days, travel, workouts, and any day where you’d rather not keep pushing hair off your shoulders. They also hold up well under hats and hoods if the braid isn’t built too high.
Additional Tips and Style Boosters

Texture Boost: If your hair is too soft to grip, mist the lengths with dry shampoo or texturizing spray before braiding. One or two light passes are enough; you want bite, not chalk.
Parting Trick: Use the tail of the comb to draw the part, then press the line once with your fingertip before braiding. That tiny press keeps thick roots from puffing back over the part.
Finishing Touch: After tying off the braid, pinch the outer edges one loop at a time instead of pulling the whole thing apart. That keeps the structure intact and gives you a wider braid without the frizz halo.
Make-It-Yours: For a softer look, leave two slim face-framing pieces free. For a tighter, more secure style, braid a little lower on the head and pin stray layers flat at the temples.
Make-Ahead, Night Care, and Re-Braiding Guidance
Dutch braids on thick hair usually look best on the day they’re made, but they can stay clean enough for another day or two if you protect them at night. A satin bonnet, silk scarf, or silk pillowcase cuts down on friction and keeps the braid from fuzzing out at the crown. If the style is a crown braid or a bun, I’d check the pins before bed and again in the morning, because heavy hair loves to loosen at the nape.
For daytime wear, many of these braids hold well for 1 to 3 days before they need a full redo. Twin braids and tucked styles often last the longest because the weight is divided. A long tail braid may need freshening sooner if the ends start to dry or separate.
If you need to refresh without taking the whole thing down, smooth the surface with damp hands, add a pea-sized amount of leave-in conditioner to the loose tail, and re-tighten the elastic at the end. Don’t braid over damp hair unless you plan to keep it in for a few hours and your scalp is comfortable with that. Wet hair plus sleep is where bad dents and weird odors start.
Variations and Adaptations to Try
Sleek Office Finish: Add a thin layer of gel or styling cream to the crown and keep the braid tight and centered. This version looks crisp with a blazer, clean collar, or sharp neckline, and it stays put better than a softer finish.
Weekend Undone Braid: Braid the hair normally, then pancake the loops and tug a few face-framing pieces loose. It keeps the Dutch structure but softens the outline enough for casual outfits, soft knits, or an off-duty day.
Ribbon-Threaded Accent: Thread a slim ribbon through one side of the braid for a little color without changing the shape. Choose a matte ribbon if your hair is very slippery, or satin if you want the braid to feel dressier.
Workout-Ready Twin Set: Use two tight Dutch braids with a clean middle part and secure the ends low so they don’t bounce around. This version handles movement better than one heavy braid because the weight is split between both sides.
Protective Overnight Style: Go looser, not tighter, and keep the braid low on the head so it doesn’t dig into the scalp while you sleep. Pair it with a silk scarf or bonnet to keep friction down.
Common Mistakes to Avoid

-
Starting with sections that are too big: Thick hair makes big sections look even bigger, and the braid ends up chunky at the crown. Start smaller than you think you need, then let the braid widen naturally as you move down.
-
Pulling too hard at the hairline: A braid that feels painful before lunch was braided too tight. Keep the scalp secure, not strained, especially around the temples and behind the ears.
-
Skipping texture on slippery hair: Fresh, soft hair can make the strands slide apart before the braid is set. A little dry shampoo, mousse, or texturizing spray solves that without turning the hair stiff.
-
Ignoring the nape: Thick hair often bulks up right where the head meets the neck, and that’s where braids start to collapse if you stop paying attention. Smooth the side sections before each crossover so the base stays neat.
-
Leaving the ends loose and frizzy: A secure elastic is not optional on long hair. If the tail starts fraying, finish with a second tie, a ribbon, or a tuck, depending on the style.
Frequently Asked Questions
How tight should a Dutch braid feel on thick hair?
Firm enough to stay put, never so tight that your scalp throbs. If you feel pulling around the temples or behind the ears within an hour, the braid was started too hard or the sectioning was uneven.
Can you Dutch braid freshly washed hair?
Yes, but it helps to add grip first. A light mousse, a touch of dry shampoo at the roots, or even a little texture spray makes slippery hair much easier to manage.
Why does my Dutch braid puff out at the sides?
Usually because the outer sections were too large or the tension changed halfway down. Keep each crossover even, then pancake only after the braid is secured if you want width.
What if my arms get tired halfway through?
Clip the unbraided sections out of your way and work in shorter passes. Thick, long hair takes more arm strength than most tutorials admit, so it’s fine to pause, reset your grip, and continue.
Do Dutch braids work on layered hair?
They do, but short layers near the crown may slip out unless you prep them with texture spray or a small amount of styling cream. Face-framing layers can be left out on purpose if you want a softer finish.
How do I keep twin Dutch braids even?
Match the starting points first, then keep checking the angle of each braid against the other. I like to braid one side to the nape, secure it with a clip, and then braid the second side while comparing the two in a mirror.
Can I sleep in Dutch braids every night?
You can, as long as the braid isn’t too tight and your scalp tolerates it. Keep the style loose enough to avoid tension, and give your hair a break if the roots start to feel sore or the braid leaves dents that take hours to flatten.
What’s the easiest style here for very thick hair?
The classic center braid or the low nape braid. Both keep the structure simple, and both are forgiving if your hair is dense enough to resist perfect sectioning on the first try.
Braids That Hold Their Line
Long, thick hair has a way of making braid styles look either beautifully full or annoyingly bulky, and there isn’t much middle ground unless the sectioning is smart. Dutch braids solve that problem better than most styles because they sit visibly on top of the hair and keep their shape while the length does its heavy-lifting thing underneath.
The best part is how flexible these braids are once you learn the basic hand motion. Tight, loose, centered, side-swept, tucked, wrapped — the same structure can move in a lot of directions without losing its backbone. That’s useful when you want your hair to stay controlled but not boring.
If you’ve got the length and the density, use them. Start with the braid that feels easiest in your hands, then work outward from there. The shape holds better than you’d think, and once you get the parting right, the rest starts to feel almost automatic.