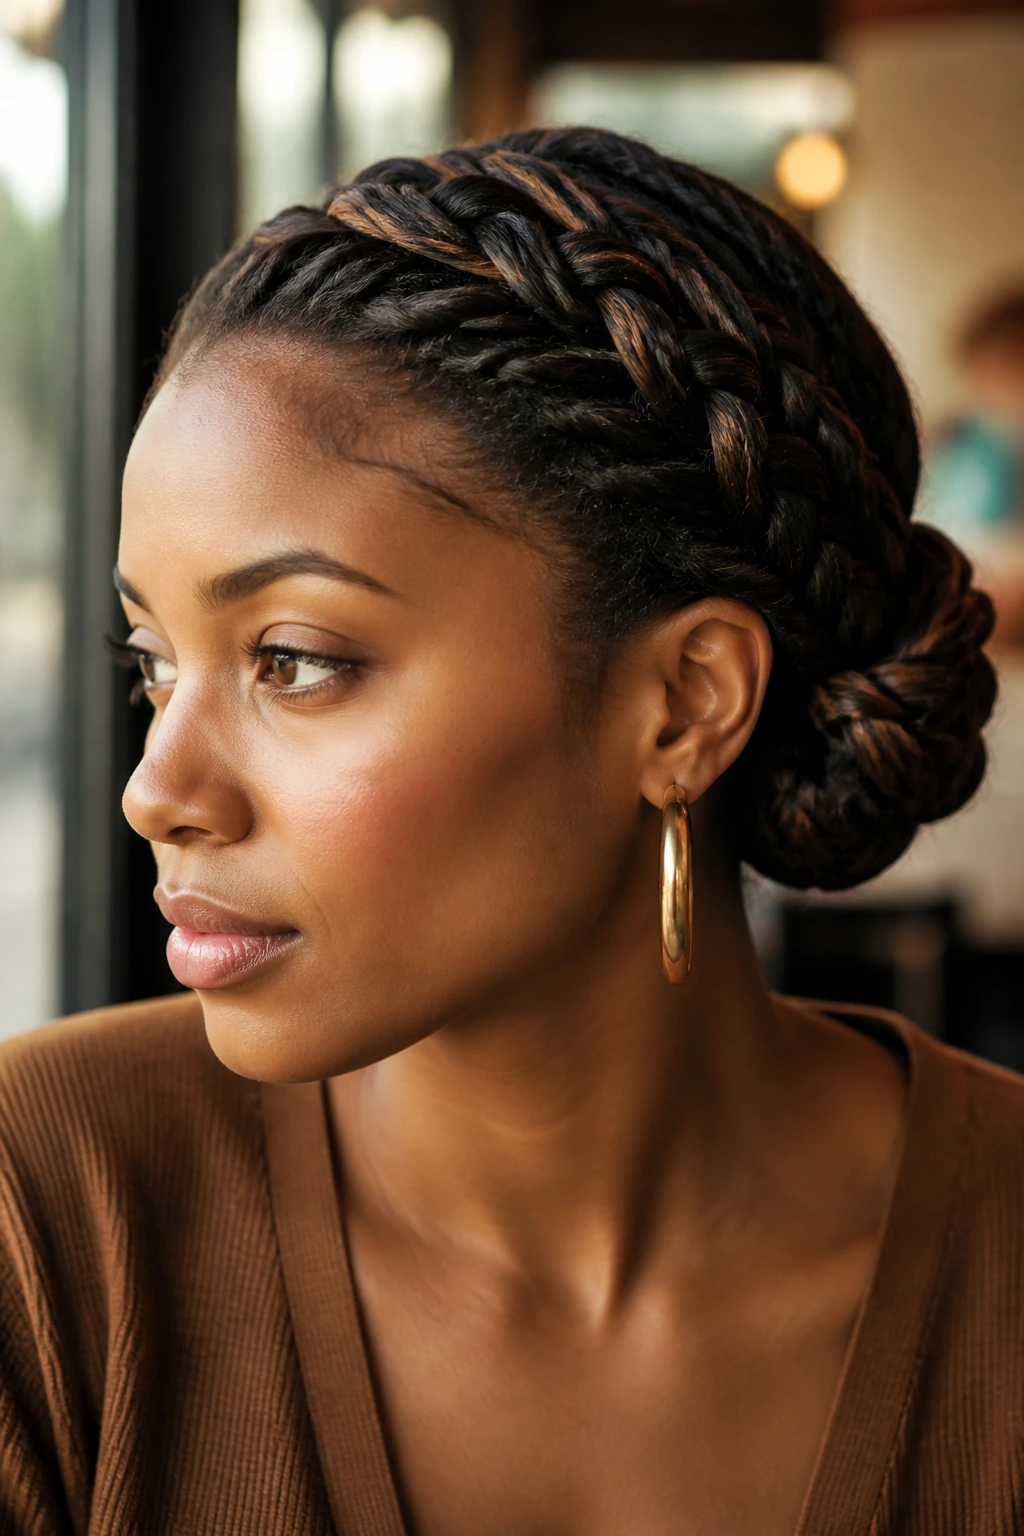
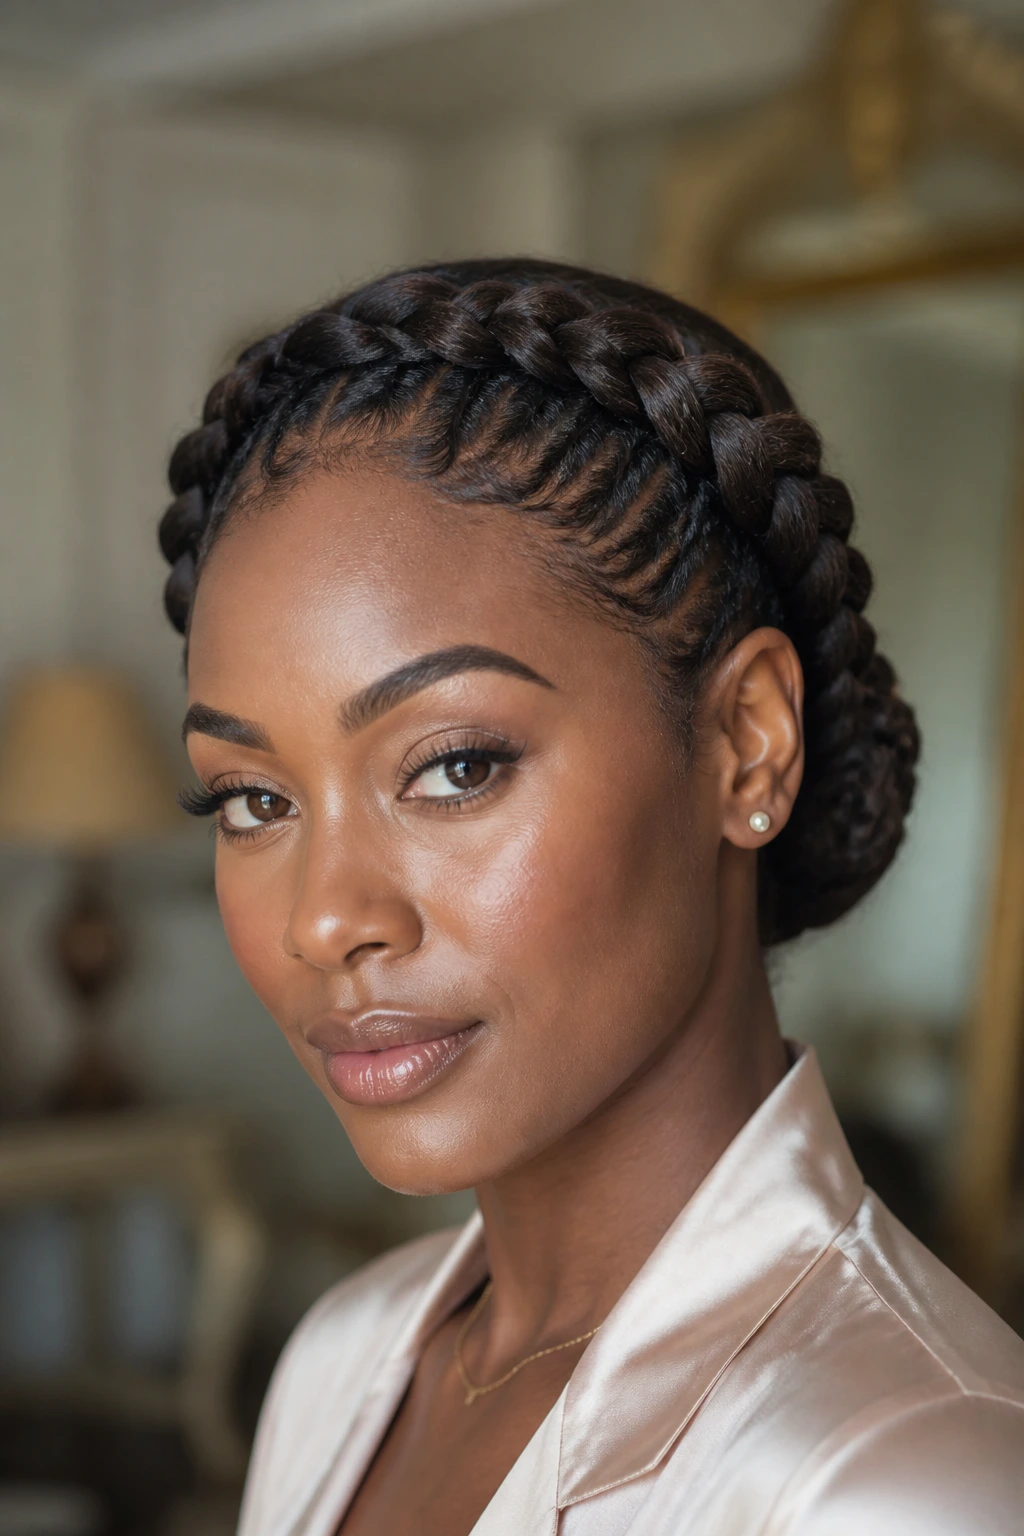
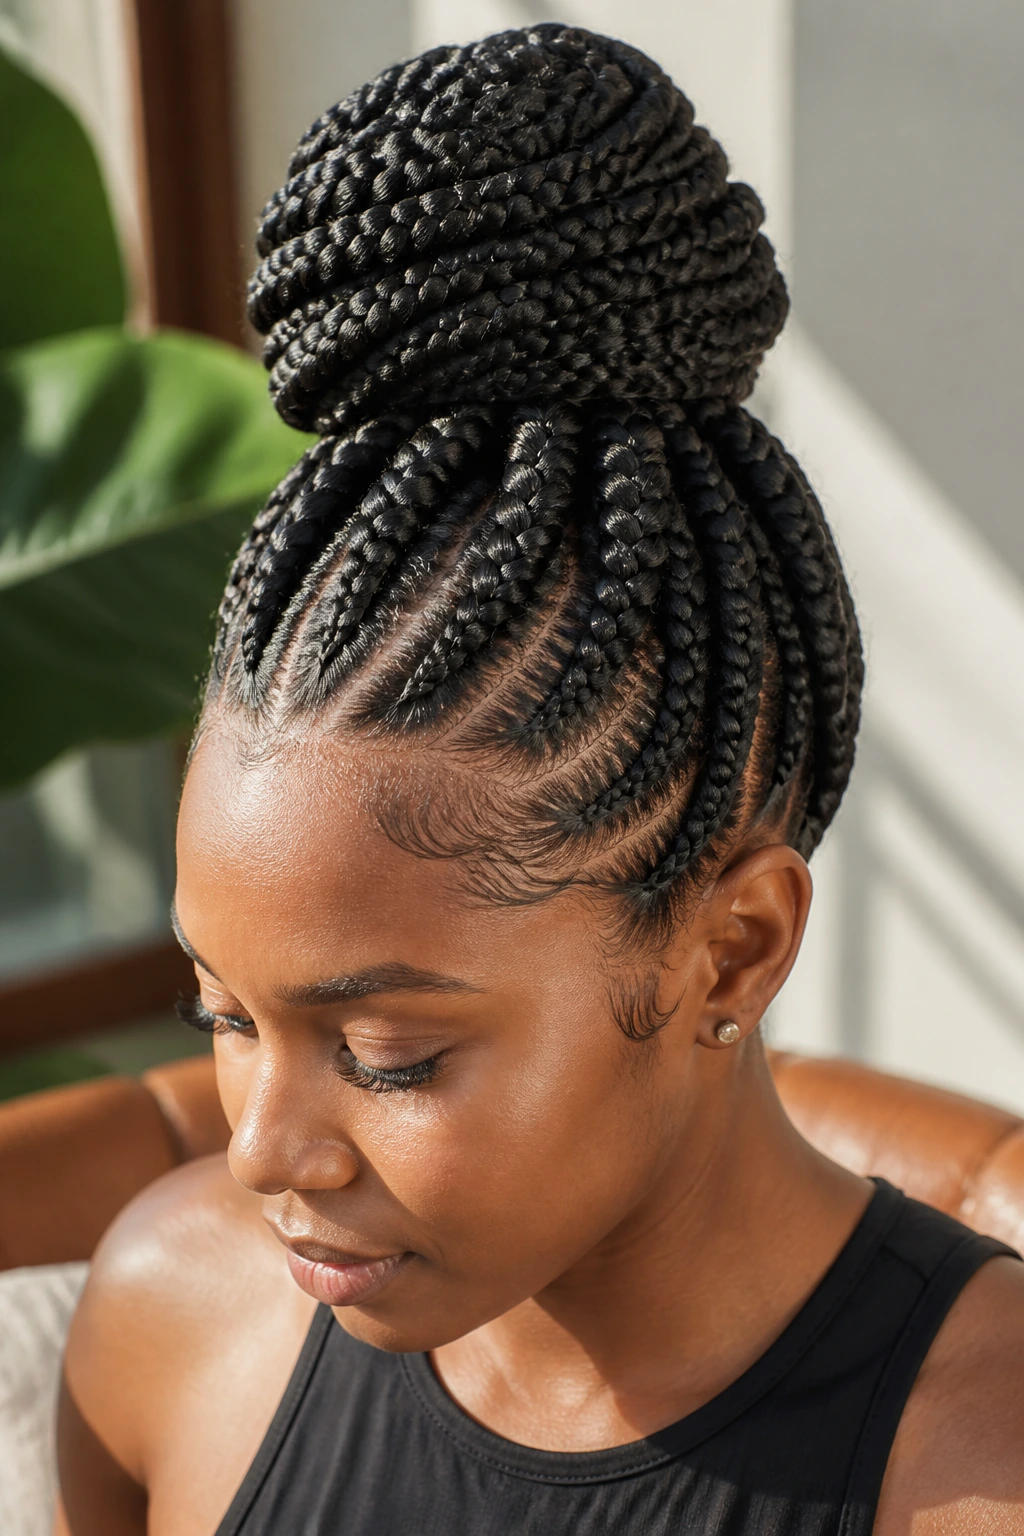
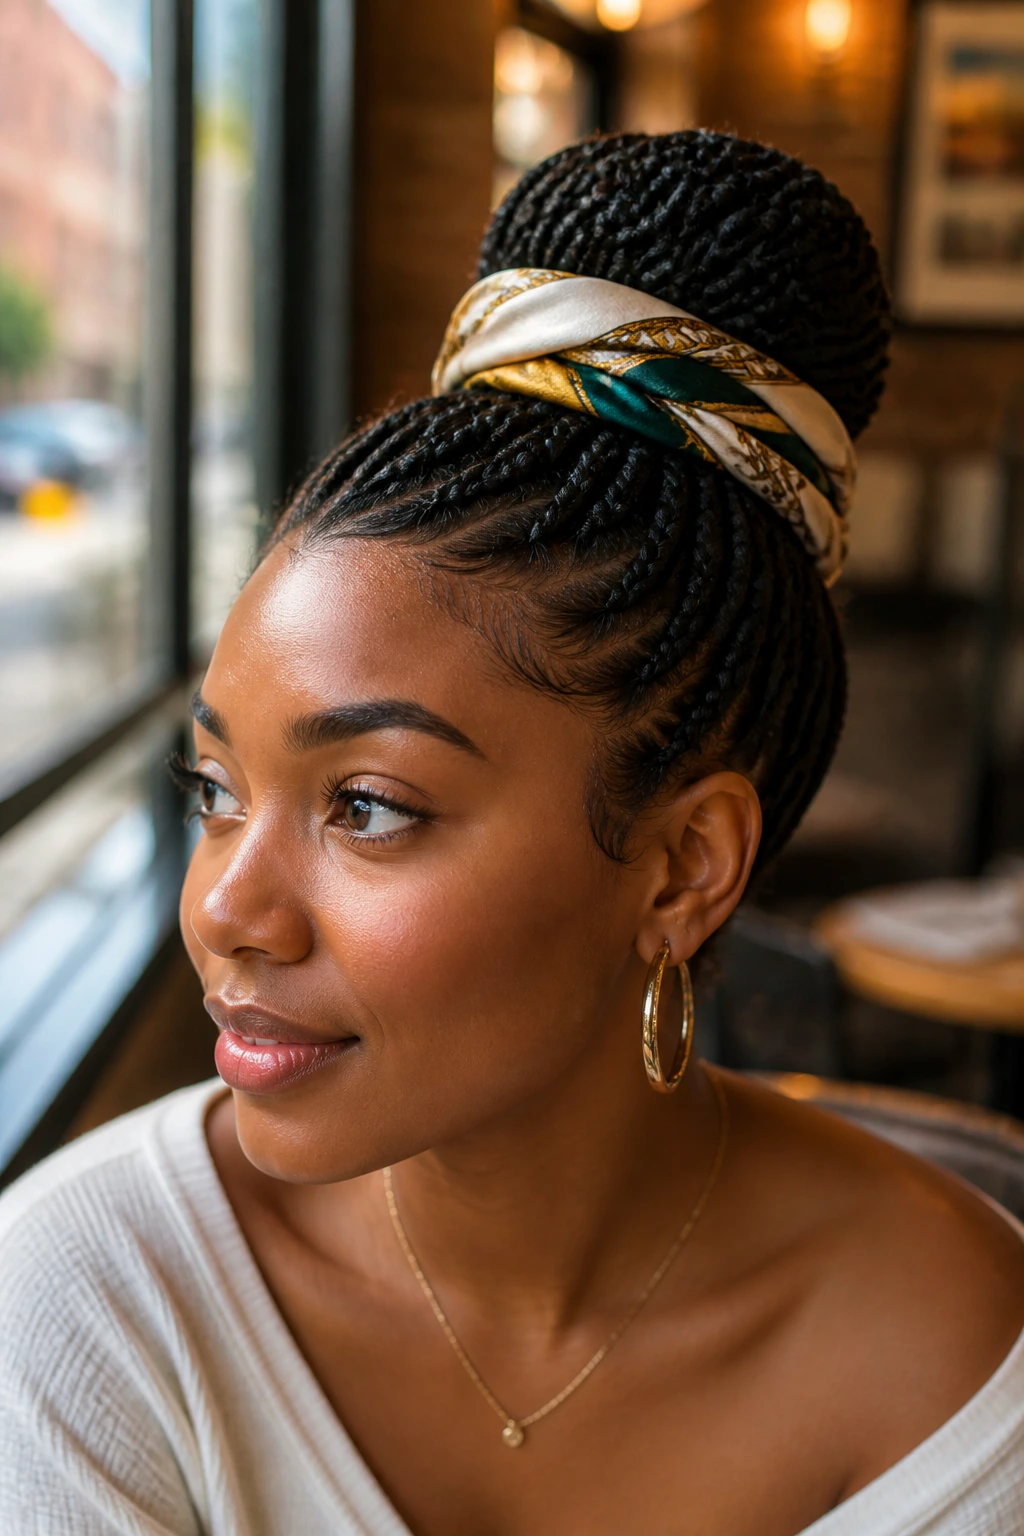
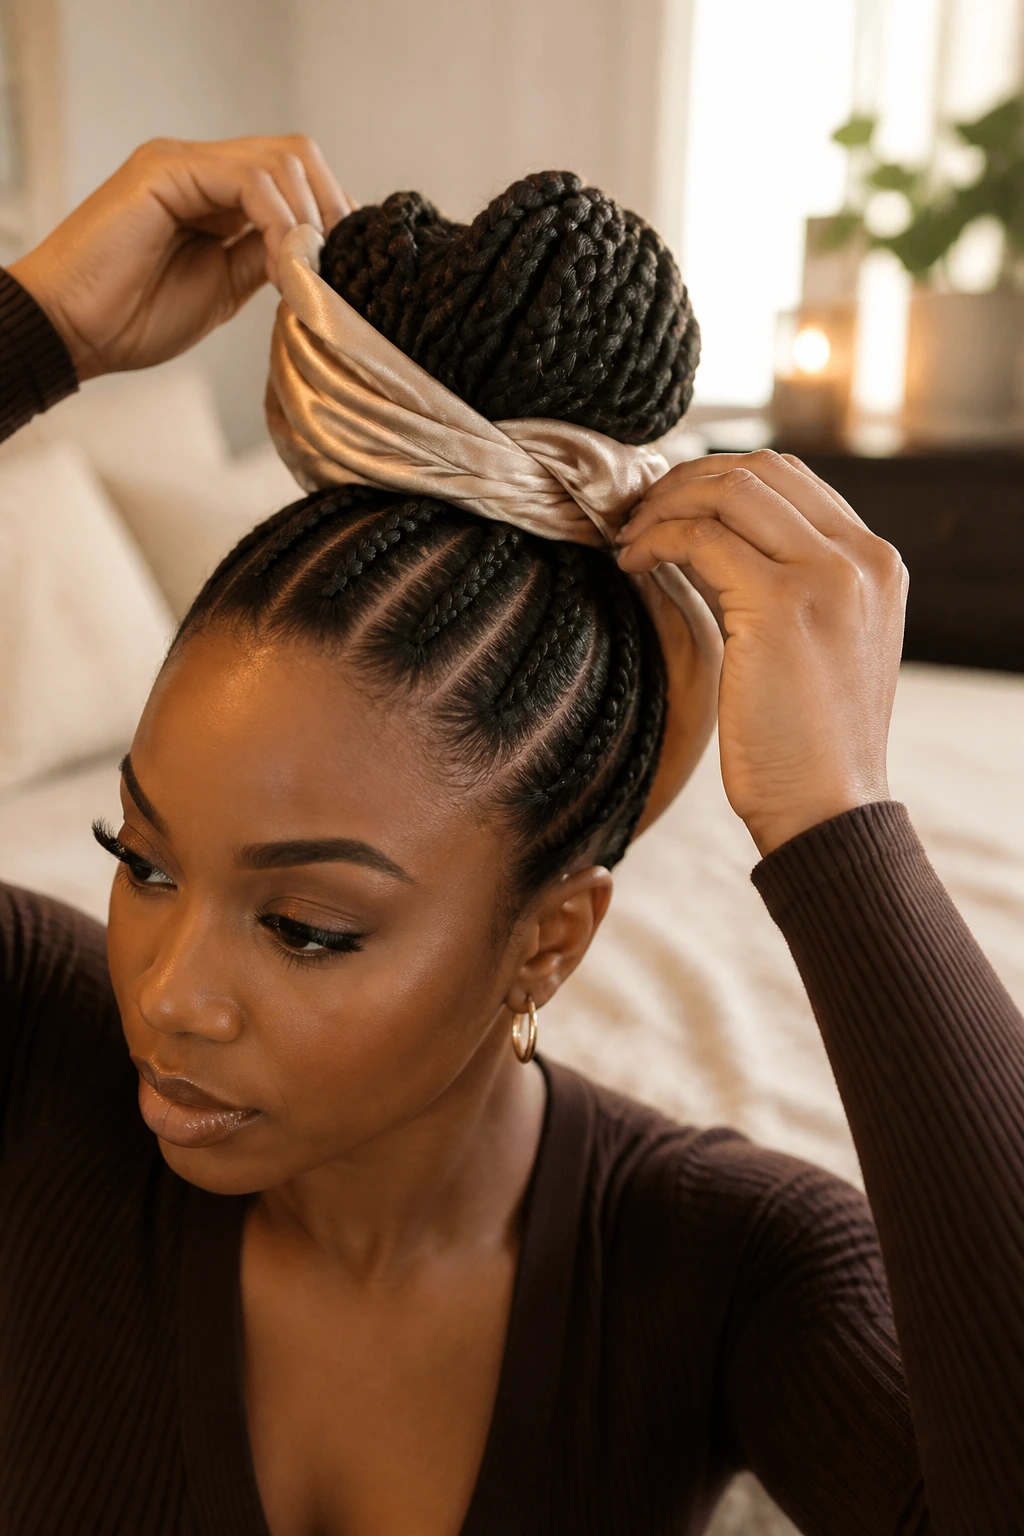
French bun braids live in that rare space where hair looks deliberately styled and still feels protected by noon. A good one keeps the roots organized, tucks the oldest ends away, and stays put through a scarf, a commute, and whatever the day throws at your neck and shoulders. French bun braids are one of those styles that can look polished without asking for constant fussing.
The braid is doing the heavy lifting. It distributes the tension, keeps the front neat, and gives the bun something solid to anchor to. But there’s a catch: if the braid is pulled too tight at the hairline, the whole style stops feeling protective and starts feeling like a headache with ambition. That’s the part inspiration photos love to skip.
What makes these styles worth keeping in rotation is the range. You can go low and sleek for a blazer, high and sculpted for an event, or soft and slightly undone when you want your hair off your face but not glued to your scalp. Some versions need bobby pins and a calm hand. Others need little more than a rat-tail comb, a few sectioning clips, and a willingness to part the hair cleanly the first time.
Why These Braided Buns Earn a Spot in Your Rotation
- Ends stay tucked: The bun keeps older ends hidden, which means less friction against collars, seatbacks, and your own fingers.
- The front stays cleaner longer: A French braid at the crown helps control puffing at the roots, especially around the part line and temples.
- They work with different lengths: Shoulder-length hair, stretched natural hair, and added hair can all be shaped into some version of this look.
- They shift from casual to dressed-up fast: Move the bun low and neat for work, or raise it and loosen the braid for a softer finish.
- They’re easy to personalize: Parting, braid width, bun height, and accessory choice change the whole mood without changing the basic structure.
- They give you access later: A good braided bun is easier to refresh at night and easier to rework tomorrow than a loose style that keeps collapsing.
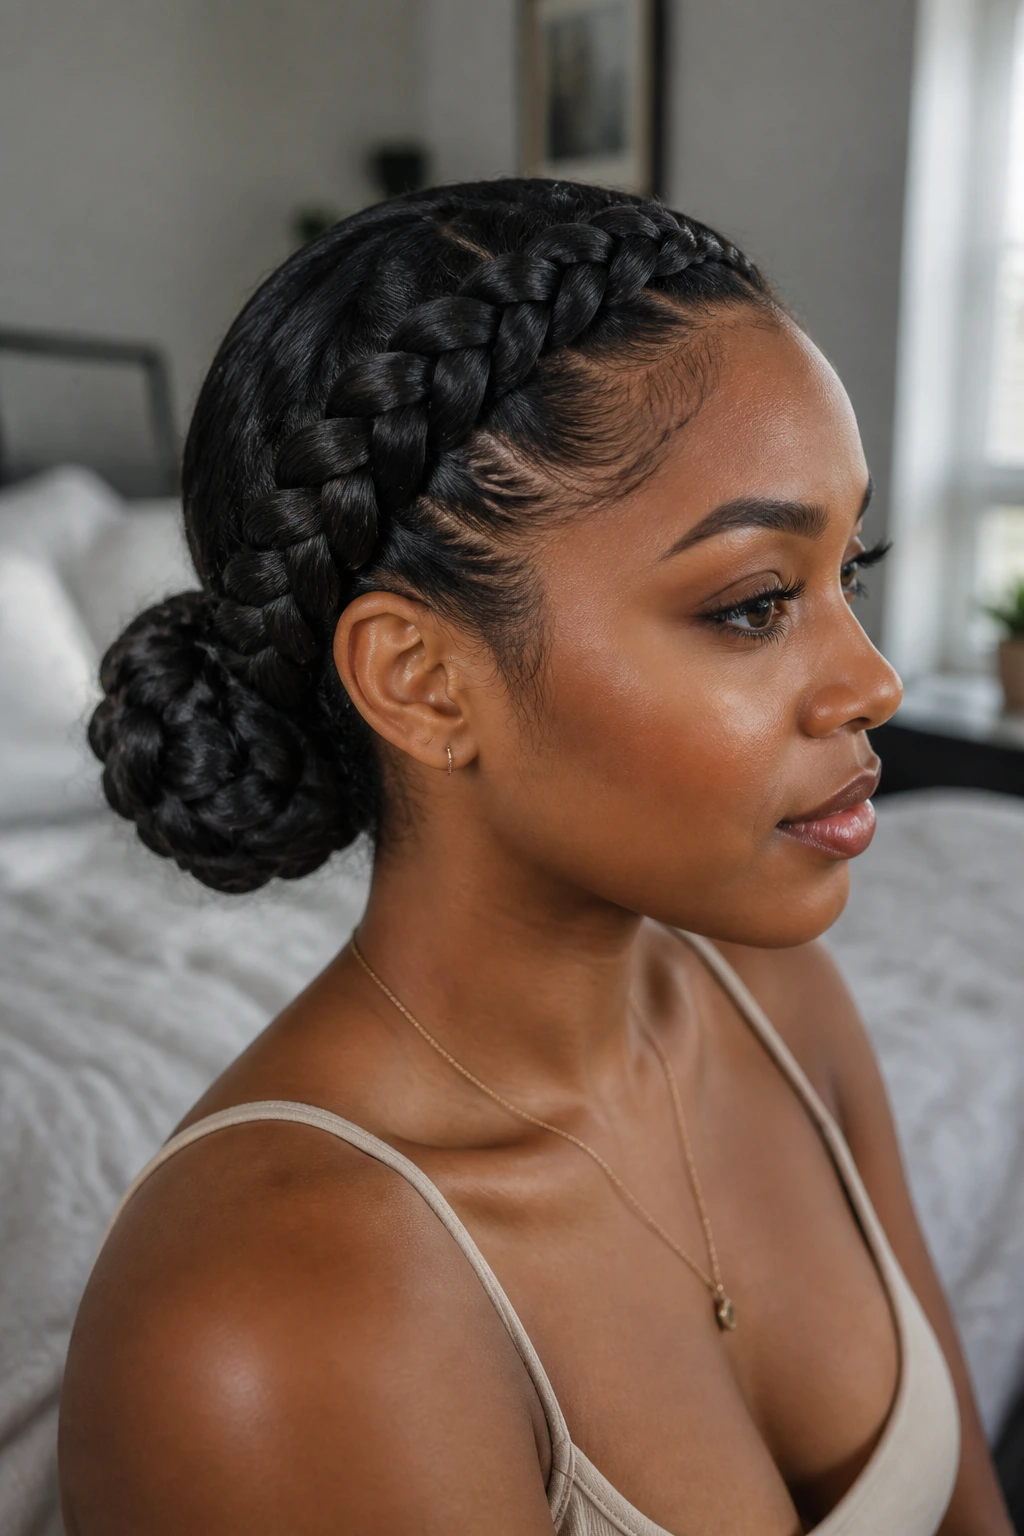
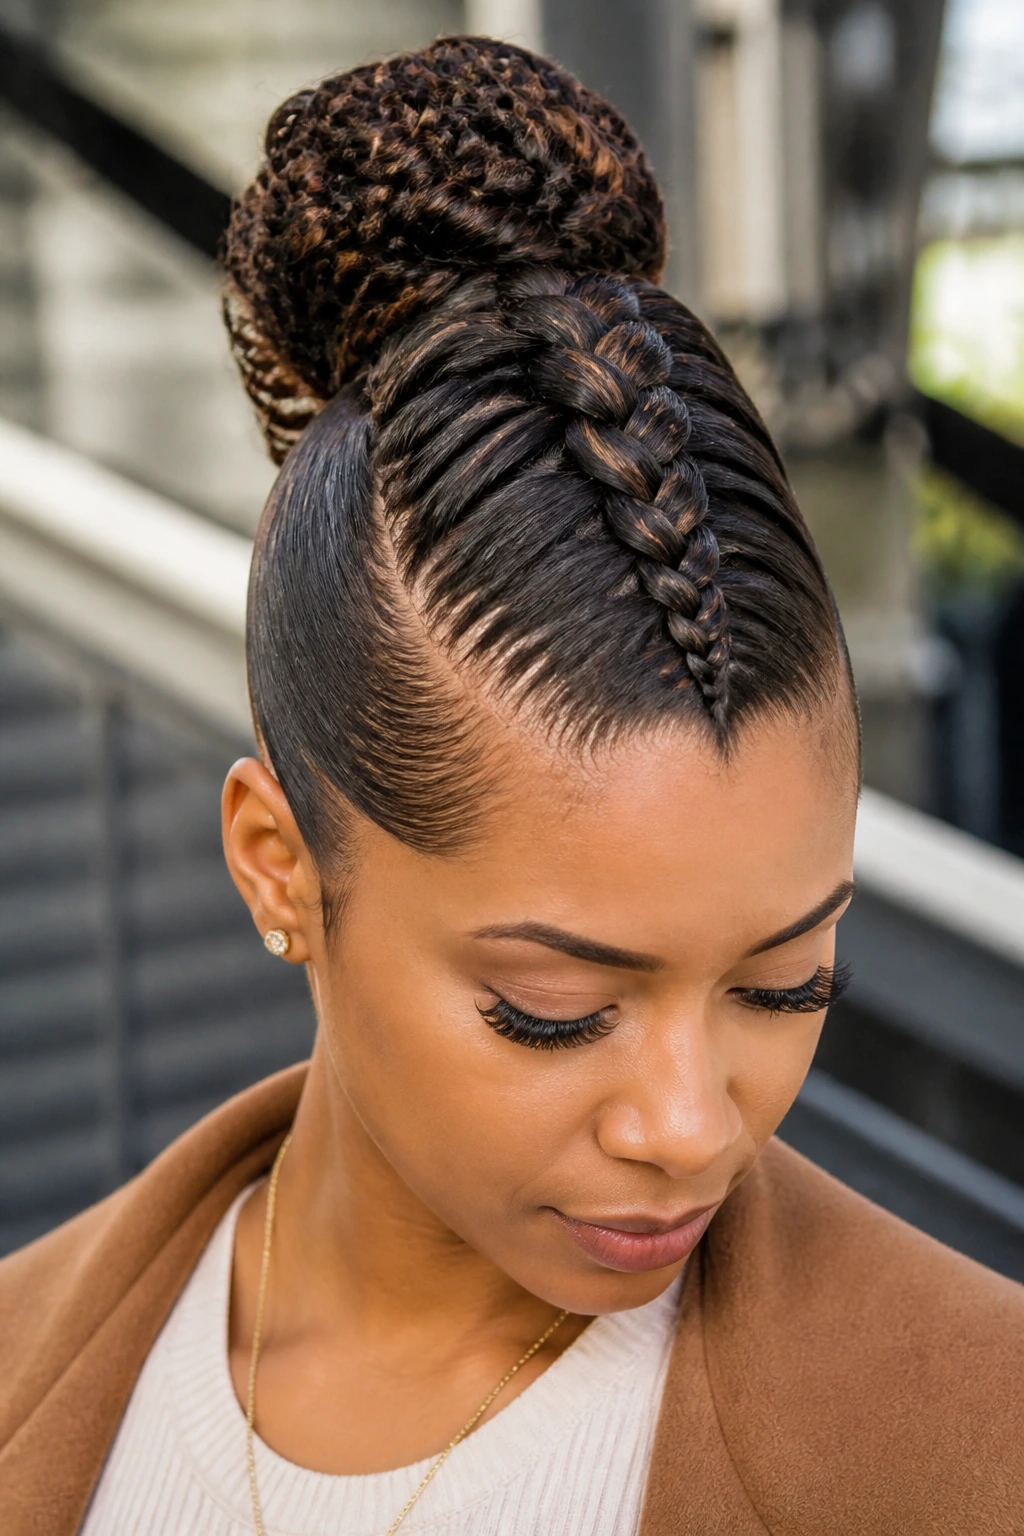
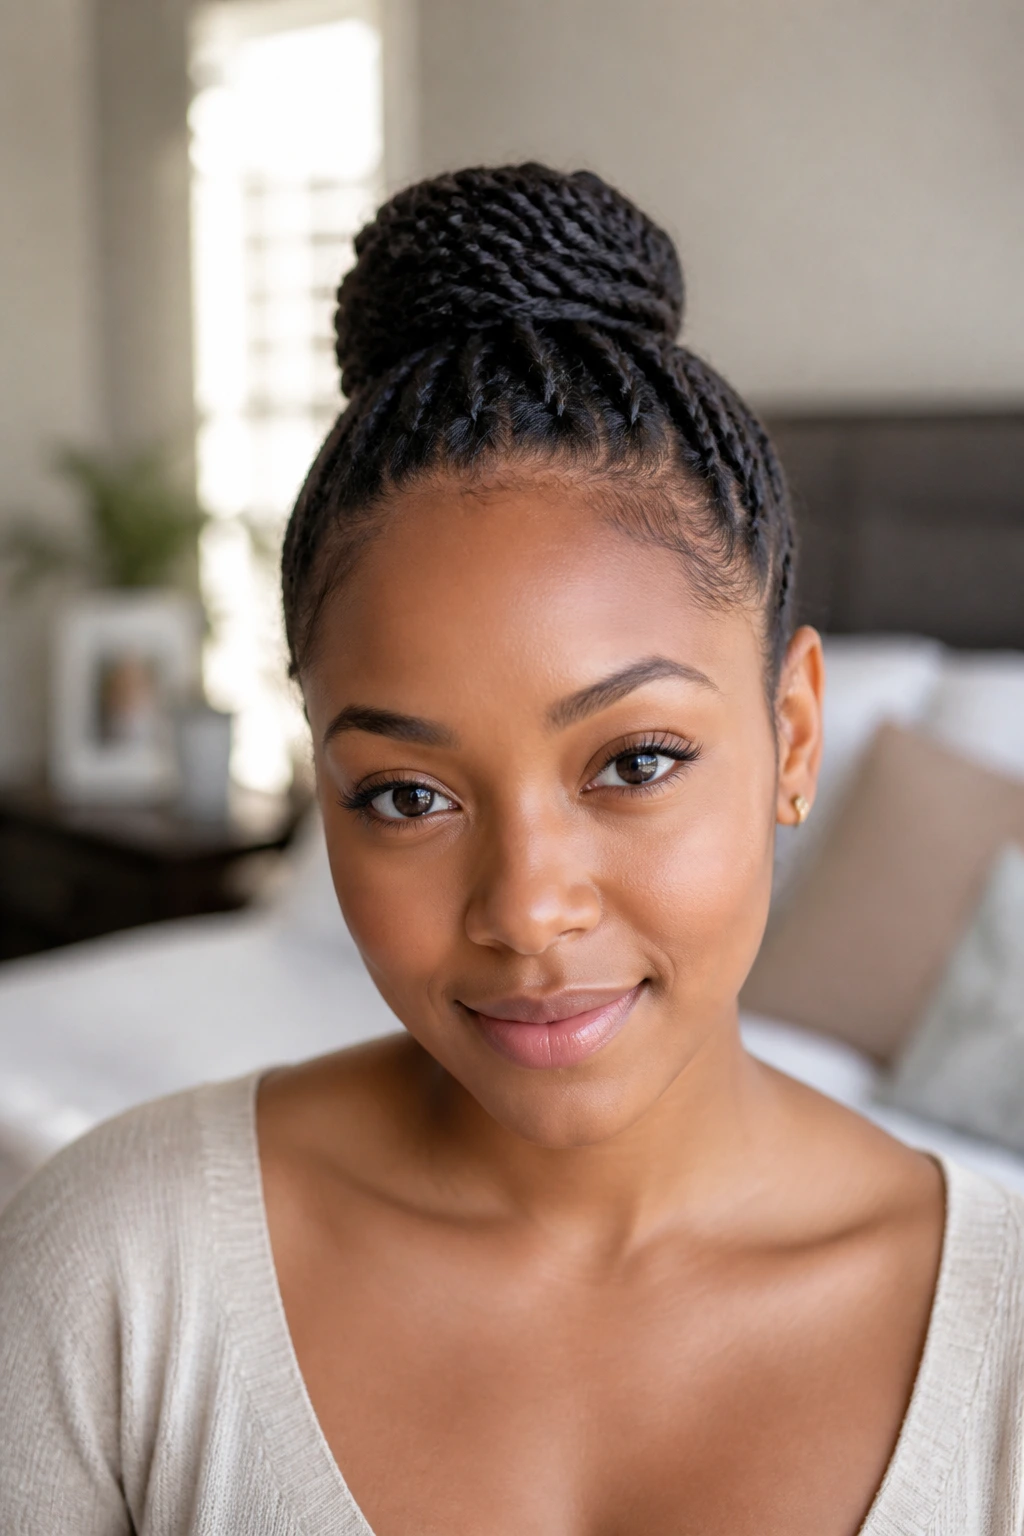
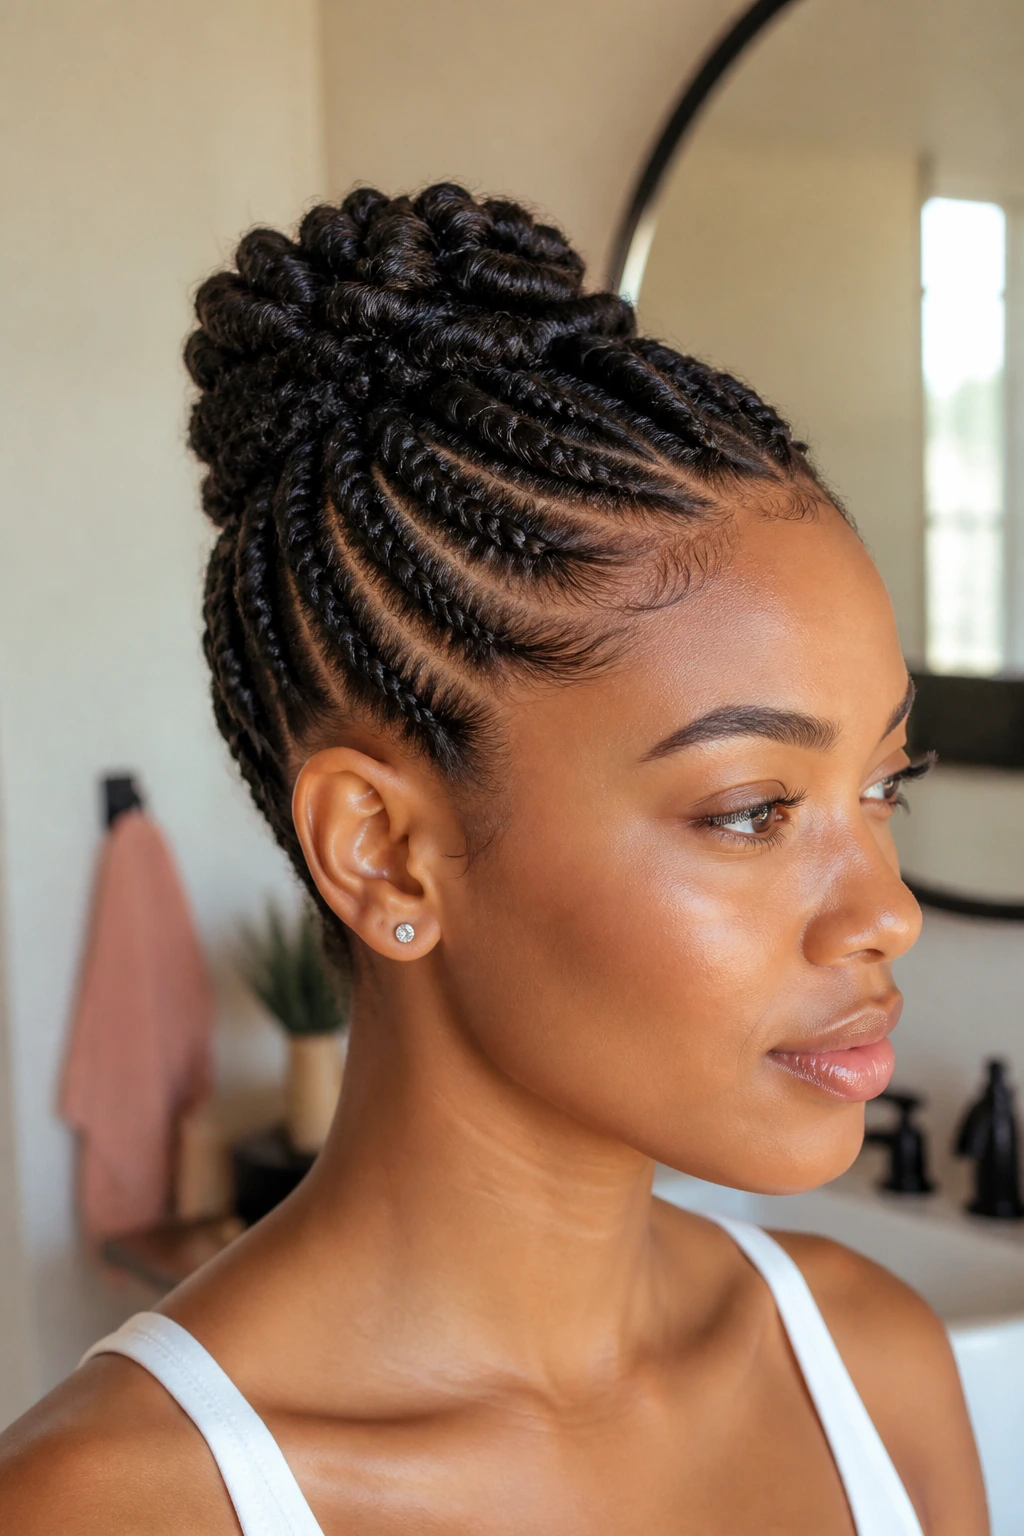
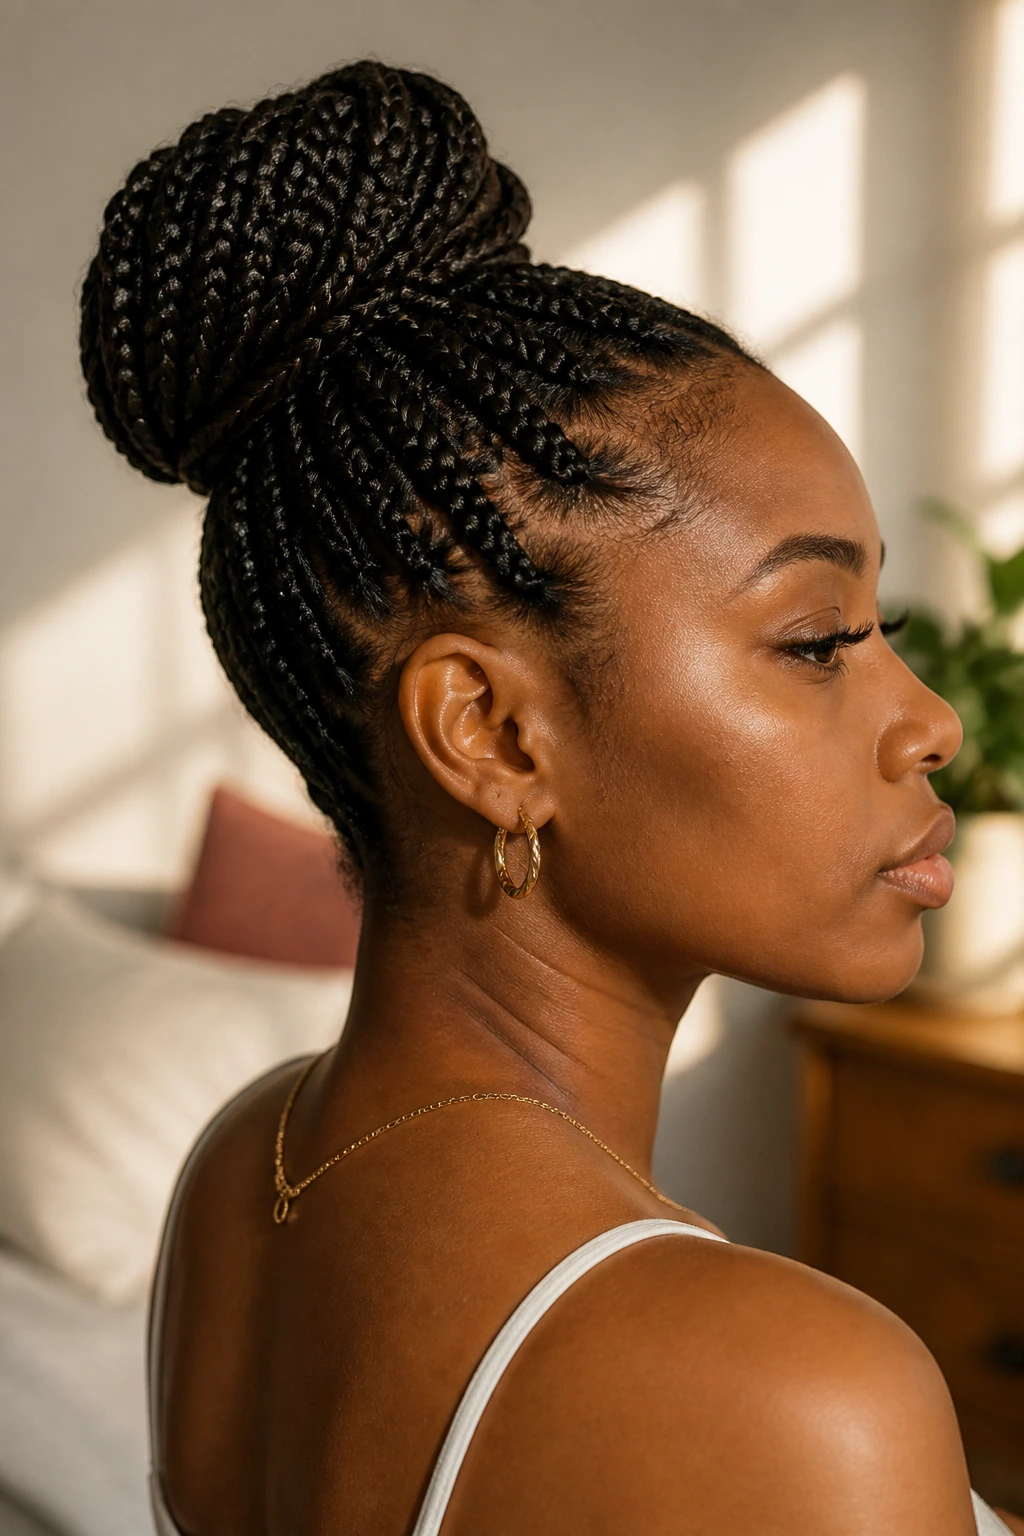
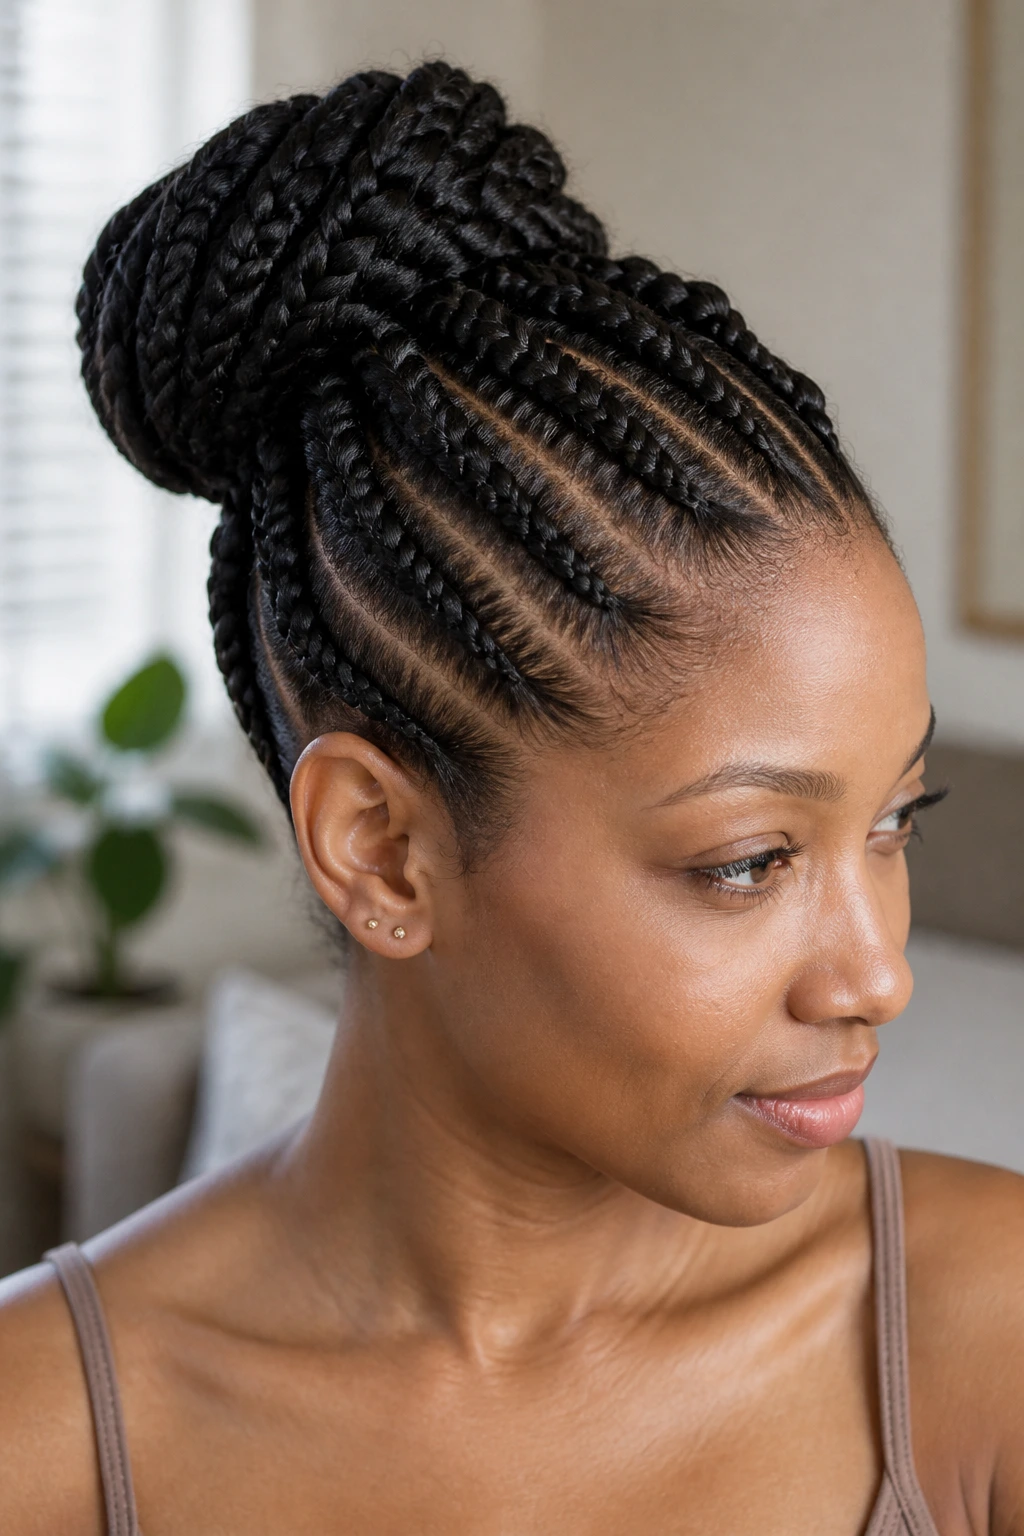
1. Classic Center-Part French Braid Into a Low Bun
A center part keeps this version clean from the first glance. The braid runs straight back on both sides or starts as one central French braid, then folds into a low bun at the nape, which gives the whole style a calm, tailored shape. I like this one when the goal is simple: hair off the face, ends protected, no drama.
Why It Holds Up
A low bun sits in the safest spot for most people because it doesn’t fight the head when you lean back or put on a coat. The center part also makes it easier to keep both sides balanced, which matters more than people think. If one side is tighter than the other, the style starts slipping in lopsided little ways by the afternoon.
This version suits medium to long hair best, especially if your hair is already stretched a bit before styling. It’s also one of the easiest French braid buns to dress up with a satin ribbon or a metal cuff, because the shape is so tidy.
Best for: workdays, interviews, church, dinner, and any day when you want the front to look calm.
Watch for: pulling the part too narrow; that can make the braid look skimpy and raise the tension at the roots.
My favorite finish: a light mist of mousse over the braid before you pin the bun.
Small tip: flatten the bun slightly instead of building it into a perfect round ball. It sits better under scarves and jackets.
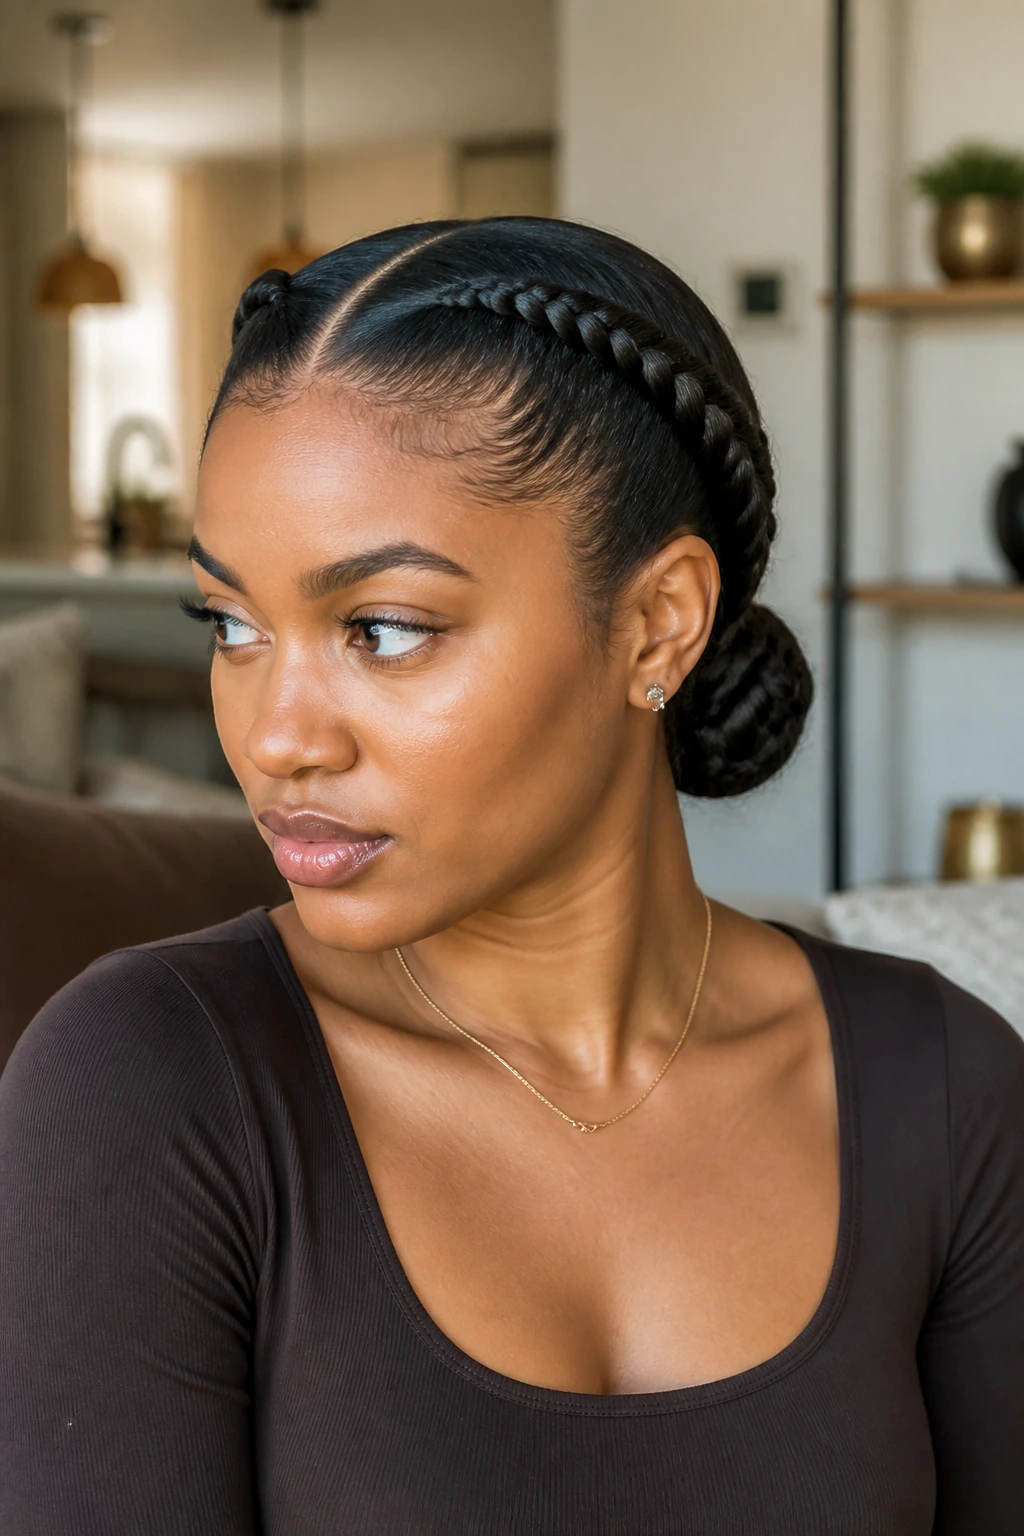
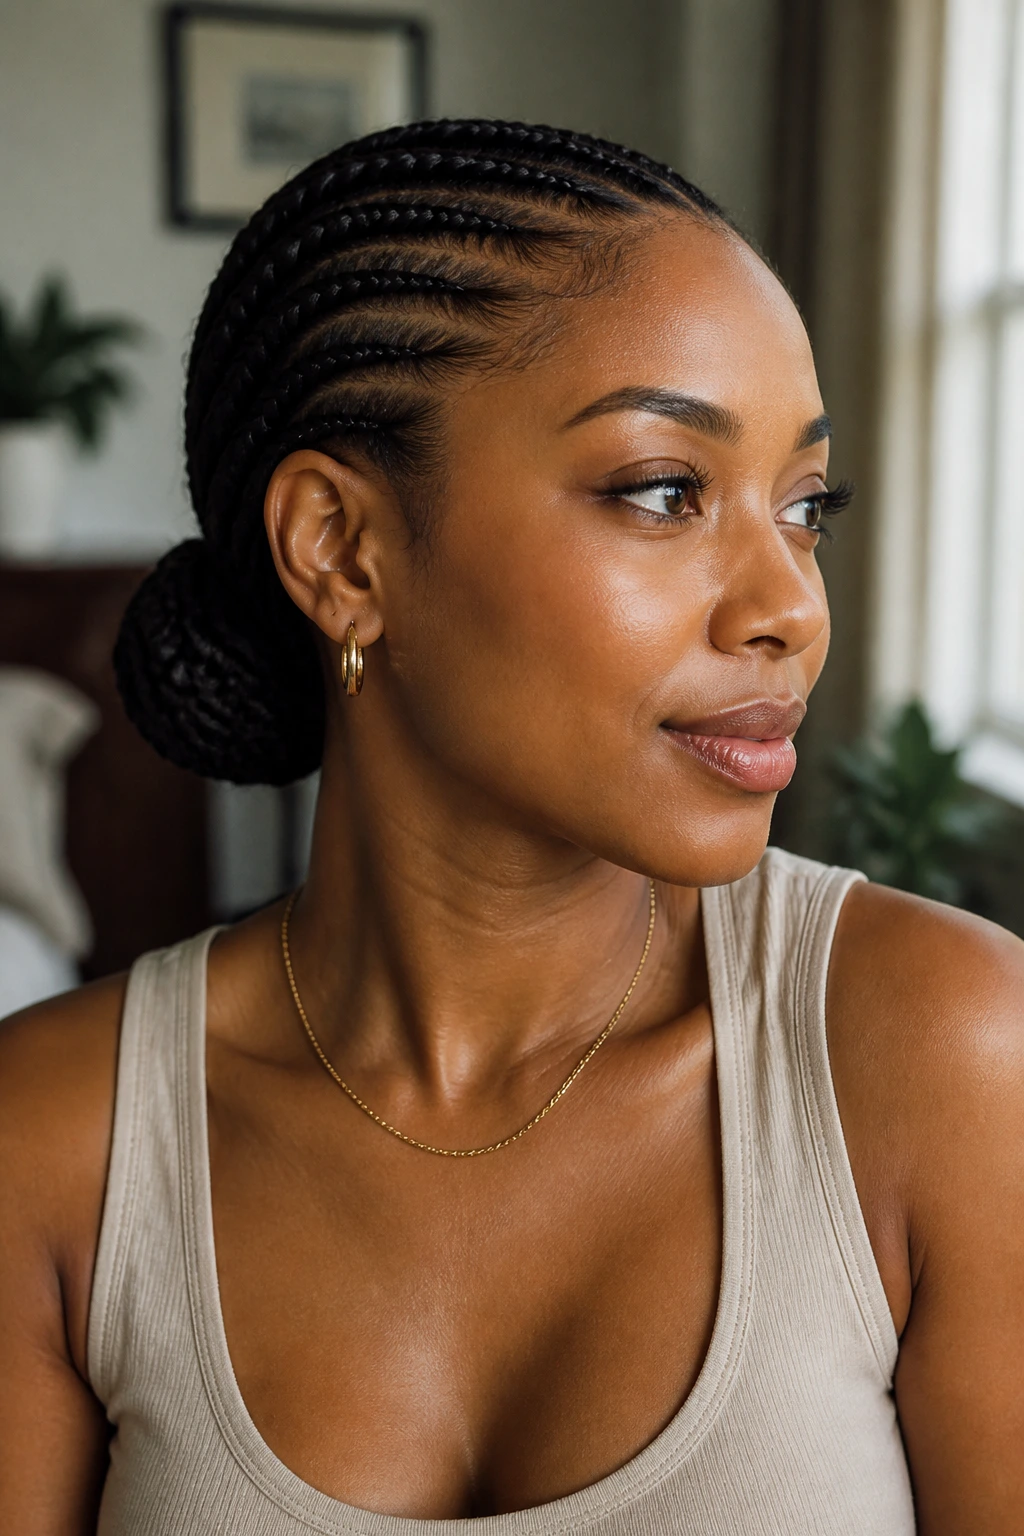
2. Side-Swept French Braid Chignon
A side part gives this style a little movement right away. Instead of marching straight down the center, the braid starts off to one side, sweeps across the head, and gathers into a chignon that sits just behind one ear or low at the nape. It feels softer than the center-part version, but it still reads as deliberate.
The side placement is useful when you want a little volume at the crown without teasing the hair into a halo of tangles. It also works nicely on hair that has one flatter side or a cowlick that refuses to cooperate. The braid follows the shape of the head instead of arguing with it.
This is one of those styles that looks best when the bun is pinned close to the skull, not ballooned out. Keep the braid snug but not tight, and let the side part do the visual work. If you’re wearing earrings, this is the braid bun that gives them room to show.
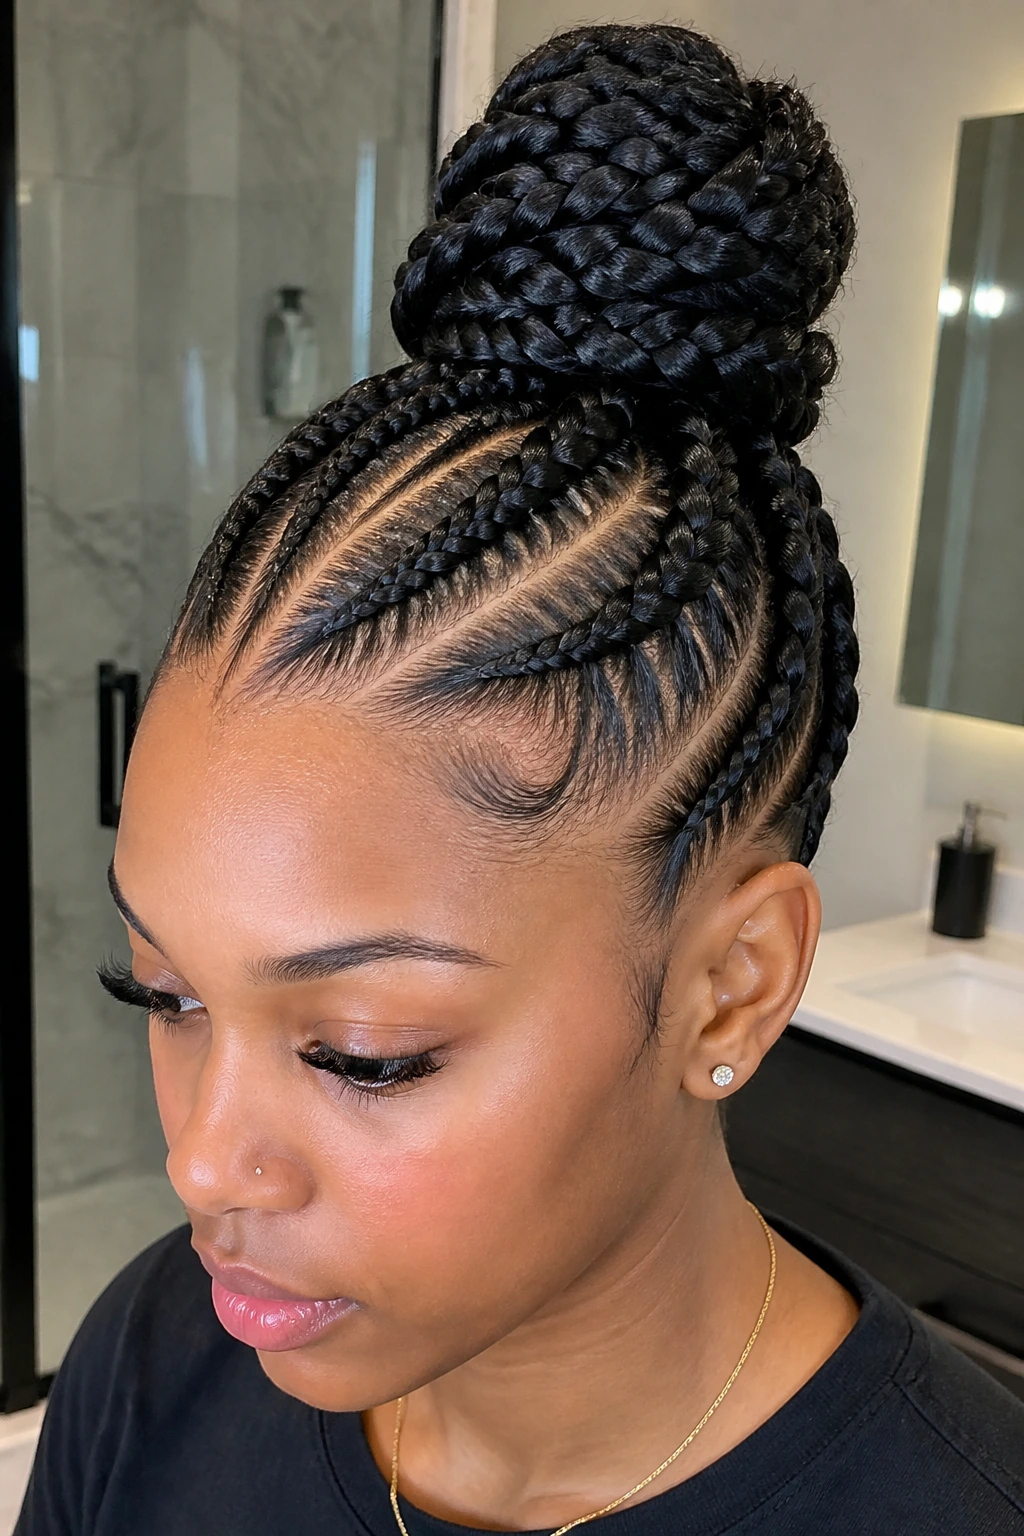
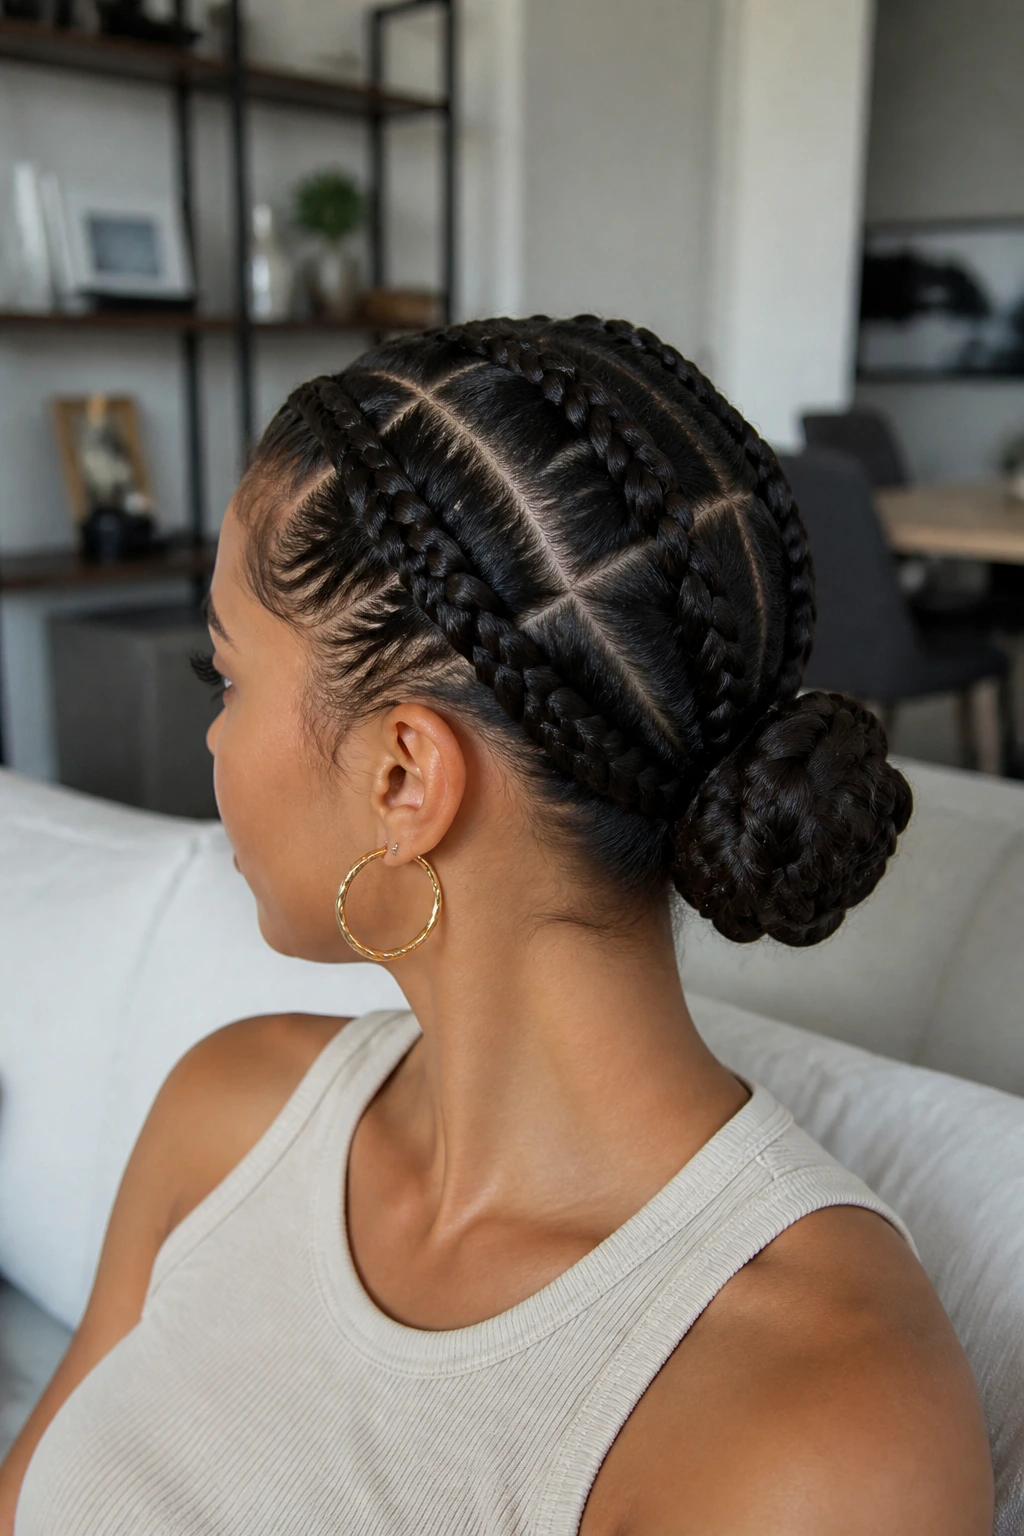
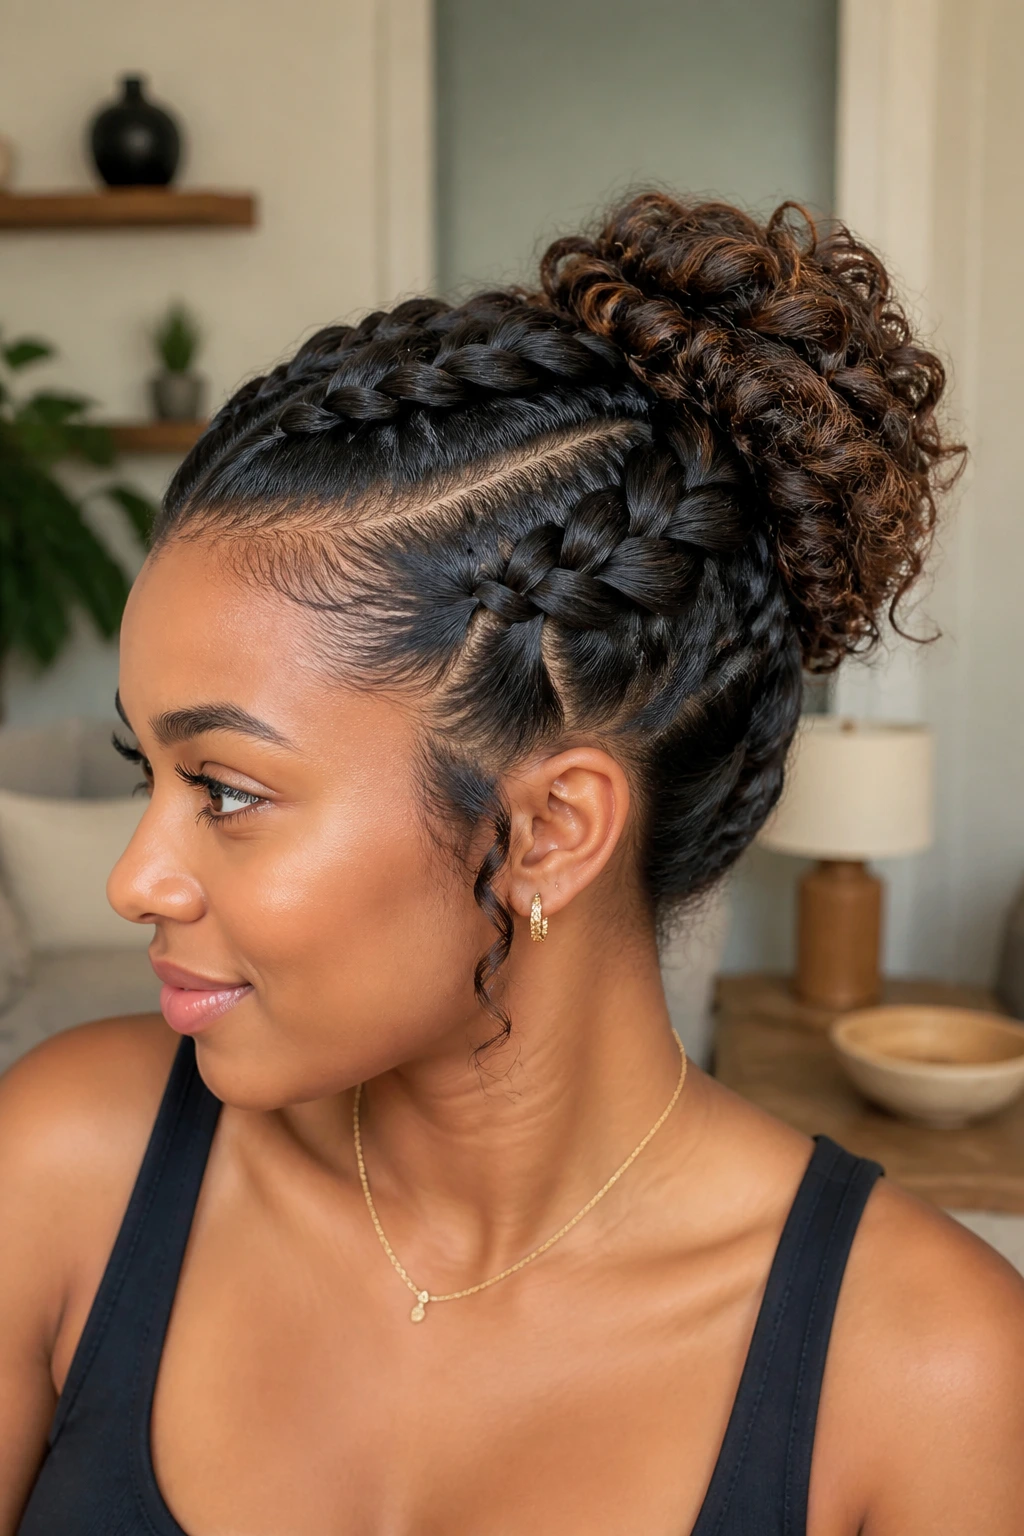
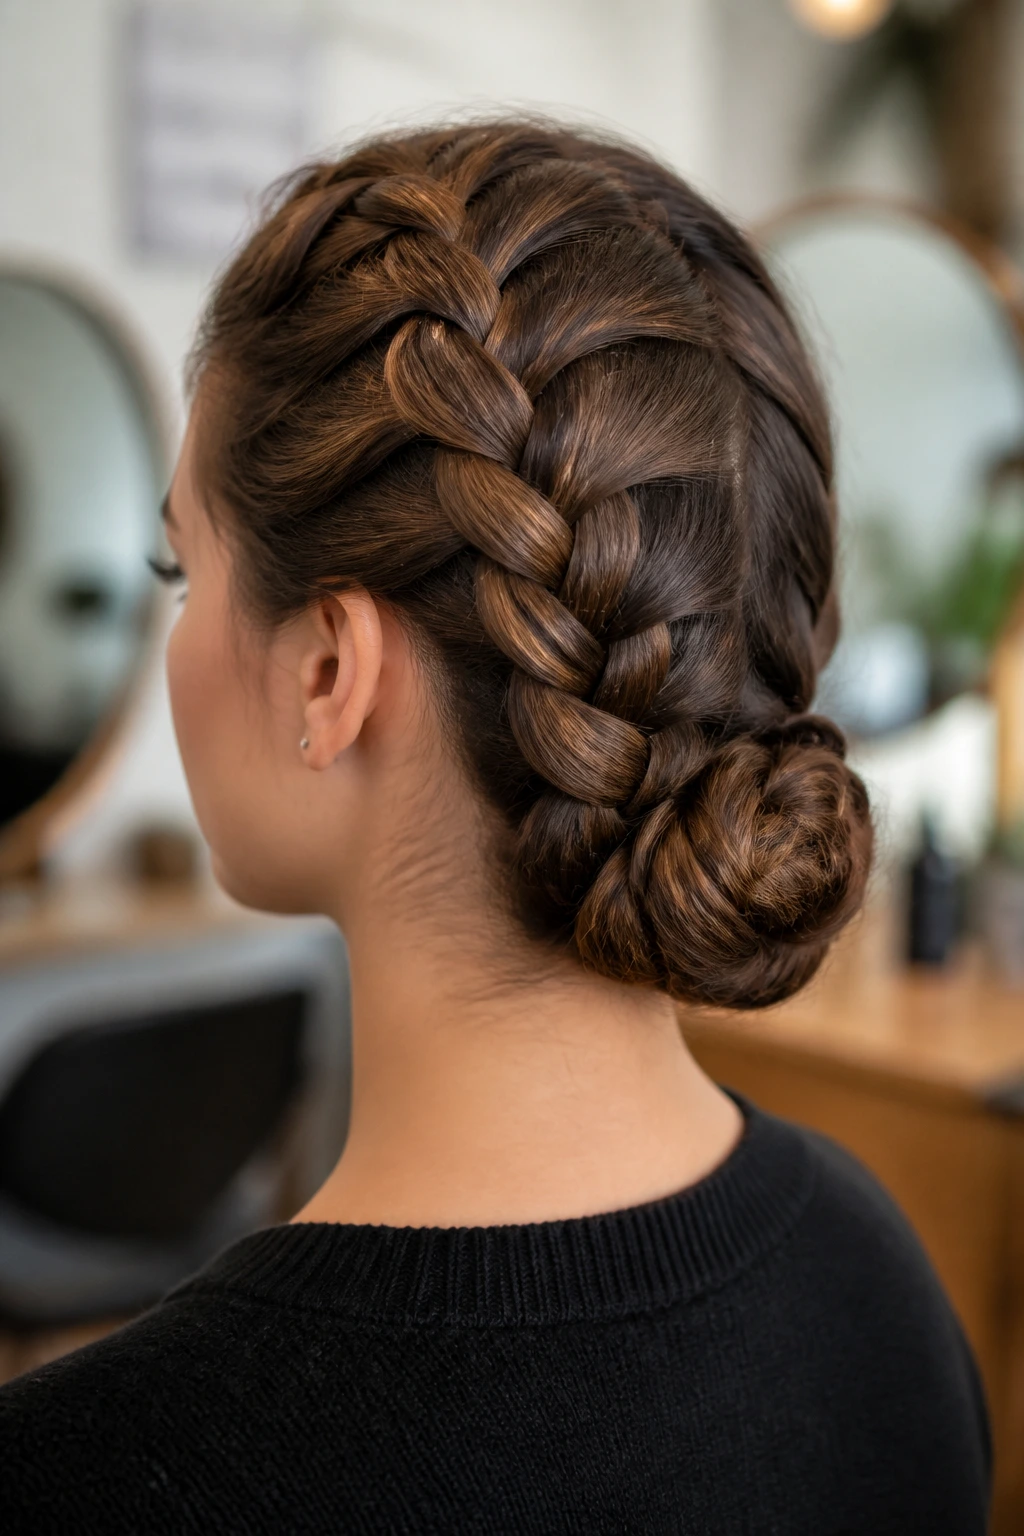
3. Double French Braids Wrapped Into One Bun
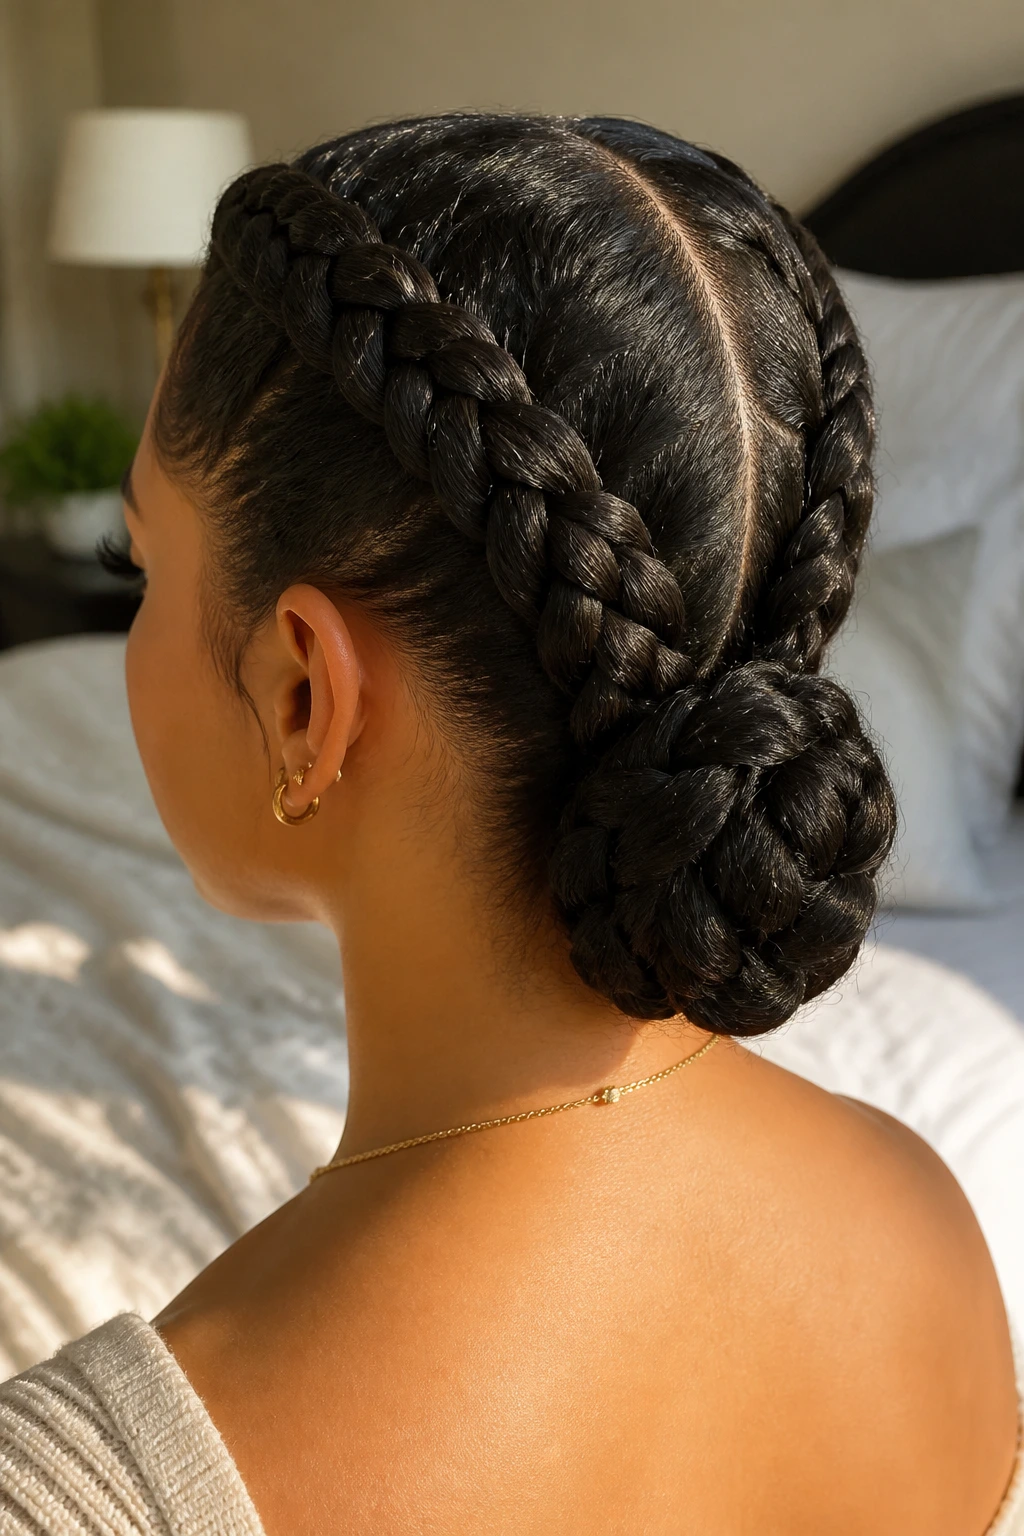
Two braids folded into one bun give you a style that feels secure in the hand and even more secure once it’s pinned. The look starts with a clean middle part, then each side is French-braided back toward the nape before the ends are wrapped together into a single bun. It has a neat, almost architectural feel.
Why does it work so well on protective styles? Because each braid helps hold the other one in place. There’s less chance of the bun sliding around, and the structure spreads tension across both sides of the head instead of loading one area. That makes this version especially nice for thick hair, long hair, or hair that tends to loosen the minute you step outside.
How to Wear It
Keep the braids medium-sized rather than tiny. Tiny braids can feel fussy and take forever; huge braids can make the bun bulky and awkward under a scarf. Medium sections give you a cleaner roll at the nape and a better chance of hiding the ends.
If you want it to last, pin the bun in a crisscross pattern with U-shaped pins or long bobby pins. Straight pins are fine, but they tend to shift if the bun has any weight to it. A spritz of mousse over the finished braids helps tame the fuzzy bits without freezing the hair stiff.
4. Crown French Braid Bun
This one gives you that braided halo effect without locking you into a full milkmaid look. The braid travels around the crown, usually from one side of the hairline, then the ends tuck into a bun that sits either low at the back or slightly off-center. It’s the style I’d pick for a formal event when I want the hair to feel finished but not fussy.
A crown braid does a nice job of protecting the perimeter, which is often the first area to get handled, rubbed, or picked at. It also keeps the line around the face neat, so the style holds up even if the bun itself loosens a little over the day. That’s useful. Styles should be allowed to age with a little grace.
If your hair is very dense, keep the braid narrow and the bun low. If your hair is finer, let the crown braid take up more visual space so the style doesn’t disappear from the front. Either way, this is one of the better options when you want a braid bun that looks expensive without trying too hard.
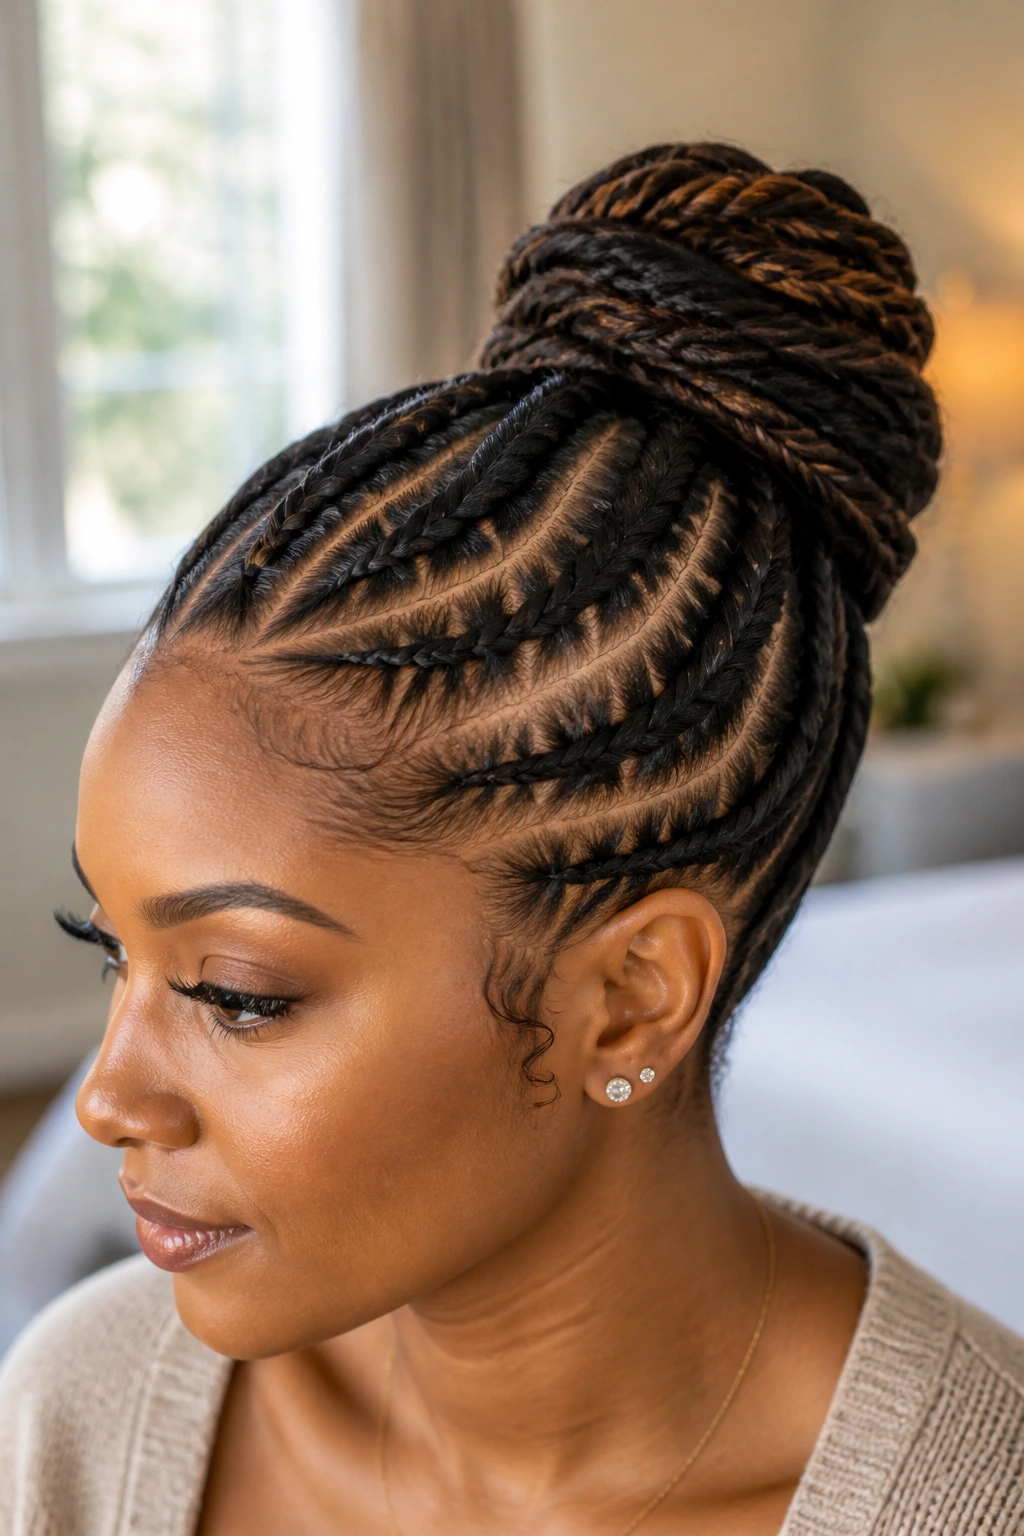
5. Sleek Feed-In French Braid Bun
Feed-in braids create a smooth, graduated look at the scalp, and that’s exactly why this version works so well for a French bun. The braid begins small, then more hair gets added in gradually, which helps the style lie flat instead of standing away from the head. The bun at the end can be compact, polished, and very clean.
This is the version I’d point to if someone wants a neat protective style that can handle added hair or extensions without looking bulky. The feed-in method makes the front look intentional from the start, and it helps avoid that “too much hair, too little shape” problem that happens with heavier buns. It’s sleek, but not in a stiff way.
A little mousse goes a long way here. Too much gel at the front can make the style flake by day two, especially if the bun gets handled a lot. I’d rather see a clean part, a light hold, and a satin scarf for twenty minutes than a heavy product stack that cracks on contact.
6. Messy French Braid Top Knot

Not every protective style needs to sit low and serious. A French braid that climbs into a top knot gives you lift at the crown and a softer, more relaxed shape overall. It also keeps the neck completely clear, which is why people reach for it on hot days or long weekends when they do not want hair brushing their shoulders.
Compared with a low bun, the top knot has more presence and a bit more attitude. The braid pulls the eye upward, and the knot can be tucked or loosely pinned depending on how neat you want it. That looseness is not sloppy if the parting is clean and the braid itself is controlled. It’s a little undone on purpose.
Best use case? Hair that’s already stretched and not freshly detangled for the first time in a week. If your strands are long and heavy, keep the knot secure with pins crossed in an X so the weight doesn’t drag the shape down by lunch.
7. French Braid Bun With Two Face-Framing Pieces

This one softens the whole style instantly. The braid runs back into a bun, but two slim pieces are left out near the temples or cheekbones so the look doesn’t feel severe. That small detail changes the mood more than people expect. Suddenly the bun looks less like armor and more like a choice.
It’s a smart option if you like protective styles but don’t want your face fully exposed. Those front pieces can be curled, stretched, or left in their natural texture, depending on what you want the style to say. I’m partial to leaving them slightly curved rather than pin-straight; that keeps the look from feeling too sharp.
A quick note on placement
Keep the face-framing pieces narrow. If they’re too thick, they compete with the braid and the bun starts looking unfinished. If they’re too thin, they disappear and you lose the point.
A small edge brush helps here, but don’t overdo the front with gel. The style needs enough softness to breathe. That’s the whole charm.
8. Zigzag-Part French Bun Braids
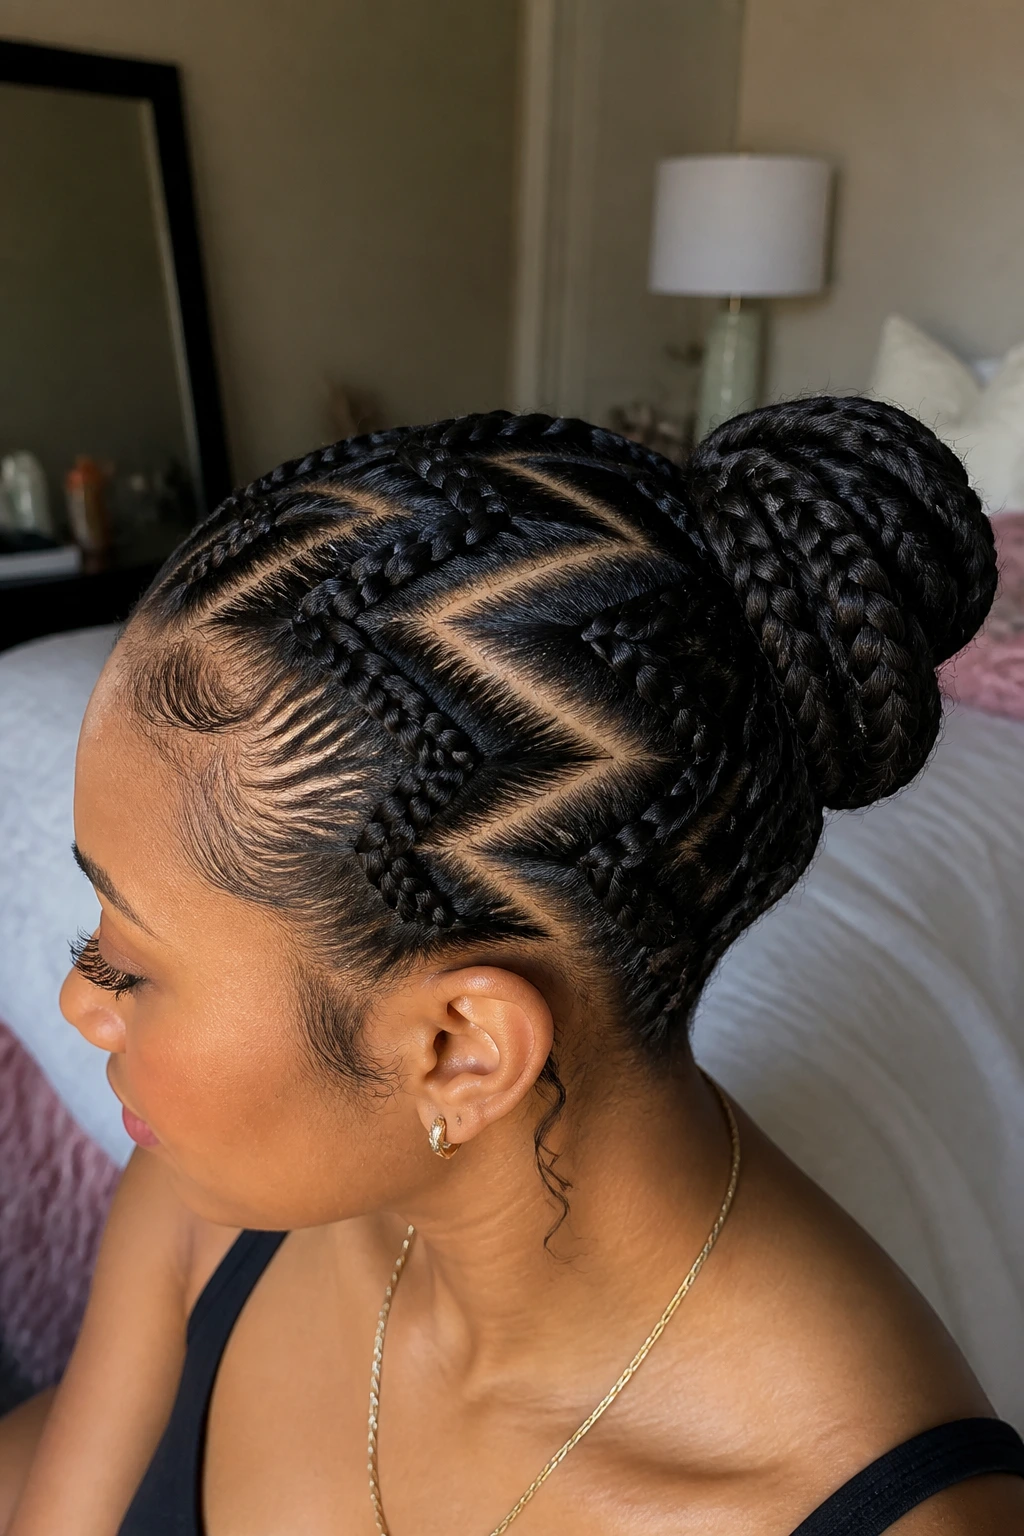
A zigzag part is for the days when you want the part itself to do some of the talking. It breaks up the straight lines and gives the French braid bun a little visual movement before you’ve even reached the bun. On textured hair, it can also help disguise areas where the hair is thinner or growing in unevenly.
This look can be surprisingly practical. The zigzag part gives each section a slightly different angle, which helps the braid sit around the head more naturally instead of looking too rigid. It’s especially good if you’re bored of center parts but still want a clean front.
The trick is keeping the zigzag precise enough to read from a distance. If the lines are too shallow, they blur. If they’re too sharp, the part can look overworked. I’d use the tail of a rat-tail comb and commit to each turn fully. Half-measures show.
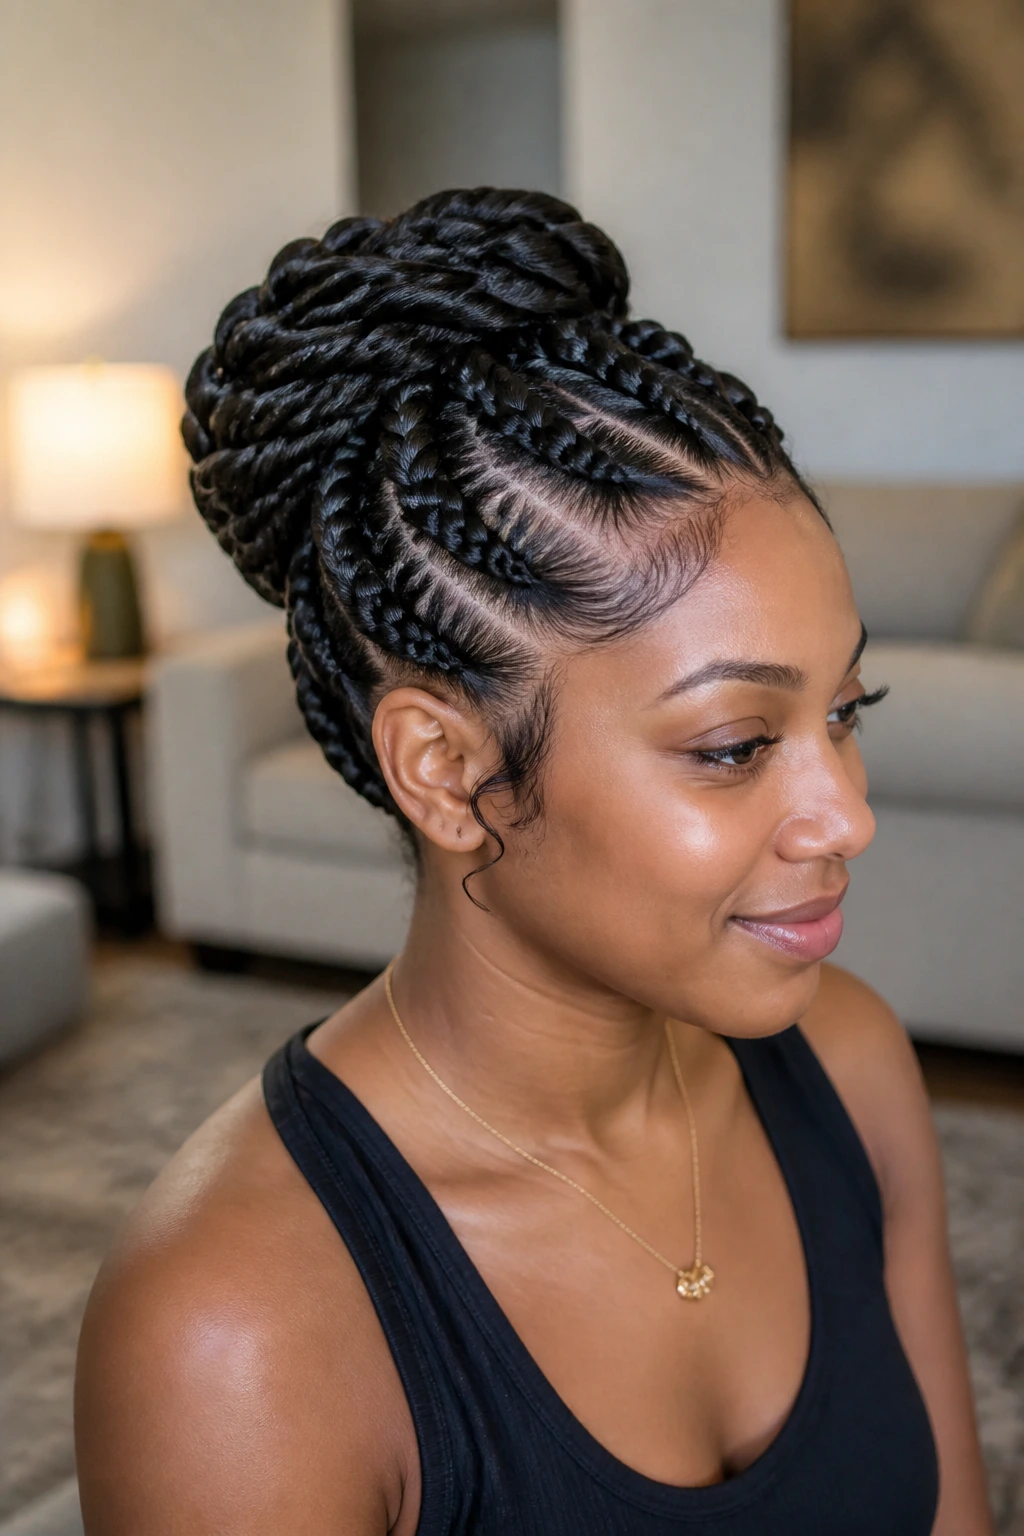
9. Halo French Braid Low Bun

A halo braid draws a line around the head first, then ends in a low bun that feels tucked in and secure. It has a slightly romantic shape, but it still does the protective job well because the ends are hidden and the perimeter is controlled. This is one of the best versions for anyone who wants the braid pattern to be visible from every angle.
Why does it look so good on protective styles? Because the braid acts like a frame. It keeps the bulk from spreading out across the head and gives the bun a neat finish at the back. If you’re wearing it with a soft sweater or a high neckline, the whole silhouette reads clean.
How to make it last
Pin the braid down every few inches rather than waiting until the end. That keeps the halo from lifting away from the head, which is the main thing that ruins the shape. A little shine spray on the braid itself can help the pattern show up, but don’t soak it. A greasy halo loses its crispness fast.
10. Half-Up French Braid Into a Mini Bun
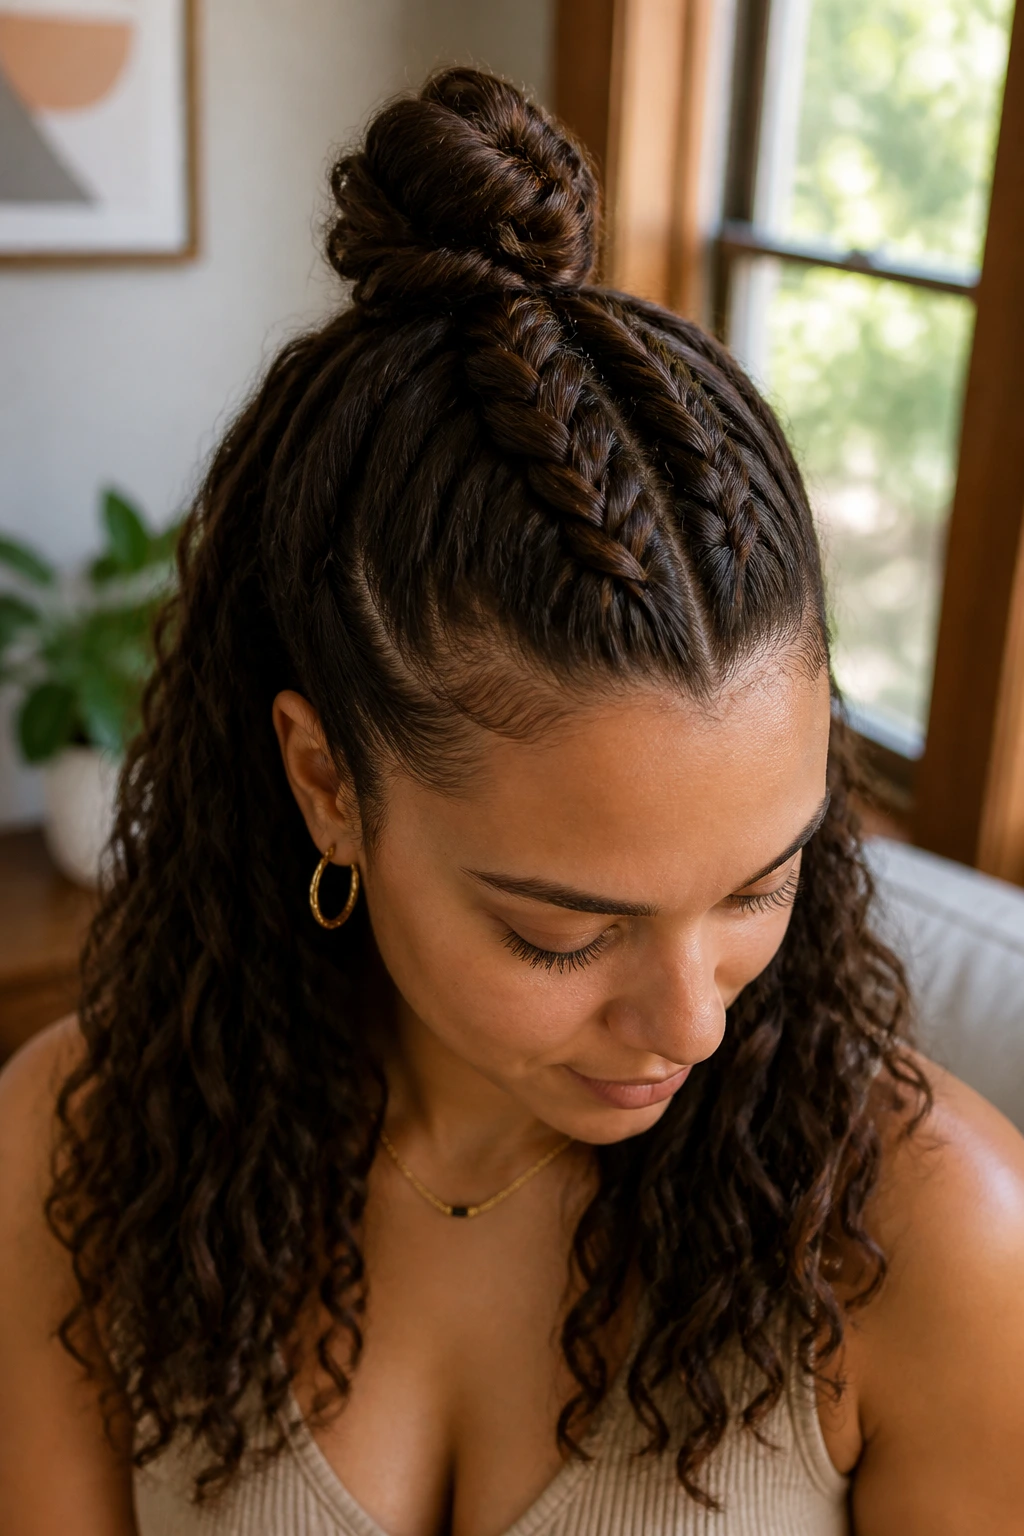
The half-up version is a good compromise when you want some hair up and some hair down. The French braid starts at the front or crown, then gathers into a smaller bun while the rest of the hair stays loose underneath. It’s protective in a lighter way, since the ends of the lower section still need some care, but the top half gets the neat, anchored treatment.
This style works well on medium-length hair and on people who don’t want the weight of a full bun sitting on the nape. It’s also one of the easier options for transitioning between casual and dressed-up settings, because the half-up shape reads relaxed even when the braid is tidy.
Use this version if you like volume. The loose lower section gives you movement that a full bun can’t. Just keep the top braid strong enough to hold the shape, or the whole thing starts to droop after a few hours and becomes more shrug than style.
11. Crisscross French Braids to Bun
Crisscross braids give this style a sharper, more graphic look. Instead of simply braiding straight back, the sections cross over each other in a way that creates visible seams across the head before gathering into a bun. It’s the kind of detail people notice when they’re standing close, which is half the fun.
This version is especially strong when you want the style to look intentional from every angle. The crisscross pattern creates structure, and the bun finishes it cleanly instead of leaving the braids dangling. It’s a good fit for thicker hair or for added hair, because the crossing helps distribute bulk across the scalp rather than concentrating it in one place.
I’d keep the bun compact here. A huge bun tends to fight the geometry of the braid pattern. The sharper the braids, the neater the bun should be.
12. Rope-Twist and French Braid Hybrid Bun
This hybrid style mixes a French braid at the front or crown with rope twists feeding into the bun. The texture shift is subtle, but it gives the whole look more dimension and keeps the style from becoming visually flat. If you’ve ever wanted a French braid bun that feels less expected, this is the one.
The rope twist section also helps when your hair is stretched and a regular braid would look too chunky. Twists can lie smoother, especially on longer hair, and they create a softer roll when pinned into the bun. I like this on days when I want the hair to look structured but not stiff.
Best use case
Use this version when you want a lighter feel around the crown and a little extra texture in the bun. It’s a nice option for hair that frizzes quickly, because twists can hide a bit of fuzz better than a very sleek braid. Keep the twists uniform, though. Uneven twists make the style look accidental.
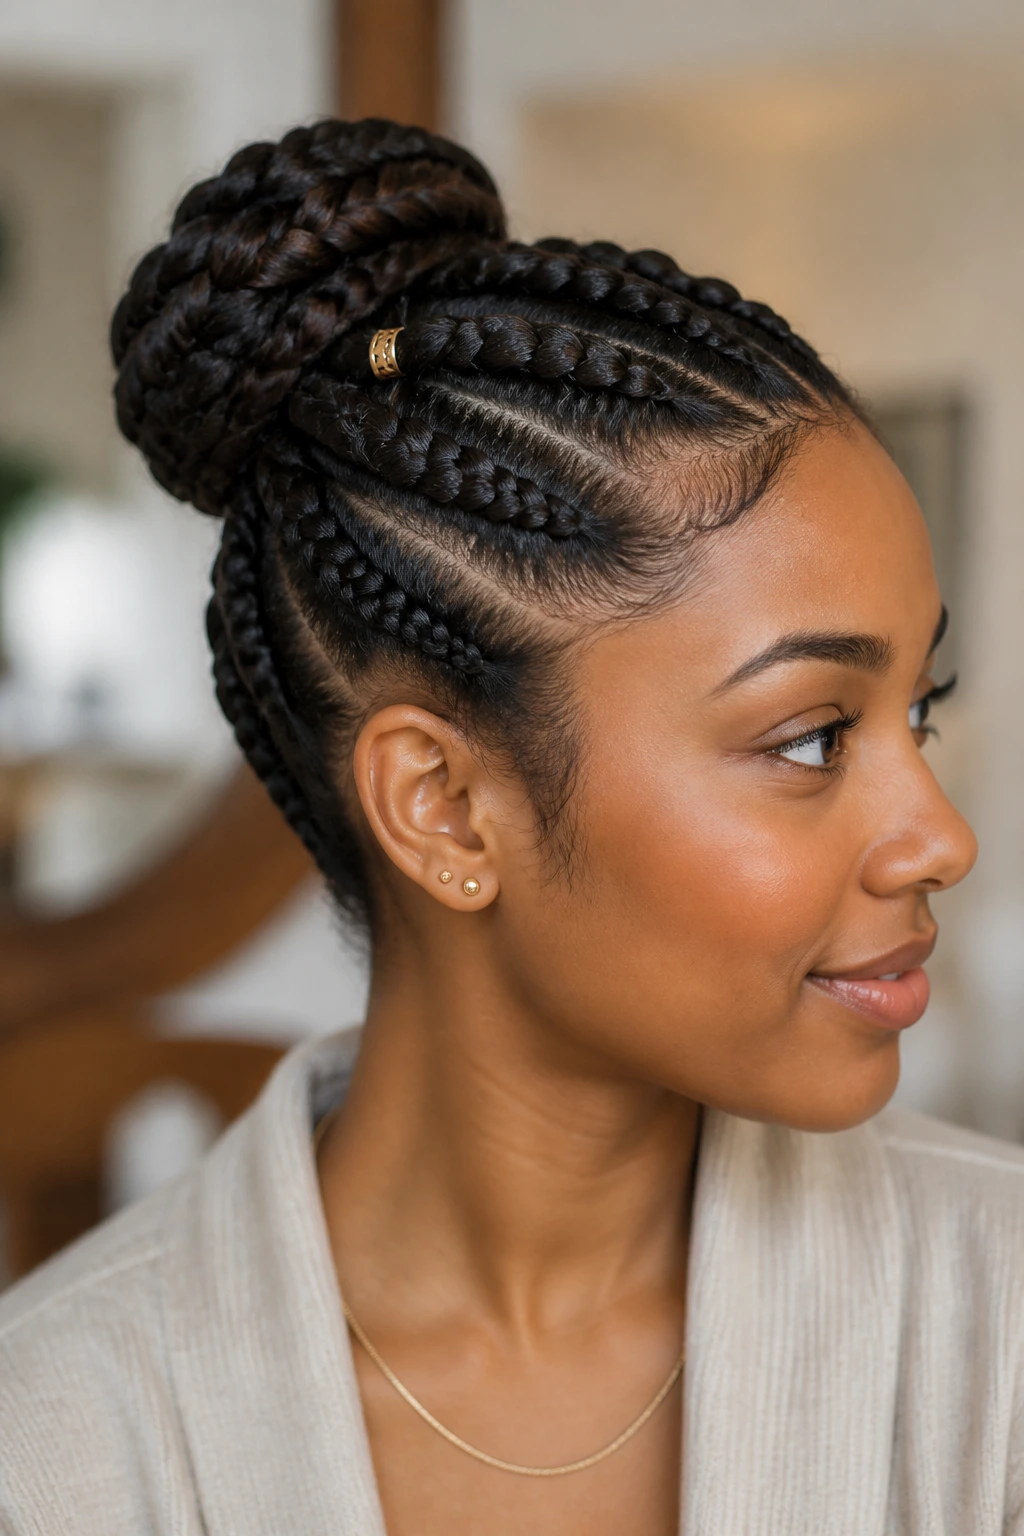
13. Chunky Jumbo French Braid Bun
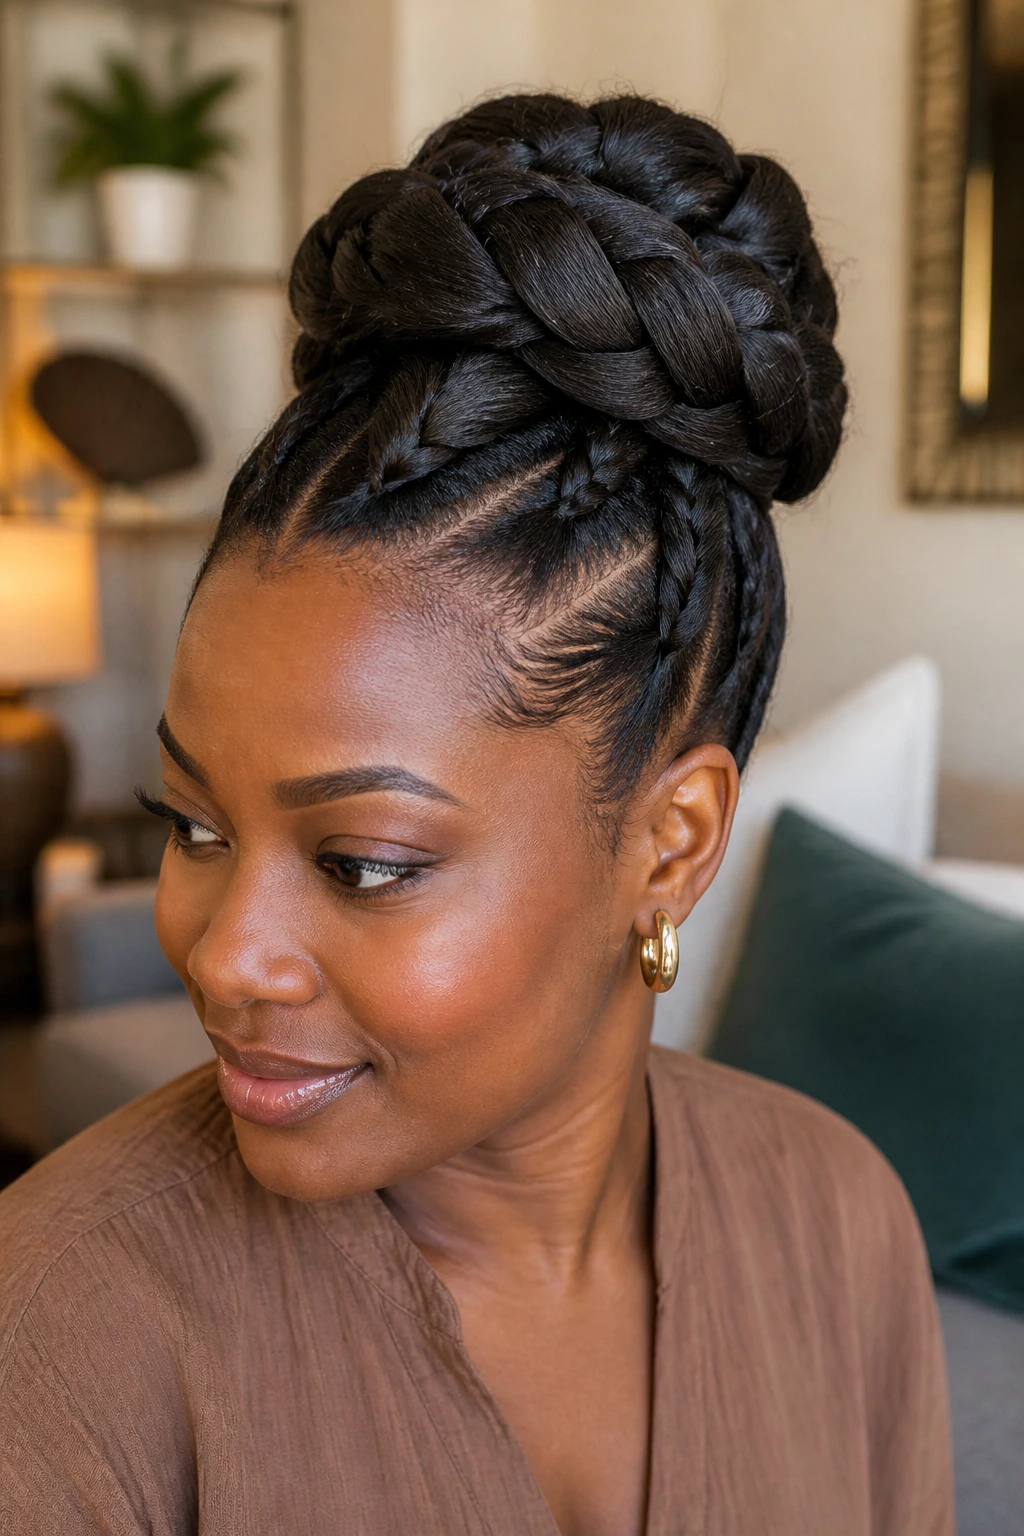
A jumbo braid changes the whole energy of the style. Instead of tiny sections and a polished little knot, you get a thick, ropey French braid that folds into a large bun with real presence. On dense hair, this is the version that finally looks proportional instead of undersized.
The jumbo approach also means less manipulation, which is a win. Fewer sections, fewer part lines, fewer chances to tug at the scalp. The braid reads bold from the front and strong from the back, which makes it a favorite for people who want a protective style that doesn’t disappear into the hair.
One thing to watch: weight. A jumbo bun can pull if it sits too high or if the braid is overloaded with product. Keep the base secure with a strong hair tie and at least four pins around the bun’s perimeter. If the bun shifts when you shake your head, it needs another pin or a flatter shape.
14. French Braid Space Buns

Space buns are playful, but they can still be protective if you keep the braids clean and the ends tucked. In this version, two French braids rise from the front or crown and each one coils into its own bun. It’s a fun shape, yes, but it still does the job of keeping the hair organized and off the shoulders.
I’d use this look when the hair needs a reset and you want the style to feel lighter around the head. The two-bun shape spreads the weight out, which is kinder on the scalp than one heavy top knot for some people. It also gives you room to play with parting, because the symmetry becomes part of the design.
Keep the buns compact. Space buns lose their edge when they sag. A few well-placed pins and a satin scarf after styling will help them stay lifted.
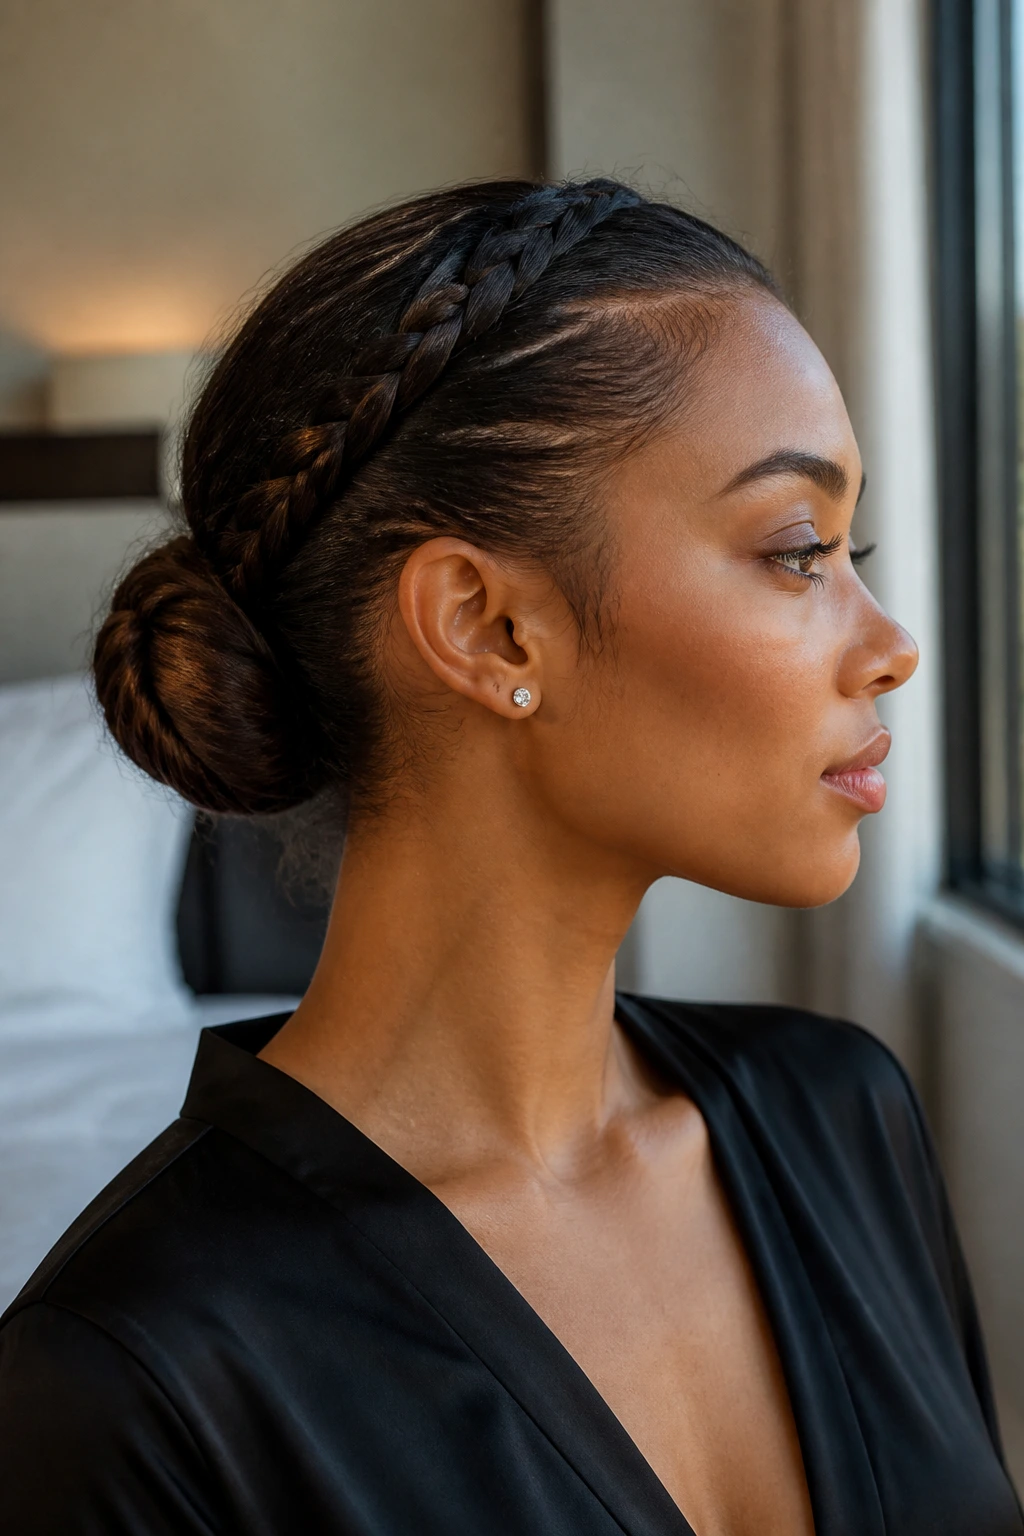
15. Low Nape French Braid Chignon
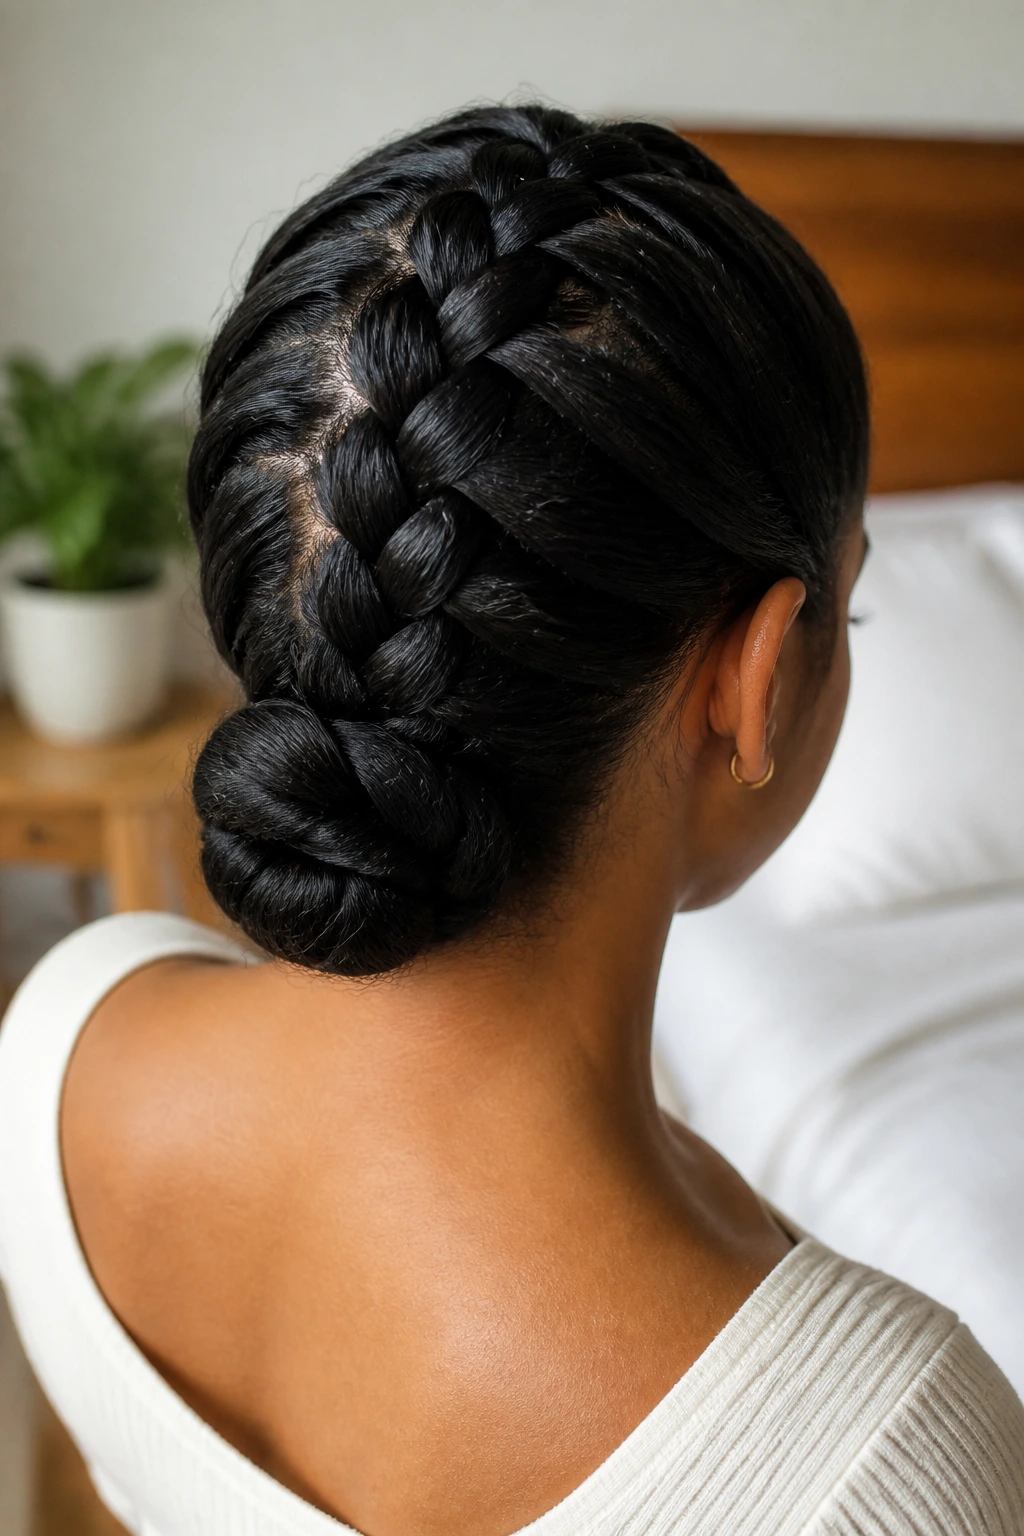
There’s something old-school and useful about a nape chignon. The braid travels down neatly, the bun sits low against the neck, and the whole thing stays out of the way of collars, headrests, and bags with a bad habit of catching on hair. It’s the most practical version in this set, and I mean that as a compliment.
This style is also kinder when you need to wear it for a long stretch. A low bun tends to move less, and the chignon shape spreads the pinned area wider rather than stacking all the tension in one point. If you’ve ever taken a bun down and found a sore spot exactly where the elastic sat, you know why this matters.
How to wear it well
Angle the braid slightly downward so the chignon can sit flat. A bun that’s too round at the nape tends to poke out against jackets and seatbacks. A flatter roll looks better and feels better.
16. Mohawk French Braid Bun
The mohawk braid bun is the dramatic cousin in the group. The braid runs along the center of the head with the sides smoothed back or pinned close, then the length gathers into a bun that sits high enough to make the center line obvious. It has shape, attitude, and just enough edge to feel different from the usual neat updo.
This is a strong choice if you want the sides controlled and the center to do the work. It’s especially flattering on thicker hair because the braid can hold its shape without disappearing into the rest of the style. If the sides are slicked too hard, though, the look can get rigid fast. Leave a little softness near the ears.
I’d keep the bun medium, not giant. The mohawk line already gives you height. If the bun also grows tall, the style starts tipping into costume territory instead of clean boldness.
17. Knotless French Braid Bun With Extensions
Knotless braiding makes a difference when you want added hair without the hard bump at the root. The braid starts more gently, the added hair is introduced in a smoother way, and the bun at the back can carry the extra length without looking clamped on. That matters if you plan to keep the style in for more than a few days.
This version is one of the kinder choices for protective styling because the tension is easier to manage. The scalp line can look neat without being aggressively tight, which is what you want when you’re trying to protect hair instead of proving a point with braiding skills. Extensions should add length and shape, not a sore scalp.
The bun itself should be secured with strong pins and an elastic that won’t snag the added hair. If the ends are synthetic, seal the bun carefully so the fibers don’t fray into the air by day three. A little mousse and a satin wrap help the finish last longer.
18. Braided Bun With a Scarf Wrap
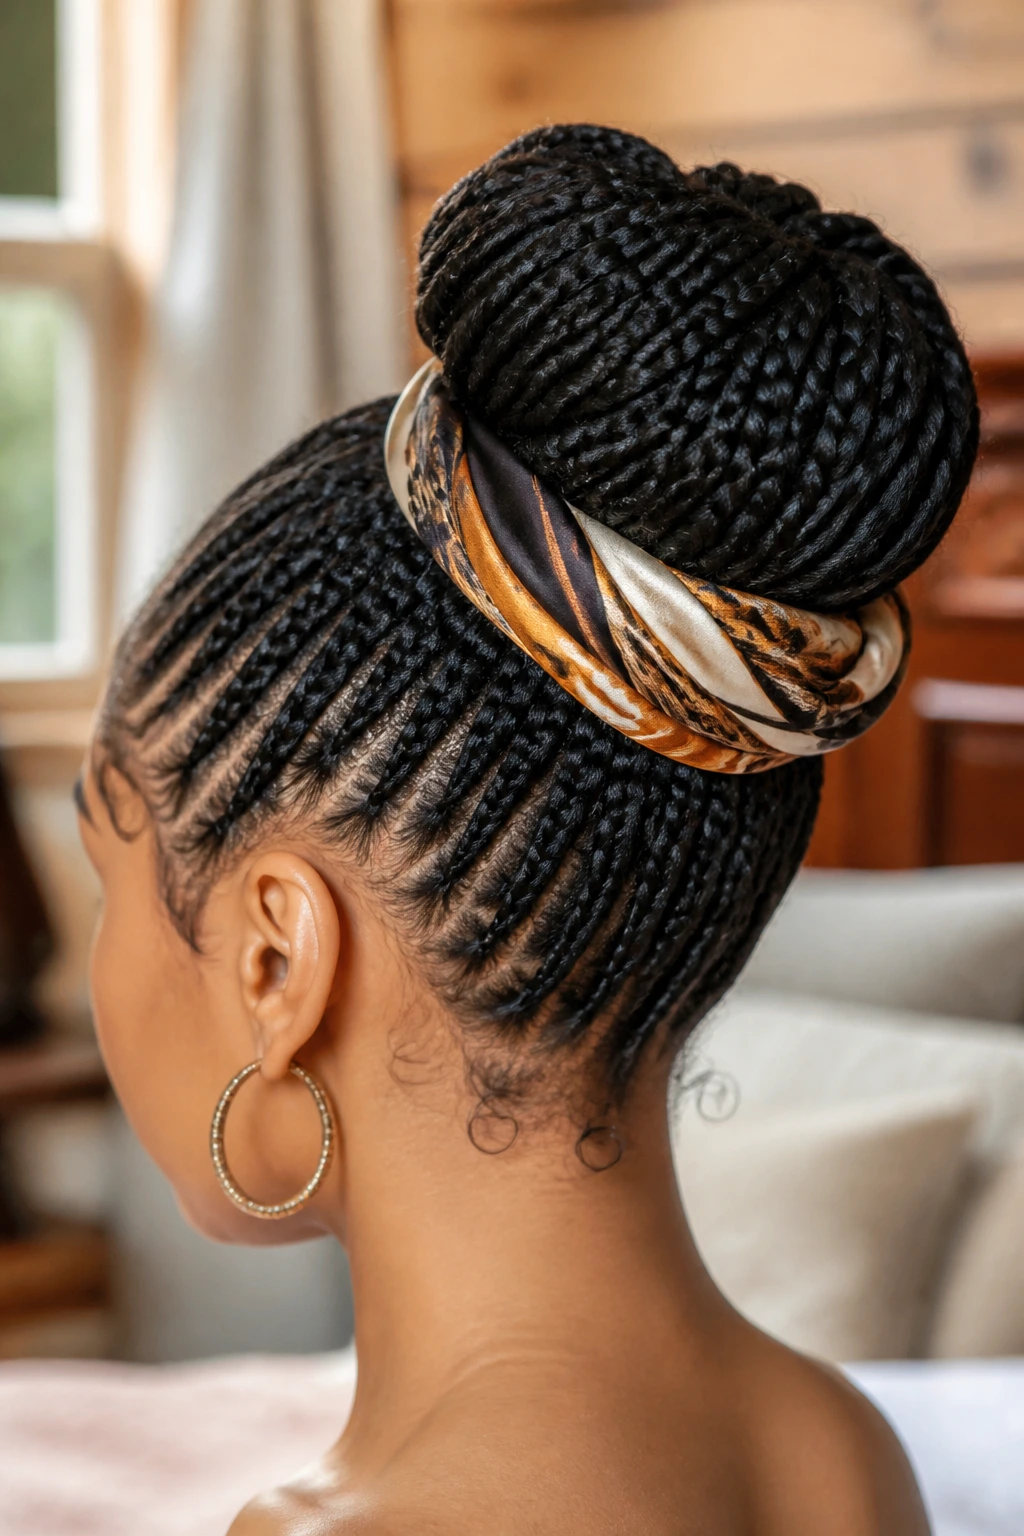
A scarf changes the style instantly. The French braid still does its structural job, but the scarf wraps the bun or the braid base and adds color, texture, and a little protection around the edges. I like this on days when the hair is doing the right thing but needs a visual lift.
The scarf also helps hold the shape in place, especially if you’re trying to reduce flyaways without layering on more gel. A silk or satin scarf is best if you care about friction; cotton can grab the hair and rough up the finish by the end of the day. If the scarf is patterned, keep the braid simple so the two elements don’t compete.
This is a nice way to make a style wearable twice in a row without it looking like you repeated yourself. Swap the scarf color, and the whole bun feels different.
19. French Braid Bun With Curly Ends
Leaving curly ends out of the bun softens the style and adds movement right where a fully tucked bun can feel a little severe. The braid runs back in the usual way, but the final bun leaves a few curls or coils peeking out, which gives the style a lived-in finish. It’s especially good on textured hair where the ends naturally want to do their own thing anyway.
This version has one real advantage: it can look tidy and playful at the same time. The braid keeps the roots neat, the bun keeps most of the hair protected, and the curly ends keep the style from feeling boxed in. That balance is hard to get right, and when it works, it really works.
Keep the exposed ends moisturized but not oily. Heavy products at the tips make them clump and lose shape. A tiny bit of cream or leave-in on the ends is enough.
20. Asymmetrical French Braided Bun

Asymmetry gives the style a little movement without needing loose curls or face-framing pieces. The braid starts off-center, the bun sits to one side or slightly lower on one side, and the whole look feels less expected than a strict center-part version. It’s a subtle choice, but the difference is visible.
This is a good option if your face shape benefits from a side sweep or if you just don’t like the symmetry of a straight-down-the-middle braid. The off-center placement can also make heavier hair feel lighter because the bun isn’t stacked directly behind the crown. That’s practical, not just pretty.
The key is commitment. A half-side, half-center part looks indecisive. Pick a side and let the braid follow it fully.
21. Protective French Bun for Short Natural Hair
Short hair can absolutely do this look, even if it needs a little creativity. The braid may be smaller, the bun may be pinned or tucked with a hairpiece, and the style may rely more on shape than size, but the result can still feel neat and protective. In fact, shorter hair often holds the front detail better because there’s less weight dragging everything down.
What makes it work
The base needs to be stretched enough to braid cleanly. If the hair is very shrunken, the braid will sit too high and the bun will fight to stay together. A light blow-dry on low heat, a banding method, or a stretched set can give you more room to work.
If you’re using a bun piece or added hair, match the texture closely. A glossy donut on matte natural hair looks off immediately. Better to keep it simple and believable.
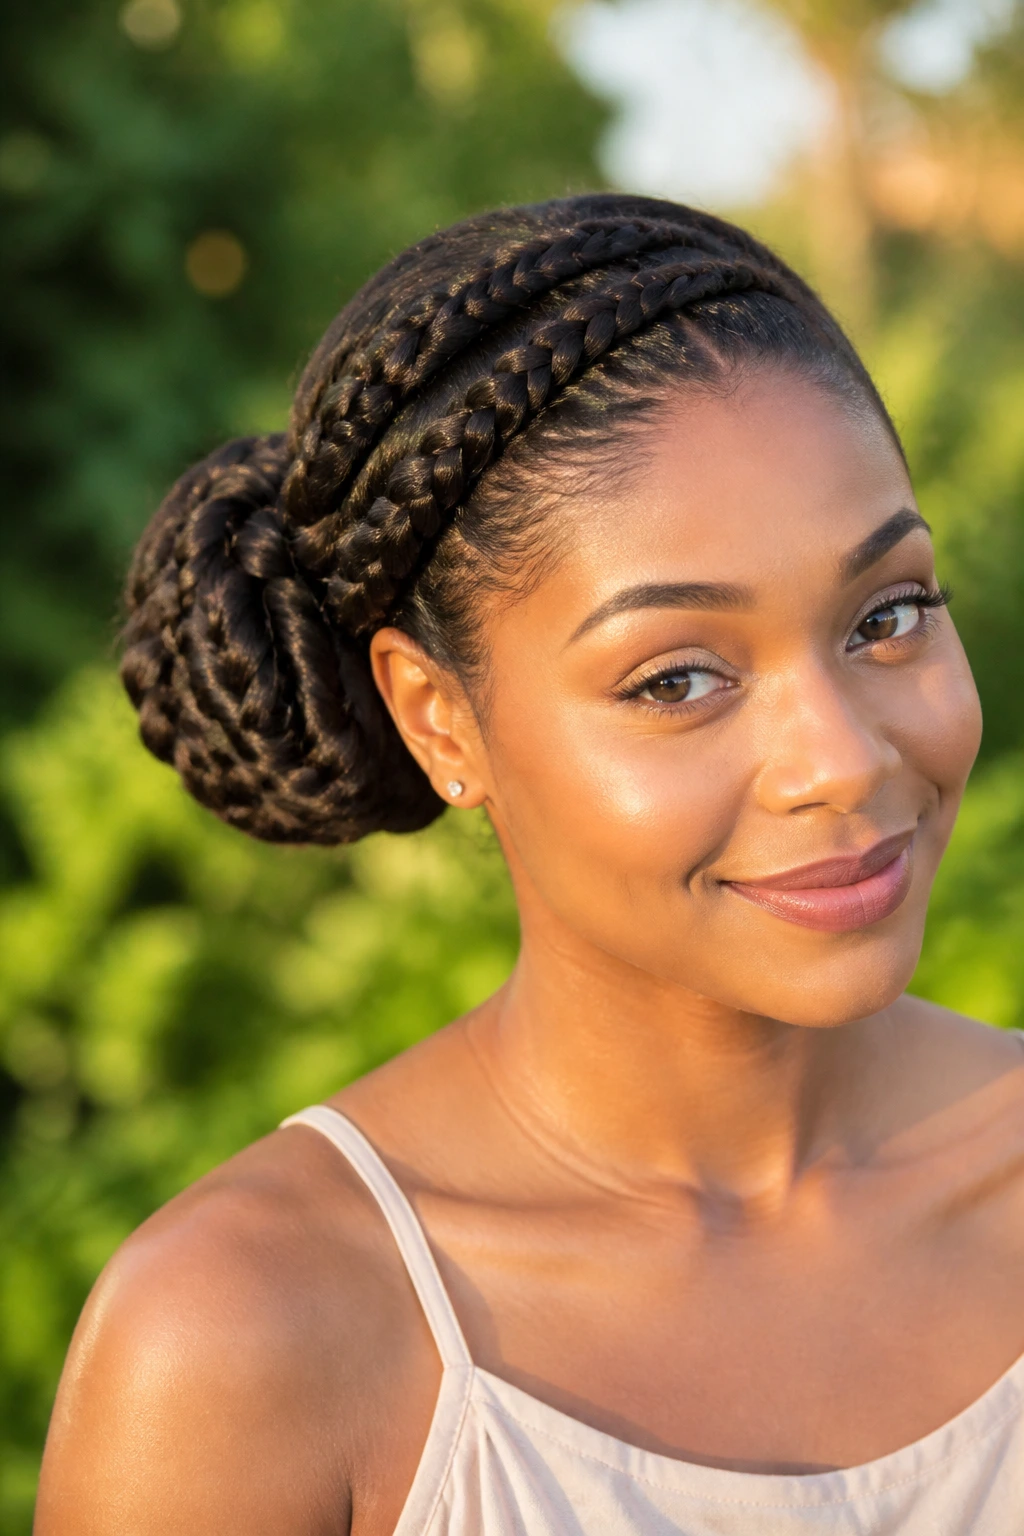
22. Elegant French Braid Ballet Bun
The ballet bun version is the polished one. It sits low, smooth, and centered, with the French braid feeding into a compact knot that looks tidy from every side. It’s the style I’d choose when I want the hair to feel restrained in the best sense of the word — controlled, neat, and not fighting the outfit.
This one is excellent for special occasions, but it’s also a useful everyday option when you don’t want flyaways competing with your day. The braid gives the front some texture, and the bun keeps the silhouette clean. If you use too much product, though, the style can start to look lacquered. That’s not the goal. Clean, not crusted.
A fine-tooth comb, a light hold product, and a couple of hidden pins are usually enough. The bun should stay flat enough to sit under a jacket collar without poking out, which is exactly why this style works so well in real life.
Why French Braid Buns Protect the Hair Better Than a Loose Updo

A loose updo can look easy, but it often asks the hair to support itself in too many places at once. French braid buns change that by building a backbone into the style first. The braid organizes the root area, keeps the hair moving in one direction, and makes the bun more stable, which means less daily handling and less random tugging at the ends.
That matters most when hair is already dry, stretched, or fragile around the perimeter. A style that keeps the ends tucked away from collars and fingertips usually lasts longer and feels calmer to wear. The ends aren’t rubbing against jackets. The braid isn’t shifting every time you turn your head. The whole setup behaves better.
The other quiet benefit is scalp access. A French braid bun can be loosened, refreshed, or cleaned in sections more easily than a loose puff or a style that sprawls in all directions. That’s not glamorous, but it’s the sort of thing that makes a protective style worth the effort.
Essential Tools for Clean Parting and Neat Braiding
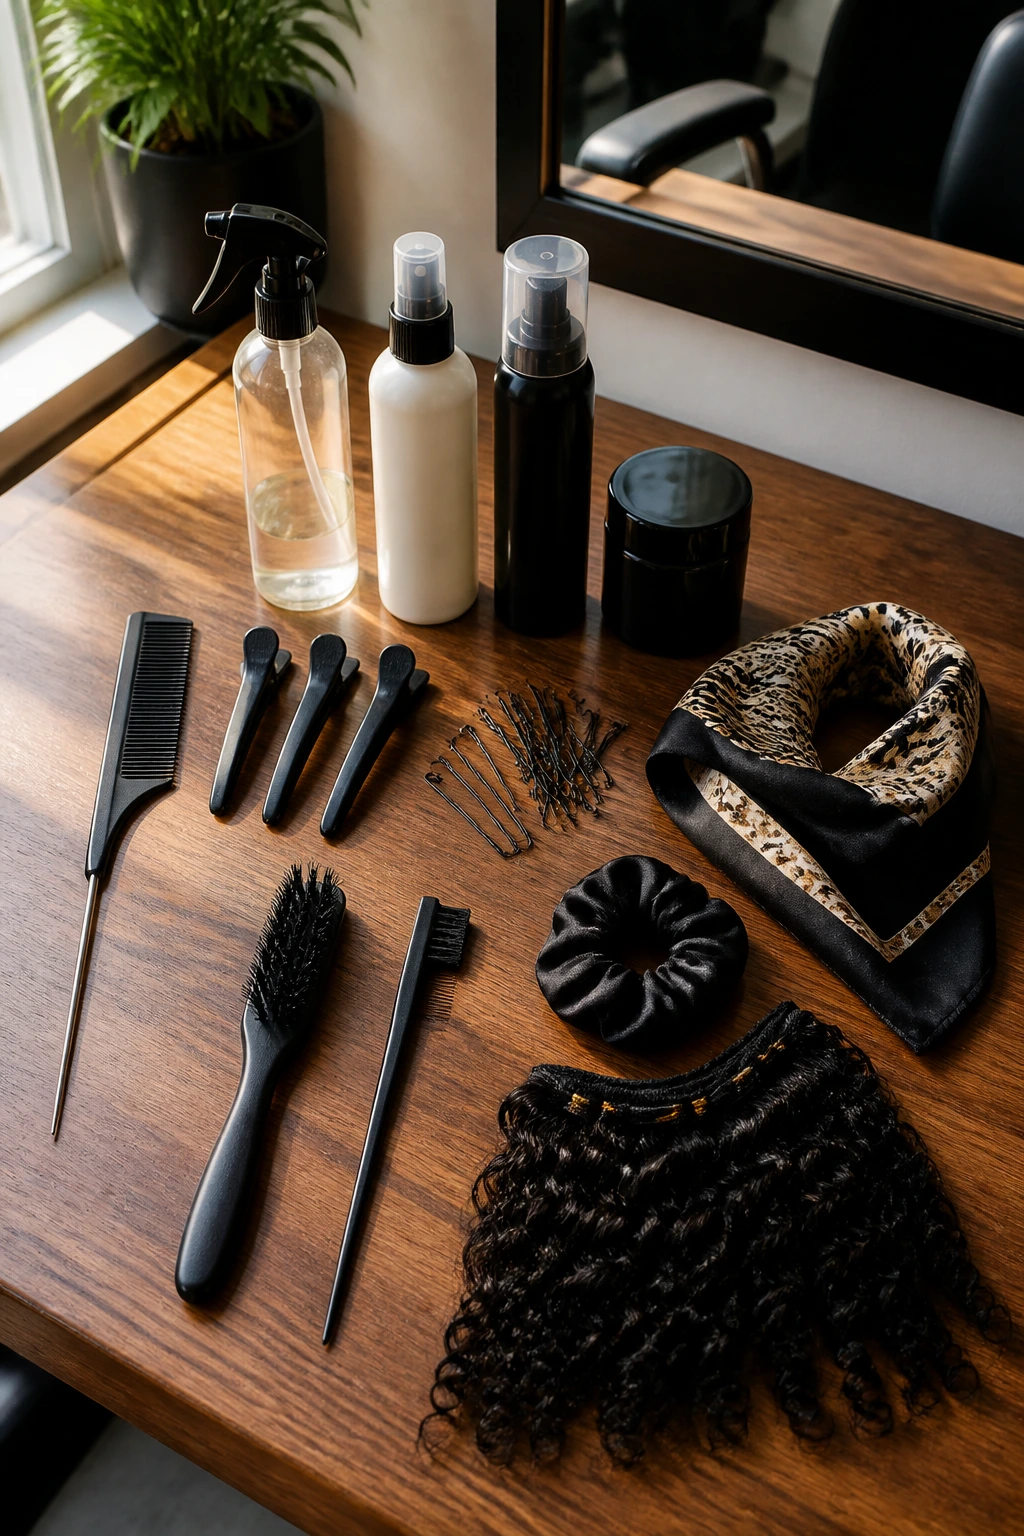
- Rat-tail comb: The pointed tail makes parts cleaner, especially for center parts, zigzags, and side sweeps.
- Sectioning clips: These keep the unused hair out of the way while you braid one side at a time.
- Spray bottle with water: A light mist helps the hair take shape without soaking it.
- Leave-in conditioner: Use a small amount on mid-lengths and ends so the braid stays soft and manageable.
- Mousse or setting foam: A light layer calms flyaways and helps the braid dry into place.
- Gel or edge control: Best used sparingly at the hairline, not piled on like frosting.
- Bobby pins and U-pins: These anchor the bun and keep it from flattening itself loose.
- Silk or satin scarf: Useful for setting the style for 15-20 minutes and protecting it overnight.
- Silk scrunchie or snag-free elastic: Better for the bun base than a rough rubber band.
- Fine brush or edge brush: Helps smooth the front without scraping the scalp.
- Optional hair extensions: Helpful if you want added length or a fuller bun, but not required for every style.
Smart Hair Prep and Product Choices
Clean parting starts before the braid does. Hair that has been detangled gently, stretched a bit, and given a light layer of leave-in is easier to braid neatly than hair that’s dry and grabbing at the comb. I’d rather spend ten extra minutes on prep than fight with one section that keeps puffing up while I braid the other side.
Product choice matters more than people admit. Heavy creams can make the roots slippery, which is a problem when you’re trying to keep a braid anchored. A lighter leave-in, a little mousse, and just enough gel to smooth the part line usually work better than trying to harden the whole front into place. The hair should still move. It should just move on your terms.
If you’re using added hair, match the texture before you match the color. A braid with glossy synthetic hair attached to dry natural hair can look mismatched from across the room. Texture harmony matters. So does weight. If the added hair makes the bun tip backward, it’s too much for the style.
How to Wear These Buns Without Fighting Them
Presentation: Keep the braid line clean and let the bun sit where the head naturally wants it to sit. A low nape bun feels calm and refined; a higher bun changes the mood fast and can look sharper or sportier depending on the braid size.
Comfort: Watch the temples, behind the ears, and the first inch of the hairline. If those spots feel tight after an hour, the braid needs to come down a notch. Protective styling only protects when you can forget about it.
Outfit Pairings: Low buns work cleanly with collared shirts, turtlenecks, and structured jackets. Higher buns leave more room for necklaces and earrings. Scarves, hoops, and bold necklines all get along with French braid buns if the bun itself isn’t fighting for attention.
Wear Time: A neat French braid bun can carry you through several days if you sleep on it correctly, but the front should still be refreshed before it gets fuzzy. A satin scarf at night and a little mousse in the morning go a long way.
Small Tweaks That Change the Whole Style
Flavor Enhancement: A tiny amount of shine spray on the braid only — not the whole head — can make the parting and weave look cleaner without weighing the bun down. Use a light hand. Hair doesn’t need to look wet to look finished.
Customization: Add cuffs, beads, ribbon, or a scarf when the base style feels too plain. One accessory is enough. Two can work. Three usually starts to look like you’re proving a point.
Comfort Hack: Leave the first braid section slightly looser around the temples and tighten the braid more through the mid-shaft. That keeps the style anchored without turning the hairline into a stress point.
Make-It-Yours: For finer hair, keep the bun smaller and the braid tighter in pattern, not tension. For dense hair, go bigger in section size so the style doesn’t disappear into a puff of volume.
Mistakes That Make French Braid Buns Fall Apart
Pulling the front too tight: The scalp starts aching, and the braid may look clean at first but frizz hard by the next day. Fix it by keeping tension firm through the braid body and softer right at the hairline.
Using too much product at the roots: The braid can start sliding because the strands won’t grip each other. Use a little mousse or gel, then stop. Slick is useful; greasy is not.
Building the bun too high or too round: A heavy bun perched on top of the head shifts, especially on thick hair. Keep it flatter and pin it low unless the style is meant to be top-heavy.
Leaving the ends exposed by accident: A few stray ends are one thing. A bun that misses half the tail is another. Tuck and pin until the hidden ends stay hidden.
Skipping night protection: Even the neatest braid bun frizzes if it’s sleeping uncovered on cotton. Wrap it with silk or satin and the next morning starts easier.
Fresh Takes on the Same Bun Shape

The Soft Office Version: Keep the part clean, the braid medium-sized, and the bun low and flat. Add small stud earrings and leave the finish matte rather than shiny. It reads calm and polished.
The Weekend Texture Version: Loosen the braid slightly, pull a few soft pieces near the hairline, and let the bun stay a little fuller. This one works best when you want the style to look relaxed without falling apart.
The Extension-Boosted Version: Add hair only at the mid-lengths and bun, not at the root. That gives the braid more body while keeping the scalp line neat and less bulky.
The Event Version: Wrap the bun with a ribbon or pin one side with a decorative comb. The shape stays the same; the finish changes from practical to dressed up in one move.
The Short-Hair Faux Bun Version: Use a braid base, then tuck the ends into a small bun piece or a pinned coil. Keep the texture match close so the style looks intentional instead of borrowed.
How to Keep the Style Fresh Without Starting Over
The first night matters. Smooth the braid down, tie the bun with a satin scarf, and sleep on a satin pillowcase if you can. That reduces the fuzzy crown that starts appearing around day two, especially near the part line and the front edge.
If the scalp needs attention, use a nozzle tip or applicator bottle to place diluted cleanser or scalp toner along the part, then wipe gently with a soft cloth. Do not flood the braid with water unless the style was installed for washability. Wetting the whole thing can swell the braid and shorten the life of the style.
Most French braid buns feel best when worn in the one- to two-week range if they’re on natural hair without extensions. With extensions or a very secure install, a little longer is possible, but the scalp should always get the final say. If the front starts feeling sore, or the bun keeps loosening at the same spot, it’s time to reset.
Questions People Ask Before Getting French Bun Braids
Can French bun braids work on short natural hair?
Yes, if the hair is stretched enough to grip and the bun is kept small. Shorter hair often needs pins, a tucked finish, or a small bun piece, but the braid pattern can still look clean.
Do I need extensions for these styles?
No. Extensions help with length and fullness, but many of these buns work on natural hair alone. If you do add hair, keep the weight balanced so the bun doesn’t drag backward.
How long can I keep a French braid bun in?
For natural hair without added hair, 1-2 weeks is a sensible window if the scalp still feels good. With extensions, a little longer can work, but only if the install stays comfortable and the front isn’t getting stressed.
What product keeps the braid neat without flaking?
A light mousse or setting foam usually behaves better than a heavy gel stack. Use a small amount on the braid and a little gel only at the part line if needed.
Can I wash my scalp while wearing this style?
Sometimes, yes. If the braid is compact and the bun is low, targeted scalp cleansing can work. Use a nozzle bottle and keep the water or cleanser on the scalp, not soaking through the whole braid.
Why does my bun keep sliding?
Usually because the base isn’t anchored enough or the bun is too heavy for the braid beneath it. Add pins around the perimeter, flatten the bun slightly, and check whether the hair is overloaded with product.
Is this style good for sensitive edges?
It can be, if the braid starts with gentle tension and doesn’t get pulled back hard at the temples. If your hairline is tender, skip the tight slicked-back finish and leave a little softness at the front.
Can I sleep in these styles?
Absolutely, and you should. A satin scarf or bonnet will keep the braid from fuzzing up overnight and help the bun hold its shape for another day.
A Braided Bun That Keeps Its Shape
French bun braids work because they solve more than one problem at once. They organize the front, protect the ends, and keep the style from collapsing into a loose pile of hair by the end of the day. That combination is why they stay in rotation, not because they look fancy in a photo, but because they behave well in real life.
The best version is the one that matches your hair density, your length, and how much handling your scalp tolerates. Start there, not with the most elaborate braid on the list. A clean, comfortable French braid bun will always beat a gorgeous one that hurts by lunchtime.