Fine hair makes sloppiness obvious. Every crooked part, every loose end, every braid that’s pulled too hard shows up fast, which is exactly why cornrows for boys with fine hair can be such a smart move when they’re done with a light hand and clean sectioning. The style doesn’t need bulk to look tidy; it needs order. Good parts, even tension, and a braid count that matches the hair’s density do most of the visual work.
That’s the part people miss. Fine hair can mean soft strands, low density, or both, and those aren’t the same thing. A boy with thin-looking strands but plenty of hair on the head needs a different braid plan than a boy with sparse spots at the crown or temples. If you treat both heads the same, the result can look stringy, puff up early, or tug at the hairline in all the wrong places.
The styles that work best here are the ones that respect the scalp. Narrow rows, smart part shapes, and low-tension braiding make the hair look neater than a style that tries to fake thickness by forcing in too much product or too many extensions. Small detail, big difference. Once you see how much part width and braid direction change the whole read of the head, the good choices start to stand out fast.
Why These Cornrows Suit Fine Hair
- Cleaner lines do more than bulk here: On fine hair, a straight part and even row spacing create the look of fullness without stuffing the braid.
- Smaller rows last longer: Narrow braids grip soft strands better, so they’re less likely to slip loose after sleep, sweat, or a hoodie being pulled on and off.
- The scalp stays calmer: When tension is spread across 4 to 6 rows instead of one heavy braid, the edges are less likely to feel sore by the end of the day.
- The style can stay simple or dress up: The same base pattern works plain for school or with a fade, beads, or a crisp line-up for photo day.
- Low-maintenance mornings: A satin wrap and a quick mist of mousse are usually enough to keep the shape tidy until the next wash.
- Fine hair looks sharper with structure: When the sections are neat, the braid itself becomes the feature, and you don’t need thick hair to get a clean finish.
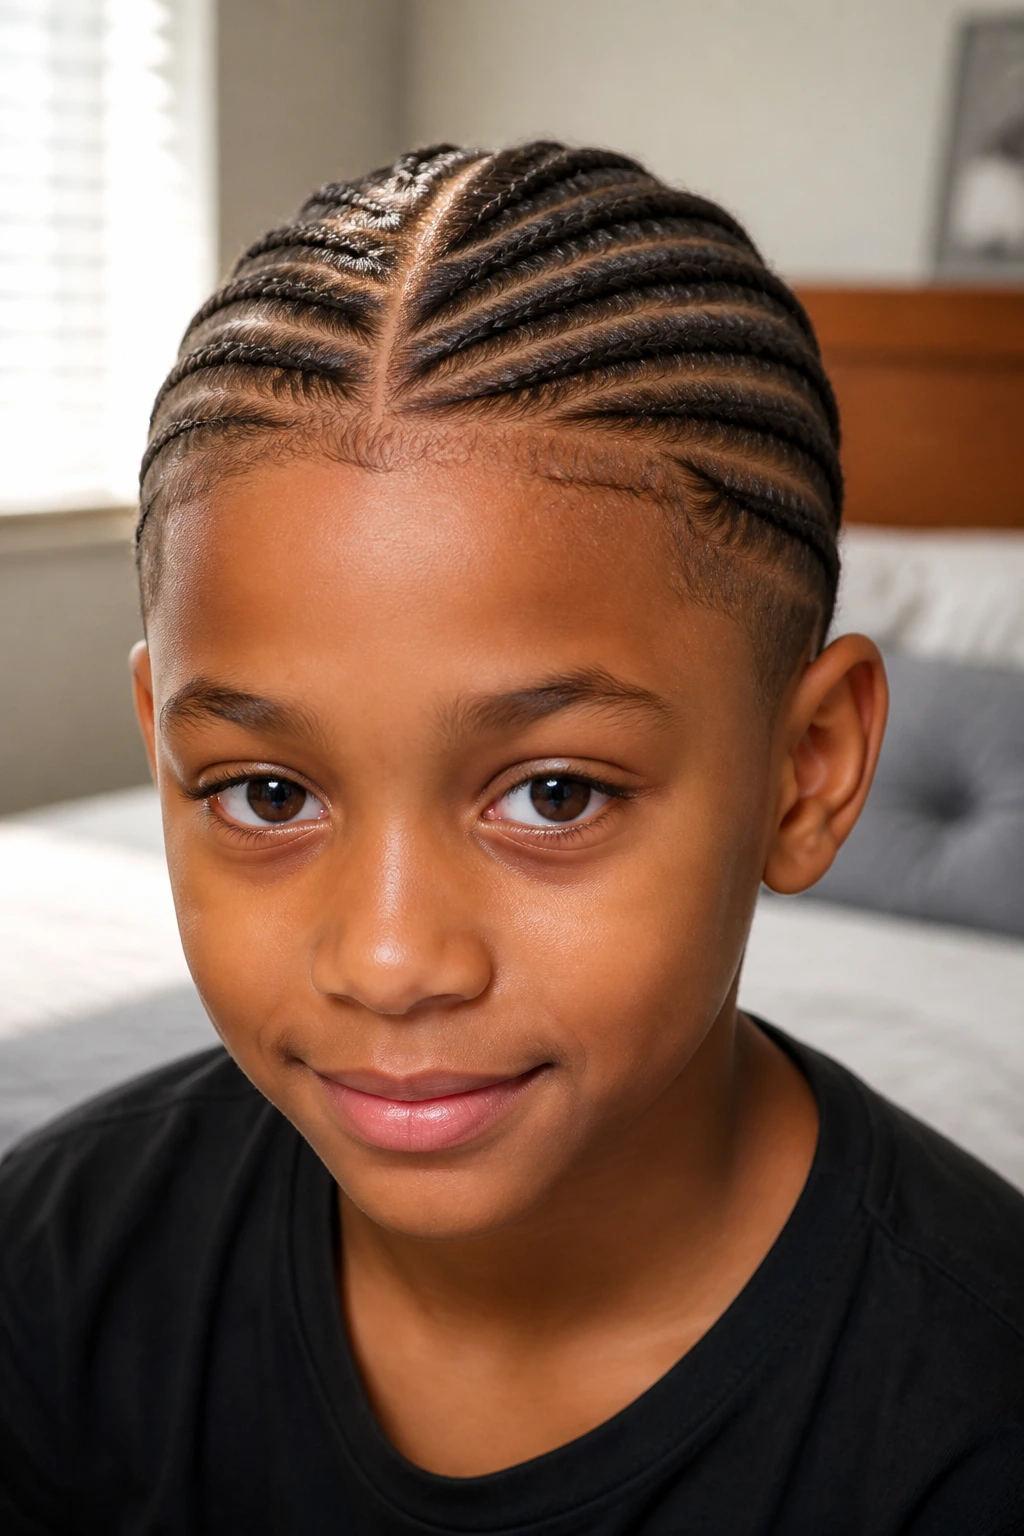
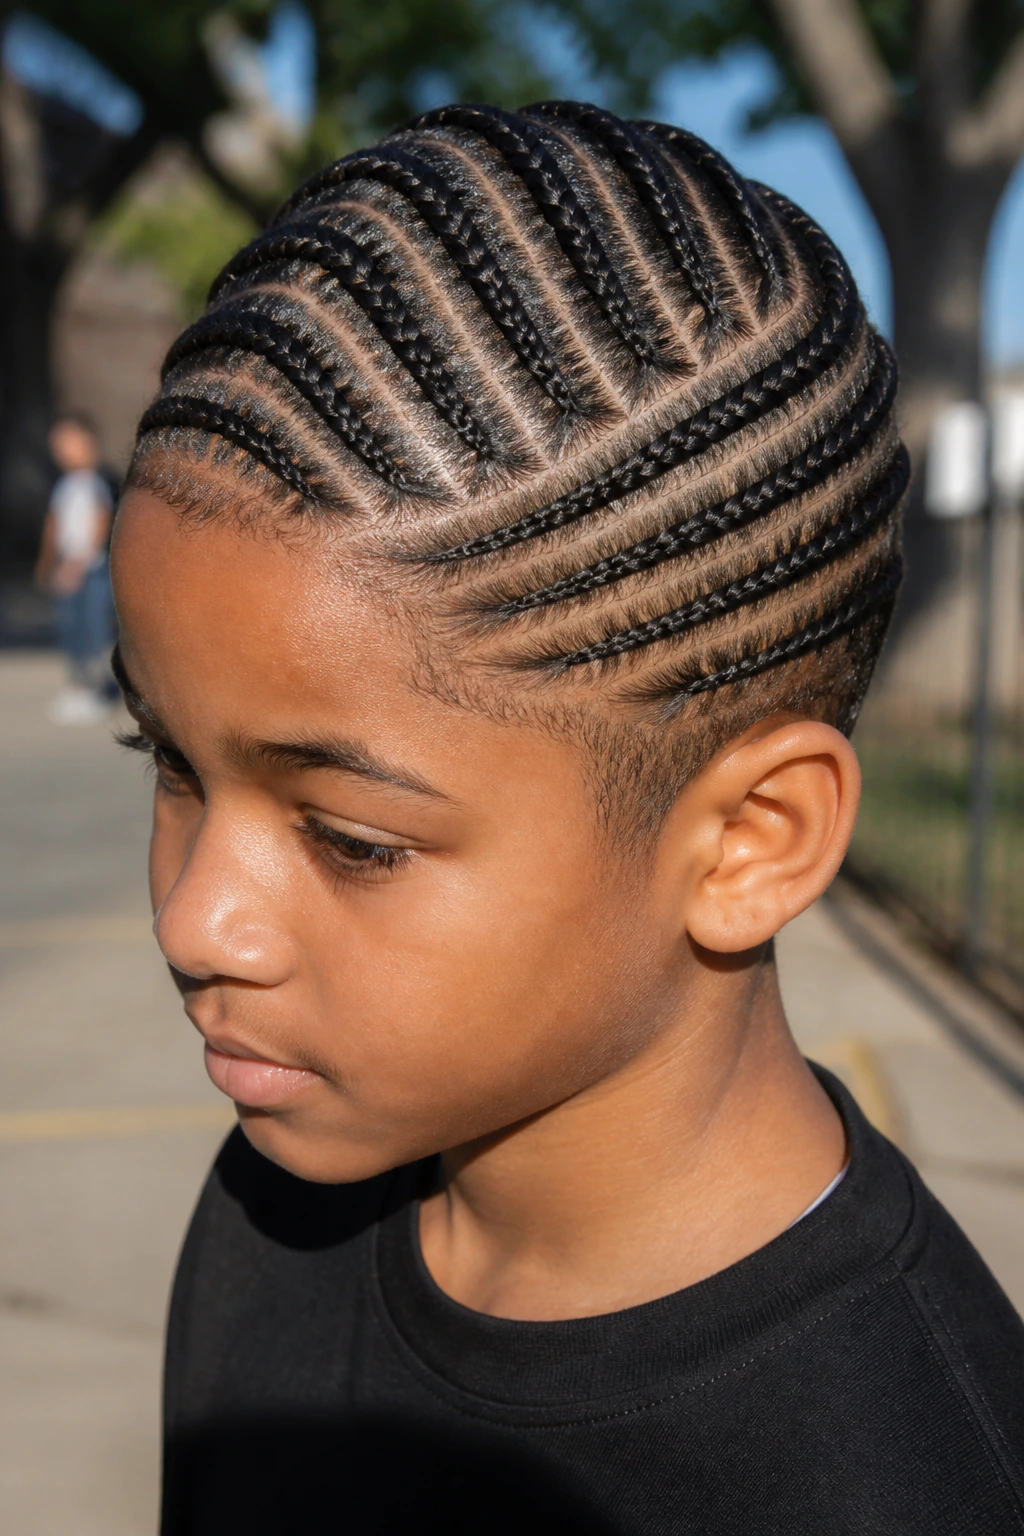
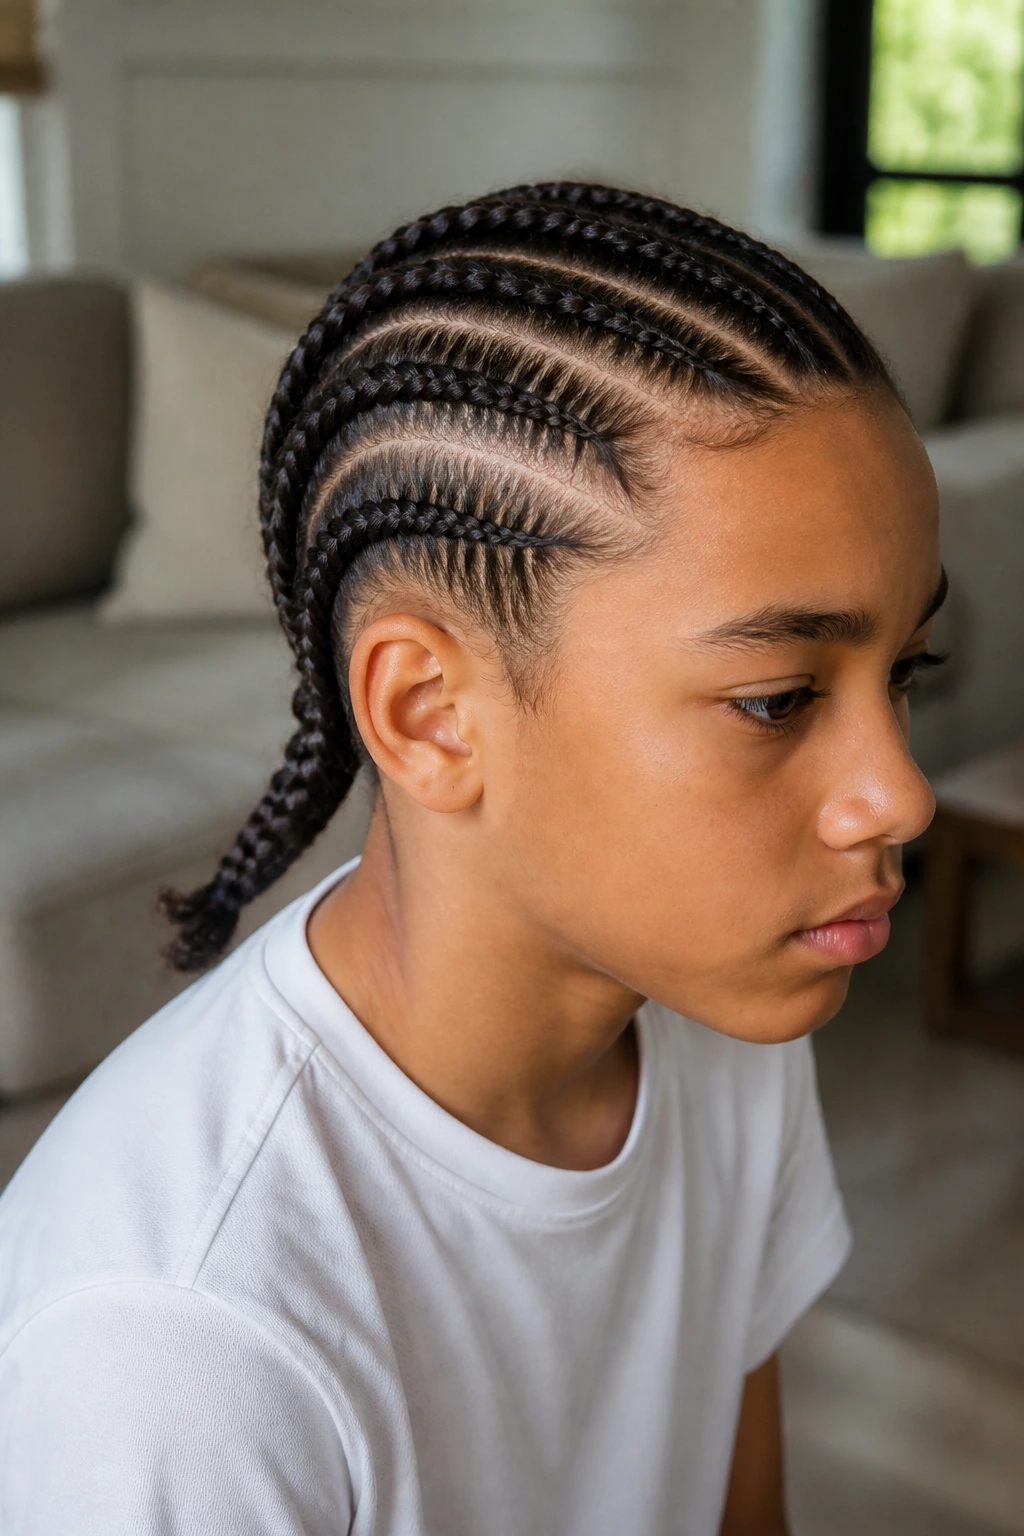
1. Straight-Back Cornrows With a Center Part
Straight-back rows are the plainspoken answer, and I mean that in the best way. A sharp center part with 4 to 6 rows running straight to the nape gives a boy with fine hair a tidy shape that doesn’t ask the scalp to do too much work visually.
The trick is keeping the sections narrow enough to bite. If the front parts are wider than about ½ inch on soft, slippery hair, the rows can look limp by day two. I like this style when the hair is short to medium short, around 1½ to 3 inches, because the braid holds better and the finish stays flat.
Why it works on fine hair
Fine strands often lie too smoothly to hold a sloppy braid pattern. Straight-back cornrows fix that by putting every strand in the same direction, which helps the hair look controlled instead of scattered. If the child has a calm crown and a straight hairline, this is the style that makes the most sense first.
A light amount of braiding gel at the roots is enough. Too much and the hair turns slick, which sounds useful until the braid starts sliding apart at the scalp.
2. Two Side Cornrows With a Deep Off-Center Part
Two braids sound simple because they are simple, but on fine hair that can be a strength. A deep off-center part and one braid on each side of the head create a cleaner frame than a crowded row pattern, especially when the crown feels a little sparse.
This version is useful when the child wants something neat without the “all braids, all the time” look. It also works well if the scalp is sensitive, because there are fewer section lines and less handling overall. The deep part should sit just far enough off the center that the top doesn’t look pinched.
- Best for short school-day styles.
- Works well on hair around 2 inches or a bit longer.
- Easier to keep tidy under hats and hoodies than wider row patterns.
If the temple area starts to look red during braiding, the grip is too hard. That’s the warning sign to watch. Two rows should feel snug, not sharp.
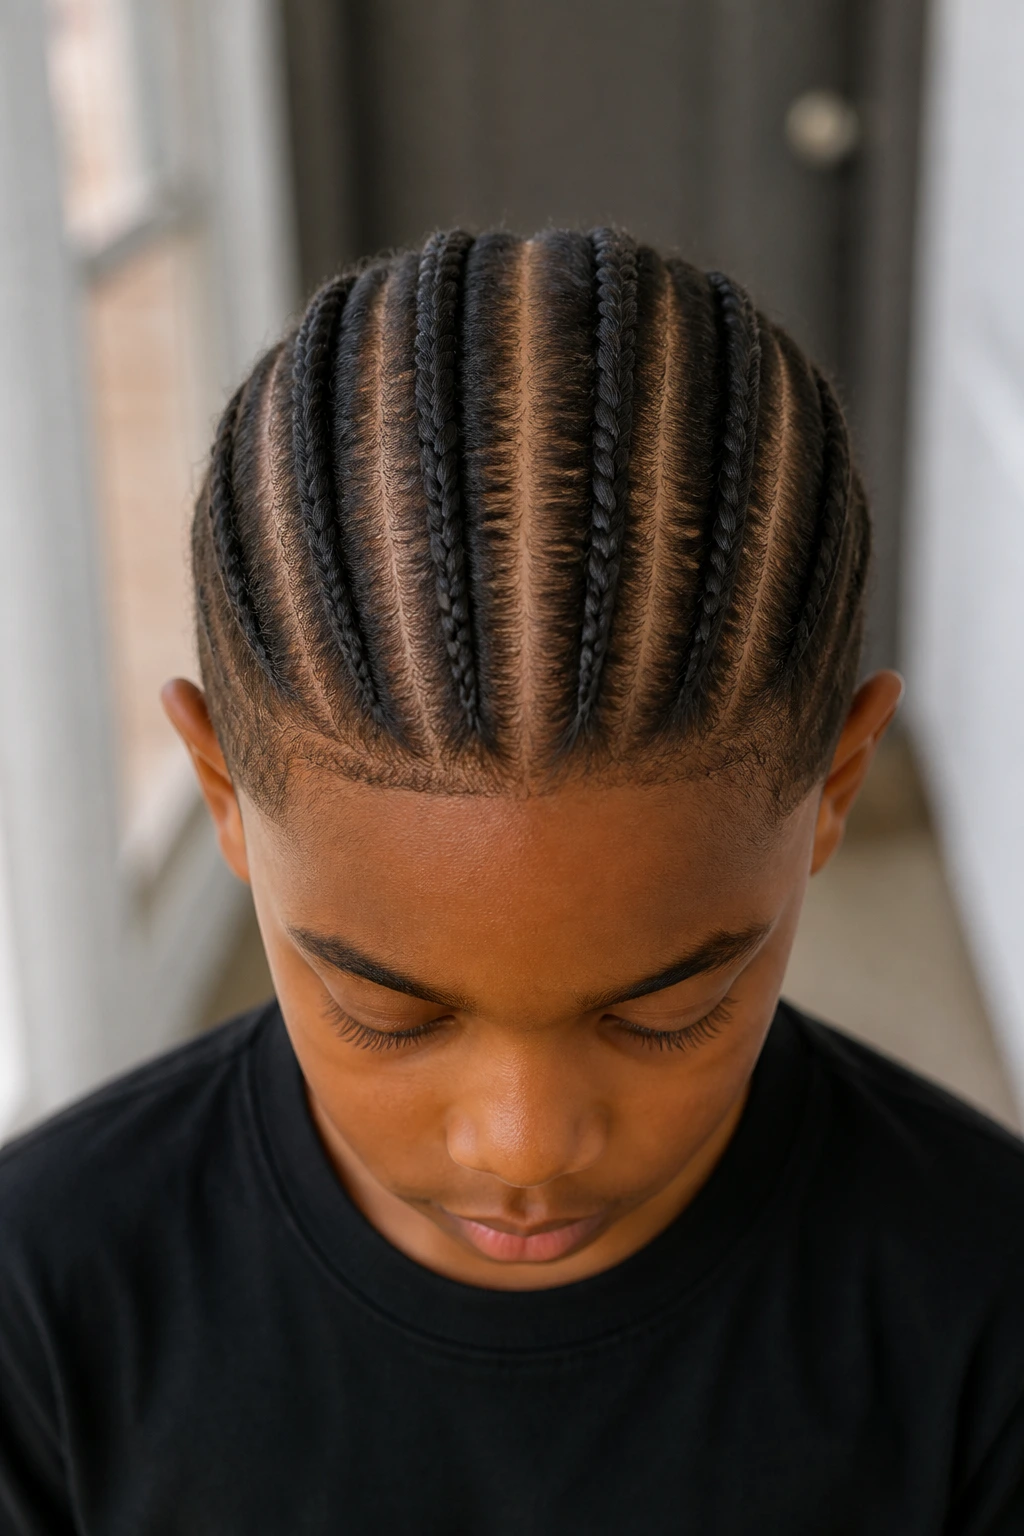
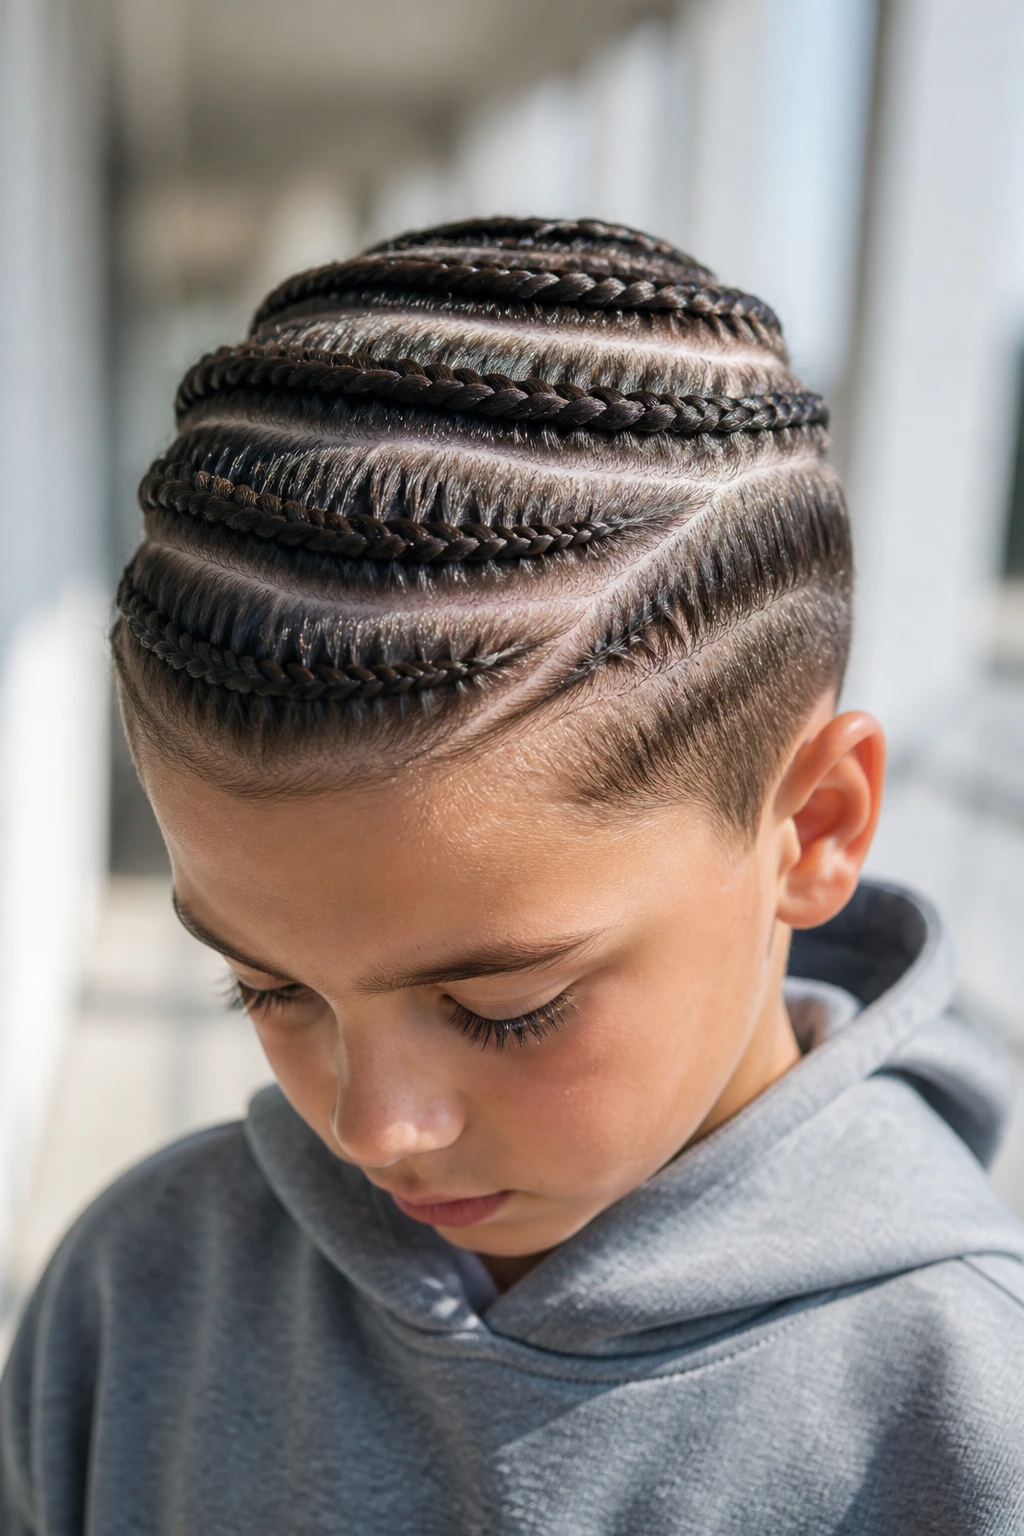
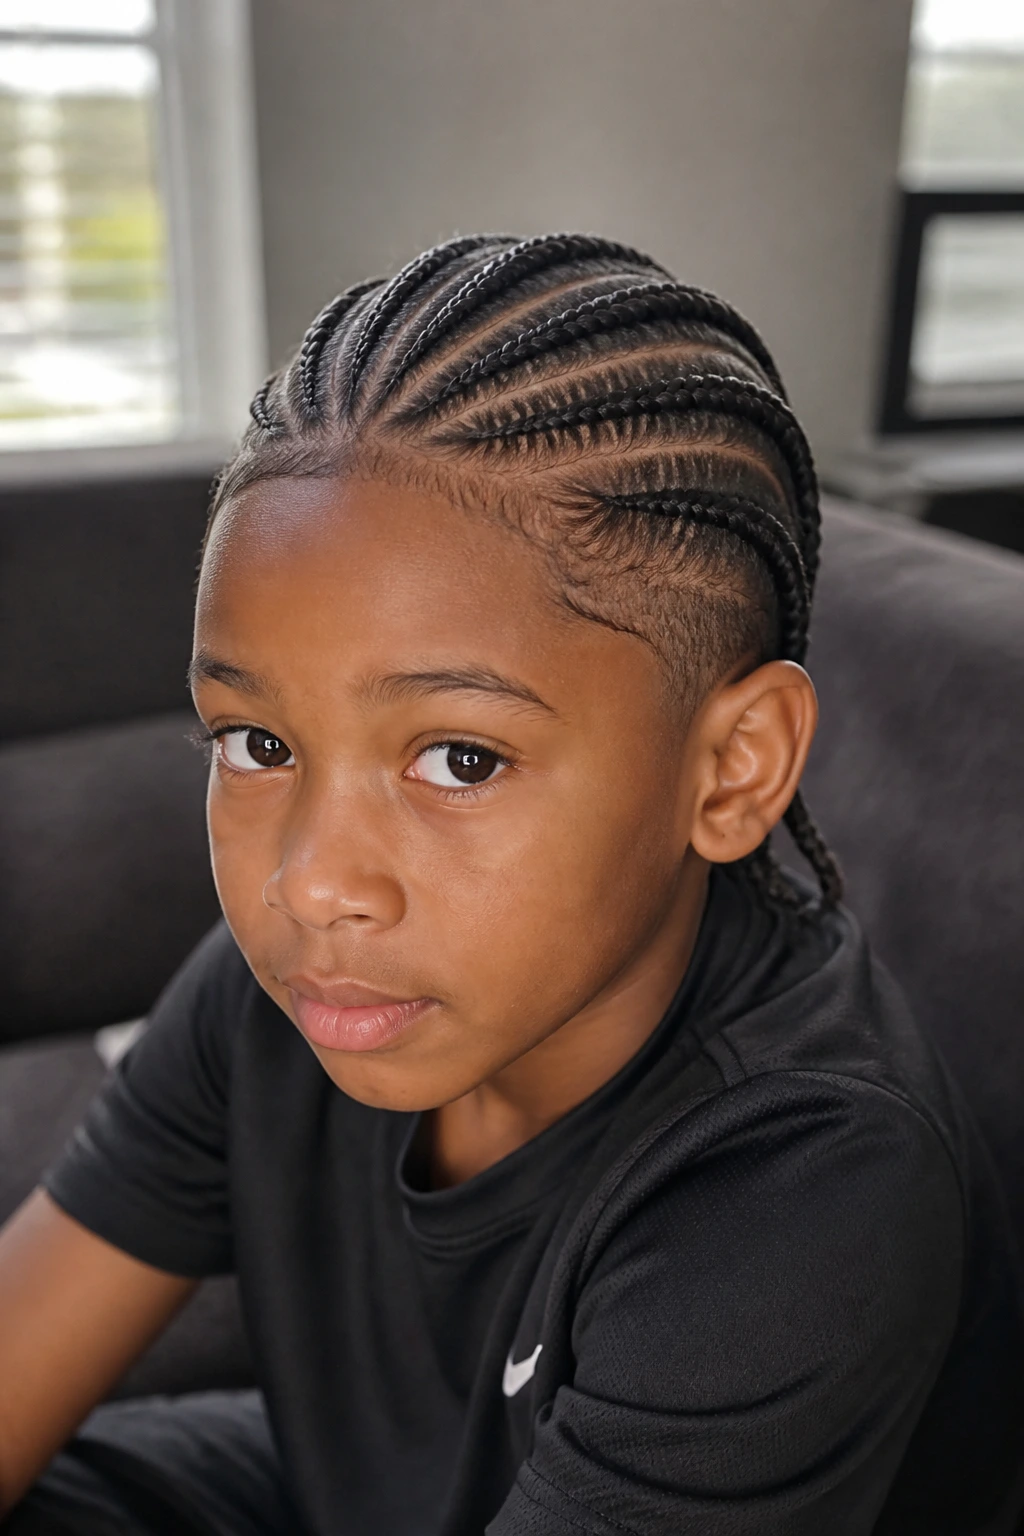
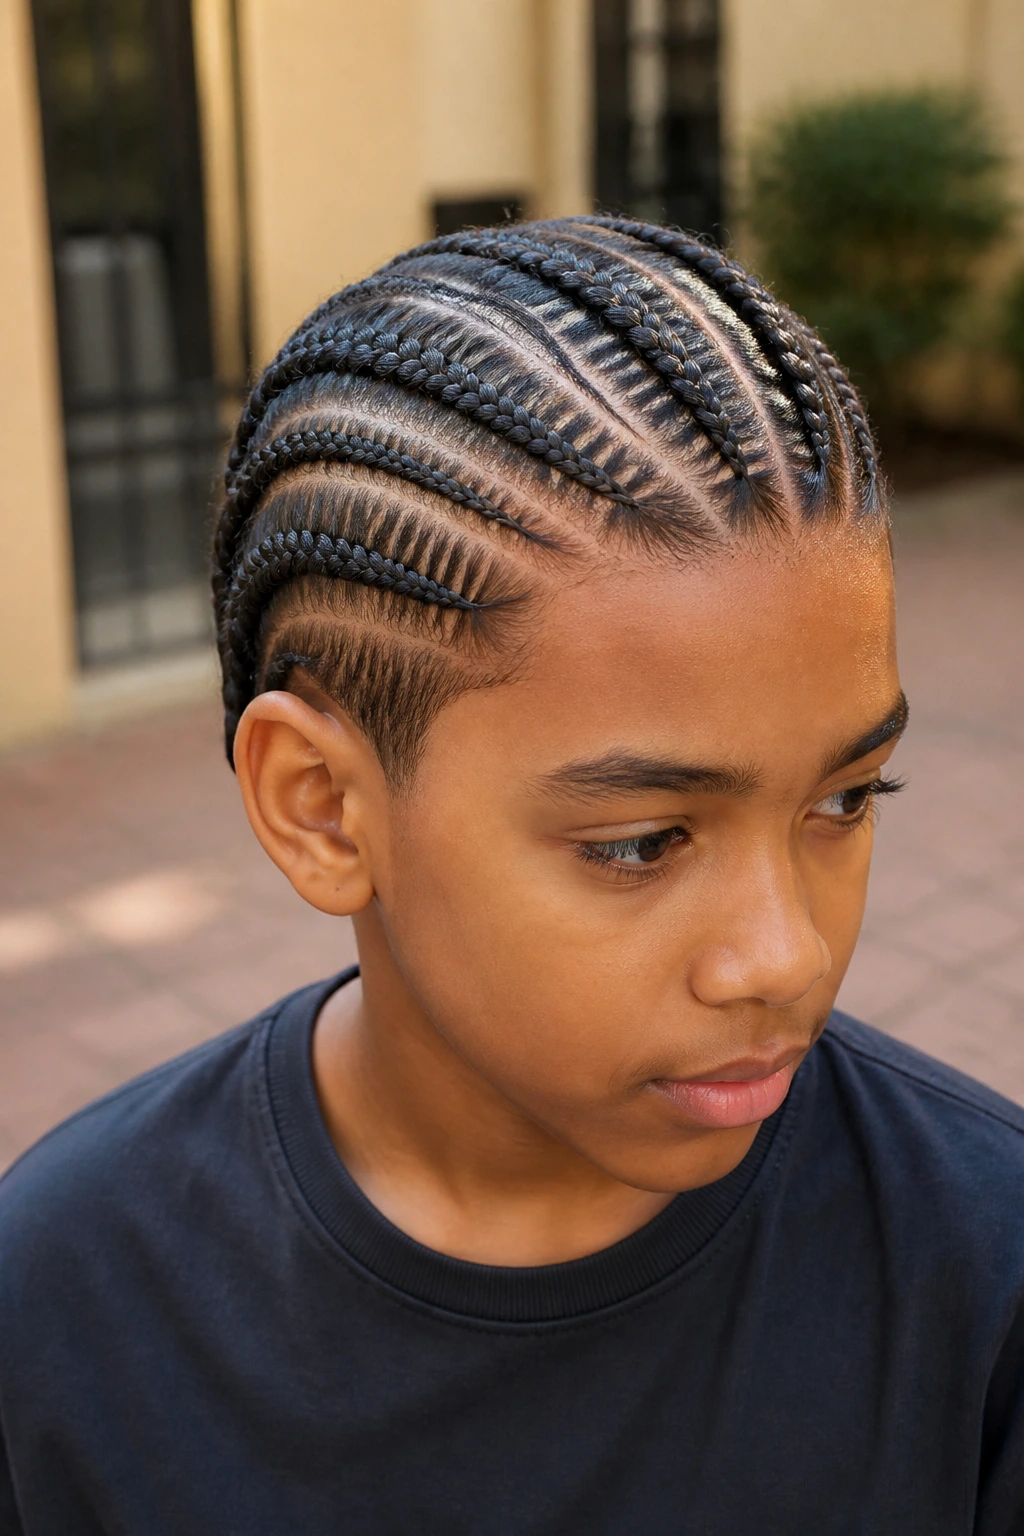
3. Three Slim Rows From Hairline to Nape
Three slim rows are where fine hair starts to look fuller, not thinner. The reason is simple: a small braid gives the eye a clear line to follow, and clear lines do a lot more visual work than a fat braid that exposes every gap.
This style is especially handy when the hair on top is fine but the sides still have decent density. The rows can start just behind the hairline and travel back in parallel, each one narrow enough to hold but not so narrow that the braid becomes fragile. I’d ask for this when the goal is a neat everyday style that can survive a week of school, sports, and sleep.
The parting matters more than the braid size. If the three rows are evenly spaced and the parts are clean, the head looks organized. If one row wanders, the whole style starts to feel off.
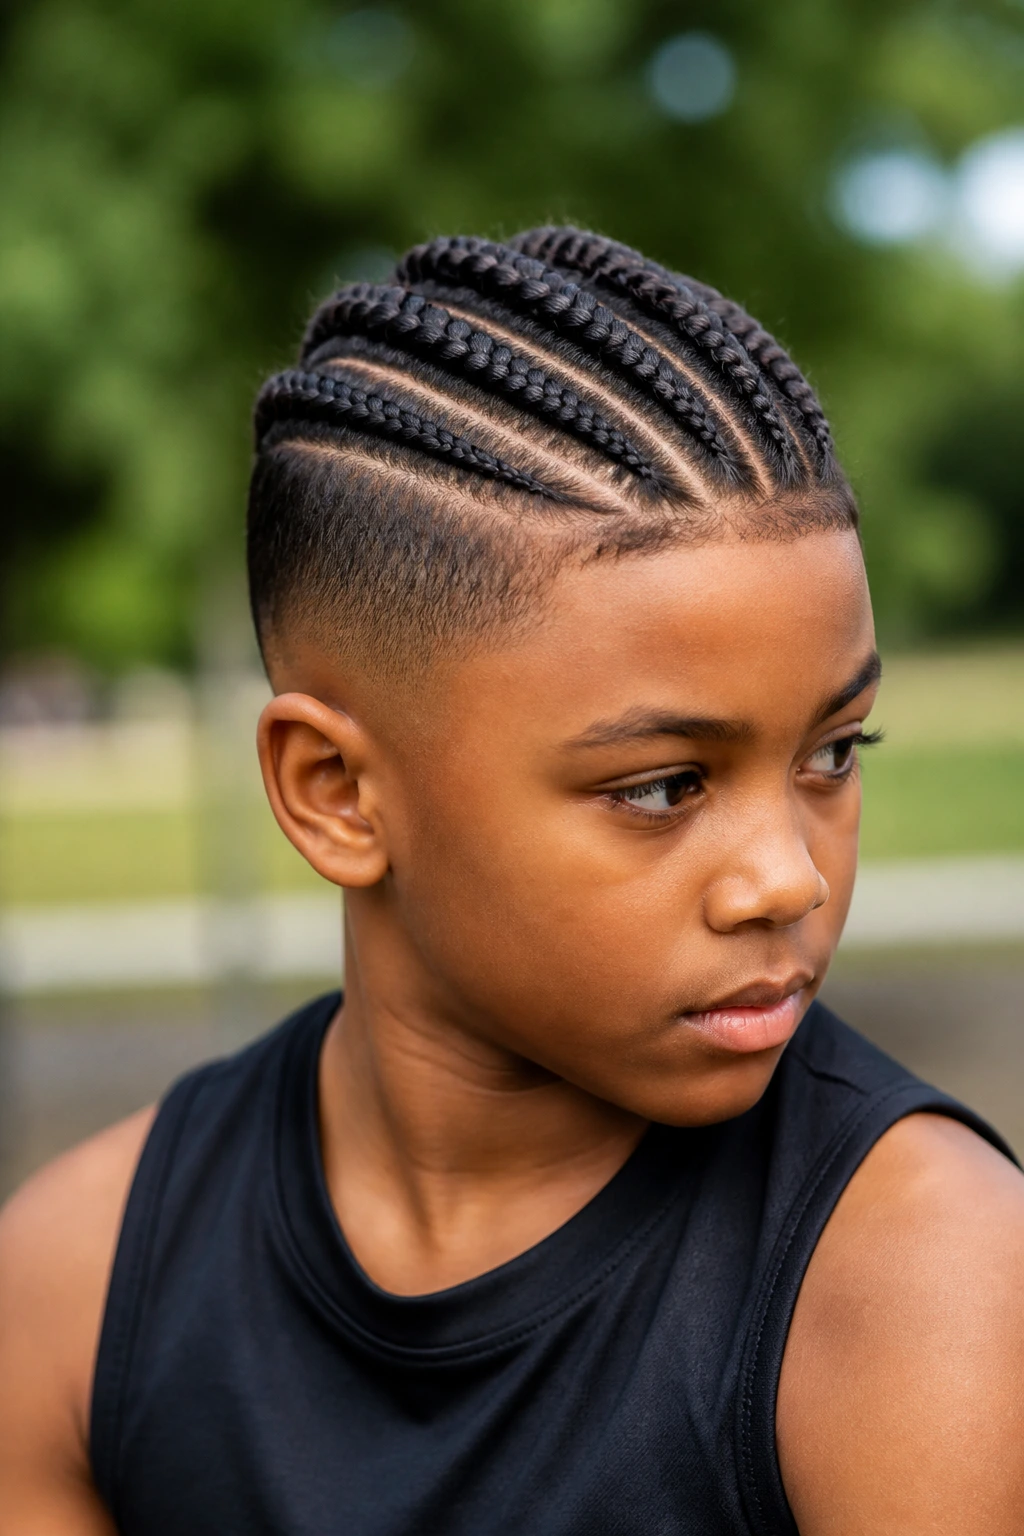
4. Curved Cornrows That Follow the Head Shape

A curved cornrow is the one I reach for when a straight row would fight the natural shape of the head. Instead of moving in a rigid line from forehead to nape, the braids bend gently around the crown, which softens cowlicks and awkward growth patterns.
That shape is useful on fine hair because the curve hides uneven density a little better than a flat grid. If the crown has a thin spot or the hairline isn’t perfectly even, a curve lets the braid move with the head instead of shouting at the problem. It also looks cleaner on boys whose hair grows in a swirl at the back.
The curve should be smooth, not dramatic. A gentle arc keeps the style calm. Too much bend and the braid starts looking decorative instead of neat, which isn’t usually the goal for a school-friendly style.
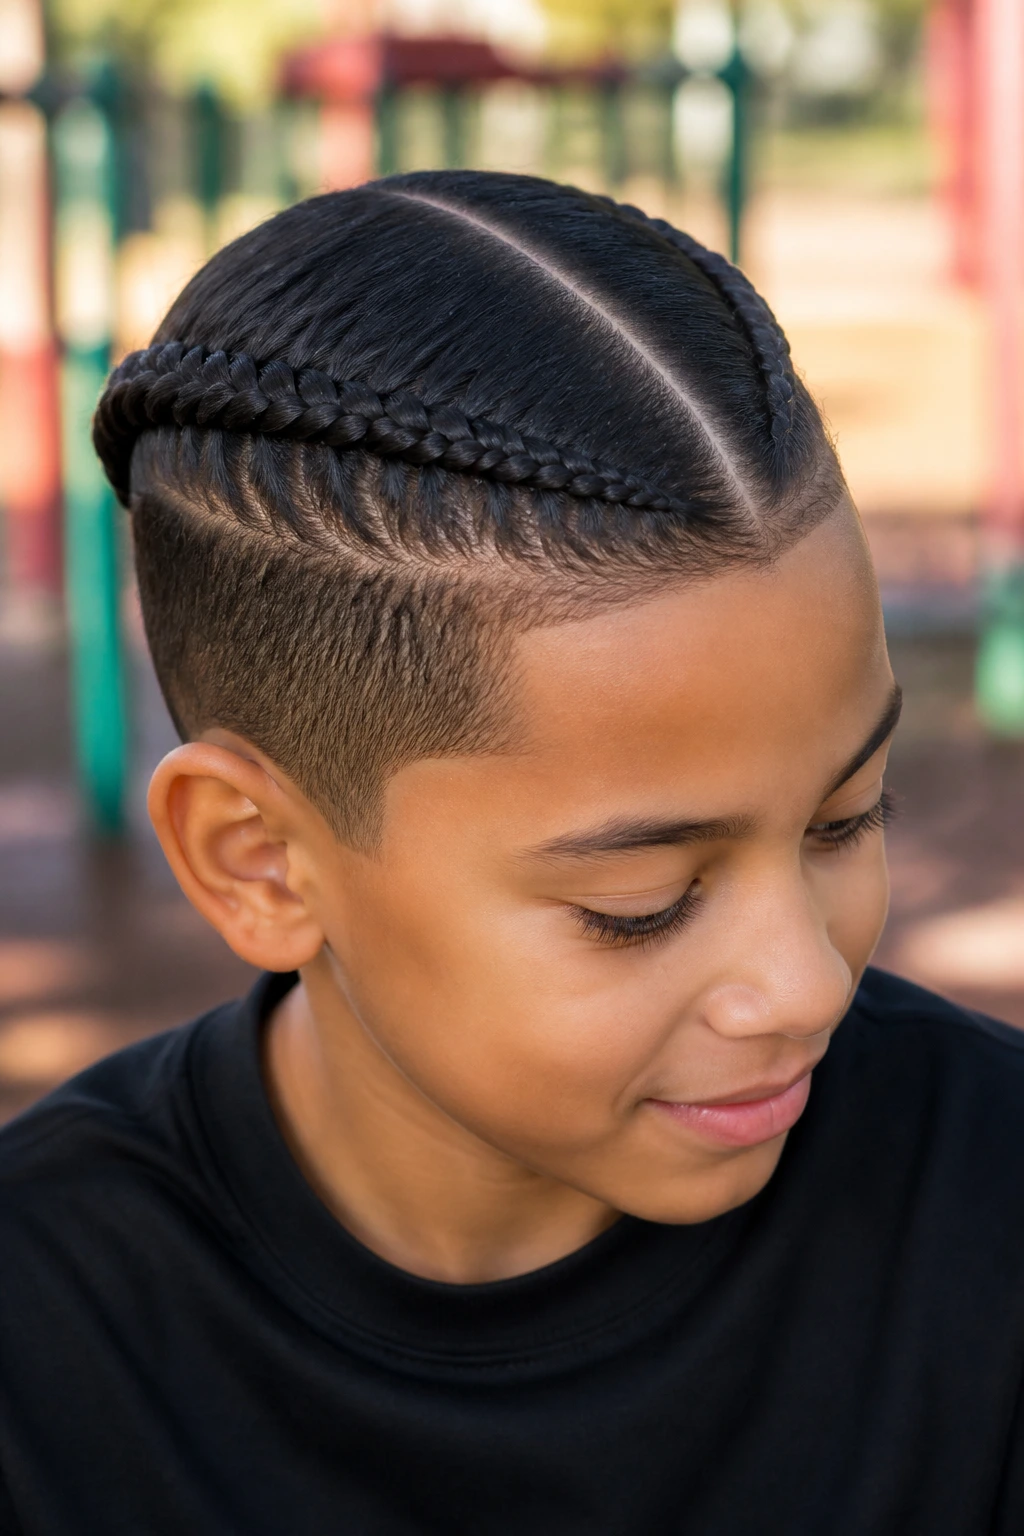
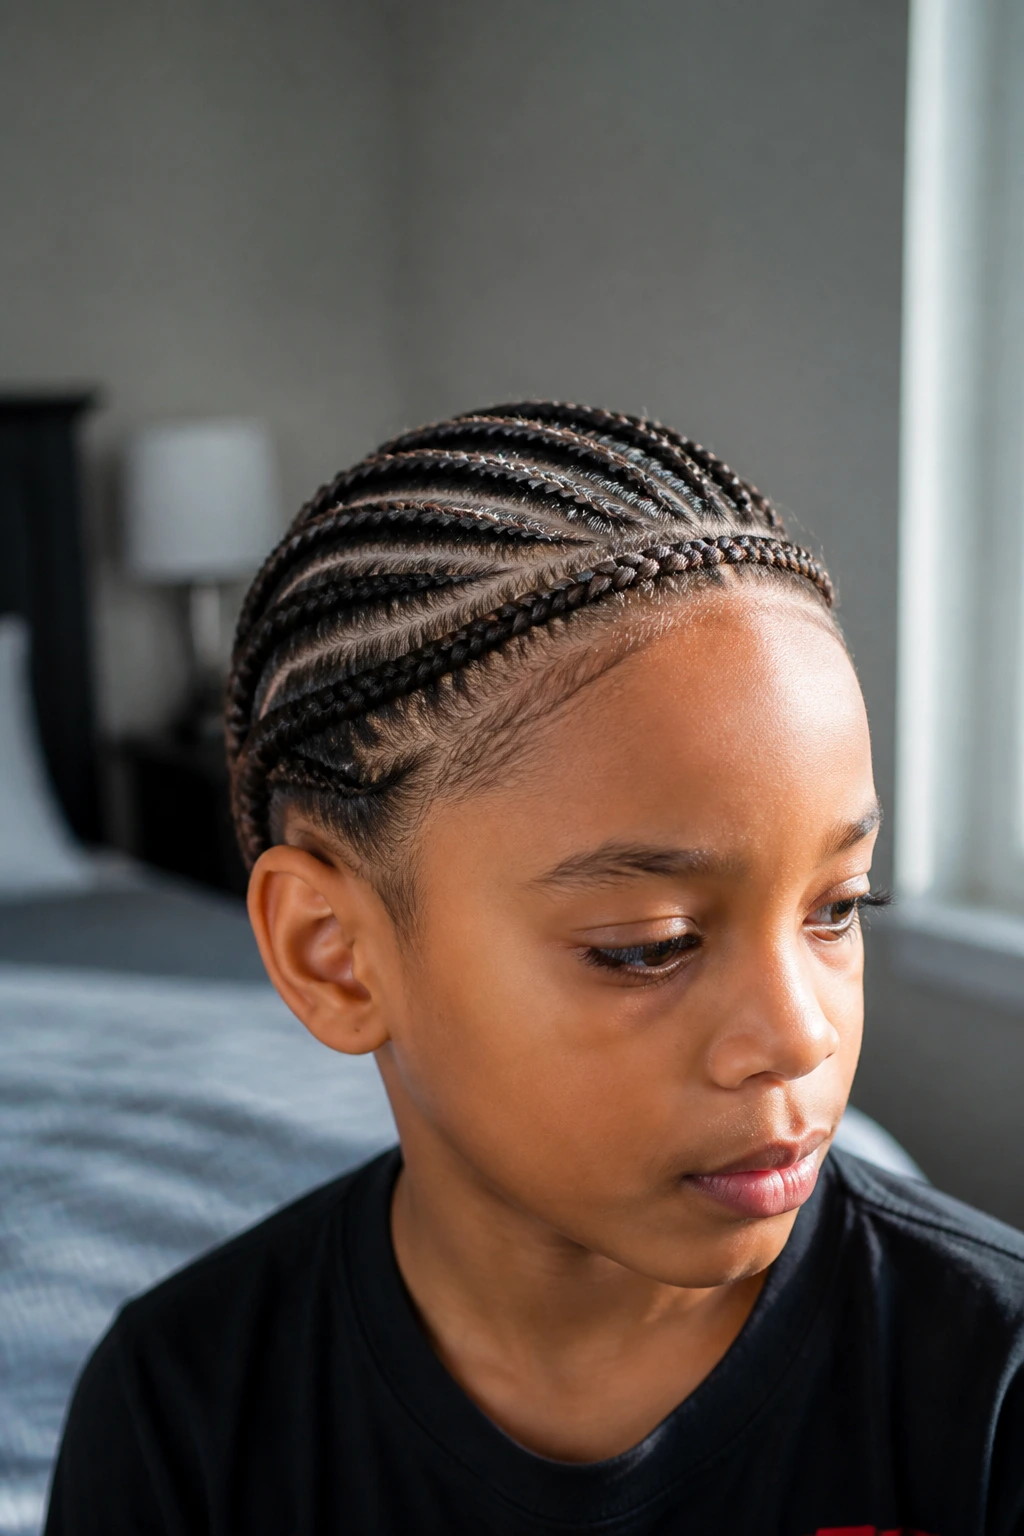
5. Side-Swept Diagonal Cornrows
Diagonal rows are a good answer when the hair naturally falls to one side or the child hates the way straight-back braids sit on his head. The angle gives the style motion without making it messy, and on fine hair that extra visual movement can make the braids feel less sparse.
I like this one for boys with a slightly uneven hairline or a side part they keep trying to make on their own. Diagonal sections are forgiving when the hair has a soft wave or a stubborn front swirl. They also work nicely if you want the braids to tuck into a low fade or a cleaner nape area.
Use the angle to your advantage, not as decoration. The rows should still be even in width. If one diagonal is skinny and the next is heavy, the eye catches that imbalance immediately.
6. Zigzag-Part Cornrows for a Sharper Pattern

Zigzag parts are for the kid who wants a bit more edge, but not a lot more bulk. The braid itself can stay simple while the parting line does the interesting work. On fine hair, that broken line also helps disguise scalp visibility better than a dead-straight grid.
A zigzag should be crisp and deliberate. Loose, wobbly part lines look accidental, and accident doesn’t read as neat. I prefer this on hair that’s at least a little cooperative—maybe 2 inches or more—because the part has to hold long enough to let the braid sit properly.
What to watch for
- Keep the zigzag small enough to read cleanly.
- Don’t overdo the number of turns; one or two turns is usually enough.
- Ask for slightly smaller sections if the crown is sparse.
This style looks strongest when the hairline gets a gentle cleanup. No need for a sharp edge-up if that’s not the child’s thing, but a tidy outline helps the zigzag parts stand out.
7. Stitch Cornrows With Crisp Segments
Stitch braids are the neat-freak cousin in the cornrow family. Each braid has those little horizontal “stitches” across the top, which makes the whole pattern look sharp and deliberate. On fine hair, that line work can be a blessing because it creates structure where the strands themselves don’t offer much volume.
The catch is that stitch braids show mistakes fast. If the hand drifts or the parts are messy, the style looks unfinished. They’re best on hair that’s fairly straight or lightly wavy, because very fluffy or very curly texture can blur the stitch pattern before it even settles.
Use a rat-tail comb and keep the product light. The goal is control, not slickness. When the stitches are even, the braid sits low and flat, and that flatness is what makes fine hair look neat instead of overhandled.
8. Mohawk Cornrows With Tapered Sides
This is the practical one for active boys. A central strip of cornrows with the sides kept low or tapered gives a strong shape without demanding a full-head braid pattern, and that matters when the hair is fine and doesn’t naturally fill space.
The mohawk line makes the top look denser because all the visual attention stays in one lane. It’s a good choice if the sides are much thinner than the top, or if the child wears helmets, hoodies, or sports gear that rubs the edges. The cleaner the taper, the better the braid line reads.
I’d keep the rows in the center narrow and straight. If they spread too wide, the style starts to look like a compromise instead of a plan. With the right taper, though, this is one of the cleanest-looking ways to style a finer head of hair.
9. Halo Cornrows That Wrap the Crown
Halo cornrows work best when the hair at the temples tends to stick out or when the front grows in a soft swirl that won’t sit flat no matter what you do. The rows circle the head instead of pushing straight back, and that wrapped shape gives the style a calmer, more finished feel.
On fine hair, the halo pattern can make a small head of hair look more intentional because the eye follows the curve. That’s useful if the hair is thin at the front but better through the sides. You’re not hiding the hair; you’re directing it.
A halo shouldn’t be too tight at the temples. That area is where kids notice discomfort first. Keep the curve smooth, the tension even, and the parting neat around the crown. It’s one of those styles that looks easy when it’s done well, which usually means it was hard to braid correctly.
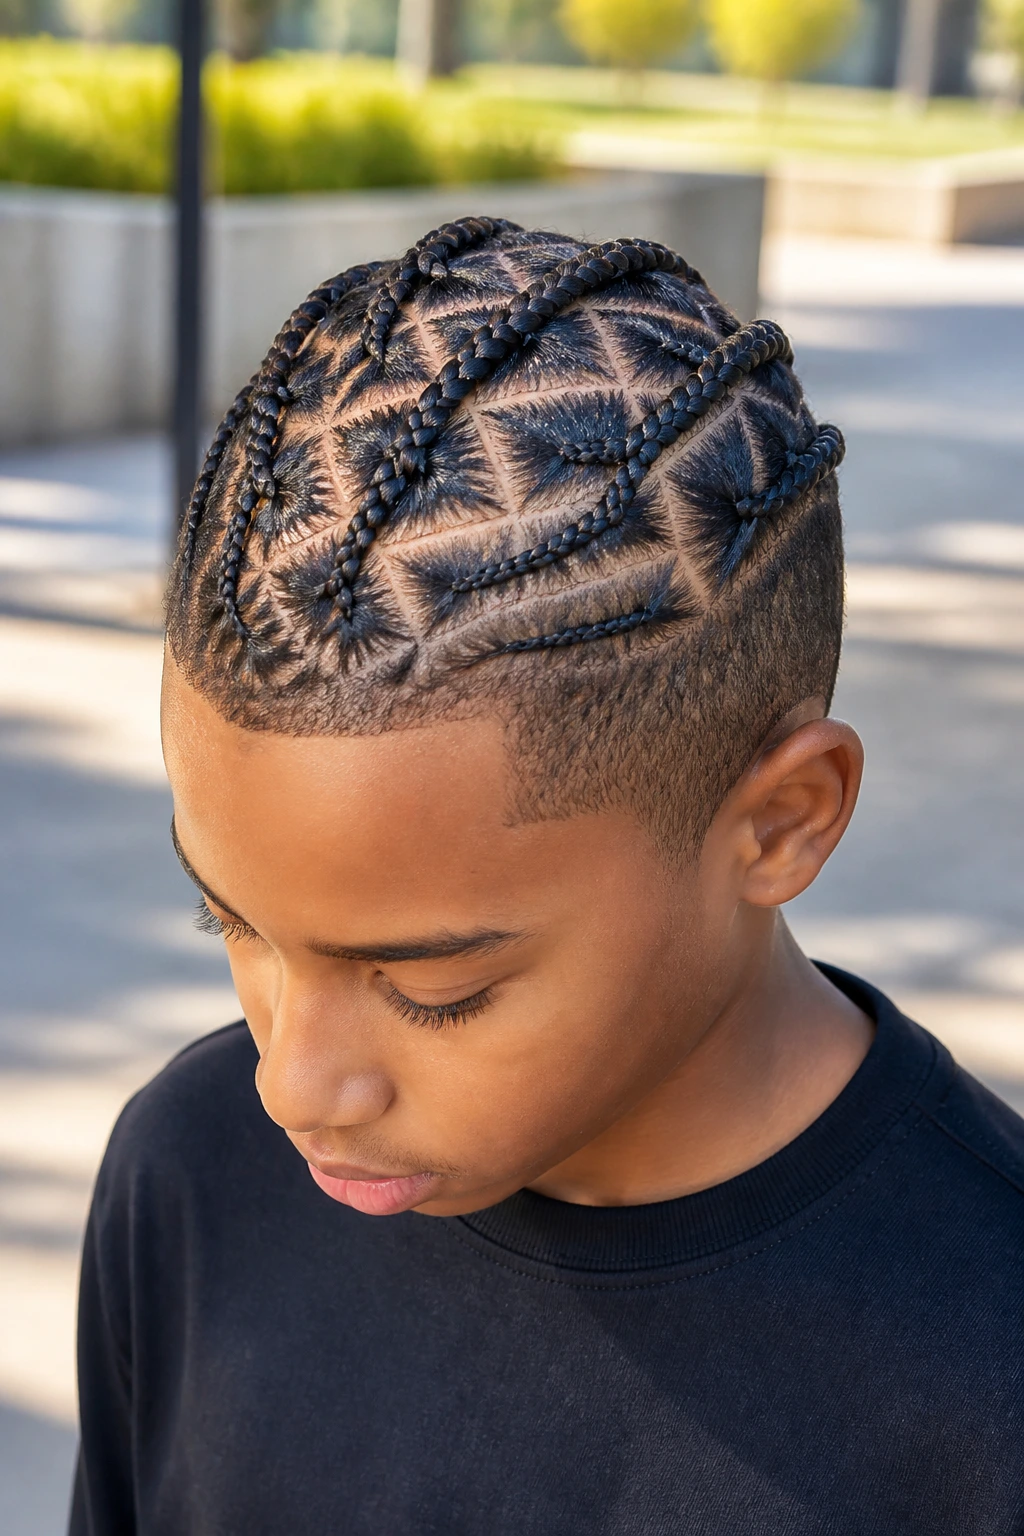
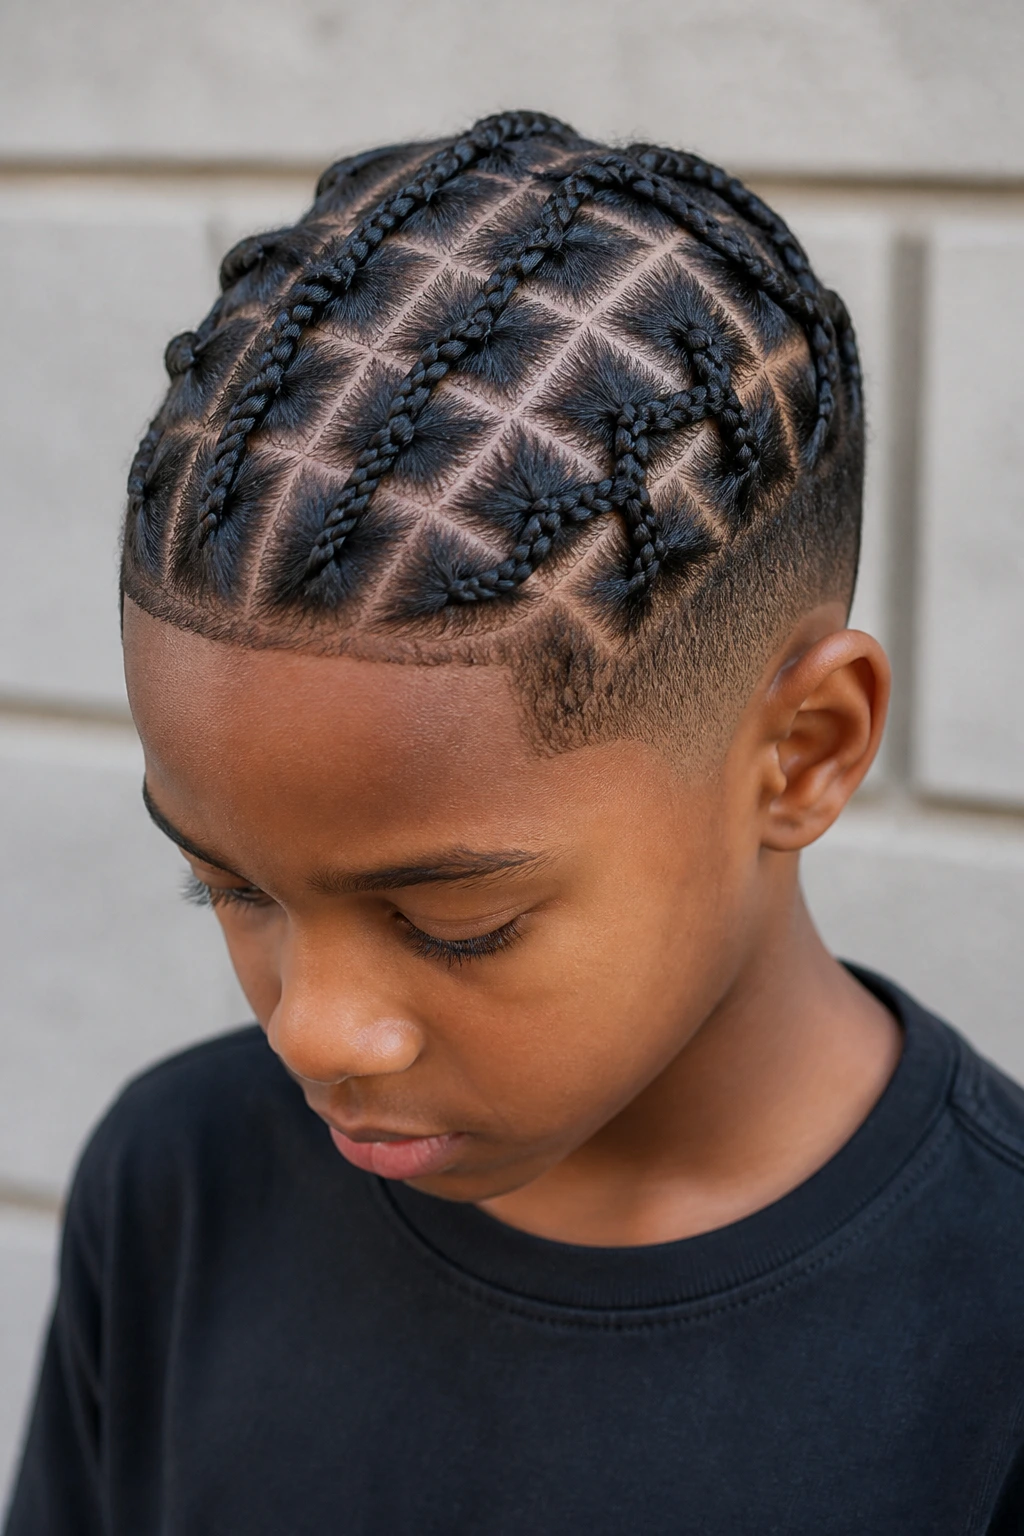
10. Diamond-Part Cornrows That Add Visual Density
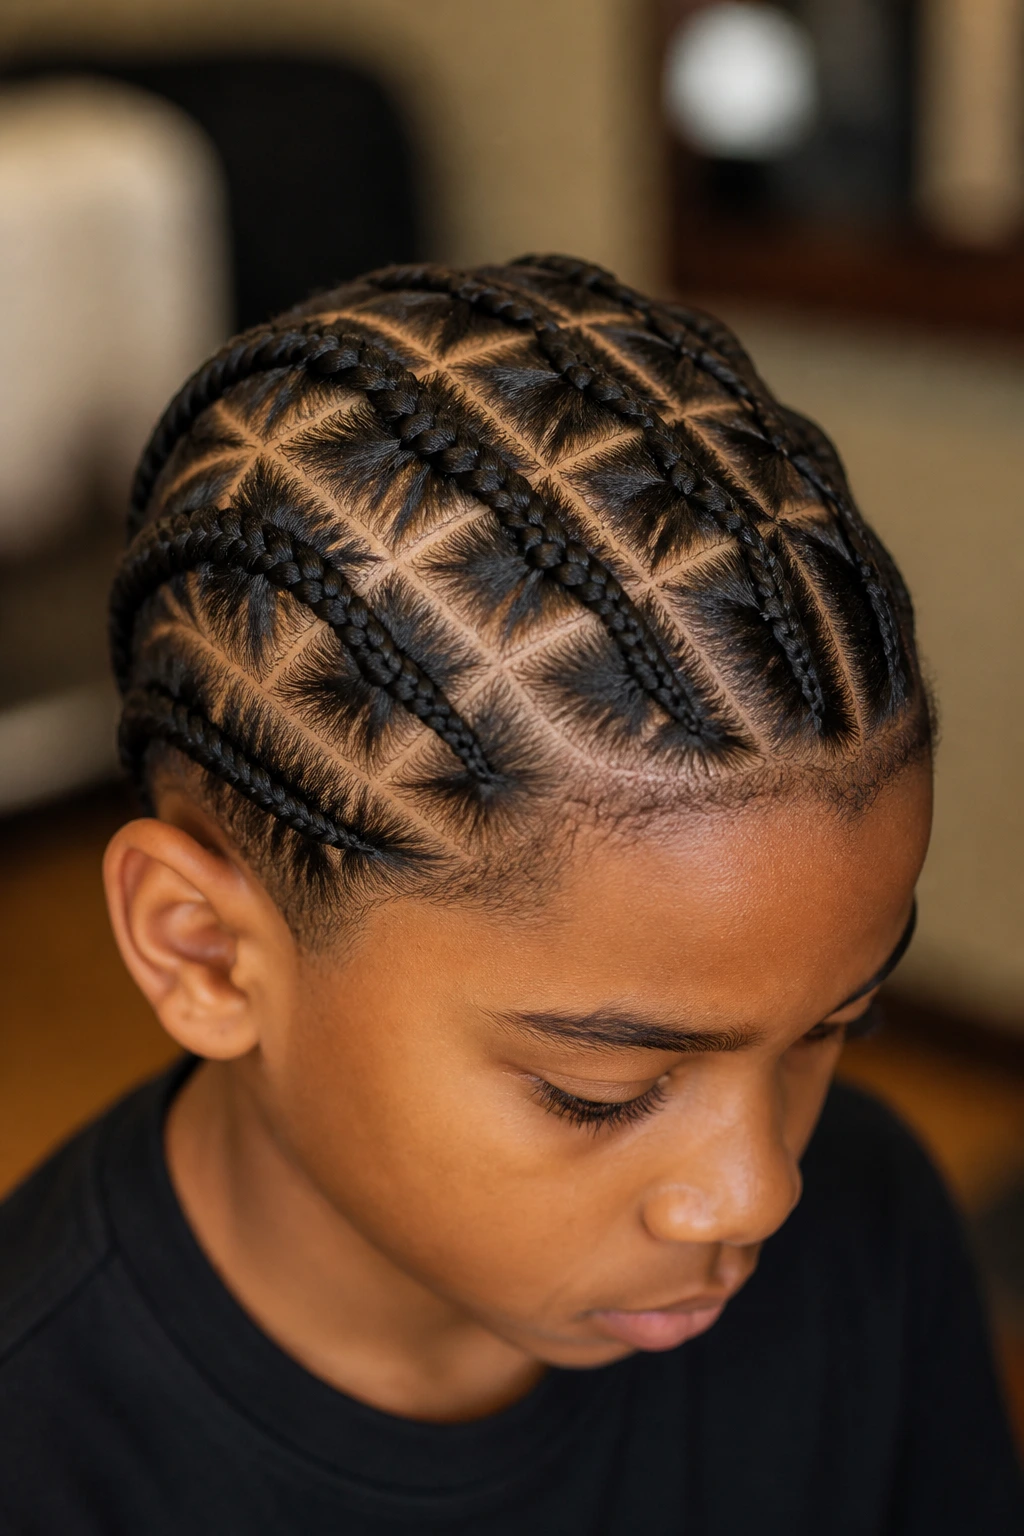
Diamond parts are one of my favorite tricks for fine hair because they make the scalp pattern look fuller without adding fake bulk. The part shapes break up the surface so the head doesn’t read as one big plain section with a few braids on top.
This style is especially useful when the crown has a few soft spots or the hair is naturally very straight and flat. A diamond grid creates movement, but in a controlled way. It feels polished, not loud.
The diamonds need to be even. Uneven points make the pattern drift, and then the whole style starts to look shaky. If the child has a sensitive scalp, ask for slightly larger diamonds rather than tiny ones. That small adjustment can make the style last longer and feel better at the roots.
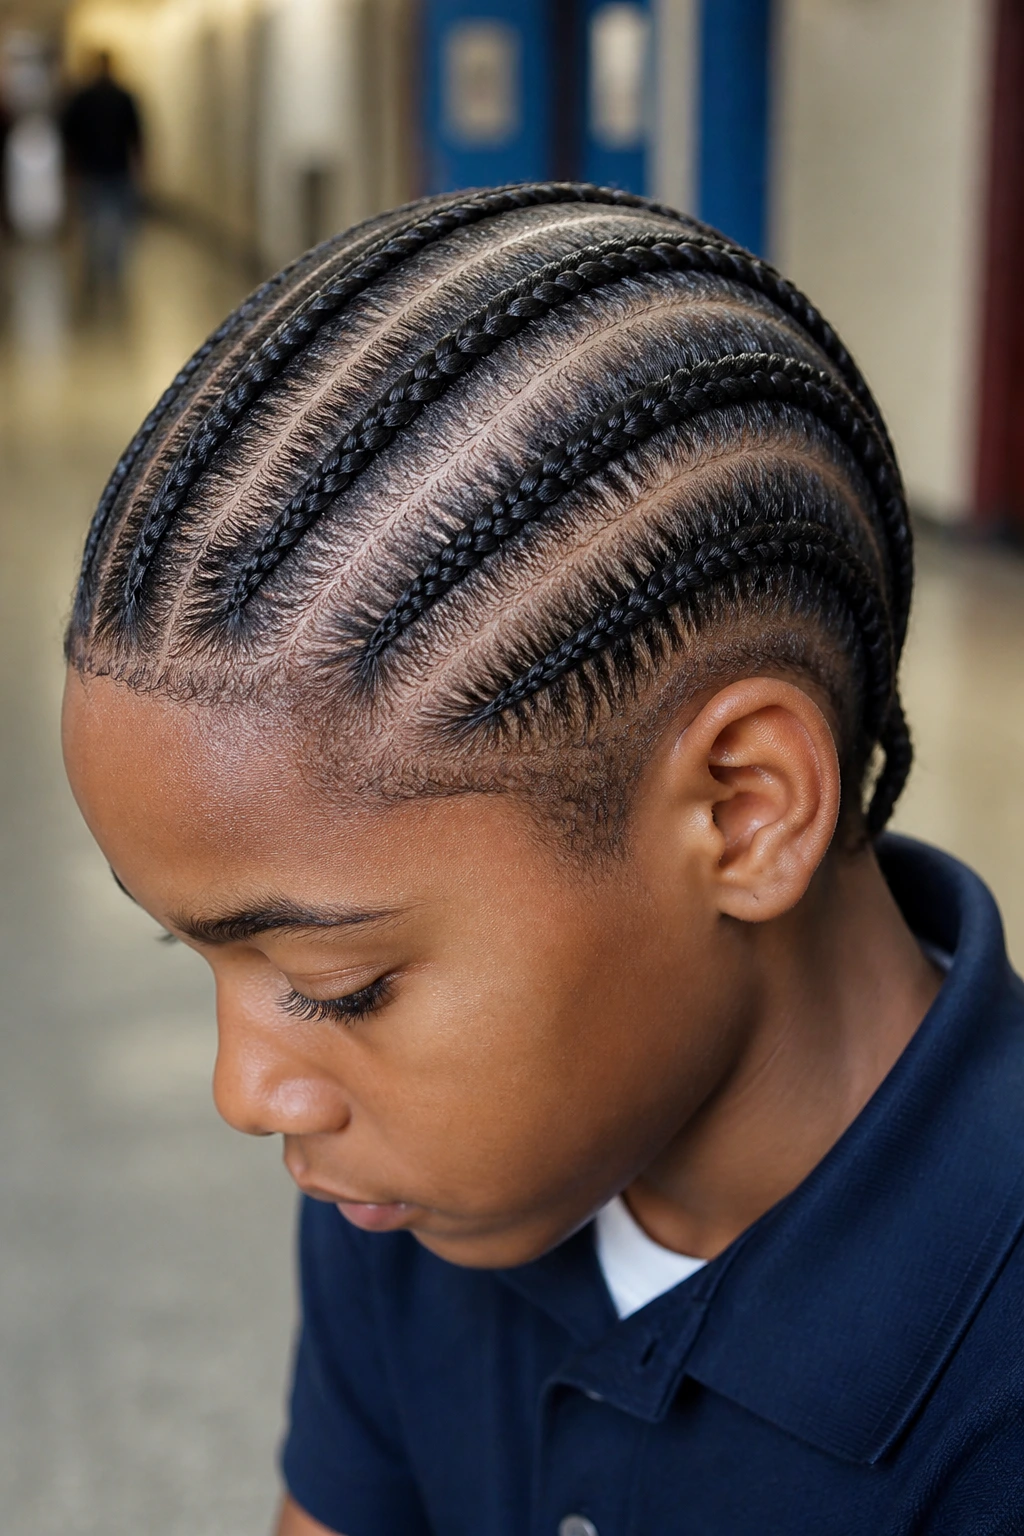
11. Triangle-Part Cornrows That Hide Uneven Spots
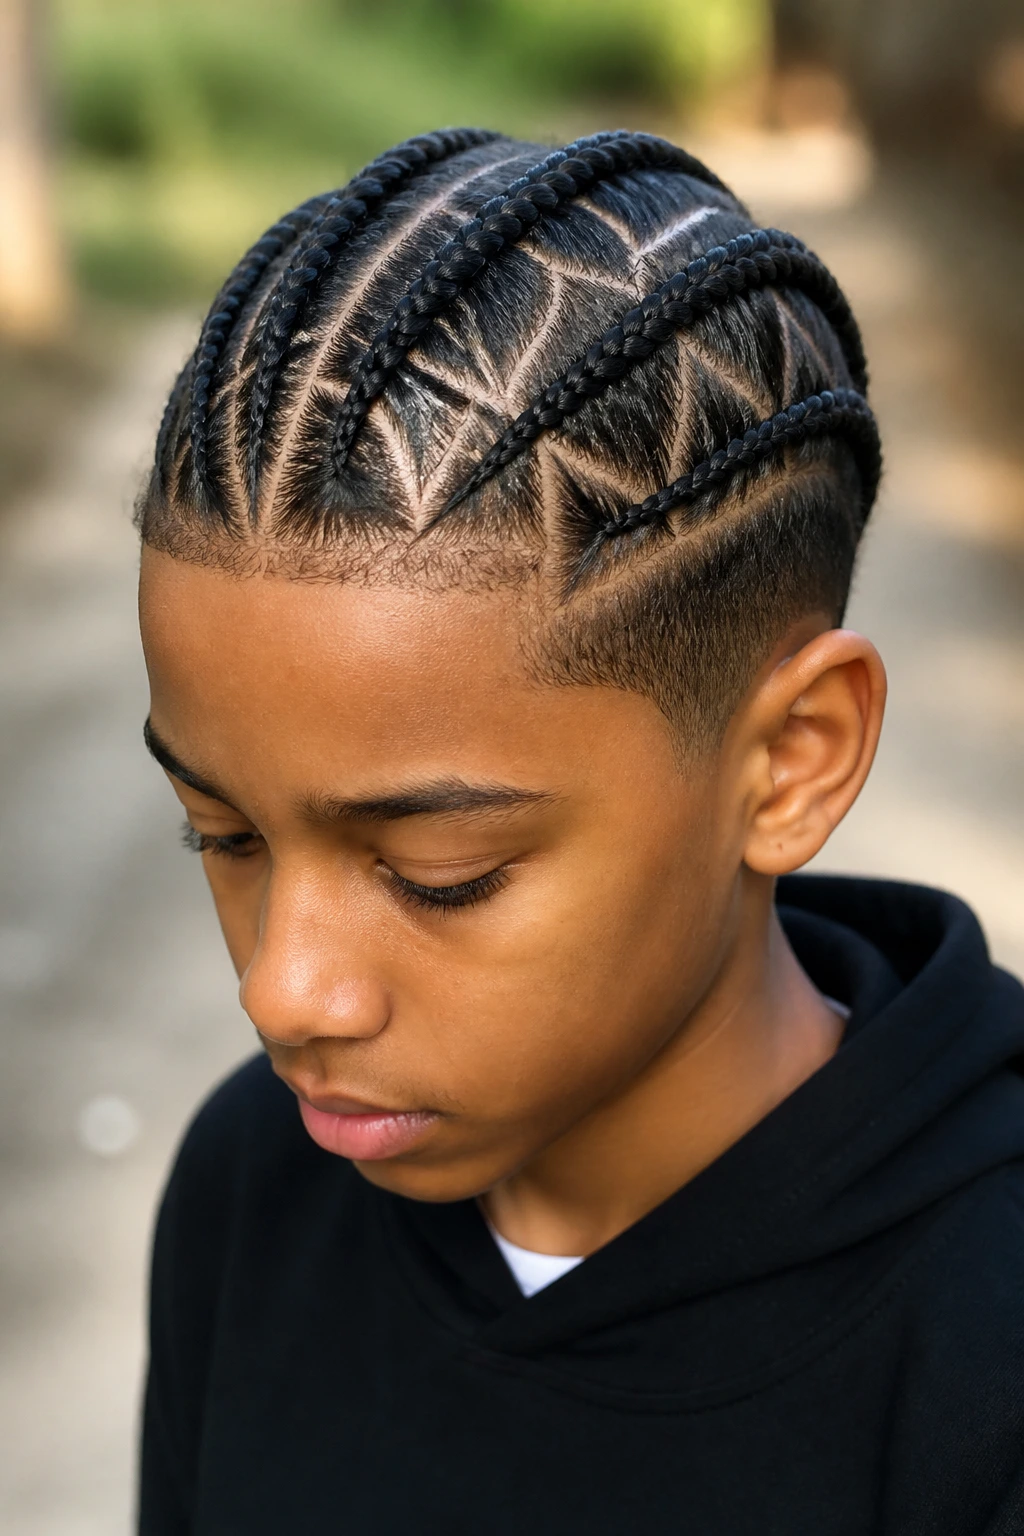
Triangle parts do a nice job of disguising uneven density because the pointed sections let the braid start with a little more shape at the root. That matters on fine hair, where square sections sometimes show a little too much scalp if the hair isn’t packed evenly.
I like triangle parts for boys whose hair grows in different directions. The shape gives the stylist more control at the base, which helps the braid sit flat without looking thin at the front. The pattern also feels a touch more modern than a plain grid, but it still reads neat enough for school or family events.
Best way to wear it
Keep the rows medium slim rather than tiny. Tiny triangles can expose too much scalp on fine hair, while medium ones give the braid a stronger base. A clean part and a smooth finish matter more here than any extra shine product.
12. Temple-to-Nape Cornrows With a Clean Fade
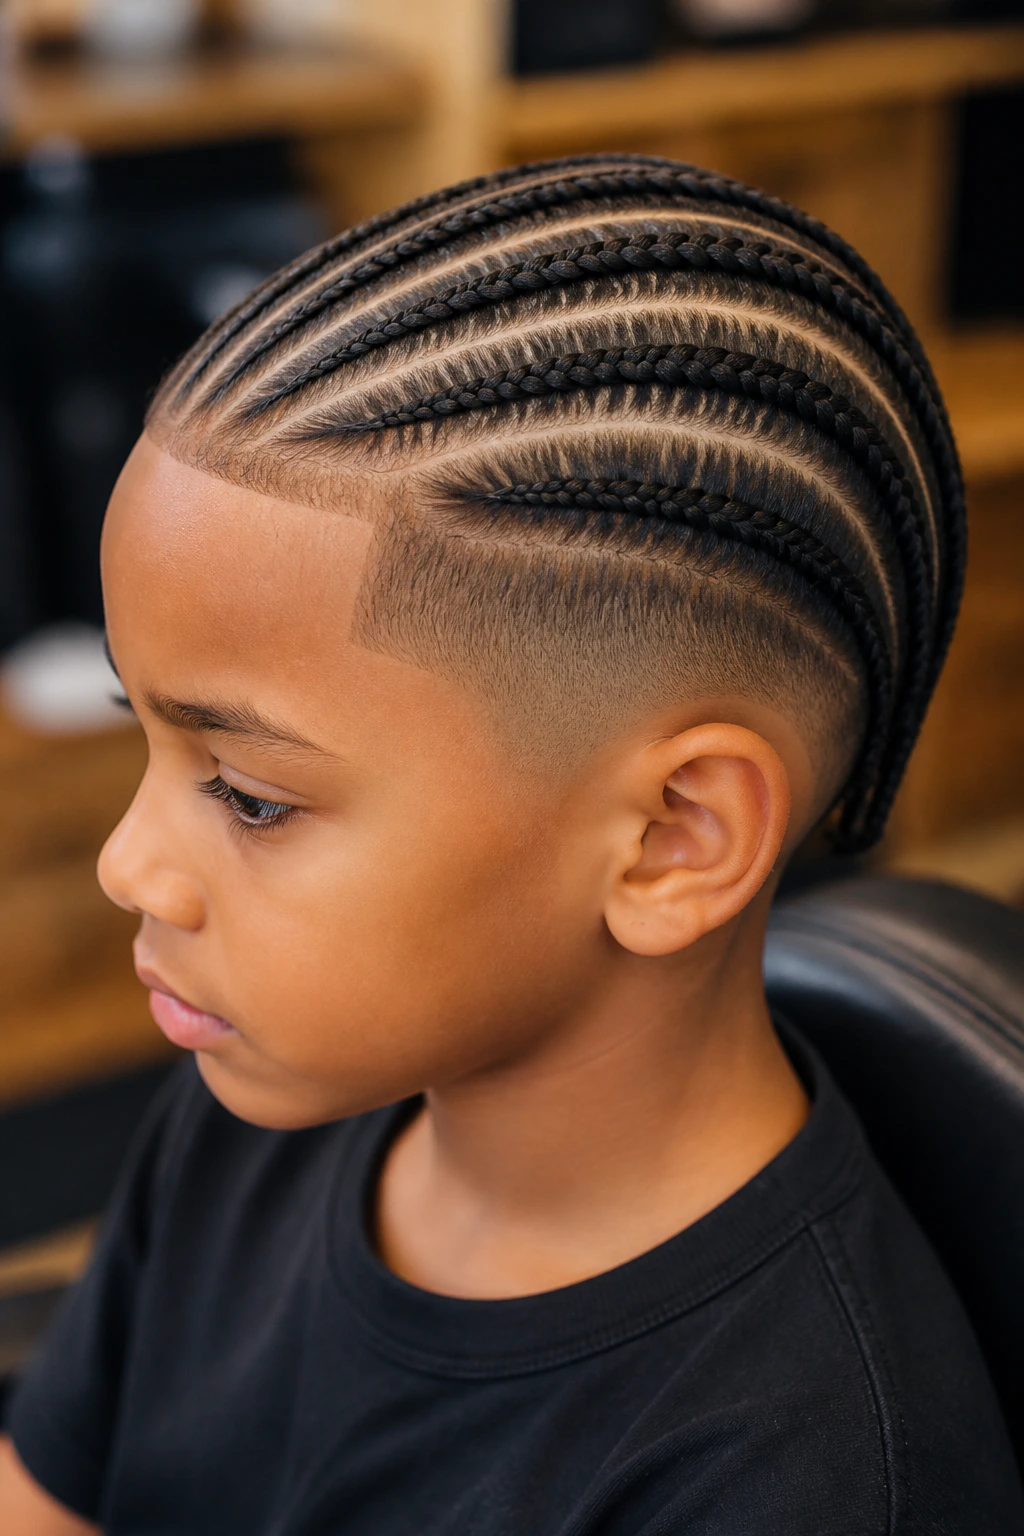
Temple-to-nape rows are the kind of style that makes a head shape look sharper without needing much hair at all. The braids start near the temples and travel down toward the nape, which creates a long, clean line and pulls the eye backward.
That direction is useful on fine hair because it avoids overloading the front hairline. If the front is fragile or sparse, this style keeps the tension away from the edge while still giving a braided look. It pairs well with a low fade because the fade makes the braid lines stand out more.
The key is symmetry. If one side angles more steeply than the other, the style loses its clean feel right away. This is one of those cuts where the barber and the braider have to agree on the shape, or the finish can look split between two different ideas.
13. Feed-In Cornrows for a Fuller Root
Feed-in braids can help when fine hair looks too narrow at the roots, but they need a careful hand. The idea is to start slim and gradually add a little more length into the braid so the row looks fuller without a chunky lump at the scalp.
On boys with fine hair, I would keep any added hair extremely light. A tiny amount of matching braiding hair can give the braid better shape, but too much makes the style heavy and can tug at the roots. If the child is young or very active, skipping extensions altogether is often the better call.
When to choose this style
- The hair is fine but long enough to anchor.
- The goal is a fuller-looking braid line.
- The child can tolerate a little extra weight.
A good feed-in braid should still move like a natural braid, not a helmet. If it feels stiff by the second day, there’s probably too much added hair in the first place.
14. Cornrows Pulled Into a Low Braided Tail
This is a clean way to finish rows when the hair is long enough to gather at the nape. Instead of stopping each braid separately, the rows flow into one low tail, which keeps the ends tidy and gives the style a finished shape.
For fine hair, that low tail can make the top appear fuller because the rows all point to the same place. It also helps reduce frizz at the ends, which is usually where fine hair starts to look messy first. A small tie at the base is enough; you do not need a heavy band that pulls.
I like this look for boys who move a lot and don’t want loose braid ends catching on collars or backpack straps. It’s neat, practical, and easy to keep flat under a hoodie. The one catch: the hair needs enough length to gather cleanly, or the tail ends up looking too short to be worth it.
15. Cornrows Finished in a Small Top Knot
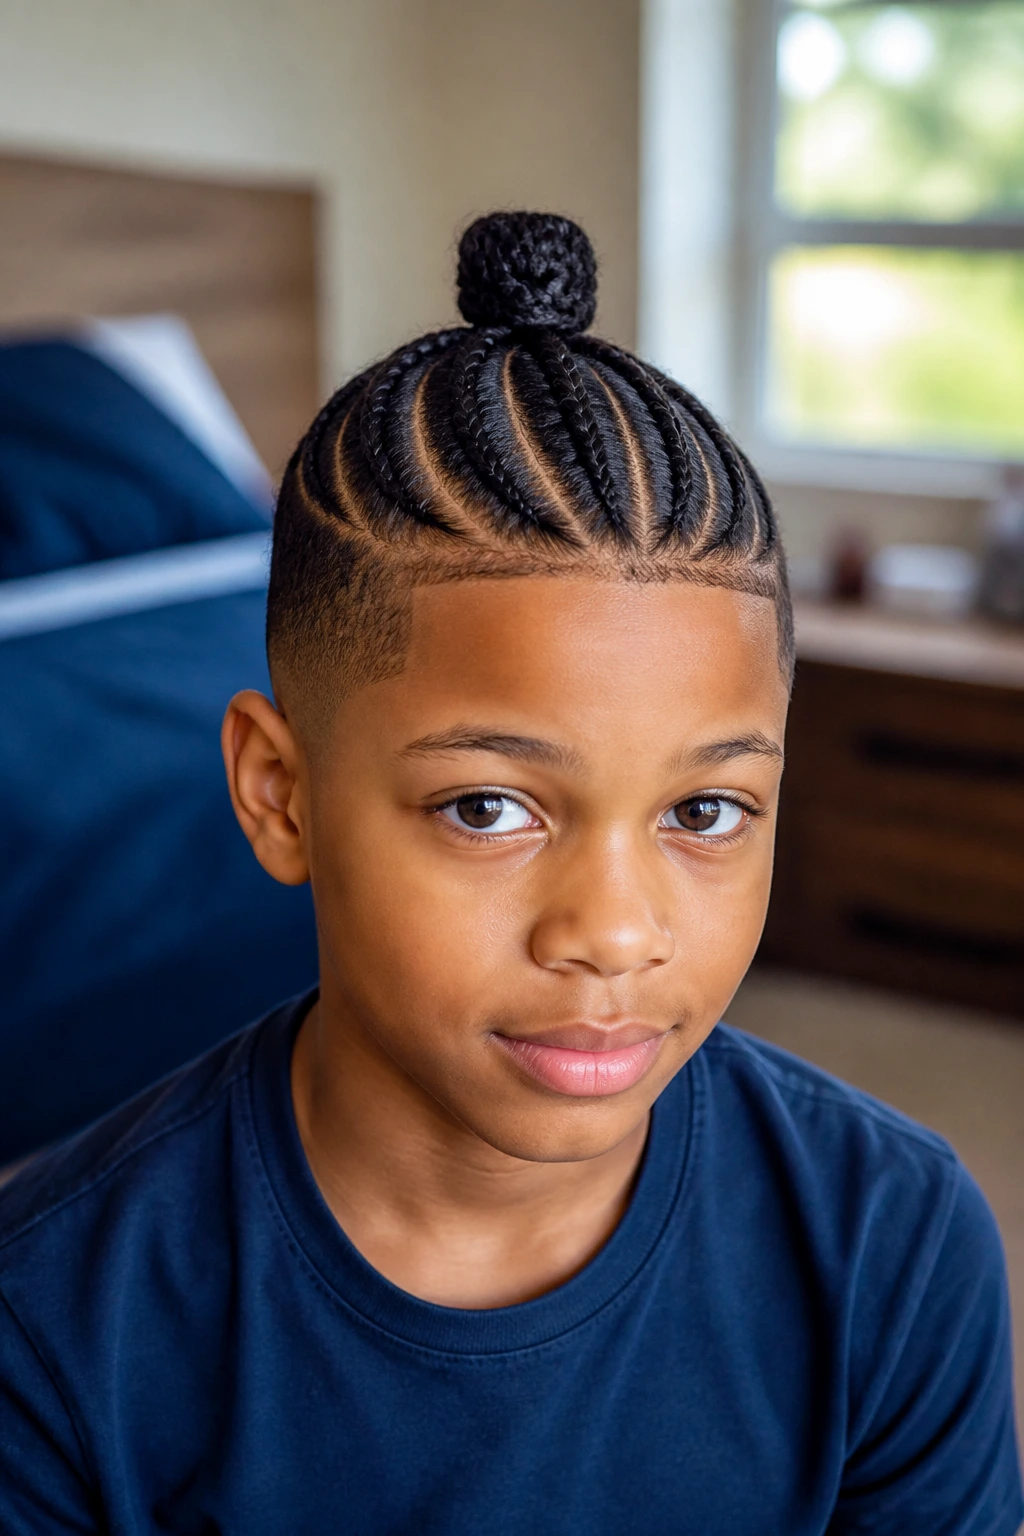
A small top knot is a better choice than it sounds, especially if the hair on top is longer than the sides. The cornrows feed upward, then collect into a compact knot that keeps the ends out of the way and adds a bit of shape at the crown.
Fine hair often benefits from a style that creates one strong focal point instead of many tiny weak ones. That’s what the knot does. It gives the eye a landing spot, and it helps the top read fuller, especially when the sides are tapered down.
This works best when the hair is long enough to hold a knot without stretching. If the bun feels tiny and loose, skip it. A limp top knot doesn’t look tidy; it looks like a style that ran out of hair halfway through.
16. Crisscross Cornrows With Woven Parts
Crisscross cornrows have a woven feel that looks more complicated than it is. The parts cross over one another, and that crossing pattern gives fine hair a little more visual weight because the head no longer reads as plain rows in a straight line.
This is a good pick when the child wants something more interesting than straight-back braids but still needs the style to stay neat. The crossing lines should be clear and symmetrical. If the pattern gets too dense, it starts looking crowded, which defeats the purpose.
The hair itself doesn’t need to be thick for this to work. In fact, the clean crossing pattern can make fine strands look more organized than a larger braid set. It’s a strong option for photo days or weekend events when you want the hairstyle to carry a bit more shape.
17. Mixed-Width Cornrows for Balance and Shape
Mixed-width rows are underrated on fine hair. If every braid is the same size, the style can look flat and expose too much scalp in one neat but unhelpful line. A mix of slim and medium rows creates rhythm, which makes the head look fuller without turning the style bulky.
I like this pattern when the hair is denser in some places than others. The bigger rows can sit over stronger patches, and the slimmer rows can tuck into finer spots near the hairline or crown. That little bit of problem-solving makes the style feel tailored instead of generic.
Keep the widths deliberate. Random sizing looks sloppy. Mixed width is not the same thing as uneven width, and that distinction matters a lot on fine hair where the eye notices every change.
18. Short Cornrows With Tucked Ends

Short cornrows with tucked ends are the most forgiving option when the hair isn’t long enough for tails, knots, or elaborate patterns. The braids stay close to the scalp, and the ends are tucked or sealed neatly so nothing sticks out and catches on clothes.
This is the style I’d point to when a boy needs something tidy, low-fuss, and practical. It’s especially useful if the hair is fine and still growing in. Shorter rows reduce weight, and less weight means less pull at the root.
The look should be clean, not cramped. If the rows are too tiny, the style can feel overdone on a head of fine hair. A few neat, short braids with properly tucked ends usually look better than a crowded set that tries to do too much.
Why Cornrows Work So Well on Fine Hair

Fine hair asks for structure, not force. That’s the whole story. When the strands are soft and the density is light, a braid style has to give the eye something stable to read: straight parts, even spacing, and a shape that follows the head instead of fighting it.
Grip matters more than bulk
A braid on fine hair should hold because the sections are small enough to stay together. If the rows are too wide, they loosen early and the braid starts to puff out at the scalp. Small sections, a light amount of gel, and a steady hand usually beat heavy product every time.
Parting does most of the visual work
The part line is not just a setup step. It is the style. On fine hair, a crisp part can make a thin head of hair look much neater because the scalp becomes part of the design. That’s why sloppy parting stands out so fast here.
Shorter, cleaner styles last longer
Very long rows can look thin on a finer head and may not hold as well at the ends. A shorter finish, or one that feeds into a tidy tail or tucked end, usually wears better. The style stays flatter, the scalp stays calmer, and the whole head looks more organized by day three than a heavier braid set would.
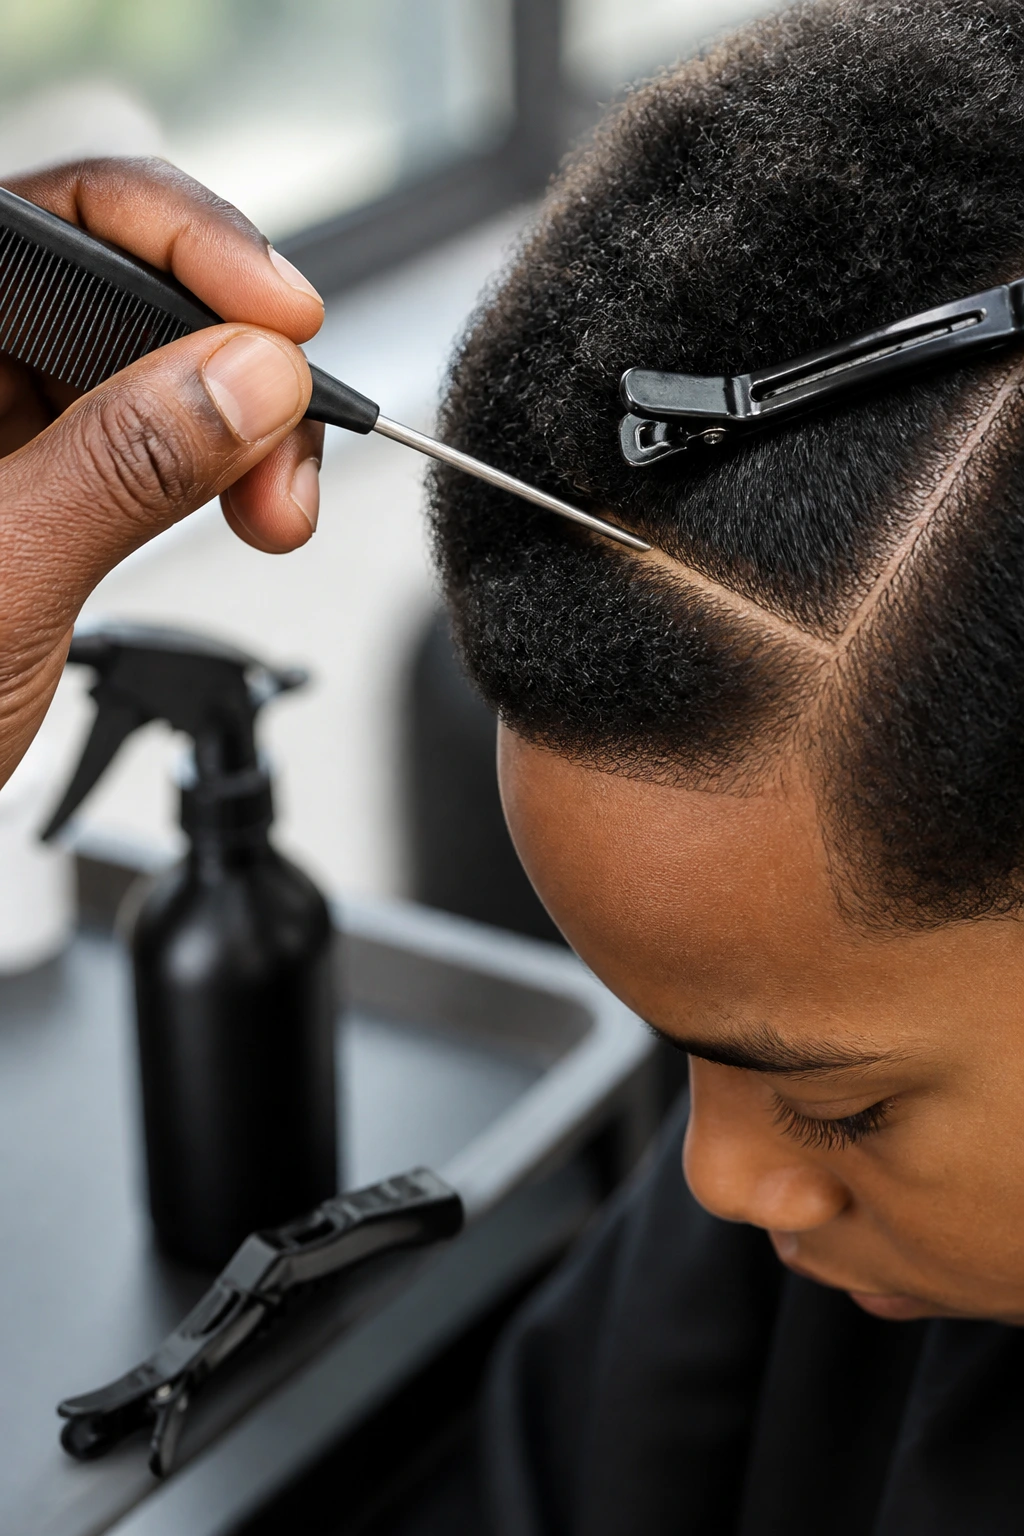
The Tools That Make Clean Parts Easier
- Rat-tail comb: The thin tail makes sharp parts and straight grids much easier to draw on fine hair.
- Duckbill clips: These hold small sections out of the way so the hair doesn’t collapse back into the part before you braid it.
- Spray bottle with water: A light mist helps tame static and makes soft hair easier to section without soaking it.
- Light braiding gel or edge control: Use a small amount at the roots only; too much turns fine hair slippery and dull-looking.
- Foam mousse: Good for smoothing flyaways after the braids are finished and giving the rows a softer set.
- Soft bristle brush: Helps line up the hair before parting and keeps the surface smooth.
- Satin scarf or durag: Protects the braid pattern overnight so the parts don’t swell and blur.
- Hand mirror: Handy for checking the nape and side angles without twisting the style apart.
- Optional blow-dryer with cool setting: Useful if the hair needs a little stretch before braiding, especially when it’s very soft or shrinks up fast.
Choosing Products That Hold Without Build-Up
Fine hair shows buildup fast. That sticky, waxy look around the roots can make a fresh braid job look older than it is, and it can also make the scalp itchy by the second or third day. I’d keep the prep simple: a clean wash, a light leave-in, and a hold product that doesn’t leave a crust.
If the hair gets oily easily, start with a gentle clarifying shampoo before braiding. If the hair feels dry or rough, use a small amount of lightweight conditioner, then rinse well so the braid has grip. Heavy creams are usually the wrong move here. They soften the strands too much and make them slide.
For hold, look for foam or gel with a flexible finish rather than a stiff wax. The braid needs enough slip to form, but not so much that the hair behaves like wet rope. If the roots puff up after a day or two, that often means the prep was too heavy, not too light.
A small scalp oil can help if the skin under the braids gets dry, but use it sparingly. One or two drops along the parts is plenty. Drenching the scalp just makes the style greasy and shortens the clean window.
How to Wear These Cornrows at School, Practice, and Family Photos
Presentation: Keep the hairline clean and the parts sharp, then stop. Fine hair doesn’t need a heavy coat of shine to look finished; it needs tidy lines and rows that sit flat. A little mousse after braiding is enough to smooth the surface without turning the scalp shiny.
Best Pairings: These styles sit well with low fades, soft tapers, hoodies, school uniforms, and sports jerseys. If the child wears helmets or caps, choose lower-profile rows that won’t press into the forehead or ears.
Scale: On a smaller head or very fine density, 2 to 4 rows can be enough. If the hair is denser or longer on top, 6 to 8 rows may look better. The point is not how many braids you can fit. The point is how evenly they sit.
Occasion Match: Straight-backs and short tucked ends suit everyday wear. Diamond parts, crisscross rows, and halo styles look sharper for photos or family events. Mohawk rows are the obvious pick for active days when comfort and a quick wash matter more than a fancier pattern.
Small Upgrades That Make the Braids Look Sharper

Finish: A light mist of mousse after braiding helps settle flyaways and keeps the rows from frizzing at the edges. Don’t soak the hair; one thin pass is enough.
Grip Help: If the front is slippery, a tiny bit of gel at the roots before sectioning can help the comb hold the part. Use it sparingly. Too much and the braid starts sliding instead of gripping.
Customization: A tiny fade, a soft line-up, or a single accent part can change the whole feel of the style without making it fussy. On fine hair, small changes usually look better than big decorative ones.
Comfort Move: Ask for the braid tension to be slightly looser at the edges and firmer through the middle of the head. That keeps the style secure without pulling the hairline into a sore spot by bedtime.
Keeping Cornrows Neat Between Wash Days
Cornrows on fine hair usually look best for about 1 to 2 weeks before the roots start puffing or the part lines blur, though a very neat set can stretch a little longer if the scalp stays calm and the night care is consistent. The fastest way to lose that clean look is to sleep on them uncovered.
Wrap the hair every night with a satin scarf or use a satin pillowcase if the child won’t keep a wrap on. That one habit does more than expensive products ever will. It reduces friction, keeps the parts from swelling, and cuts down on the fuzzy halo that fine hair gets when it rubs all night.
If the scalp feels dry, a very light spritz of water mixed with a little leave-in can help, but don’t soak the braids. You want the hair refreshed, not damp. If sweat or sports have made the roots look dull, a small bit of foam mousse can reset the surface after the hair dries.
Washing is best done carefully. Use diluted shampoo on the scalp, let the suds run through the rows, and rinse well. Scrubbing the braid lengths too hard just roughs up the finish. If the child is active every day, wash around the 7- to 10-day mark. If the style is protected well and the scalp stays clean, you can often stretch it a bit longer.
Ways to Change the Look Without Starting Over
School-Day Straight Backs: Keep the rows low, straight, and simple with no extra part tricks. This is the version that gets out the door fast and stays tidy through a long day of class and recess.
Photo-Day Diamond Grid: Add diamond parts, a clean line-up, and a small amount of mousse for a sharper finish. The pattern reads more polished without needing thick hair.
Sports-Ready Mohawk: Leave the sides tapered and braid only the center strip. It cuts down on bulk under a helmet and keeps the style from getting flattened at the edges.
Low-Tension Halo: Wrap the braids around the crown with a soft curve and keep the temple area relaxed. This is a good call for boys who complain about pressure at the front hairline.
Extension-Free Fuller Finish: Use mixed-width rows, small curved parts, and a fade instead of adding extra hair. On fine hair, that combination often looks denser than trying to force in synthetic length.
Where Fine-Hair Cornrows Go Wrong

The most common mistake is making the rows too wide. Wide sections can look empty on the scalp and they loosen faster, especially after sleep. The fix is simple: go smaller and cleaner, even if that means fewer braids.
Another problem is overloading the hair with product. Heavy gel or thick cream makes fine strands slick, not secure, and the braid starts to slip by the next day. Use a light hand. If the roots feel greasy before the style is even finished, that’s too much.
Tension is the other big one. Boys may not always say the braid hurts until an hour later, so watch the hairline while the style is being done. If the skin looks white at the roots, or the child keeps touching the same spot, the braid is too tight and needs to be redone.
Skipping night protection is a quiet killer. Fine hair frizzes fast under friction, and one rough pillow can undo half the neatness. Satin at night. Every time. It’s boring advice because it works.
Questions Parents Ask Most
How short can a boy’s hair be for cornrows?
Around 1½ to 2 inches is usually the workable zone for simple rows, though a very skilled braider can sometimes work with a little less. If the hair is shorter than that, the braid may not grip well enough to stay neat.
Do cornrows work on very silky fine hair?
Yes, but the braid plan needs to be smaller and cleaner. Silky hair slips more easily, so narrow sections and light hold product matter more than anything else.
Should the hair be braided wet or dry?
Dry or lightly damp is usually safer. Soaking the hair can make it stretch too much and then shrink later, which makes the rows puff up unevenly.
Can you add extensions to fine hair?
You can, but I’d keep them minimal. A little added hair can help with fullness, yet too much weight is hard on a small scalp and can pull at the roots.
How many rows look best on a fine-haired boy?
That depends on density and head size, but 2 to 6 rows are the sweet spot for most boys. Once you go much higher, the scalp can start to look overcrowded or the rows can feel too small to hold.
What if the braids start slipping after a few days?
That usually means the sections were too large, the product was too slick, or the hair was too soft at the start. A tighter section plan next time solves more than extra gel ever will.
Do cornrows hurt when they’re done right?
They shouldn’t. A little snugness at the scalp is normal, but sharp pulling, redness, or a headache means the braid is too tight and the style needs to be loosened.
Can a child wash the braids after sports practice?
Yes, but use a diluted shampoo or a gentle scalp rinse and avoid rough scrubbing. Fine hair frizzes fast, so keep the washing careful and let the rows dry fully before wrapping them again.
A Clean Finish
The best cornrows for boys with fine hair don’t try to fake thickness. They use clean parts, smart braid sizes, and a shape that respects the hair the boy actually has. That’s why straight-backs, diagonals, halos, and short tucked finishes keep coming back: they look organized without asking too much from soft strands.
Once you start thinking in terms of part width, tension, and shape, the right style gets easier to spot. And that’s the real advantage here. The head doesn’t need to be covered in braids to look finished; it just needs the rows to sit in the right place, with enough neatness to carry the whole look from the first morning to the last.