A French Twist looks fussy until you actually do one. Then it becomes clear that the whole thing rests on a few very ordinary moves: build some grip, fold the hair vertically, hide the ends, and pin the seam like you mean it. The style has a polished reputation, but the mechanics are plain enough that once your hands learn the shape, it stops feeling mysterious.
What makes people struggle isn’t the twist itself. It’s usually the hair being too clean, too slippery, too layered, or too softly pinned. A French Twist on slick, freshly washed hair can slide around like it has a mind of its own. The same style on day-two hair with a little dry shampoo behaves completely differently. That difference matters more than most tutorials admit.
There’s also the visual trick of it. A good French Twist doesn’t look like a bun that got confused. It has a vertical line, a tucked seam, and a shape that sits close to the head without feeling crushed flat. Done well, it keeps the back of the neck clear, hides the ends, and gives you that clean, lifted outline people notice from across a room.
Why the French Twist Is Worth the Pin Count
-
It keeps the length off your neck: The hair is folded upward and tucked in, so you get a neat back profile instead of a bulky knot sitting low at the nape.
-
It plays nicely with second-day hair: A little texture makes the style hold better, and that means you do not have to chase perfect, freshly washed smoothness.
-
It works with more than one finish: You can keep it sleek for a formal event or loosen the crown a touch for something softer and less severe.
-
It hides the ends cleanly: The bottom of the hair disappears into the fold, which is one reason the style still reads tidy even when a few flyaways show up later.
-
It can be protective in a practical way: The hair stays contained, which cuts down on rubbing against collars, scarves, and bag straps for the hours you’re wearing it.
-
It is easier than it looks once the seam makes sense: The first attempt can feel awkward. The second usually goes faster, because your hands stop fighting the shape.
What a French Twist Actually Is, and What It Isn’t
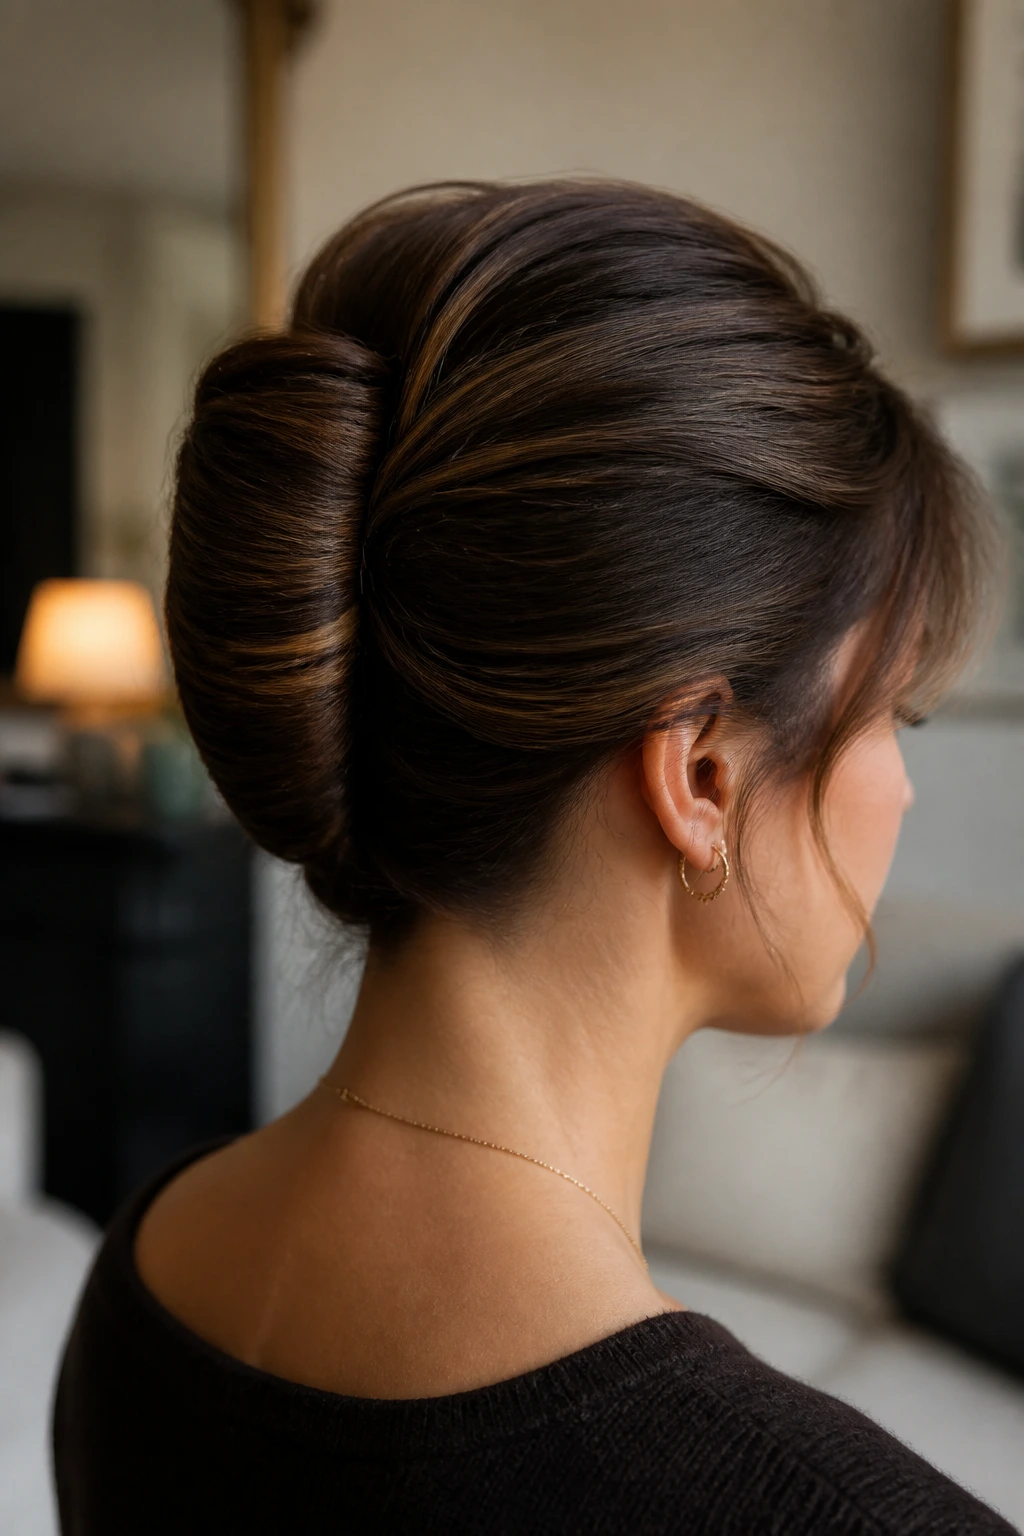
A French Twist is a vertical updo built by gathering the hair, rolling or twisting it upward against the back of the head, and tucking the ends into the fold. The finished shape usually runs from the nape toward the crown, with a seam that can be hidden or left slightly visible depending on how polished you want it to look. It is not a braid, and it is not just a random bun pinned near the back of the head.
That distinction matters. A chignon usually sits lower and reads rounder. A French Roll tends to be tighter, sleeker, and more shell-like, with a stronger curve and a cleaner surface. A French Twist lives in the middle of those ideas: elegant, vertical, and compact, but not so shellacked that it has to look stiff.
The style can be as formal or as relaxed as you make it. Pull the crown smooth and pin the seam tightly, and it leans dressed-up fast. Leave a little lift at the top, soften the front, and let one or two pieces near the temples fall forward, and the whole thing feels less severe. The bones of the style stay the same. The mood changes with tension, pinning, and finish.
Hair Length, Texture, and Density: What Cooperates, What Fights Back

A French Twist is happiest on hair that reaches at least the shoulders, and it gets easier as the length passes the collarbone. Very short hair can be forced into a twisted shape with pins and patience, but the result often leans more “approximation” than classic twist. The sweet spot sits around shoulder-length to mid-back hair, where there’s enough length to fold and enough weight to create a clean line.
Fine Hair Wants Friction
Fine hair usually needs help from texture. Dry shampoo, mousse, or a light dusting of volumizing powder at the roots gives the pins something to bite into, and that bite is the difference between a style that lasts and a style that quietly slips by lunchtime. Fine hair can look beautiful in a French Twist, but it usually needs less smoothing and more grip.
Thick Hair Needs a Stronger Anchor
Dense hair brings a different problem: weight. The twist can look full and rich, but if the seam is only held by a few bobby pins, the whole shape will sag. U-pins, larger hairpins, and cross-pinning matter more here, and you may need to split the process into two controlled folds instead of trying to force one giant roll in a single motion.
Curly and Coily Hair Can Keep More Texture
Curly hair does not need to be flattened into submission. If you want a sleek French Twist, you can stretch the hair first with a blow-dryer, tension, or a light pass of heat styling on the surface. If you prefer to keep the natural texture visible, leave the curl pattern alive and shape the twist around it. The result is less glassy and more textured, which can be a good thing.
Layers Are the Sneaky Trouble Spot
Layers make the style more interesting and more annoying. The shortest pieces around the nape are usually the ones that escape first, especially if the seam is shallow or the pins only catch the top layer. With layered hair, the trick is to tuck in small sections as you fold rather than assuming the whole tail will cooperate as one piece.
The Pins, Combs, and Spray That Make the Style Behave
A French Twist is not a place to be stingy with the right tools. You do not need a suitcase full of gadgets, but you do need a few things that do different jobs. A smoothing brush shapes the surface. A tail comb helps with parting and cleanup. U-pins and bobby pins hold different parts of the structure. Hairspray locks the finished surface down, not the whole process.
-
Rat-tail comb: Useful for making a clean part, sectioning the front, and tucking stray ends into the fold without scratching up the shape.
-
Boar-bristle or smoothing brush: Helps press the outer layer smooth before pinning; this is especially useful if you want the twist to look polished rather than airy.
-
Bobby pins: Best for trapping smaller sections, flyaways, and the edges of the seam. The crimped side should face the scalp for more grip.
-
U-pins or hairpins: These work well for supporting the bulk of the twist, especially on thicker hair. They hold without squeezing the shape flat.
-
Flexible-hold hairspray: Keeps the style in place without turning the surface crunchy. You want control, not a shell.
-
Dry shampoo or texturizing spray: Adds friction to clean, silky hair and gives the pins something to hold onto.
-
Smoothing cream or light styling balm: Helpful for taming the hairline and front sections, but use it sparingly. Too much will make the twist slide.
-
Two mirrors: One in front and one behind you saves a lot of guesswork. A hand mirror alone usually leaves the seam half-hidden and half-hopeful.
Prep the Hair So It Has Grip Before You Lift a Pin
The prep step is where the style is won or lost. If the hair is too slick, the twist will feel slippery in your hands and the pins will slip out while you are still admiring the shape. If the hair has a little texture, the whole process gets calmer. Less dramatic. Much easier.
Start with dry hair. If it was washed that day and feels like silk, mist dry shampoo or texturizing spray through the roots and mid-lengths, then let it sit for a minute so the product actually settles. If your hair is naturally soft and fine, this is not optional fluff. It is the thing that makes the twist possible.
Brush the hair backward to see where it naturally wants to sit, then decide whether you want a center part, side part, or no part at all. A clean part gives the twist a more deliberate front. No part gives it a softer, more old-Hollywood look. Neither is wrong. The choice changes the mood more than the mechanics.
If your hair is very smooth, a light mousse at the roots before drying can help. If you are working with curls or waves, do not over-smooth the entire head unless you want the twist to lose all of its texture. A little body at the crown is useful. It keeps the finished style from lying too hard against the scalp.
And one small thing: keep the front sections loose until the main shape is secure. People often slick everything back too early, then spend ten minutes trying to rescue the hairline. Leave yourself a little slack. You can always tighten it later.
Gather the Hair Into a Clean Vertical Column
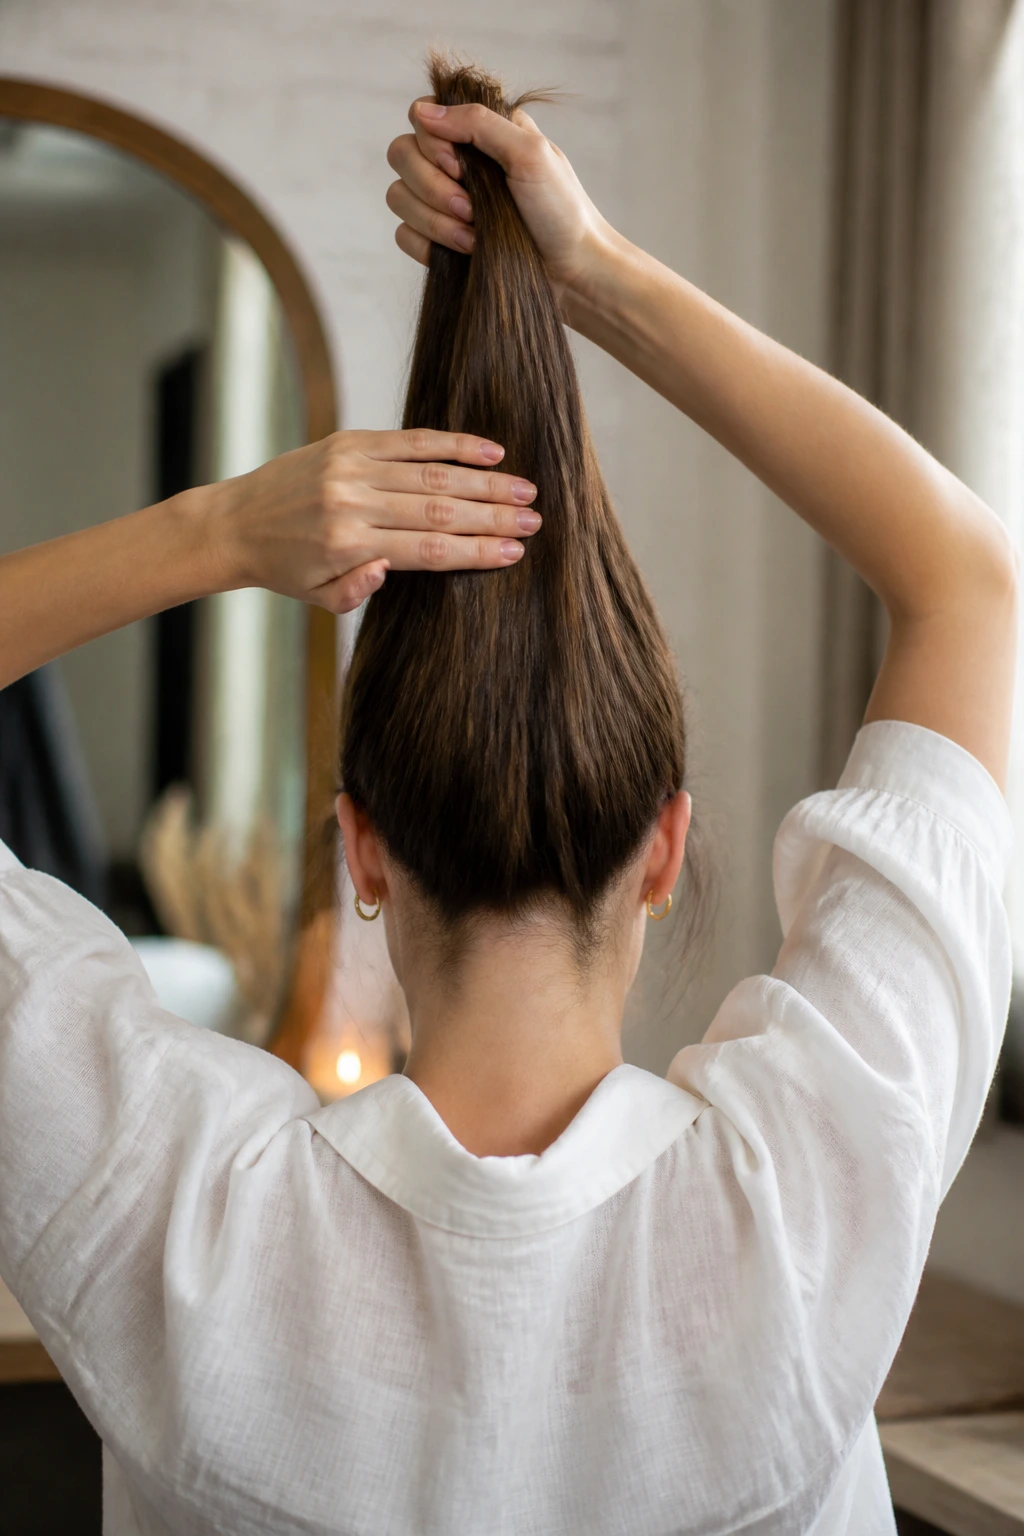
The first real shape of the French Twist starts when the hair is gathered into one controlled column at the back of the head. Not a ponytail. Not a messy bundle. A column. That’s the part people skip, and then wonder why the twist feels lopsided.
Use one hand to gather the hair at the nape and slightly above it, where the skull starts to round away from the neck. Hold that mass firmly, but not in a white-knuckle grip. The goal is to collect the length into one line so the eventual fold sits upright instead of sprawling sideways. If you have layers, keep sweeping the shorter pieces into the hand as you gather.
A slight offset can help. Right-handed people often find it easier to hold the base a little to one side while the other hand works the twist. Left-handed people may prefer the opposite. The exact side matters less than choosing a hand position that lets you keep tension without losing the shape every four seconds.
This is also where you decide how tight the final style should feel. A sleeker French Twist starts with a closer, firmer gather. A softer version leaves a touch more volume at the crown and does not squeeze the sides so hard. Both can work. The difference is in the hand pressure now, not just the finish later.
If the hair keeps slipping, pause and add grip before moving on. A little extra dry shampoo at the nape or a short spray of texturizer in the gathered section can save you from fighting the same slide over and over. That is the part no one likes to admit. Sometimes the fix is not “try harder.” It is “give the hair something less slick to hold onto.”
Roll the Length Up and Tuck the Ends
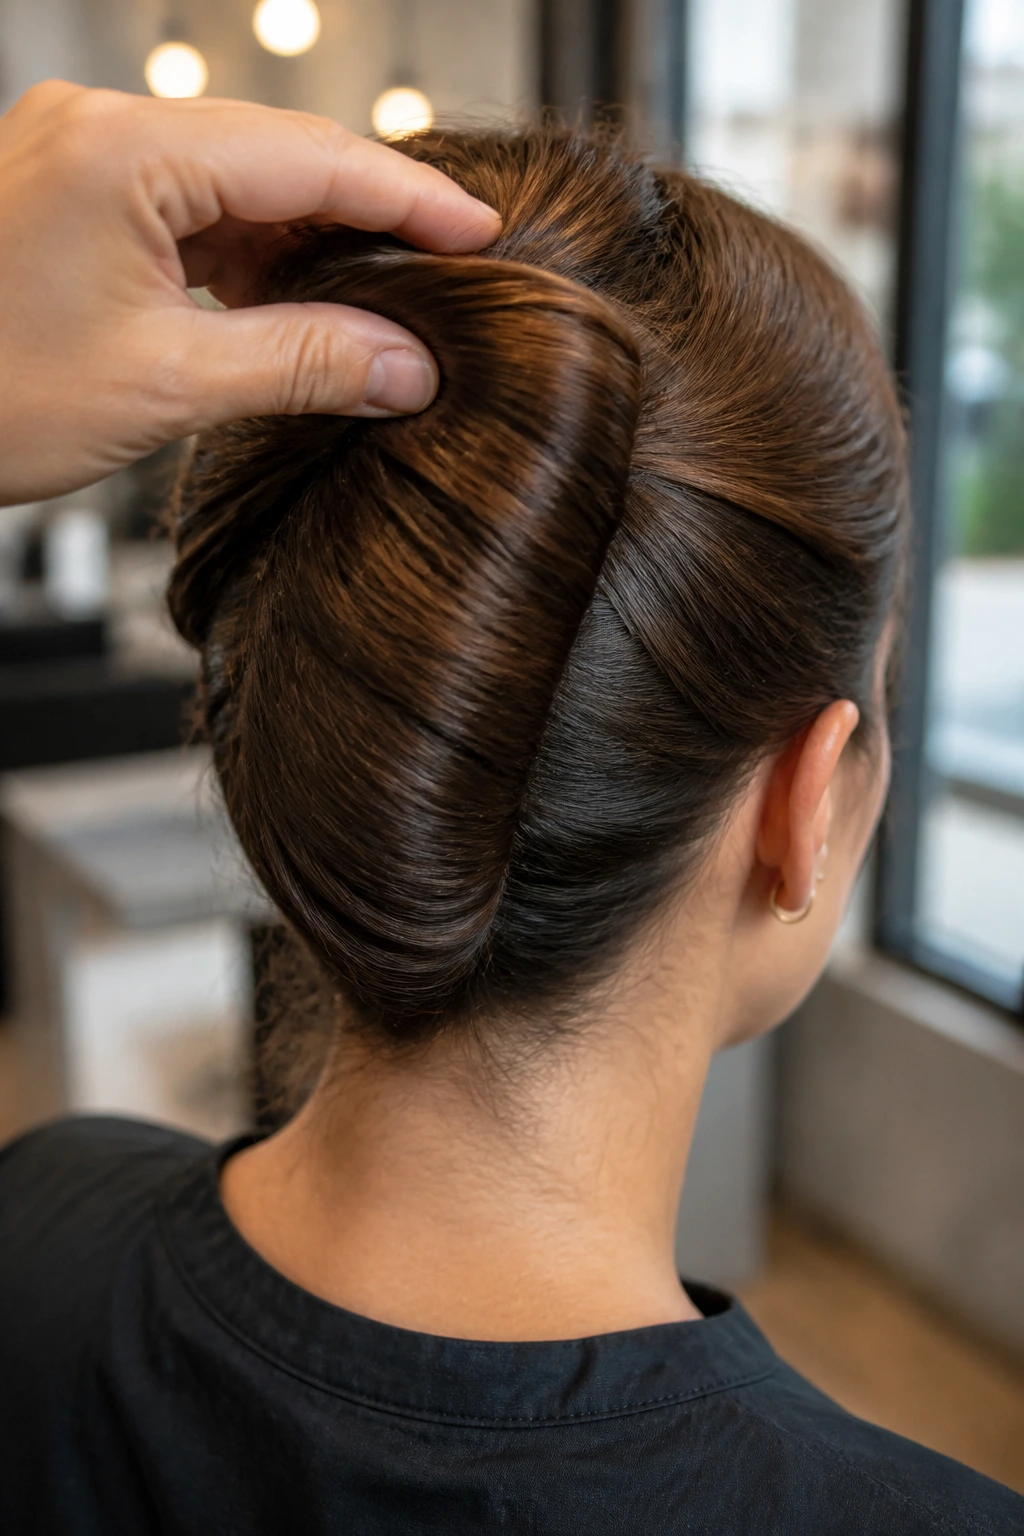
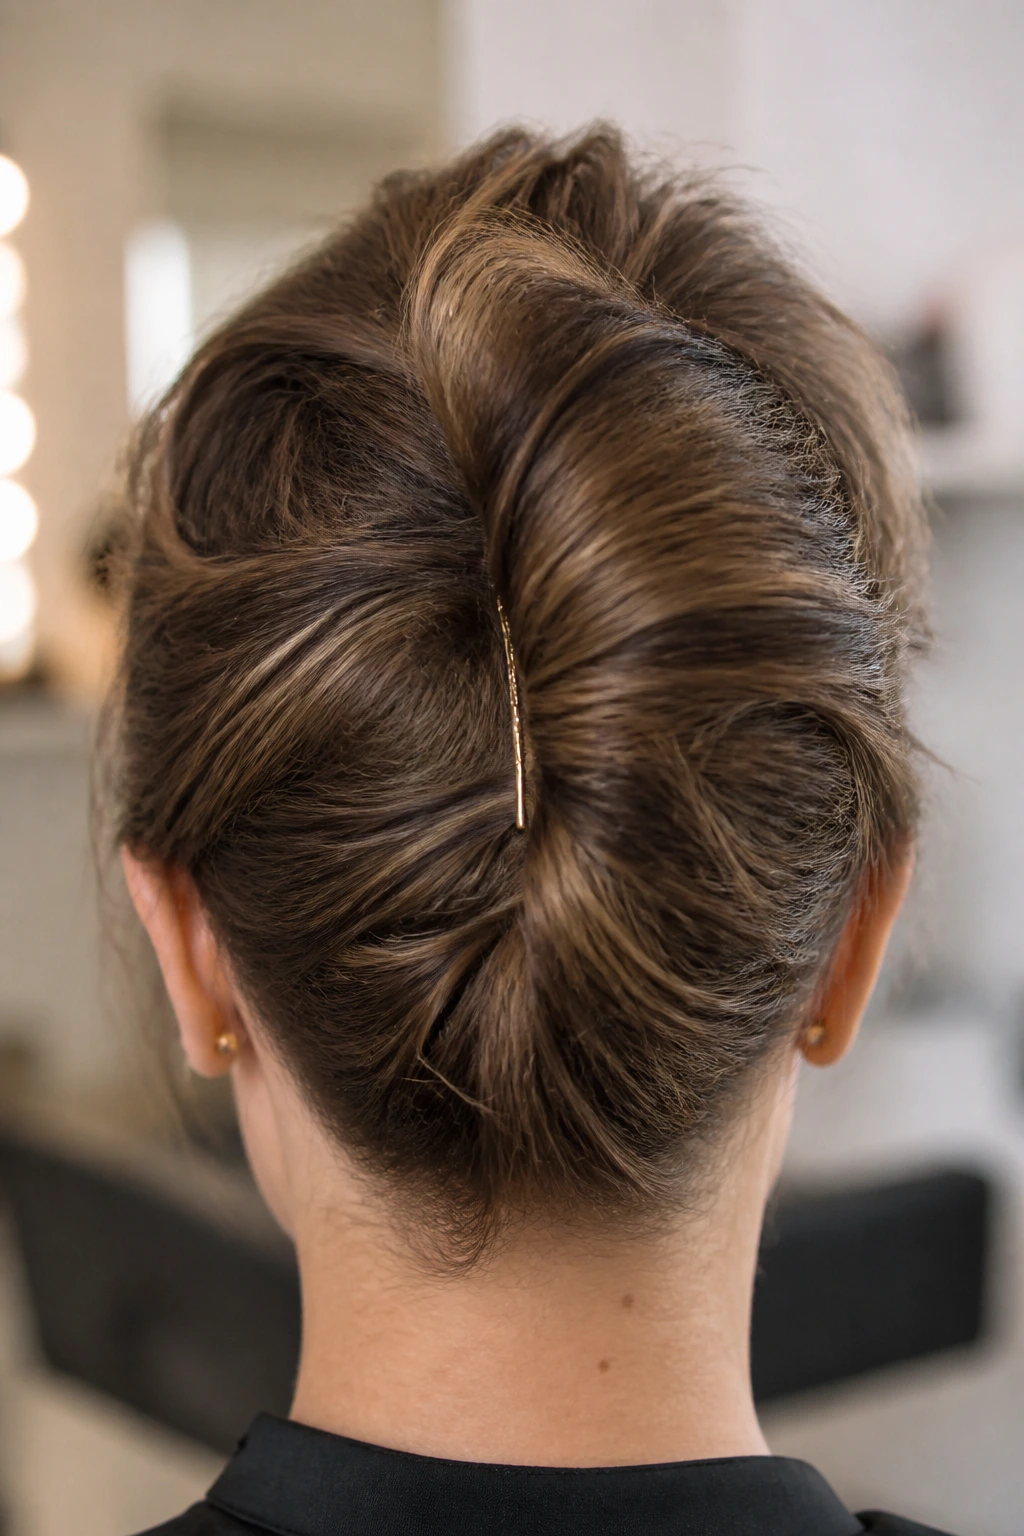
Now the French Twist becomes recognizable. With the gathered hair held in one hand, begin rolling the length upward against the back of the head so it forms a vertical fold. Some people twist inward as they lift; others roll more than they twist. The method varies a little, but the visual result is the same: a clean seam with the ends disappearing inside.
The best way to think about it is this: you are not making a donut. You are making a tall fold that sits close to the head. The hair should follow the contour of the skull, not drift away from it in a puffy loop. If the fold starts to separate from the head, pinch it back in while the other hand keeps the base controlled.
Long hair usually needs to be folded more than once before the ends can be tucked fully inside. Don’t rush that part. Tuck the lower length into the central cavity of the twist, then smooth the outer layer over it. If you have layered ends poking out, coax them in with the tail comb or your fingertips. Small sections behave better than one giant shove.
There is a temptation to over-tighten the roll at this stage. Resist it. If the twist is yanked too hard, the crown goes flat, the nape gets sore, and the shape starts to look severe instead of clean. A French Twist needs tension, yes. It does not need to feel like a helmet.
If you want a slightly fuller profile, leave the outer shell a touch looser before pinning. That little bit of air between the seam and the scalp gives the style a softer outline. Too much air becomes slack. Too little makes it stiff. The middle ground is where the style looks intentional.
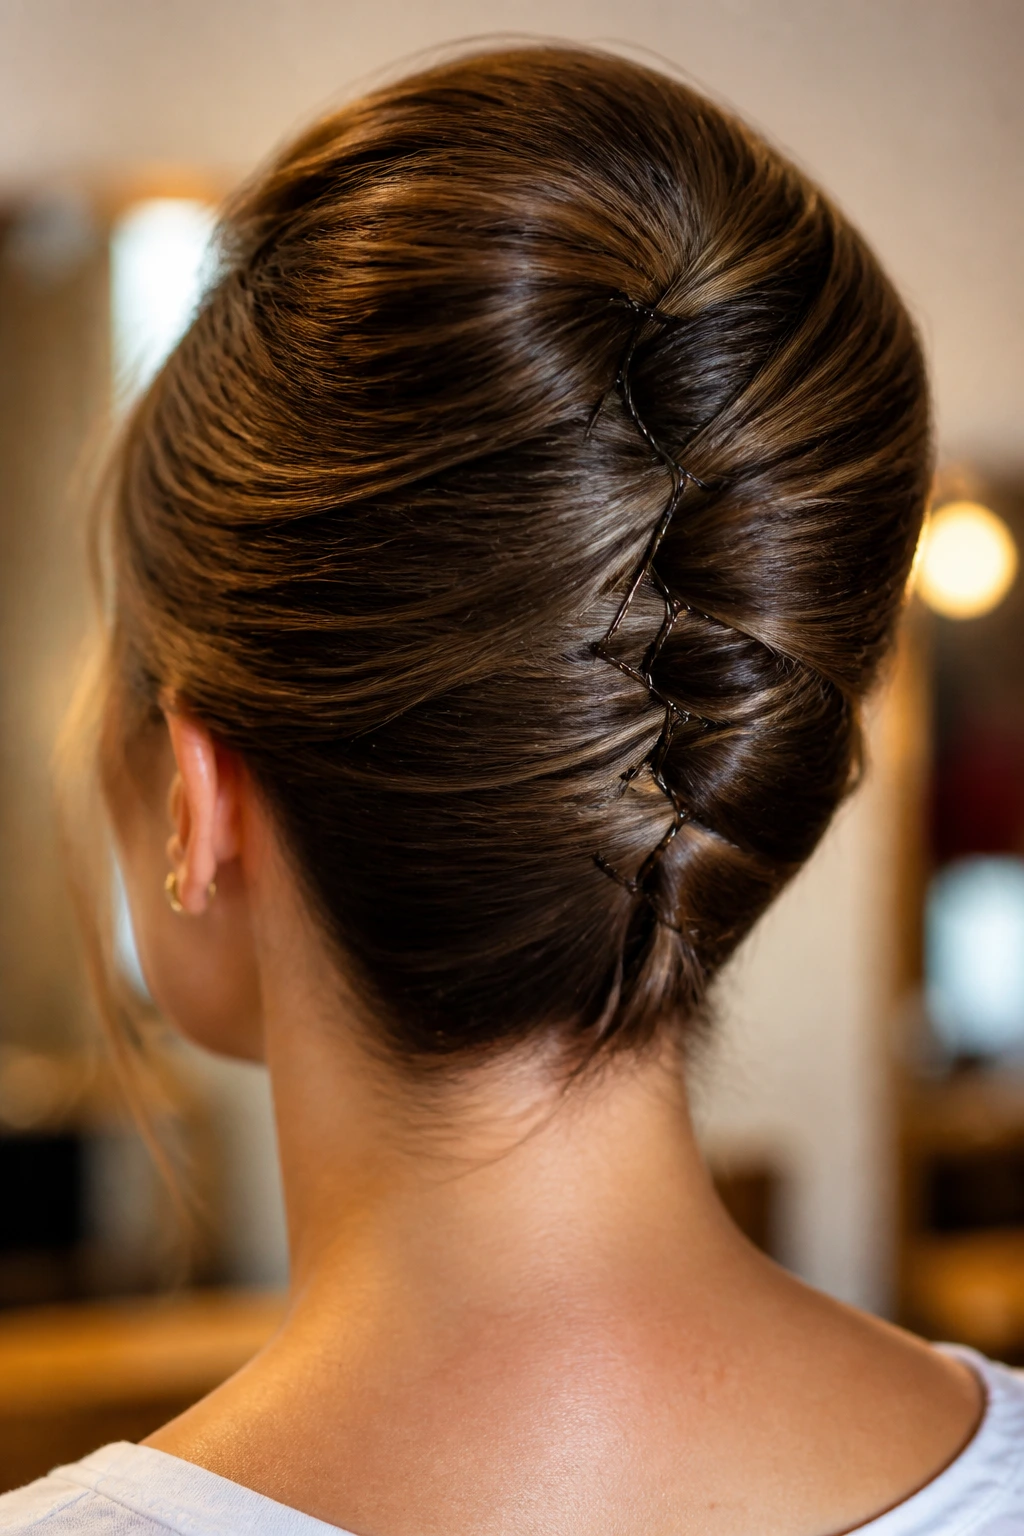
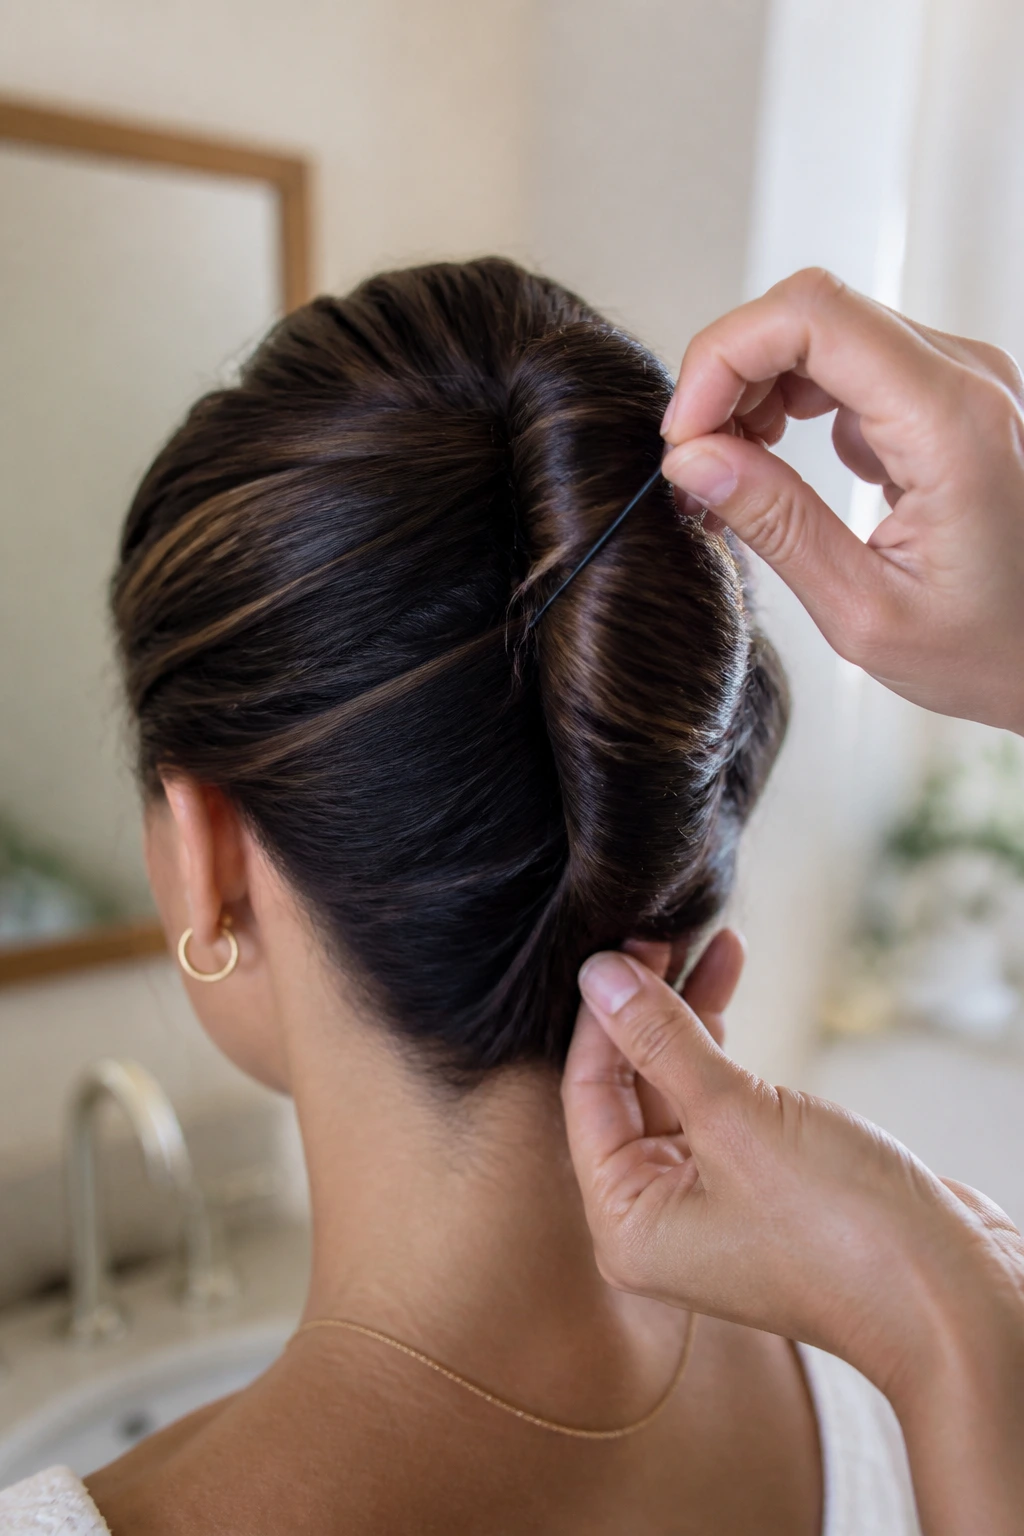
Pin the Seam So It Holds Under Real-World Movement
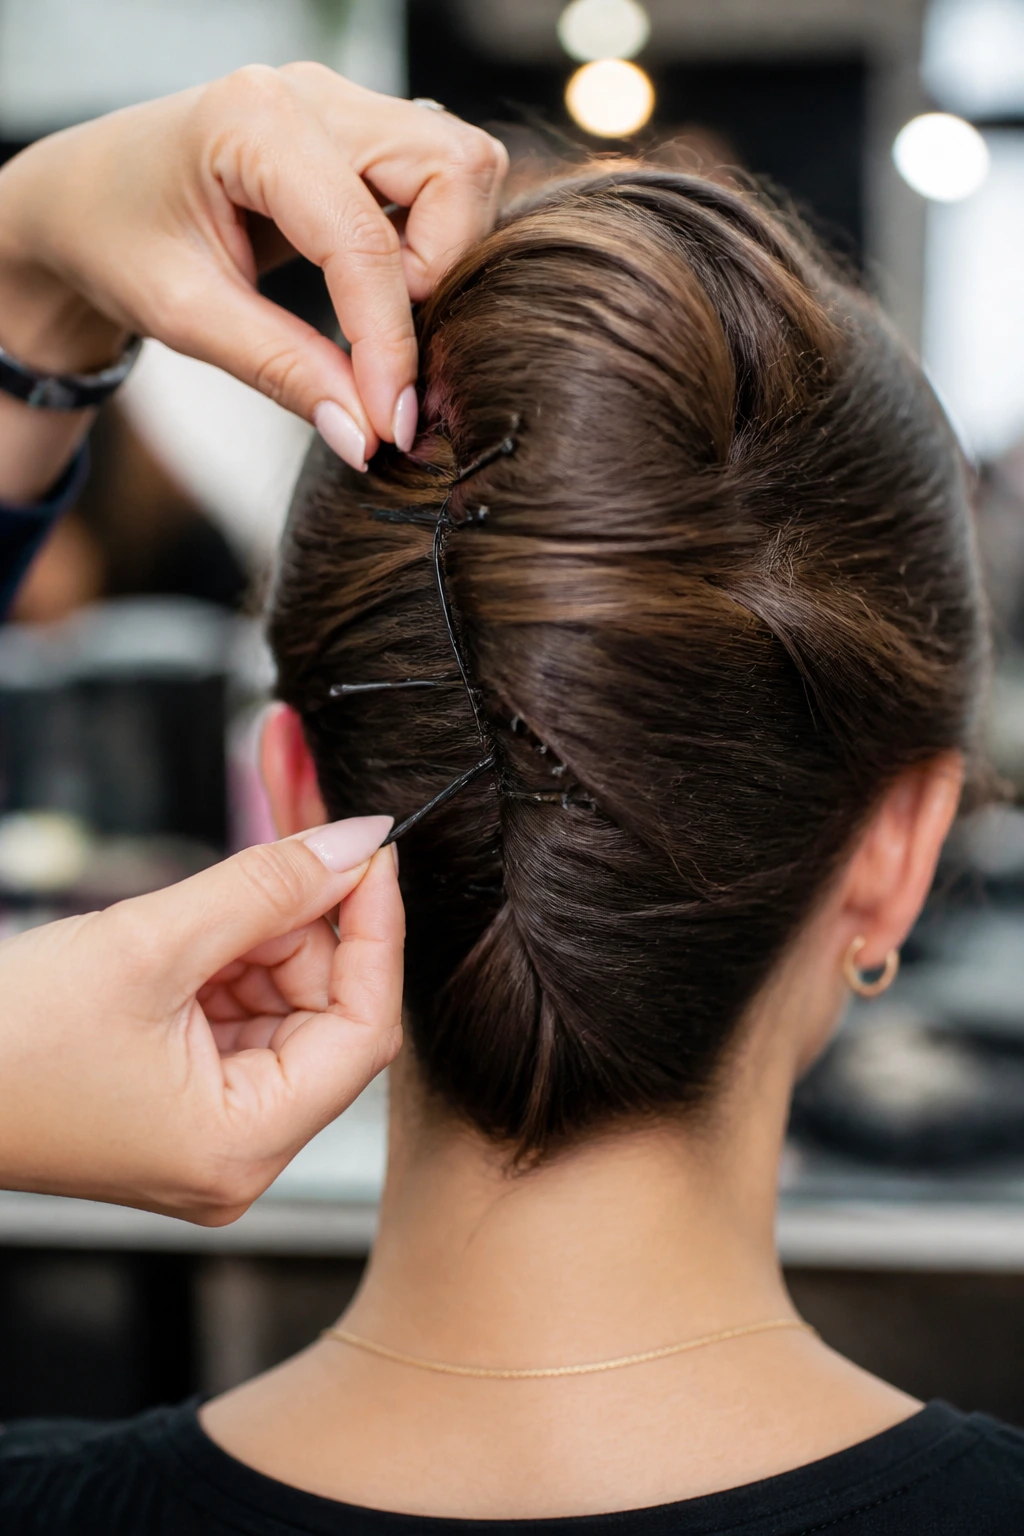
This is the part that separates a nice-looking French Twist from one that survives a dinner, a commute, or a long stretch of standing around. Pins should not just sit on the outside like decoration. They need to anchor the seam, catch the folded layers, and lock the shape to the head.
Start with the base of the twist near the nape. Slide a U-pin or bobby pin into the seam, then angle it back toward the scalp so it grabs both the folded hair and the hair underneath. If you only pin across the surface, the style can look secure while doing almost nothing useful. A deep insertion gets more hold and less drama later.
Cross-pinning helps. One pin goes in one direction, a second pin crosses it from the other side. That creates a small X inside the fold, which is far more stable than one lonely pin sitting flat against the shell. Thick hair usually needs several of these anchor points, not just one or two.
Move upward along the seam, adding pins where the hair feels springy or where the fold wants to separate from the head. Don’t chase every flyaway. That turns into over-pinning, and over-pinning can make the twist look lumpy. Focus on structure first, detail second.
A practical number? For medium-density hair, plan on 6 to 10 pins. Thick or very layered hair may need more. Fine hair may need fewer, but it usually needs better placement. The count matters less than the anchor. One deeply placed pin is worth more than three shallow ones.
Check the twist by turning your head slowly from side to side and tilting forward a little. If the shape shifts or the seam opens, pin again before you spray. Hairspray is a finish, not a substitute for a good anchor. That mistake is everywhere, and it never gets less annoying.
Shape the Front, Crown, and Nape for the Finish You Want
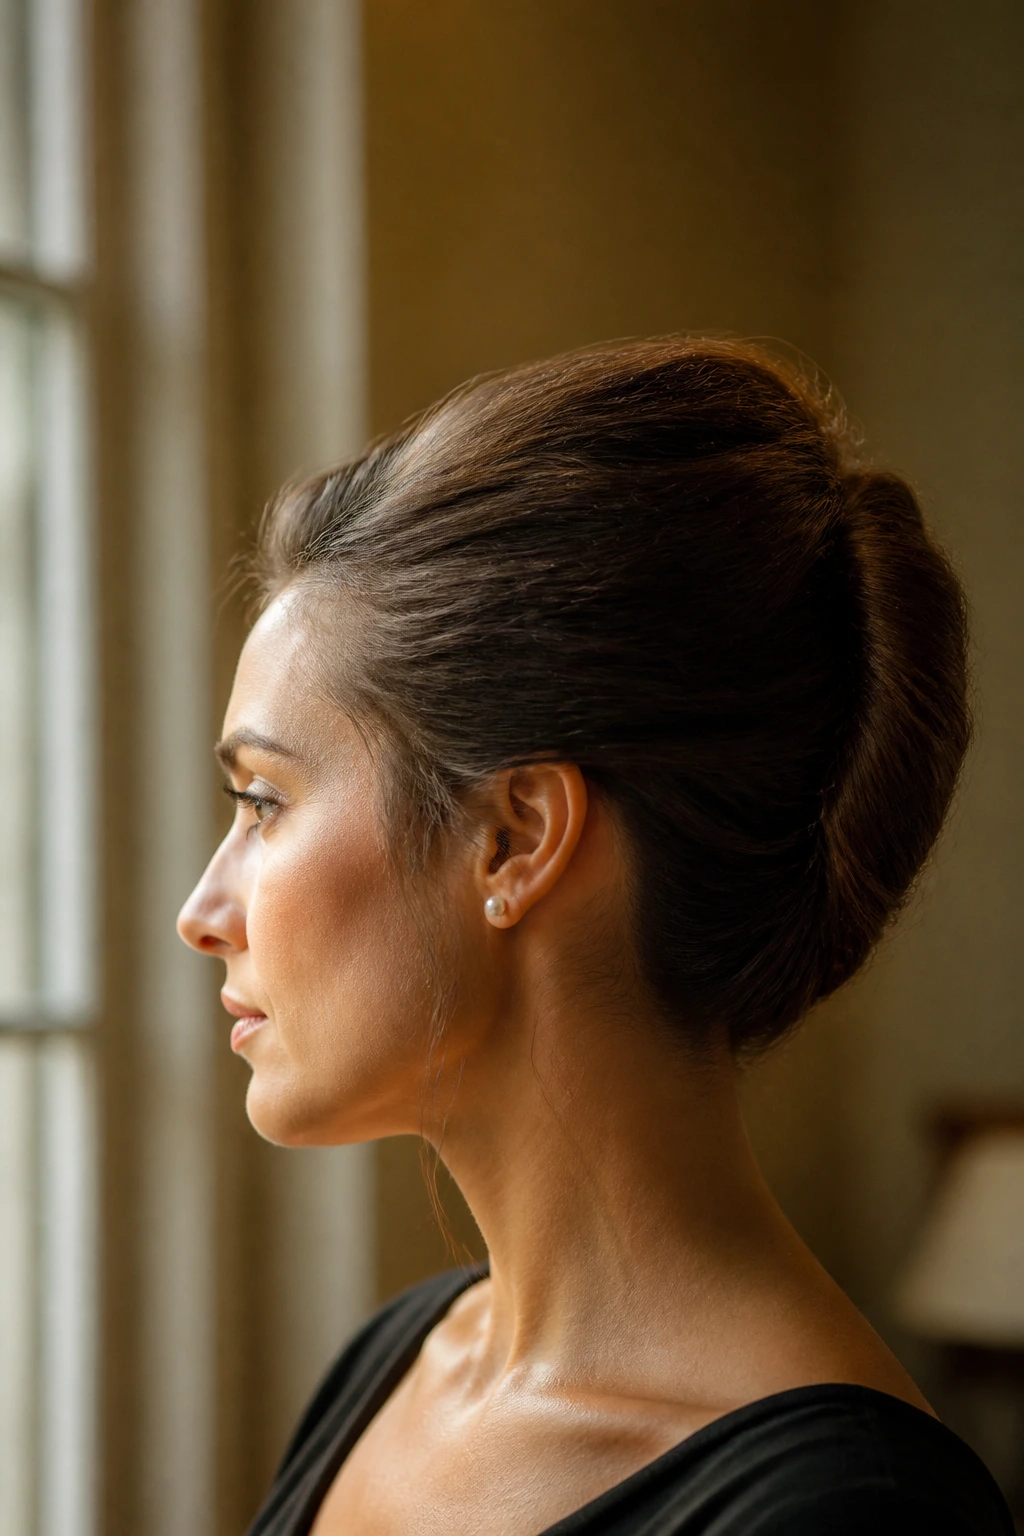
The back of the twist might be the structure, but the front is what people notice first. If the hairline looks harsh, the whole style can feel too severe. If the crown is too flat, the silhouette loses life. The nice thing is that a French Twist gives you room to tune both.
For a sleek finish, smooth the front sections backward with a brush and a tiny amount of styling cream on your palms. Use the lightest touch you can manage. The aim is to tame the surface, not plaster it down. A finger-width of softness around the temples often looks better than a perfectly sealed front. Too smooth can start to feel hard.
For a softer look, gently lift the crown with the tail of a comb before pinning the top section. That little bit of lift keeps the twist from hugging the head too tightly. You can also pull out a narrow face-framing piece on one side, or a few wisps near the nape if you want the style to feel less rigid. Keep those pieces narrow. Thick tendrils can make the look collapse into mess.
Bangs change the picture too. Full bangs can stay forward and give the twist a sharper frame. Side-swept bangs can blend into the twist line. Longer fringe can be tucked, pinned, or left loose depending on how much forehead you want to show. The key is to decide before the final spray goes on, because once the shell is set, adjusting the front becomes clumsy.
The neckline matters more than people think. A French Twist with a clean nape looks crisp against a collar, a strap, or a bare neckline. If you’re wearing earrings, the open back lets them do more work. Tiny detail, big effect.
Where a French Twist Belongs on the Calendar of Getting Dressed
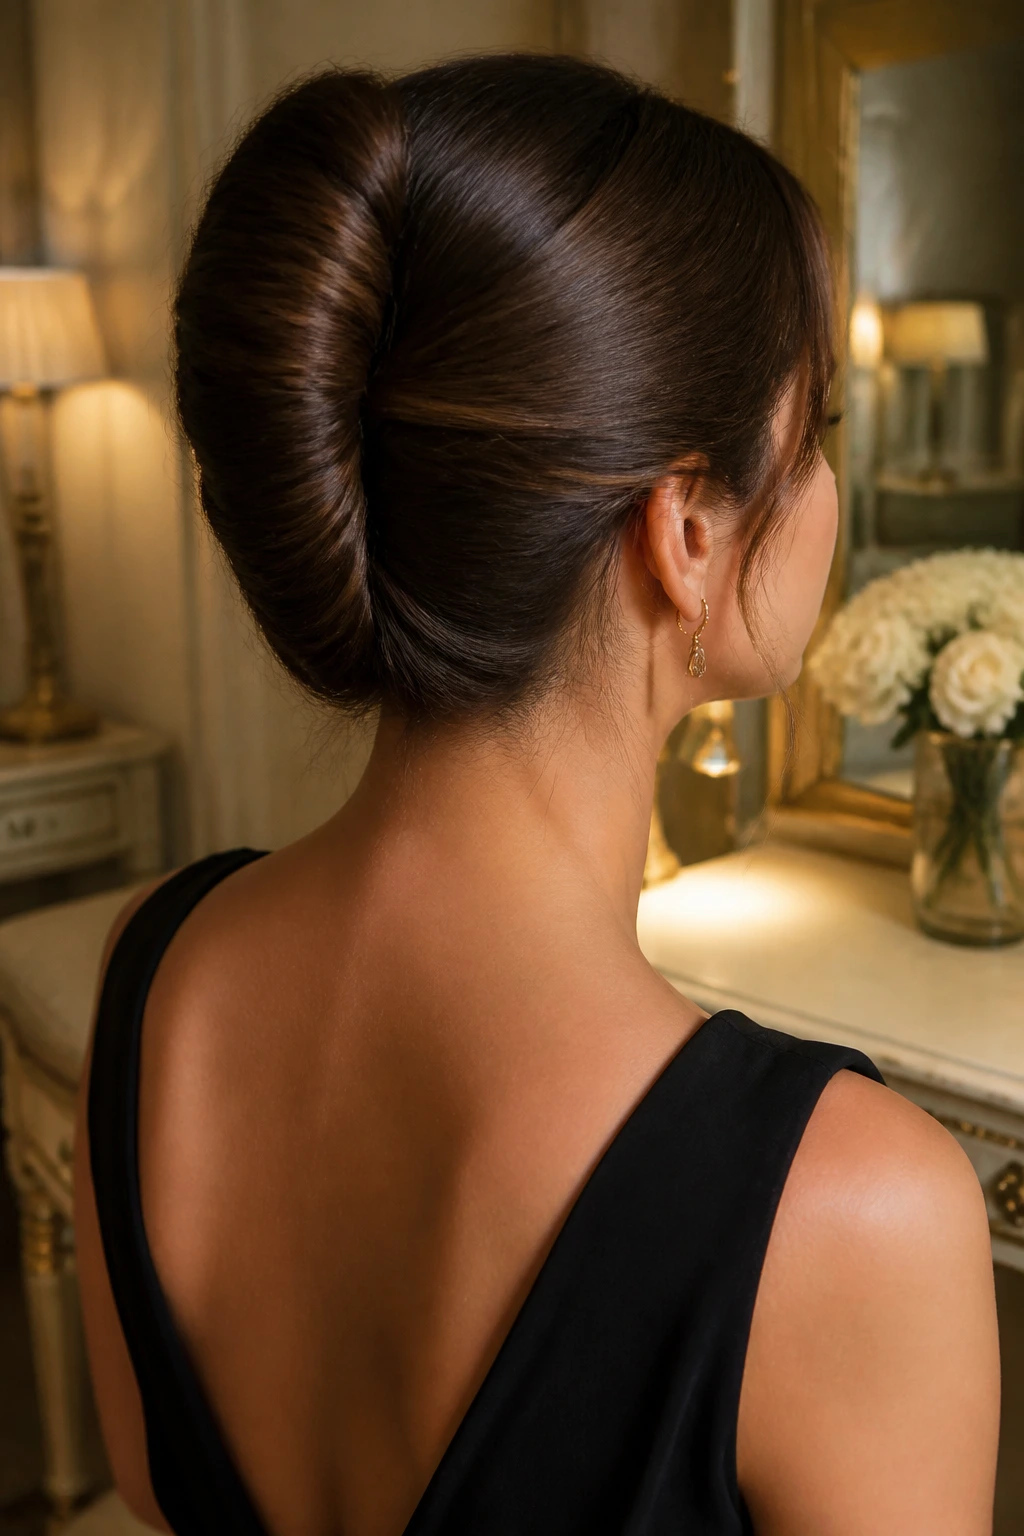
A French Twist shows up in formal spaces for a reason. It clears the neck, shows the profile of the face, and keeps the hair from competing with a neckline, necklace, or pair of statement earrings. It sits especially well with a boat neck, square neck, open back, crisp collar, or anything with a little structure up top.
It also works for lower-key days if you relax the finish. The same shape that looks polished with a black dress can look smart with a blazer or a knit top when you leave a touch of softness around the crown. The style does not need to be dramatic to read as intentional. It just needs a clear seam and a shape that stays close to the head.
If you like earrings, this is one of the easiest updos to wear them with. Drops, pearls, small hoops, even a decorative clip at the twist itself — all of that makes sense because the hair is not taking over the whole frame. The face and neck stay visible. That alone changes the mood of the style.
And if you are using a French Twist as a low-manipulation option for a stretch of time, it does a decent job of keeping the ends contained while still looking finished. That is the practical appeal. Not every style needs to be a full protective set to be useful. Sometimes you just need the hair off your shoulders without tying it into a knot that looks like an afterthought.
Keep It Fresh, Refresh It, and Take It Down Without Breakage
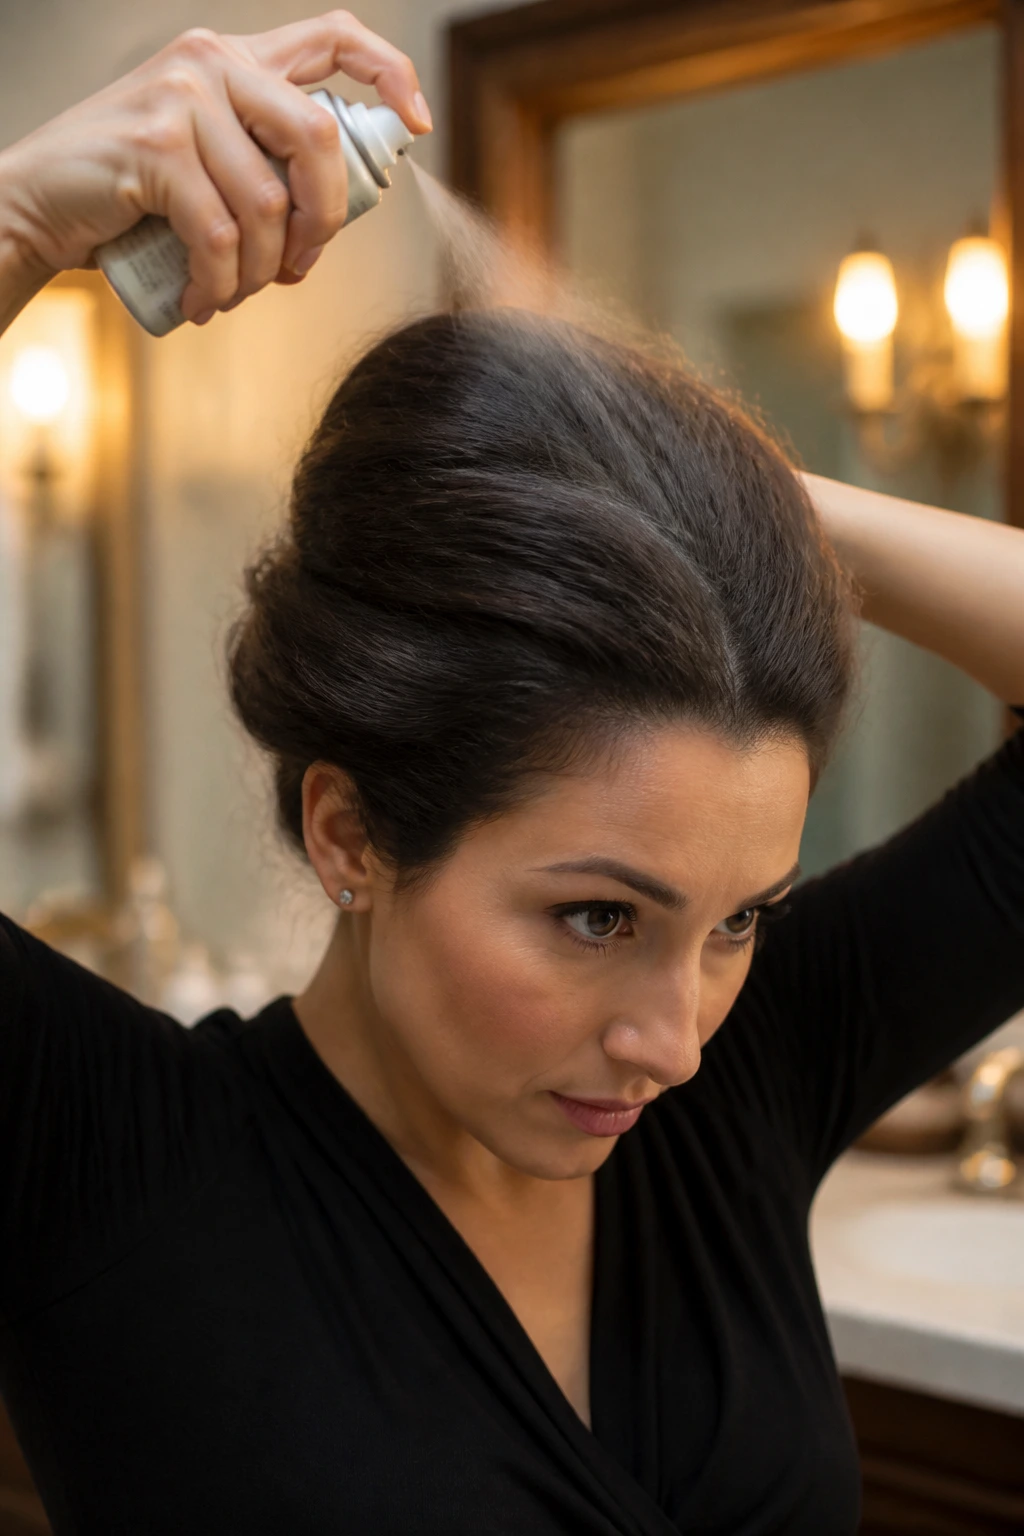
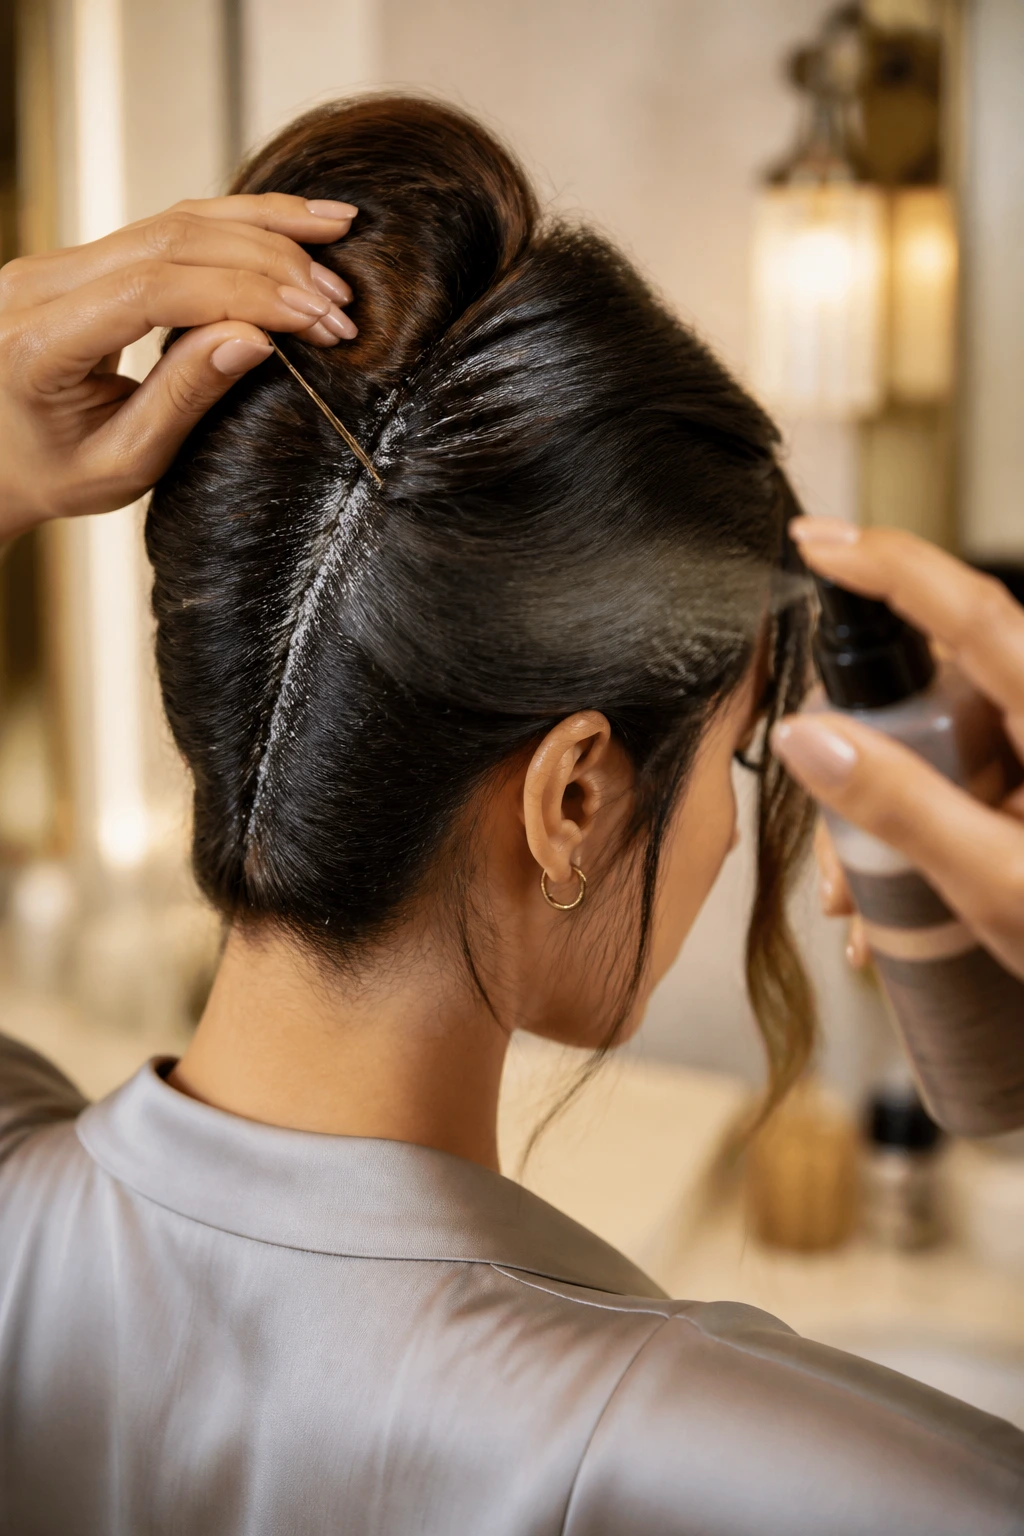
A French Twist can last surprisingly well when the pins are placed properly and the surface wasn’t overloaded with product at the start. If the front starts to puff or the seam loosens, the fix is usually small: slide in one or two new pins where the twist is sagging, then smooth the visible surface with dry hands. A quick mist of flexible hairspray from about 8 to 10 inches away can help, but don’t soak the hair.
If you need to refresh it later in the day, don’t rebuild the whole thing unless it has truly collapsed. Usually, a small amount of dry shampoo at the roots, a few presses with the palm, and one fresh pin at the seam are enough. The more you tear it down and restyle it, the more the hairline gets roughened. Better to nudge the shape back into place.
Taking it down cleanly matters too. Remove the pins in the reverse order you added them, and don’t yank them straight out if the twist is holding tight. Wiggle each one free with a small twist if needed. If you rush this part, especially on textured or color-treated hair, the ends catch and the breakage shows up later when you brush.
After the pins are out, separate the hair gently with fingers first. Then brush or comb from the ends upward. That keeps you from dragging a knot into the middle of the shaft and making a simple takedown feel like a fight. If the hair feels dry from hairspray, a drop of lightweight oil on the ends can help, but keep it away from the roots or the next French Twist will have a harder time holding.
If you wear the style often, let your hair rest between tight versions. A looser twist one day, a side part the next, and a lower-manipulation style after that is a better rhythm than pulling the same area taut every time. The hairline likes a break. So does the scalp.
French Twist Mistakes That Cause Slipping, Bulging, or Collapse
The first mistake is starting with hair that is too slick. Freshly washed hair can work, but only if you rough it up first. Without texture, the pins slide and the seam never settles. The fix is plain: dry shampoo, texturizing spray, or a little mousse before styling, then let the product sit for a minute so it actually does something.
The second mistake is pinning only the outer shell. The twist may look neat in the mirror, then sag the moment you move your head. A pin that doesn’t catch the folded layers and the hair underneath is decorative, not structural. Push the pin deeper through the seam and cross-pin where the fold feels springy.
The third mistake is twisting too low and too loose. That turns the style into a soft bun that reads round instead of vertical. If you want a French Twist silhouette, the seam needs to run upward along the back of the head. Hold the fold closer to the skull and keep the line clean as you pin.
Another common one: too much product. Hairspray, balm, gloss, dry shampoo — all of them help in the right amount and cause trouble in the wrong amount. If the hair feels sticky or heavy before you finish pinning, start over on that section. A light hand is better than a lacquered one.
Layers can cause a fifth problem: little ends escaping near the nape. That does not mean the whole style failed. It means those shorter pieces need their own pins, usually tiny bobby pins tucked under the seam or hidden along the neckline. Ignore them and they keep poking out like they are trying to leave.
Finally, don’t use only bobby pins on thick or heavy hair and expect magic. The style needs support, not just pressure. U-pins, hairpins, and thoughtful placement work better when the hair has weight.
Three French Twist Variations That Change the Whole Mood

Soft Romantic French Twist
Loosen the crown a little, leave a thin face-framing piece on one or both sides, and use flexible spray instead of hard hold. The structure stays the same, but the outline relaxes, which makes this version work nicely for weddings, dinners, or any time you want the style to read gentler.
Sleek French Twist
Brush the surface smooth, create a cleaner part, and pin the seam tightly with as few visible flyaways as you can manage. This version looks sharp against a tailored jacket or a structured neckline. If your hair is fine, a touch of root texturizer underneath can keep the polish from sliding straight out of place.
Braided-Base French Twist
Add a narrow braid along one side, or braid a short section at the crown before folding the rest into the twist. The braid gives the style more grip and adds a little detail that breaks up the plain surface. It is a smart choice when the hair is slippery or when you want the twist to feel less formal.
Curly French Twist
Let the natural texture stay visible and avoid flattening the curl pattern into submission. Stretch the roots just enough to get the base under control, then tuck the length into the twist while preserving some shape in the ends and front pieces. This version has more texture and a little less shine, which can be exactly the point.
Additional Tips for Getting More Wear Out of the Style
Grip Boost: If your hair is soft or freshly conditioned, put dry shampoo at the roots before you gather anything. The powder gives the pins something to hold and stops the twist from sliding while you work.
Pin Map: Place pins in a loose zigzag rather than in one straight line. The alternating direction locks the seam more evenly and keeps one weak spot from taking down the whole shape.
Smoothing Trick: Warm a pea-size amount of styling cream between your palms, then press it over the surface instead of raking it through. Pressing keeps the outer layer calm without dragging the twist out of shape.
For Thick Hair: Divide the length into two sections before folding if the bundle feels too heavy for one pass. A smaller fold is easier to control and usually sits closer to the head.
For Fine Hair: Backcomb a narrow strip at the crown, not the whole head. A 2-inch band is often enough to create lift without turning the top into a nest.
Make It Last Longer: Spray the finished twist lightly, then let it dry before you touch the front again. If you start fussing with it while the spray is still wet, you weaken the hold and flatten the lift you just created.
Tools That Belong in the Drawer Before You Start
-
Rat-tail comb: Best for clean parting and for nudging small sections into the seam without disturbing the twist.
-
Boar-bristle brush or smoothing brush: Helps press the outer layer into a cleaner surface before you pin.
-
U-pins: Strong support for the main body of the twist, especially with thick hair or layered hair.
-
Bobby pins: Useful for smaller sections, flyaways, and the edges around the neckline.
-
Flexible-hold hairspray: Sets the finished style without making it stiff or brittle.
-
Dry shampoo or texturizing spray: Gives slippery hair the roughness it needs to stay in place.
-
Mousse or lightweight styling foam: Handy for fine hair or hair that needs extra root body before styling.
-
Two mirrors: A front mirror and a hand mirror make the seam and lower pins easier to check.
-
Small clips: Optional, but useful if you need to keep the front sections out of the way while building the base.
FAQ About the French Twist

How long does my hair need to be for a French Twist?
Shoulder-length hair is usually the practical starting point, and collarbone length tends to feel much easier. Shorter hair can sometimes be pinned into a twist-like shape, but the ends are harder to tuck cleanly and the style often needs more support than it is worth.
Can I do a French Twist on curly or coily hair?
Yes, and you do not have to flatten every bit of texture to make it work. If you want a sleek finish, stretch the hair first; if you prefer to keep the texture visible, build the twist around it and use stronger pins at the seam.
Why does my French Twist keep falling apart?
The usual culprits are slippery hair, shallow pins, or too much weight left unsupported at the seam. Add texture first, pin through the folded layers instead of the surface, and use more pins near the nape where the style feels heaviest.
How many pins do I actually need?
For medium hair, think 6 to 10 pins as a starting point. Thick hair usually needs more support, while fine hair may need fewer but deeper pins. If a pin does not grab the inner fold, it does not count, no matter how pretty it looks.
Can I make it without heat?
Absolutely. In fact, many French Twists hold better without freshly heat-smoothed hair because a little natural grit helps. If your hair is very frizzy or very curly and you want a sleeker surface, use minimal heat only where the outer layer needs calming.
Is the French Twist protective?
It can be low-manipulation for the hours you wear it, especially because the ends are tucked away and not brushing against everything in sight. It is not the same as a full braided protective style, but it does reduce friction when you need a polished updo.
What if I have layers that keep popping out near the nape?
Pin those short pieces separately instead of trying to bully them into the main fold. Tiny bobby pins tucked low and hidden under the seam work better than one oversized fix. If the layers are very short, a softer twist with a few intentional loose pieces may look cleaner than forcing a strict version.
Can I sleep in a French Twist?
It is not the best overnight style if it is pinned tightly. The pins can dig in, and the pressure point at the back of the head can leave the shape bent in the morning. If you need an overnight option, take it down, preserve the smoothness with a loose wrap, and re-twist the next day.
A Style That Still Pulls Its Weight

A French Twist earns its place because it solves a bunch of small problems at once. It clears the neck, keeps the ends tucked, and gives you a shape that can look formal or relaxed depending on how hard you pin and how much softness you leave at the front. That is a useful range for one hairstyle.
The style also rewards practice more than perfection. The first attempt may feel like a fight with your own hair. After that, the pattern gets easier to read: gather, fold, tuck, pin, check, adjust. Once those motions stop feeling separate, the French Twist turns from “special occasion only” into one of those reliable styles you can reach for when you want the hair out of the way and still want to look put together.