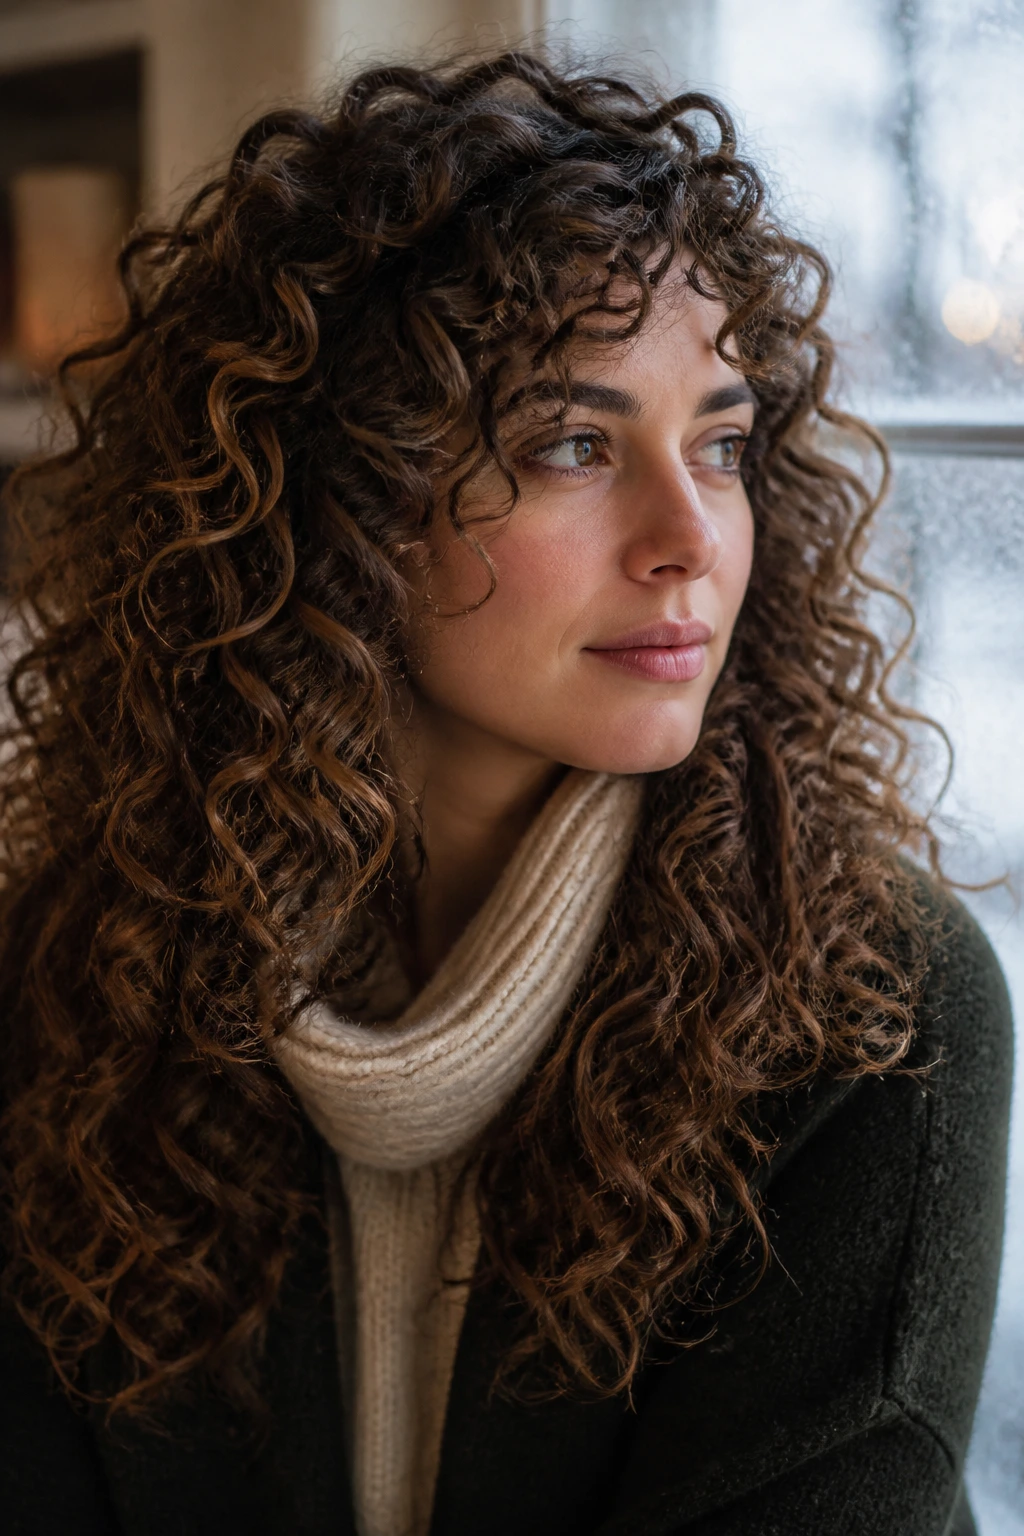
Winter does odd things to curly hair. The air dries out the cuticle, the scarf rubs the nape, and the roots that looked lively yesterday can go a little sleepy by lunch.
That is where winter hairstyles for curly hair with lowlights earn their keep. The deeper strands keep the curl pattern from looking washed out under flat gray light, and they give twists, puffs, and braids a shadow line that makes the whole head look fuller without piling on product.
I care more about shapes that survive a coat collar than about styles that sit still for a photo. A good cold-weather style on curly hair should leave the ends protected, the crown lifted, and the front pieces doing some actual work instead of hanging there by accident.
No heroic blowout required.
Why These Curly Winter Styles Work So Well With Lowlights
- The color does half the styling: Lowlights create dark-and-light movement inside the curl clumps, so even a simple bun looks layered instead of flat.
- Winter light is kinder to depth than to brightness: Gray skies can wash out bright highlights fast, but deeper ribbons keep shape visible when the sun disappears early.
- These styles fight scarf friction: Anything that keeps the nape tucked away or the ends lifted will fray less where wool and cotton rub the most.
- They work with day-two curls: A lot of these looks actually improve when the curls have a little grit, since slick hair can make clips slide.
- They do not demand perfection: If one side sits a little higher than the other, the lowlights still read as intentional, which is a nice break from fighting every stray curl.
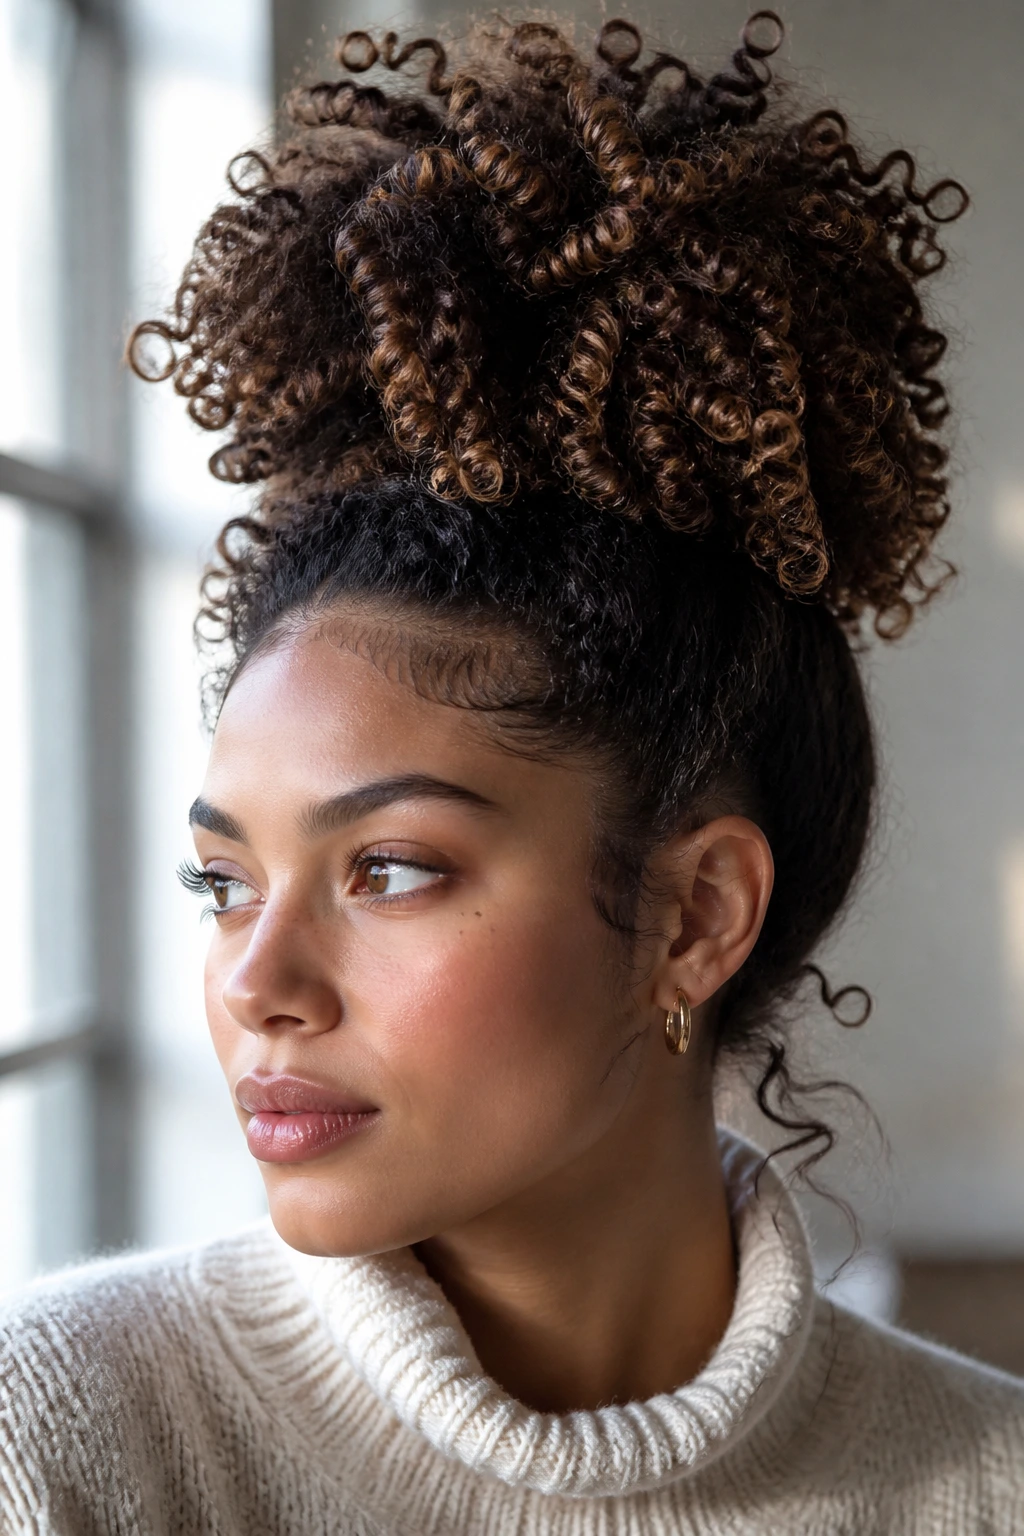
1. High Pineapple Puff
The high pineapple puff is the quickest way to get curly hair off a winter collar without crushing the shape. Pulling the curls up to the crown keeps the ends safe, and the lowlights tucked underneath still peek through when the puff fans out.
Why it works in cold weather
The crown gets the lift, the neck gets relief, and the curl pattern stays readable. That matters when hats flatten the top layer and the wind starts stealing volume from the back.
- Best for: shoulder-length hair and longer curls that still have enough stretch to gather high.
- Time: about 5 minutes once the curls are detangled.
- What lowlights do: they add shadow under the top layer, so the puff looks fuller instead of fuzzy.
- Watch out for: a tight elastic that leaves a dent you can feel all day.
Use a silk scrunchie and leave the final wrap loose. That tiny bit of slack keeps the roots from going painfully flat when you take the puff down later.
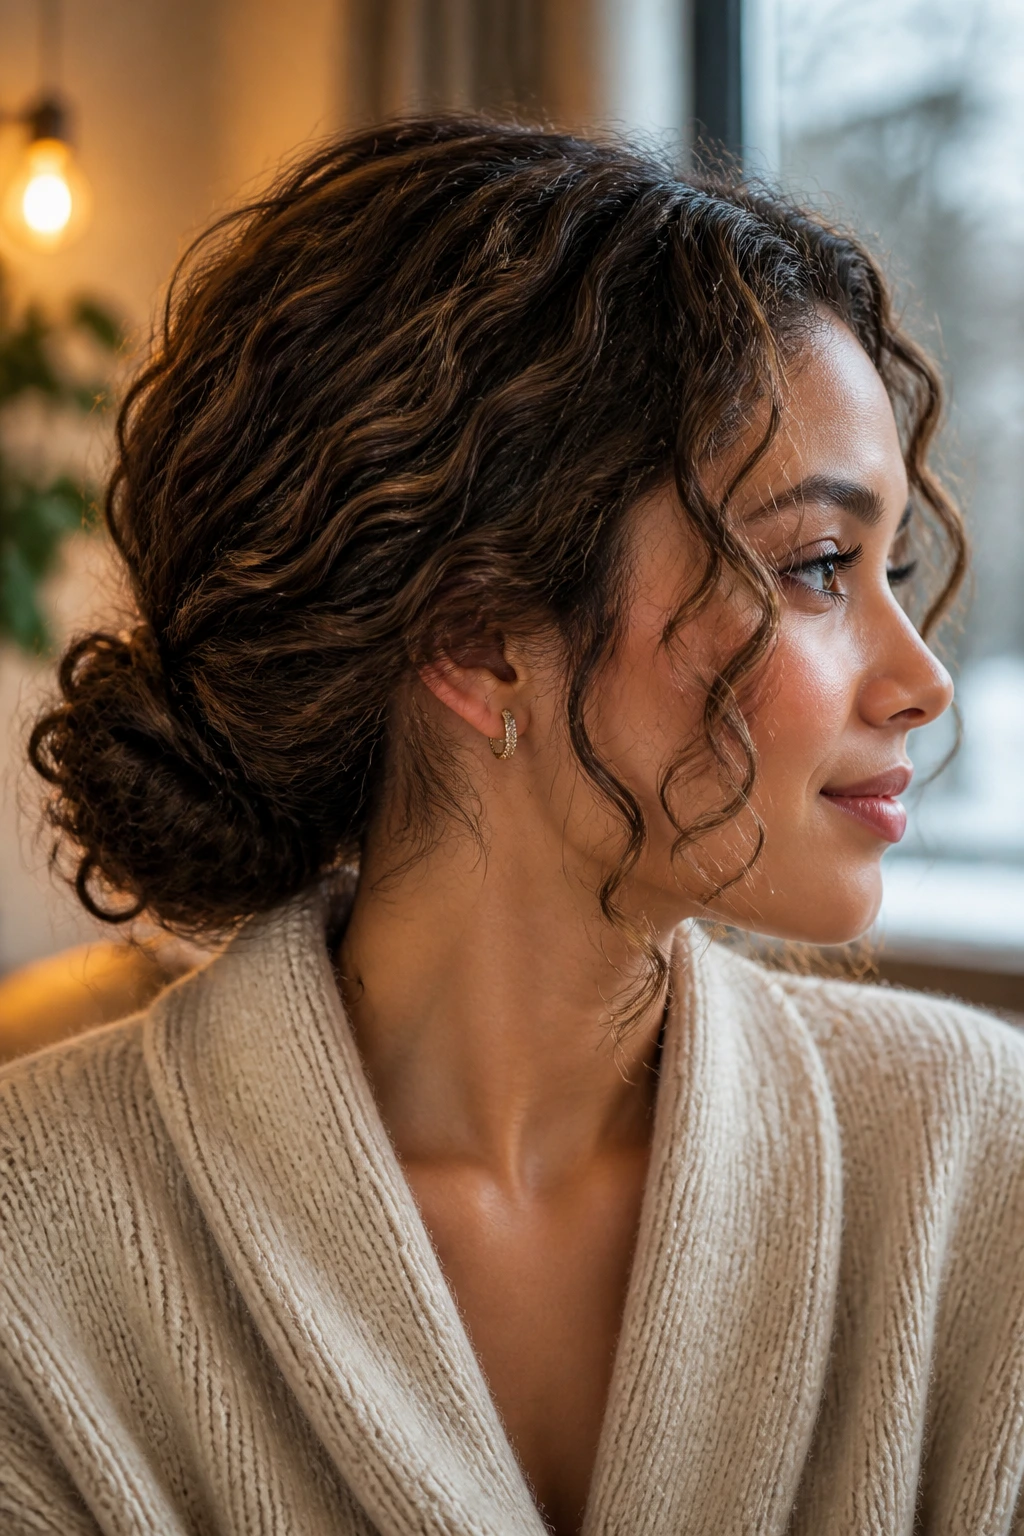
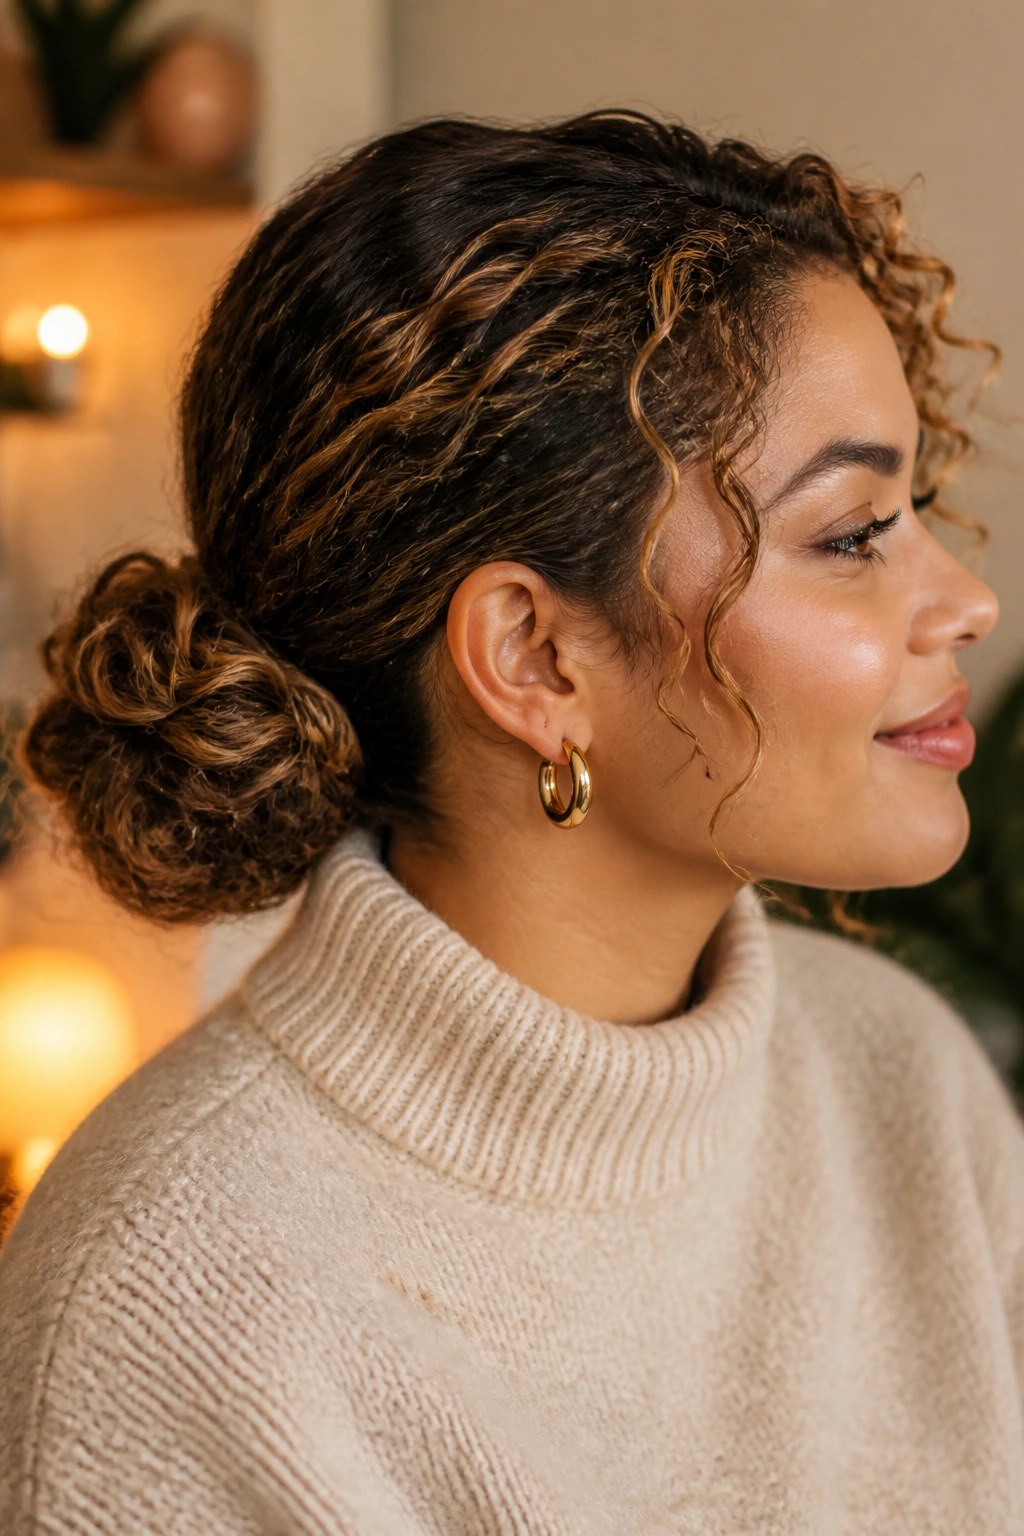
2. Low Twisted Bun with Face-Framing Curls
This is the style I reach for when the weather is rude and I still want the color to look richer, not louder. A low twisted bun sits cleanly at the nape, and the loose face pieces keep the whole thing from looking too serious.
Twist each side from the temples back toward the ears, then gather the rest low and coil it into a soft bun. The darker ribbons in the lowlights make the bun read as thicker, which is handy if winter air has taken a little spring out of your curls.
A few U-pins hold better than one stubborn elastic, especially on dense hair. Leave two front curls out if you want softness around the cheeks, and keep them hydrated with a pea-sized dab of leave-in so they do not go stringy by noon.
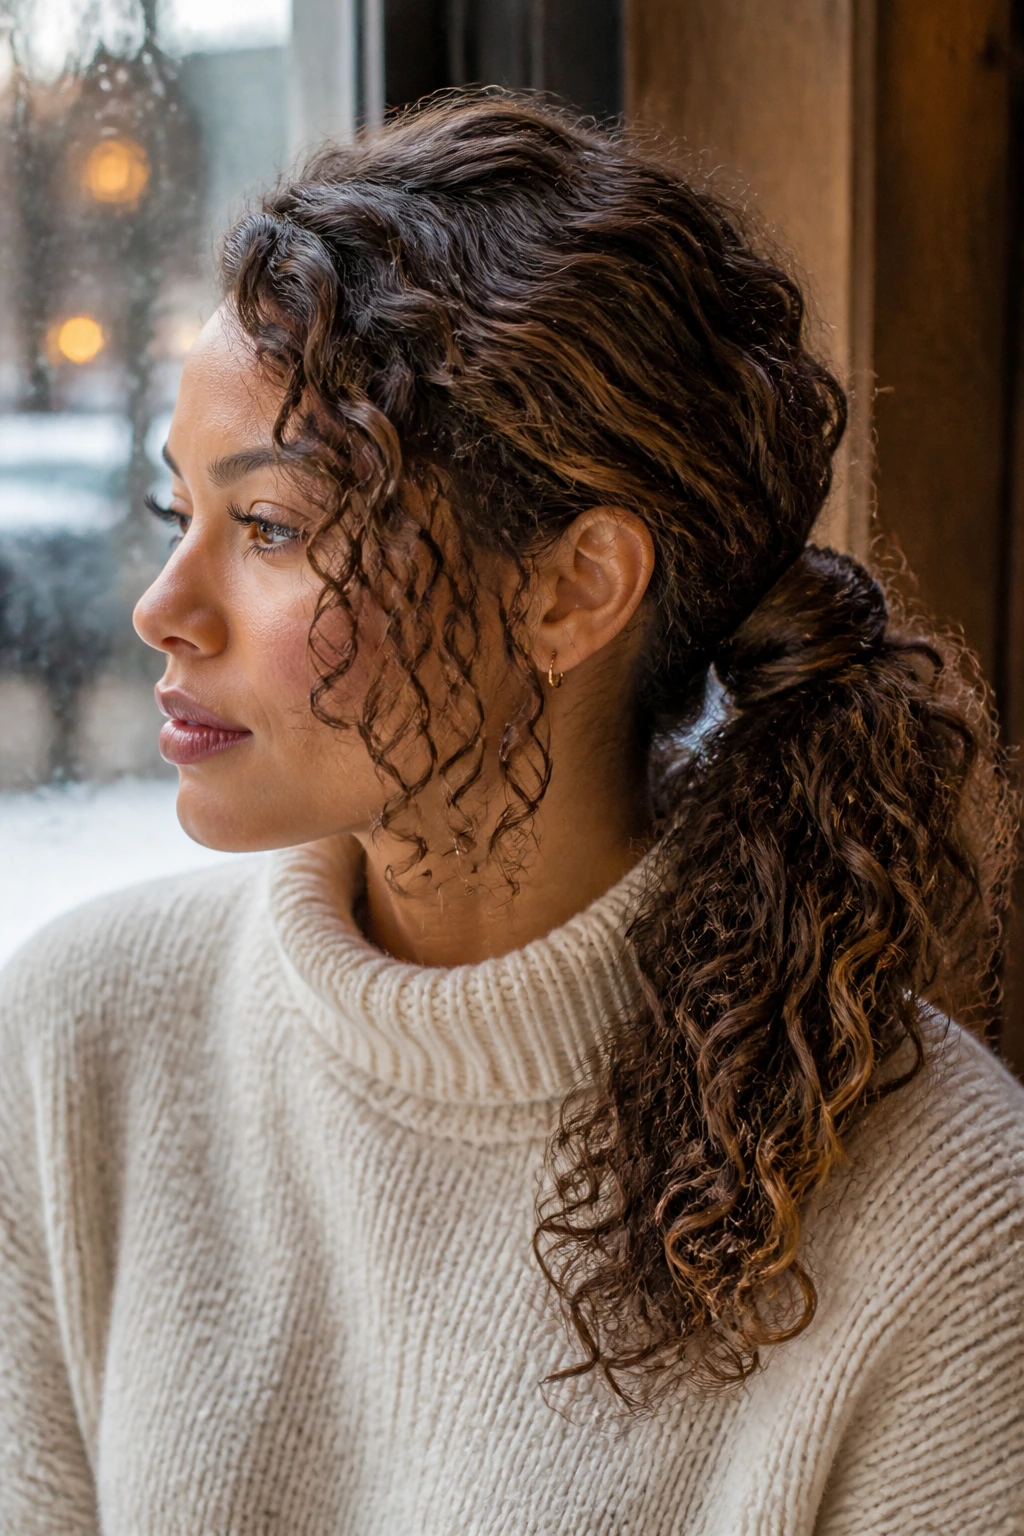
3. Side-Part Curly Ponytail with a Wrapped Base
Why does a side-part ponytail work so well on curly hair with lowlights? Because the asymmetry gives the color movement something to do. A center part can make a ponytail feel severe fast, but a deep side part breaks the shape in a way that suits curls better.
Smooth the roots with a little water and curl cream, then gather the hair low or mid-height depending on how much coat room you need. Wrap a small curl around the elastic, pin it underneath, and let the ponytail hang loose enough that the curl clumps stay intact.
How to wear it with a winter coat
If your collar sits high, keep the ponytail low so it does not get mashed every time you turn your head. If your hair is fine, smooth only the top inch at the scalp; if it is dense, finger-comb the rest and stop there. The point is control, not stiffness.
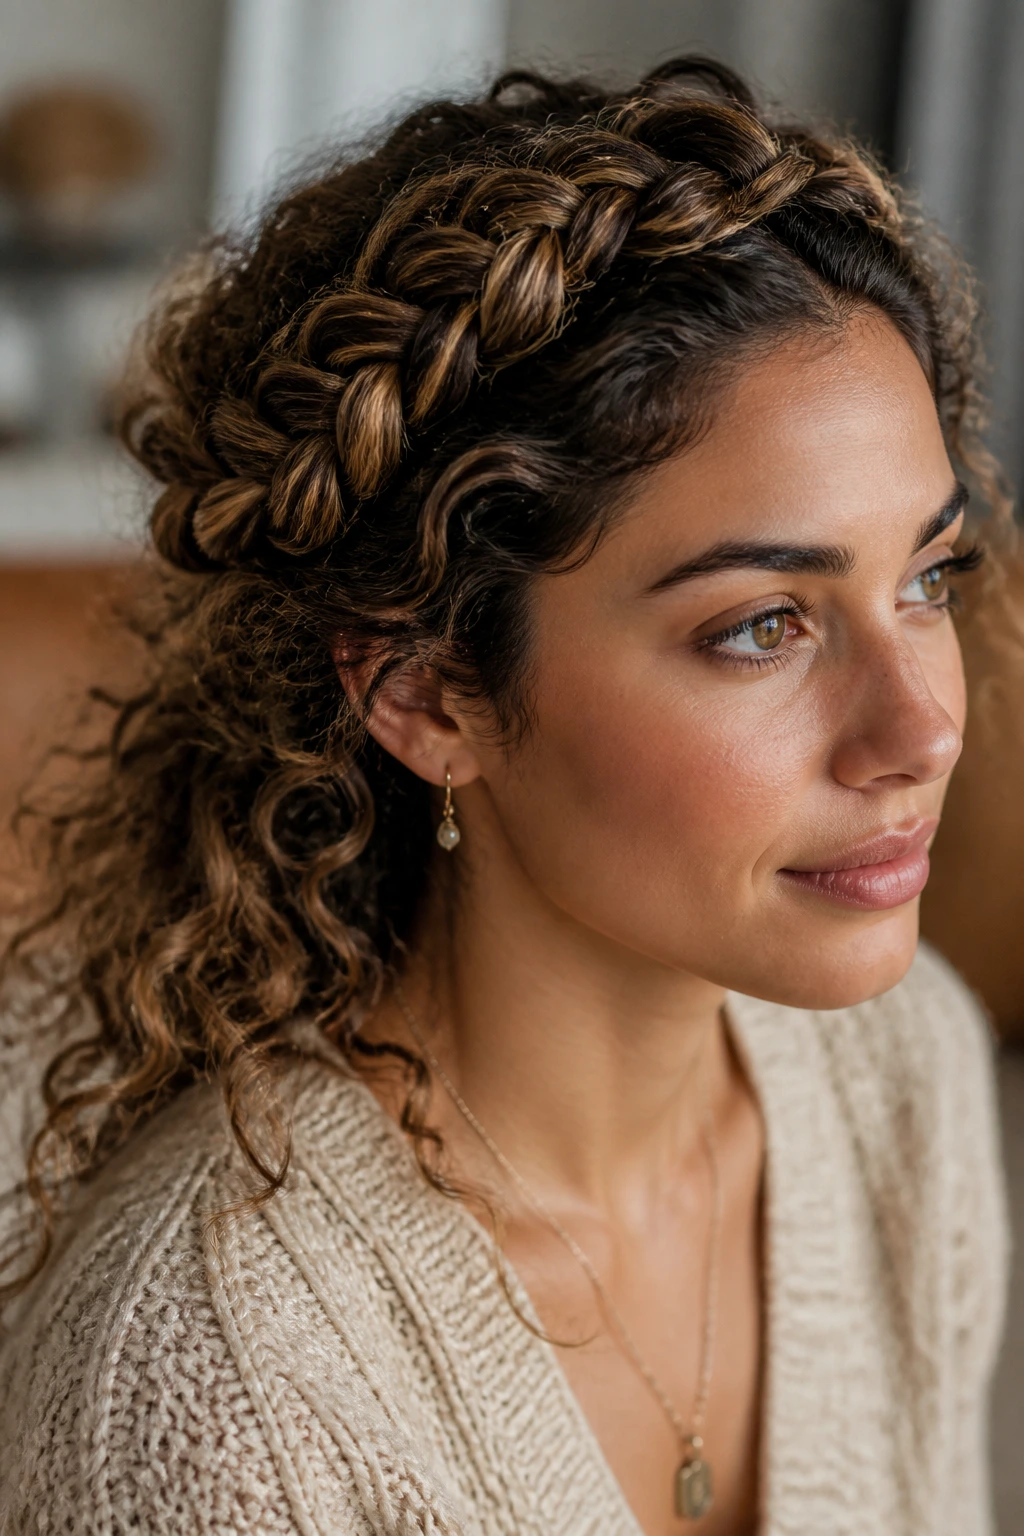
4. Crown Braid into Loose Ends
If you have 20 minutes and a mirror that actually shows the back of your head, this is the style that looks more deliberate than the effort it takes. The braid acts like a frame, and curly ends left loose keep it from turning stiff or costume-like.
Start the braid along the hairline from one side, keep the sections no thicker than a pencil, and stop around the opposite ear. Secure it with a clear elastic, then let the rest of the curls fall where they want. The lowlights show up in the braid like little dark lines between the plaits, which is exactly why this one reads so well in dim winter light.
- Best for: medium to long hair with enough length to keep the braid stable.
- Tension rule: braid snug, not tight. Your scalp should not feel pulled.
- Detail that matters: a little cream on the loose ends keeps them from puffing out.
- Why it lasts: the braid controls the front, while the loose back keeps the style from feeling helmet-like.
A crown braid is one of those styles that looks fussy in theory and surprisingly relaxed in practice. That is a rare combination, so I take it.
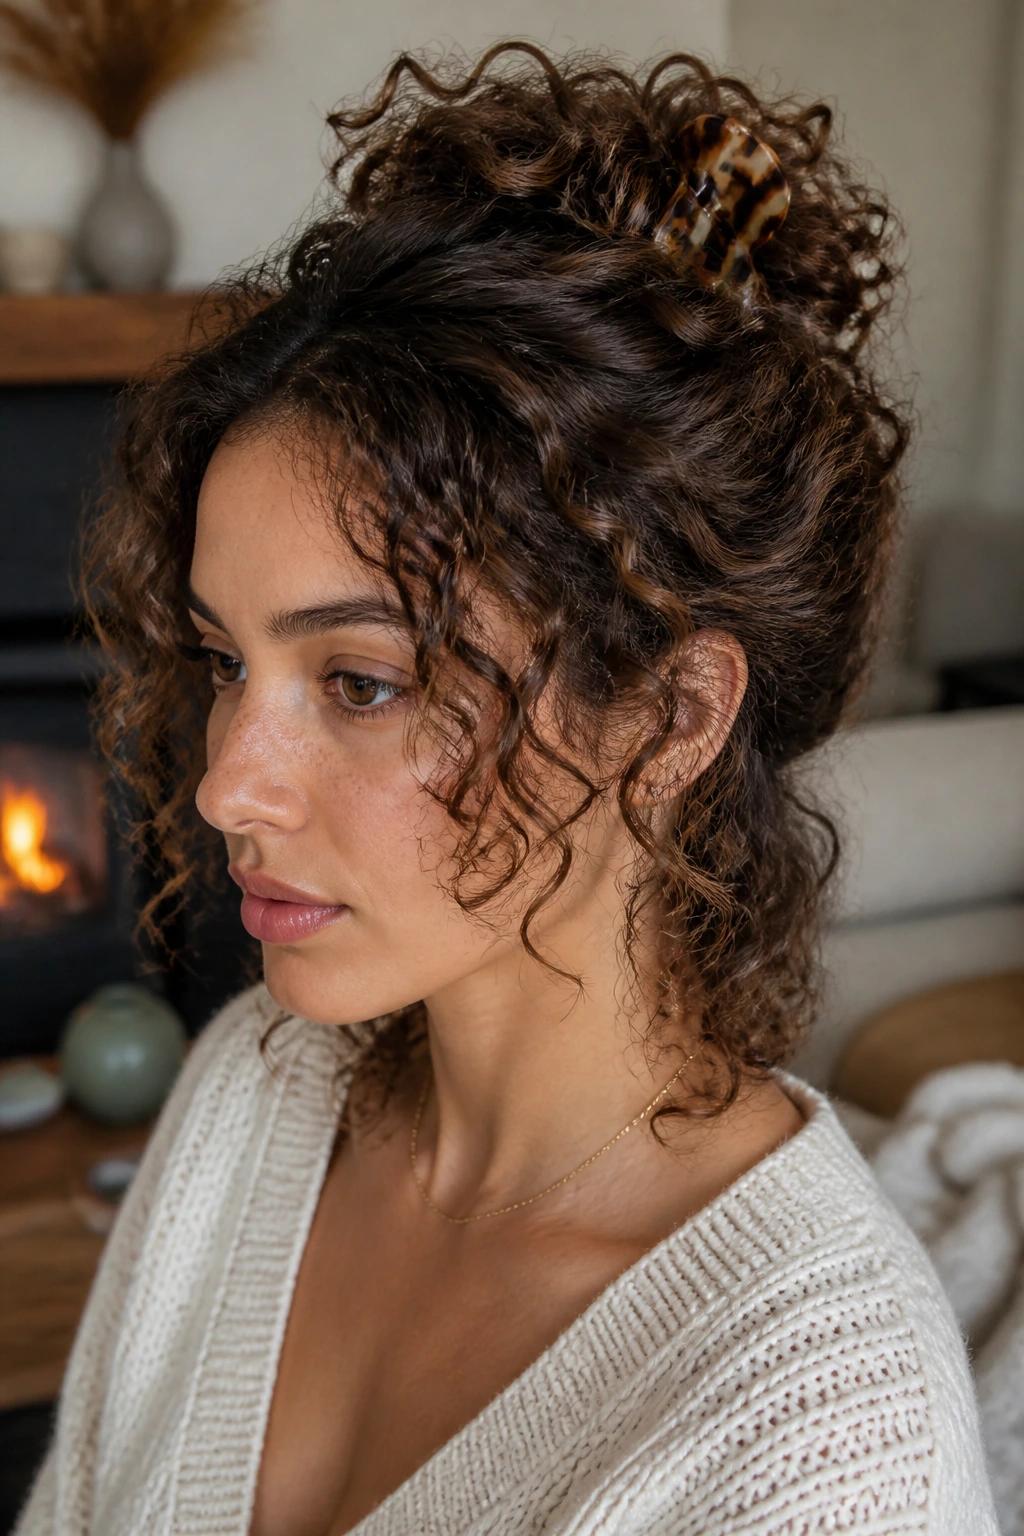
5. Half-Up Claw Clip Twist
A claw clip is the easiest winter answer when the neck section has gone flat from scarves and coat seams. Twist only the top third of the hair, clip it in place, and let the rest fall loose so the lowlights still show through the full length.
Choose a clip with teeth wide enough to catch curly hair without crushing it. A 3-inch clip works for many medium-density heads; dense curls usually need something closer to 4 inches, and tiny decorative clips tend to slide out before lunch.
The trick is to keep the twist loose enough that the curls still spring around the clip instead of being pressed into a hard ridge. If you want extra polish, tuck the ends of the twist under the clip so the hardware disappears from the front.
One minute. Maybe two. That is the appeal.
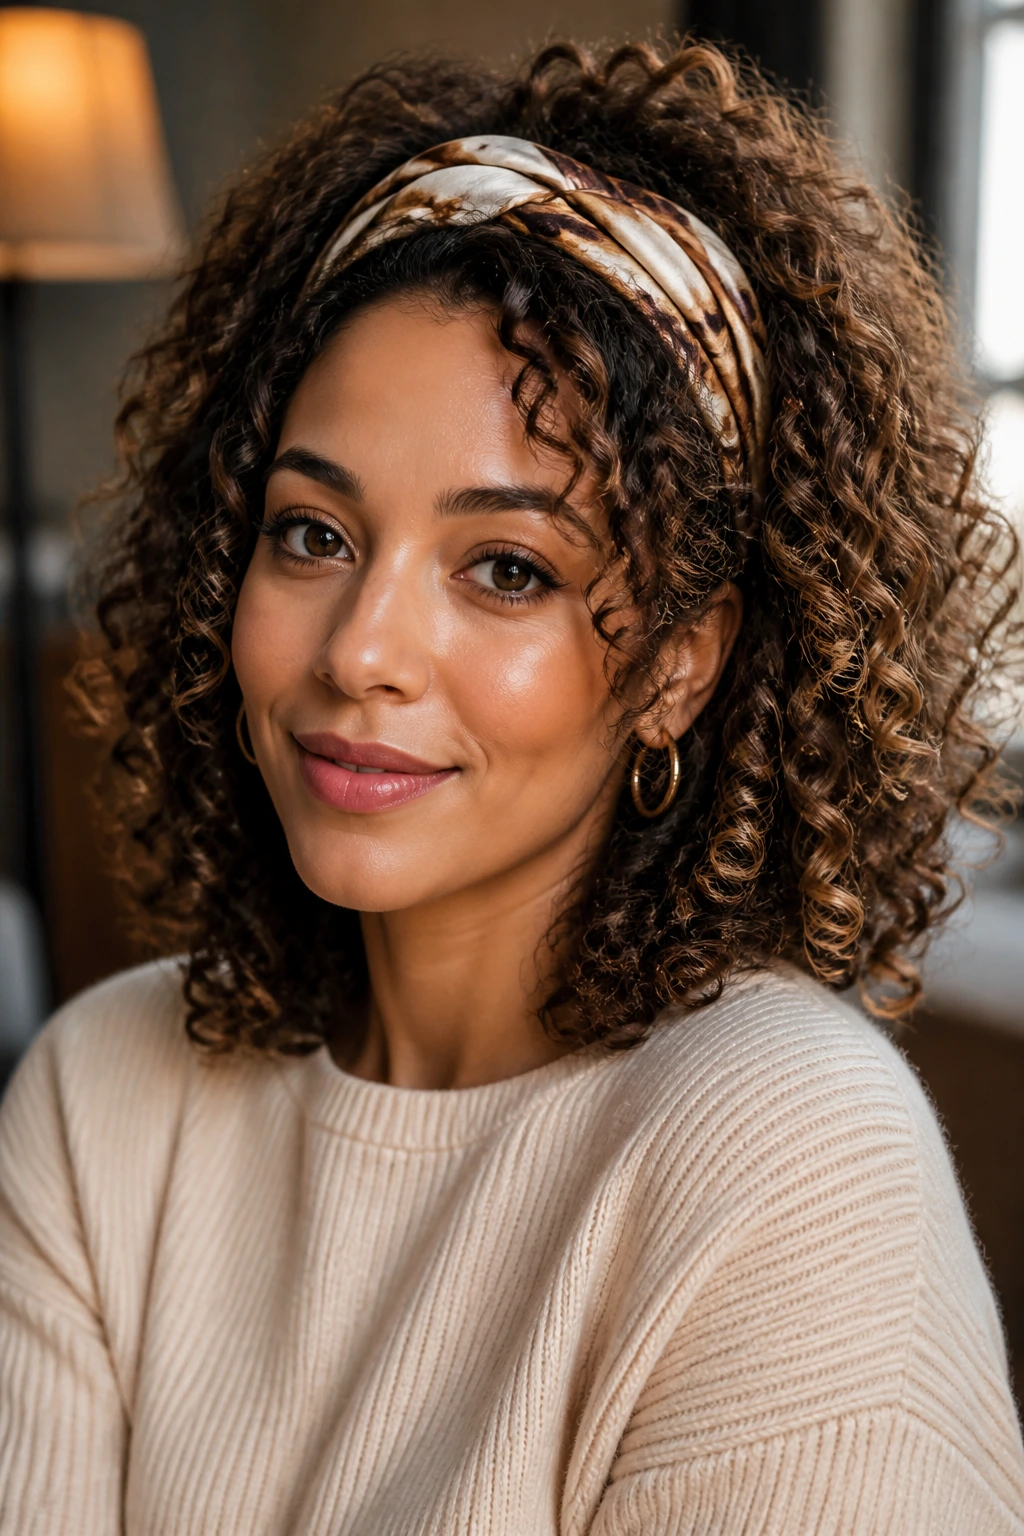
6. Silk-Scarf Headband Tuck
A silk scarf is gentler than a stiff headband, and that matters when your curls are already dealing with dry air. Unlike a rigid band that squashes the temples into a weird flat strip, a soft scarf lets the curl clumps stay round while still keeping the front off your face.
Fold the scarf into a band about 2 to 3 inches wide, place it just behind the hairline, and tuck the ends under the nape or tie them low at the back. If it slips, pin the scarf underneath the back section with two hidden bobby pins.
This one suits wash-and-gos and day-two curls especially well because it gives the lowlights around the face room to show. I like it most with a side part and a little volume at the crown. A center part can work too, but the side part gives the darker strands more shape.
7. Double Puff Space Buns
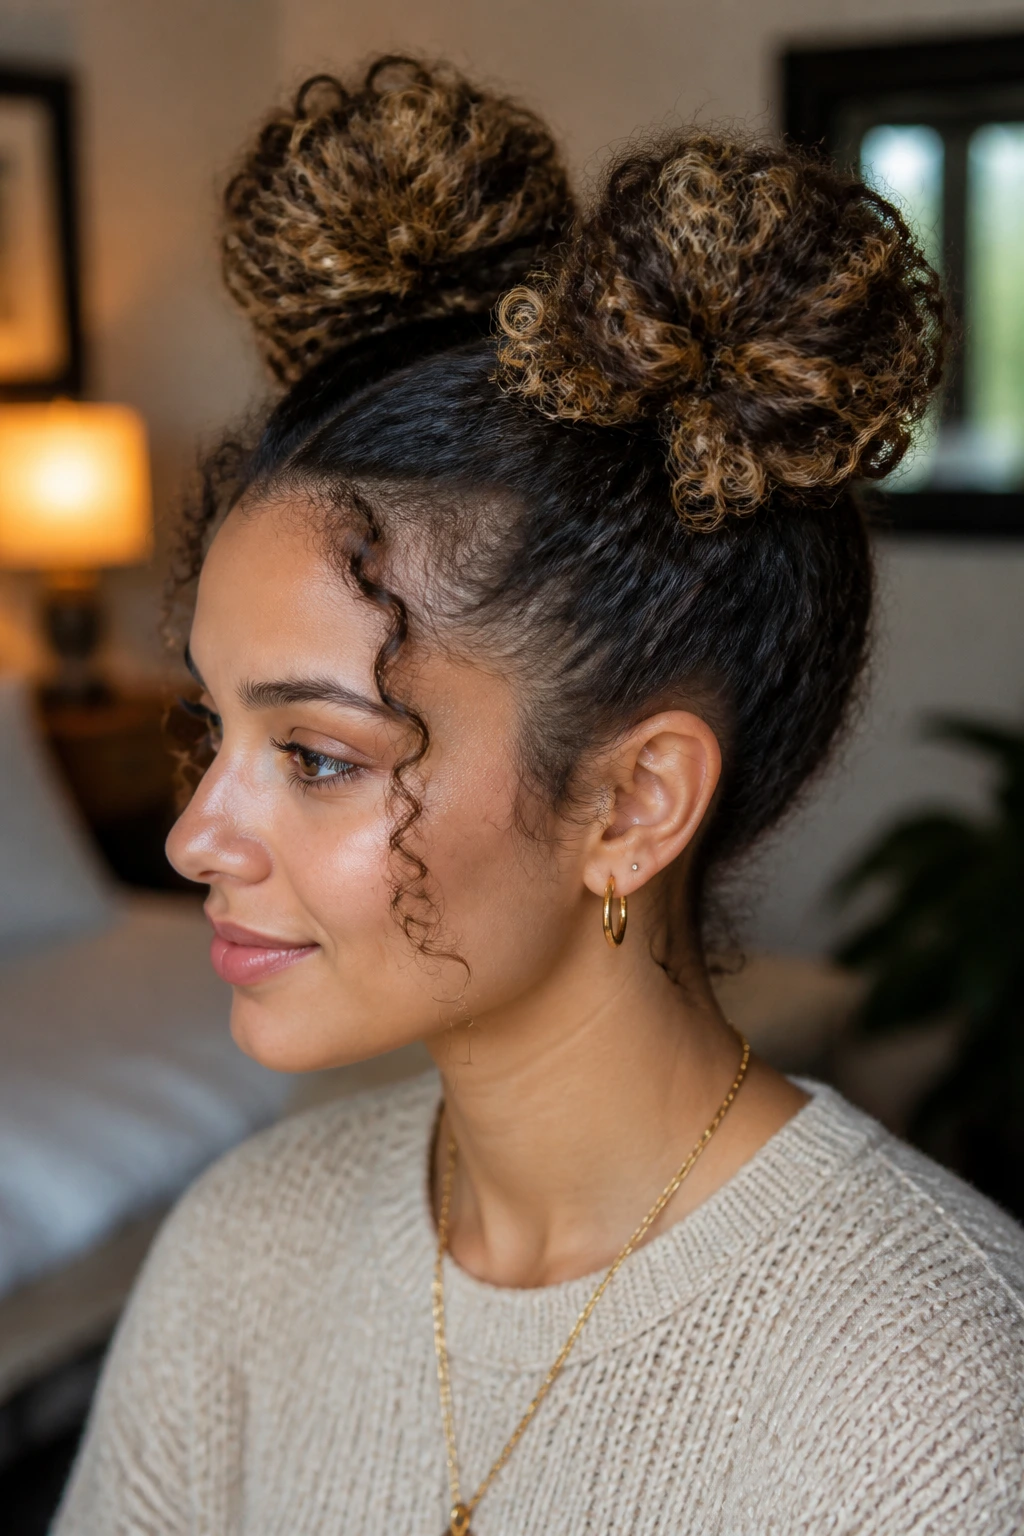
Two puffs beat one when your curls are dense and the winter air keeps flattening the crown by lunch. Split the hair roughly ear to ear, gather each half high, and let the buns sit a little soft so the lowlights can show through the loops.
Use snag-free elastics first, then wrap the lengths into puffs or mini buns depending on how much hair you have. If the buns look too tight, pull them apart slightly with your fingers instead of trying to restart the whole style.
- Best for: thick curls, high shrinkage, and mornings when you want something playful but still practical.
- Parting tip: make the part while the hair is damp; it is easier to keep both sides even.
- Hat note: this one needs room, so pair it with a slouchy beanie rather than a tight cap.
- Why lowlights help: the dark strands keep the puffs from looking like two separate cotton balls.
The style does have a little attitude. That is part of the charm.
8. Rope-Twist Half-Up Half-Down
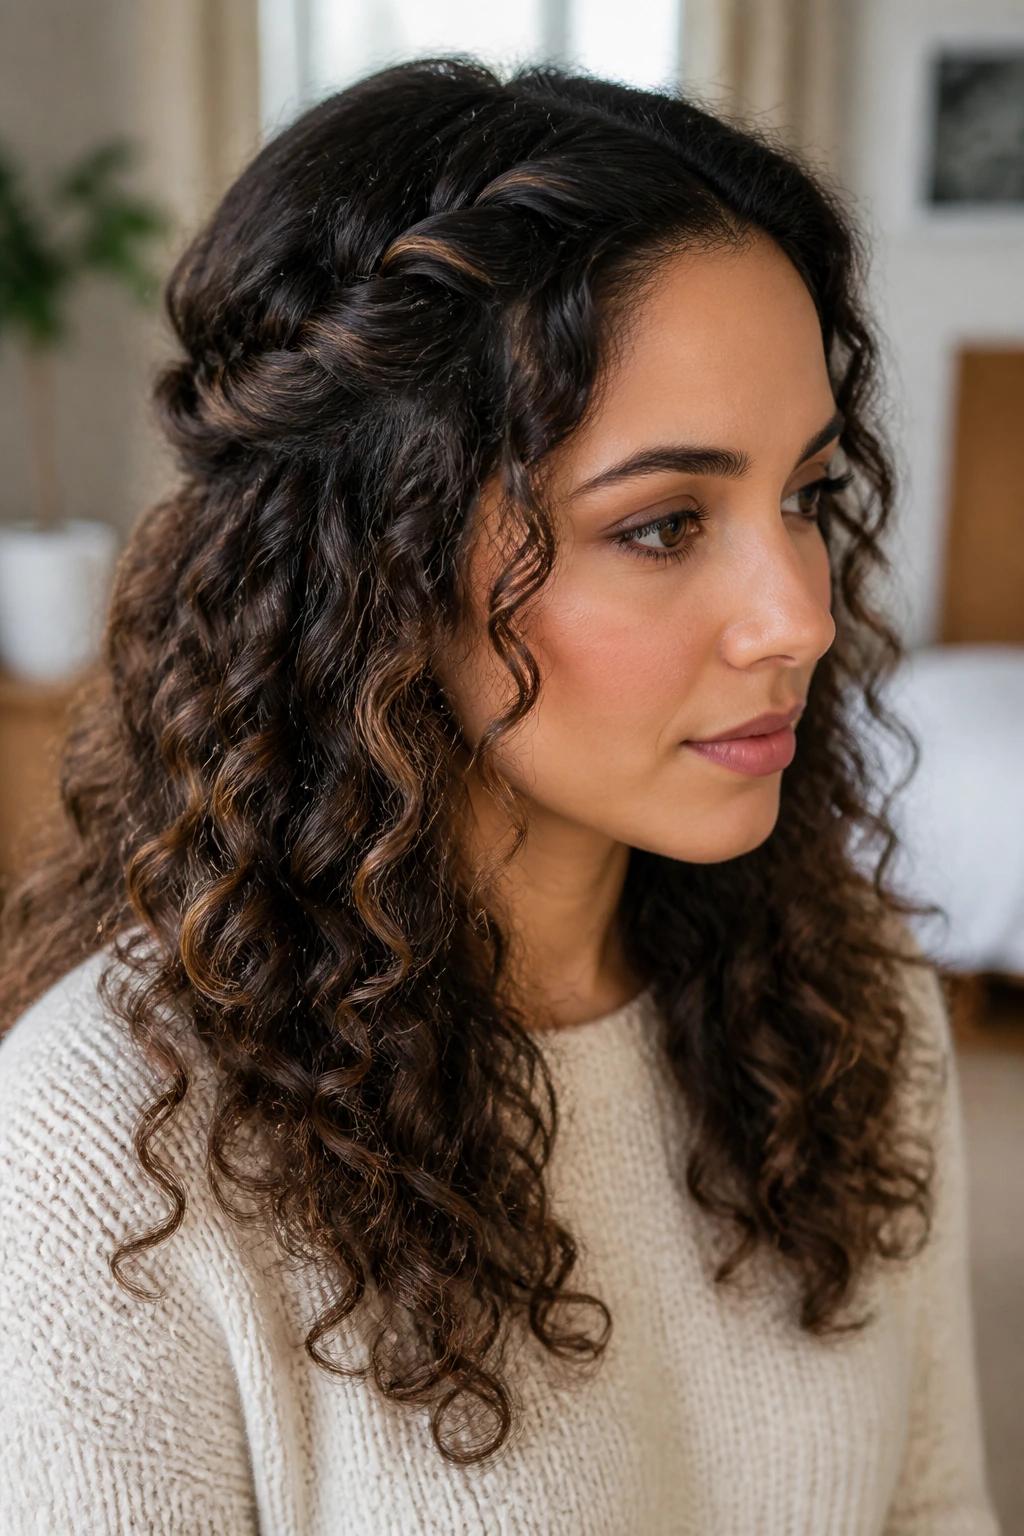
What if you want polish without giving up length? Rope twists are the answer. They are faster than braids, gentler than tight twists, and they give the front of the hair enough structure to survive a scarf without flattening the rest.
Take two front sections, twist each one in the same direction, then wrap them around each other in the opposite direction and pin them at the back. Leave the bottom curls loose. The lowlights show off the twist pattern because the strands catch light and shadow in little bands as the hair moves.
This is a smart choice for hair that frizzes when fully pinned back. You keep the loose length, but the sides stay controlled where winter usually causes the most chaos. A small dab of cream on the section before twisting helps the rope stay smooth all day.
9. Sleek-Root Low Puff
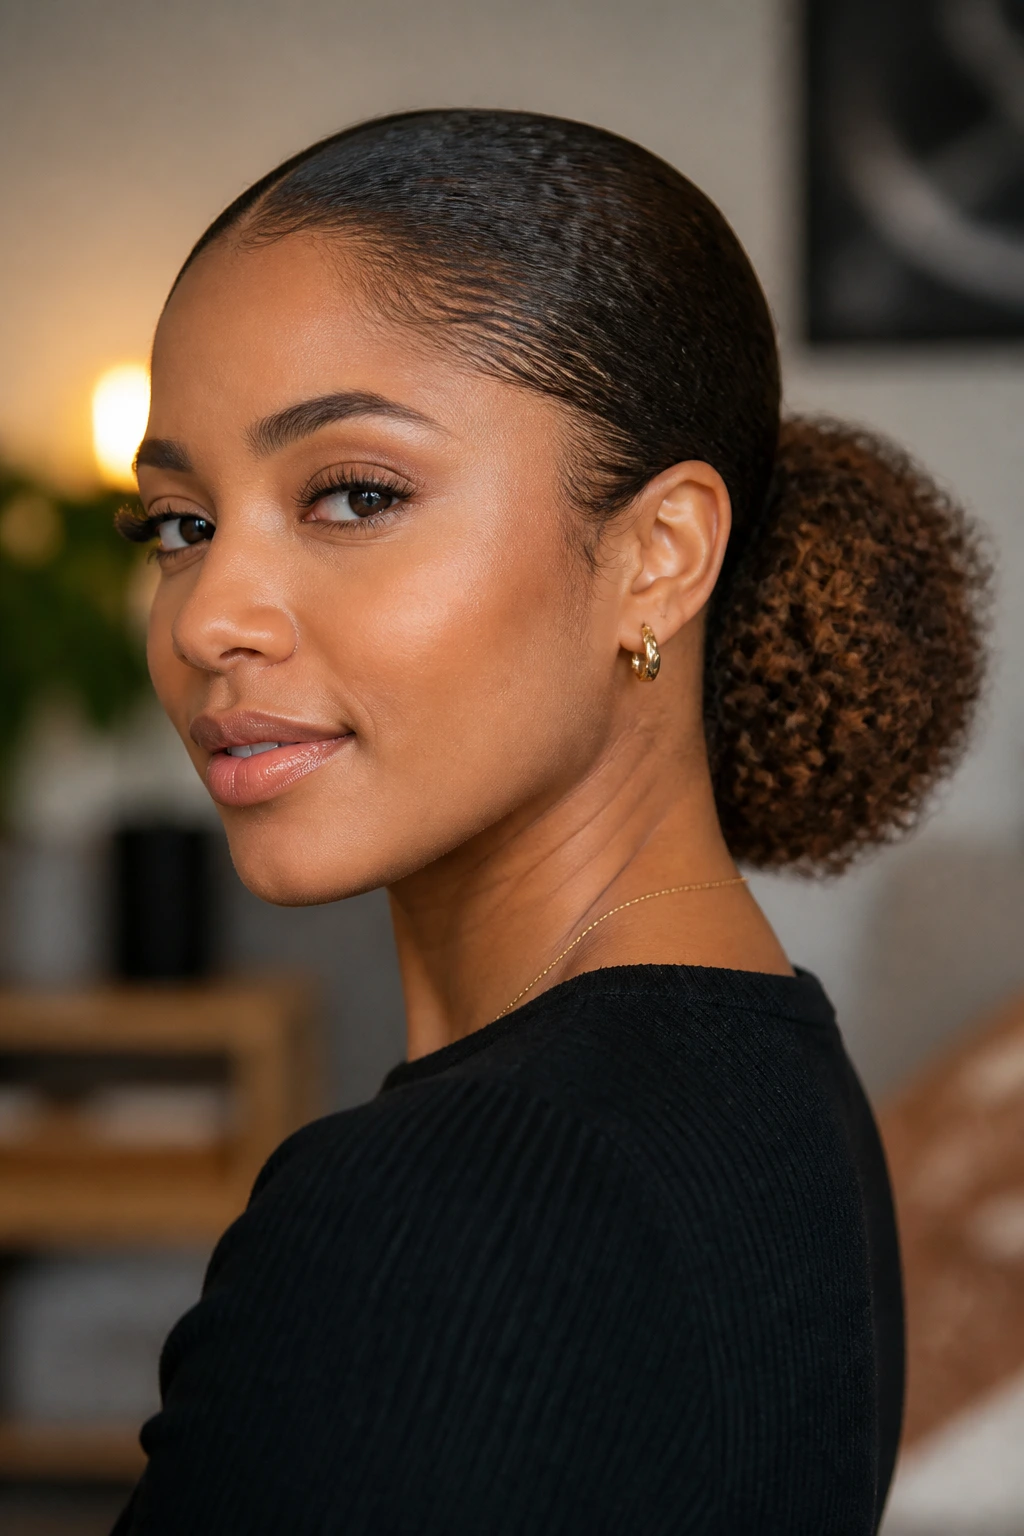
This is the cleanest answer when the roots look fuzzy but the ends still have life. Smooth the top with a little water and gel, gather the hair low, and let the puff sit just above the nape so it does not fight your coat collar.
The lowlights are the reason this style can look fuller than it should. Darker interior strands show through the puff and keep it from reading as one solid shape. That shadow makes a big difference on short winter days when flat light tends to erase texture.
Use an edge brush only at the hairline. Dragging it through the lengths kills the volume you actually want. If your hair is thick, stop after the first smooth layer and let the rest remain airy; if it is fine, a light finger fluff at the crown is enough.
10. Curly Faux Hawk with Pinned Sides
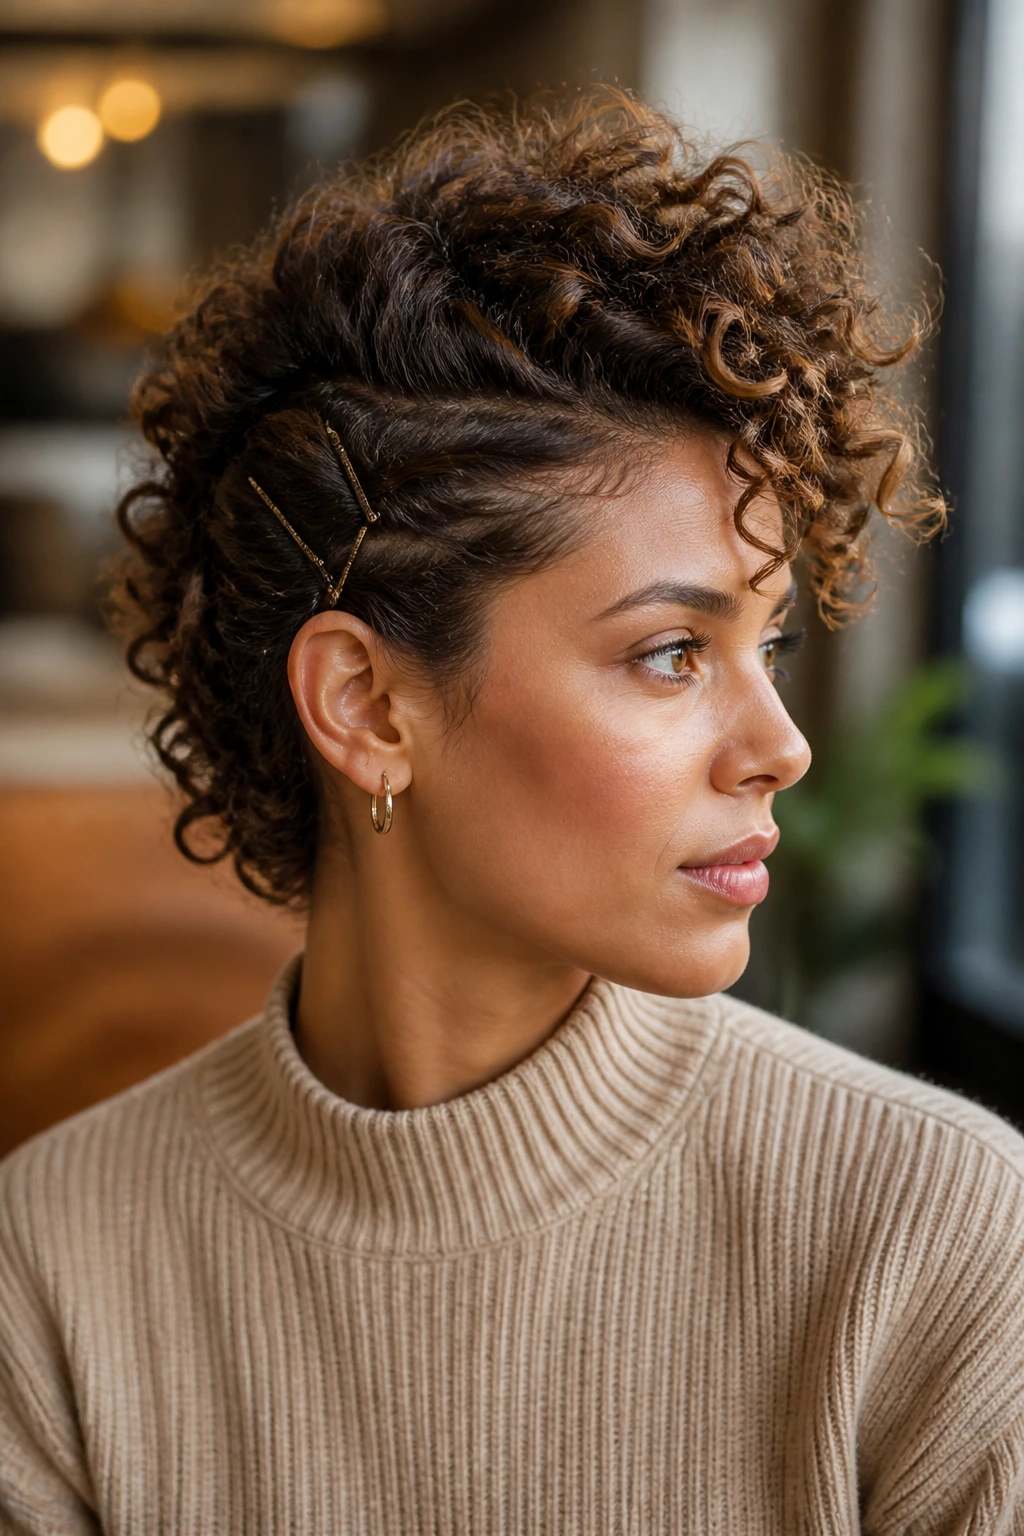
Picture a day when you want height but do not want a full updo. The curly faux hawk gives you that ridge down the center while the sides stay pinned back and out of the way.
Section the sides from temple to ear, smooth them back with two or three bobby pins on each side, and let the center strip keep its curl. The lowlights along that central ridge make the shape read fast, even when the air is flat and the light is dull.
A little lift at the crown helps this one a lot. Pin the sides a half-inch higher than you think you need to; curls settle. They always do. If your hair is very dense, cross two pins in an X instead of using a single straight pin, because straight pins can slide once the curls start moving.
11. Halo Braid with Free Ends
The halo braid is a good answer when wind keeps attacking the front pieces but you still want the back to move. Braid around the perimeter, then leave the rest of the curls free so the style does not harden into one big loop.
Start near one temple, braid along the hairline, and stop at the opposite side around the ear. Secure the braid low and let the remaining length fall. The lowlights around the braid line make the crown read like a framed picture instead of a mass of curls, which is useful when winter light is dull and every shape needs help.
Keep the braid on slightly textured hair, not soaking wet hair. A little grit helps the sections grip. If the braid starts to pull after an hour, it was too tight at the start.
12. Bubble Ponytail on Curly Lengths
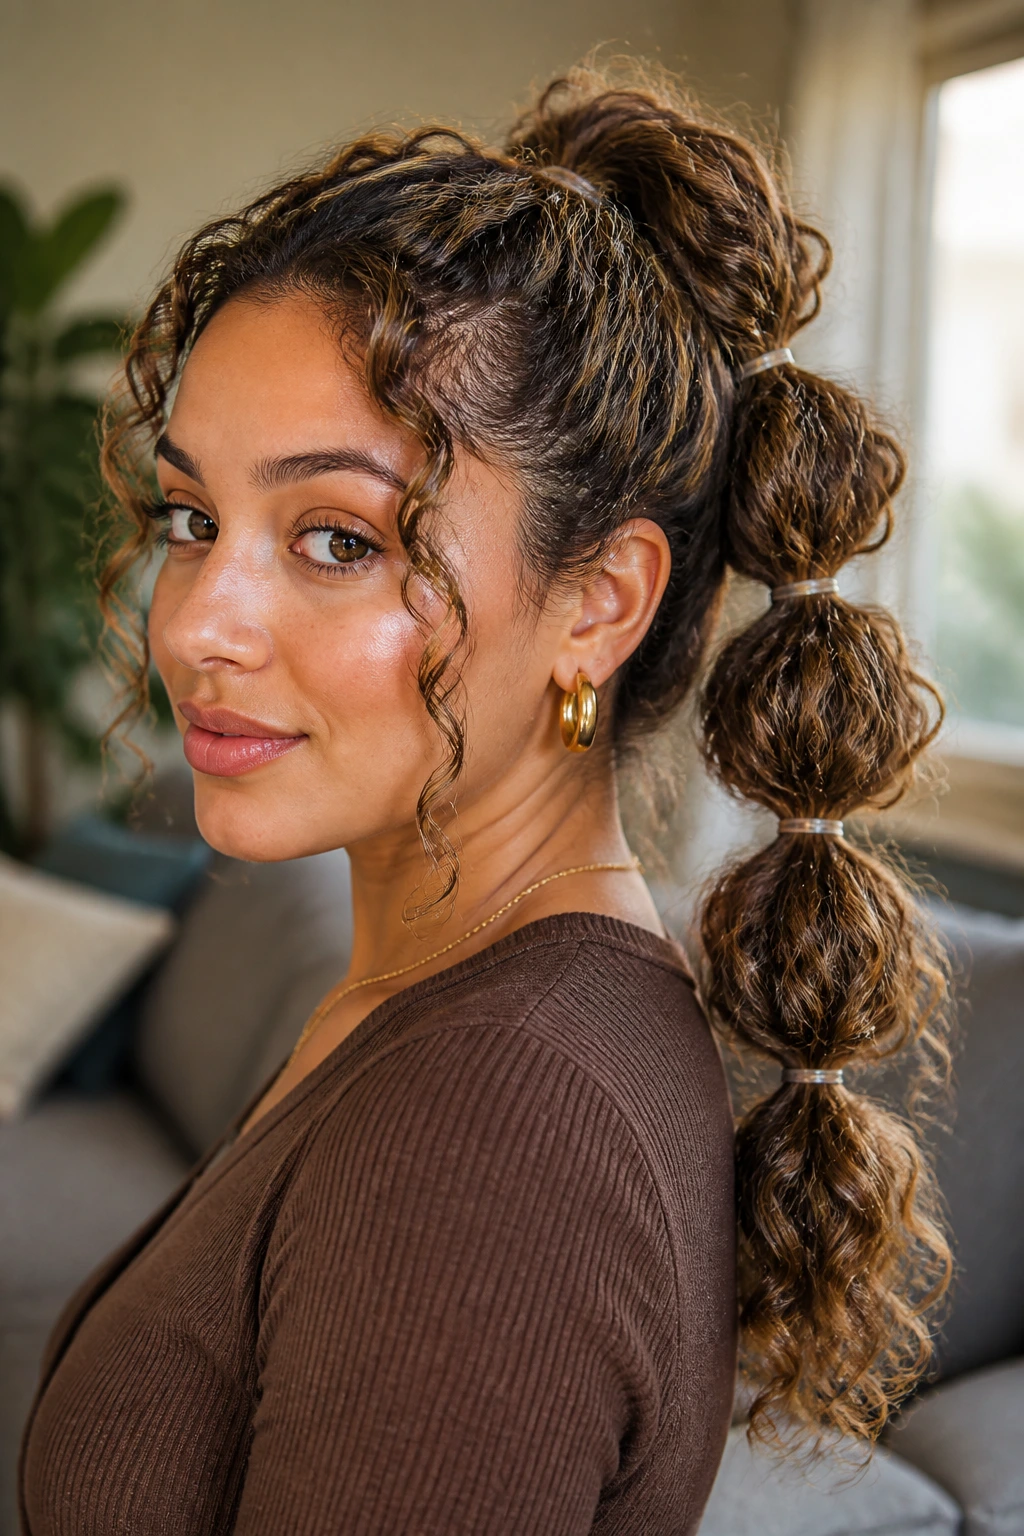
Unlike a plain ponytail, the bubble version breaks the length into sections so the lowlights show in little bands. That matters on curly hair because the color can disappear into the overall volume if everything hangs as one big mass.
Secure the ponytail, then add clear elastics every 3 to 4 inches down the length. Tug each section outward gently to make the bubbles round, but stop before they start looking overstuffed. Curly hair needs less help than straight hair here; too much pulling just frays the clumps.
- Best for: shoulder-length hair and longer.
- Tool choice: clear elastics or tiny snag-free bands, never tight rubber bands.
- Finish: smooth the crown, but leave the bubbles airy.
- Why it works: the spacing keeps the curls from tangling and gives the lowlights little windows to show through.
I like this one when I want length and shape at the same time. It gives both.
13. Side-Swept Clip-Back Style
When one side refuses to cooperate, pin it back and let the better side do the talking. A deep side part plus a clean clip on one side is about as low-effort as winter styling gets, and it works especially well when the lowlights sit around the face.
Sweep the smaller side back behind the ear, secure it with two crossed bobby pins or one flat barrette, and let the bigger side fall forward with the curl pattern intact. The darker strands tucked near the part help the whole shape look intentional instead of rushed.
This style is good for short hair, long hair, and everything in between. It also behaves under a coat because the pinned side stays out of the way. If your curls are fine, rough up the roots a little with your fingertips before pinning so the clip has something to grab.
14. Mini Twist Bun

If your hair is already in twists or a twist-out, this bun takes under a minute. Gather the twists low or mid-height, coil them into a bun, and pin the base so the ends stay tucked rather than poking out in every direction.
The woven texture is the whole point. Lowlights threaded through mini twists create a darker lattice that looks clean even when the air is dry and the curls are trying to fray at the edges. If you are starting from loose curls, twist the front sections into chunky rope pieces first; that keeps the bun from looking too soft.
A few U-pins hold this better than a single elastic, especially if your hair is heavy. Keep the bun compact enough to fit under a hood if you commute. That small detail saves a lot of redoing later.
15. Deep Side Part with One-Side Tuck
Need something even simpler? A deep side part with one side tucked behind the ear can look finished in under five minutes, which is exactly why it belongs in a winter rotation.
Create the part, smooth one side back with a little product, and tuck it behind the ear with a hidden pin or a small decorative clip. Leave the other side full and curly. The lowlights around the exposed cheekbone give the style structure, and the tucked side stays safe from scarf friction.
This is one of the easiest ways to wear curly hair with a turtleneck or a high collar. Nothing gets buried under fabric. Nothing fights the neckline. It just sits there and behaves, which is rare enough to be worth celebrating.
16. Curly Bob with One-Clip Sweep
A bob can go flat fast under winter air, which is why one clip can save the whole cut. Sweep one front section back and secure it with a medium or large clip, leaving the rest of the bob loose and springy.
The lowlights do a lot of visual work here. On shorter curls, they make the shape look carved instead of puffy, especially when the back is tucked behind the ear and the front keeps some height. Use a clip that sits flat, not one of those tiny decorative ones that vanish into the curls.
A bob also benefits from a little crown lift. Pin the front back for 10 minutes while it dries, then remove the clip if you want a softer finish. That tiny setting step helps the cut keep a nice bend instead of sinking straight down.
17. Low Braided Bun
This is the grown-up version of a low bun, and it holds better than a twist if your hair is dense or layered. Braid the ponytail first, then wrap the braid into a bun at the nape and pin it in two places.
The braid keeps flyaways under control, which is useful when winter air starts lifting every short piece near the face. Lowlights run through the braid like stitched lines, so the style looks textured even when it is sitting low and close to the neck.
I especially like this one on long curls that need to survive a full day out. It can take a scarf, a collar, and a few hours of indoor heat without falling apart. If the bun feels too tight, loosen the outer braid loops by a few millimeters rather than taking the whole thing down.
18. Defined Wash-and-Go with Ear Tuck
Sometimes the easiest answer is to leave the curls alone and change where they sit. A defined wash-and-go with one side tucked behind the ear keeps the curl pattern visible, and the lowlights are the thing that keeps it from looking one-note.
Set the curls with gel or mousse, dry them fully, then tuck one side back with a tiny clip or a pin hidden under the top layer. The untouched side stays full, and the tucked side opens the face. That split lets the color breathe.
If your curls tend to soften in dry weather, refresh the outer layer with a mist bottle and scrunch once before heading out. No need to soak the whole head. The point is to keep the clumps intact while letting the darker strands show where the light hits them.
The Tools That Save Time on Cold Mornings
- Wide-tooth comb: It detangles curls without tearing the clumps apart, which matters before any twist, puff, or braid.
- Rat-tail comb: Clean parts make side sweeps, puffs, and half-up styles look sharper.
- Spray bottle: A light mist resets the top layer when winter air makes curls rough.
- Leave-in conditioner: A small amount keeps face-framing pieces from going stringy.
- Curl cream or light gel: Use cream for softness and gel for hold; the two can be layered if your hair likes structure.
- Bobby pins and U-pins: U-pins are better for buns, while bobby pins are better for tucking sides and holding smaller pieces.
- Snag-free elastics: These hold puffs and ponytails without slicing into the curl pattern.
- Claw clip: A 3- to 4-inch clip is the sweet spot for most medium to dense curly hair.
- Satin scrunchie: It reduces dents at the root and is kinder to day-two curls.
- Silk scarf or bonnet: This is the difference between waking up with usable curls and waking up with static.
- Diffuser: Optional, but it helps set the style when you need volume fast.
- Hand mirror: Not glamorous, but absolutely useful when you are checking the back of a bun or braid.
Choosing Lowlights and Cuts That Work With Curls

A good lowlight on curly hair should look like depth, not stripe paint. Thin ribbons usually blend better than chunky panels, especially near the face, where the curl pattern already creates a lot of movement. If the lowlights are too blocky, the style can start reading muddy instead of dimensional.
How deep should the shade be?
One shade deeper than your base gives soft contrast. Two shades deeper creates more obvious shadow, which can be nice if your curls are bright or heavily highlighted. Tight coils tend to hide the color more, so they often need a little more depth than loose waves do.
Why the cut matters as much as the color
A blunt one-length cut can make puffs and buns feel bulky. Face-framing layers and a little shaping around the crown help the style sit closer to the head without turning flat. If your hair lives in clips and buns during winter, a few strategic layers are worth more than extra product.
If you color your hair often, ask for placement that follows where you actually wear your hair. Lowlights near the temples show up in side parts and tucked styles. Lowlights underneath matter more if you love puffs, buns, and braids.
How to Wear These Styles With Coats, Scarves, and Hats
Silhouette: High styles like pineapple puffs, faux hawks, and double buns keep the hair away from heavy collars, while low buns and tucked styles sit neatly under coats and scarves. If you wear a lot of turtlenecks, lower shapes usually feel easier because they do not get caught in the neck line.
Accessories: Satin-lined headbands, matte claw clips, and wide bobby pins are the friendliest choices for curly hair. Tiny shiny clips look cute for about ten minutes, then they start slipping or digging into the curl clumps. A simple tortoiseshell clip often does more work than a fussy one.
Outfit balance: Side parts and one-side tucks pair nicely with earrings or a high neckline because they leave room around the face. Crown braids and halo braids work better when the coat has a big collar, since the braid already creates its own frame. When the outfit is bulky, keep the hair shape clean.
Wear time: If you know you will be indoors and outdoors all day, choose styles that can be fluffed with fingertips. A half-up claw clip twist or a low puff is easier to reset than a tight braid. That small choice saves time later.
Small Styling Moves That Make the Whole Look Last Longer
Root lift: Clip the crown up for 10 minutes after styling, then remove the clip once the shape has cooled. That one move helps the top stay away from the scalp when hats come off and on.
Frizz shield: Smooth a pea-sized amount of serum over the outer layer only. Too much oil at the roots makes lowlights look muddy and kills the curl shape.
Part reset: If one side starts lying flat, flip the part to the other side for a few hours. Curly hair remembers. The lift comes back faster than people expect.
Pin placement: Hide bobby pins under a curl clump instead of sticking them straight through the center of the section. They hold better and show less.
Make-it-yours: A satin ribbon, a plain clip, or a scarf in the same color family as your coat can make the style feel deliberate without adding work.
Overnight Care and Refreshing Without Starting Over
Most of these styles hold for one to three days if you protect them at night. Loose wash-and-go shapes and side-swept looks usually need a refresh sooner, while braided buns, mini twists, and low buns can last longer if your scalp is comfortable and the pins are secure. If a style starts hurting, take it down. There is no prize for sleeping badly.
For loose curls, gather the hair into a pineapple at the very top with a satin scrunchie or wrap it loosely in a silk scarf. For buns and braids, a bonnet or scarf over the full head keeps the nape from fuzzing out against the pillow. A satin pillowcase helps when the bonnet slides off in the middle of the night.
To refresh, mist the outer layer until it feels cool, not soaked. A mix of 1 part leave-in to 4 parts water works well in a spray bottle. Scrunch the curls once or twice, smooth the frizziest pieces with wet fingers, and let the style air dry for 20 to 30 minutes. If you need faster reset, diffuse on low for 5 to 8 minutes.
Clips and pins can usually stay in place overnight if they are comfortable, but elastics left too tight leave dents. If the roots flatten, use your fingertips or a pick to lift only the first half-inch of hair at the crown. That is usually enough.
Variations and Adaptations to Try
Beanie-Friendly Shape: Keep the height low and the sides smooth, then choose a low puff, low bun, or side part that sits under a hat without fighting it. This version works best when you know you will be indoors and outdoors all day. A floppy beanie is kinder than a tight cap.
Short-Curl Adaptation: If your hair is chin-length or just above the shoulders, lean on side-swept clips, one-clip bobs, and tucked headbands. Short curls do not need much shaping; they need room to move. The lowlights should sit close to the face so the color still shows.
High-Definition Wash-Day Look: Style on damp hair with gel or mousse, then diffuse before you pin or tuck anything. This version gives the cleanest ringlets and shows lowlights with more contrast. It takes longer, but the definition holds better in dry air.
Low-Tension Protective Version: Swap tight elastics for claw clips, U-pins, and silk scrunchies. Use braids, buns, and twist styles that let the scalp relax a little. Good for sensitive scalps and for days when you do not want much pulling at the hairline.
Office-Ready Side-Part Edit: Choose a deep side part, tuck one side, and keep the rest polished with a light cream. This keeps the style neat without looking stiff. It is the easiest route when you need the hair to cooperate with a collar and still look pulled together.
Common Mistakes That Flatten Curly Hair in Winter
Pulling the crown too tight: The roots go flat, the scalp gets sore, and the style looks smaller than it should. Leave enough slack that two fingers can slide under the base before you pin or tie it.
Using tiny elastics on dense curls: They dig in, snap the curl clump, and leave dents that show up hours later. Use snag-free elastics, U-pins, or a larger claw clip instead.
Coating the whole head in oil: Heavy oil can make lowlights look muddy and can drag the roots down. Keep the product light and focus it on the outer layer or the dry ends.
Ignoring collar friction: Wool, fleece, and stiff scarf edges fray the nape fast. Choose styles that lift the hair away from that zone or add a satin layer underneath the fabric.
Starting a part on soaking-wet hair and expecting it to stay: The part shifts as the curls dry, then the whole style looks crooked. Set the part, let it dry, and only adjust after the shape has cooled.
Choosing lowlights that are too chunky: Thick color panels can look striped on curly hair. If the placement feels harsh, ask for finer ribbons or a gloss to soften the contrast.
FAQ About Winter Curly Hair and Lowlights
Do lowlights make curly hair look thicker?
Usually, yes. Darker strands create shadow between curl clumps, so the hair reads as fuller even when winter air has stretched the curl pattern a little.
Which style works best if my curls are shoulder length?
A side-part ponytail, half-up claw clip twist, bubble ponytail, or side-swept clip-back style all work well at that length. They keep enough hair down to show the shape without letting the ends rub all day.
Can I wear these styles under a beanie?
Absolutely, as long as the style sits low or stays compact. Low buns, side parts, tucked styles, and braid-based looks are easier under hats than high puffs or space buns.
How do I keep my curls from going flat after I take a hat off?
Flip the part, lift the roots with your fingertips, and mist only the crown if it needs help. A pick at the top can revive volume fast, but do not drag it through the lengths.
What if my claw clip keeps slipping out?
Use a larger clip, gather less hair into the twist, or rough up the roots with a little dry texture before clipping. Dense curls usually need a clip with wider teeth and a deeper jaw.
How often should I refresh lowlights?
If the color is permanent, root maintenance often lands around 8 to 12 weeks, depending on how visible you want the placement. A gloss or demi-permanent refresh can help the tone stay rich between appointments.
Do these styles need heat tools?
No. Most of them work with air-dried curls, a mist bottle, and a few pins or clips. A diffuser helps if you want faster drying or sharper definition, but it is optional.
What is the safest style for a sensitive scalp?
Loose buns, soft puffs, and clip-based styles usually feel better than tight braids or snug elastics. If the roots ache by the end of the day, the style is too tight.
Will dark lowlights look too heavy on fine curls?
Not if the placement is thin and follows the curl pattern. Fine hair usually does better with subtle ribbons near the surface rather than large dark blocks underneath.
Cold-Weather Curl Moves
The best winter curly styles are the ones that work with dry air instead of fighting it. Lowlights help by giving every twist, bun, braid, and side sweep a little depth, so the hair still looks shaped when the light gets weak and the coat collar starts doing its damage.
I like styles that can survive a commute, a scarf, and one bad gust of wind without needing a full reset. That is the real test. Pick one shape that fits your curl pattern, your haircut, and the kind of mornings you actually have, then keep it in rotation until it feels like muscle memory.