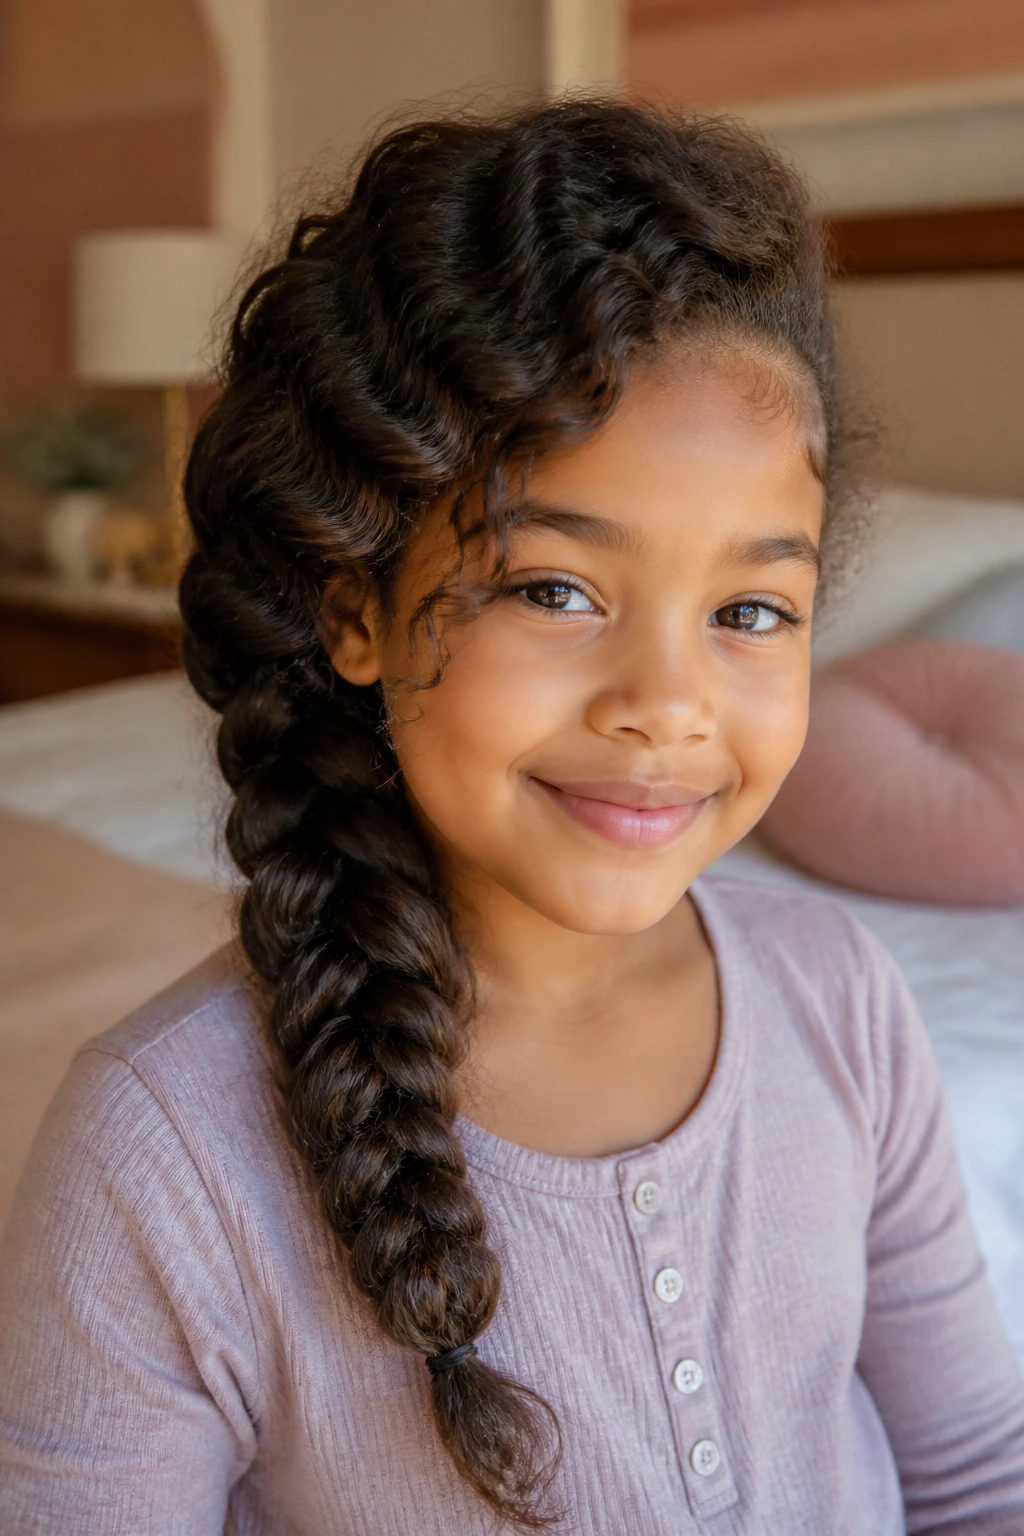
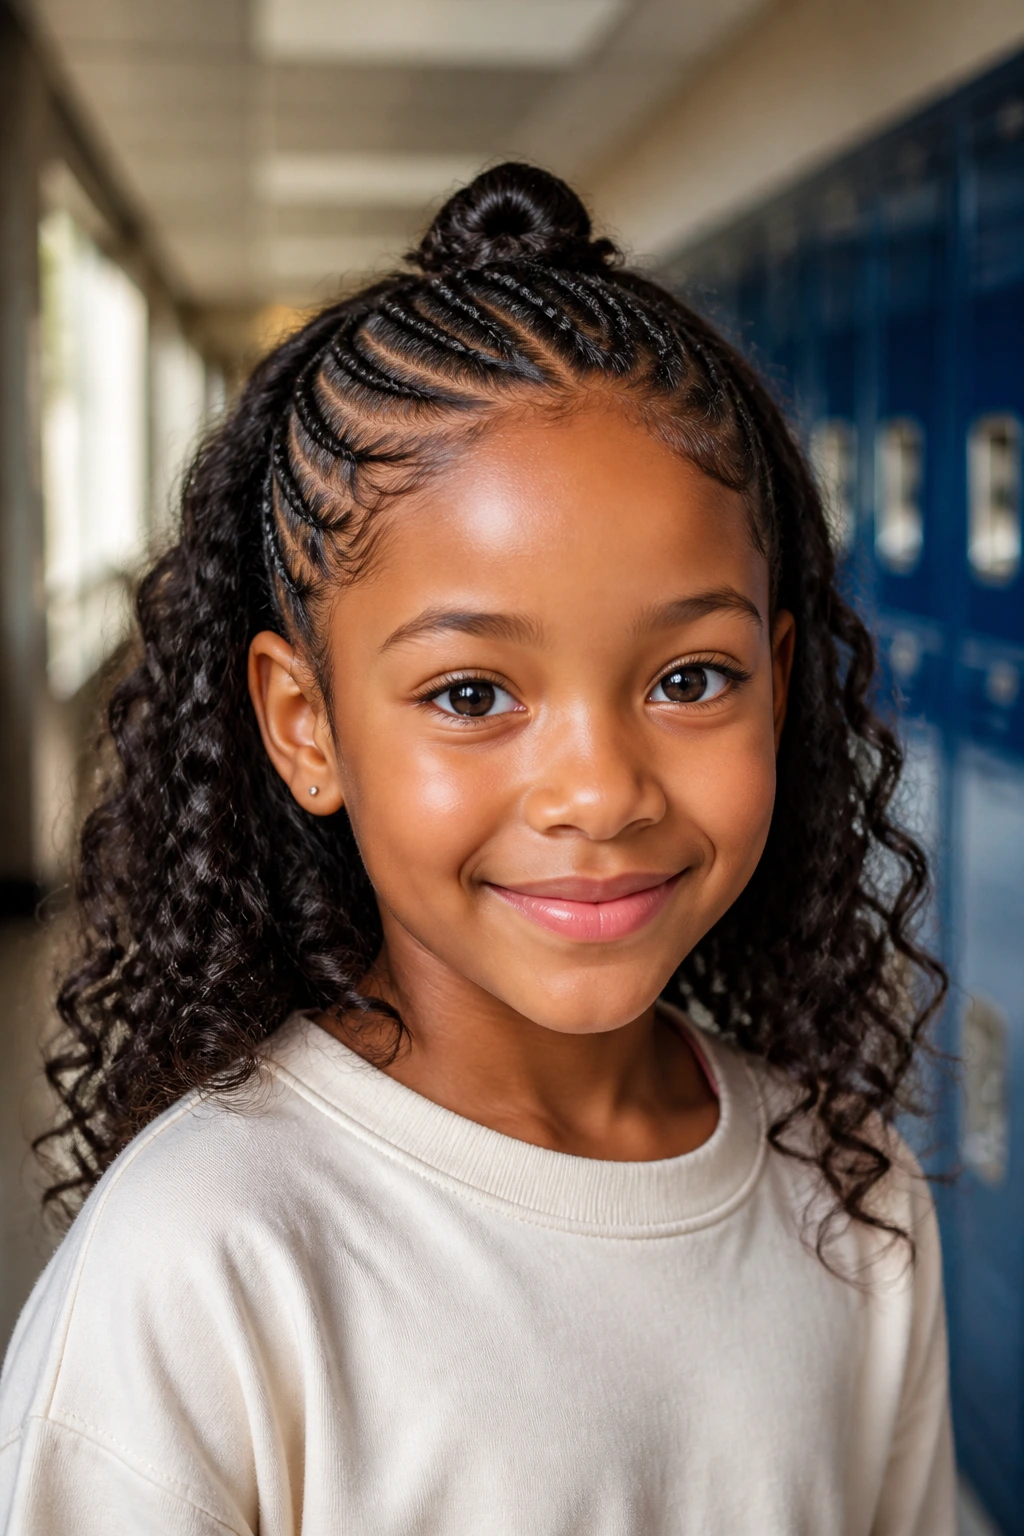
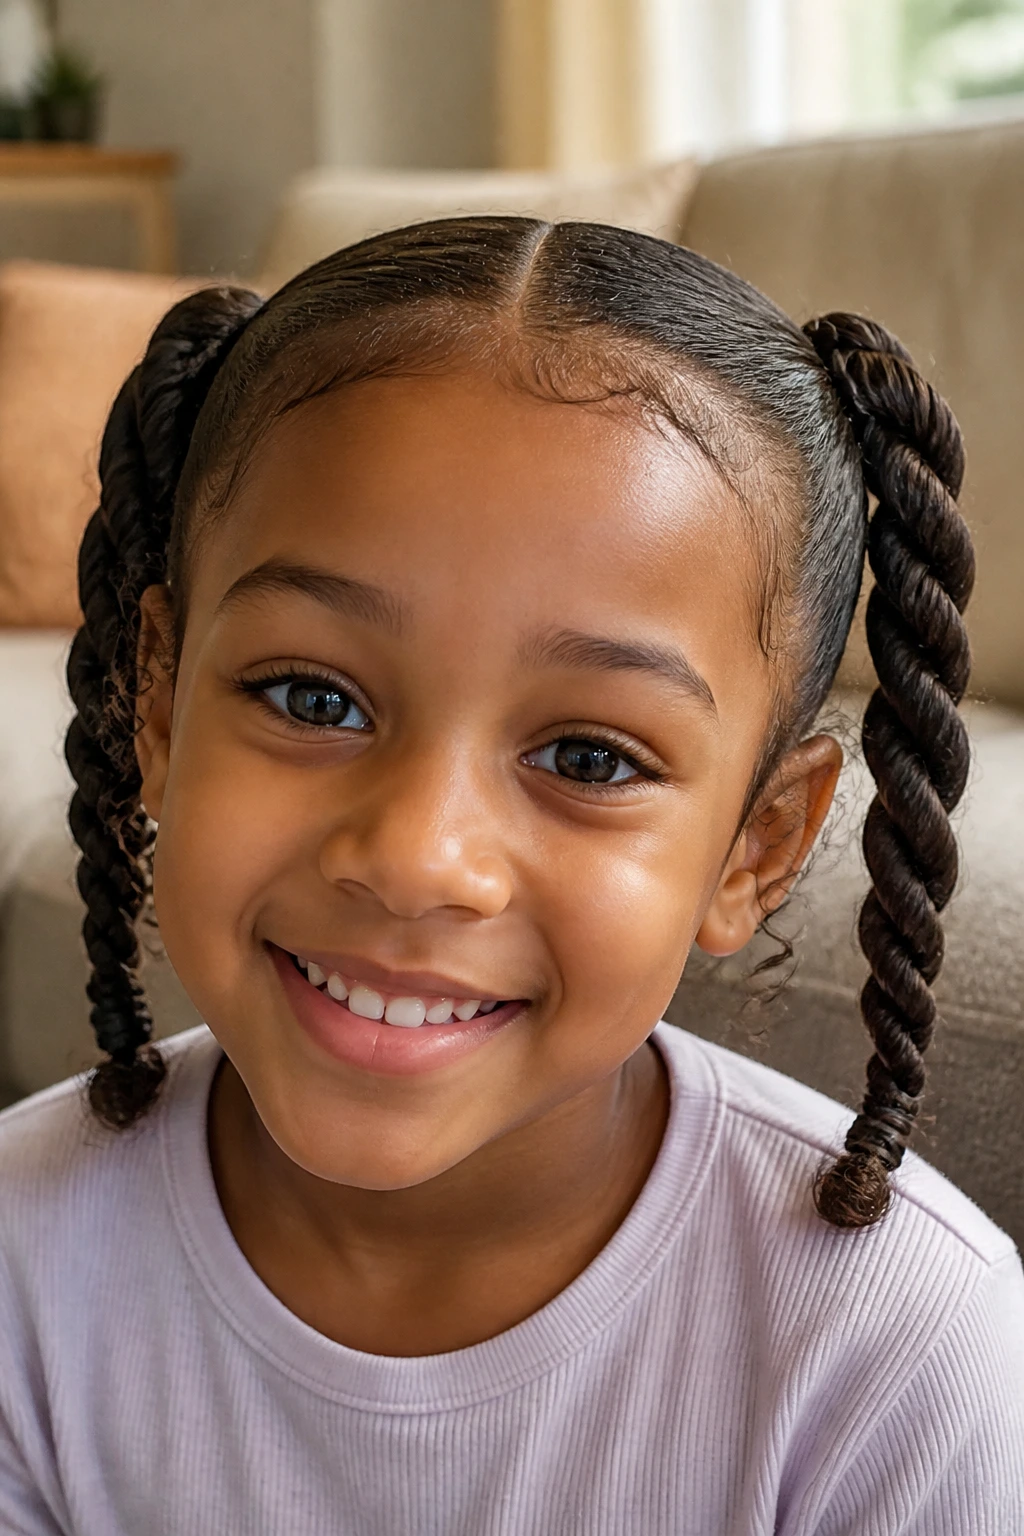
Braids for kids with curly hair work best when you stop fighting the curls and start using them. That bend, that grip, that little bit of natural texture at the root—it all helps a braid stay put longer than it would on slick, straight hair. The trick is not getting every strand to behave like a ribbon. The trick is giving the hair enough slip to part cleanly, then enough hold to keep the braid from puffing apart before lunch.
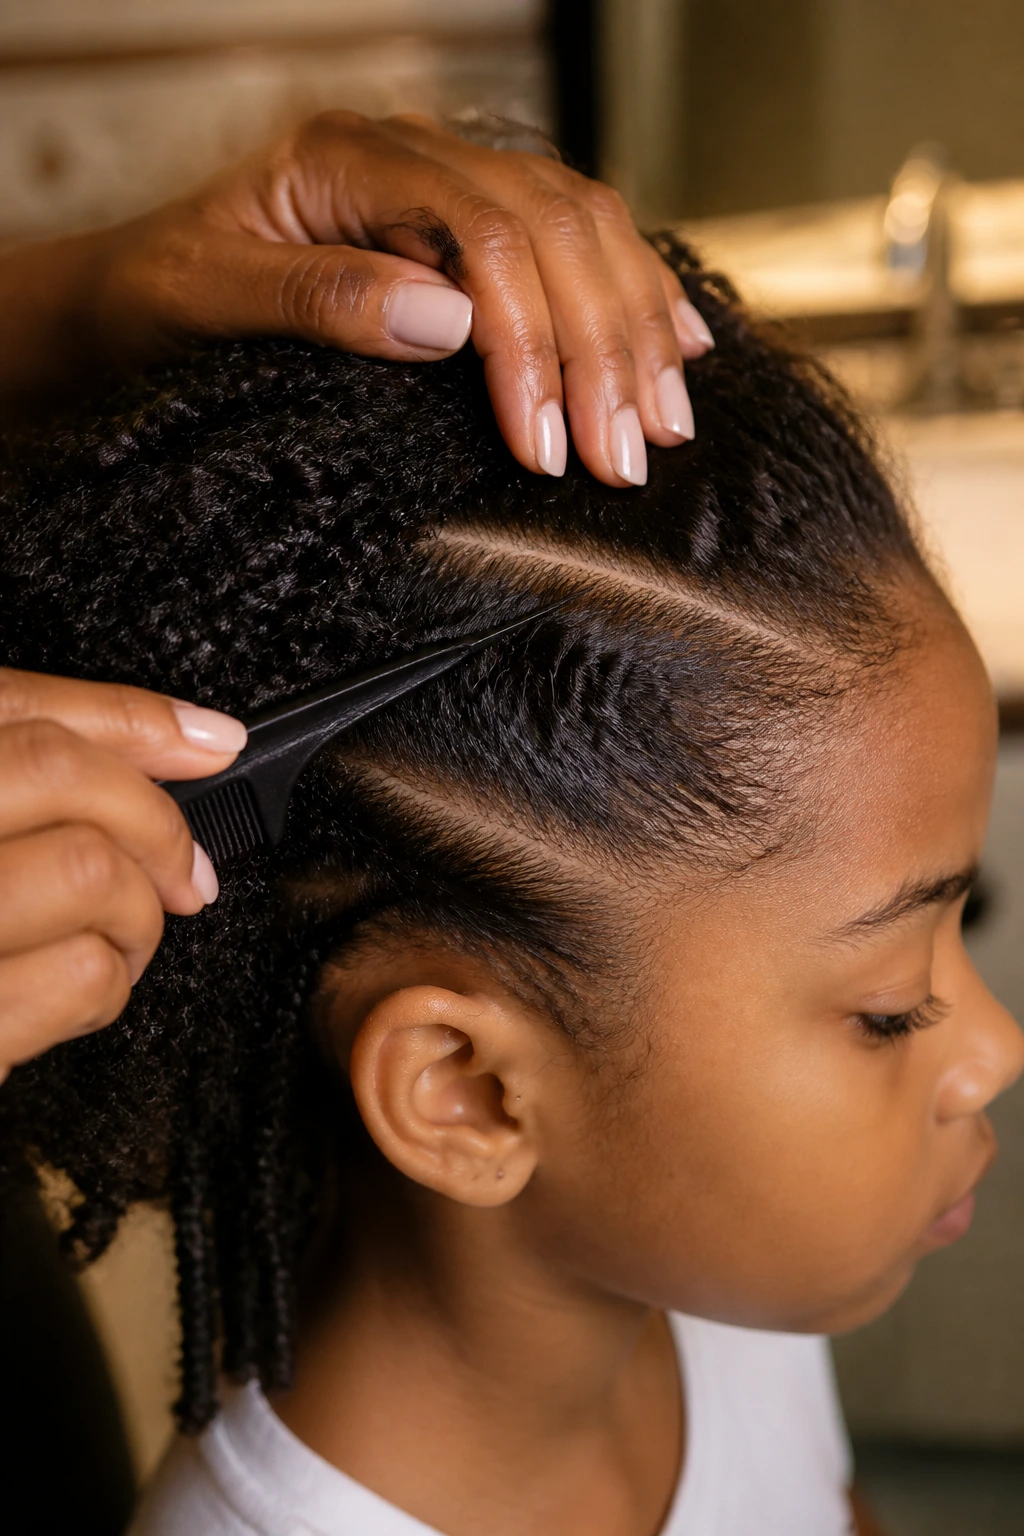
The biggest mistake I see is the same one over and over: people start braiding dry, tangled curls and then blame the hair when the style gets frizzy, lumpy, or painful. Curly hair usually needs a light mist of water, a small amount of leave-in, and a detangling pass from ends to roots before the first section ever gets crossed. Skip that part and you’ll fight every inch. Do it well and even a plain braid can look neat, soft, and sturdy.
There’s also a comfort issue adults tend to ignore. Kids notice pulling fast. They notice when the scalp feels tight behind the ears, when one side of a part line is doing more work than the other, and when a style gets yanked so hard it starts a mood before the day does. The styles below are chosen because they hold without demanding a stiff, scraped-back finish. Some are school-simple. Some are picture-day cute. A few are the kind you can do while a child watches a cartoon and forgets they’re being styled.
Why These Braids Are Worth the Comb Time
-
Less morning battling: A clean braid can keep curls off the face for hours, which means fewer stray pieces in eyes, mouths, and snack time.
-
Curl pattern works in your favor: Curly hair gives braids texture and grip, so the style often holds better once the hair is stretched and detangled.
-
Easy to dress up or down: The same basic braid can look plain with no accessories or polished with beads, bows, clips, or ribbon.
-
Kinder than a hard slick-back: When you keep tension even and the sections small, the style sits flatter without needing the hairline to be pulled tight.
-
Good for active kids: Braids stay neater through recess, playground swings, dance class, and the usual head-shaking chaos that follows.
-
Works on a few different lengths: Some styles need shoulder length or more, but others hold up just fine on shorter curly cuts with a little stretch at the root.
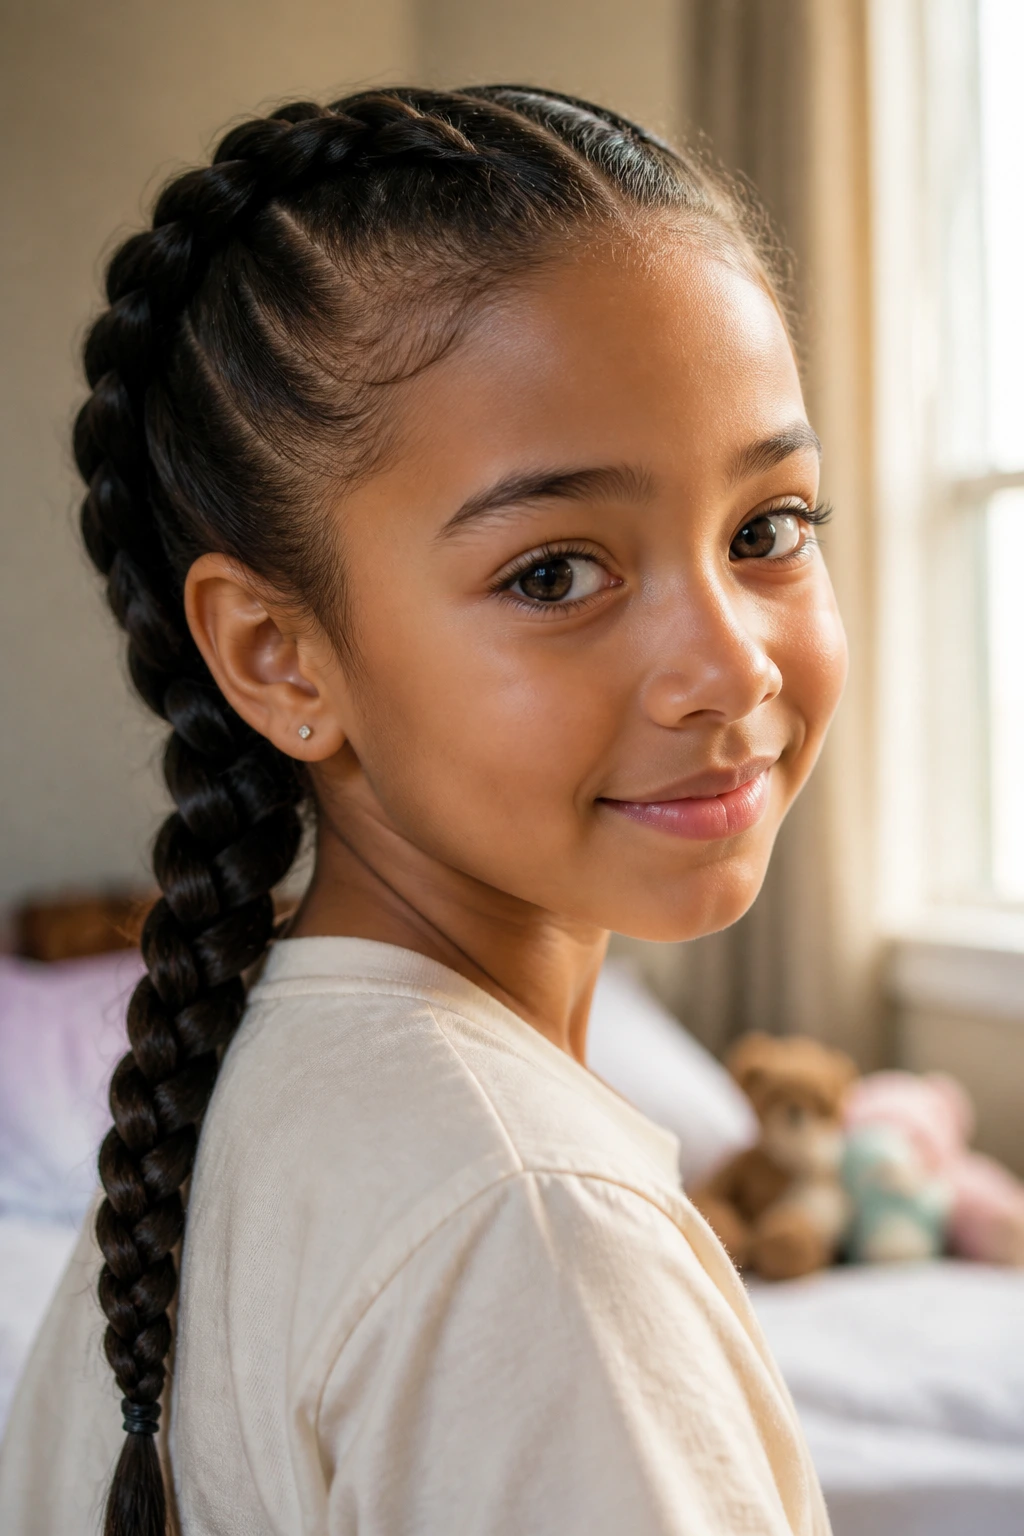
1. Side-Swept Loose Braid
A side braid is the one I reach for when the hair needs to look done but not fussy. It falls over one shoulder, shows off the curl texture, and stays friendlier to tender scalps than a tight, center-pinned style.
Why It Works:
Curly hair gives this braid thickness without much effort, so the finished plait looks fuller than the same style would on straighter strands. A deep side part also hides a little puff at the crown, which is handy when the hair has its own opinions by noon.
Key Supplies:
- 1 spray bottle filled with water and 1 teaspoon leave-in conditioner
- 1 detangling brush or wide-tooth comb
- 1 rat-tail comb for the part
- 1 snag-free elastic
- 2 duckbill clips to keep the unused side out of the way
Quick Steps:
- Mist the hair until it feels damp, not wet, then work in a small amount of leave-in from mid-lengths to ends.
- Make a deep side part and clip the smaller side away.
- Gather all the hair over one shoulder and split it into 3 equal sections.
- Braid down with even tension, adding a little hair from the top side if the front layers need more control.
- Tie the end with an elastic, then pinch the braid gently to widen it and soften the shape.
Tools for This Style:
- Rat-tail comb
- Spray bottle
- Detangling brush
- Small elastic
How to Wear It:
This sits nicely with a plain T-shirt, school uniform, or a dress with a wide collar because the braid rests off to one side and doesn’t fight the neckline. A ribbon at the end gives it a sweeter finish without changing the structure.
Pro Tips for This Style:
- Start the braid a little lower than you think you should; too-high side braids tug at the temple and lose the easy look.
- Smooth only the outer surface with your fingers. Leave the inner texture alone so the braid has something to grip.
- If the ends are frizzy, tuck them under the elastic instead of chasing them with more gel.
Variations on This Style:
- Ribbon Tail: Thread a narrow ribbon through the base elastic and let it trail with the braid.
- Side Crown Start: Begin with a tiny front braid and merge it into the larger side braid for a neater hairline.
- Puff-End Finish: Leave the last inch unbraided and secure it in a puff for a softer finish on very curly ends.
Common Mistakes to Avoid with This Style:
- Don’t start on dry tangles. The braid will look bumpy and the child will feel every snag.
- Don’t pull the first cross too tight. If the child starts rubbing the side of the head, loosen and restart that section.
2. Double Dutch Pigtails
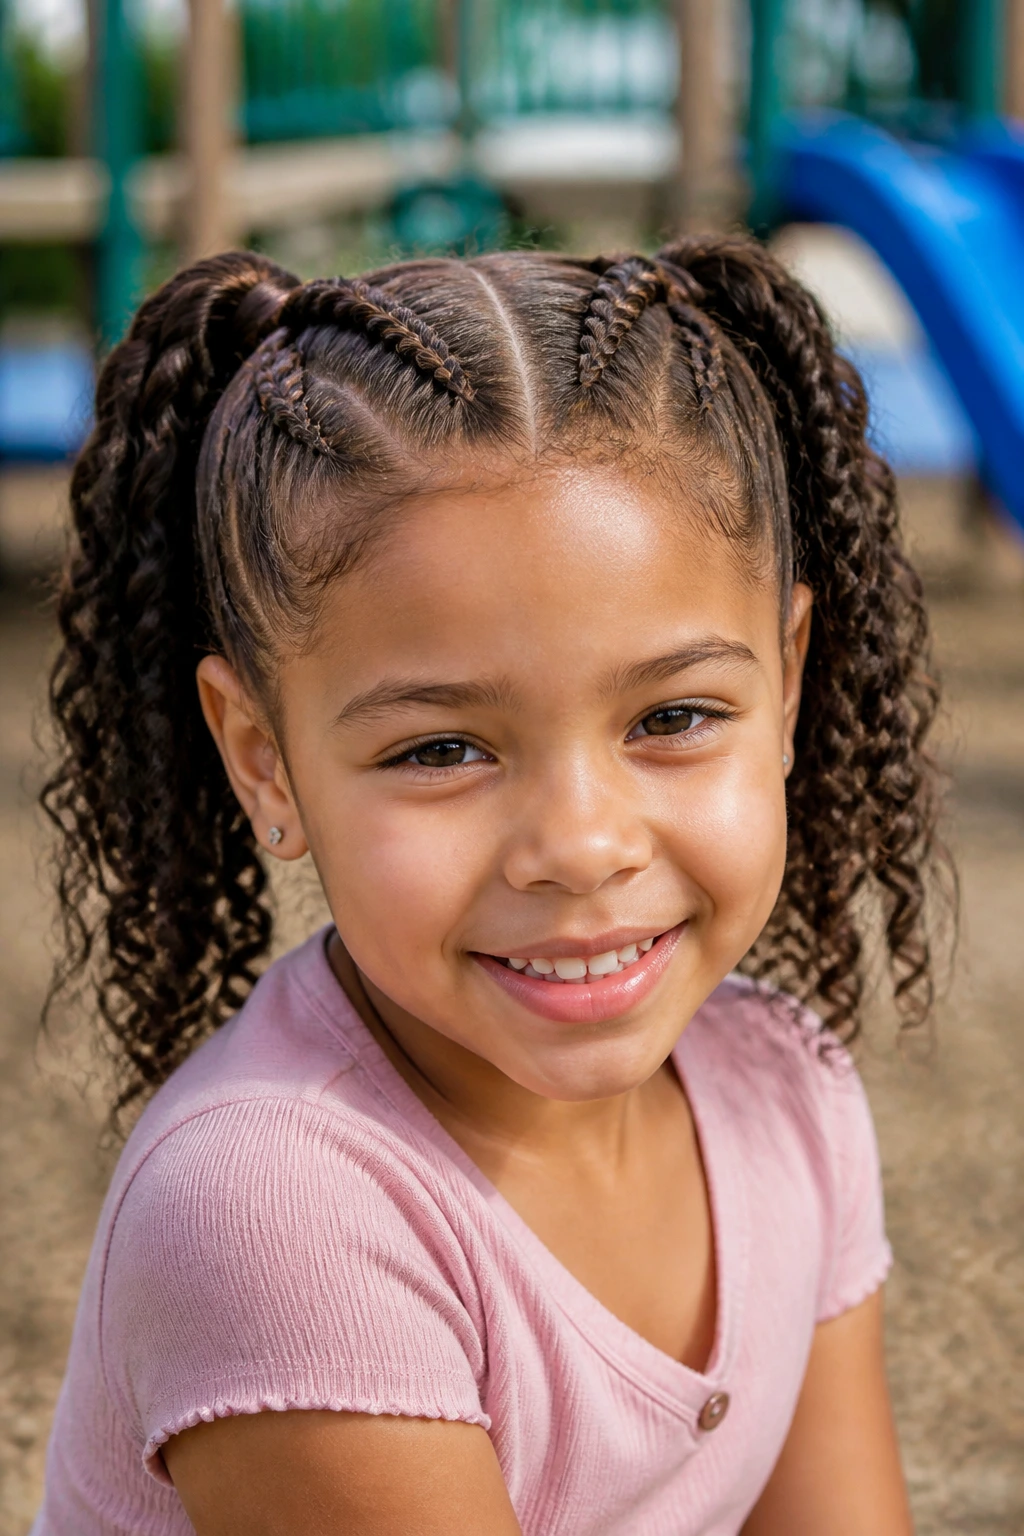
These are the braids that stay neat through recess, snack time, and the inevitable playground sprint. They sit on top of the hair instead of sinking into it, which makes them easier to see and easier to keep even.
Why It Works:
Dutch braids push the sections under instead of over, so the braid has more definition on curly hair. On kids, that raised shape gives a tidy look without needing the roots to be plastered flat with product.
Key Supplies:
- 1 spray bottle with water
- 1 teaspoon leave-in conditioner
- 2 snag-free elastics
- 4 to 6 duckbill clips
- 1 rat-tail comb
Quick Steps:
- Part the hair straight down the middle and clip one side away.
- On the open side, take a front section near the hairline and split it into 3 pieces.
- Cross the outside sections under the middle one, feeding in a small bit of hair each time you move back.
- Braid to the nape of the neck and finish the length like a regular braid.
- Repeat on the other side, then even out the ends and tie both with small elastics.
Tools for This Style:
- Rat-tail comb
- Sectioning clips
- Fine elastic bands
- Soft brush or comb
How to Wear It:
This style works best with sporty clothes, school clothes, or anything that asks the hair to stay out of the face. Add beads at the ends only if the child likes the sound and the weight—some kids adore it, others hate the clacking.
Pro Tips for This Style:
- Keep the middle part clean, but don’t obsess over perfection. A straight line helps, but a child’s head is not a drafting table.
- If the braids start to widen too fast, use smaller feed-in sections at the top.
- Match the tension on both sides so one braid doesn’t sit tighter and flatter than the other.
Variations on This Style:
- Low Pigtail Finish: Stop the braids lower for a softer look that sits at the back of the neck.
- Beaded Ends: Add two or three beads to each end for a play-ready finish.
- Crossed Back: Bring the pigtails together into one low tie for a quick cleanup style.
Common Mistakes to Avoid with This Style:
- Don’t make the part too narrow. On curly hair, tiny parts can fray fast and look messy by midday.
- Don’t braid so tight at the hairline that the child can feel pressure behind the ears.
3. French Braid Ponytail
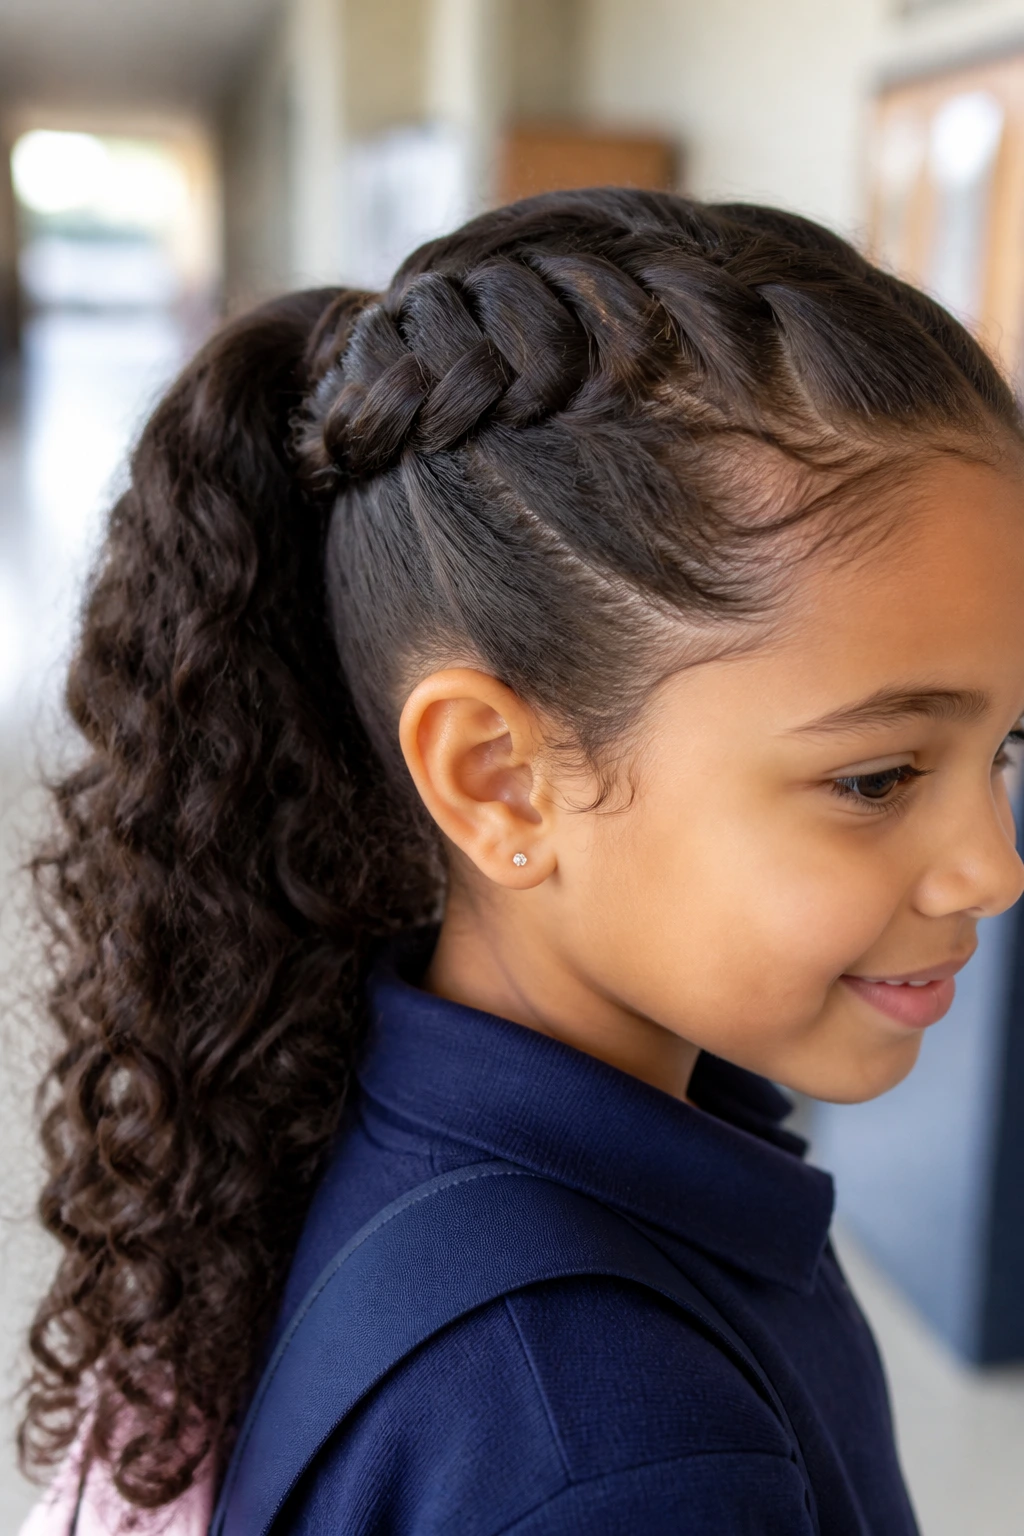
This is the style for a child who wants hair partly down but not in the eyes. The front stays controlled, the back keeps some curl and bounce, and the whole look lands between sporty and polished.
Why It Works:
The French braid anchors the front and crown where flyaways usually start, then hands the rest of the hair over to a ponytail. That balance matters on curly hair because it controls the area most likely to puff while leaving the lengths free.
Key Supplies:
- 1 spray bottle
- 1 to 2 teaspoons leave-in conditioner
- 1 medium elastic
- 2 clips
- 1 rat-tail comb
Quick Steps:
- Mist the hair lightly and detangle the top half first.
- Take a section from the front hairline and split it into 3 pieces.
- Braid over the top, adding a little hair from each side as you move back toward the crown.
- Stop once you reach the crown and secure the loose hair with a ponytail elastic.
- Let the ponytail fall naturally, or twist it once around the elastic for a slightly neater finish.
Tools for This Style:
- Rat-tail comb
- Elastic band
- Clip for sectioning
- Detangling brush
How to Wear It:
This sits well with school uniforms, polos, or dresses with collars because the braid creates a clean top line and the ponytail keeps the style from looking stiff. A scrunchie makes the back look fuller without adding tension.
Pro Tips for This Style:
- Braid only to the crown. If you keep braiding too far down, the ponytail loses the easy bounce.
- Let the ponytail stay a little textured; don’t chase every curl smooth. That’s the point of starting with curly hair.
- If the top layers are short, use a tiny dab of gel only on the front hairline.
Variations on This Style:
- Curly Pony Puff: Use a softer elastic and leave the ponytail fuller and rounder.
- Side French Start: Begin the braid just off-center for a softer, more relaxed look.
- Braided Wrap Base: Wrap a small strand around the ponytail holder to hide the elastic.
Common Mistakes to Avoid with This Style:
- Don’t make the ponytail too high if the child wears backpacks; the elastic can press uncomfortably.
- Don’t pull the braid tight enough to flatten the crown completely. That’s where the style starts to look stiff.
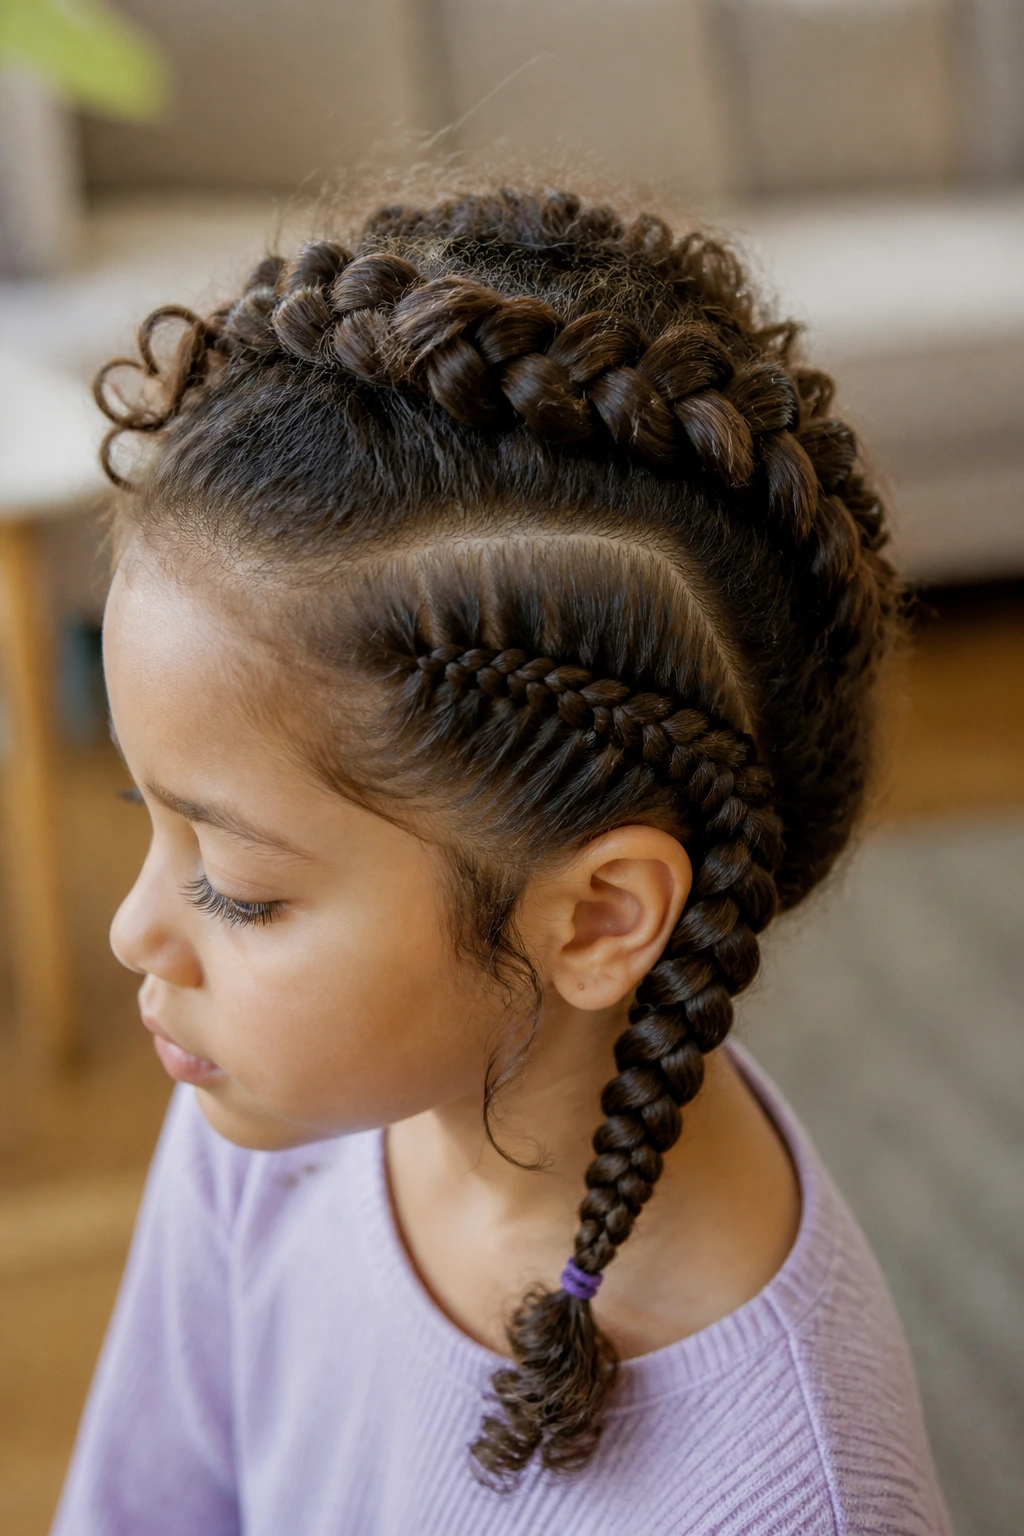
4. Crown Braid Halo
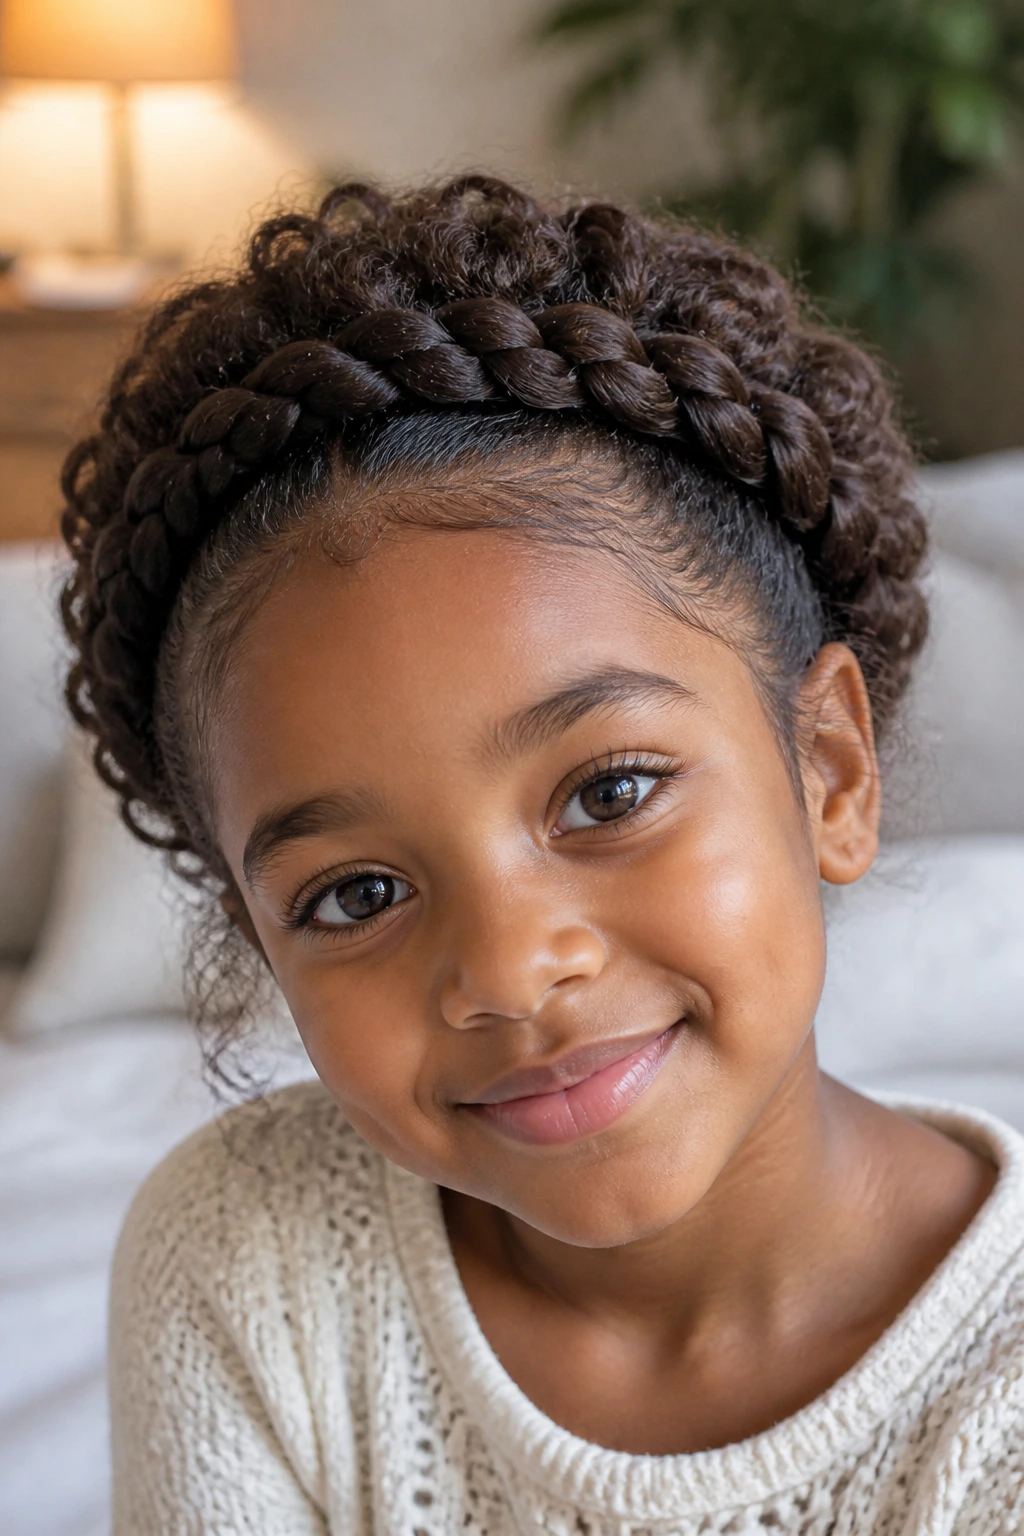
A crown braid is the style people notice first, then assume took more skill than it did. On curly hair, it looks softer and thicker than on straight hair, which makes the whole halo effect easier to pull off.
Why It Works:
The braid moves around the hairline and keeps front pieces tucked away, so it handles growth at the edges better than a straight-back braid. Curly texture gives the braid a plush look, which helps the halo read clearly even if your parting isn’t salon-perfect.
Key Supplies:
- 1 rat-tail comb
- 2 to 4 duckbill clips
- 1 spray bottle
- 2 small elastics
- 4 to 8 bobby pins
Quick Steps:
- Make a side part and section off the front hairline.
- Begin a braid near one temple and work it along the hairline, adding hair as you go.
- Continue around the head until you reach the other side.
- If the braid ends before meeting its start, tuck the end under and pin it firmly with bobby pins.
- Gently loosen the braid with your fingers so it sits fuller and softer around the head.
Tools for This Style:
- Bobby pins
- Rat-tail comb
- Clips
- Small elastic
How to Wear It:
This one suits picture day, family gatherings, or any moment when you want the hair pulled back but still clearly styled. A small bow at one temple keeps it sweet instead of stiff.
Pro Tips for This Style:
- If the hair is thick, split the halo into two braids and pin them into a circle. It’s easier on your hands and easier on the child.
- Pin along the braid’s inner edge so the fasteners disappear.
- Keep the braid slightly loose. A halo should sit like a soft band, not a helmet.
Variations on This Style:
- Half Halo: Braid from one side to the other and stop across the back instead of making a full circle.
- Double Halo: Use two thinner braids for a more detailed look on denser hair.
- Beaded Temple Finish: Add tiny beads only at the temple section to keep the focus near the face.
Common Mistakes to Avoid with This Style:
- Don’t chase perfect symmetry. On a moving child, one side of the halo will always want to act differently.
- Don’t pin only at the ends. A halo needs support along the curve, or it slips.
5. Boxer Braids
Boxer braids are the practical choice when the day includes running, tumbling, or a child who uses their head like a weather vane. They stay close to the scalp and hold their line better than looser styles.
Why It Works:
Because the braid is centered and snug, the style keeps hair anchored from the root down. Curly hair benefits from that structure, especially if the sections are even and the first few crosses are clean.
Key Supplies:
- 1 spray bottle
- 1 to 2 teaspoons styling cream or light gel
- 2 medium elastics
- 4 clips
- 1 rat-tail comb
Quick Steps:
- Make a straight center part from forehead to nape.
- Clip one side away and start a Dutch braid on the open side near the hairline.
- Keep the braid close to the scalp, adding small pieces as you go.
- Finish at the nape and braid the remaining length down.
- Repeat on the other side, then smooth any flyaways with a pea-size amount of gel.
Tools for This Style:
- Rat-tail comb
- Sectioning clips
- Small elastics
- Edge brush, optional
How to Wear It:
This is one of the best styles for sports days, dance class, or any school morning that needs hair to stay out of the face all afternoon. If the child likes accessories, two simple beads at the ends keep it from looking too plain.
Pro Tips for This Style:
- Work with slightly damp hair. Dry curls resist clean parting, and soaking wet hair is harder to control.
- Keep the tension even all the way down each braid. A tight front and loose end looks sloppy and feels odd.
- Use only a little gel at the roots. Too much makes the style stiff and flaky.
Variations on This Style:
- Boxer Bun Finish: Twist each braid into a small bun at the nape.
- Beaded Ends: Use one or two beads per braid for a playful finish.
- Side Boxer Set: Start the part slightly off-center for a softer look.
Common Mistakes to Avoid with This Style:
- Don’t pull the braids back so hard that the scalp lifts or reddens. That’s where a child starts resisting the style entirely.
- Don’t overdo the product. A crunchy part line is not the same thing as a neat one.
6. Rope Braid Pigtails
If three-strand braids make your fingers feel clumsy, rope braids are the easier cousin. They’re fast, tidy, and surprisingly good on curly hair because the twist pattern keeps the shape visible.
Why It Works:
Rope braids depend on direction, not complicated weaving, so they’re forgiving when you’re styling a wriggly kid. Curly texture adds body and helps the twist stay round instead of collapsing flat.
Key Supplies:
- 1 spray bottle
- 1 teaspoon leave-in conditioner
- 4 snag-free elastics
- 2 clips
- 1 detangling brush
Quick Steps:
- Part the hair into two even sections and clip one side away.
- Tie the open side into a low or mid pigtail.
- Split the pigtail into 2 pieces and twist both in the same direction.
- Wrap the twisted pieces around each other in the opposite direction until you reach the ends.
- Secure with a small elastic and repeat on the other side.
Tools for This Style:
- Detangling brush
- Elastics
- Clips
- Spray bottle
How to Wear It:
Rope braid pigtails look cute with ribbons tied near the base or with simple cuffs at the ends. They sit well with play clothes because they stay neat without looking formal.
Pro Tips for This Style:
- Twist each section the same amount before you cross them. Uneven twisting is what makes rope braids loosen.
- Put a tiny bit of leave-in on the ends before twisting so they don’t fray.
- If the hair is thick, work in smaller pigtail sections so the twist stays smooth.
Variations on This Style:
- High Rope Pigtails: Lift the pigtails higher for a more energetic look.
- Single Rope Ponytail: Make one low ponytail instead of two.
- Ribbon Wrap: Tie a thin ribbon around the base and let the ends peek through the twist.
Common Mistakes to Avoid with This Style:
- Don’t twist one strand forward and the other backward in a random way. Rope braids need consistent direction.
- Don’t leave the pigtails too loose at the base or the whole style starts to sag.
7. Fishtail Side Braid
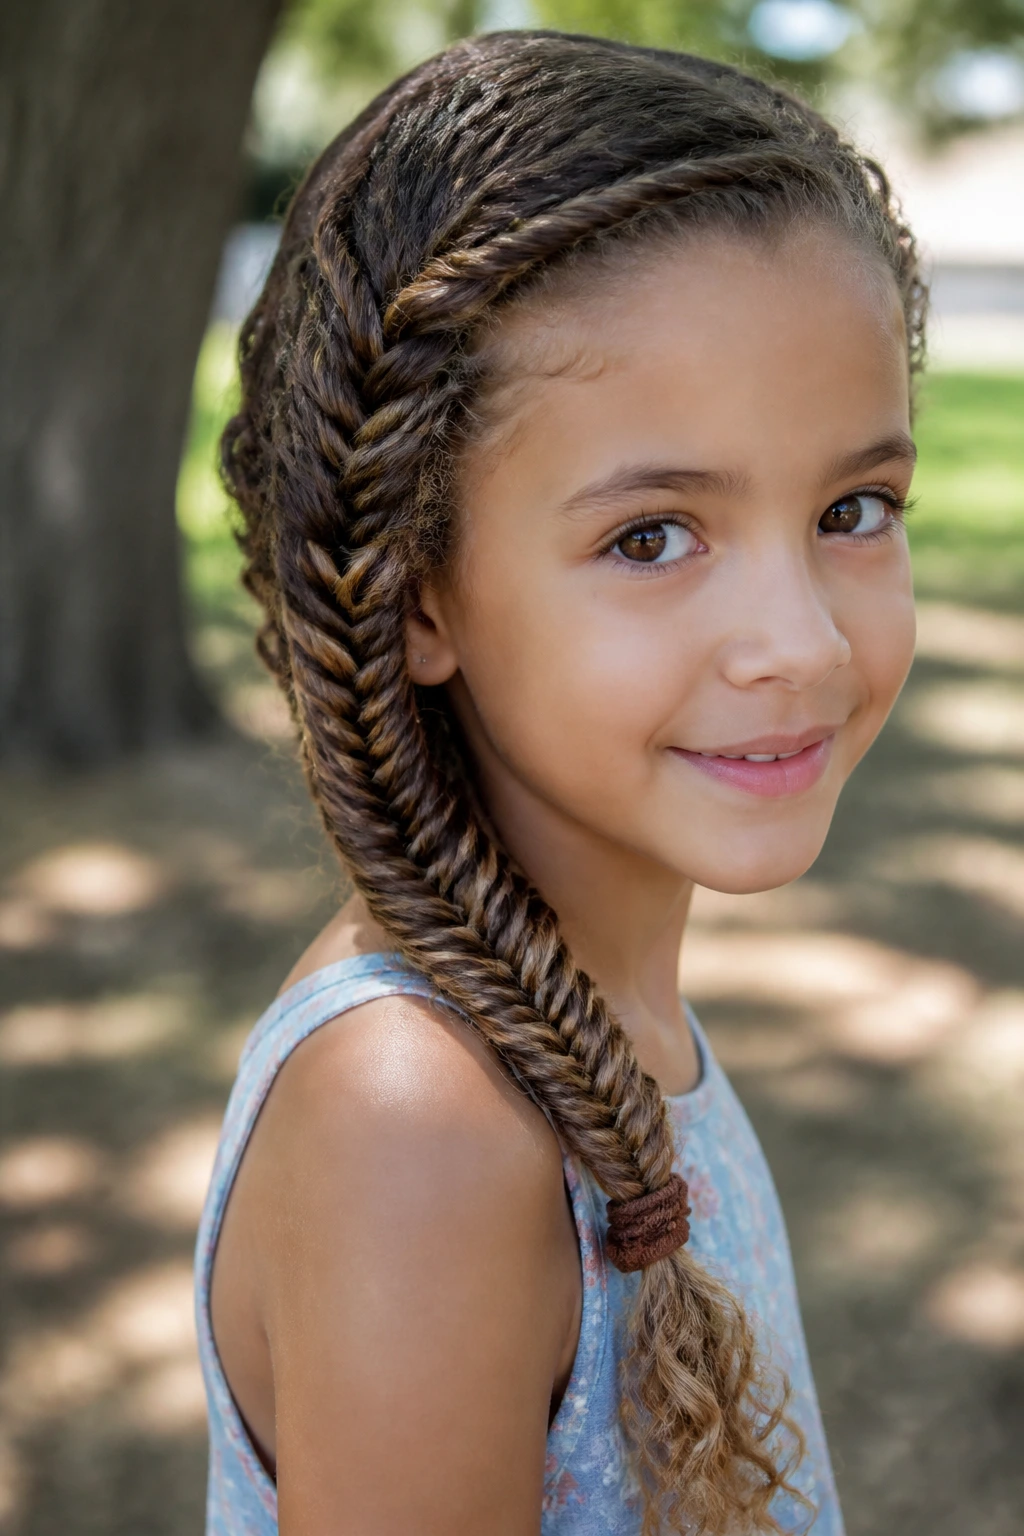
A fishtail braid looks more detailed than it is, which is one of the few hair tricks I’m happy to defend. On curly hair, the texture hides tiny imperfections and makes the braid look fuller right away.
Why It Works:
The small crossovers give the braid grip, and the side placement keeps it easy to hold while you work. Hair with a little stretch behaves especially well here because the pieces don’t slip as fast.
Key Supplies:
- 1 rat-tail comb
- 1 spray bottle
- 1 to 2 small elastics
- 2 clips
- Light detangler
Quick Steps:
- Mist the hair and brush out the section you want to braid.
- Gather everything over one shoulder and split it into 2 equal pieces.
- Take a tiny piece from the outside of the left section and add it to the right, then repeat from the other side.
- Keep the pieces small and even until you reach the ends.
- Tie off with an elastic and pull gently at the braid to widen it.
Tools for This Style:
- Rat-tail comb
- Small elastic
- Detangling brush
- Clip
How to Wear It:
This is a nice picture-day braid, especially when the hair is tucked behind one ear or topped with a tiny bow. It looks neat with dresses, but it also works with a plain sweatshirt because the braid itself carries the style.
Pro Tips for This Style:
- Make the pieces tiny. Big sections turn a fishtail into a clumpy rope.
- Use on hair that’s lightly stretched or freshly detangled; very springy curls can make the braid hard to manage.
- Don’t yank the braid apart too aggressively. A gentle pull gives body without wrecking the pattern.
Variations on This Style:
- Half Fishtail: Braid only the top half and let the rest hang loose.
- Fishtail Bun: Twist the finished braid into a bun at the nape.
- Side Accent Fishtail: Add just one fishtail panel to a ponytail instead of braiding the whole head.
Common Mistakes to Avoid with This Style:
- Don’t take large pieces from the sides. The braid will stop looking like a fishtail fast.
- Don’t skip detangling. A fishtail shows every snag.
8. Half-Up Braid with Loose Curls
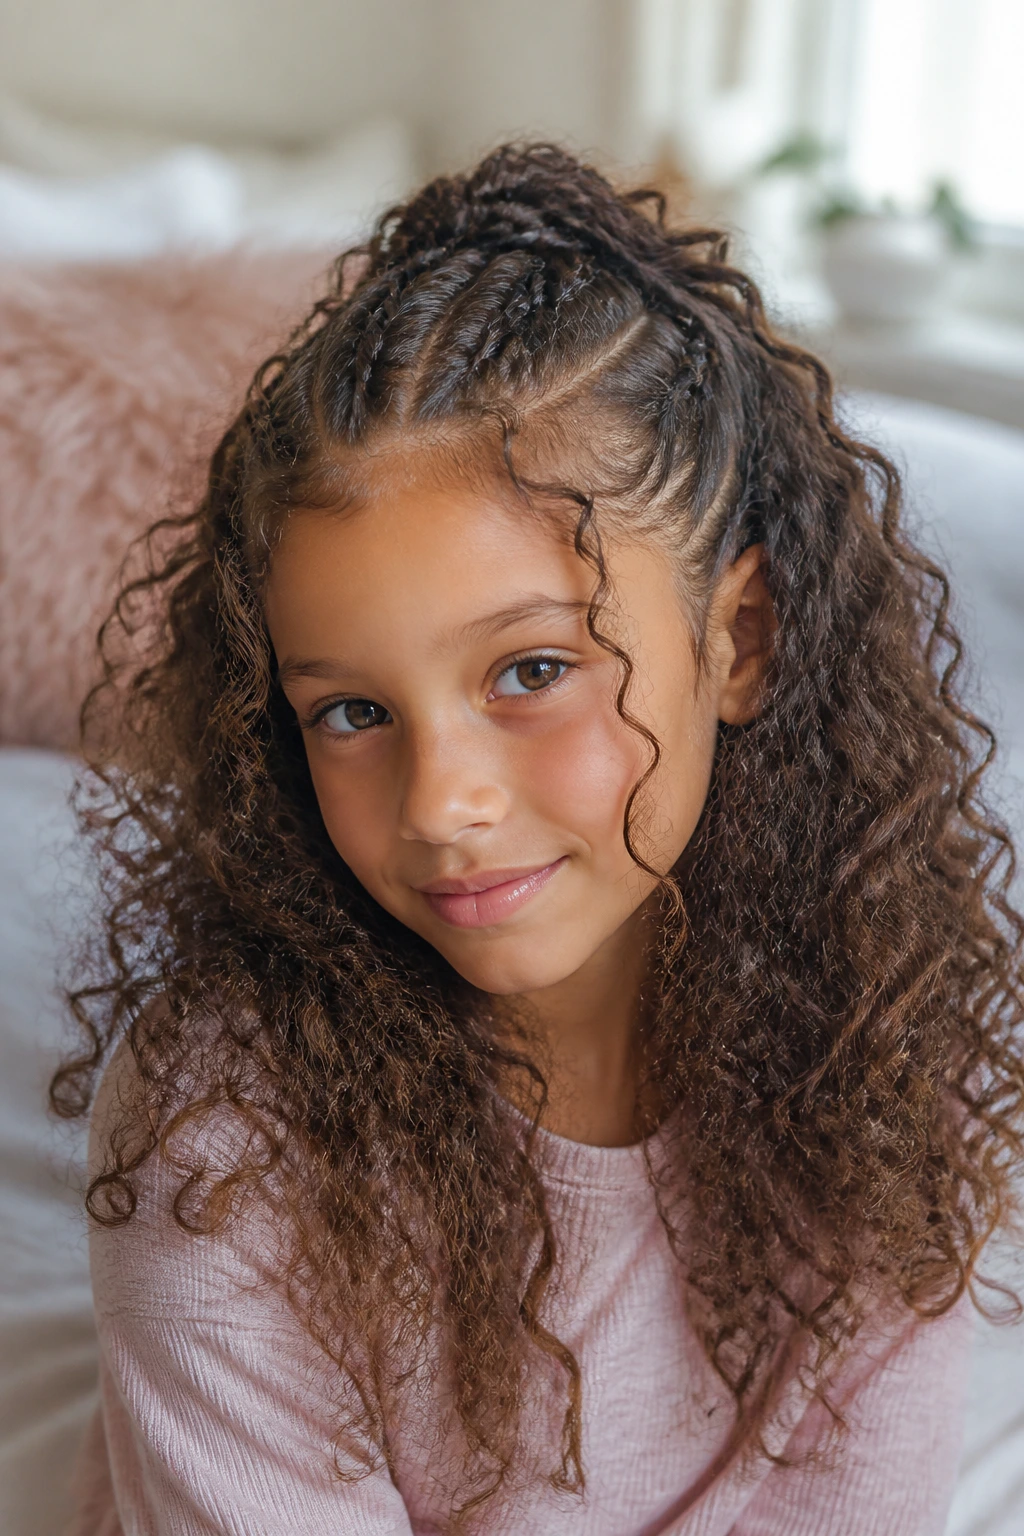
Some kids want their curls free but not in their face, and this is the compromise that usually wins. The top section gets braided back, while the rest of the hair keeps its shape, volume, and bounce.
Why It Works:
The braid controls the front and crown, where the mess usually starts. Leaving the rest of the curls down makes the style feel lighter and less restrictive, which matters on younger kids who hate the feeling of a fully pulled-back head.
Key Supplies:
- 1 spray bottle
- 1 small elastic
- 2 clips
- 1 rat-tail comb
- Leave-in conditioner
Quick Steps:
- Section off the top third of the hair from temple to temple.
- Braid that top section straight back, either as a regular braid or a French braid.
- Stop at the crown and tie the braid off with a small elastic.
- Let the remaining curls fall loose around the shoulders.
- Fluff the loose section with your fingers so it sits evenly under the braid.
Tools for This Style:
- Clips
- Rat-tail comb
- Small elastic
- Detangling brush
How to Wear It:
This style works well with school photos, family events, or a day when the child wants to keep some curl volume on display. Add a bow where the braid ends meet the loose hair, and it looks finished without being stiff.
Pro Tips for This Style:
- Keep the top section smaller than you think. Too much hair up top can make the style feel heavy.
- Let some front curls escape on purpose if the child likes softness around the face.
- If the loose hair frizzes fast, smooth only the outer layer with a tiny bit of cream.
Variations on This Style:
- Half-Crown Braid: Let the braid curve slightly around the head instead of going straight back.
- Twist-and-Braid Mix: Add a small twist at the sides before braiding the top section.
- Braid to Puff: Finish the top braid into a small puff instead of leaving a loose braid tail.
Common Mistakes to Avoid with This Style:
- Don’t grab hair from too low on the sides. The braid should lift the top, not pull down the whole shape.
- Don’t leave the loose curls unmoisturized if they frizz fast. They’ll look half done by afternoon.
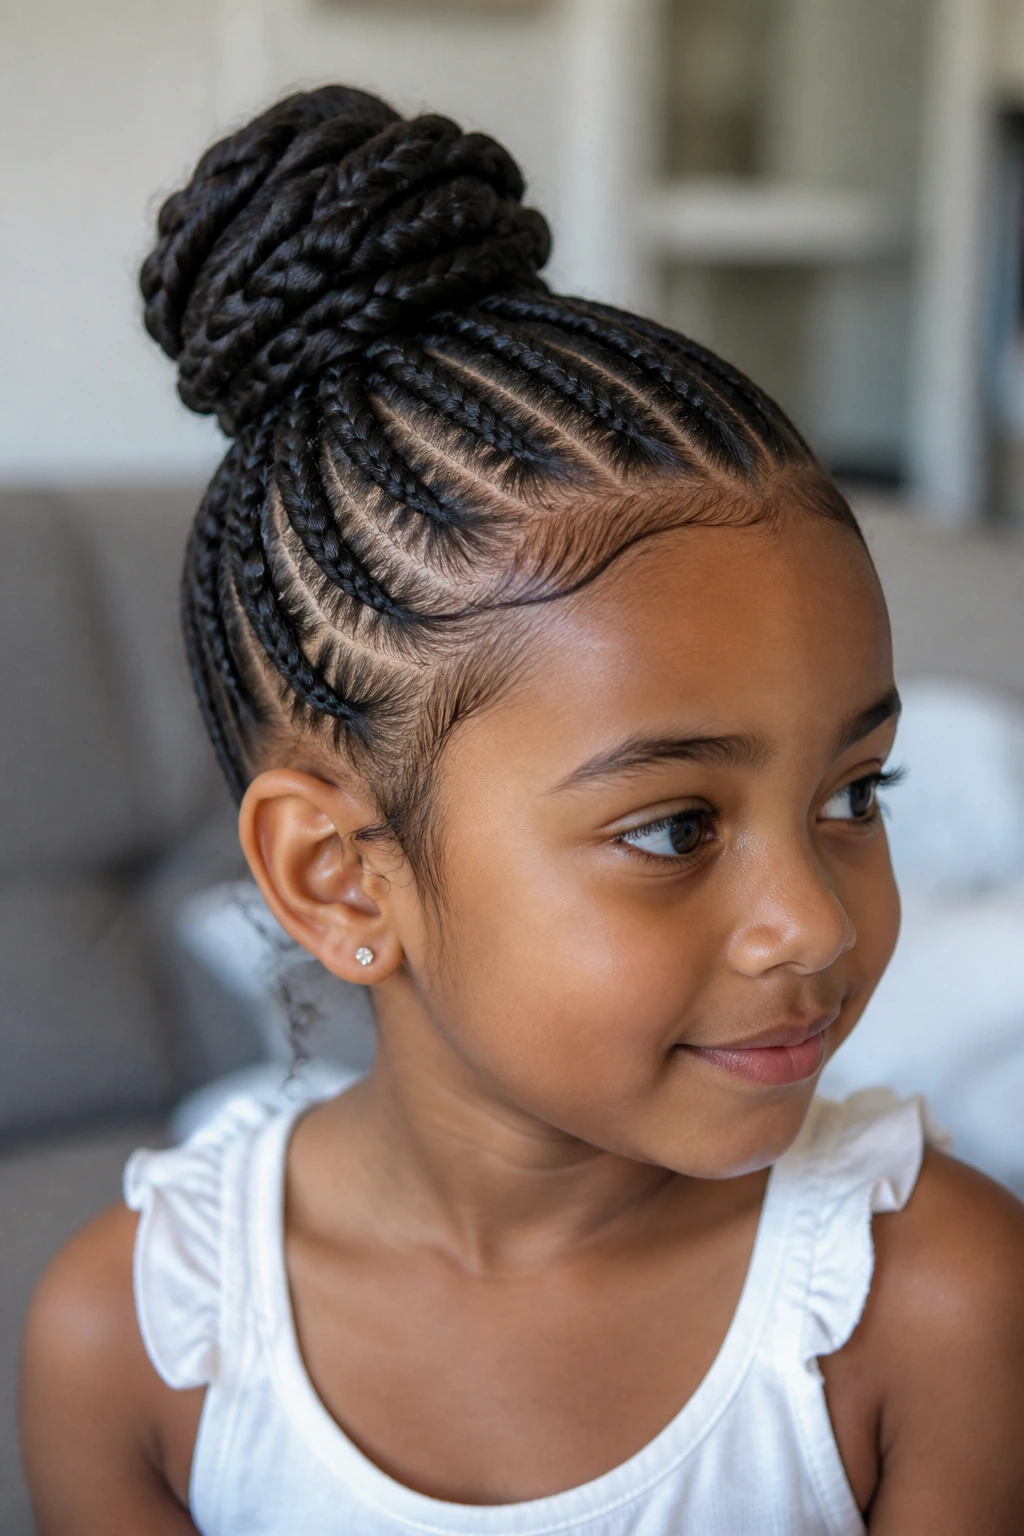
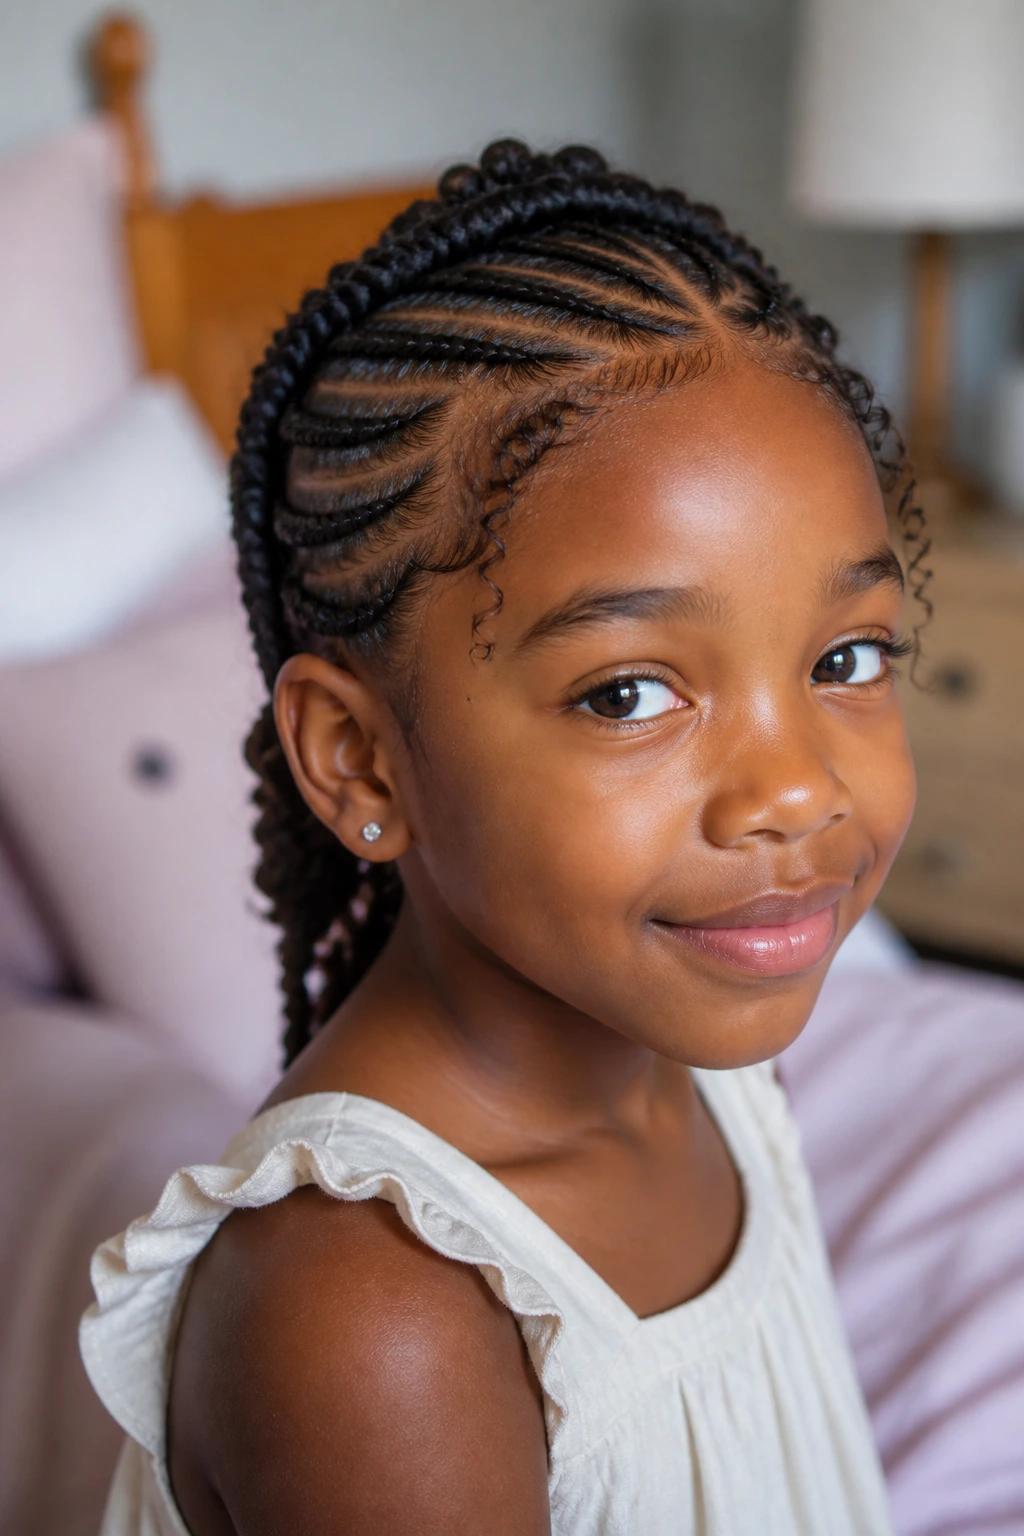
9. Cornrow Rows Into a Puff
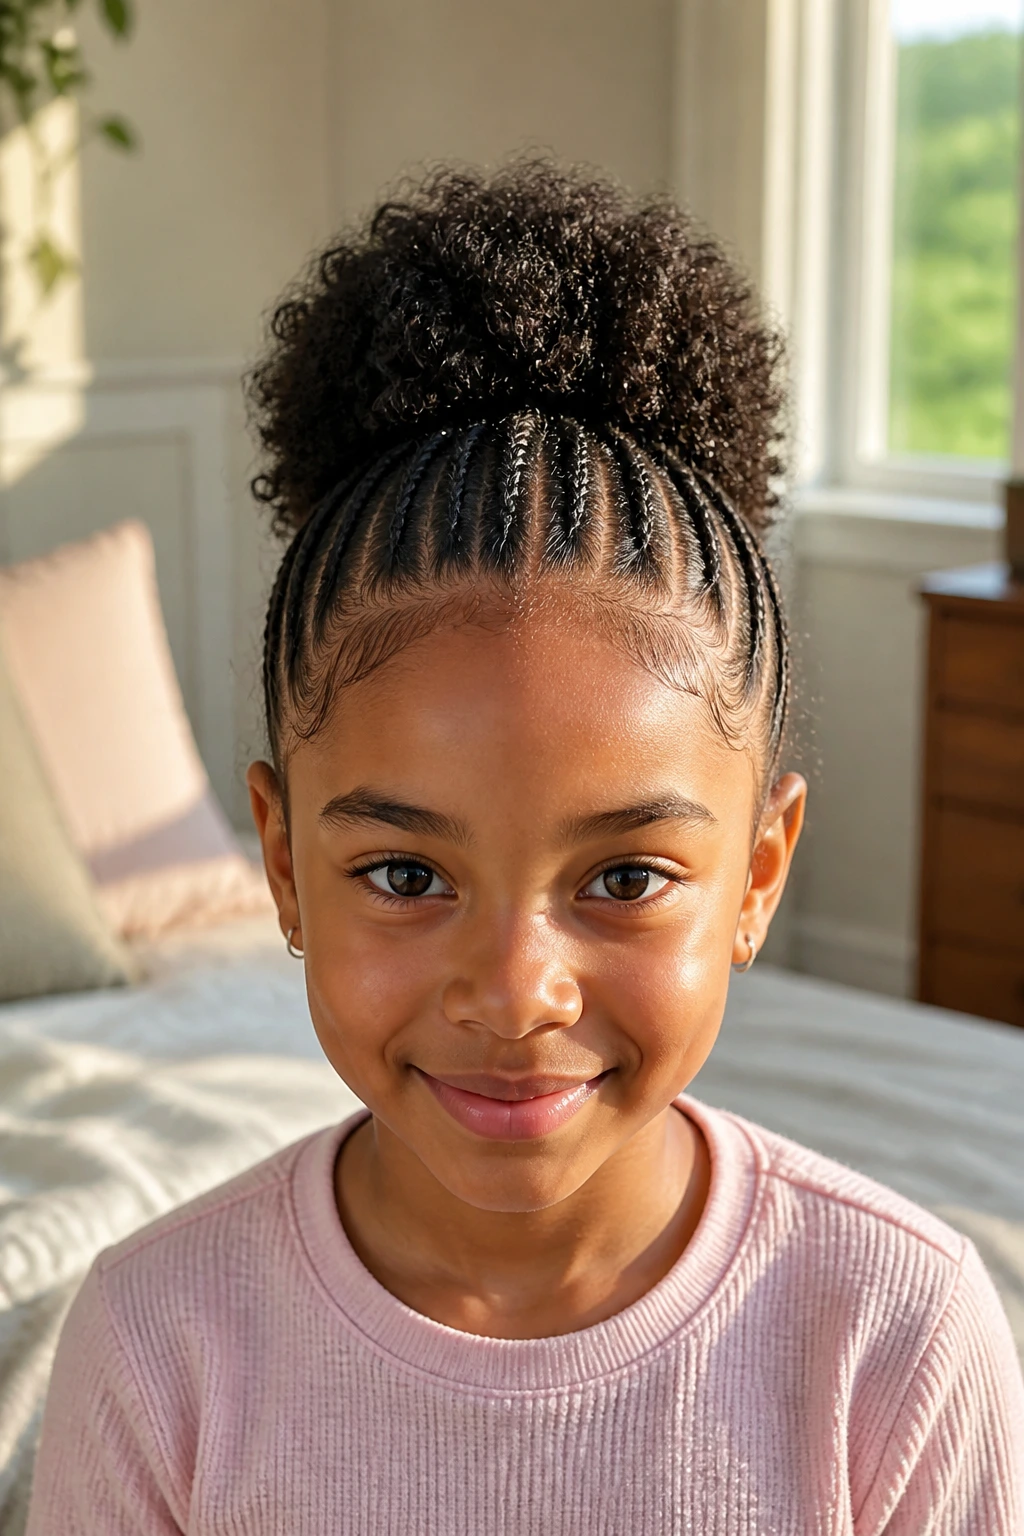
This is one of the most practical styles on the list because it gives neatness at the roots and volume at the ends. The cornrows keep the front controlled, and the puff lets the hair still feel like curly hair.
Why It Works:
Straight-back rows create a strong base that holds up well on textured hair, especially when the hairline is mapped cleanly and the sections are even. The puff at the back gives the child movement and keeps the whole style from feeling too tight or too adult.
Key Supplies:
- 1 rat-tail comb
- 1 spray bottle
- Light gel or braid cream
- 4 to 8 clips
- 1 medium elastic for the puff
Quick Steps:
- Part the front hair into 2 to 4 rows, depending on density and length.
- Braid each row straight back with even tension, keeping them close to the scalp.
- Stop once you reach the back of the head and smooth the remaining curls into one puff.
- Secure the puff with a medium elastic that does not pinch.
- Fluff the puff with your hands so it sits round and full.
Tools for This Style:
- Rat-tail comb
- Styling gel
- Elastic band
- Sectioning clips
How to Wear It:
This is a good choice for school, sports, and days when you need the front totally out of the way. A puff cuff or soft scrunchie makes the back look intentional instead of just gathered.
Pro Tips for This Style:
- Keep the rows straight enough to read clearly, but not so tiny that the styling takes forever.
- Use a little gel only at the root line. Overloading the scalp makes the rows hard and flaky.
- If the puff starts to flatten, pick it out gently at the roots and re-fluff instead of tightening the elastic.
Variations on This Style:
- Two-Row Puff: Use just two larger cornrows for a faster version.
- Four-Row Finish: Add more rows for a more detailed front.
- Puff Bun: Twist the puff into a low bun if the child wants less volume.
Common Mistakes to Avoid with This Style:
- Don’t braid too close to the skin. The scalp should not feel like it’s being stretched from the first row.
- Don’t leave the puff elastic too tight. A child who keeps touching the back of the head is telling you something.
10. Braided Bun
A braided bun looks dressed up, but it’s mostly just a braid wrapped around itself. That makes it a useful style for church, performances, or any day when the hair needs to stay contained and neat.
Why It Works:
Braiding the ponytail before coiling it helps the bun keep its shape on curly hair. The braid gives structure, and the curls at the ends tuck in neatly instead of escaping in every direction.
Key Supplies:
- 1 medium elastic
- 4 to 6 bobby pins
- 1 spray bottle
- 1 detangling brush
- Light styling cream
Quick Steps:
- Gather the hair into a high, mid, or low ponytail.
- Braid the ponytail all the way to the ends.
- Wrap the braid around the ponytail base in a circle.
- Pin the bun in place with bobby pins as you go.
- Tuck the end under the bun and smooth the outer surface with your fingertips.
Tools for This Style:
- Bobby pins
- Elastic band
- Detangling brush
- Comb
How to Wear It:
This works beautifully with dresses, button-down shirts, or any outfit that benefits from a neat neckline. A satin scrunchie at the base can make the bun look softer and keep the elastic from rubbing.
Pro Tips for This Style:
- If the hair is thick, braid the ponytail a little looser so the bun has enough length to wrap.
- Pin the bun as you wrap it, not after. Waiting until the end usually means the shape shifts.
- Mist the ends lightly before coiling so they fold in without sticking out.
Variations on This Style:
- Low Braided Bun: Place it at the nape for a calmer look.
- Side Bun: Sweep the bun behind one ear for dressier days.
- Two Mini Buns: Split the ponytail into two braided buns if the child wants a playful finish.
Common Mistakes to Avoid with This Style:
- Don’t make the ponytail too tight before braiding. A bun built on a painful base is still a painful style.
- Don’t leave the braid loose and expect the bun to hold itself. It won’t.
11. Pull-Through Braid
This is the cheat code when a child wants a thick braid but your hands are tired of traditional weaving. It uses elastics instead of a full three-strand braid, which makes the pattern easier to build and easier to fix.
Why It Works:
Pull-through braids create a full, chunky look that suits curly hair well because the natural volume hides the elastic points. The style is also forgiving if one section comes out a little uneven, which is useful when the kid won’t sit still.
Key Supplies:
- 5 to 8 small snag-free elastics
- 1 spray bottle
- 1 rat-tail comb
- 2 clips
- Leave-in conditioner
Quick Steps:
- Gather the hair into a ponytail at the top, middle, or nape.
- Split the ponytail into two sections and make a second ponytail underneath.
- Pull the top ponytail apart, then bring the lower ponytail up through the gap.
- Add another small section below, secure it, and repeat down the length.
- Tug each loop gently so the braid looks full and rounded.
Tools for This Style:
- Small elastics
- Rat-tail comb
- Sectioning clips
- Spray bottle
How to Wear It:
This style looks best when the loops are even and the sections are puffed out on purpose. It pairs well with sporty outfits, party clothes, or any day when a child wants a bigger braid without the work of a long traditional plait.
Pro Tips for This Style:
- Make the ponytails the same size from top to bottom or the braid will tilt.
- Leave a little texture in each section before you pull it through; too much smoothing makes the braid flat.
- Use clear elastics if you want the pattern to show more cleanly.
Variations on This Style:
- High Pull-Through Pony: Build the braid at the crown for a bouncier look.
- Side Pull-Through: Shift the whole braid to one side.
- Double Pull-Through Pigtails: Make two smaller versions for a playful style.
Common Mistakes to Avoid with This Style:
- Don’t make the elastic sections too tiny. The style can look stringy instead of full.
- Don’t leave the loops unevenly puffed. A few quick tugs on each section make a big difference.
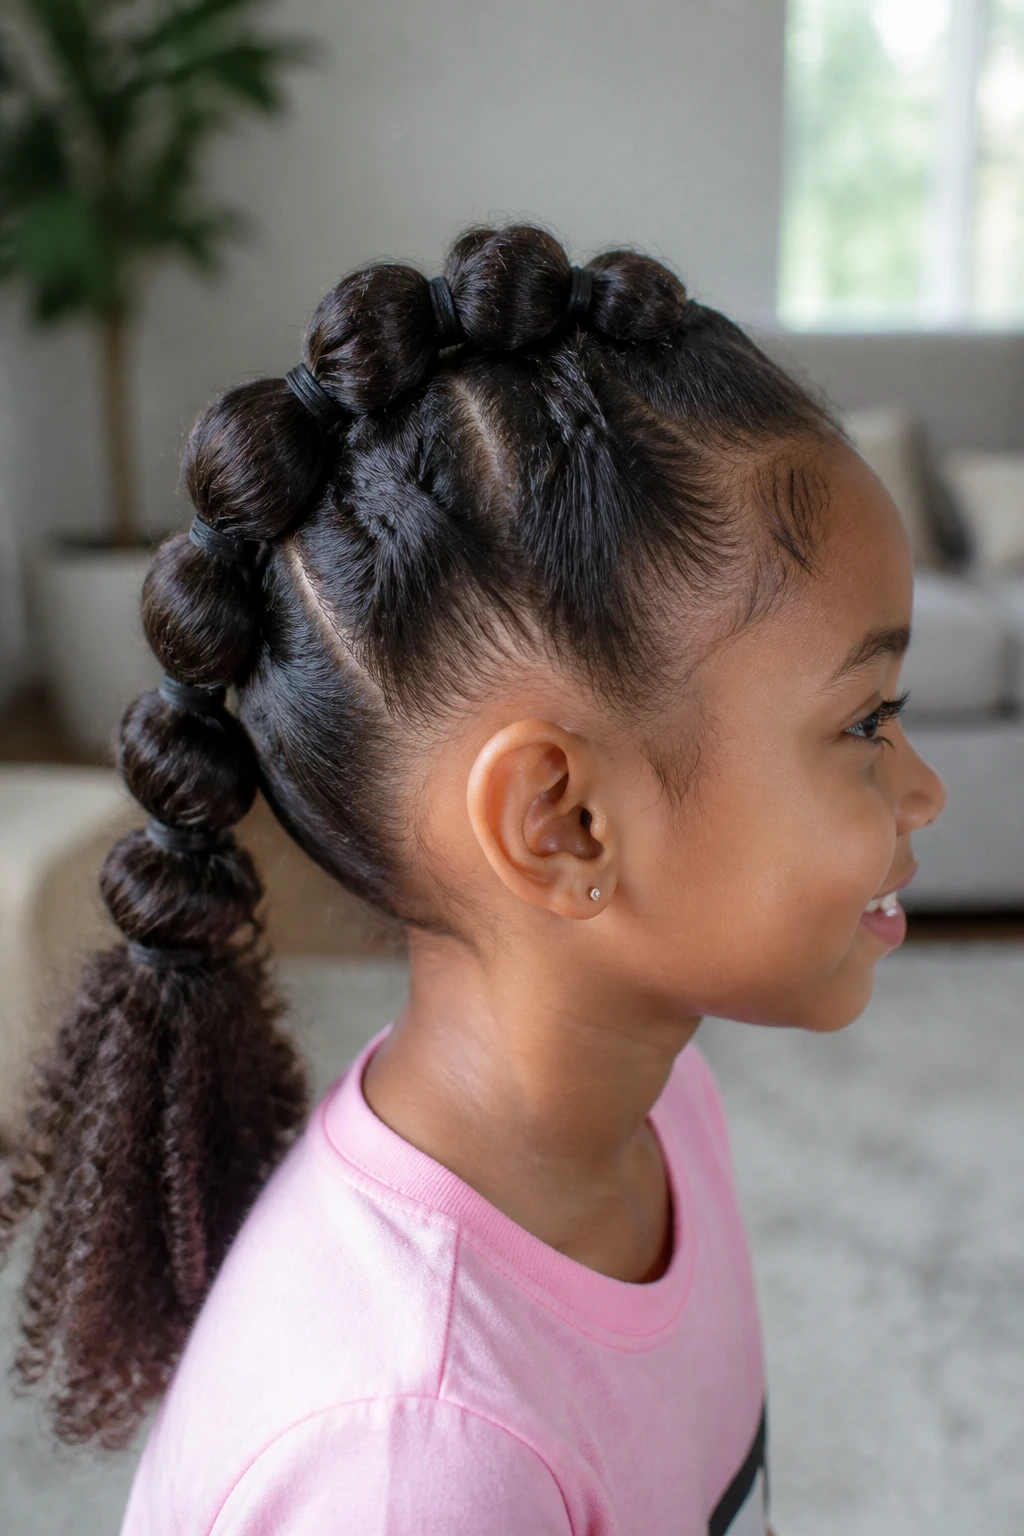
12. Bubble Braid with a Braided Base
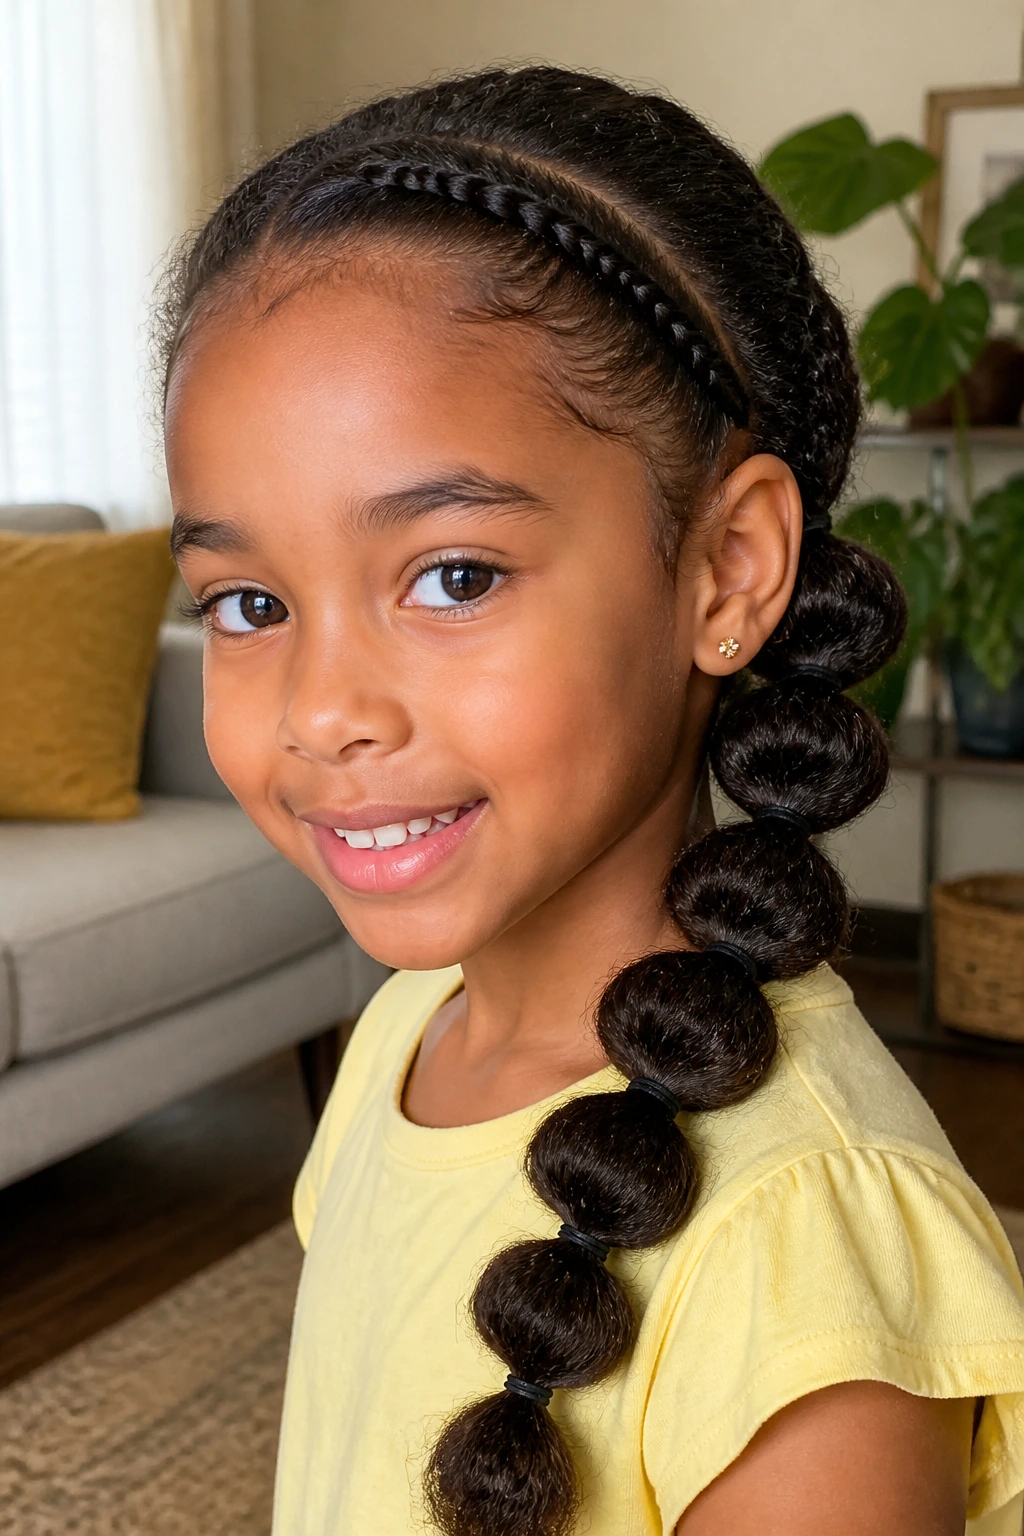
Bubble braids are fun because they look detailed without requiring a complicated braid all the way down. On curly hair, they work nicely because the texture already gives the bubbles extra body.
Why It Works:
A small braid at the base anchors the style, then the bubble sections add shape without heavy tension. That makes it easier for kids who like playful hair but complain the second a style starts pulling.
Key Supplies:
- 4 to 6 small elastics
- 1 rat-tail comb
- 1 spray bottle
- 2 clips
- Optional ribbon or hair cuffs
Quick Steps:
- Make a front braid or small braid across the crown.
- Gather the rest into one ponytail and secure it.
- Add another elastic 1.5 to 2 inches down the tail.
- Puff the hair between the elastics into rounded bubbles.
- Repeat until you reach the ends, then smooth any stray pieces.
Tools for This Style:
- Small elastics
- Comb
- Clips
- Light detangler
How to Wear It:
This is a fun weekend or birthday style, but it still works for school if you keep the accessories simple. Ribbon loops tucked between two bubbles can make it feel special without turning it into a costume.
Pro Tips for This Style:
- Space the elastics evenly before puffing the hair out. That keeps the bubbles balanced.
- Use the front braid to control the hairline so the style looks neat from the front.
- On fine curls, puff the bubbles less aggressively so they don’t collapse.
Variations on This Style:
- Double Bubble Pigtails: Split the hair into two ponytails first.
- Ribbon Bubble Tail: Tie ribbon around the elastics for a softer finish.
- Short Bubble Stack: Use only three bubbles for shorter hair.
Common Mistakes to Avoid with This Style:
- Don’t place the elastics too close together. The bubbles disappear and the style loses its shape.
- Don’t over-puff the sections if the hair is fine or short. It starts to look fuzzy instead of rounded.
13. Feed-In Side Braid
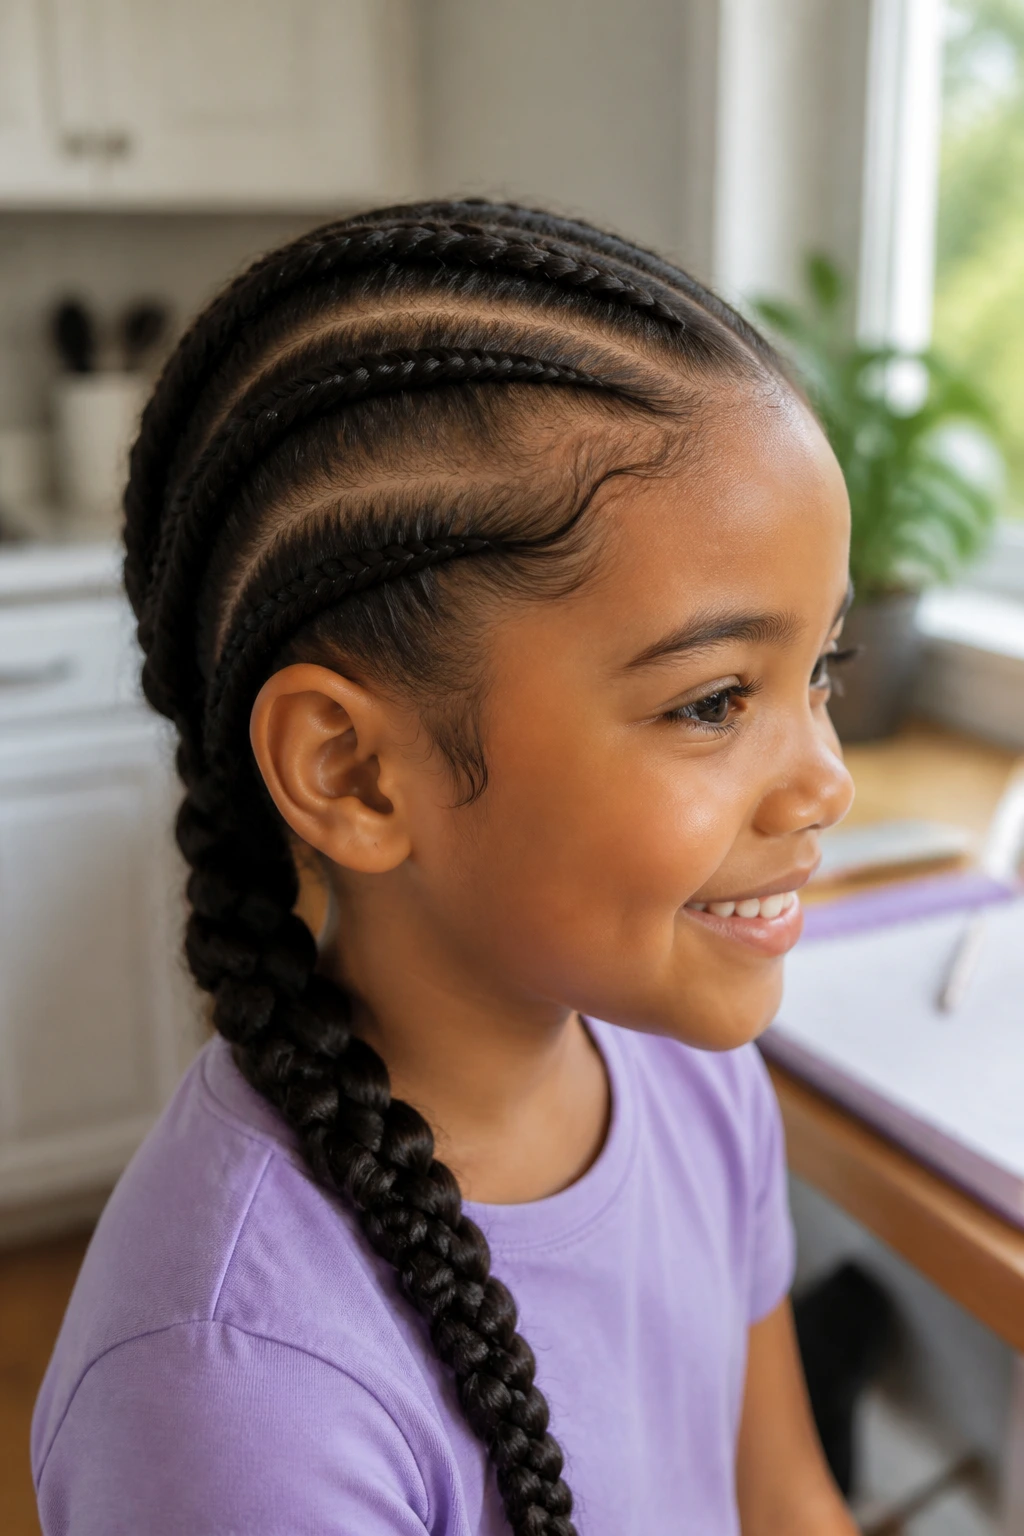
Feed-in braids are good when you want the hairline tidy without a harsh, all-at-once braid. You add hair gradually, which keeps the base smooth and the tension more even.
Why It Works:
The gradual feed-in method spreads tension across the braid instead of loading it all at the start. That matters on kids because a braid can look polished while still feeling gentler than a hard-pulled style.
Key Supplies:
- 1 rat-tail comb
- 1 spray bottle
- Light gel or braid cream
- 4 clips
- 1 or 2 small elastics
Quick Steps:
- Make a side part and smooth the front section with a little leave-in.
- Start a tiny braid at the hairline and add small bits of hair as you move back.
- Keep feeding in hair gradually until the braid reaches behind the ear or nape.
- Finish the length like a regular braid or a loose tail.
- Secure the end and smooth the outer surface with your fingers.
Tools for This Style:
- Rat-tail comb
- Clips
- Styling gel
- Snag-free elastic
How to Wear It:
This style has a cleaner, more finished look than a simple side braid, so it’s a nice pick for picture day or family events. A single side braid cuff keeps the end from disappearing into the shirt collar.
Pro Tips for This Style:
- Add hair in small amounts. Big feed-ins make the braid lumpy fast.
- Keep the braid close to the scalp only at the start; after that, let it relax a little.
- If the hair is thick, use less gel and more careful sectioning.
Variations on This Style:
- Feed-In Pigtails: Turn the same idea into two braids.
- Feed-In Crown Curve: Sweep the braid across the front hairline instead of down the side.
- Feed-In Ponytail Base: Start the feed-in and tie it into a ponytail at the back.
Common Mistakes to Avoid with This Style:
- Don’t add too much hair at once. It breaks the clean line and makes the braid bunch up.
- Don’t braid so tight that the feed-in sections feel different from the rest of the head.
14. Zigzag Part Braids
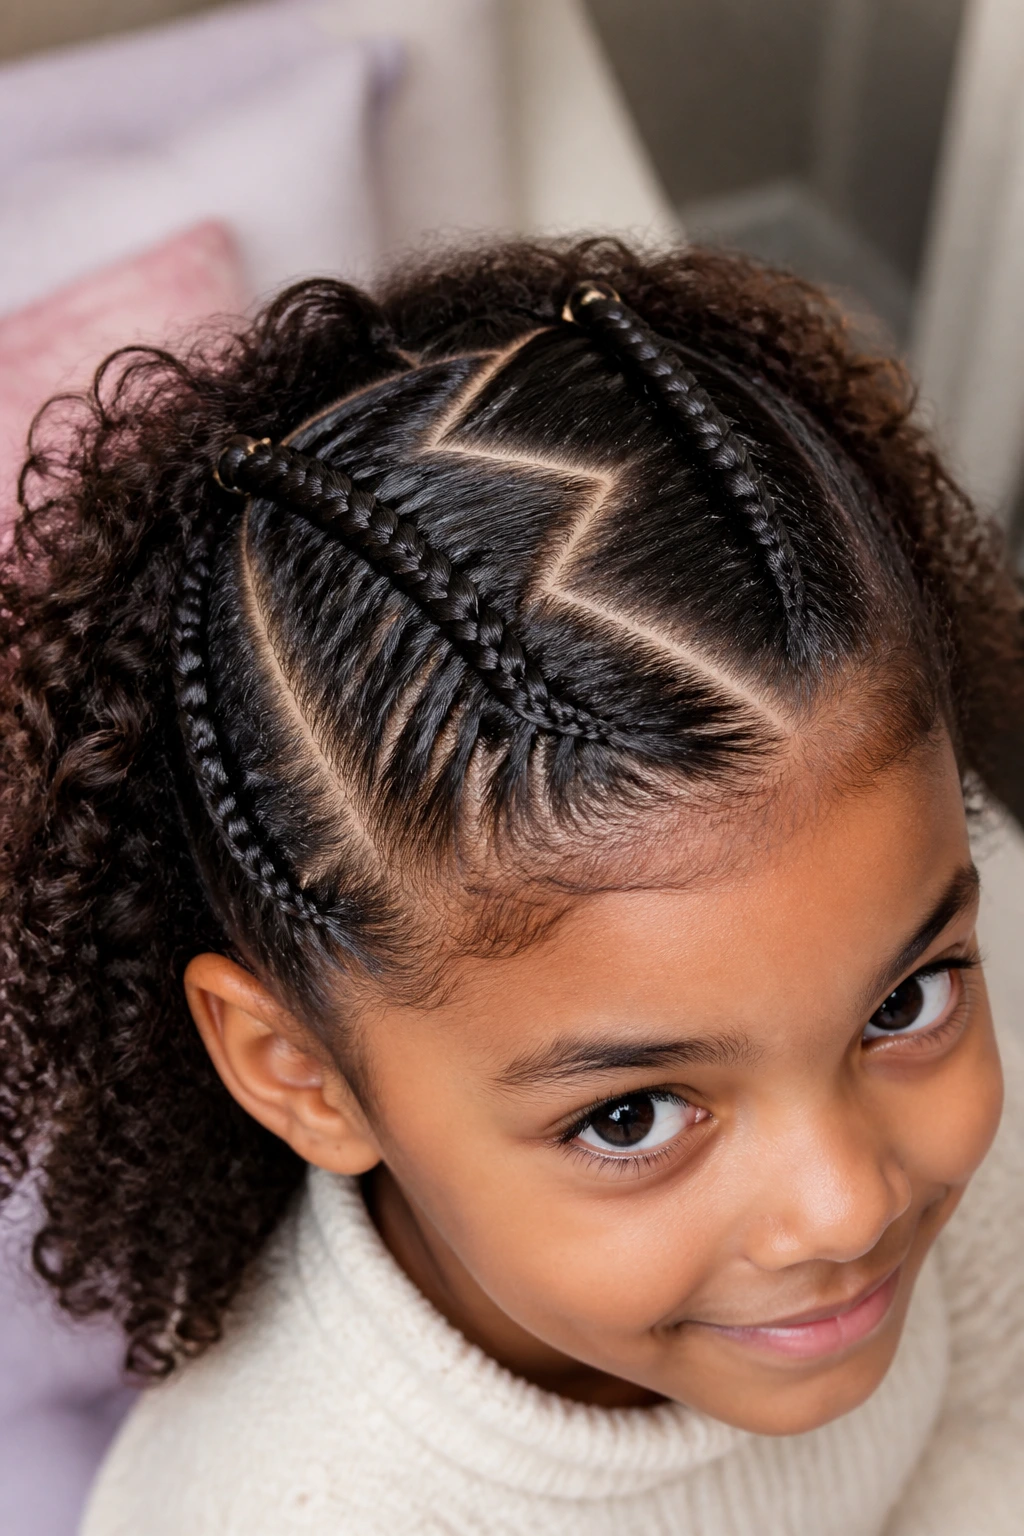
The part is the decoration here. A zigzag part can turn a very plain braid into something a kid notices in the mirror, which is half the battle on styling day.
Why It Works:
Curly hair hides tiny parting flaws, so a zigzag line looks playful instead of fussy. The pattern also breaks up the head shape in a way that makes basic braids feel more intentional.
Key Supplies:
- 1 rat-tail comb
- 2 to 4 elastics
- 4 clips
- Spray bottle
- Light leave-in or cream
Quick Steps:
- Mist the hair lightly and detangle the parting area first.
- Use the tail of the comb to draw a zigzag line from the front to the crown.
- Separate the hair into 2 or 4 braided sections, depending on density.
- Braid each section down in a simple three-strand braid or Dutch braid.
- Secure the ends and smooth the part line gently with your fingertips.
Tools for This Style:
- Rat-tail comb
- Sectioning clips
- Small elastics
- Detangling brush
How to Wear It:
This is a fun school style because the parting detail shows even if the braids stay simple. It also works well with colorful elastics, since the pattern already feels playful.
Pro Tips for This Style:
- Use wider zigzags on thick curly hair. Tiny jagged parts can blur fast.
- Do the parting slowly. The line matters more than the braid length here.
- If the child is impatient, keep the zigzag shallow and the braids basic.
Variations on This Style:
- Double Zigzag: Add one zigzag across the crown and a second one behind it.
- Zigzag Pony Braids: Finish each section into a ponytail instead of a full braid.
- Side Zigzag Start: Begin the pattern off-center for a softer finish.
Common Mistakes to Avoid with This Style:
- Don’t try to make the zigzag too sharp. The line should read as playful, not carved into the scalp.
- Don’t skip detangling the parting area first. The comb will snag and the line will wobble.
15. Braided Mohawk
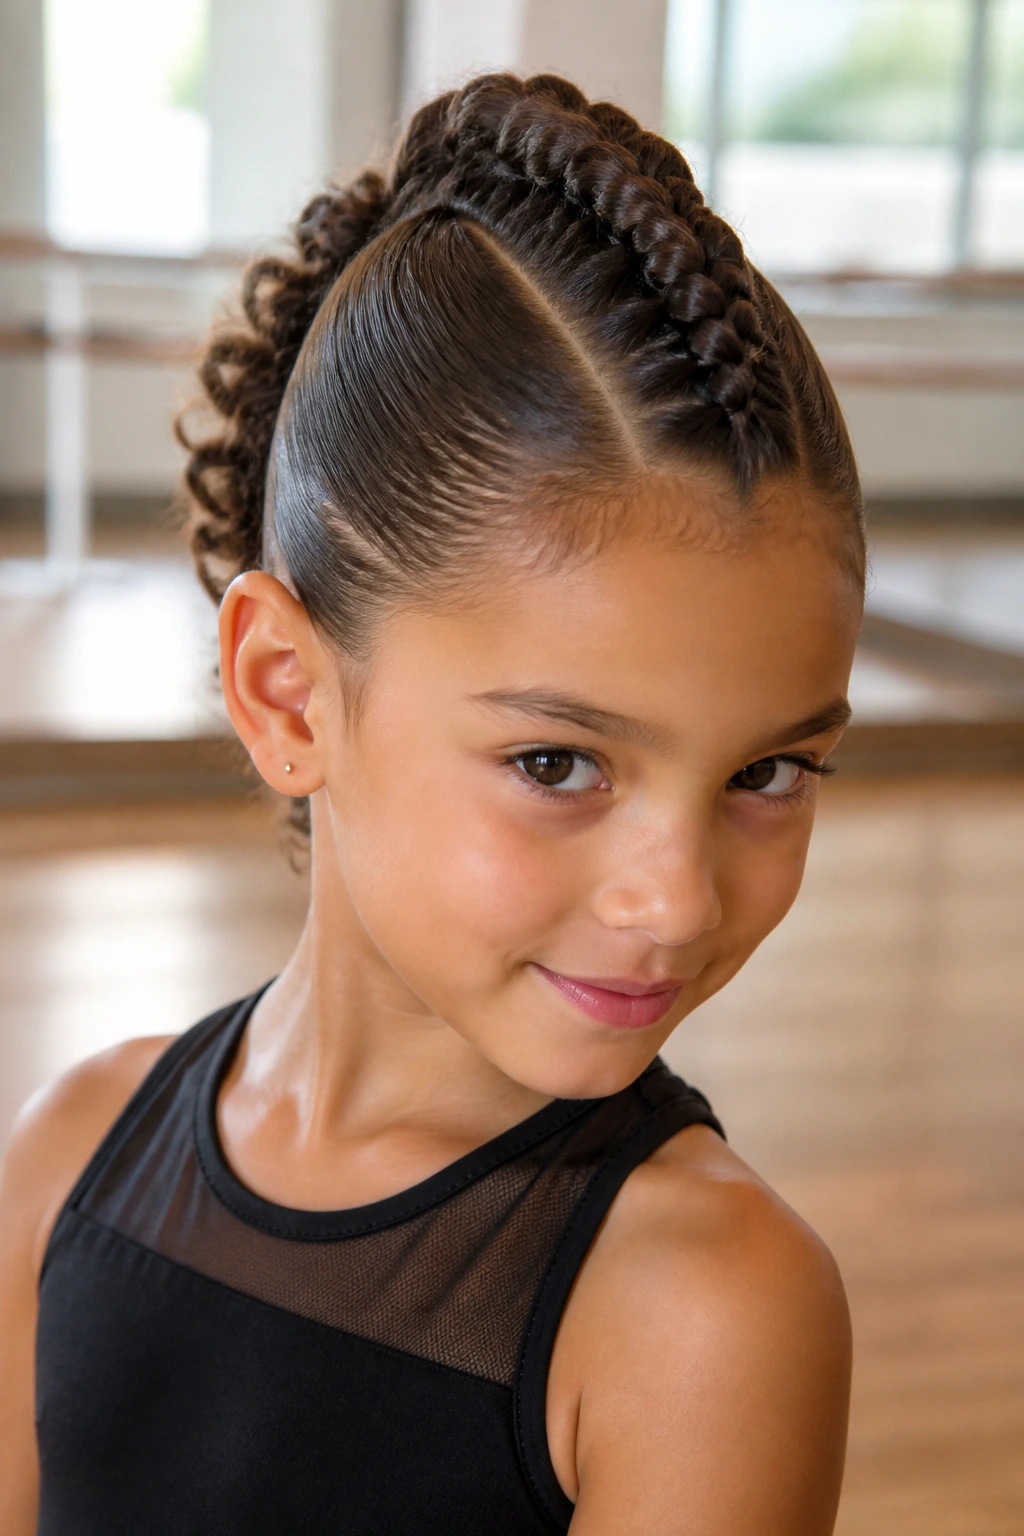
A braided mohawk gives you attitude without needing a complicated construction. The sides stay controlled, the middle braid gets the spotlight, and the curly texture on top keeps it from looking flat.
Why It Works:
Keeping the center section braided while smoothing the sides makes the style feel bold but still child-friendly. It’s a good option when you want movement on top and a clean outline near the ears.
Key Supplies:
- 1 rat-tail comb
- 2 to 4 clips
- Light gel or braid cream
- 2 small elastics
- 1 spray bottle
Quick Steps:
- Part off the center section from forehead to nape.
- Clip the sides down and smooth them back gently with a little product.
- Braid the center section into a Dutch braid or French braid.
- Secure the braid at the nape or continue into a ponytail.
- Fluff the braid slightly so it stands up instead of lying limp.
Tools for This Style:
- Clips
- Rat-tail comb
- Styling cream
- Elastic bands
How to Wear It:
This one works for dance class, birthday parties, or any kid who likes their hair to feel a little bold. Keep the sides neat and add a bright bow at the back if you want the style to read as fun instead of edgy.
Pro Tips for This Style:
- Don’t over-slick the sides. A thin layer of control is enough; hard-shell gel isn’t needed.
- Keep the center section wide enough that the braid doesn’t look thin on a full head of curls.
- If the hair is short, finish the braid into a small ponytail rather than trying to force a long tail.
Variations on This Style:
- Mohawk Bun: Coil the braided center into a bun.
- Two-Row Mohawk: Add a second narrow braid beside the first for more texture.
- Curly Top Finish: Stop the braid early and leave the ends curly.
Common Mistakes to Avoid with This Style:
- Don’t pull the sides so hard that the child hates the style by noon.
- Don’t make the center braid too narrow; it loses the mohawk effect fast.
16. Waterfall Accent Braid
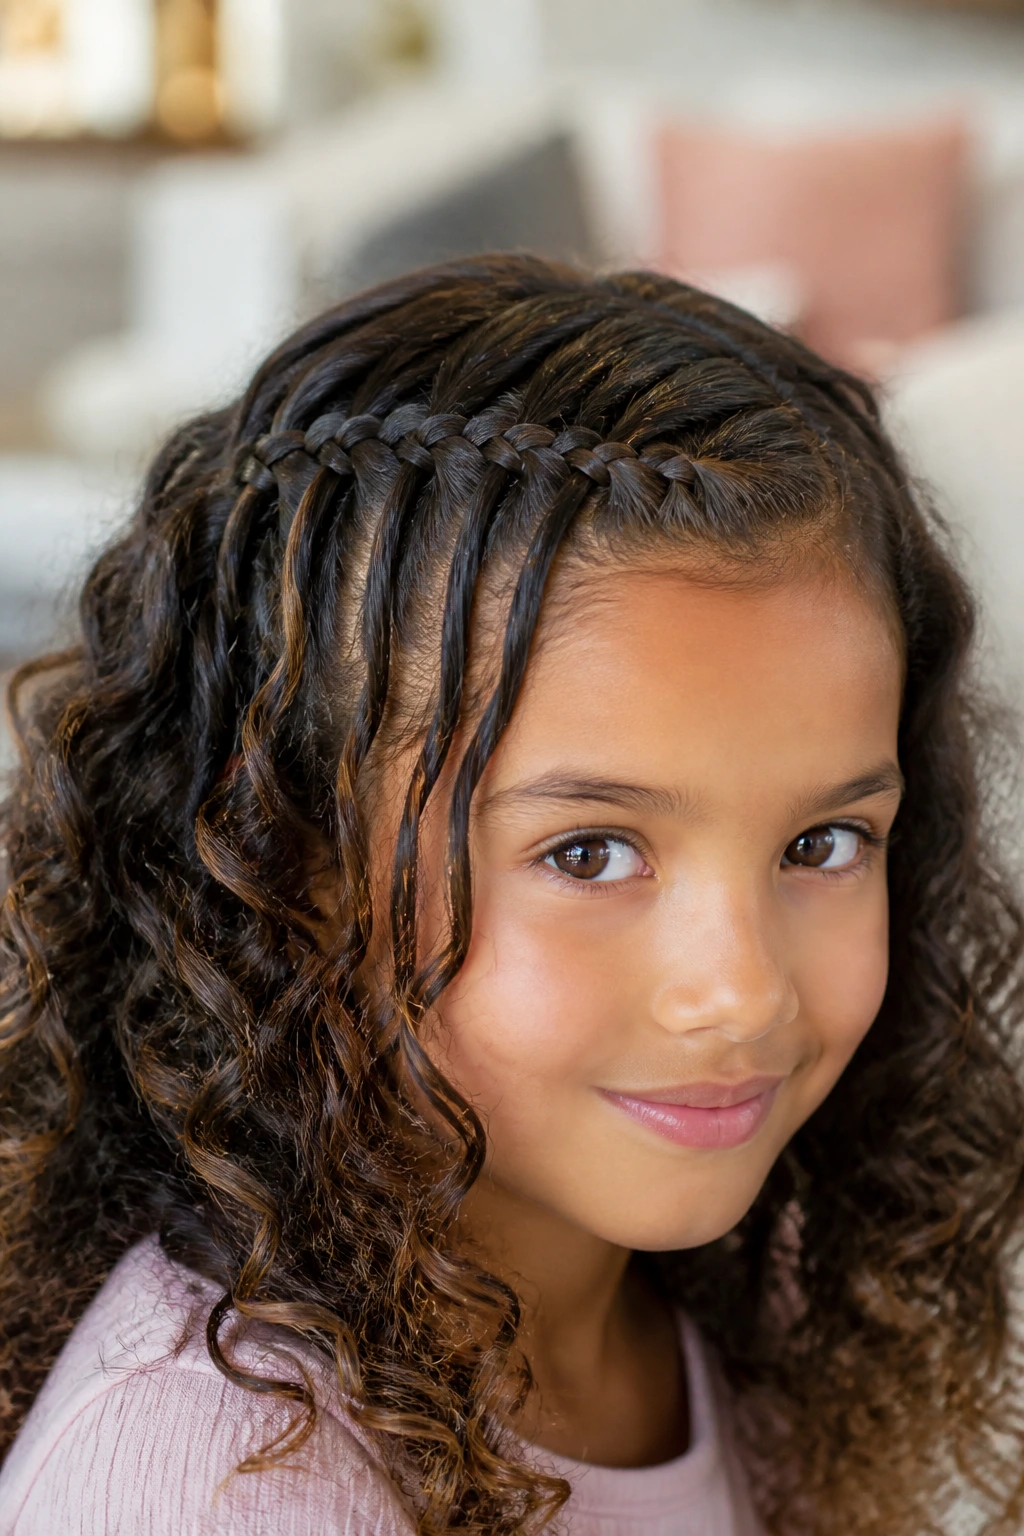
This one looks fussy from a distance, but the motion is repetitive once you get the rhythm. It’s a nice choice when you want one decorative braid without committing to a full head of braids.
Why It Works:
The dropped strands create a soft edge that shows off curly hair instead of hiding it. On slightly stretched curls, the waterfall shape is easier to see and easier to keep from collapsing into the rest of the texture.
Key Supplies:
- 1 rat-tail comb
- 1 spray bottle
- 1 to 2 small elastics
- 2 clips
- 2 bobby pins
Quick Steps:
- Part off a front section from one temple to the other.
- Start a braid near the hairline and cross the top strand over as usual.
- Drop the bottom strand and replace it with a fresh piece from just behind it.
- Continue across the head, letting the released pieces hang into the curls below.
- Pin the end behind the ear or blend it into a loose half-up style.
Tools for This Style:
- Rat-tail comb
- Bobby pins
- Small elastic
- Sectioning clips
How to Wear It:
This is a pretty option for photos, dress-up days, or any time a kid wants one special detail without sitting still for a full braided set. It pairs well with a soft headband or a simple clip near the end point.
Pro Tips for This Style:
- Best on hair with a little stretch. Very springy curls can make the dropped strands bounce too much.
- Keep the moving pieces small so the braid reads clearly.
- If the front hairline is short, stop sooner and pin the braid rather than forcing it too far.
Variations on This Style:
- Half-Up Waterfall: Finish the braid into a half-up style.
- Double Waterfall: Add one on each side for symmetry.
- Waterfall Crown Accent: Curve the braid across the top like a soft band.
Common Mistakes to Avoid with This Style:
- Don’t use too much cream at the front. Slippery pieces make the braid slide apart.
- Don’t pull the released strands tight. They should fall softly into the rest of the hair.
17. Space Buns with Mini Braids
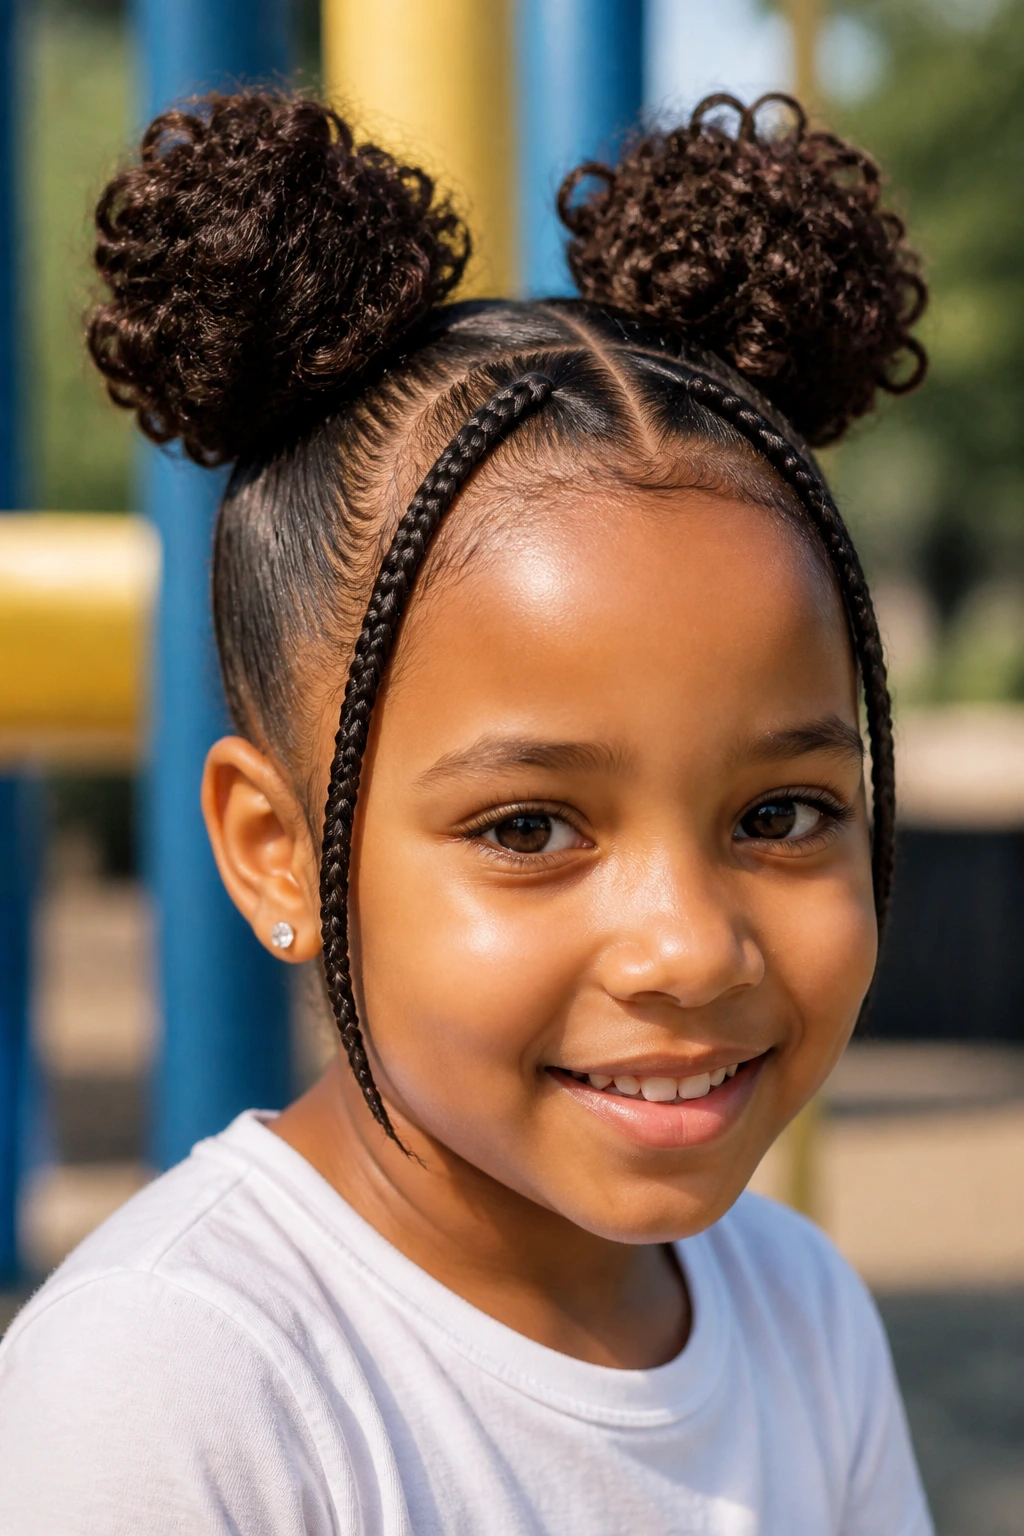
Space buns are fun on their own, but a few mini braids at the front make them feel less like a costume and more like a real style. Kids usually notice the braids first, which is a good sign.
Why It Works:
The small braids keep the front controlled while the buns hold the bulk of the hair off the neck. Curly hair adds enough volume that the buns look full even when they’re not huge.
Key Supplies:
- 4 small elastics
- 6 to 8 bobby pins
- 1 rat-tail comb
- 1 spray bottle
- Leave-in conditioner
Quick Steps:
- Part the hair down the middle and section off two small front pieces.
- Braid those front pieces into mini braids and clip them aside.
- Gather the remaining hair into two pigtails at the crown or upper sides.
- Twist each pigtail into a bun and pin it firmly.
- Lay the mini braids along the hairline or wrap them into the buns.
Tools for This Style:
- Bobby pins
- Sectioning clips
- Rat-tail comb
- Elastics
How to Wear It:
This works for dance class, playdates, or any day when a kid wants something playful and loud in the best way. Bright elastics or small bows near the buns make the style feel cheerful without adding weight.
Pro Tips for This Style:
- Place the buns at the same height so the style doesn’t tilt.
- Use the mini braids to disguise flyaways at the front.
- If the child has very thick hair, build each bun a little looser so it doesn’t pull the scalp.
Variations on This Style:
- Low Space Buns: Move the buns down behind the ears.
- Braided Bun Wraps: Wrap the mini braids around the bun base.
- Half Space Buns: Leave the back curls down and keep only the top buns.
Common Mistakes to Avoid with This Style:
- Don’t make the buns too tight. Space buns should sit, not clamp.
- Don’t ignore the front sections; the little braids are what make the look hold together.
18. Heart-Part Braids
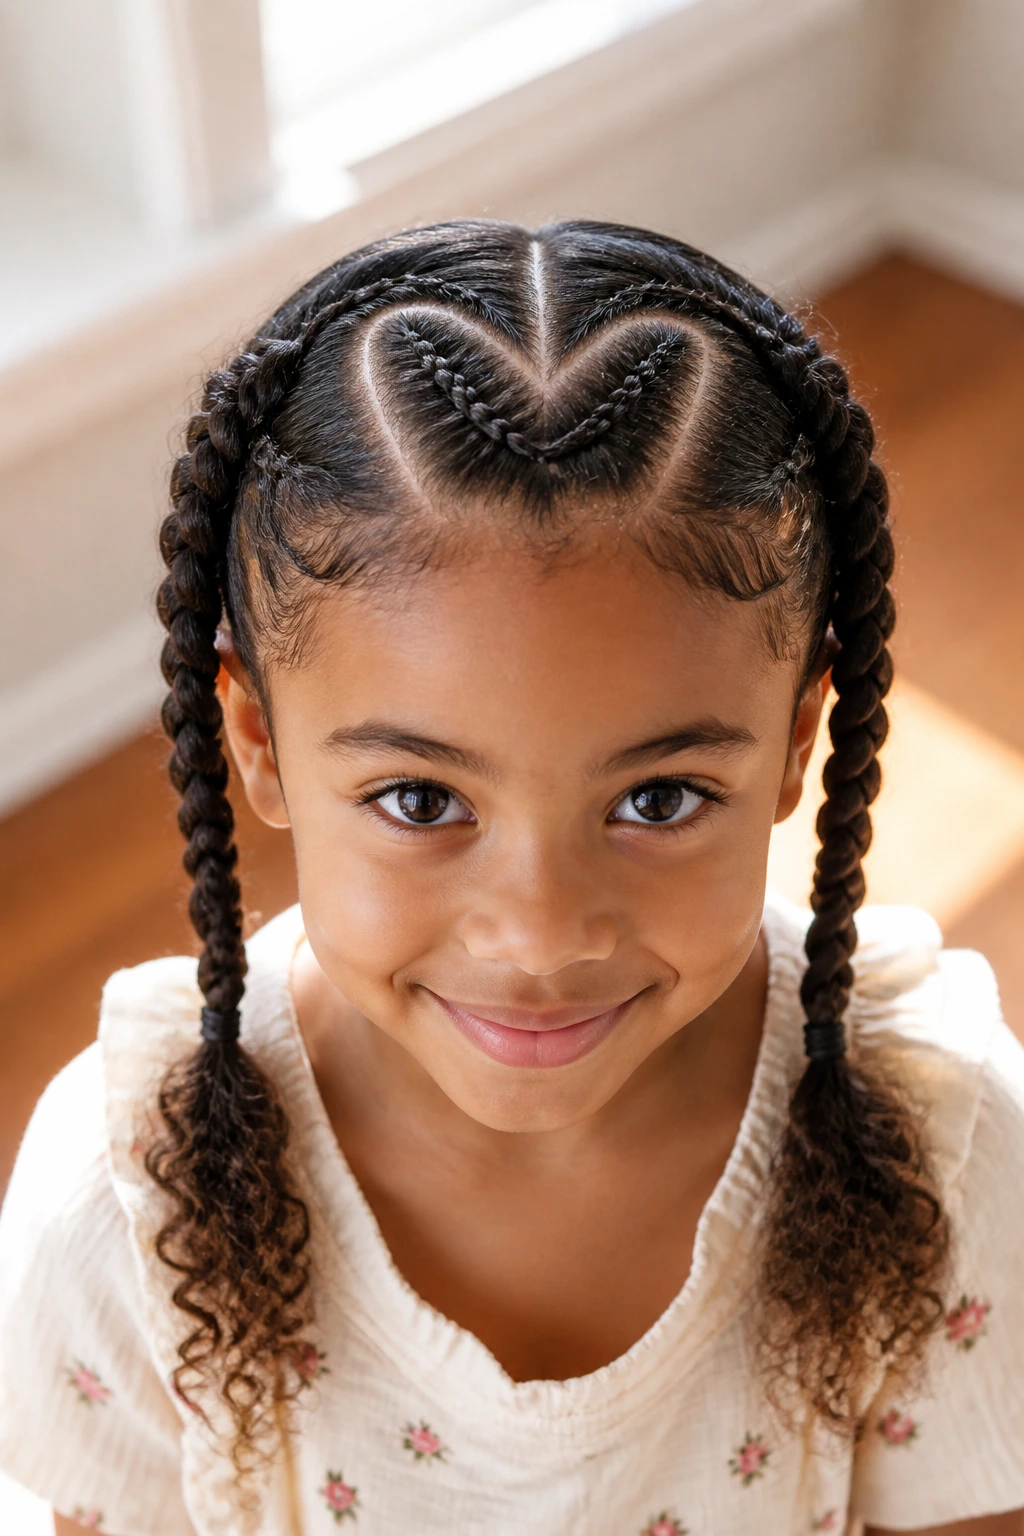
A heart part is the sort of detail kids remember. The braids can stay simple, but the parting makes the whole style feel special enough for holidays, birthdays, or photo day.
Why It Works:
The shape gives the style a clear focal point before the braid even starts. On curly hair, the part can be a little forgiving, which means the heart reads clearly without every curve needing to be mathematically exact.
Key Supplies:
- 1 rat-tail comb
- 2 to 4 clips
- 2 small elastics
- Spray bottle
- Light leave-in
Quick Steps:
- Mist the hair lightly and detangle the top area first.
- Use the tail of the comb to sketch a heart-shaped part from the front toward the crown.
- Separate the hair into 2 sections and braid each one into a simple pigtail braid.
- Secure the ends with small elastics.
- Smooth the heart outline gently with the comb tip and let the braids hang evenly.
Tools for This Style:
- Rat-tail comb
- Sectioning clips
- Small elastics
- Detangling brush
How to Wear It:
This is a special-occasion braid, plain and simple. A tiny bow at the end of each braid or a matching ribbon through the heart part makes the style feel finished without crowding the shape.
Pro Tips for This Style:
- Make the heart wide enough to show from a distance. Tiny hearts disappear into curly hair fast.
- Braid the sections after the part is set, not while you’re still fixing the shape.
- Use the comb tip to adjust the curve, not your fingers, or the lines will blur.
Variations on This Style:
- Double Heart: Add a second heart part behind the first for more detail.
- Heart Into Puff: Gather the braids into a puff instead of leaving them down.
- Heart Pigtails with Beads: Use one or two beads at the ends for a celebratory finish.
Common Mistakes to Avoid with This Style:
- Don’t make the heart too small or too sharp; it loses the shape once the curls settle.
- Don’t overwork the part line. A few clean passes are better than endless combing.
Why Curly Hair Braids Hold Better With a Little Stretch
Curly hair has a built-in advantage that gets ignored in too many styling tutorials. It grips. It bends. It gives braids texture and shape the moment the first section crosses over. That means you do not need to force a glossy, flat finish to get a style that lasts.
The part that matters most is the prep. A quick detangle with water and leave-in, starting at the ends and moving upward, changes the whole experience. Slightly stretched curls part cleaner, the sections stay more even, and the braid doesn’t have to fight shrinkage while you work.
Tension is the other big piece. A child’s braid should feel secure, not clenched. If you can see the scalp lifting, or if the child keeps touching one side of the head, the braid is too tight. A style that sits a little softer usually lasts longer because the hair isn’t protesting the whole time.
No heat is required for most of these looks. A damp braid-out base, a low-stress detangle, or even hair that was braided the night before can be enough. That matters because the best styles for kids are usually the ones they can tolerate again tomorrow.
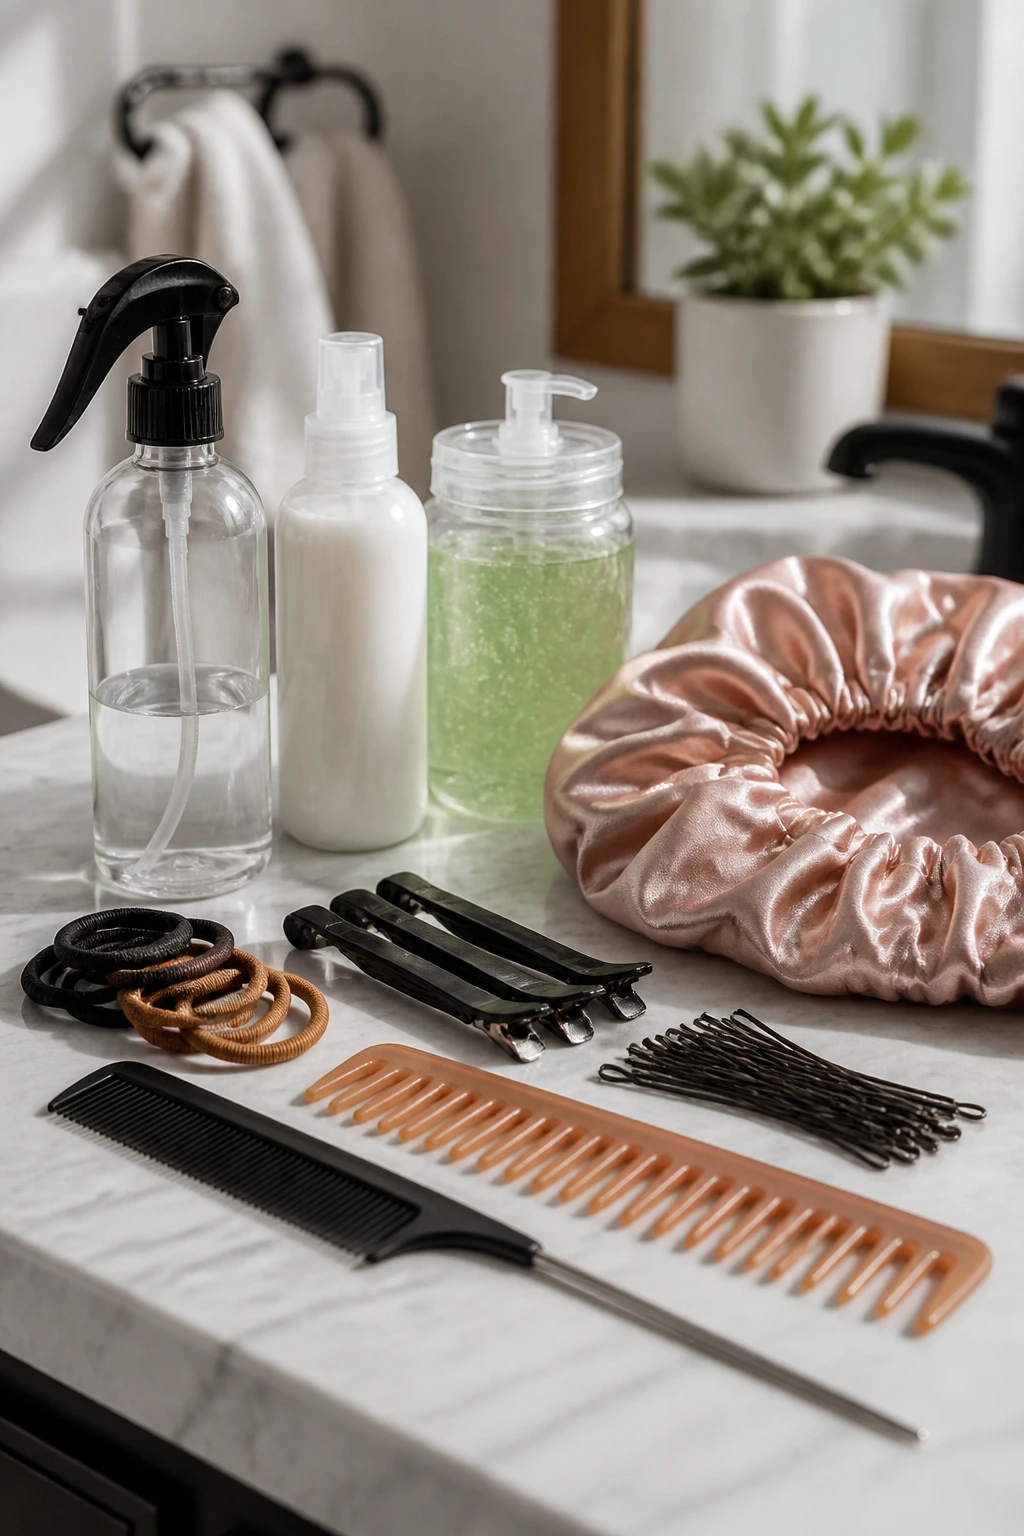
Essential Equipment for These Styles
-
Rat-tail comb: The skinny tail gives you clean parts, especially for center lines, zigzags, and heart shapes.
-
Wide-tooth comb or detangling brush: Use this before styling so the braid starts on smooth, separated strands instead of knots.
-
Spray bottle: A few light mists are enough to wake up dry curls without soaking the whole head.
-
Snag-free elastics: Metal seams pull hair out during removal, and kids notice that pain faster than adults expect.
-
Duckbill or sectioning clips: These keep one side out of the way while you braid the other side and save a lot of accidental mixing.
-
Bobby pins: Useful for halo braids, buns, and any style that needs hidden support.
-
Leave-in conditioner or braid cream: Choose something with slip so the hair parts without dragging.
-
Light styling gel: A small amount on the roots can tame flyaways, but the goal is control, not a helmet.
-
Satin bonnet or scarf: This is the difference between a braid that lasts and a braid that wakes up fuzzy.
Smart Product Picks for Softer Parts and Less Frizz
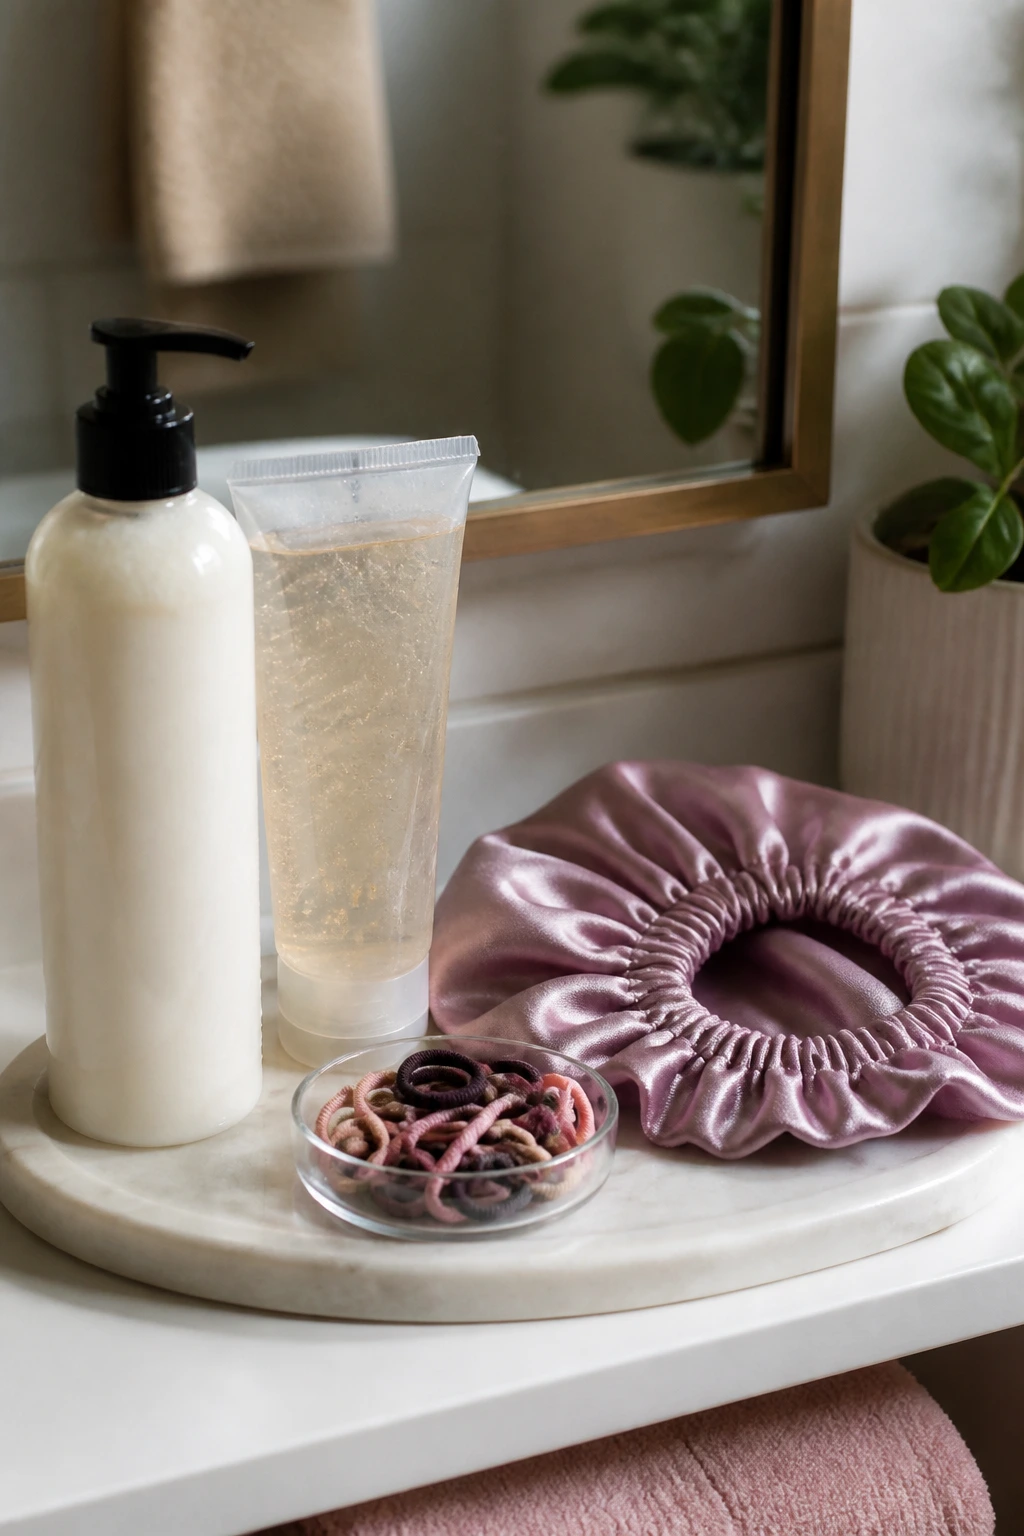
Braiding products for curly kids should help the hair move, not freeze it. I like water-based leave-ins first, because they give slip without turning the hair greasy. If the first ingredient is water and the texture feels light in your hands, you’re usually in the right area. Thick butters and heavy oils can feel nice for seal-in moisture later, but they make parts slide around while you’re trying to braid.
A light gel is useful when the front hairline needs a little help. The best kind dries clear, doesn’t flake when you rub it between your fingers, and doesn’t leave the roots stiff as wire. If a gel leaves white dust on your comb before you even finish the style, toss it. That mess only gets worse once the child starts moving.
For elastics, choose the soft, no-metal kind. Small clear bands work well for bubble braids and pull-through styles, while slightly larger snag-free ties are better for buns and puffs. Kids with very dense curls often need stronger elastics, but stronger should not mean sharper. You want hold, not a fight at removal.
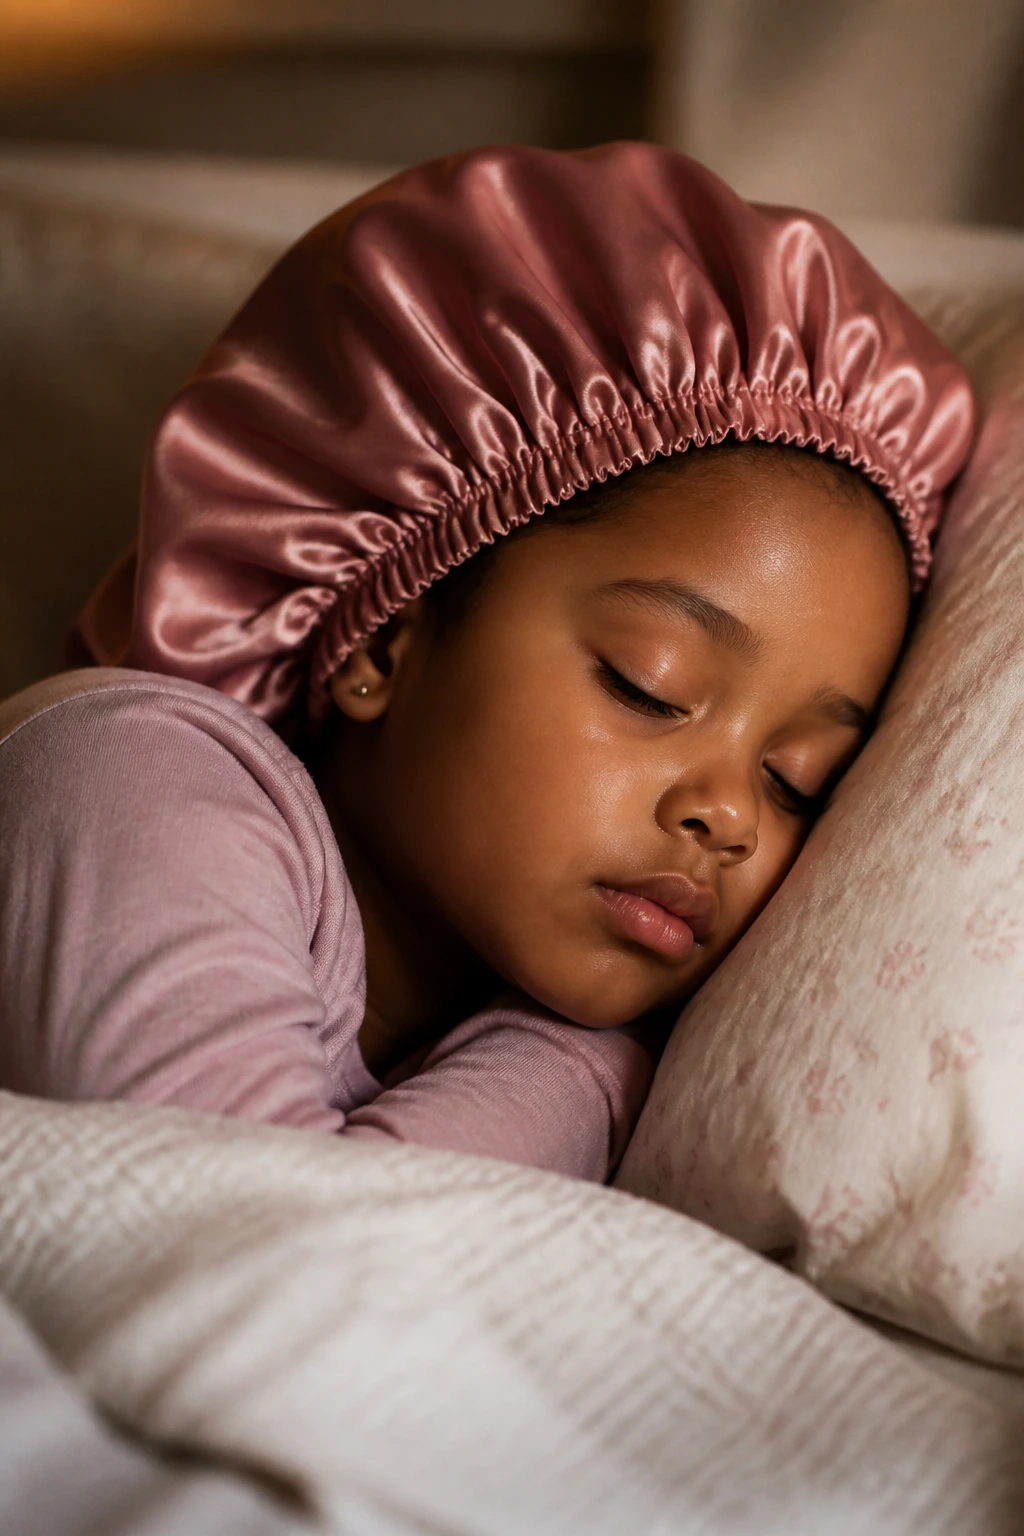
Satin matters more than people think. A satin bonnet, scarf, or pillowcase keeps friction down overnight, which helps the braid stay neat and stops the ends from fuzzing up by the second day. For children with sensitive scalps, fragrance-light products are usually the safer pick because the style should feel good enough to forget about.
How to Wear These Braids to School, Practice, and Picture Day
Presentation: Keep the braid line clean and the finish soft. A braid that sits neatly at the hairline and keeps the ends even always looks more intentional than one that’s overworked into stiffness.
Accessories: Bows, bead ends, ribbon tails, snap clips, and soft headbands all work well here. For everyday wear, I’d keep accessories light and snag-free; for dress-up days, a matching bow at the braid end is often enough.
Scale: Bigger sections make a faster style for thick hair, while smaller sections give you more control on shorter curls. If a child has a tender scalp, choose fewer braids with less pull instead of packing in more detail.
Best Match: Side braids and half-up styles are easy for school. Boxer braids, cornrows, and braided buns handle practice or active days better. Crown braids, heart parts, and waterfall accents are the ones I’d save for picture day, parties, or any moment when the mirror matters.
Small Tweaks That Make Braiding Kinder and Faster
Frizz Control: Smooth the outer layer of each section with your fingers or a small brush, but don’t try to erase every bit of texture. Curly hair looks best when it still looks like curly hair.
Time-Saver: Pre-part the hair before you start braiding. Four clips and a clean map of the head can save ten minutes of backtracking when the child starts wriggling.
Comfort Check: Ask the child to turn their head, smile, and look down after the first braid is in. If the skin around the hairline tightens or the ears feel pinched, loosen it right then.
Pro Move: Use one tiny dab of product at the roots and a slightly richer cream on the ends. That keeps the part neat while the braid tail stays soft enough to fold, twist, or secure.
Make-It-Them: Add a ribbon, one colored elastic, or one small bead accent rather than loading the whole head with extras. Kids usually like one clear detail better than a pile of them.
Night Wraps, Refreshing, and How Long These Styles Last
Most of these styles stay neat for 1 to 3 days if they’re loose and decorative, like side braids, half-up braids, or waterfall accents. Denser styles like boxer braids, cornrows, and feed-in braids can last 5 to 10 days when the scalp is healthy and the child sleeps with a satin bonnet or scarf. Braided buns and halo braids usually sit somewhere in the middle, about 3 to 5 days before the shape starts to soften.
Night care matters. A satin bonnet or pillowcase cuts down on friction, and that alone keeps the parts cleaner. If the child hates bonnets, tie a soft satin scarf loosely around the hairline and let the lengths rest on the pillow. For styles with buns or puffs, a loose pineapple at the crown works too, but keep it loose enough that it does not stretch the roots while they sleep.
Refreshing should be light. A few sprays of water mixed with a small amount of leave-in at the hairline is usually enough, followed by smoothing with clean fingers. Do not soak the braids. Too much moisture swells the hair and can make the style fuzzy or take forever to dry.
Removal should be gentle and planned. Cut elastics rather than ripping them out, and work braid by braid from the ends upward. If a style has been in for more than a week and the scalp feels sore or itchy, wash and rest the hair before putting in another set. Kids do not need a heroic endurance test on their heads.
Variations and Adaptations to Try
-
Quick School-Morning Version: Pick side braids, half-up braids, or rope pigtails and skip extra accessories. These are the styles that can move from detangled hair to out-the-door in one sitting.
-
Ribbon Day Version: Thread a thin ribbon through the tail of a braid or tie it around a ponytail base. It gives a plain style a special finish without adding weight or tension.
-
Low-Tension Sensitive-Scalp Version: Choose looser braids, wider sections, and fewer rows. Boxer braids can be adapted here if you keep the root tension light and stop before the scalp feels pulled.
-
Short-Curl Friendly Version: Use cornrows, half-up braids, zigzag parts, and braided crowns on shorter hair. Styles that rely on the roots tend to hold better than long tail braids when the lengths are limited.
-
Post-Swim Rescue Version: After pool time, rinse the hair, detangle with leave-in, and switch to a simple side braid or a braided bun. Chlorine and braids do not need to be enemies, but the hair does need a quick reset.
-
Party-Photo Version: Heart parts, waterfall accents, and braided buns with bows work well when you want the style to read clearly in pictures. Keep the lines clean and the accessories small enough that they frame the braid instead of swallowing it.
Common Mistakes to Avoid

The first mistake is starting on tangled hair. The braid may go in faster that way, but it will not stay neat, and the child will feel every snag. Detangling from the ends up and adding a little slip to the hair first saves more time than it costs.
Too much tension is the second problem, and it shows up fast. If the child is touching the sides of the head, wincing, or asking you to stop halfway through, the braid is too tight. Loosen it. A braid that feels comfortable at the chair usually survives the day better than one that looks ultra-flat and feels miserable.
Product overload is a sneaky one. Heavy cream, thick oil, and too much gel can make the hair slippery in your hands and gummy by the next hour. Use enough to help the hair move, not enough to coat it. The goal is neatness, not a slick helmet.
Another mistake is choosing a braid that does not match the length or density of the hair. Tiny fishtails on short curls can turn into frustration. A crown braid on very thick, springy hair can become a long afternoon. Pick the style that suits the head in front of you, not the photo you saved.
The last problem is skipping nighttime care. Even the best braid starts to frizz after a rough pillow fight. A satin wrap and a light refresh protect all that work.
Frequently Asked Questions
What is the easiest braid for a child with curly hair?
A side-swept braid or rope braid pigtails are the quickest starting points. They need fewer moving parts, less sectioning, and less time with the comb.
Should curly hair be braided wet or dry?
Slightly damp is usually the sweet spot. Wet hair stretches oddly and takes longer to dry, while dry curls can fray and resist parting.
How do I keep braids from getting frizzy by lunchtime?
Start with a clean detangle, use a light leave-in, and sleep on satin if the style needs to last more than one day. Frizz usually starts at the hairline and ends, so those are the spots to refresh first.
Can these styles work on short curly hair?
Yes, but the best options are the styles that stay close to the scalp: cornrows, boxer braids, zigzag parts, and half-up braids. Very long tail styles need more length than some short cuts can give.
How tight should a kid’s braids be?
Tight enough to stay in place, never tight enough to hurt. If the scalp looks raised, the child keeps rubbing the same spot, or you can see tension at the edges, loosen it.
What if my child hates sitting still for braiding?
Break the style into parts. Detangle first, then do one braid at a time, and keep a clip or tablet handy. Shorter styles like rope braids and side braids usually finish before patience runs out.
How long can braids stay in before they need a redo?
Decorative styles often last 1 to 5 days, while tighter protective styles can last closer to a week or more if the scalp is comfortable. As soon as the parts blur, the roots itch, or the braid starts leaning, it’s time to redo.
What if the braid keeps unraveling at the ends?
Use a smaller elastic and braid a little farther down before tying off. If the ends are extra slippery, add one tiny dab of cream and secure the tail with two wraps instead of one.
Braids That Hold Up Past Breakfast
The braid that survives a child’s day is rarely the tightest one in the room. It’s the one that starts with clean parts, enough slip to move through curly hair, and a finish that doesn’t fight the child’s scalp. That’s the pattern running through all 18 styles here: neat enough to last, loose enough to live in.
Start with the simplest version that matches your child’s length and patience. Side braids, pigtails, half-ups, and rope braids are good first wins. Once your hands know the rhythm, the crown styles, feed-ins, and heart parts stop feeling intimidating and start feeling like a normal part of the week.
And that’s really the point. A good braid should make the morning easier, not louder.