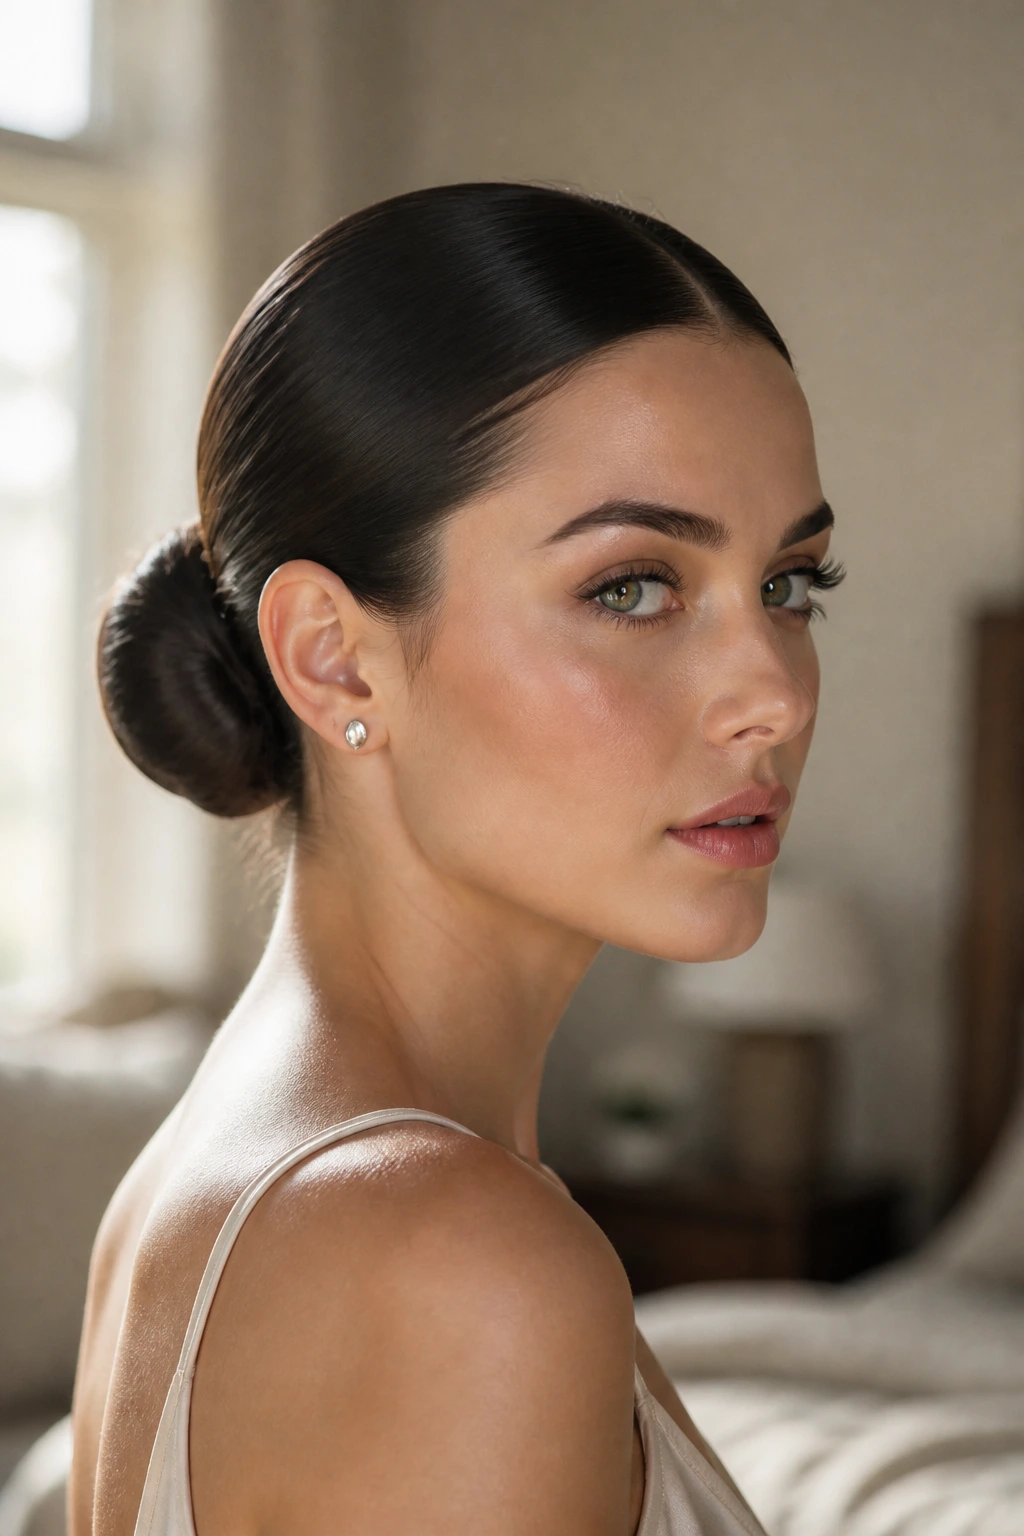
A sleek updo looks simple from across the room. Up close, it is a negotiation between smoothness, tension, shine, and the stubborn little hairs that refuse to stay down no matter how nicely you ask. The difference between polished and slightly frazzled is often a few deliberate moves: a cleaner base, a better brush angle, a stronger pin placement, and enough patience to stop fiddling once the shape is set.
That’s why this style has such staying power. A sleek updo can make damp weather less annoying, second-day hair look intentional, and a plain outfit read as finished instead of half-done. It can feel severe if it’s handled badly. It can also look sharp, expensive, and quietly confident when the surface is controlled and the silhouette sits in the right place on the head.
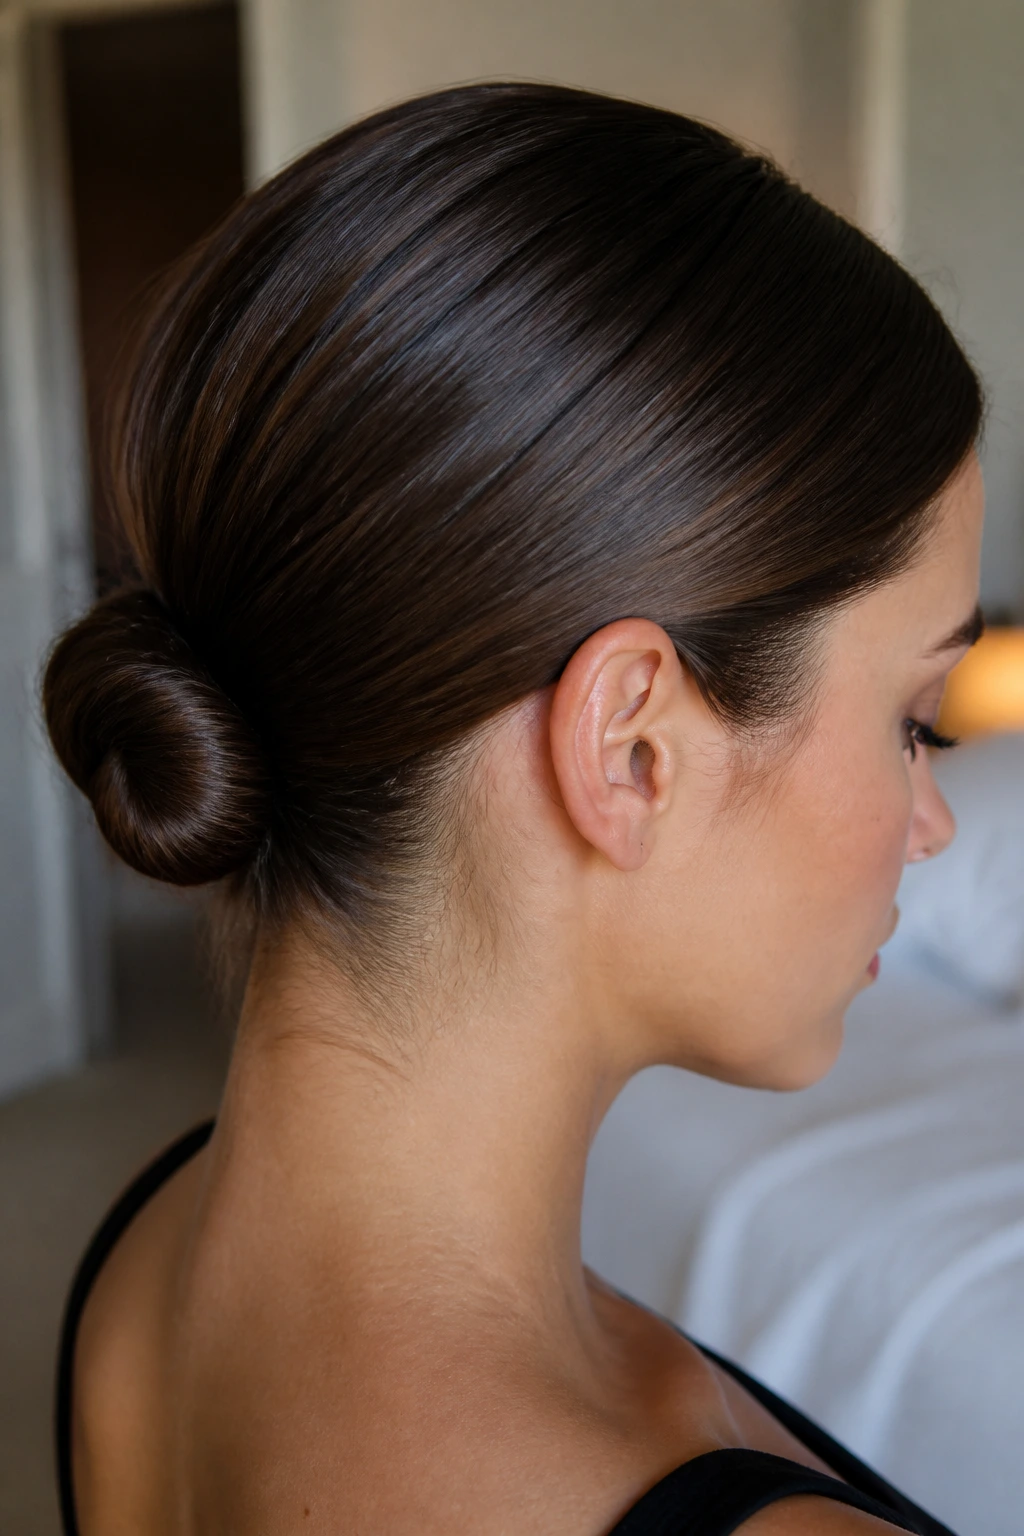
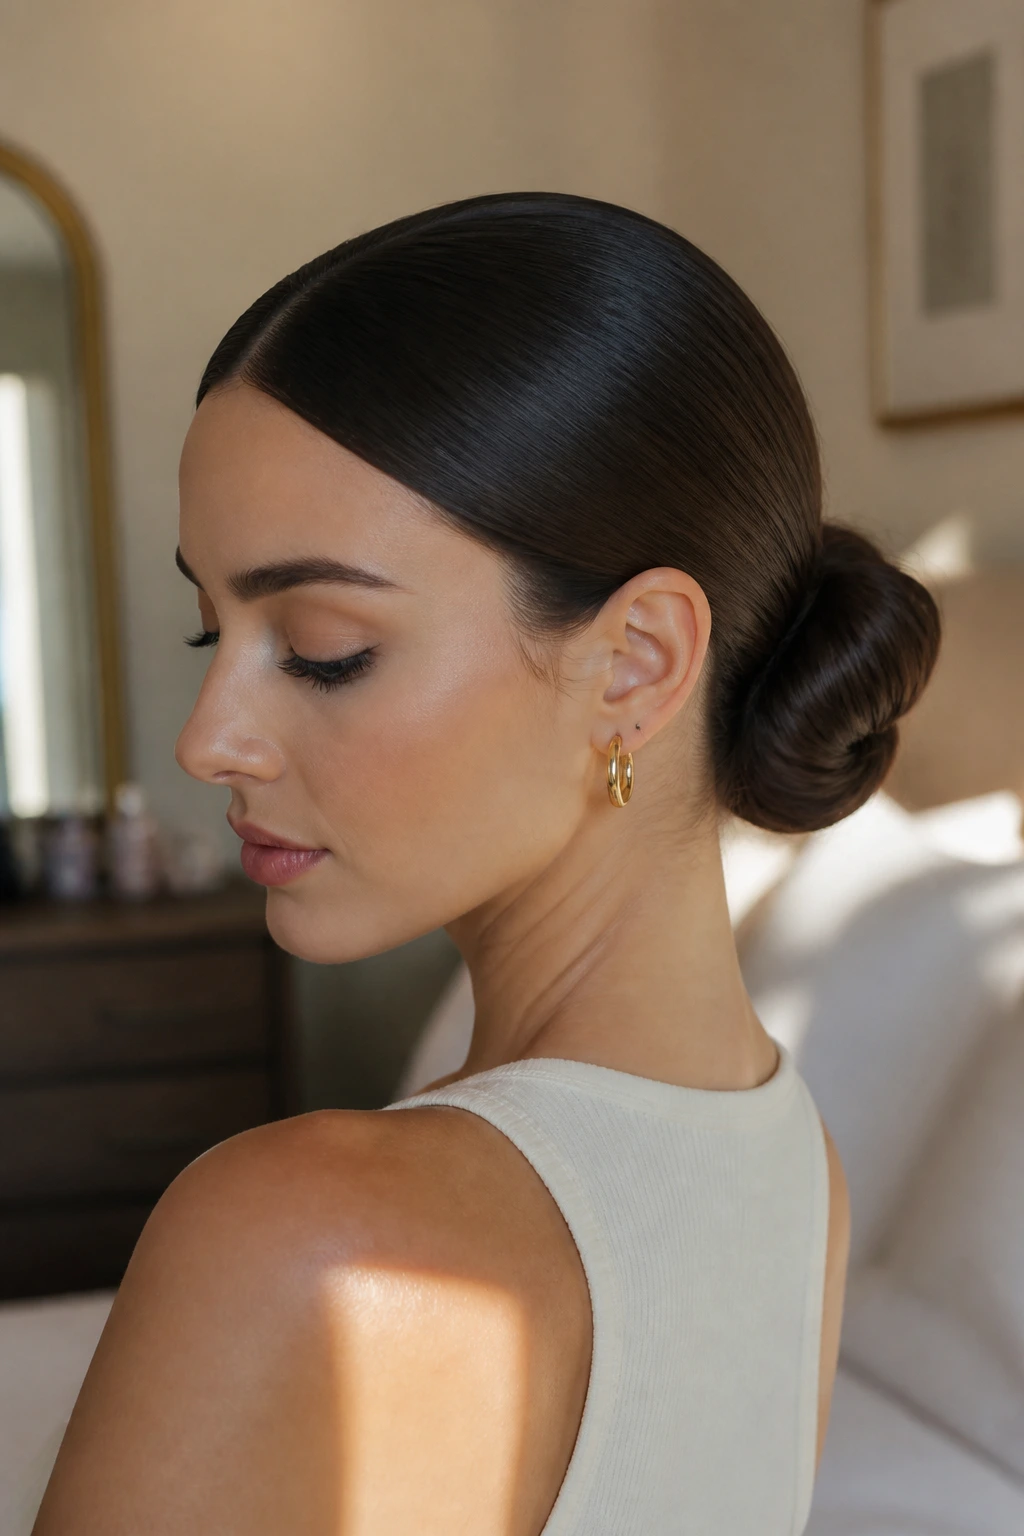
I like the low version best because it gives you room to work. You can smooth, tuck, and pin without forcing the whole style into a tiny knot that screams for help by dinner. Once the foundation is right, the rest is mostly shape and restraint. That part matters more than people think.
Why a Sleek Updo Is Worth the Trouble
-
It keeps the eye on the line, not the frizz: A smooth hairline and a clean nape create a strong outline, which reads as deliberate even when the rest of the outfit is low-key.
-
It works with hair that feels uncooperative: Slightly oily roots, day-two texture, and hair that has lost its bounce can all work in your favor here, because the style needs grip more than fluff.
-
It gives you a hard stop against humidity: Loose waves can swell the minute moisture hits them. A sleek bun or twist has less surface area for frizz to spread across, so the shape stays cleaner.
-
It makes accessories behave better: A flat base gives barrettes, pins, and earrings room to show up without competing with big, airy hair.
-
It scales from office to formal dinner without a haircut: Change the part, lower the bun, or add a wrapped ponytail and the same basic structure can look restrained or dressy.
-
It saves bad hair days with a little strategy: When the top is flat, the ends are dull, or the crown has gone weird, a polished updo turns the problem into a clean shape instead of a struggle.
What Makes the Finish Look Smooth Instead of Flat
A sleek updo is not the same thing as hair being mashed against the scalp. That’s the rookie trap. The style works when the hair is guided, not bullied. Smoothness should come from direction and product control, while the overall shape still has enough life to keep the head from looking pasted shut.
The cleanest versions share three things: a controlled hairline, a stable anchor point, and a surface that reflects light in a soft line rather than a patchy one. If the crown puffs up, the style reads as unfinished. If the bun is too tight and too tiny, the result can look severe. And if the ends are left to poke out in random directions, the whole thing loses the neat, intentional feel that makes a sleek updo worth doing in the first place.
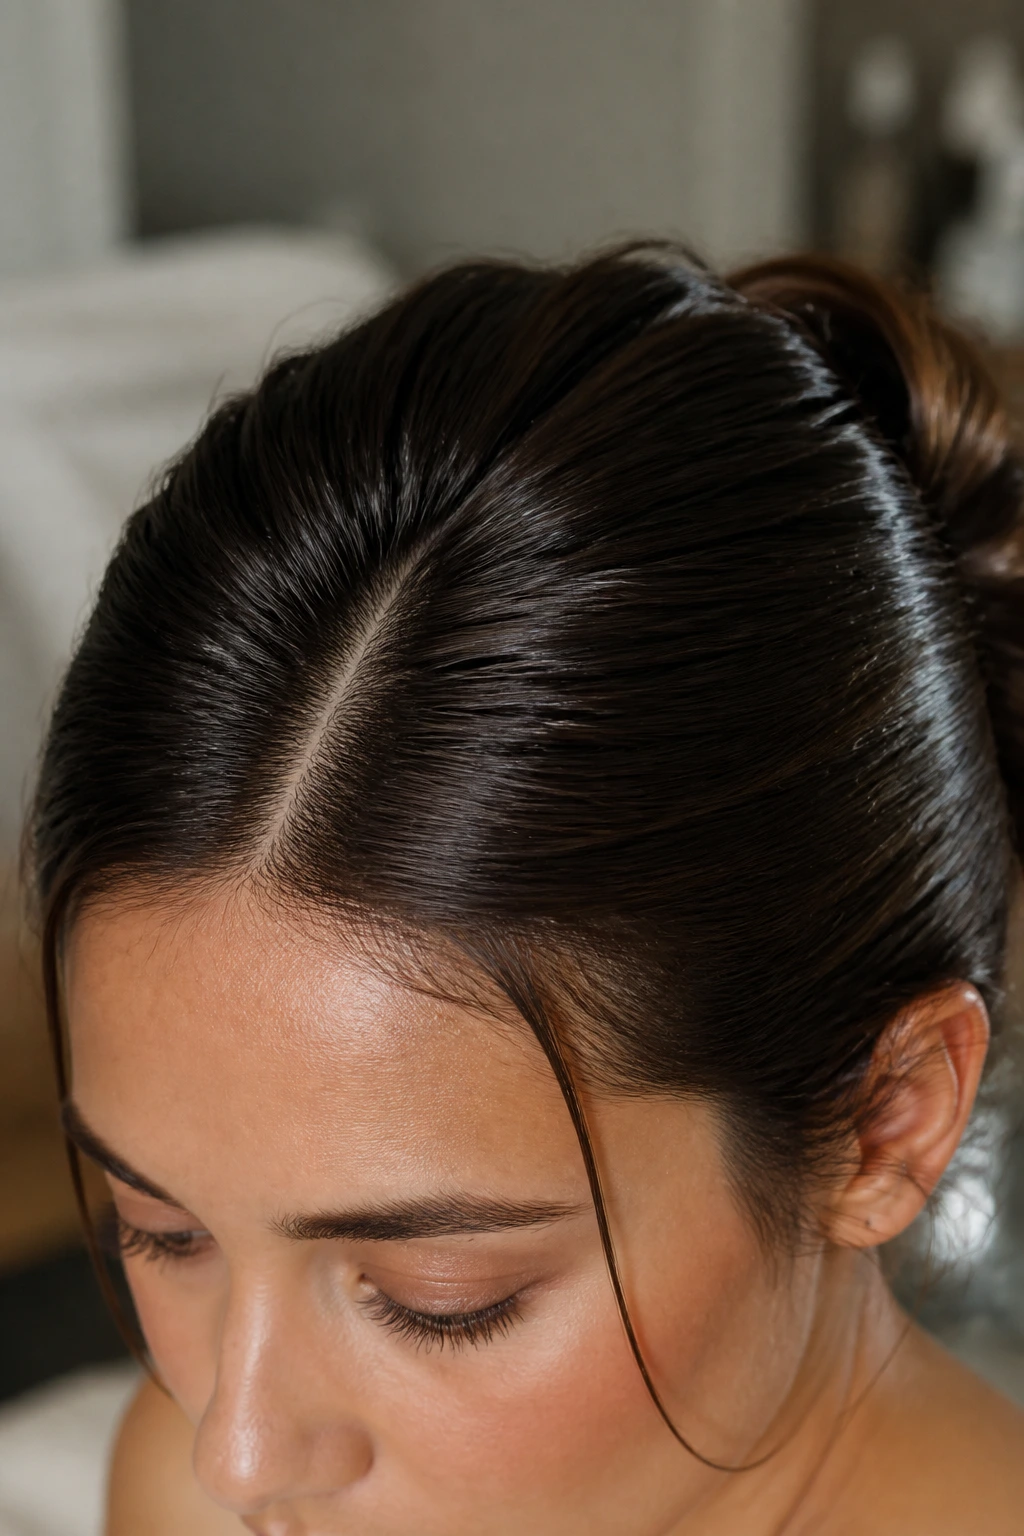
The hairline is the first clue
The front section does a lot of heavy lifting. A clean part, brushed side sections, and a thin veil of product around the temples set the tone before the bun even exists. I’m not a fan of drenching the hairline in gel. That tends to make the roots look wet in a bad way. A lighter hand gives you control without the helmet effect.
Shape matters more than volume
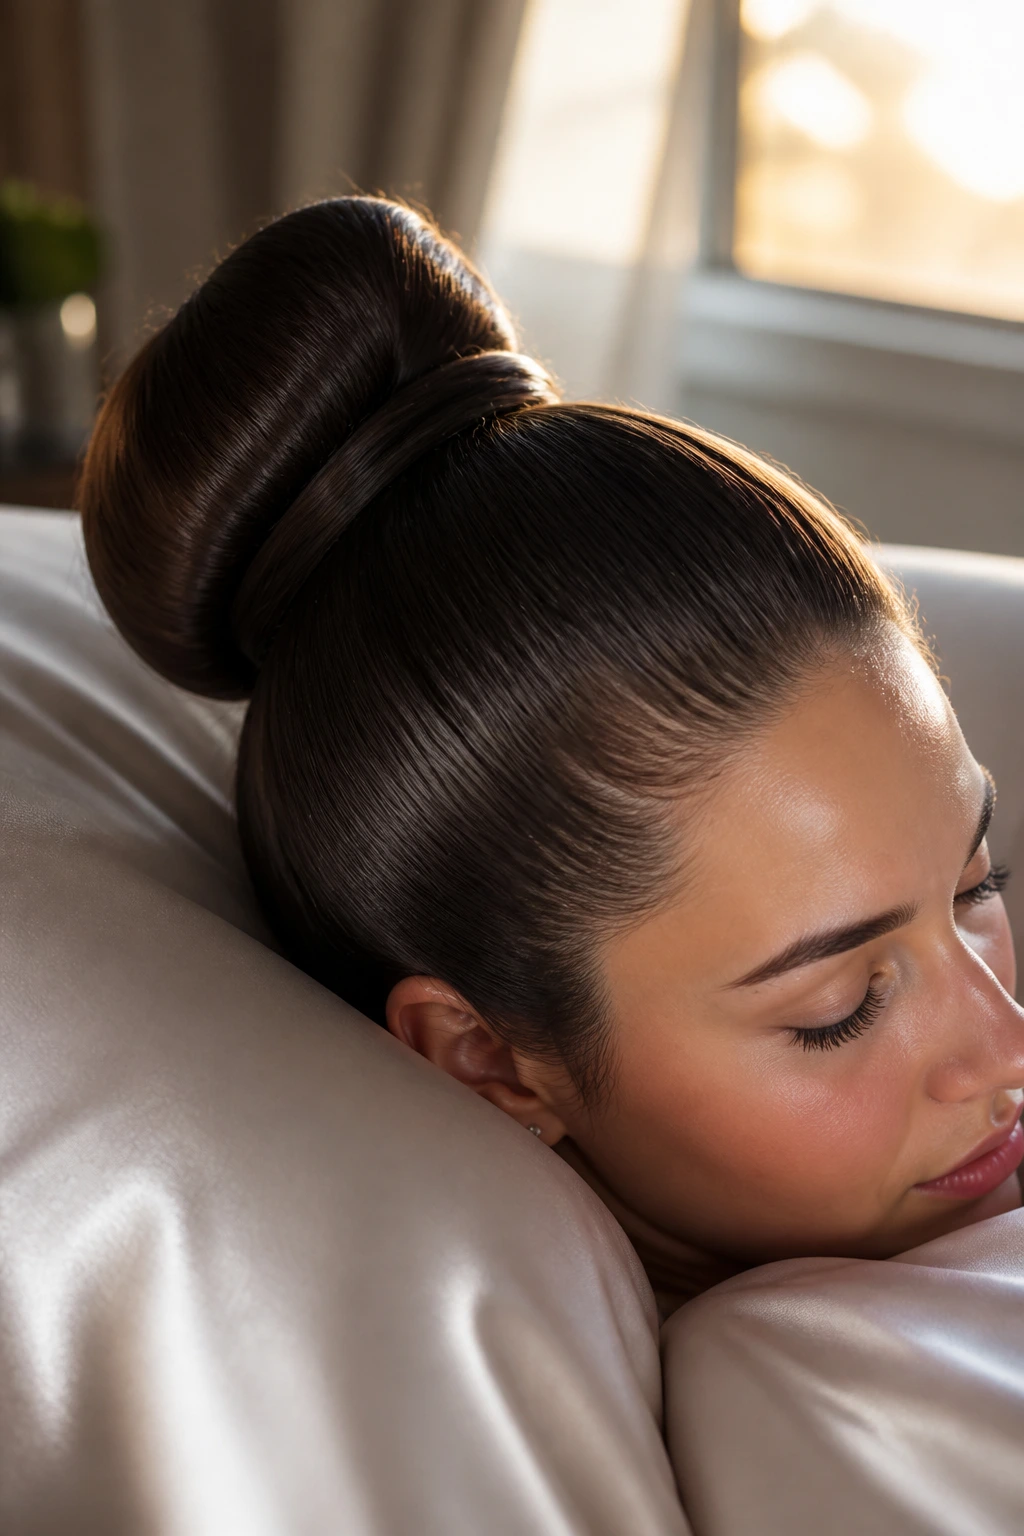
People sometimes chase “sleek” so hard that they flatten the whole head. Don’t. The bun, knot, or twist should still have a clear shape. A low oval bun, a tucked chignon, or a folded ponytail reads much better than a compact lump that looks like it was made in a hurry.
Shine should look like hair, not plastic
That line between polished and sticky is thin. A small amount of serum on the lengths and a touch of spray on the outside layer usually gets you there. Too much, and the style starts to separate under light. Too little, and the surface looks dusty. The sweet spot is visible only when the hair moves.
The Hair Prep That Matters Before a Comb Touches the Head
Most sleek updo problems start before the styling starts. The hair either has too much slip, too much puff, or too much leftover conditioner clinging to the roots. Once that happens, the comb has to fight the surface. That’s exhausting, and the style can only hold for so long.
Clean roots, soft lengths
Freshly washed hair can be slippery in the exact wrong way. Second-day hair usually gives better grip, especially if the roots are still clean enough to smooth down without clumping. If your hair tends to go flat and greasy fast, wash it earlier in the day and let it dry fully. If your hair is dry and coarse, a light leave-in on the ends can stop the bun from feeling wiry.
Dry hair gives you control
A sleek updo is much easier to shape on fully dry hair. Damp roots can look smooth at first, then spring back with a vengeance once they dry. That puff-back is annoying. It usually shows up right when you think you’re done. If you need to shape with heat, use a blow-dryer with a nozzle and direct the airflow from front to back so the cuticle lies in the same direction you’re brushing.
Product order matters more than product quantity
Start with heat protectant if you’re blow-drying. Add a small amount of smoothing cream or mousse only where the hair needs it. Then finish with gel, wax stick, or hairspray in very measured amounts. Dumping all three on at once just builds a sticky layer that flakes later.
Tools That Make the Job Easier
A sleek updo does not need a drawer full of gadgets, but a few specific tools make the whole thing much less annoying.
-
Fine-tooth tail comb: Essential for clean parts and for guiding the surface hair into a smooth line without lifting too much volume.
-
Boar-bristle or mixed-bristle brush: Good for the final polish, especially around the crown and sides where you want the strands to lie flat.
-
Strong hair elastics: Choose ones that hold without snapping. The cheap stretchy ones are fine if they grip well, but they should not feel flimsy.
-
Bobby pins in your hair color: Match them as closely as you can. Wavy-sided pins grip better against the scalp than the perfectly straight kind.
-
Sectioning clips: Helpful if your hair is thick, layered, or slippery. They keep the front pieces from escaping while you work on the back.
-
Hairspray with flexible hold: A firm spray can lock the surface without freezing every strand into place. That matters if you want the style to move a little instead of cracking.
-
Smoothing cream, gel, or wax stick: Pick one main control product and use the others sparingly. Too many products at once usually makes the hair look dirty faster.
-
Handheld mirror: Non-negotiable if you care about the back. The back of the head is where sleek updos often go to hide their mistakes.
-
Blow-dryer with a nozzle attachment: Useful for smoothing the roots and directing the cuticle. The nozzle matters. It gives you control.
-
Optional: small toothbrush or spoolie: Great for taming baby hairs along the hairline without spraying product everywhere.
The Classic Low Sleek Bun, Step by Step
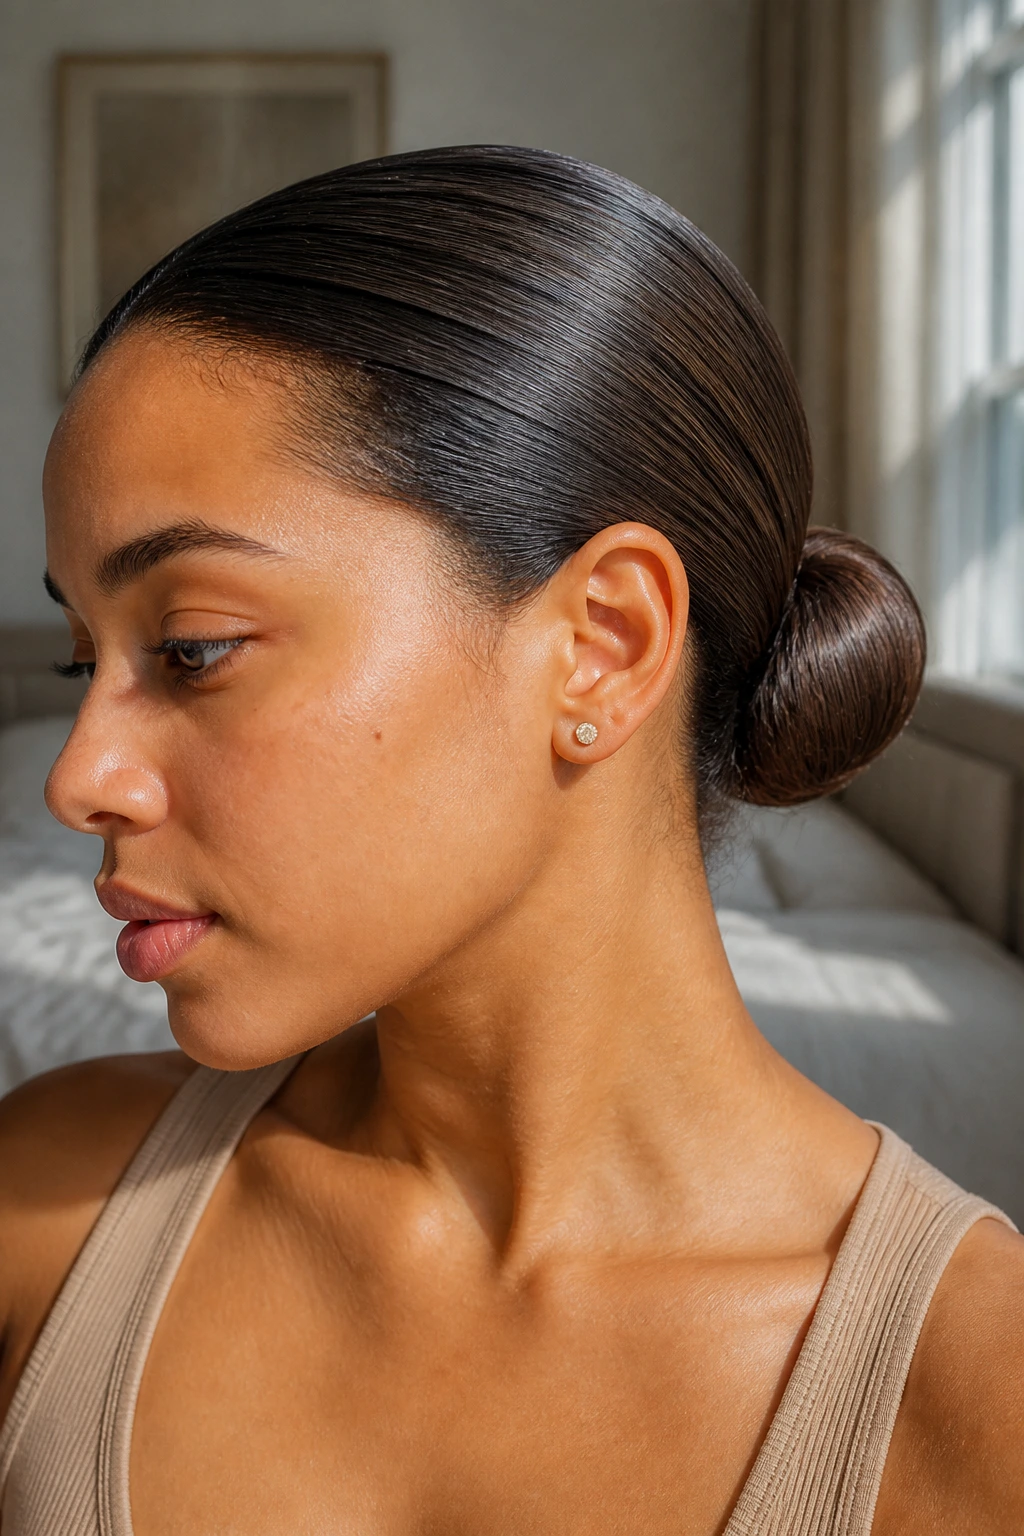
The classic low bun is the safest place to start because it exposes the fewest weak spots. The shape sits at the nape, which gives you room to smooth the crown and tuck the ends without making the style feel overworked.
Step 1: Build a smooth base
- Start with dry hair. If the roots are fluffy or uneven, mist them lightly with water or a leave-in conditioner mix, then blow-dry them smooth with the nozzle pointed from forehead to nape.
- Apply a pea-sized amount of smoothing cream through the mid-lengths and ends only. Do not load the roots with heavy oil here or the style may slip before it’s pinned.
Step 2: Create the part and direct the hair
- Decide on a center part, a deep side part, or no part at all. Use the tail comb to draw it cleanly if you want a visible line.
- Brush the front and side sections back in the same direction you want them to sit. Keep the strokes even and close to the head. Random brushing creates bumps you’ll fight later.
Step 3: Secure the ponytail base
- Gather the hair at the nape and hold it where you want the bun to sit. A low placement is easier to keep neat, especially if your hair is layered.
- Secure the hair with one strong elastic. If your hair is thick or heavy, use a second elastic just above the first for support. That little move saves you from the sagging bun problem.
Step 4: Shape the bun
- Twist the tail once or twice, then wrap it around the base in a flat coil. If your hair is long enough, tuck the ends underneath the bun and pin them in place.
- If the hair is shorter, fold the ends under the shape and use extra pins to trap the ends against the scalp. Don’t force the hair into a tighter coil than it can handle — that’s how the bun gets bulky and uneven.
Step 5: Pin with intent
- Slide bobby pins in where the bun meets the head, not just on top of the bun. Cross-pin if needed. That means placing one pin in one direction and another over it in the opposite direction so they lock each other in place.
- Check the tension from the side and the back. The bun should sit flush, but not jammed so hard that the scalp looks pulled.
Step 6: Polish the surface
- Spray a little hairspray onto a brush or spoolie, then sweep it over the hairline and crown. This gives you control without soaking the front.
- If you have flyaways, tap them down with a tiny bit of wax stick or gel on your fingertips. Use less than you think you need.
Step 7: Set the final shape
- Press the style lightly with your palms and look at it in the mirror from the side and back. If one side puffs out more, adjust before the spray dries.
- Finish with a light mist of hairspray over the outer layer. Do not flood the whole style or you’ll lose the smooth movement that makes the finish look clean.
How to Shape the Crown, Sides, and Nape
A sleek updo lives or dies by the shape above the elastic. The bun can be neat and the style can still look off if the crown sits too flat, the sides flare, or the nape has a hard ridge where the hair was gathered.
A center part creates a very clean line. It’s sharp, symmetrical, and easy to read. That makes it a strong choice if the rest of your outfit is simple and you want the hair to act like a frame rather than the loudest thing in the room.
A deep side part softens the whole look. It pulls one side of the face forward a little and gives the style more movement. I like this when the hairline is uneven or when the face shape benefits from a little asymmetry. It keeps the updo from looking too severe.
No part at all can be the neatest option of the bunch. The hair is brushed straight back from the forehead, which gives the front a plain, almost sculpted finish. That works especially well when the goal is a very clean chignon or a low knot that sits close to the neck.
The crown should be smooth, not stretched
If the crown is pulled too tightly, you’ll see little stress lines near the part and the style may feel painful by lunch. If it’s too loose, the top puffs up into a soft dome that fights the rest of the silhouette. The sweet spot is snug enough to stay flat, loose enough to look like hair.
The nape is the anchor point
The lower the bun sits, the easier the nape is to smooth. That’s why low sleek buns are so forgiving. The nape also hides pins better than the top of the head. If your style keeps slipping, place the first pin where the bun touches the neck, then build outward from there.
Sides should follow the head
Side sections that stick out are the biggest giveaway that a style was rushed. Brush them back in one clean motion, then hold them there while you secure the elastic. If you release the tension too early, the hair springs out and you have to start over.
Sleek Updos for Fine, Thick, Curly, and Short Hair
Hair type changes the job. Not the goal. That’s the useful part to remember. A sleek updo is still about smoothness and control, but the way you get there needs to match the hair sitting in your hands.
Fine hair
Fine hair can look polished fast, but it can also slip out of pins with annoying ease. Use a small amount of mousse at the roots before blow-drying so the hair has a bit of body. A tiny amount of dry shampoo at the crown can help too, but use it lightly or the hair will look dusty.
For fine hair, a smaller bun often looks better than a huge one. Too much bulk can make the hair seem thinner by comparison. A compact low knot or wrapped ponytail usually gives the cleanest result.
Thick hair
Thick hair tends to resist the “smooth and stay there” plan. Divide the hair into two manageable sections before you twist or wrap it. That keeps the bun from turning into a giant rope that slips loose halfway through the evening.
Use stronger pins and more of them. Not because thick hair is difficult in some moral sense. Because physics is annoying. A heavy bun needs more anchoring, especially at the nape.
Curly or coily hair
Curly hair can make a gorgeous sleek updo, but the base needs more preparation. Stretch the hair first with a blow-dryer, twist-out, banding, or a gentle straightening pass if that fits your routine. Then smooth the roots in small sections rather than trying to flatten the entire head at once.
A strong gel at the hairline and a light cream on the lengths usually works better than one heavy product everywhere. Keep tension even. Very tight pulling can cause discomfort fast, and that is not worth the look.
Short or layered hair
Short layers are tricky because they like to escape. Use sectioning clips, then pin the loose ends down in the direction they want to fall instead of fighting them straight into a shape they don’t want. Small U-shaped pins can help more than large bobby pins here.
If the hair is too short for a full bun, a tucked roll or pin-and-fold shape still counts as sleek. The point is the finish, not the size of the knot.
Getting Shine Without Crunch
Shine is one of the reasons a sleek updo looks so clean. Not mirror-shiny. That’s too far. More like the hair has a soft, controlled gloss that shows the direction of the strands without exposing every product choice.
I’m picky about this part. Too much product can make the style look greasy by the time you arrive wherever you’re going. Too little, and the hair reads dry, which makes the sleek shape look unfinished. The trick is to place product where the eye will actually see it.
Put smoothing cream or serum on the mids and ends, not the roots. Roots need grip and control. Ends need softness so they don’t stick out like tiny wires. For the hairline, a wax stick or a clean spoolie with a touch of gel often works better than slathering on more spray.
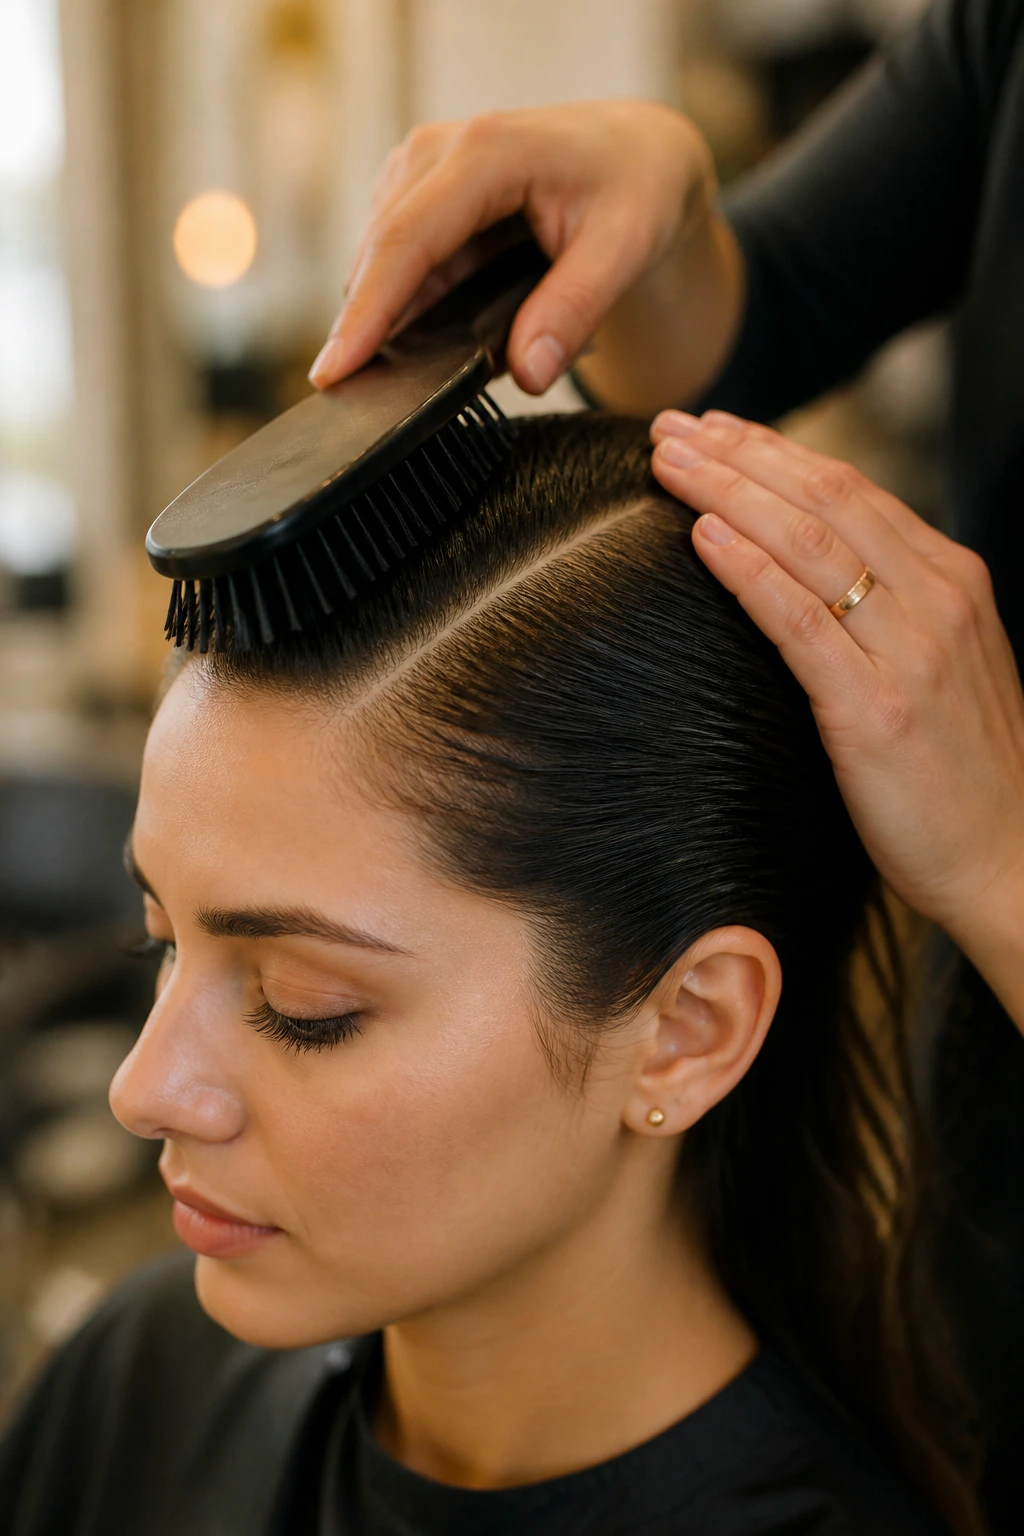
Use the brush as the tool, not your hands alone
This is one of those little things that changes the whole finish. Spray a little hairspray onto the brush, then smooth the sides and crown. The product gets distributed thinly, which is exactly what you want. If you spray directly onto the front from six inches away, you often get a wet patch and crunchy spots.
Less product near the face
The temples and hairline don’t need as much help as they think they do. A tiny amount of product at the edges can clean up baby hairs and short layers. A heavy layer near the face tends to attract lint, which is a terrible trade.
Shine should be balanced with texture
A little natural texture on the bun itself keeps the style from looking overdone. If every strand is lacquered, the head can look stiff. A smooth crown and a softly polished bun is the more wearable balance.
Comfort, Tension, and All-Day Wear
A sleek updo that hurts is not a good sleek updo. Full stop. If your temples are throbbing, the ponytail is too high or too tight, or the pins are pressing into the scalp in the wrong place. The style should feel secure, not punishing.
Tension should be spread out. That means using the elastic to create the base, then using pins to support the shape, not relying on one brutally tight ponytail to do everything. One tight anchor point creates headaches. Several smaller anchors create stability.
Watch the pressure zones
The temples, the hairline behind the ears, and the center back of the scalp can all get sore if you yank the hair too hard. If you feel a hot spot starting, stop and loosen the section. Rework it. Don’t press on and hope your scalp forgets.
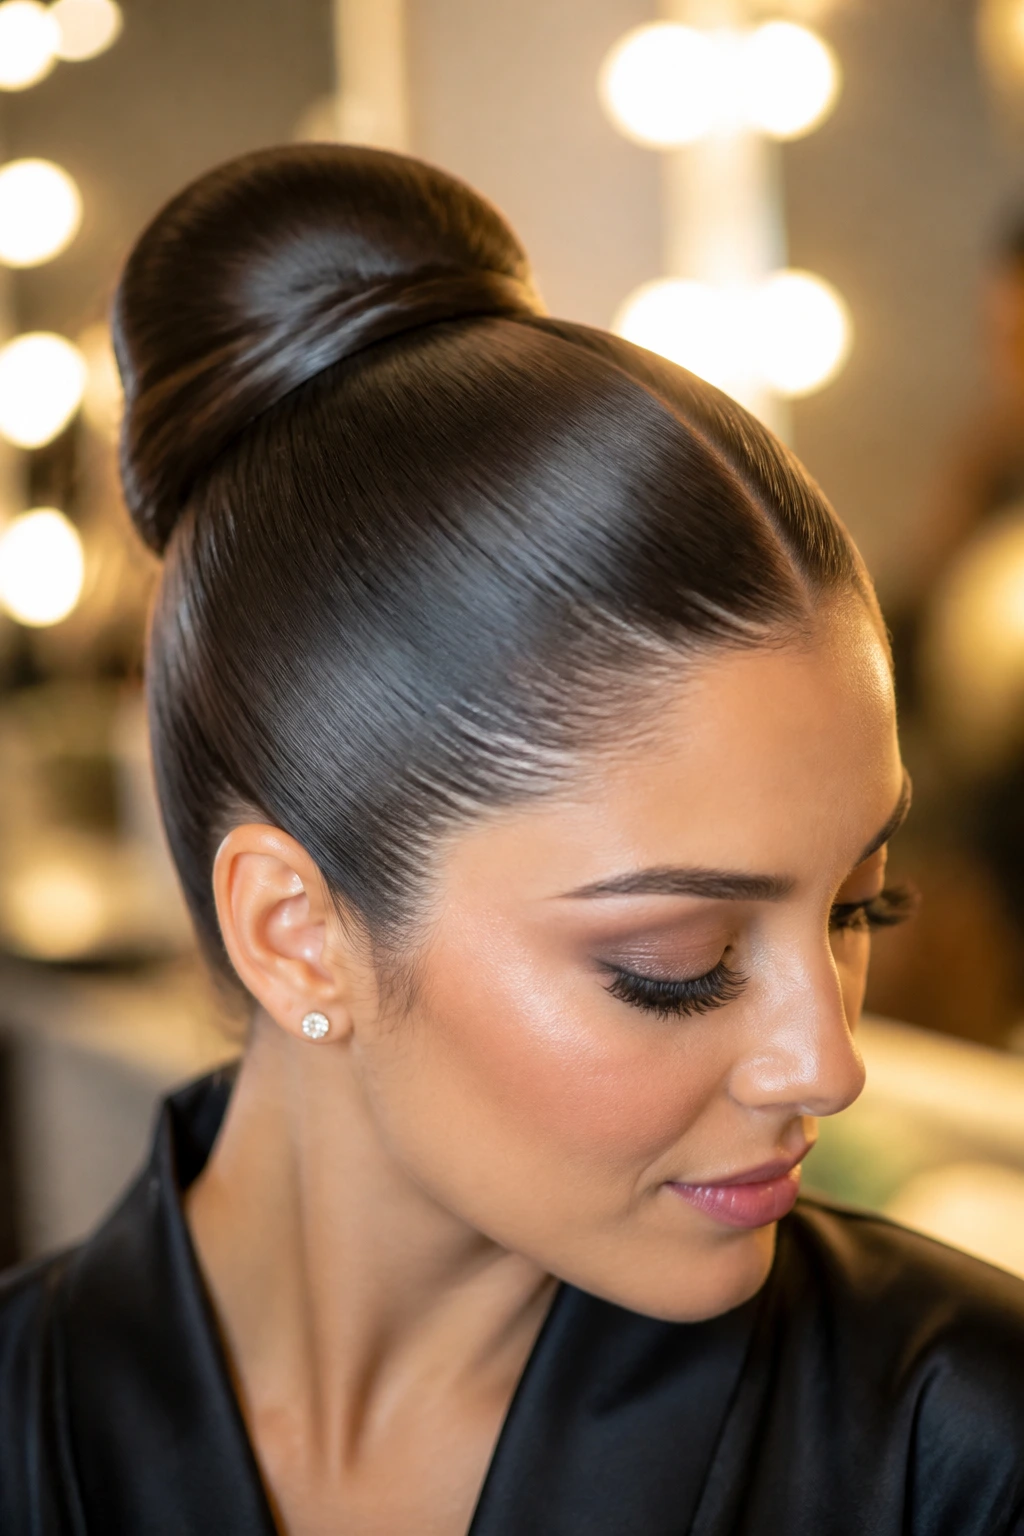
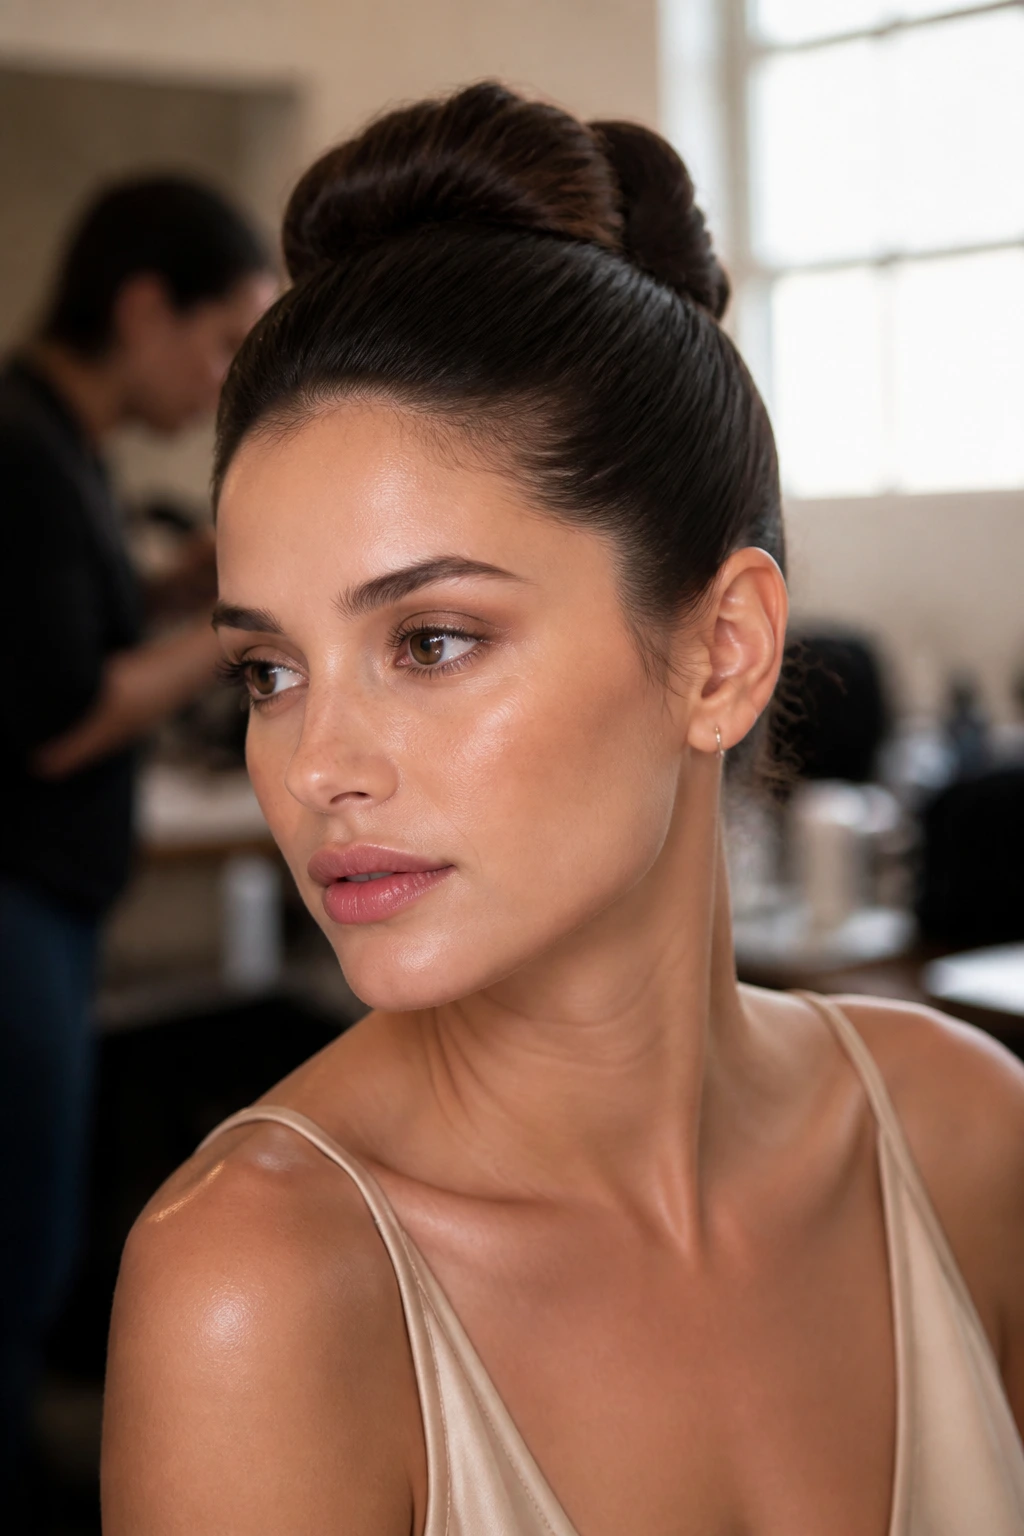
The bun should sit where your head is widest
This sounds oddly specific because it is. A bun that sits on a flatter part of the head can wobble and feel heavy. One that sits too high may tug upward all day. The low nape area usually distributes weight better, especially for thicker hair.
Pins should disappear, not announce themselves
If a pin hurts, it’s not in the right place. Move it. Slide it deeper into the bun seam or reposition it so the bend follows the scalp. The best pins are the ones you know are there only because the hairstyle stays put.
Small Adjustments That Improve the Finish

A sleek updo gets better with small, boring adjustments. That’s not glamorous, but it’s true. The people who make this style look easy usually do a few unexciting things well.
Grip Boost: If your hair slips, dust a little dry shampoo or texturizing spray at the roots before smoothing them back. Use a small amount. You want enough friction for the elastic to hold, not a chalky coating.
Shine Boost: A pea-sized drop of serum spread between your palms and pressed lightly over the outer surface gives a cleaner finish than spraying oil straight onto the style. Keep it away from the hairline unless the front is truly dry.
Speed Move: Clip the front sections away while you secure the back. That keeps the side pieces from falling into your hands every ten seconds and makes the bun cleaner from the start.
Pro Move: Wrap a thin strand of hair around the elastic, then pin the end underneath the bun. It hides the band and makes the whole style look more finished. That tiny detail matters more than most people admit.
Fix-It Move: If one side is puffy, mist the brush with a little water, smooth the section down, and pin it again before the hairspray dries. Don’t keep layering spray over a bad shape. It only makes the surface harder to correct.
Common Mistakes That Ruin the Look
Most sleek updos fail for very ordinary reasons. That’s the annoying part. It’s rarely one dramatic disaster. Usually it’s three small things that pile up.
-
Using too much product at the roots: The hair starts looking heavy and greasy before the bun is even finished. Fix it by keeping creams and oils off the scalp and using only a thin layer of gel or spray where the hair actually needs control.
-
Pulling the hair too tight from the start: This creates a headache, leaves stress lines around the hairline, and can make the crown puff later when the scalp relaxes. Gather the hair firmly, not violently, and let pins do part of the work.
-
Ignoring the back of the head: The front can look neat while the back is lopsided or bulky. Use a handheld mirror or phone camera. Every time. The back hides nothing.
-
Stopping too soon: A style often looks “done” right before the final smoothing pass. Then one side lifts, a pin sticks out, or the bun seam shows. Give yourself two minutes to look from every angle before walking away.
-
Choosing an elastic that can’t hold the weight: Thin, worn-out bands stretch out and let the bun sag. Use a stronger elastic or double it if the hair is dense.
-
Smoothing dry curls without prep: The result is usually frizz at the surface and puff at the crown. Add a little moisture or use a proper stretch-and-smooth prep first.
Variations That Keep the Base Sleek
The classic low bun is only one version of the style. Once you know how to make the base neat, you can change the mood without changing the method much.
Glass-Flat Low Bun
This version is all about a center part, a close-to-the-head crown, and a bun that sits low and tidy. It looks severe in a good way when paired with strong eyeliner or a clean neckline. The trick is to keep the bun compact and the surface smooth, not wet.
Wrapped Knot Ponytail
Start with a sleek ponytail, then fold the length over itself and pin the fold into a knot shape. It gives you a little more lift and movement than a plain bun. I like this when the outfit needs a hint of height but not a full top knot.
Side-Swept Chignon
A deep side part and a low chignon can soften the whole style without losing the polished finish. One side of the hair is guided across the forehead more deliberately, and the bun sits just off-center. It’s a nice choice if a perfectly symmetrical style feels a bit stiff.
Braided Nape Finish
Slick the hair into a low ponytail, braid the tail, then coil the braid into a bun. The braid gives the bun a little texture on the inside while the crown stays neat. This version holds especially well on thick hair because the braid locks the length together before pinning.
Ribboned Evening Version
A narrow satin ribbon wrapped around the base of the bun changes the tone instantly. Keep the hair sleek and let the ribbon supply the softness. This works best when the color is close to the hair or intentionally contrasts with it, because a random ribbon can look fussy fast.
How to Keep It Fresh Overnight and the Next Day
A sleek updo is happiest on the first day, but it can be carried into the next day if you protect the shape. The main enemy overnight is friction. Pillowcase friction opens the surface, and pin pressure can leave the style bent in weird places.
If you plan to sleep in it, build it a little flatter than you would for a one-day wear. Place the bun lower and use pins that sit flush against the scalp. A silk or satin scarf helps a lot. So does a satin pillowcase. Both reduce the little surface frizz that shows up by morning.
What to do the next day
If the style is still solid, smooth the hairline with a tiny amount of serum on your fingertips and check the pins. Replace any that have shifted. A light mist of hairspray on the brush is usually enough to wake the finish back up.
If the bun has loosened, do not rebuild the whole thing from scratch unless you have to. Take out two or three pins, tighten the anchor elastic if needed, and re-secure the seam. That usually fixes the shape faster than starting over.
Removing product matters too
After a heavy gel or wax day, wash the hairline and the nape carefully. Those areas collect the most buildup. A second shampoo pass may be needed if you used a wax stick or a firm edge control. Be gentle. Scrubbing the hairline too hard just creates more fluff to tame later.
Frequently Asked Questions About Sleek Updos
How clean should my hair be before I do a sleek updo?
Second-day hair is often easier because it has a little grip, but fresh hair works if you add light product and blow-dry it smooth first. If your scalp gets oily fast, wash earlier in the day and let the roots settle before styling.
Can I do a sleek updo on curly hair without straightening it fully?
Yes, but stretching the hair first usually makes the finish cleaner. A blow-dry with tension, a twist-out stretched into a smoother base, or a gentle straightening pass on the roots can help the style lie flatter without making the hair bone-straight.
Why does my crown puff up after I finish?
That usually means the roots were not fully dry, the product was too light, or the hair was brushed in different directions as you worked. Smooth the crown in one direction, let the hair dry completely, and lock the shape before the final spray.
How many bobby pins do I actually need?
Enough that the bun feels secure when you turn your head, but not so many that the style turns stiff and bulky. Fine hair might need 4 to 6 pins. Thicker or heavier hair often needs 8 to 12, sometimes more if the bun is large.
What if my updo gives me a headache?
Loosen the elastic at the crown or move the style lower toward the nape. Headaches usually come from too much tension in one spot. The fix is not “push through it.” It’s redistribute the weight and pin the bun more evenly.
Can I make a sleek updo without gel?
You can, especially if your hair already has some natural slip control. A smoothing cream, wax stick, and flexible hairspray can do the job, though you may need a little extra brushing and pinning to keep flyaways in line.
How do I hide the elastic at the base?
Take a thin strand from the ponytail, wrap it around the elastic, and pin the end under the bun. If the hair is short, use a small matching ribbon or a decorative pin instead. It should look intentional, not like a repair job.
What’s the fastest version when I’m short on time?
A low ponytail twisted into a compact bun is the quickest. Keep the part simple, smooth the sides with a brush and a little spray, and use two strong pins at the nape before you fuss with anything else. That usually gets you out the door faster than a more sculpted shape.
A Finish Worth Repeating
A sleek updo works because it makes a clear promise and keeps it: smooth lines, a controlled shape, and hair that stays out of your face without looking random or rushed. The style doesn’t need extra volume to be interesting. It needs accuracy. A clean part, a sensible amount of product, and pins placed where they matter will do more than any oversized can of hairspray ever will.
The nice part is that once you get the rhythm of it, the style stops feeling fussy. You start to notice which side of your hair slips first, where the bun likes to sit, and how much product your roots can actually take before they start protesting. That’s the point where a sleek updo becomes one of those styles you can pull out without drama, which is exactly how it should be.