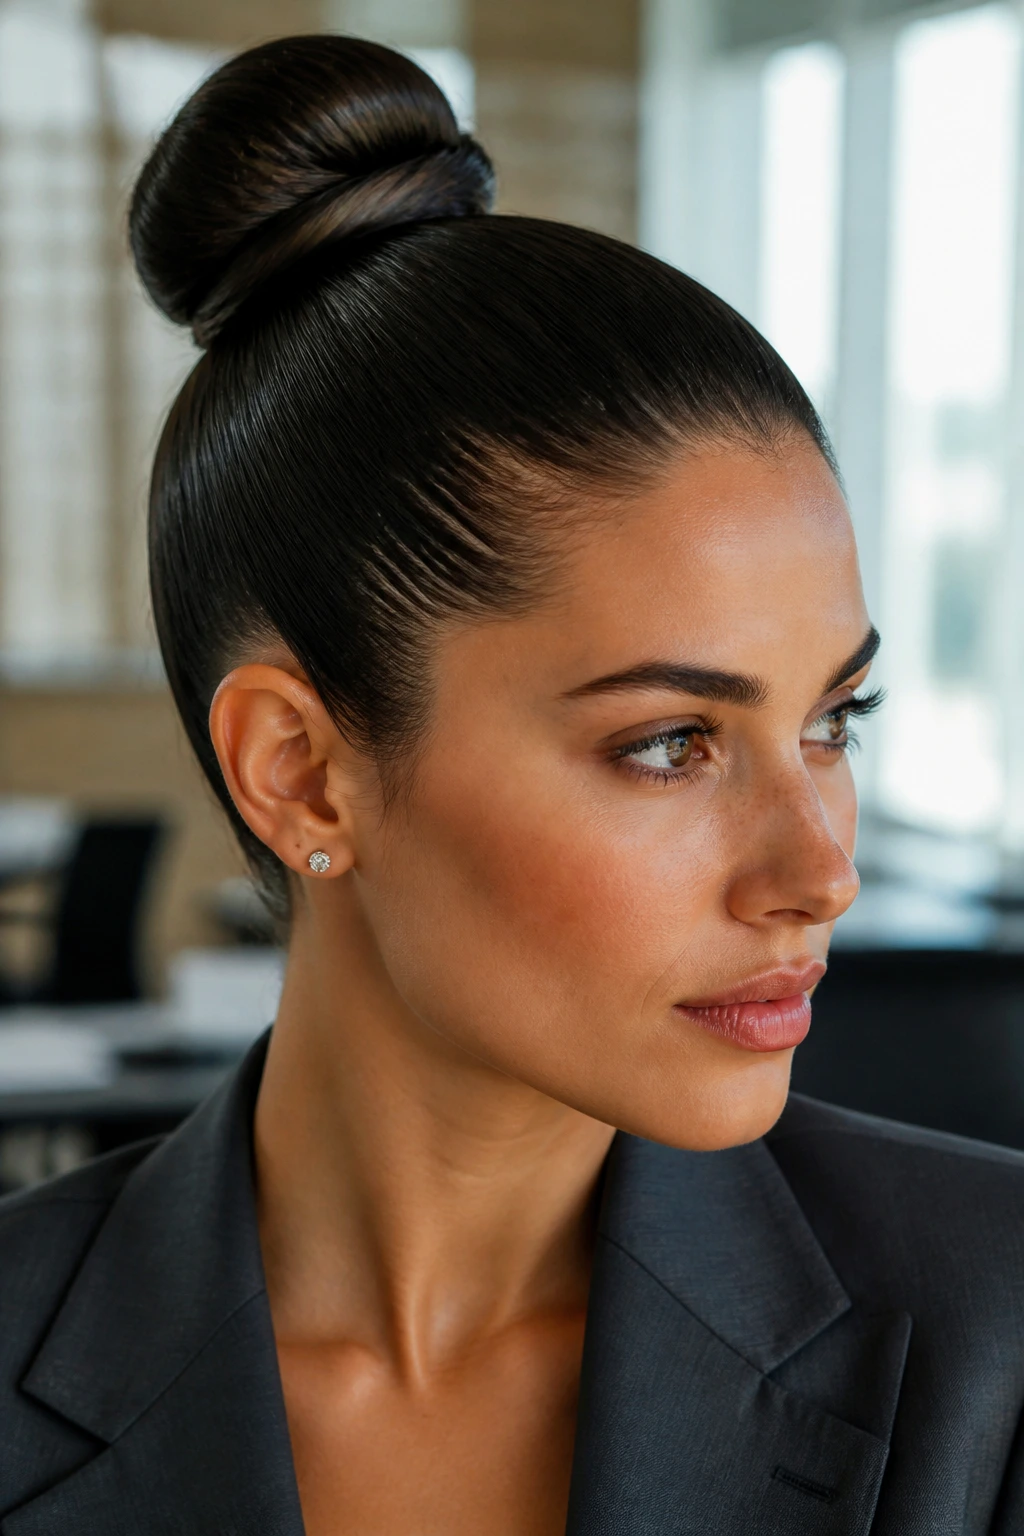
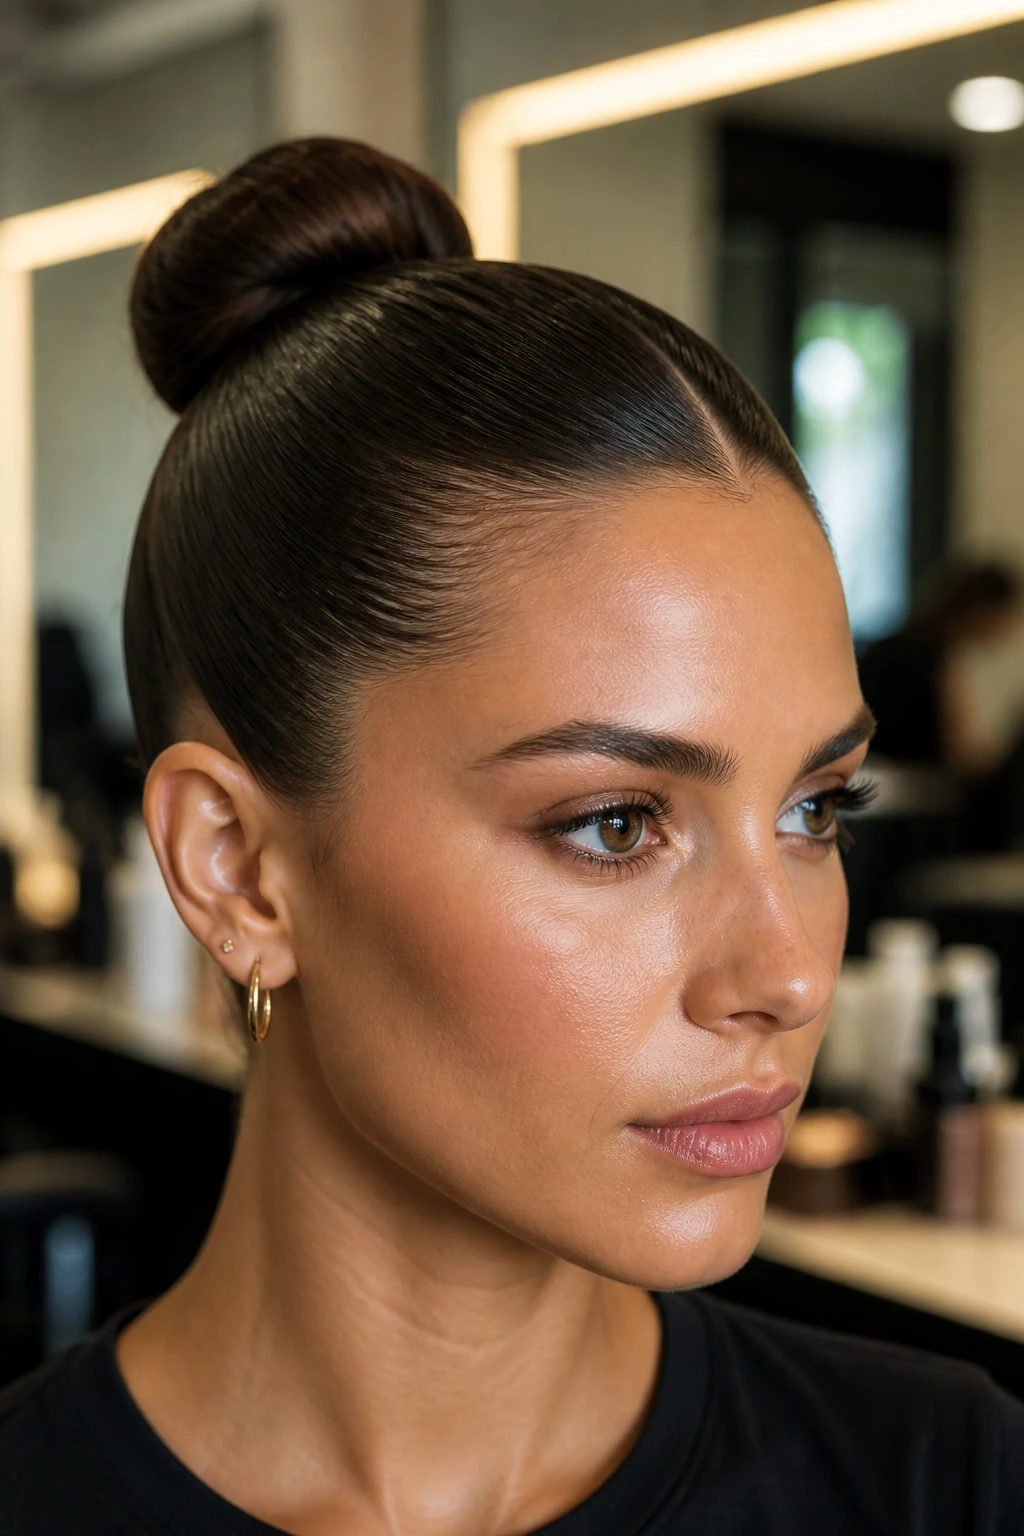
A clean bun can rescue hair that has gone too soft, too frizzy, or too busy for its own good. The style works because it trims everything down to one sharp shape: smooth crown, tidy hairline, tucked ends, no puffing around the ears. Done well, it looks deliberate; done badly, it looks like you fought a brush and lost.
The difference usually isn’t a fancy product. It’s the order. Dry hair behaves one way, damp hair another. A center part gives a different feel than a side part. A little tension flattens the crown; too much tension drags the whole face backward and makes the scalp complain for the rest of the day.
That balance is why the sleek bun keeps showing up in offices, at events, on the way to the gym, and on the kind of mornings when your hair has already chosen chaos. The trick is less about piling on gel and more about knowing where to smooth, where to pin, and where to stop.
Why a Sleek Bun Earns Its Keep
-
It takes 10 to 15 minutes when the hair is already dry and detangled. That means the real time goes into prep, not into wrestling the shape into place.
-
It keeps the ends tucked away from wind, friction, and food-lunch humidity. Long layers stop escaping onto your collar every five minutes.
-
It works with a blazer, a slip dress, a hoodie, or a white T-shirt. The silhouette changes with the rest of the outfit, which is why this style gets worn so often.
-
It lets the face do the talking. Earrings, lipstick, or a sharp brow line stand out more when the hair stays close to the head.
-
It can be adjusted for straight, wavy, curly, and coily hair. The base method is the same; the prep changes, which is half the battle.
-
It looks better when it is a little imperfect than when it is overloaded with product. A bun that moves a little reads as polished. A bun that looks shellacked reads as overworked.
The Surface Has to Be Prepared First
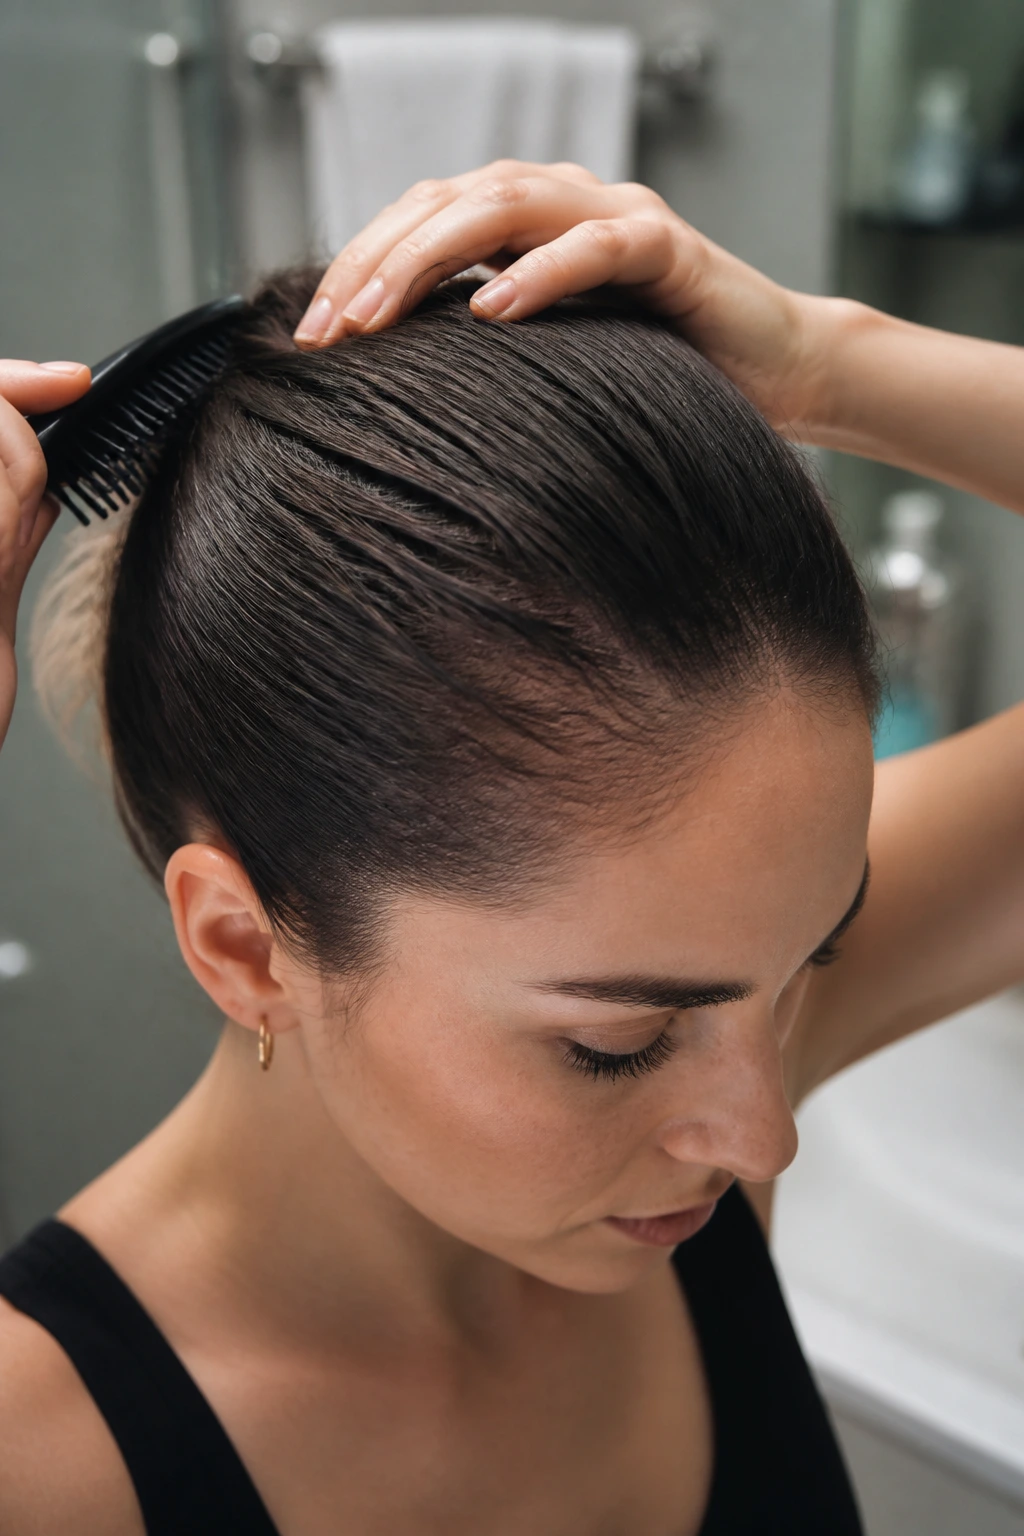
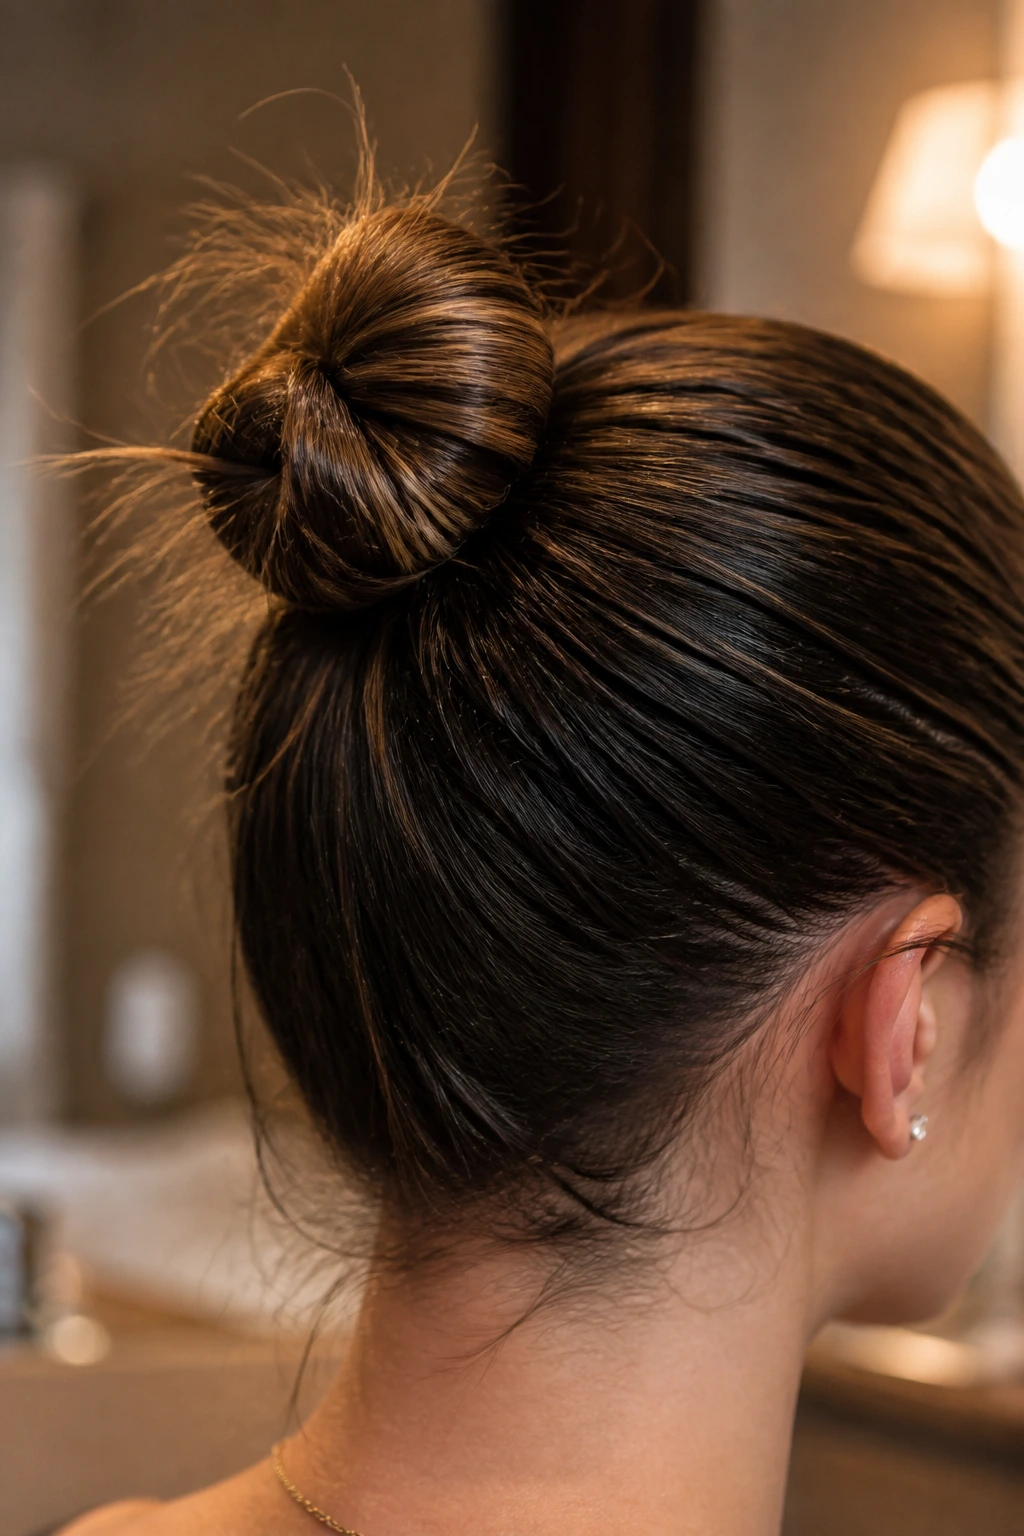
Hair that is slightly lived-in is easier to smooth than hair that is freshly washed and slippery. That sounds backward, but it matters. Very clean hair often has zero grip, so the bun looks glossy for ten minutes and then starts sliding, especially at the nape.
Drying comes first. If the hair is damp, blow-dry it completely before you even think about gathering it. Any moisture left near the crown will trap a bend or ridge under gel, and that ridge will show once the style sets. Not cute. Not subtle.
Start With a Base That Can Hold Shape
If your hair is silky or fine, a small amount of dry shampoo at the roots can help. Use it on the crown and the back of the head, then brush it through so you don’t end up with dusty patches. For thicker or curlier hair, a blow-dry with a nozzle attachment gives you more control than air-drying and hoping for the best.
Detangling matters more than people want to admit. Start at the ends, work upward, and get every knot out before you pull the hair back. A single snarl near the nape can turn into a ridge once the bun is pinned.
Decide How Much Natural Texture to Keep
You do not need every strand to lie like a painted line. A sleek bun looks best when the surface is smooth, not when the hair has been flattened into a helmet. If your hair naturally has a little bend, you can leave a tiny amount of movement at the ends inside the bun itself. No one sees it, and the style feels less severe.
A lot of the “sleek” part happens at the top and sides anyway. The bun body can be a little fuller as long as the crown and hairline are neat. That contrast is what keeps the style from looking stiff.
Brushes, Combs, Gel, and Pins: The Small Gear That Changes Everything
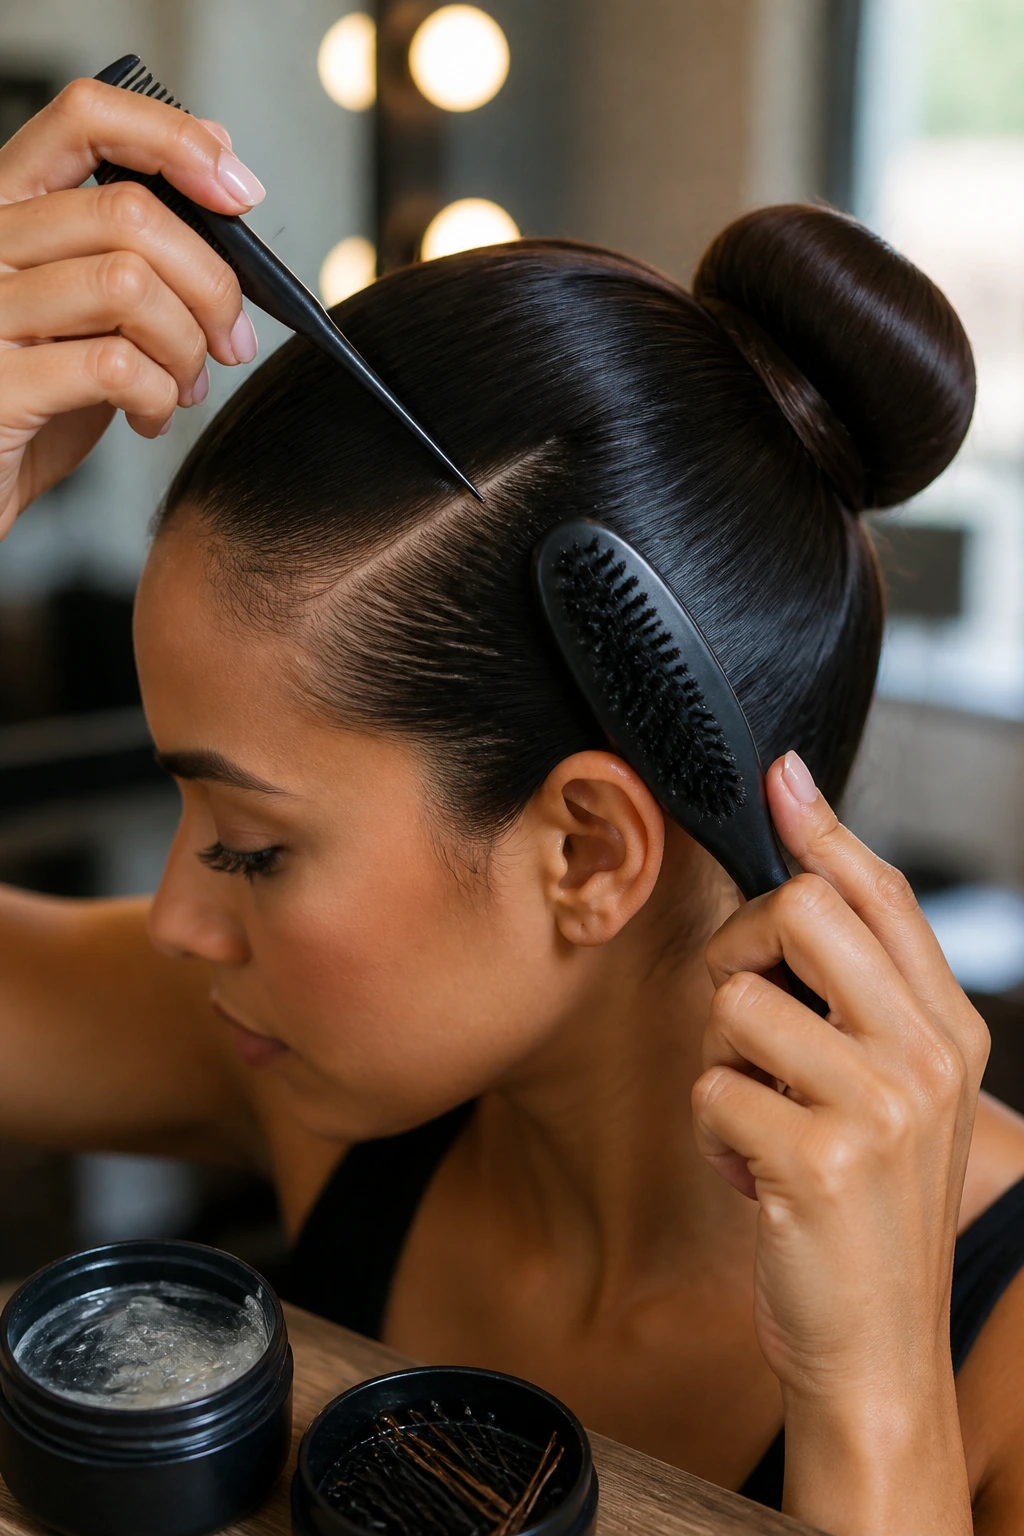
A sleek bun lives or dies by the tools you use. I’d take a firm brush and a decent set of pins over a drawer full of fancy styling cream any day. The brush creates the direction. The pins lock it in. Everything else is support.
The Brush Matters More Than the Bottle
A boar-bristle brush or a firm synthetic bristle brush helps press the hair into place without separating it too much. A soft detangling brush is nice for knots, but it often leaves the crown a little fluffy. Use the detangler first, then the firmer brush for the finish.
A rat-tail comb earns its spot here. The pointed tail draws a clean part, and the narrow teeth can smooth smaller sections near the temples and nape. If your hairline gets puffy fast, a small edge brush gives you more control than spraying product straight at the roots.
Why Pins Beat One Giant Elastic
A single elastic can hold the ponytail, but it rarely shapes the bun well on its own. Bobby pins and U-pins let you anchor the bun from underneath, which is where the weight actually sits. That matters if your hair is thick, layered, or long enough to swing when you move your head.
I like using a plain, no-snag elastic first, then pinning the bun into place. If you try to make the elastic do everything, the base often ends up too tight and the bun body too loose. That’s an annoying combination.
What to Skip
Heavy oils at the root are trouble. They can make the hair look slick for all the wrong reasons and stop your gel from gripping. Save shine products for the lengths or the outer surface only, and use less than you think you need.
Skip giant dollops of edge control too. That stuff can flake if you layer it over other products or if you keep touching it. A thin film is enough.
The Part That Makes the Style Look Intentional
A part changes the whole mood of the style in one move. Center, side, or no part at all — each one sends a different signal, and the wrong one can make the bun feel off even when the construction is solid.
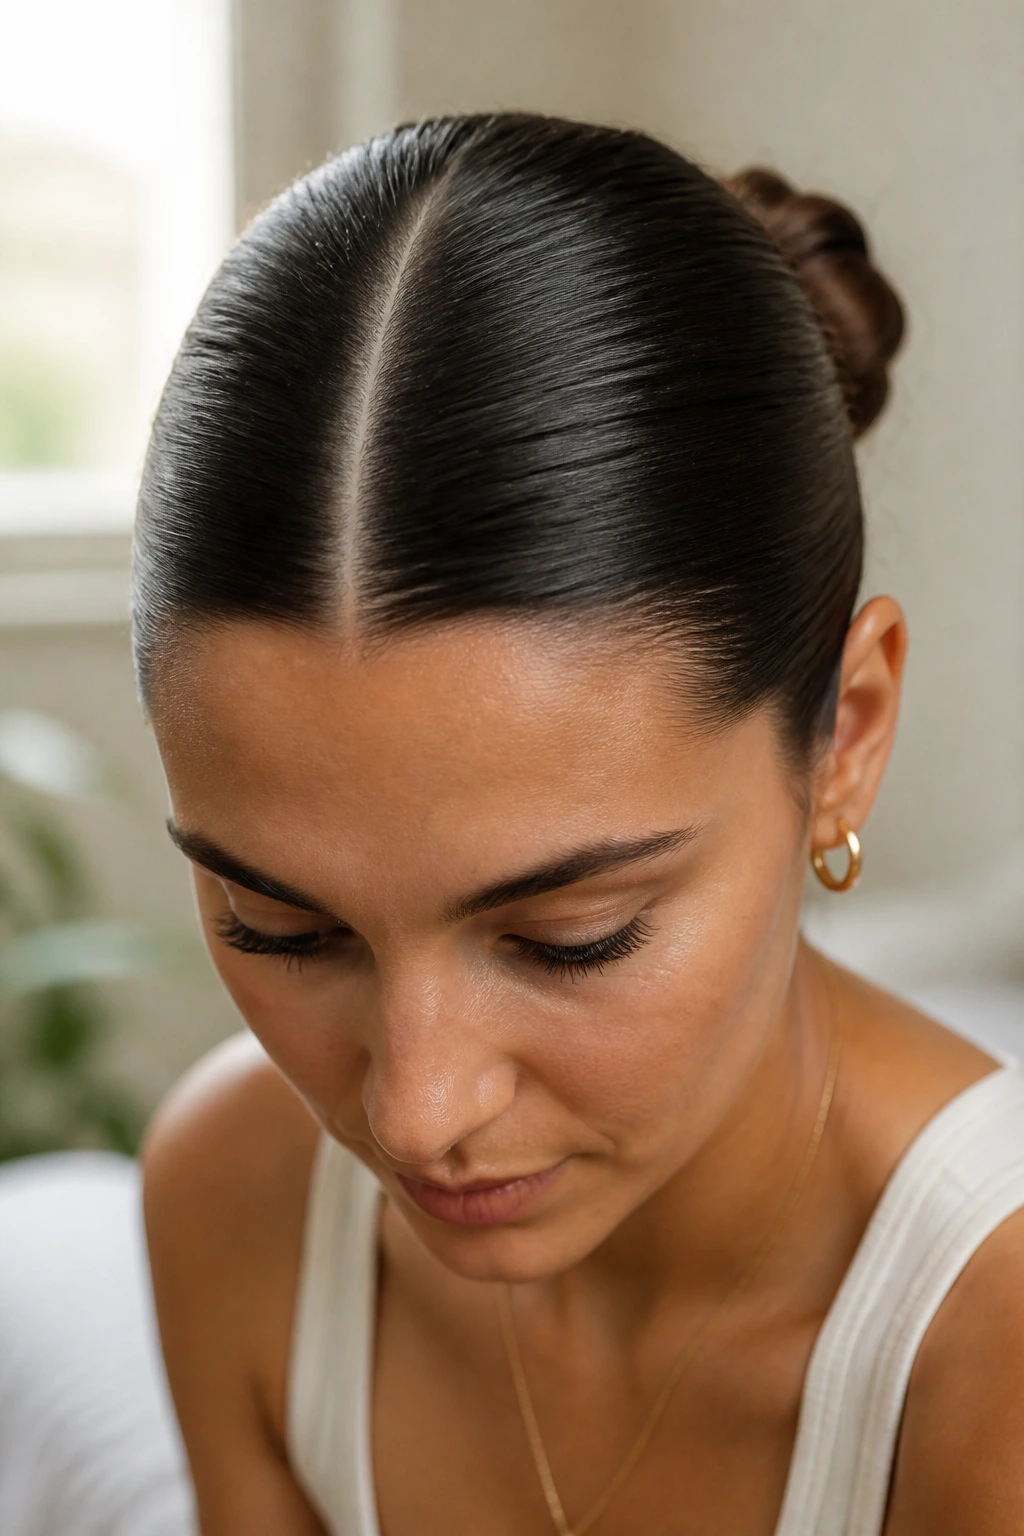
Center Part: Sharp and Symmetrical
A center part gives the sleek bun its cleanest look. It works especially well when the face is balanced and you want the hair to feel orderly rather than soft. Draw the line on dry hair before you add gel so you don’t drag product into the part and make it look muddy.
The part does not need to be ruler-perfect. It needs to be straight enough that both sides read evenly from a normal distance. Tiny imperfections disappear once the hair is brushed back.
Side Part: Softer, Less Severe
A side part makes a sleek bun feel less formal and a little more relaxed around the face. It’s a smart move if a center part tends to emphasize cowlicks or if the hairline isn’t naturally even. Keep the part shallow if you want the bun to stay modern rather than old-school prom.
No Part: The Cleanest Option for Some Hair
No part is underrated. It gives the front a uniform sweep and works well when you want the bun to feel smooth without drawing attention to the scalp line. The tradeoff is that it needs better brushing because every bump is visible.
If your hair has a stubborn growth pattern at the crown, a no-part bun can be easier than fighting it. Brush the hair back in sections rather than all at once. That’s the part people skip, and it shows.
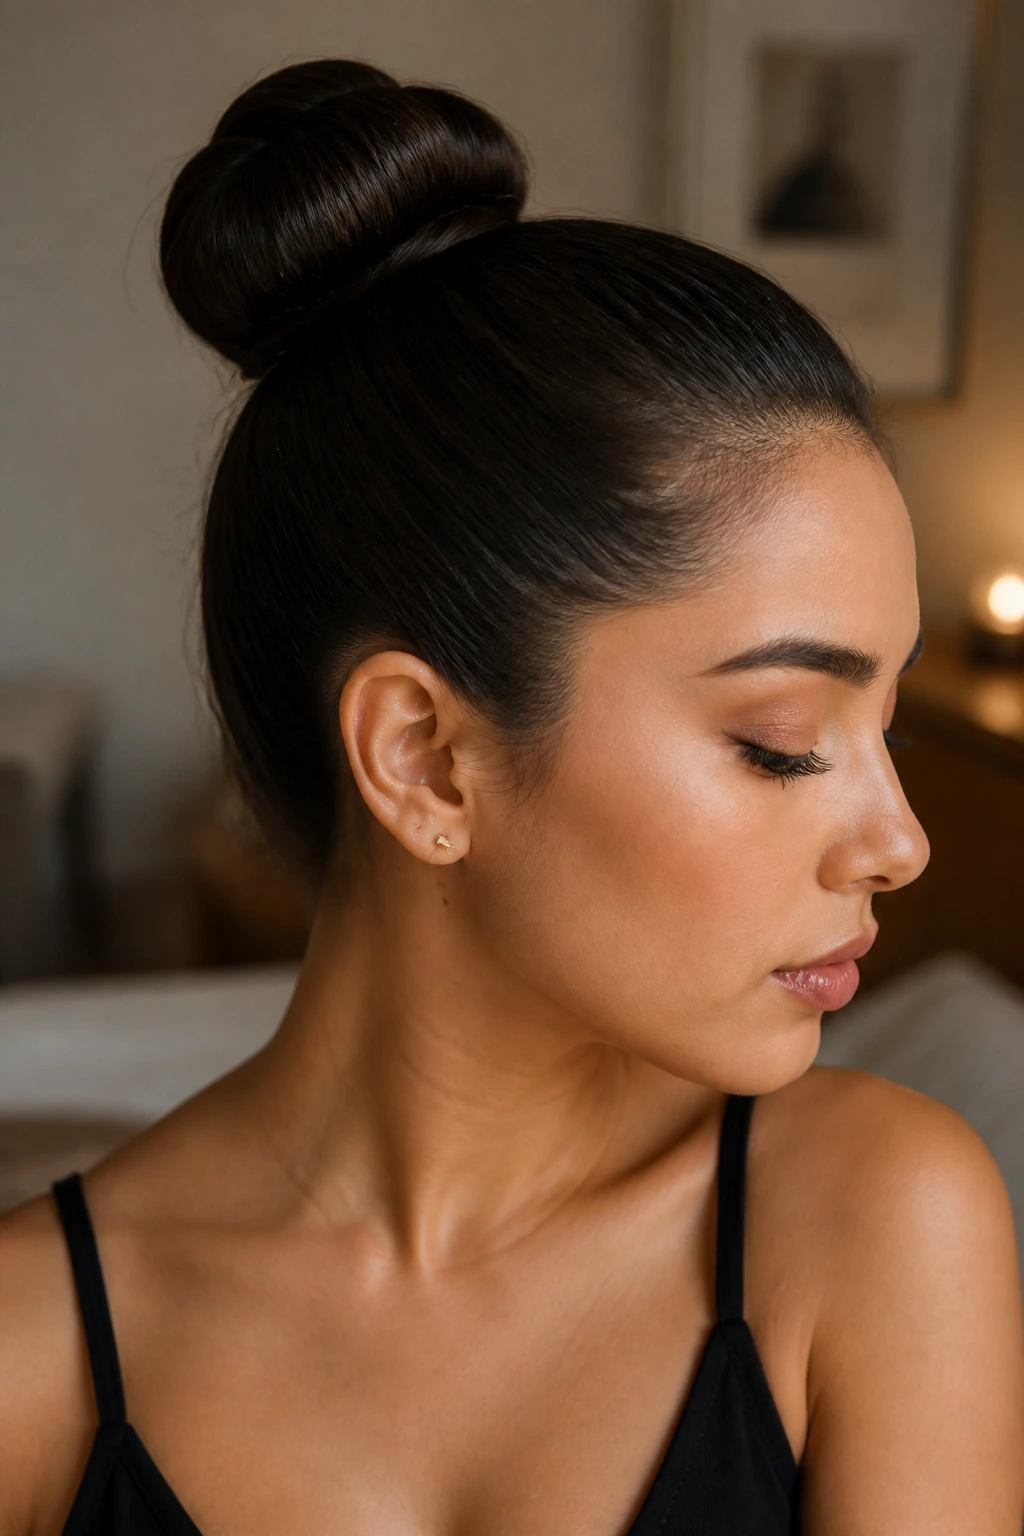
How to Build a Low Sleek Bun
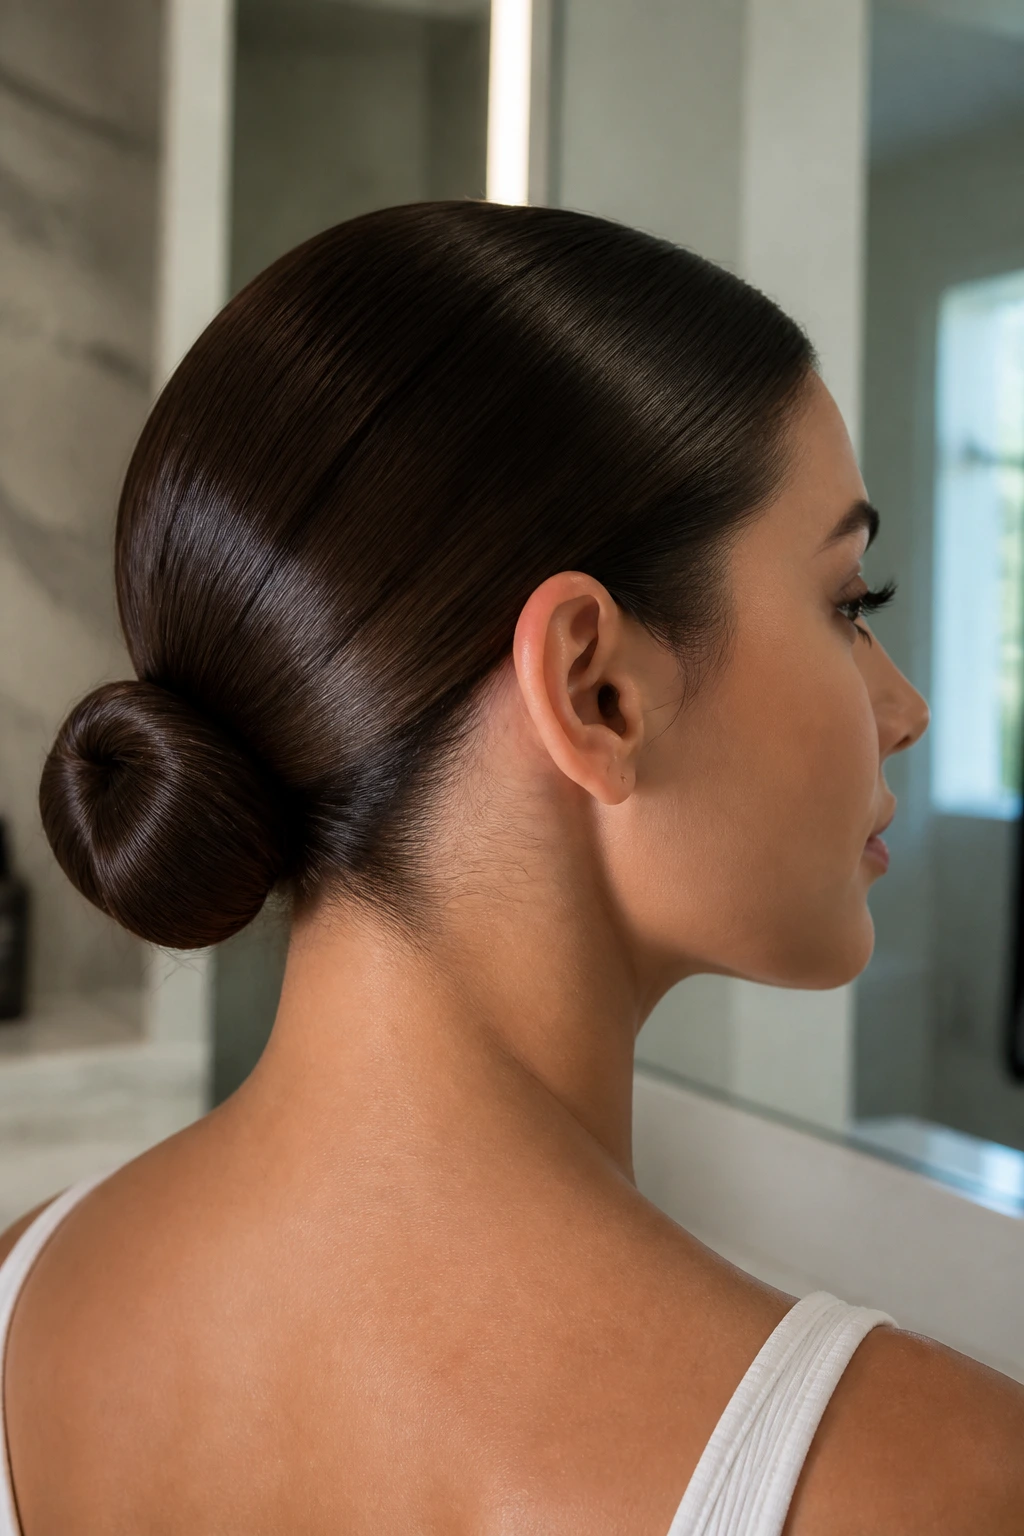
A low sleek bun is the version most people reach for when they want polish without drama. It sits at the nape, stays close to the head, and tends to be more comfortable for long wear than a high bun. The shape also hides layers better, which is why I prefer it for hair that never sits neatly on command.
Prep and Set the Direction
-
Draw your part first, on dry hair. Use a rat-tail comb to make the line, then brush each side flat before you add any product. If the part is crooked, fix it now, not after the ponytail is in place.
-
Apply a small amount of gel or styling cream to the top layer only. Work from the hairline back toward the crown with a brush, not your fingers. Fingers leave ridges; a brush presses the hair down in a flatter sheet.
-
Brush the hair into a low ponytail at the nape. Keep your head level and look in the mirror as you gather. A ponytail that sits too high will pull the bun up and make the shape look less sleek.
-
Secure the ponytail with a no-snag elastic. Hold the base tight enough that it does not slide, but not so tight that your scalp feels like it’s being pinched. If the elastic is already biting at the hairline, loosen and start over.
Shape the Bun
-
Twist the ponytail into a rope and wrap it around the base. If the hair is very thick, split the ponytail into two sections and twist them separately before wrapping. That gives you more control and a neater coil.
-
Tuck the ends under the bun and pin from underneath first. Use bobby pins in an X pattern if the hair slips. The underside does the work; the top just hides the work.
-
Smooth the crown again and press the sides flat with a brush. If a few hairs refuse to lie down, touch them with the tiniest bit of product on the brush head — not directly from the tube. That keeps the hairline from looking greasy.
-
Set the style for 10 minutes with a silk scarf or satin wrap. This is the part people ignore. Don’t. A short setting period helps the surface dry into place and makes the bun survive contact with life.
A Small Detail That Helps
If your hair is layered, pin the shorter pieces first, especially near the nape. Those pieces are the ones that slip out when you move. Catch them early and the bun stays cleaner.
How to Build a High Sleek Bun Without Bumps
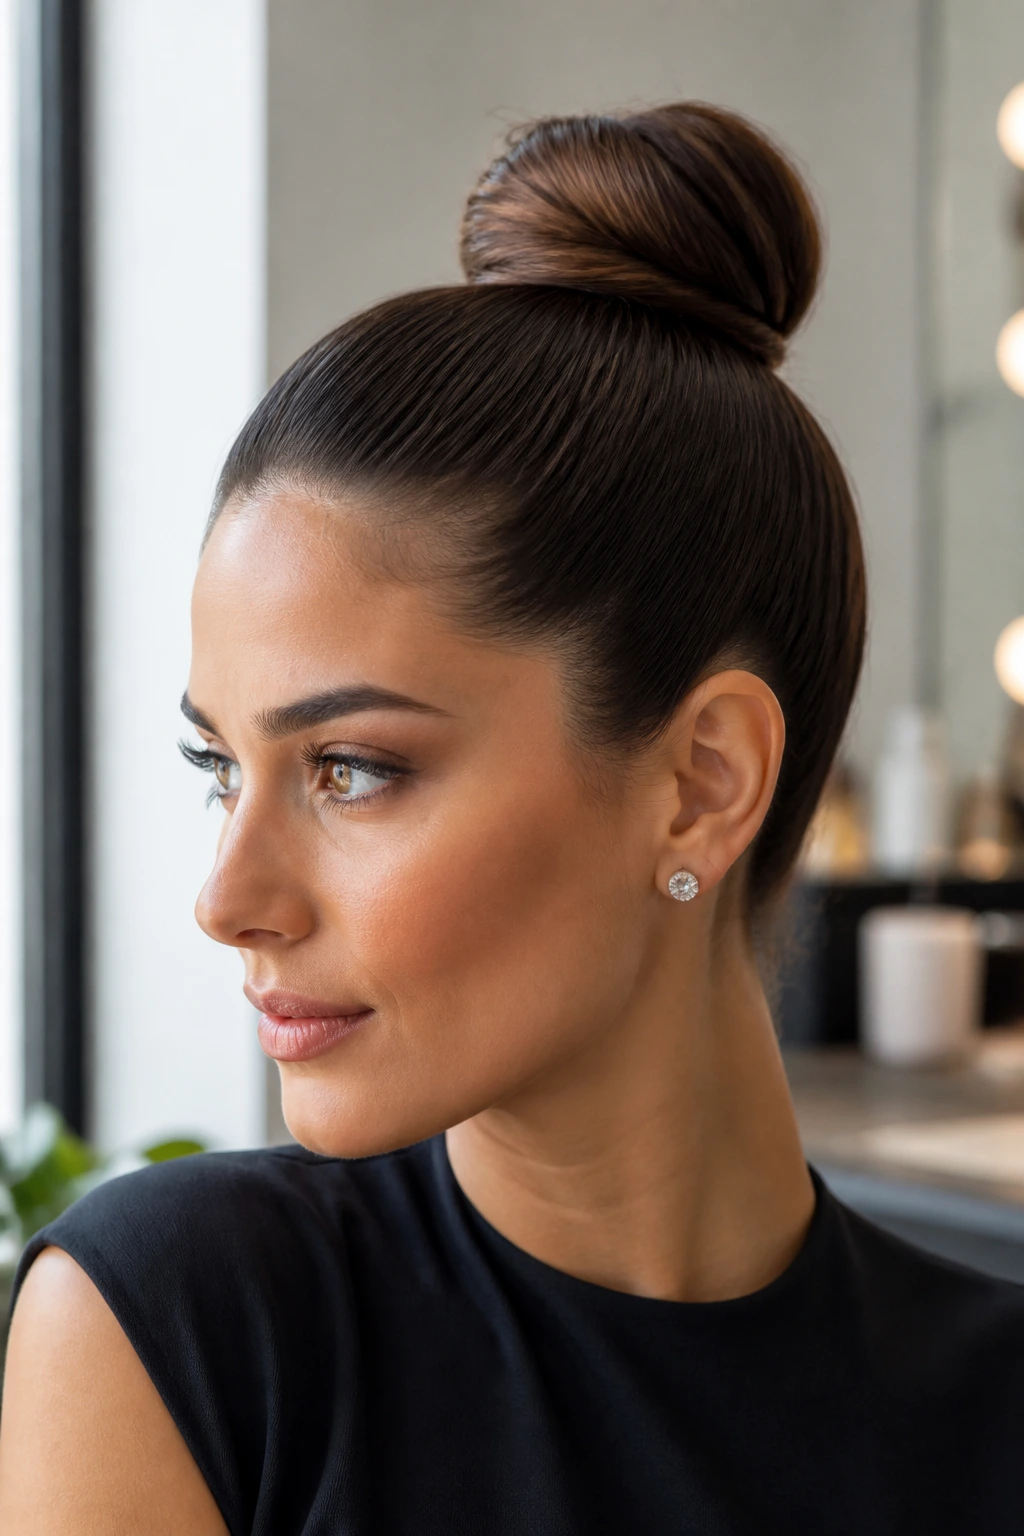
A high sleek bun is sharper and more lifted than a low one, which makes it better when you want the face to look open and the neck line to feel clean. It can also be less forgiving. Every bump at the crown shows up. Every uneven section around the ears shows up too.
The fix is not more product. It’s better direction.
Get the Crown Flat Before You Lift It
-
Brush the hair upward in sections before you gather it. Start at the nape and sides, then work toward the crown so the direction stays even. If you flip everything upward in one sweep, the ends often bunch in the wrong place.
-
Keep a light tension on the hair as you move it to the top of the head. The goal is smooth, not yanked. Too much tension makes the bun too tight and creates a hard line across the hairline.
-
Place the ponytail slightly above where you think it should sit. Hair tends to settle down a little once the elastic is in. If you start too low, the bun lands lower than intended and loses that lifted shape.
-
Secure the ponytail, then split it if the hair is thick. Two smaller twists are easier to control than one heavy coil. They also pin more securely.
Shape the Bun So It Stays Put
-
Wrap the hair around the base in a circular motion, keeping the outer layer smooth. Use your free hand to keep the surface taut as you wrap. The bun should look compact, not puffy.
-
Anchor the bun with bobby pins at the base, not just on top. Slide the pins into the coil toward the center of the bun so they disappear. If you can see a row of pins, the bun is under-anchored.
-
Use a bun net if your hair is long or very dense. It’s not glamorous, but it works. The net tames volume and keeps the bun from swelling open during the day.
A high bun tends to reveal the ears and jawline, which is why it can look so neat when it’s done right. It also demands a cleaner crown than a low bun. There’s nowhere for the bumps to hide.
Getting the Hairline Smooth Without Making It Greasy
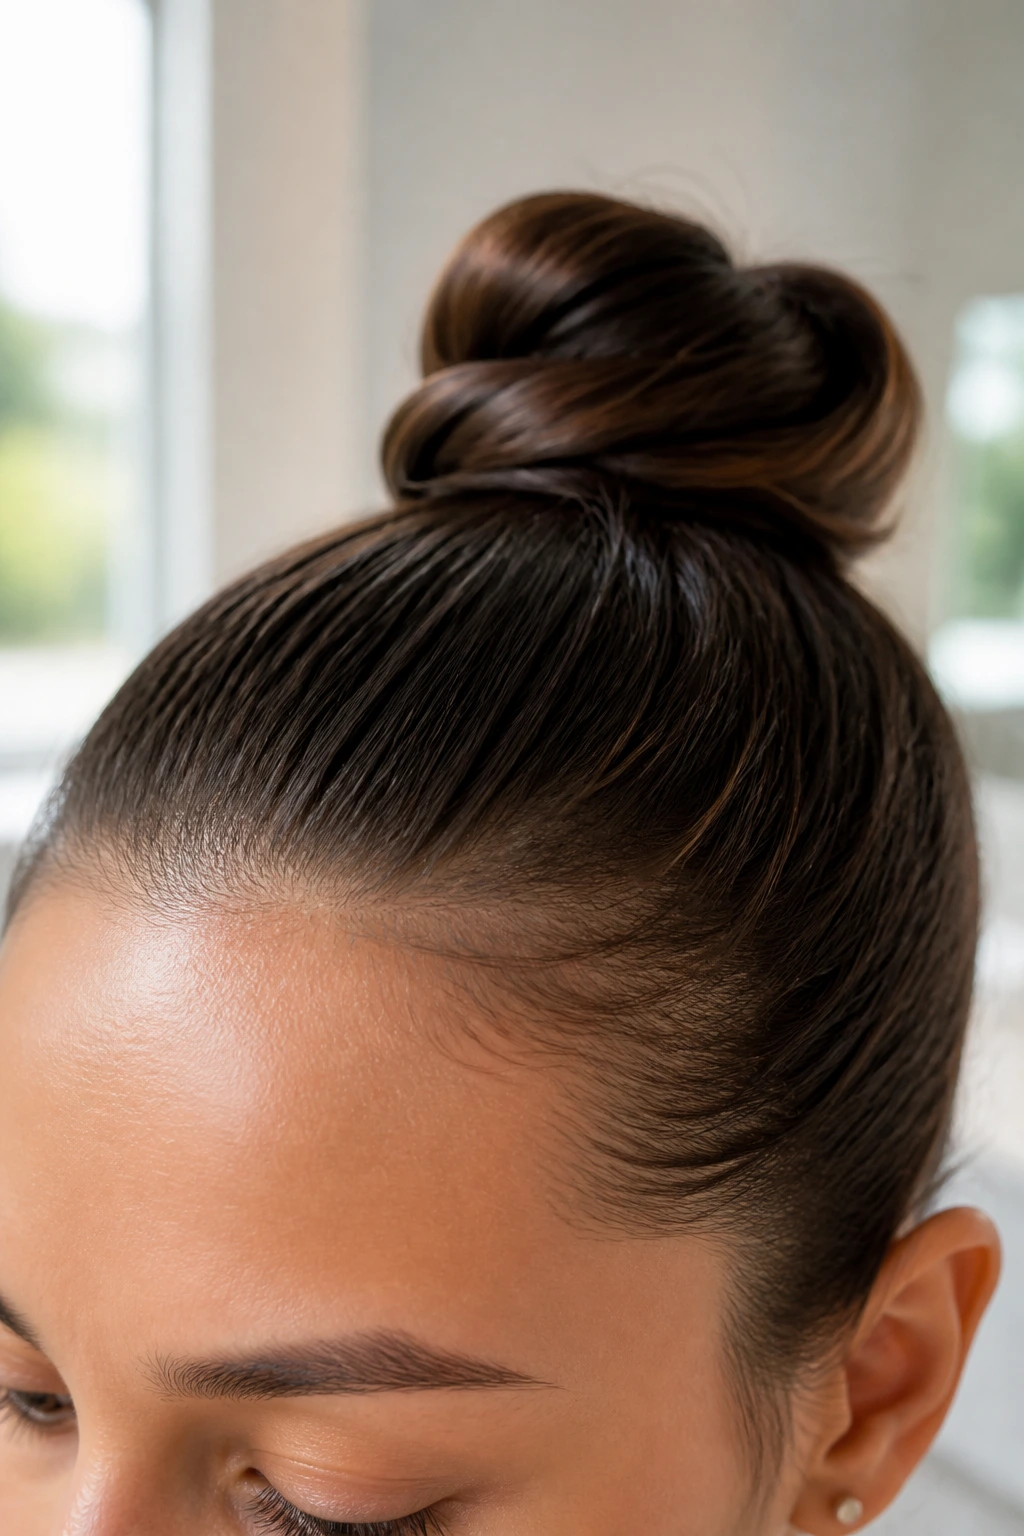
The hairline is where a sleek bun wins or loses its polish. A smooth crown with a fuzzy hairline looks unfinished. A shiny, over-producted front looks wet in the wrong way. The middle path is where the style lives.
Use Product on the Brush, Not the Scalp
That one change solves a lot. Put a small amount of gel, edge control, or styling cream on the brush or the edge brush, then sweep the surface flat in short strokes. Direct product at the roots and you often get buildup around the temples before the style is even set.
If your hairline has short baby hairs, decide what you want them to do. Either smooth them back into the shape or leave them soft on purpose. Half-slicked baby hairs that stick out in different directions look accidental.
Press, Don’t Pile
A little pressure goes farther than a lot of product. Use the brush to press the hair back in one direction, then repeat with a lighter hand to finish the surface. When you start brushing in circles or changing direction mid-stroke, the crown gets rough.
I also like a final pass with a clean brush after the first layer of gel goes on. It spreads the product thinly and removes any clumps. If the front starts to look sticky, you’ve used too much.
Respect the Hairline
Some hairlines can handle a fully slicked finish. Some can’t. If your temples are fragile or your scalp is sensitive, soften the style a little and don’t force tiny baby hairs into a sharp shape just because social media likes the look. A neater, gentler line is better than a pulled-back one that aches by lunch.
A sleek bun should frame the face. It should not look like it’s fighting the skin.
A Sleek Bun on Fine, Wavy, Curly, and Coily Hair
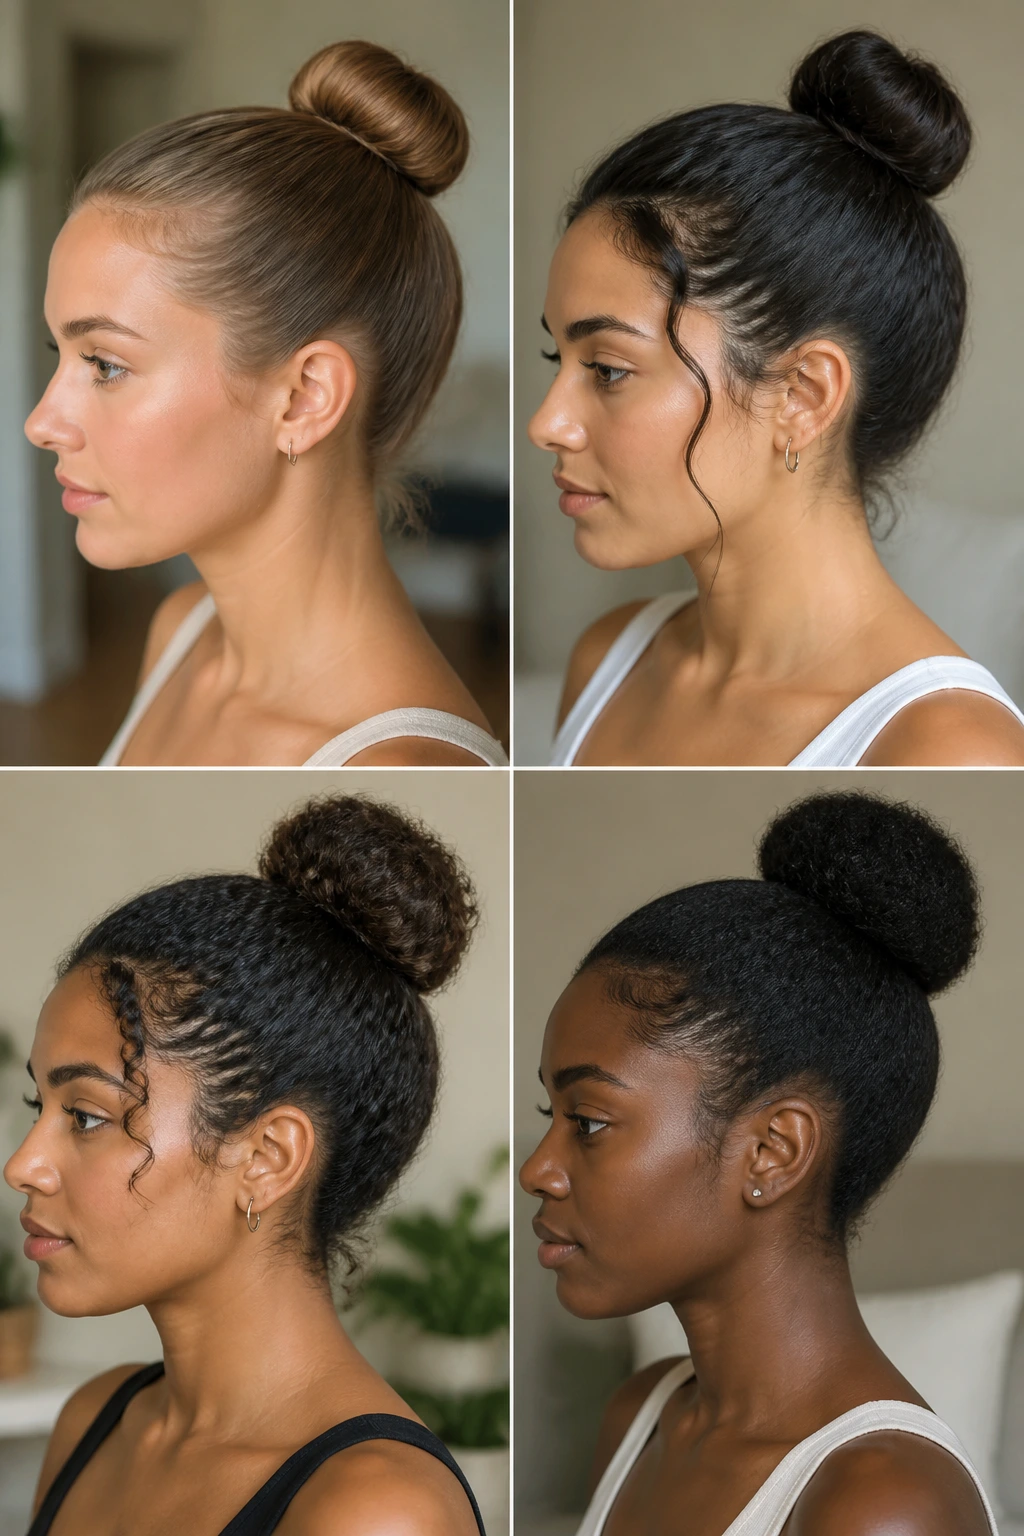
The base method stays the same across textures. The prep does not. That’s the part most people get wrong. They copy one video, then wonder why their hair behaves like a different species.
Fine or Straight Hair
Fine hair needs grip. Use a small amount of mousse at the roots before blow-drying, then add dry shampoo or texture spray if the hair is especially slippery. That gives the style something to hold onto without making it crunchy.
Keep the elastic snug and use extra pins at the base. Fine hair can look smooth, but it slides faster than heavier textures. If you want the bun to stay fuller, wrap the ponytail once and pin the ends instead of winding the hair into five tight loops.
Wavy Hair
Wavy hair usually needs the most crown smoothing. The wave pattern likes to spring back right around the temples and the nape, so work in sections with a brush and a little product. A light blow-dry helps flatten the base without frying the lengths.
If the wave is loose, you can leave the bun itself a little softer. If the wave is stronger, smooth the top layer more aggressively and pin the bun closer to the head. A wavy texture often looks best with a clean part and a controlled, low shape.
Curly Hair
Curly hair rewards stretch. If you try to build a sleek bun on a dense curl pattern without first loosening the curl, the surface can turn lumpy fast. A blow-dry on medium heat with a nozzle works, as does banding or stretching the hair in sections before styling.
Use a cream under gel if the hair tends to dry out. Cream gives slip, gel gives hold. The combo helps the hair lie down without turning brittle. And please don’t keep brushing the same section for ten minutes — that can rough up the cuticle and create frizz where you were trying to prevent it.
Coily Hair
Coily hair usually looks best when styled in quadrants. Smooth each quadrant separately, then gather the whole head into one base. Trying to force the whole head back in one go often leaves little islands of puff at the crown.
A firmer gel and a denser brush can help here, but so can patience. Let each section lie flat before you move on. If your hair is thick or very long, a two-step bun helps: first a tight ponytail, then a wrapped knot with pins and, if needed, a small bun net to hold the shape.
Small Moves That Make the Finish Sharper

The gap between “fine” and “clean” is usually a handful of tiny adjustments. Nothing dramatic. Nothing expensive. Just the kind of details that separate a rushed bun from one that looks like someone actually meant it.
Time-saver: Divide the hair into four sections — left front, right front, left back, right back — and smooth each one before you gather. You’ll spend less time re-brushing the same ridge over and over, and the crown ends up flatter with less product.
Humidity fix: Finish the surface with a cool shot from the blow-dryer, then tie a silk scarf around the hair for 10 minutes while you get dressed. That extra set time helps the shape hold when the air feels thick and sticky.
Comfort check: If the bun gives you a headache before you leave the house, loosen it. Tightness does not read as polished once the forehead creases start. A bun can be secure without feeling like a clamp.
Photo-ready move: Pull the bun a touch lower than your instinct tells you. Hair often creeps upward as you pin it, and the final position ends up higher than planned. That tiny shift can keep the style balanced with your face and neck line.
Cost-saver: A firm brush, a rat-tail comb, and a strong-hold gel do most of the work. You do not need a drawer full of specialty products to get this style right. The shape comes from technique.
What Usually Goes Wrong
A sleek bun is brutally honest. If something is off, you’ll see it. The fix is usually simple, but only if you know what the problem looks like.
-
Starting with damp hair: The bun looks smooth at first, then turns puffy as it dries and shifts. Fix: Dry the hair fully before styling, then set the bun with a scarf or cool air.
-
Using too much oil or serum at the roots: The style slides, the hairline separates, and the gel won’t stick. Fix: Keep shine products off the crown and use them only on the lengths or the finished bun surface.
-
Pulling the ponytail too tight in one spot: The scalp aches, the front looks strained, and the bun can sit at an awkward angle. Fix: Gather in sections, smooth evenly, and stop when the hair is flat rather than pulled taut.
-
Pinning only the top layer of the bun: The outside looks fine for ten minutes, then the coil starts to sag. Fix: Anchor the pins underneath and cross them where the bun meets the base.
-
Touching the hair before the product sets: Flyaways return, the surface gets fuzzy, and the whole style loses its edge. Fix: Give it a short setting period and avoid running your hands through it every five minutes.
-
Ignoring layered ends: Short pieces slide out and make the style look unfinished. Fix: Tuck and pin the shorter layers first, especially around the nape and temples.
Sleek Bun Variations for Different Moods
The shape can change without losing the clean finish. That is part of the appeal. Once the base technique is in place, you can steer it in a few different directions.
Ballet-Flat Bun
This is the classic high, centered version with the most lift and the least fluff. It sits close to the crown and looks crisp with structured clothing, statement earrings, or a sharp collar. Best when you want the hair to feel deliberate and fully controlled.
Low Knot With a Side Part
A side part softens the whole look before the bun even goes in. Keep the knot near the nape and let the front sweep across the forehead in one clean line. It’s a good choice when a center part feels too severe or when your natural growth pattern likes to split unevenly.
Braided Base Bun
Braid the ponytail first, then wrap the braid around the base. The braid gives extra grip and keeps the bun from loosening on slippery hair. It’s especially handy for layered cuts, thick hair, or days when you want the bun to stay put longer than usual.
Wrapped Ribbon Bun
A slim satin ribbon or clean hair tie wrapped around the base changes the whole mood without changing the structure. Use this when you want the style to feel dressed up but not fussy. Keep the ribbon flat and let the bun stay the star.
Sculpted Texture Bun
This one keeps the crown smooth but leaves the bun body with a little more dimension. Think of it as polished, not bone-flat. It works when you want movement in the back while keeping the front neat.
Tools and Equipment You’ll Want Nearby
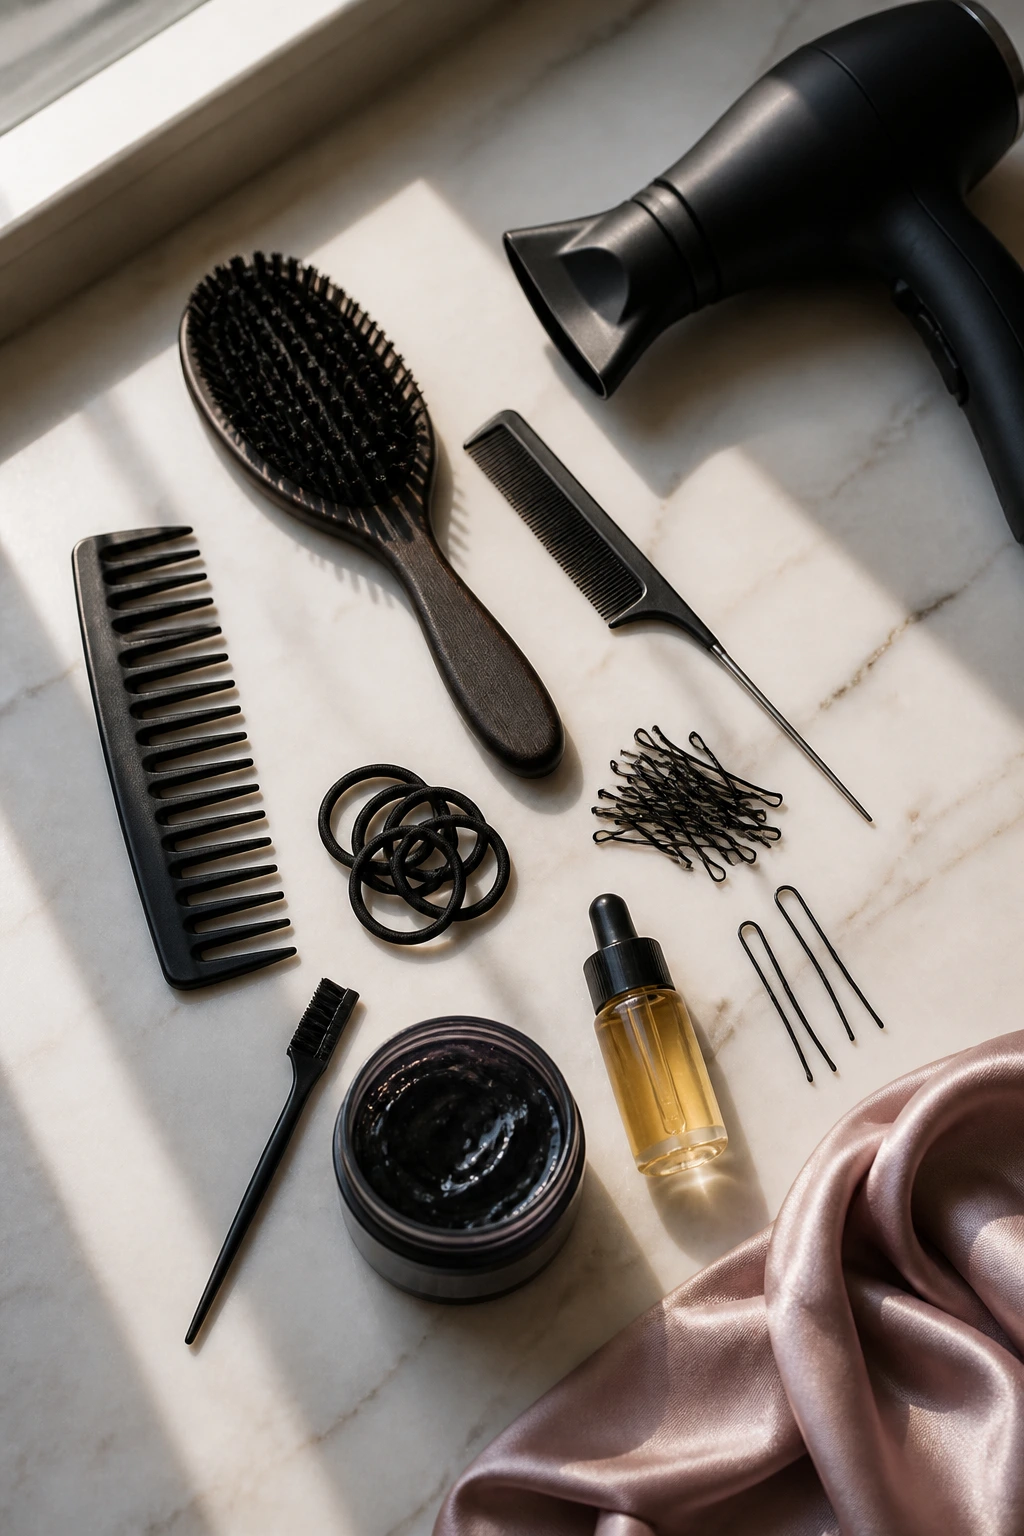
-
Firm bristle brush — Best for pressing the crown flat and directing the hair into a tight base.
-
Rat-tail comb — Useful for drawing a clean part and separating sections without tearing at the hair.
-
Wide-tooth comb — Good for detangling before styling, especially if the hair is wavy, curly, or coily.
-
No-snag elastics — Hold the ponytail without chewing through the hair or leaving a rough ridge.
-
Bobby pins — Ideal for anchoring the bun from underneath and hiding short layers.
-
U-pins — Helpful for thicker hair or buns that need extra support without visible hardware.
-
Edge brush or toothbrush-style brush — Lets you smooth the hairline with a small amount of product.
-
Strong-hold gel or styling cream — Keeps flyaways down and helps the surface set cleanly.
-
Hair oil or shine spray, used sparingly — Best reserved for the finished bun or the ends, not the root area.
-
Silk or satin scarf — Helps the style set and keeps the finish smoother while you get ready.
-
Blow-dryer with a nozzle attachment — Useful when you need to smooth the base before gathering, especially on wavy or curly hair.
-
Small mirror or handheld mirror — Saves you from guessing what the back looks like.
Night Care, Refreshing, and Washout
A sleek bun can last through a full day and into the next morning if the scalp is comfortable and the style was pinned well. Overnight care depends on how tight the bun feels and how much product you used. If the style is snug but not painful, sleep on a silk pillowcase or wrap the hair with a satin scarf. That keeps the surface from rubbing into frizz while you move around in your sleep.
If the bun feels too tight to sleep in, take it down. That isn’t failure; that’s common sense. Re-doing the style the next day is better than waking up with a sore scalp and a crease line you’ll spend half the morning trying to flatten.
Refreshing is simple. Mist a bristle brush lightly with water or a little diluted styling product, then smooth the hairline and crown again. Replace any pins that have slipped and press the bun back into shape. Don’t soak the whole head. Once the style is already in place, a little moisture at the surface is enough.
Washout depends on how much product you used. A light sleek bun usually comes out with one good shampoo. Heavier gel, edge control, or oil at the root can take two rounds, with conditioner kept on the mid-lengths and ends. If the hair feels coated, use a clarifying shampoo when you wash it next. That clears the buildup without making the scalp feel like it’s wearing a film.
Frequently Asked Questions About the Sleek Bun
Should a sleek bun start on clean hair or second-day hair?
Second-day hair usually gives better grip. Freshly washed hair can be too slippery, which makes the bun slide and the crown puff up faster. If you do style it on clean hair, use a little texture spray or dry shampoo at the roots first.
Can you make a sleek bun without gel?
Yes, but the finish will be softer. A strong styling cream, mousse, or a little leave-in followed by firm brushing can work if your hair already has grip. For a really flat crown, though, some kind of hold product usually makes the difference.
How tight should the ponytail be before you wrap the bun?
Tight enough that it won’t slip, loose enough that your scalp doesn’t ache. If your forehead feels pulled, the base is too tight. A sleek bun should look controlled without making you regret it an hour later.
Why does my sleek bun keep getting bumps at the back?
That usually comes from gathering the hair too quickly or not smoothing the nape in sections. Work from the bottom up with the brush and keep tension even while you bring the hair into place. Pinning only after the ponytail is already in can leave those bumps trapped underneath.
Can curly or coily hair do a sleek bun without straightening first?
Absolutely. Stretching the hair with blow-drying, banding, or twist-outs helps, but you do not need a bone-straight finish to make the style work. The key is smoothing each section before the ponytail goes in and using enough hold at the crown.
What if my hair is layered and the short pieces keep popping out?
Start with the shortest layers and pin them into the base before you finish wrapping the bun. A low sleek bun usually hides layers better than a high one, so that’s often the easier option. A little extra gel on the ends can help, but pinning matters more than product.
How do I make the hairline smooth without making it shiny in a greasy way?
Use a small amount of product on the brush, not directly on the roots, and keep the strokes thin. If the front starts to look wet, stop. A soft sheen is enough; the hairline doesn’t need to glisten.
Is it okay to wear a sleek bun often?
Yes, as long as you vary the tension and give the scalp breaks when it feels tender. Wearing the same style too tightly over and over is what causes trouble, not the bun itself. Loosen it, move the part, and avoid yanking the same spots every time.
A Clean Finish That Holds Its Own
A sleek bun works because it understands restraint. It doesn’t need fluff, volume, or a dozen accessories to do its job. It needs clean direction, the right amount of hold, and enough patience to smooth the surface before you pin it down.
Once that rhythm clicks, the style stops feeling like a backup plan. It becomes a clean answer for days when you want your hair to look sharp without looking overworked, and that’s a very useful thing to have in your pocket.