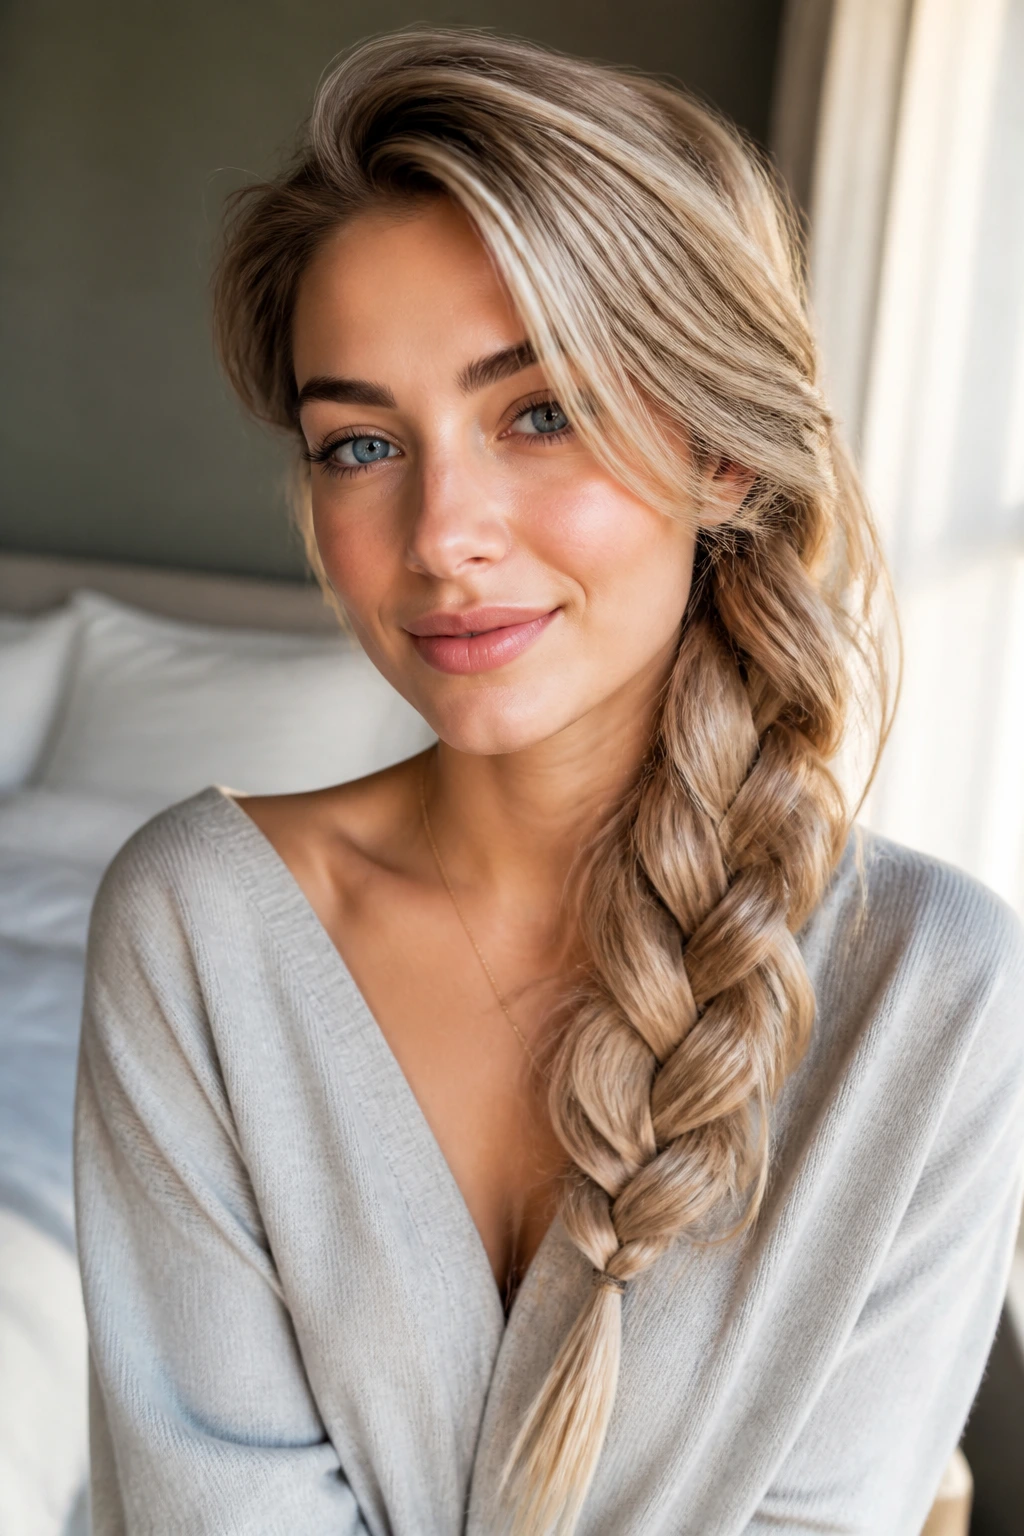
Fine hair can make spring mornings feel unfair. You spend five minutes making it look airy and polished, then one breeze, one scarf, one too-heavy leave-in cream, and the whole thing goes a little sad at the roots. The trick with spring hairstyles for busy mornings with fine hair is not to fight the hair into submission. It’s to work with what it already does well: clean lines, quick movement, soft shape, and styles that need a few pins instead of a full armory.
That’s the part most people get wrong. They reach for the biggest curling iron, the thickest mousse, or the roundest, puffiest blowout they can manage, then wonder why the style collapses before lunch. Fine hair usually does better with lighter products, smaller sections, and a little structure right where the style needs it most — at the crown, the temples, or the nape. Not everywhere. Never everywhere.
And spring adds its own chaos. Humidity shows up just enough to puff the ends, wind lifts the fringe at the wrong moment, and hats or hoodies flatten the top layer into a shape that looks like you slept on a paperback. So the styles here lean fast, forgiving, and practical. Most can be done in 2 to 6 minutes, and almost all of them look better with second-day texture than with freshly washed, slippery hair.
Why These Styles Earn Their Keep on Fine Hair
-
They need less mass to look finished: Fine hair often looks best when the shape is built with a part, a twist, a braid, or a clip instead of a lot of teasing and product.
-
They hold with small tools: Mini elastics, narrow bobby pins, slim clips, and French pins tend to grip fine hair better than oversized accessories that slide around.
-
They work with day-two texture: A little grit at the roots can be your friend, especially if your hair tends to slip out of ponytails before breakfast.
-
They don’t ask for a perfect blowout: These styles look good with bends, soft ends, and a few flyaways. Perfection usually makes fine hair look flatter, not better.
-
They move fast: Most of the looks below can be built while your coffee is still hot, which is the whole point on a rushed morning.
-
They survive real life: Wind, commuting, school drop-off, headset hair, and a quick change of earrings. That’s the test, and these styles can handle it.
Why Fine Hair Wants Shape More Than Weight
Fine hair is about strand diameter, not necessarily about how much hair you have. That distinction matters a lot. A head of dense fine hair can still look flat if the style is too heavy. And a smaller amount of fine hair can look fuller than it really is if the cut and styling create lift in the right places.
Weight is the enemy. Thick oils, rich creams, and a heavy-handed layer of smoothing product can make the top section sit down like it lost the argument. Light mousse at the roots, a touch of texture spray through the mid-lengths, and a style that gives the hair somewhere to go — up, over, back, or around — usually works better.
There’s also the shape problem. Fine hair tends to show every bend, so a style that gives the eye a clear line looks more intentional than one that tries to be “big” everywhere. A low pony with a clean side part. A tiny braid at the temple. A bun pinned close to the neck. These work because the silhouette is tidy. The hair itself doesn’t need to be huge.
And that’s the real game here. Not bulk. Structure.
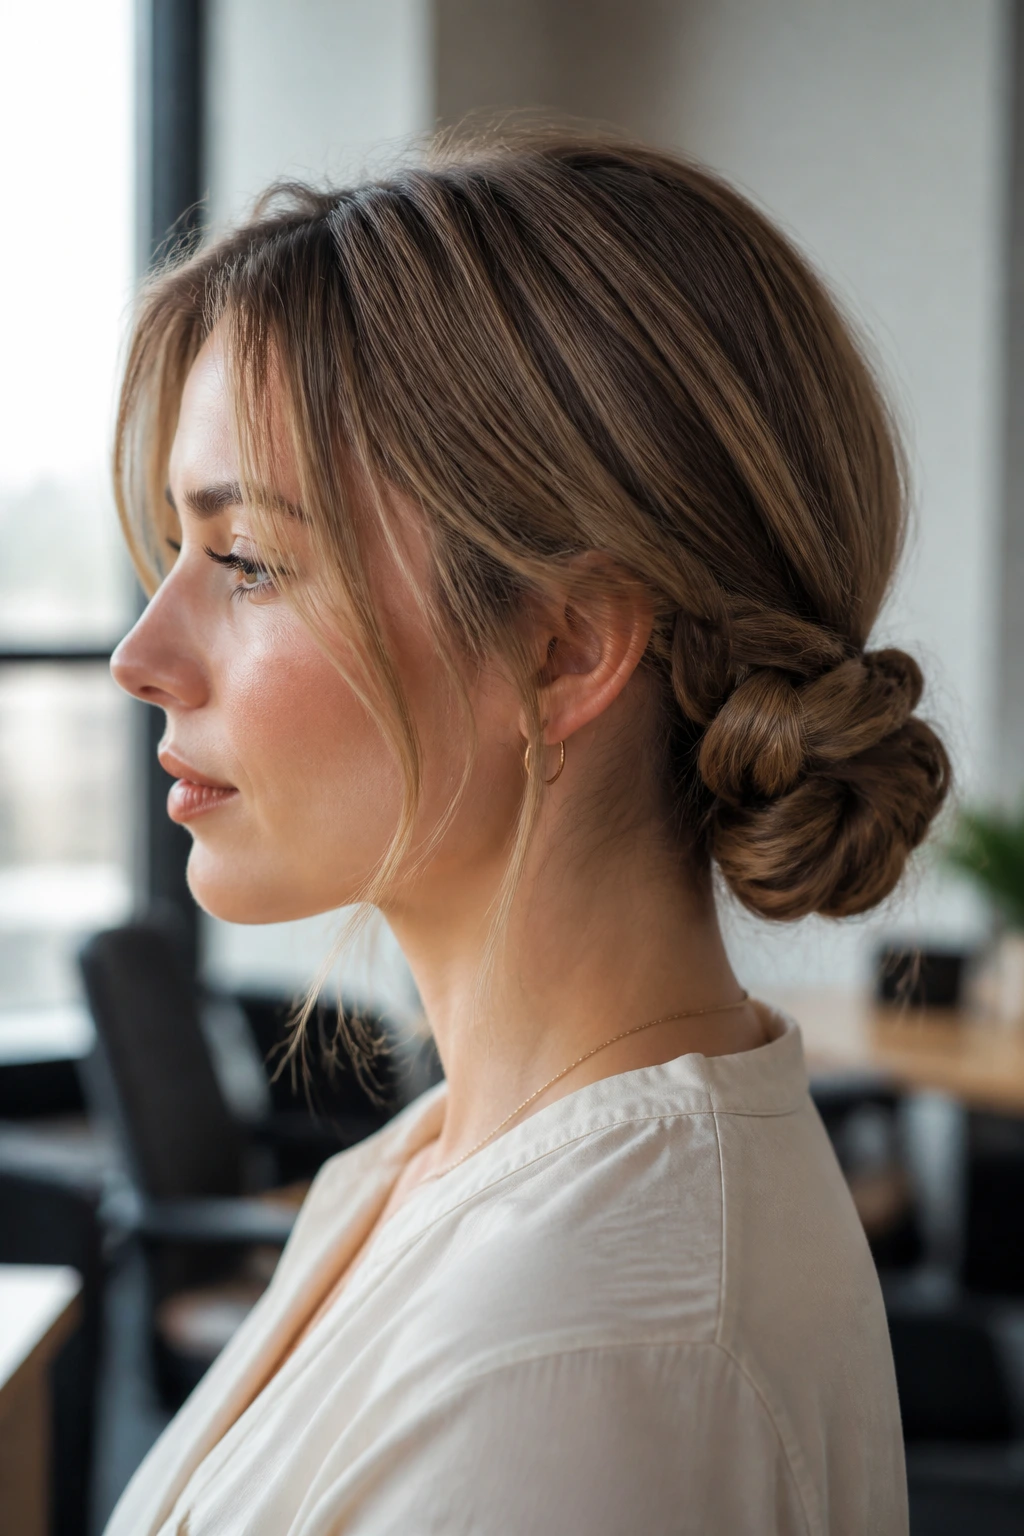
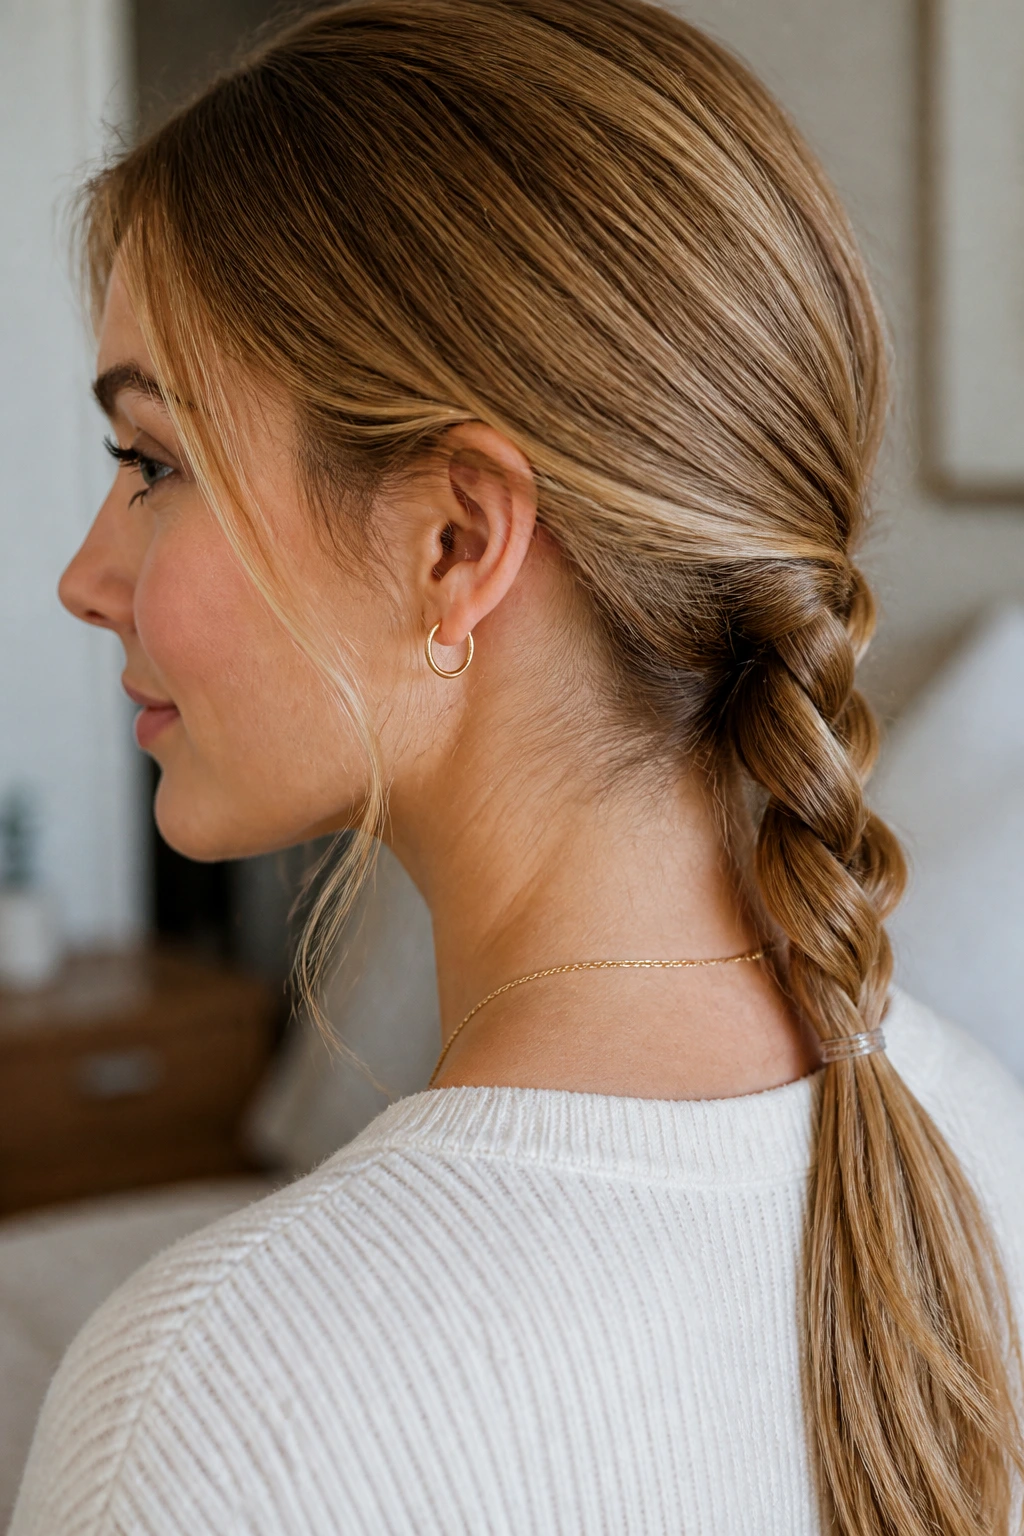
1. The Sleek Low Pony With a Clean Side Part
A low ponytail can look boring on fine hair, or it can look sharp enough to pass for deliberate style. The difference is the part and the finish. A clean side part gives the crown a little shape, and a low placement at the nape keeps the length from dragging the whole look down.
Use a pea-sized amount of lightweight gel or smoothing cream only at the top layer. Brush the hair back with a boar-bristle brush, not a big round brush, and secure it with a slim elastic just behind one ear or centered at the nape. Wrap a small strand around the elastic if you want it to look finished without adding more product.
This works especially well on day-two hair. Freshly washed fine hair can be too slippery; a little texture from the previous day makes the pony sit better. If the crown still feels flat, lift the roots with the tip of a tail comb before you tie it off. That tiny bit of lift matters more than a lot of teasing.
Best for: shoulder-length hair and longer, especially when you need a clean look in under 5 minutes.
2. The Clipped Half-Up Twist
Ever notice how fine hair can look fuller when half of it is lifted off the neck? That’s the whole trick here. The lower section stays loose and soft, while the top gets a little shape from two quick twists pulled back into a clip or barrette.
Take 2 small sections from the temples, twist each one back once or twice, and meet them at the back of the head. Clip them together with a small claw clip or a flat barrette. If the clip is oversized, it tends to slide on fine hair and flatten the top. Small hardware works better.
How to keep it from slipping
Mist the temple sections with dry shampoo before you twist. Not a cloud of it. One or two light sprays, then wait 20 seconds and finger-comb through. The roots should feel a little less silky, not dusty. If you want the twist to hold longer, cross two bobby pins under the clip in an X shape.
This is one of those styles that looks more elaborate than it is. That’s useful on a work morning when you want your hair off your face but still want some movement around the shoulders.
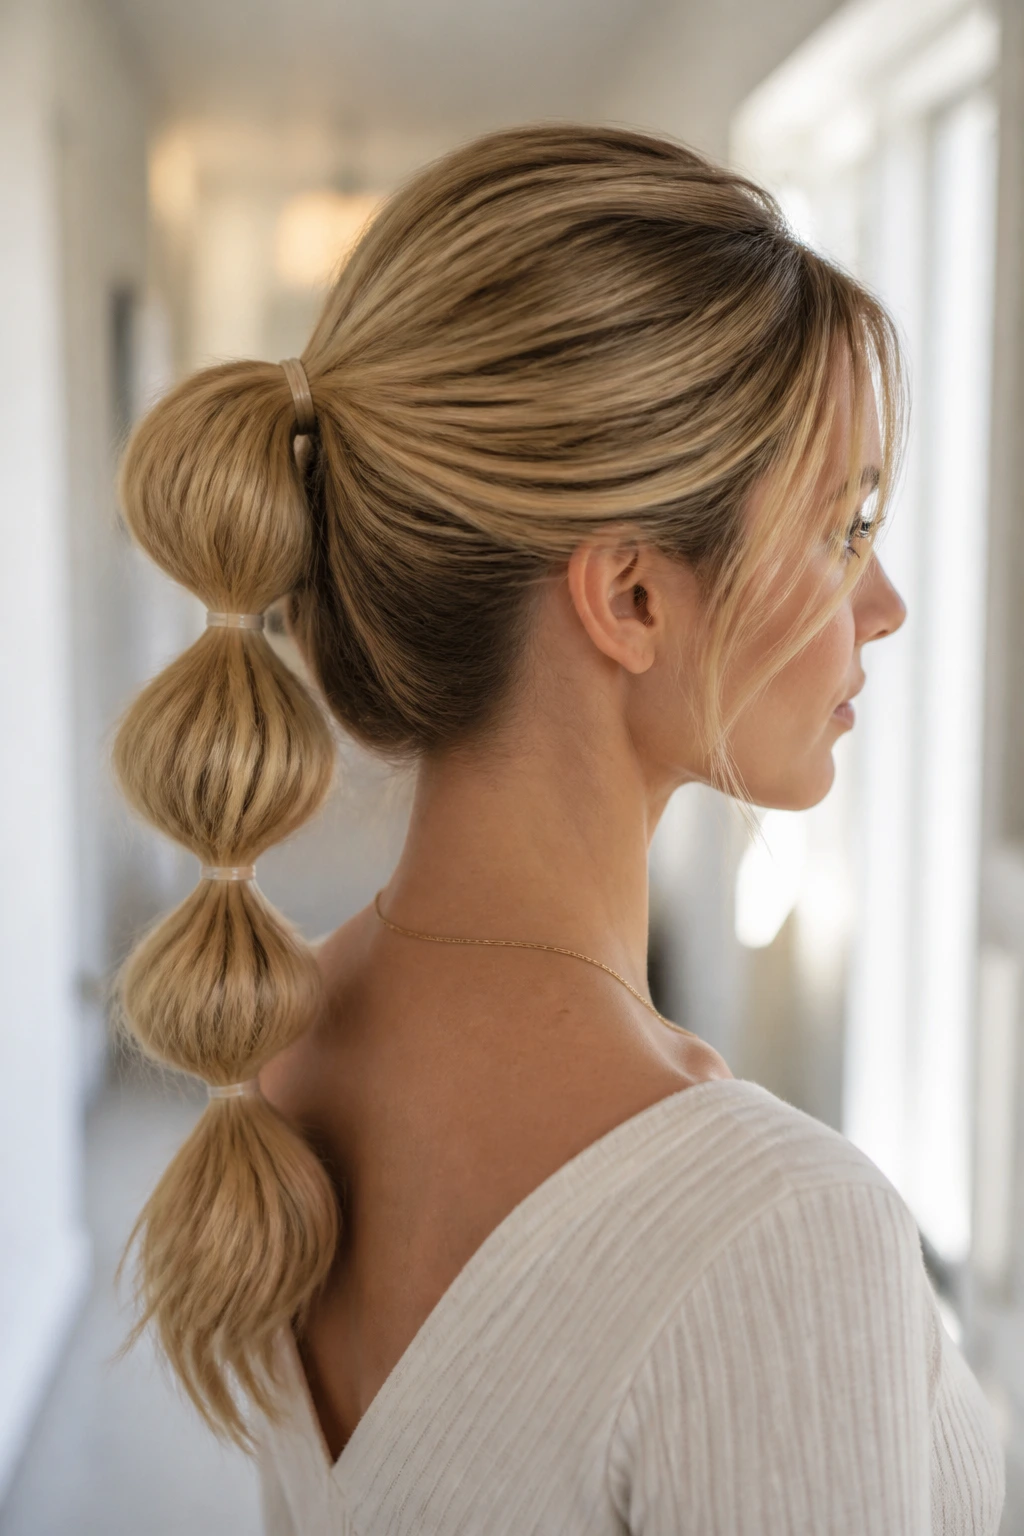
3. The Bubble Ponytail That Fakes Thickness
Bubble ponytails are a small miracle for fine hair. Instead of pretending the hair is denser than it is, the style uses spacing and shape to make the ponytail look fuller. A few evenly placed elastics create those rounded sections that catch light and give the illusion of more hair.
Start with a low or mid ponytail and secure it with a clear elastic. Add another elastic 2 to 3 inches down, then another, depending on length. Gently tug each section outward with your fingertips until it puffs into a soft oval. You do not need to yank hard. A little puff goes a long way.
The reason this works so well on fine hair is simple: the style gives your eye something to read. Even if the actual volume is modest, the segmented shape feels intentional. If your hair is especially silky, dust a touch of texture powder at the roots first. That keeps the pony from sliding lower during the day.
A bubble ponytail also plays nicely with second-day hair, which means less washing and less styling time. That alone is reason enough for me to keep it in the rotation.
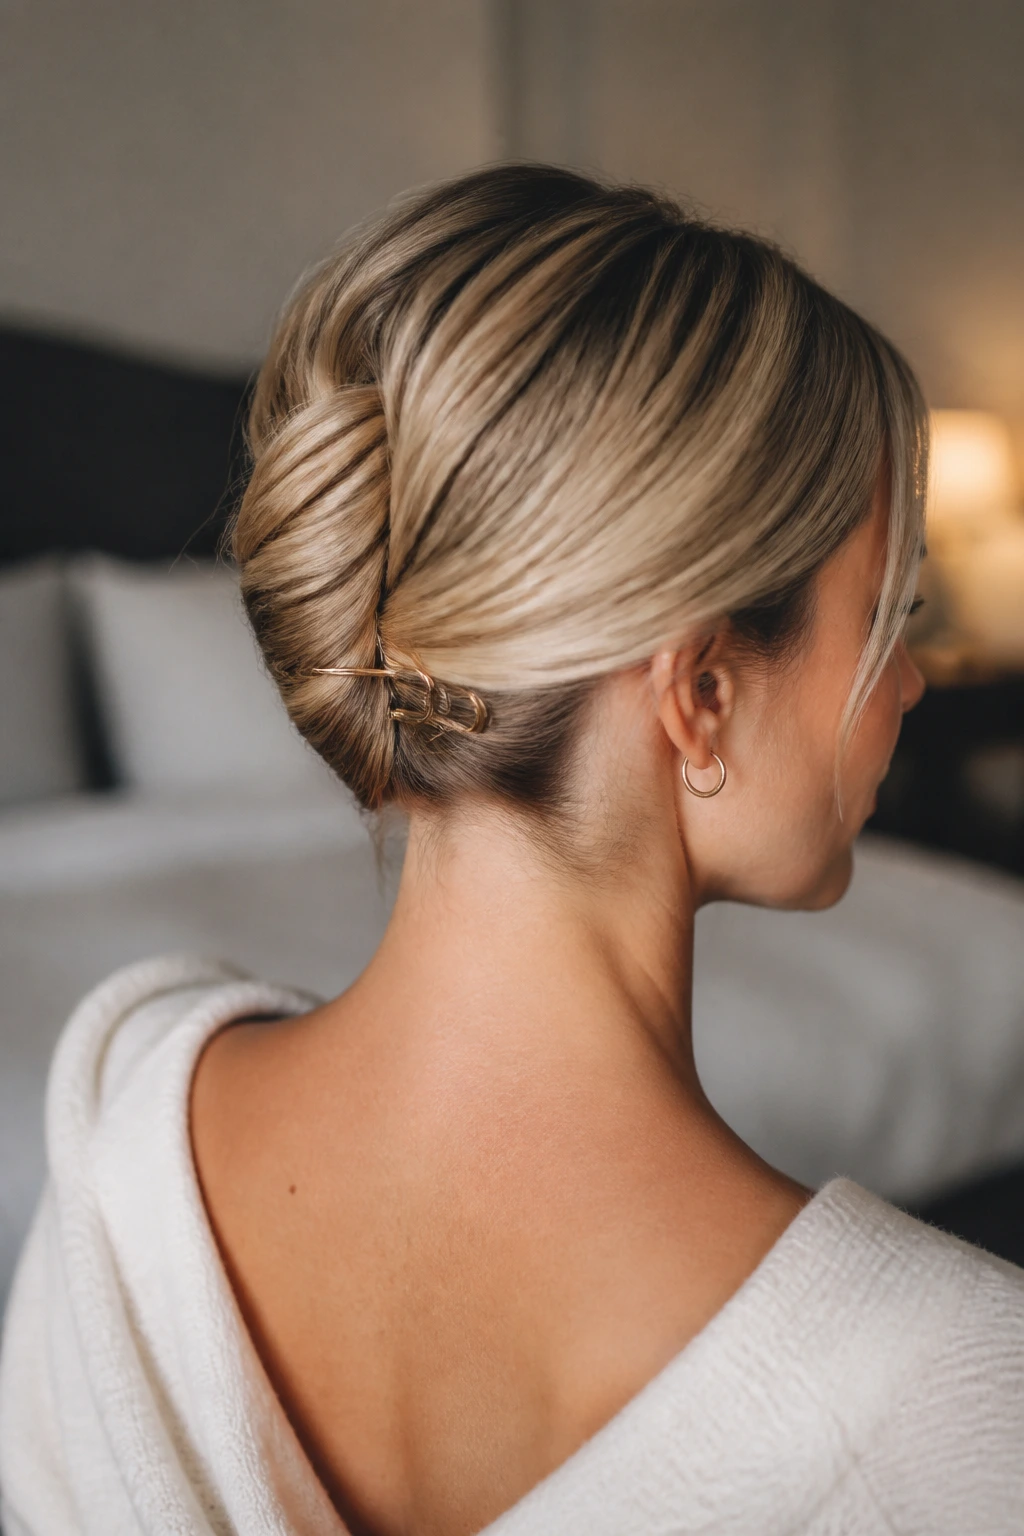
4. The French Pin Twist at the Nape
A French pin can make fine hair look strangely elegant without requiring much hair at all. It’s the kind of style that looks like you thought about your hair, when really you spent 90 seconds and used one piece of metal.
Gather the hair low at the nape, twist it upward once, then fold the length back under itself into a compact roll. Slide the French pin through the twist at an angle so it locks the shape in place. If your hair is very fine, prep with a light mist of texturizing spray first. That gives the pin something to bite into.
The nice thing about this style is that it doesn’t depend on bulk. A small, neat roll often looks better on fine hair than a big bun that sags by noon. Keep the twist close to the head and resist the urge to make it too fluffy. Too much padding can make the whole thing look loose and weird.
This one is excellent for short-to-medium lengths that still reach the nape. If the ends keep poking out, tuck them in with a second pin. Messy is fine. Escapees are not.
5. The Claw-Clip Roll-Up
The claw clip came back for a reason: it is fast, and it’s kinder to fine hair than a tight elastic pulling on the same few strands all day. But the shape matters. A small or medium clip usually works better than the giant version on fine hair, which can swallow the whole head and make it look smaller.
Twist the hair upward from the nape, fold the length back on itself, and clip it vertically so the teeth catch the twist and the ends stay tucked. Leave a few soft pieces loose around the ears if you want the style to feel less severe. A matte clip grips better than a shiny one.
What makes it work: the clip lifts the hair off the neck without crushing the crown. Fine hair tends to go flat when it’s pinned in too many places, so one strong anchor point is often enough. You’re aiming for controlled, not overbuilt.
If the twist feels slippery, rough up the roots with dry shampoo before you start. And if your hair is just above shoulder length, clip the bottom half first, then fold the top over. That little adjustment makes a big difference.
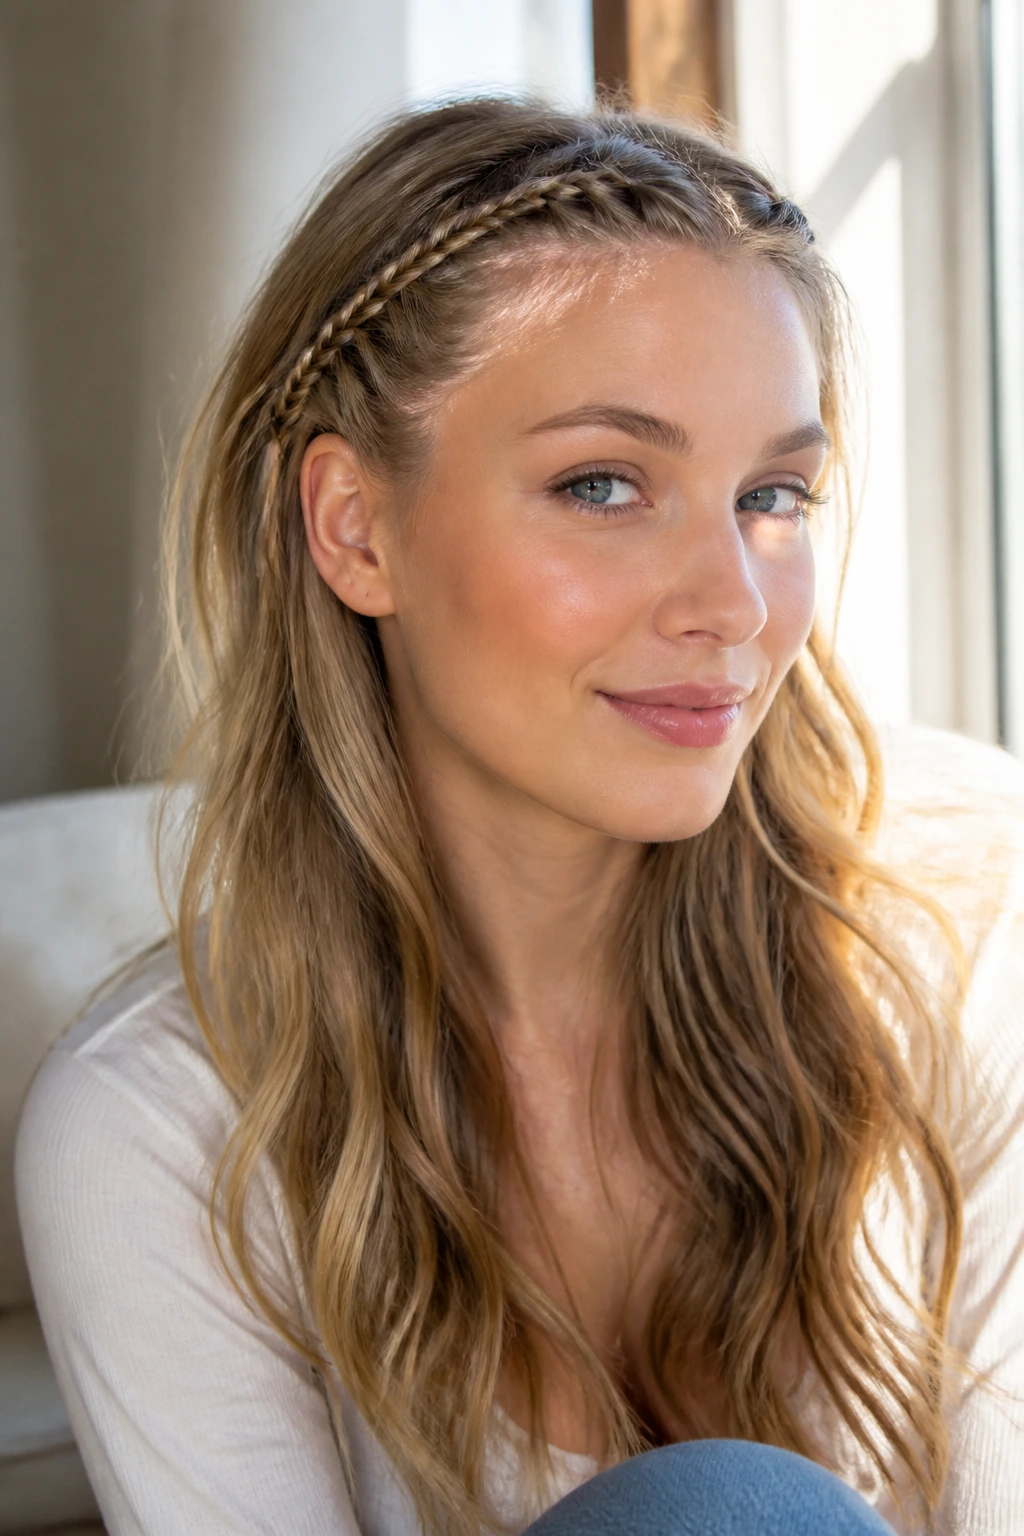
6. The Tiny Braids at the Hairline
This is the style I reach for when the front of my hair refuses to behave. Two narrow braids near the hairline pull the face-framing pieces back without stealing all the softness from the rest of the hair. Fine hair actually benefits from the delicate look; the braids don’t need to be thick to feel intentional.
Take a small section from each temple and braid it back toward the ear, stopping after 3 or 4 crosses. Secure each braid with a tiny elastic or pin them behind the ear. The rest of the hair can stay loose, half-up, or gathered into a pony. If your hair is layered, mist the front pieces with water or leave-in spray before braiding so the shorter bits don’t pop free immediately.
Best use case
This is the move for mornings when you want your face clear but do not want to commit to an updo. It also works well if your hair has a little static at the front, because the braid keeps the flyaways from frizzing all over your forehead.
You can make the braids look softer by gently pulling at the edges once they’re secured. Not too much. Just enough to widen them by a few millimeters.
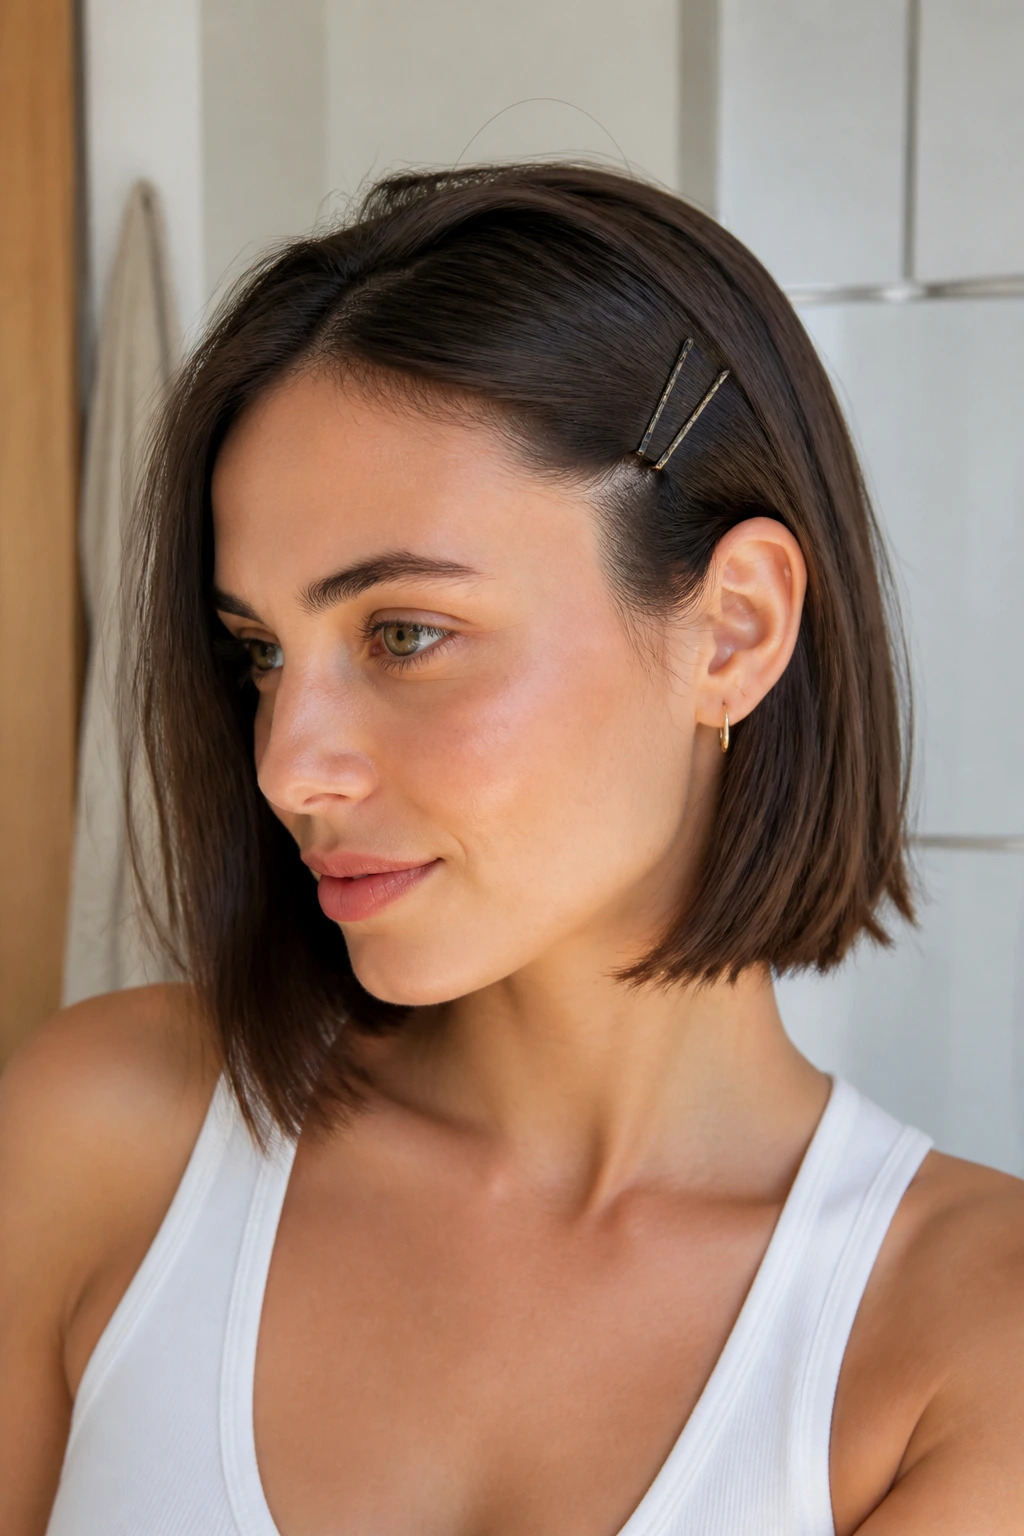
7. The Tucked Bob Behind the Ear
A bob with fine hair can look crisp or limp, and the difference is often one tucked side and one un-tucked side. That asymmetry gives the cut shape without asking for more volume than the hair can reasonably give.
Part the hair slightly off-center, then tuck one side behind the ear and secure it with one or two bobby pins hidden just above the ear. Leave the other side loose. If the ends are too straight, bend them under with a flat iron for a few seconds or use a round brush while blow-drying the last inch.
This style works because it shows off the cut itself. Fine hair often looks best when the outline is clean. Overloading it with product only makes the bob sit lower. A tiny dab of lightweight serum on the ends is enough.
I like this one for mornings when I don’t have time to fuss but still want the haircut to do the work. Bobs need structure more than decoration, and this gives them exactly that.
8. The Rope-Braid Ponytail
A rope braid is one of those tricks that sounds fancy and ends up being easier than a regular braid. For fine hair, that’s a win. The twist pattern creates a tighter, sleeker look that doesn’t depend on a lot of thickness.
Pull the hair into a low ponytail, split the length into two sections, and twist each section in the same direction — away from your face is easiest to remember. Then wrap the two twisted sections around each other in the opposite direction and secure the end with a clear elastic. If it starts to loosen, pinch it lightly and add a tiny bit of hairspray.
Why use this on fine hair? Because the rope braid gives the tail a more substantial look than a plain pony, and it keeps the ends contained. The texture reads better in daylight, too. Fine strands can disappear in a standard braid, but the rope braid keeps its shape.
Use it when your hair is straight, smooth, and a little too cooperative. The style gives it some attitude.
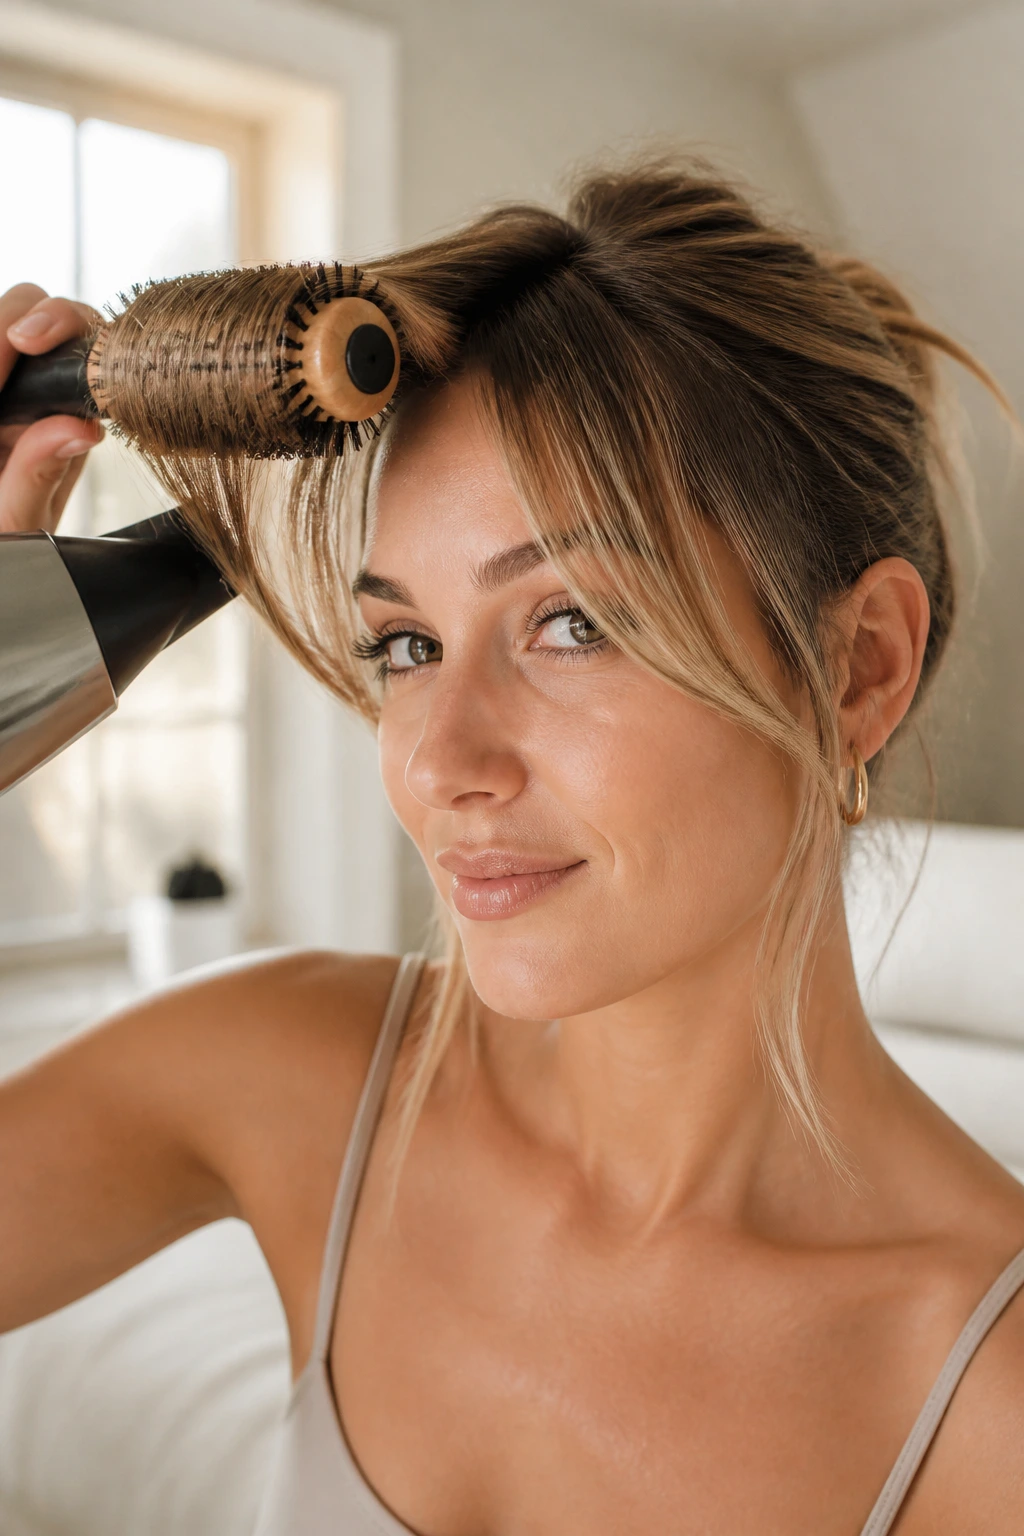
9. The Curtain Bang Blowout Shortcut
Got curtain bangs or face-framing layers? They can do half the styling work for you if you give them 4 minutes and the right direction. Fine hair often falls flat at the front first, so lifting those pieces can make the whole head look more awake.
Wrap each front section around a medium round brush or a Velcro roller while you do makeup, then hit the roots with warm air for 20 to 30 seconds. Let the bangs cool before you touch them. That cooling step matters more than people think. Hair sets as it cools, not while it’s hot.
What to watch for
If you over-dry the bangs, they can flip in a weird, stiff way. Stop when they’re about 90 percent dry and still a little bendy. Then use your fingers, not a brush, to separate them.
This shortcut is especially good if the rest of your hair is going into a pony, clip, or braid. You’re not doing a full blowout. You’re stealing the illusion of one from the front section only.
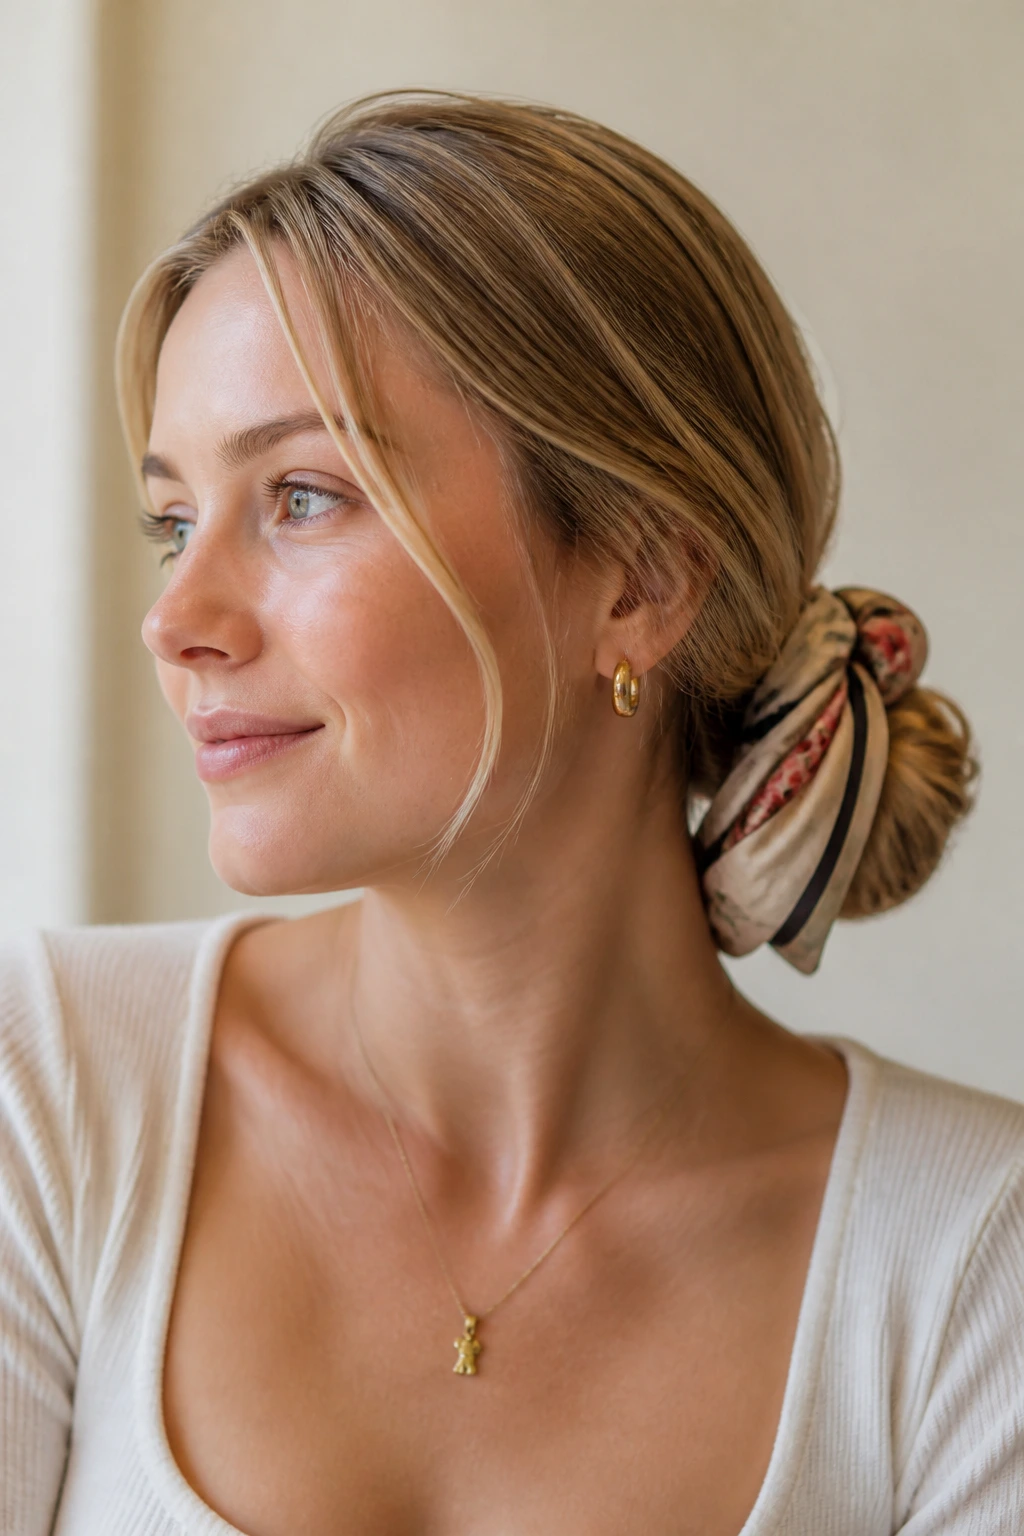
10. The Scarf-Tied Low Bun
A scarf can do more than decorate a bun. On fine hair, it can give the style a sense of weight and shape that the bun itself may not have. That’s useful when your hair is too soft for a big knot but you still want something that looks finished.
Gather the hair into a low bun at the nape, secure it with a small elastic, then tie a narrow silk or cotton scarf around the bun or around the base like a ribbon. The scarf should sit snugly but not yank the hair upward. If you tie it too tight, the bun can look bunched and odd.
The best part is that a scarf covers a lot of fine-hair sins. Little gaps, smaller bun size, pieces that refuse to stay tucked — the fabric smooths all of it over. Choose one with enough body to hold its knot and not slide.
Use this when your ends are dry or frizzy and you don’t want to keep chasing them with serum. Sometimes the smarter move is to hide the problem in plain sight.
11. The Double Mini Buns

Double buns sound playful because they are playful, but they also make practical sense on fine hair. Two smaller buns often look better than one big bun that tries too hard and deflates. The shape stays balanced, and the style sits lightly on the head.
Part the hair down the middle, create two low or mid-height pigtails, and twist each one into a small bun. Secure with tiny elastics and a few pins. Don’t build them too far out to the sides or the style starts to look costume-y. Keep them close to the head and slightly loose at the edges.
Fine hair benefits from the symmetry. The eye reads the pair as intentional structure, which makes the hair seem fuller than it is. If the ends are too short to tuck cleanly, let a few little pieces stick out on purpose and mist the whole style with flexible spray.
This is one of those looks that works best when you stop before it becomes precious. A little mess helps.
12. The Low Braided Bun
A plain bun on fine hair can sometimes look like a knot with a good attitude. A braid solves that. It adds texture, grip, and enough visual detail to make the bun feel complete even when the hair itself is not overflowing.
Make a low ponytail, braid the length all the way down, then coil the braid around its base and pin it in place. If your hair slips out of braids easily, prep the length with texturizing spray before you start. That gives each strand a bit of friction.
Why this one beats a regular bun
The braid creates its own pattern, so the bun does not need to be huge. That matters on fine hair. Big buns can end up looking hollow, while a braided bun looks deliberate and tidy even when it’s compact.
This is a good office style, a good school-drop-off style, and a good “I need my hair off my neck” style. You can dress it up later with a barrette or leave it plain. Either way, it holds better than a fluffy knot built from smooth hair.
13. The Textured Pixie With a Little Paste
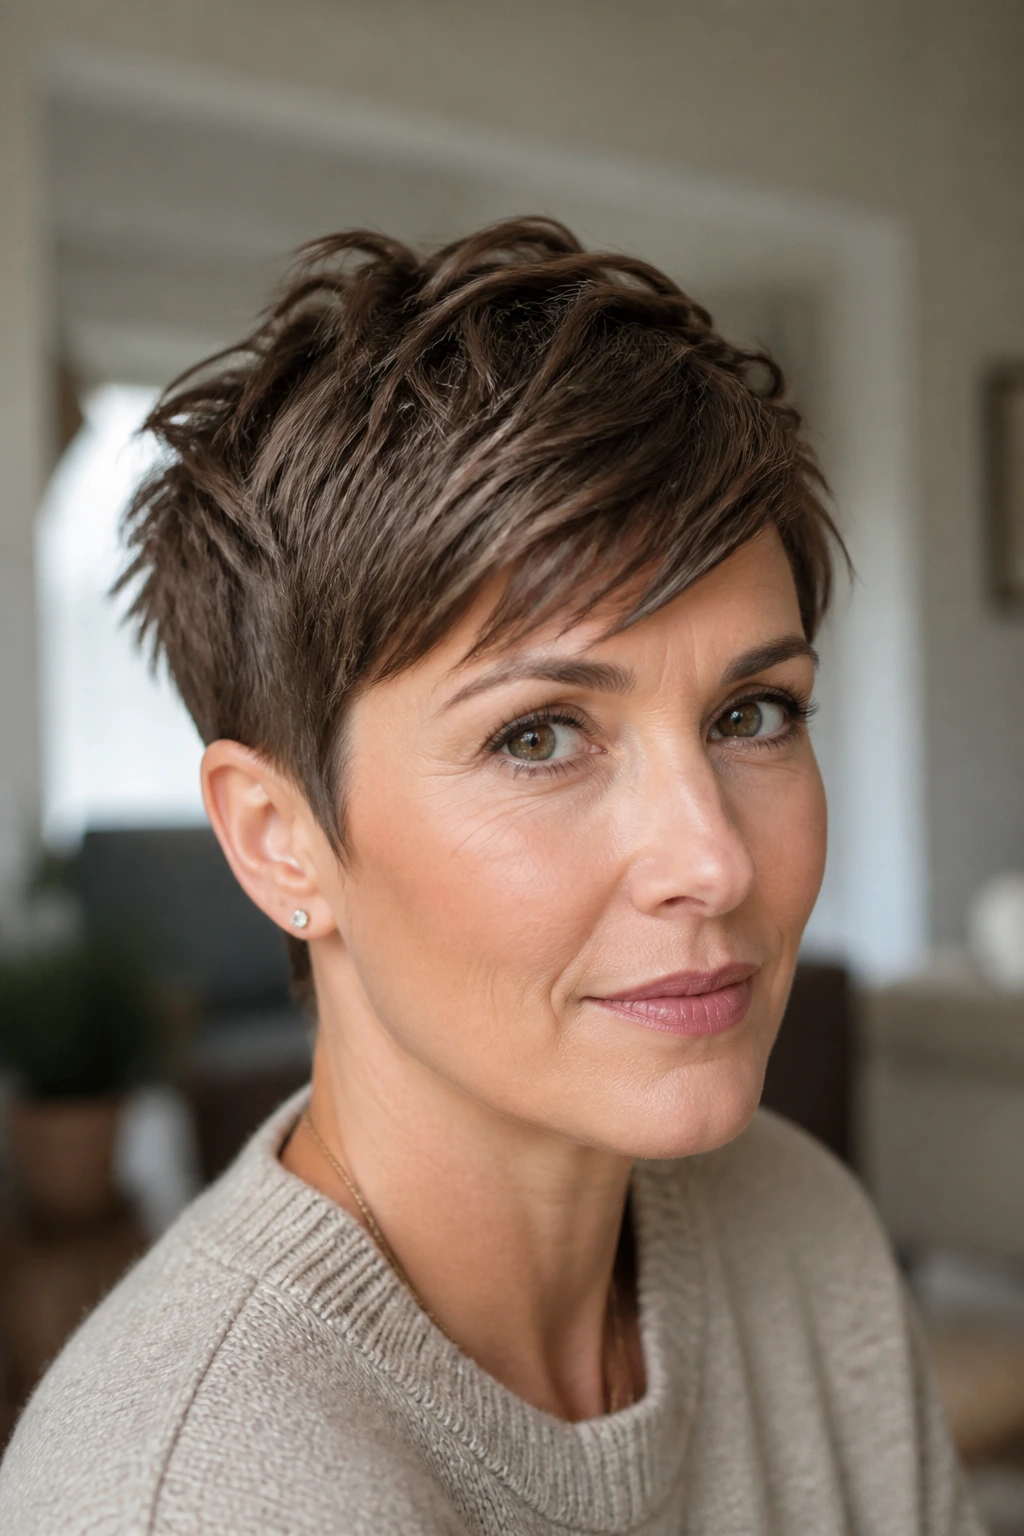
Short fine hair is its own sport. The good news: a pixie can look fantastic with very little effort if you stop trying to make every strand cooperate. The trick is to use a tiny amount of product and direct the pieces instead of flattening them.
Work a pea-sized dab of matte paste between your fingertips, then pinch small sections at the crown and fringe, pushing a few pieces forward and a few to the side. The movement should look broken up, not glued. If you use too much product, the hair gets stringy fast.
A little root powder at the crown can help if the top lies down too quickly. Tap it in, wait a few seconds, then lift with your fingers. No heavy cream. No glossy oil. Pixies on fine hair need grip and shape, not shine that collapses the cut.
Best for: people who want a 2-minute style that still looks edited. This is one of the few looks where a little roughness looks better than perfect symmetry.
14. The Chin-Length Flip-Out

A chin-length cut can feel too plain when it falls straight, but a subtle flip at the ends changes everything. Fine hair responds well to this because the bend adds motion without needing volume through the whole head.
Use a 1-inch curling iron or a flat iron to flick the ends outward just an inch or two. Don’t curl the whole head. Just the last section. A side part helps, and so does a light mist of heat protectant before you start. If you have naturally straight hair, set the ends with a cool shot from the dryer for a few seconds after shaping them.
The style works because it gives the eye movement at the bottom edge of the haircut. That’s where fine hair often looks too quiet. A little flip keeps the silhouette from sinking.
I prefer this to over-texturing a short cut. A small bend looks neat. Choppy waves on short fine hair can sometimes look messy in a bad way.
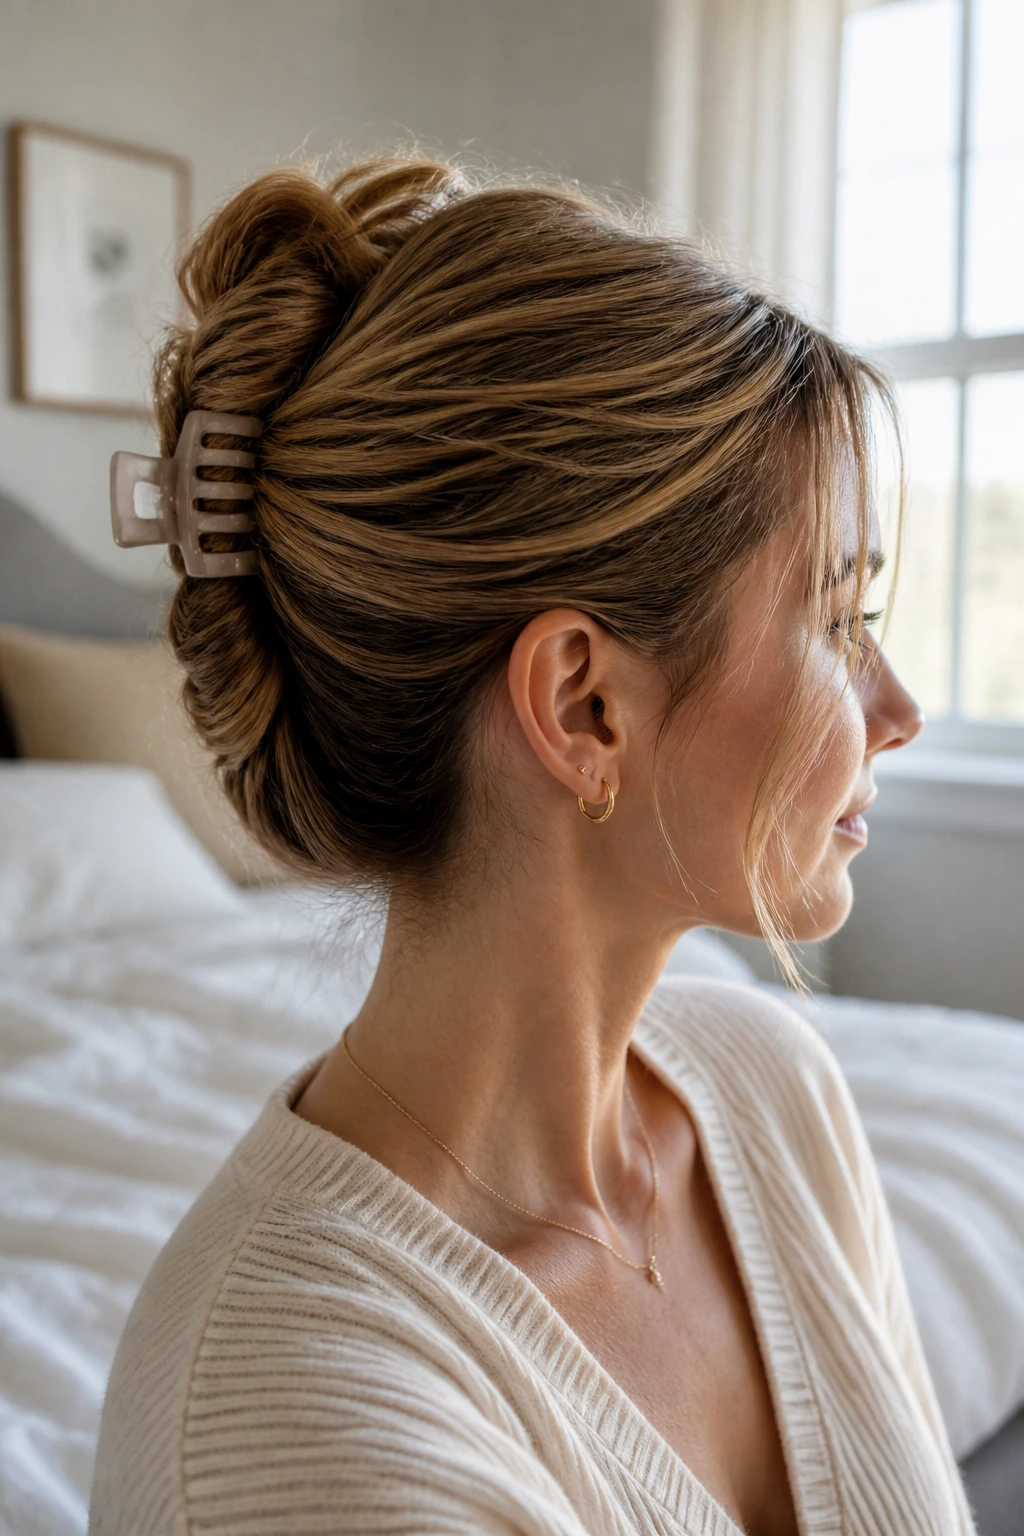
15. The High Half Pony With Lift at the Crown
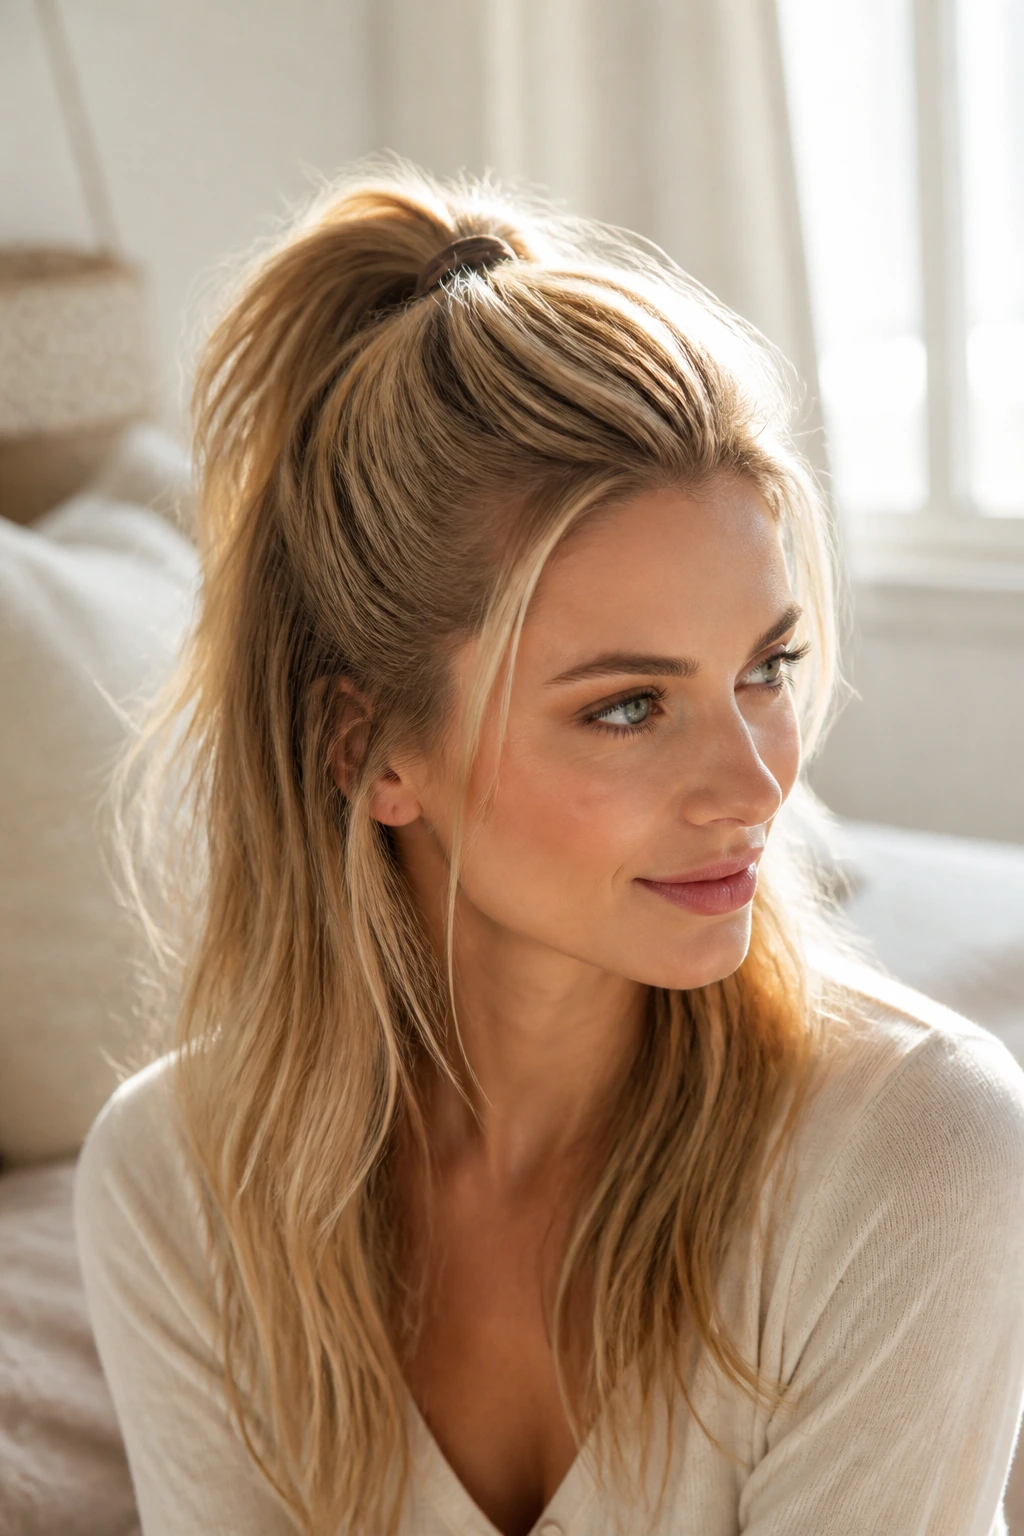
Want the face-opening effect of an updo without committing to a full ponytail? The high half pony is the answer. It pulls the top section up and back, which gives fine hair the lift it needs right where the eye notices it first.
Take the top third of the hair, tease just the underlayer at the crown with two gentle strokes of a tail comb, and secure it with a small elastic or clip. Then tug a little at the section above the elastic so it rounds out instead of lying flat. The lower half stays loose, which keeps the style from feeling too severe.
How to make it hold
Mist the crown lightly with texture spray before you gather the section. If your hair is slippery, add a small hidden clip underneath the half pony for extra support. One tiny anchor can save the whole style.
This is a good choice for fine hair because it gives lift without requiring every strand to do something. Half the hair rests. Half the hair works. That’s a decent deal on a rushed morning.
16. The Sleek Pony With an Airy Crown
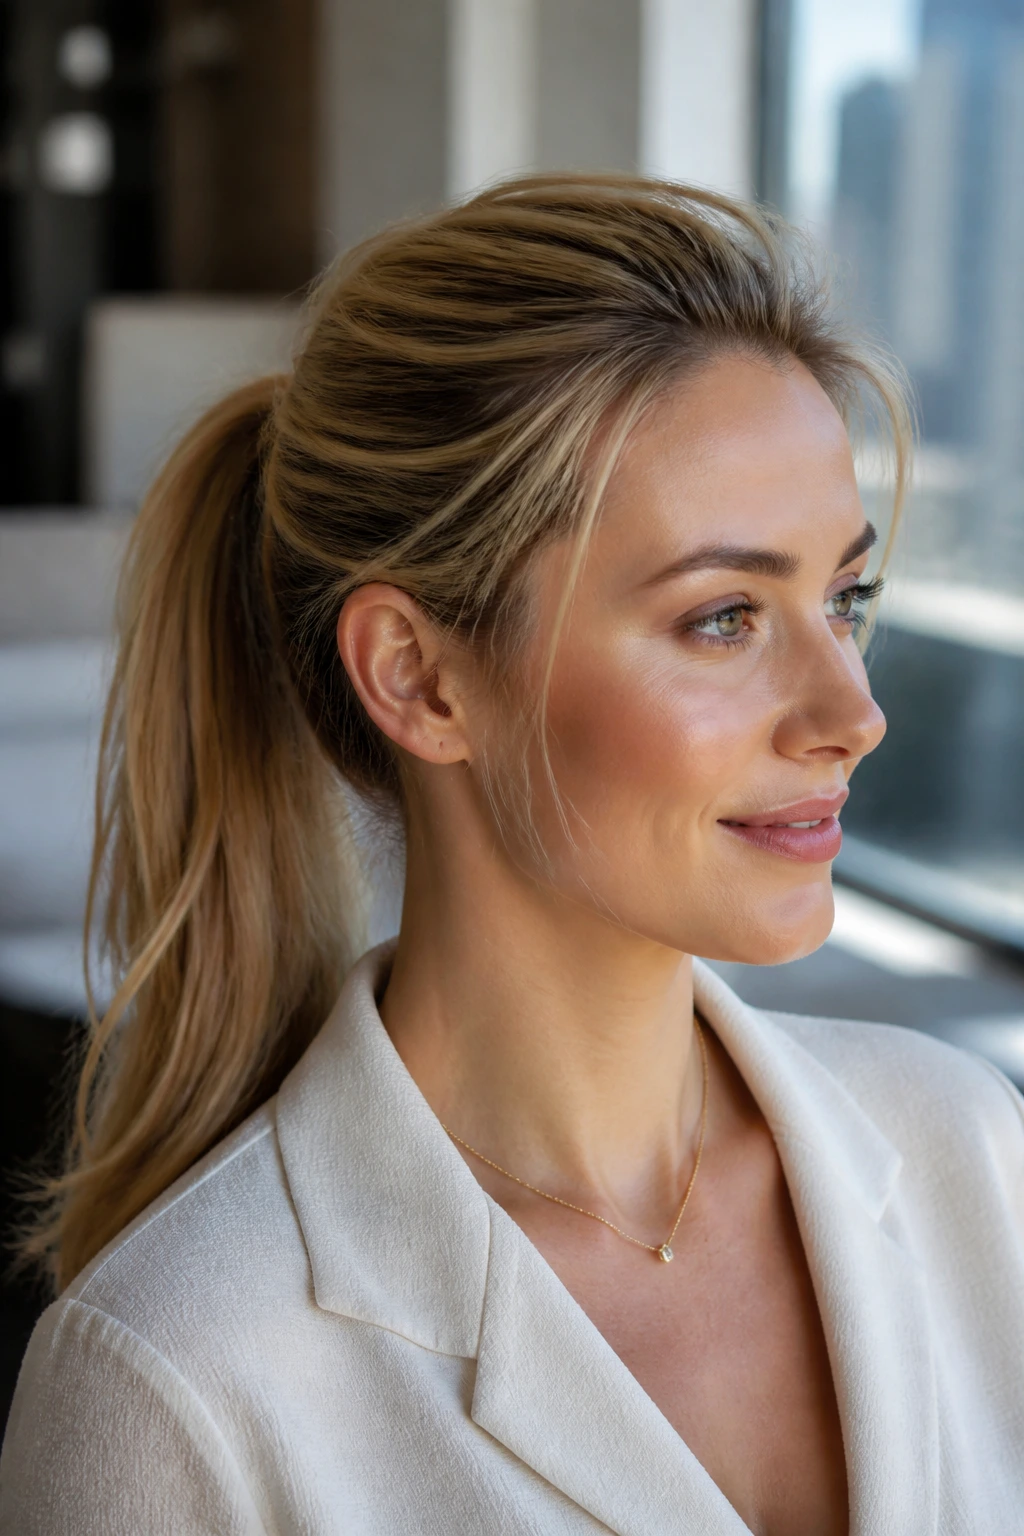
This one goes against the usual advice, and that’s why I like it. Fine hair does not always need volume everywhere. Sometimes the cleanest move is a sleek pony with just enough lift at the crown to keep the head shape from going flat.
Smooth the hair back with a small amount of gel or mousse, but don’t crush the roots. Use your fingers to raise the crown a few millimeters before securing the ponytail. The tail itself should stay soft, not over-brushed into a thin rope. A little puff in the pony tail makes the whole thing feel fuller.
The contrast is what sells it. Sleek top, airy crown, soft tail. The eye reads that mix as intentional, and the hair looks denser because it isn’t trying to be overly polished in one uniform way.
If you want a fast style that survives wind, this is one of the better ones. Just keep the product light. Too much gel turns fine hair into a helmet, and nobody needs that before coffee.
17. The Loose Side Braid
A side braid can look romantic, but on fine hair it also solves a practical problem: it gathers the hair into one visible shape instead of leaving the lengths to hang flat and silent. The side placement adds a little body because the braid sits over the shoulder, where it naturally looks fuller.
Sweep the hair to one side, braid loosely, and stop before the ends get too tight. Then pull at the outer edges of the braid with your fingertips to widen each section by a few millimeters. That “pancaking” step is small, but it changes the whole braid. Fine hair looks better with a soft braid than a hard one.
If your hair is very straight, use a touch of dry shampoo before braiding. It makes the sections less slippery and helps the braid hold its shape through the day.
This is the kind of style that makes a plain blouse or sweatshirt look more finished without much effort. Not fancy. Just better.
18. The Side-Swept Tuck With Pins
This is the emergency style I trust when the front sections are having a rough day. You don’t need to redo your whole head. You just sweep one side back, pin it, and let the rest fall naturally.
Start with a deep side part. Take the heavier side and twist it back toward the ear, then secure it with two bobby pins crossed into an X. Leave the opposite side loose, or tuck both sides back if you want more openness around the face. The pins should sit hidden under the top layer, not perched on top where they can slide.
It works because fine hair often looks better when only part of it is controlled. A partial tuck can make the haircut look intentional, even when the lengths are doing their own thing. Add a flat barrette if you want more hold and a little shine.
This style is especially useful on mornings when one side flips weirdly or the front is too flat to wear down. You’re not fixing everything. You’re redirecting the problem.
19. The Messy Knot Bun at the Nape
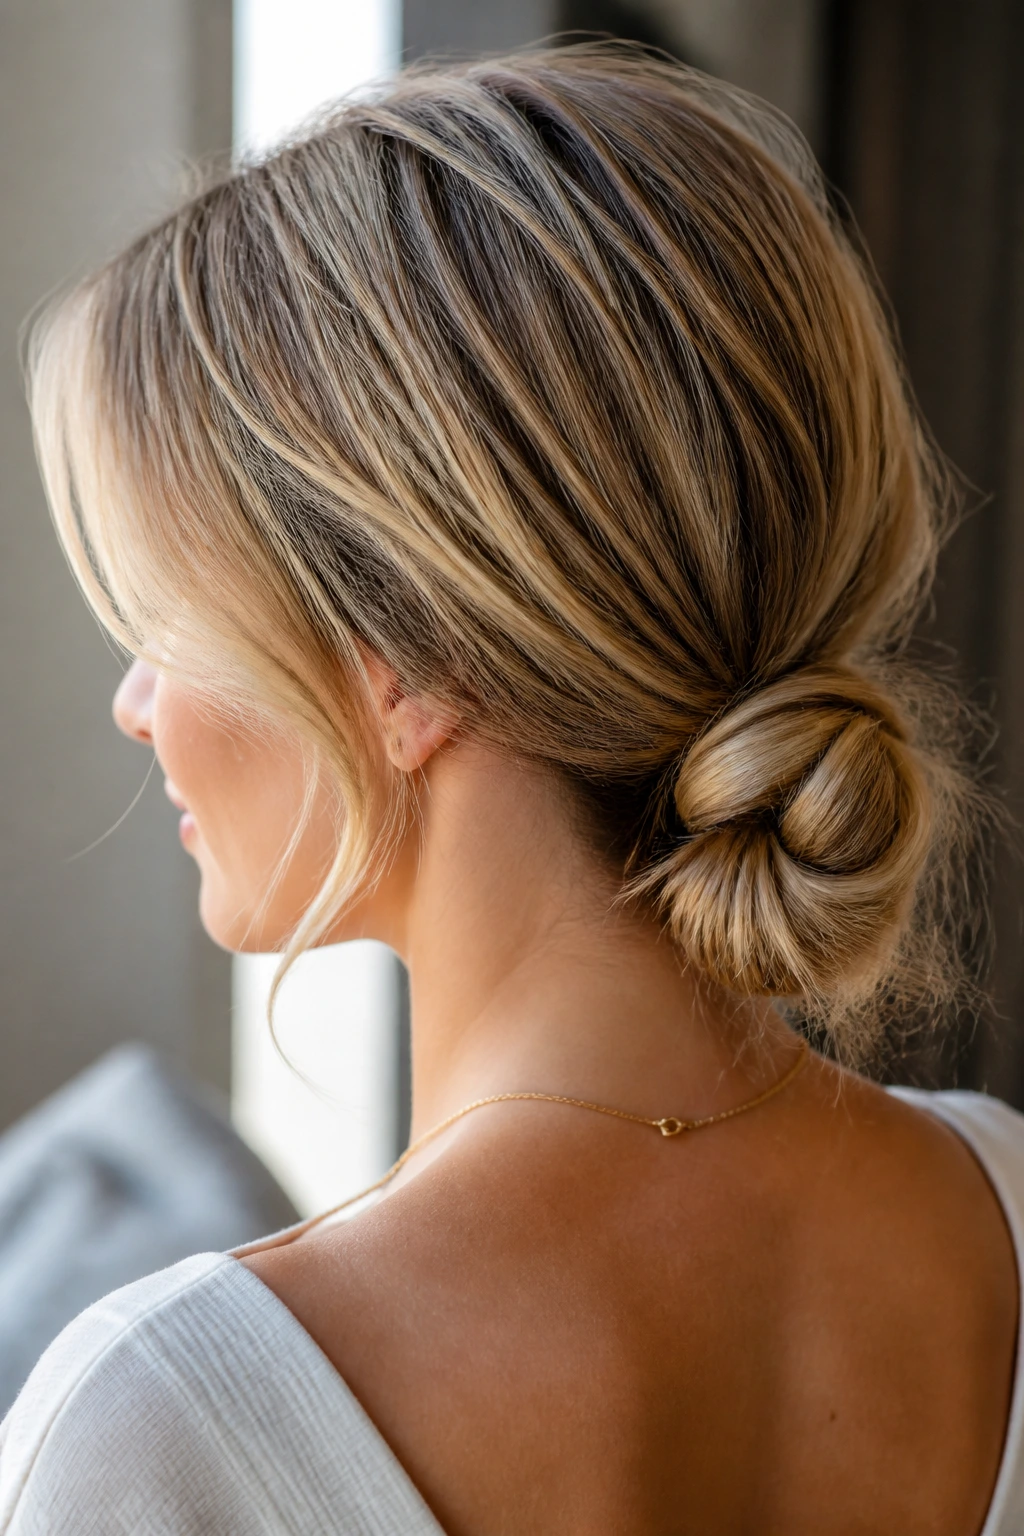
A low knot bun is more forgiving than a big topknot, especially on fine hair. When the bun sits at the nape, it can use the natural fall of the hair instead of fighting it. That usually means less pulling, less fuss, and less time.
Twist the hair once, then wrap the length around itself into a loose knot and pin it. Leave one face-framing piece free if the style feels too severe. The bun should look small and relaxed, not like a stuffed pillow. Fine hair rarely benefits from pretending to be heavier than it is.
What gives it shape
A little texture spray at the mid-lengths helps the knot stay put. If the hair is super smooth, the style can unravel in a hurry. A few discreet pins at the outer edge keep the bun from collapsing while still letting it look soft.
This is one of those styles that gets better when you stop fussing. If the bun looks a touch imperfect, good. That usually means it still has movement left in it.
20. The Velcro-Roller Ends
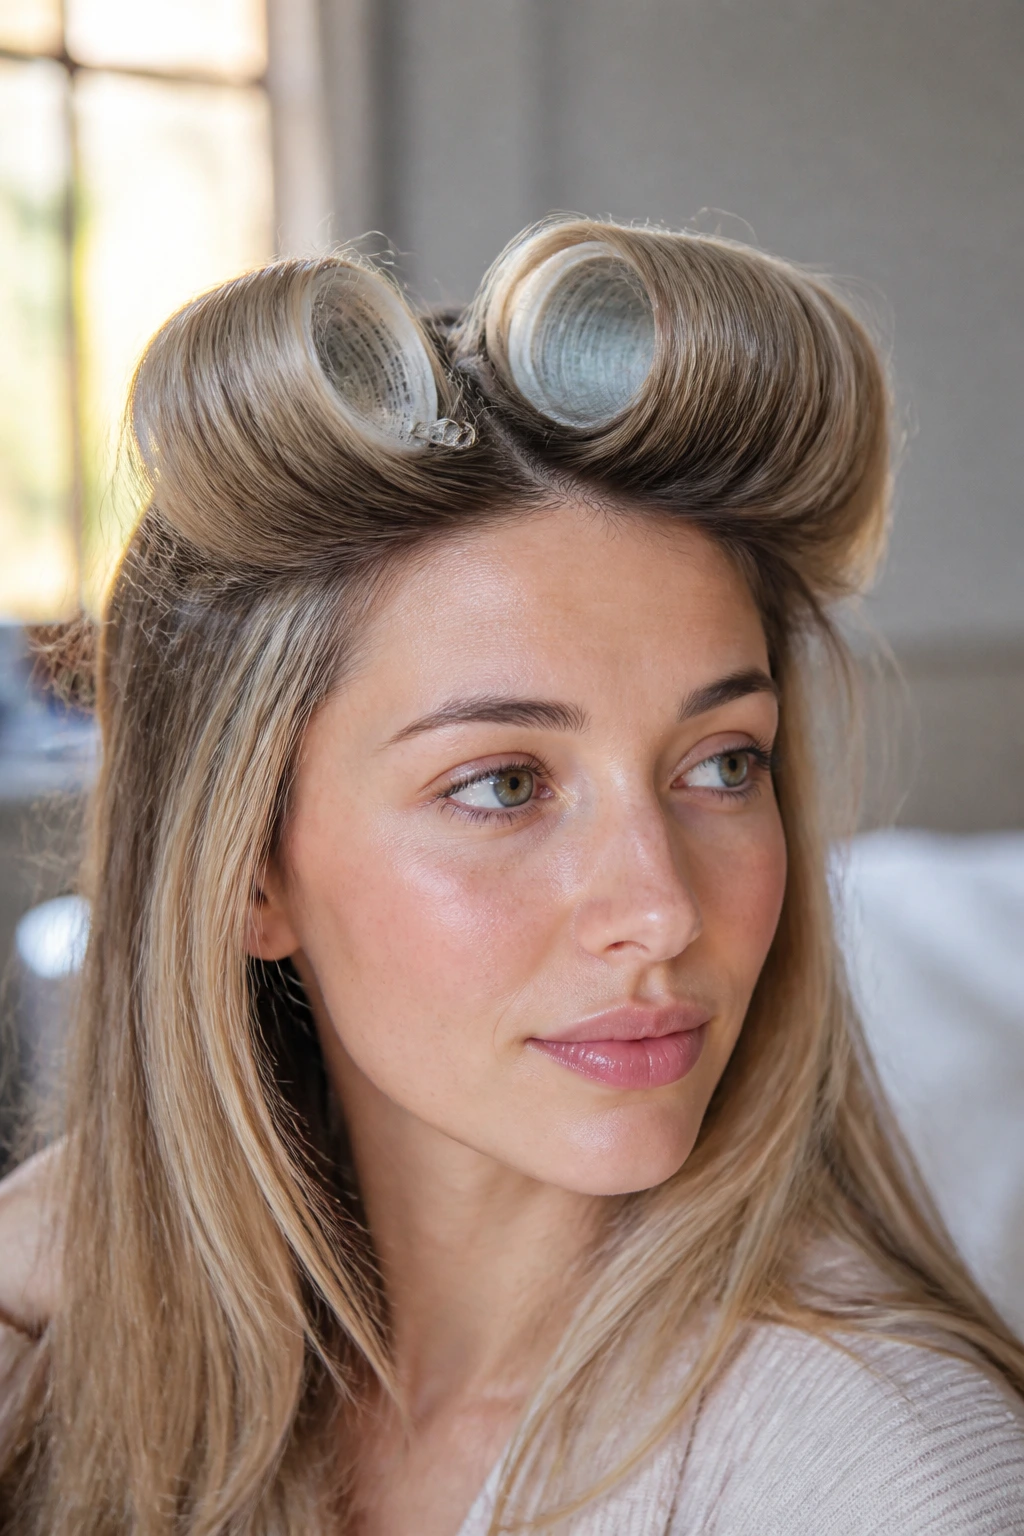
Some mornings need a hairstyle; others need a head start. Velcro rollers are that head start. On fine hair, rolling just the front pieces or the ends can make the whole cut look fuller without turning the morning into a production.
Take two to four sections, roll them away from the face or under at the ends, and let them sit while you do everything else — skincare, mascara, coffee, whatever comes first. You can leave them in for 10 to 15 minutes if you need a stronger bend. Remove them gently, then separate the hair with your fingers.
The reason rollers work so well on fine hair is that they lift the root without making the strands heavy. Heat is optional. The shape comes from tension and cooling, not a thick layer of product.
If your hair is short-to-medium length, this is one of the cheapest ways to fake a fuller blowout. No dramatic skill required. Just patience for one cup of coffee.
21. The Wide-Headband Blow-Dry Shortcut
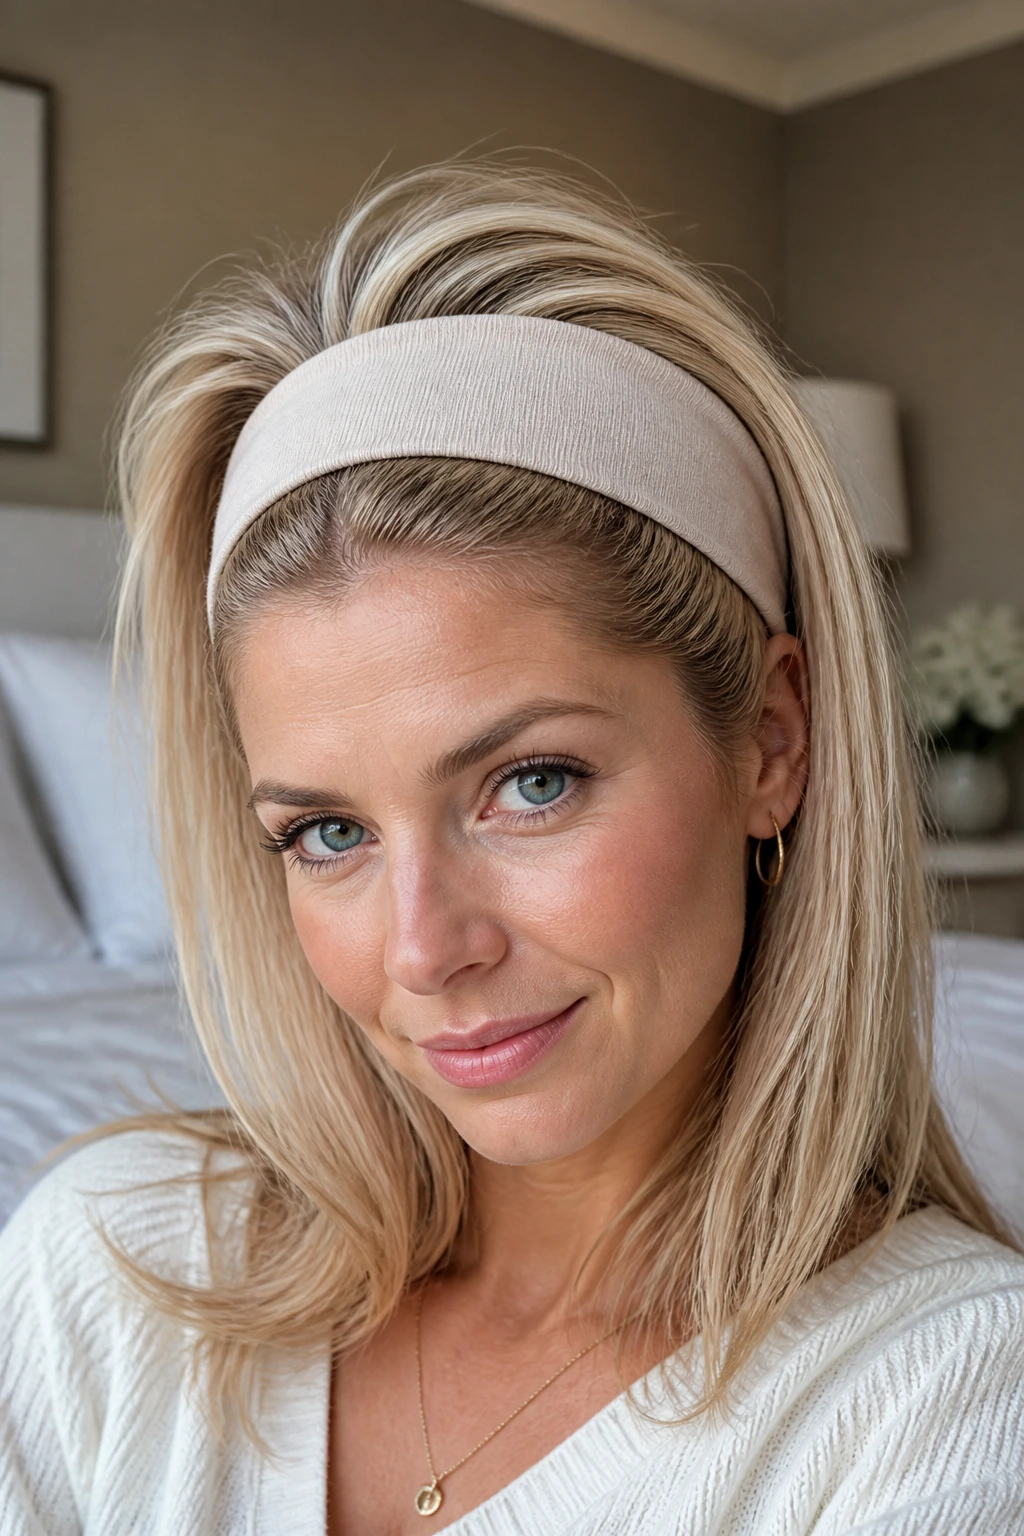
A wide headband can do more than hide a bad hair day. Used right, it helps set a little crown lift and keeps the front pieces from collapsing onto the face while you move through the morning. Fine hair responds well to that kind of gentle control.
Slip on a soft, wide headband, then blow-dry the roots over and around it for a minute or two. Pull the front lightly upward before you set the band in place. The goal is a small lift at the crown, not a stiff puff. Once the roots cool, slide the headband back into position and smooth the ends with your fingers.
Why this works: the band gives the style a framework. Fine hair often needs a little framework. That’s all. A plain fabric band can also hide the fact that the roots are not freshly washed, which is useful when the week gets real.
Choose a band that sits flat and does not squeeze the sides of the head. If it leaves a deep line, it’s too tight.
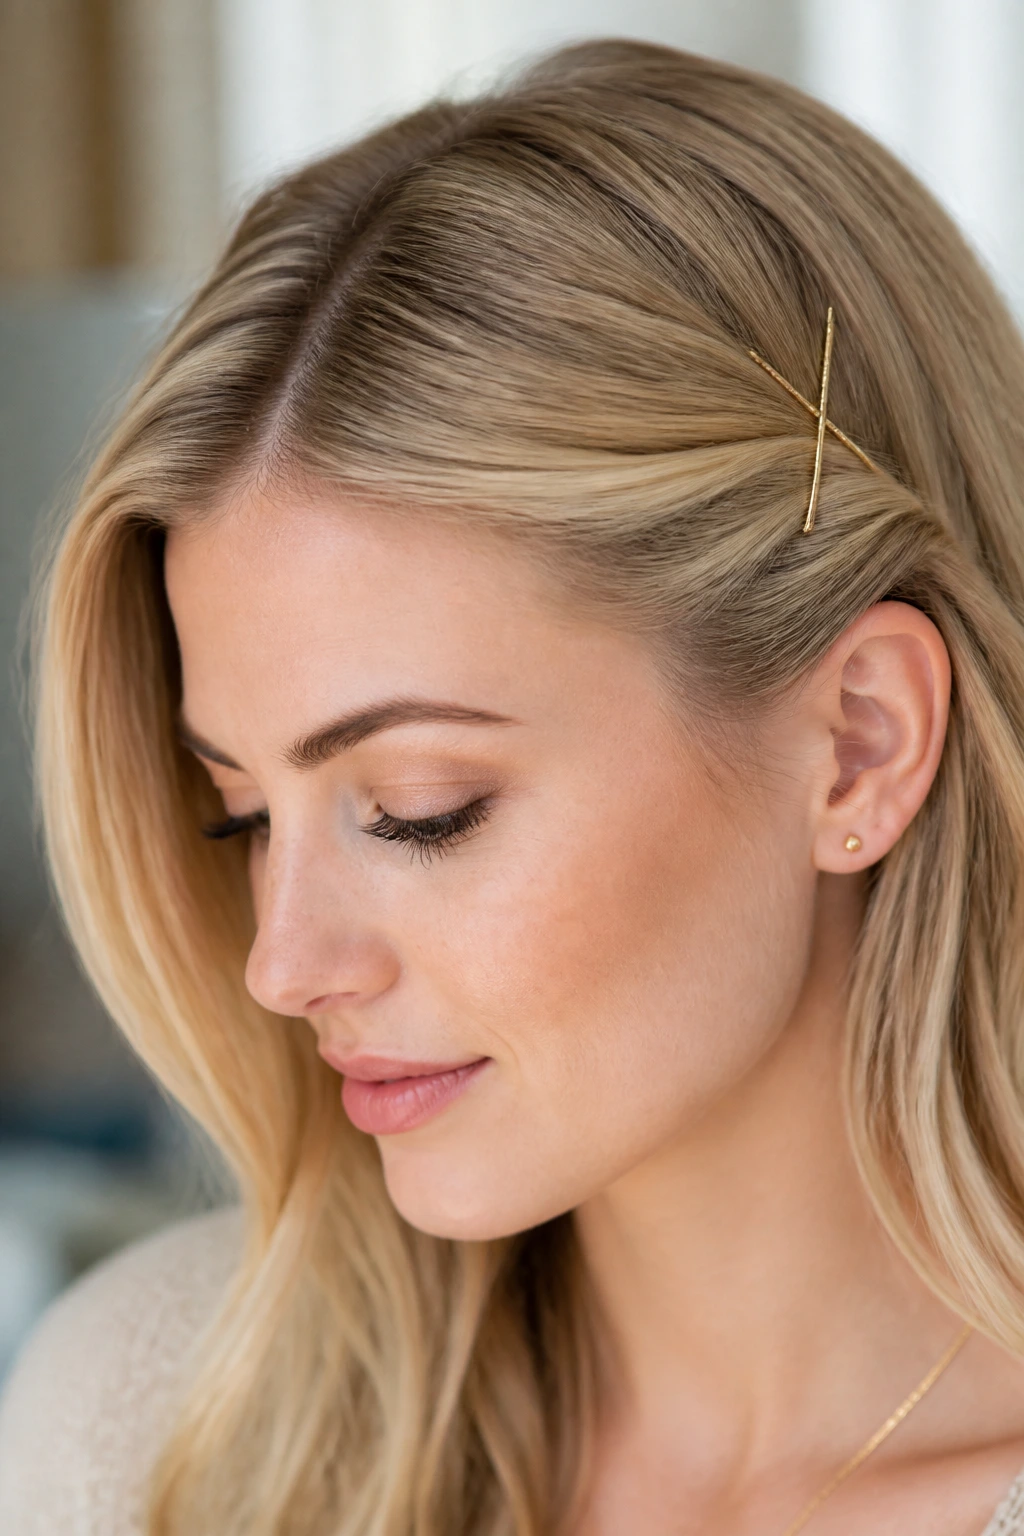
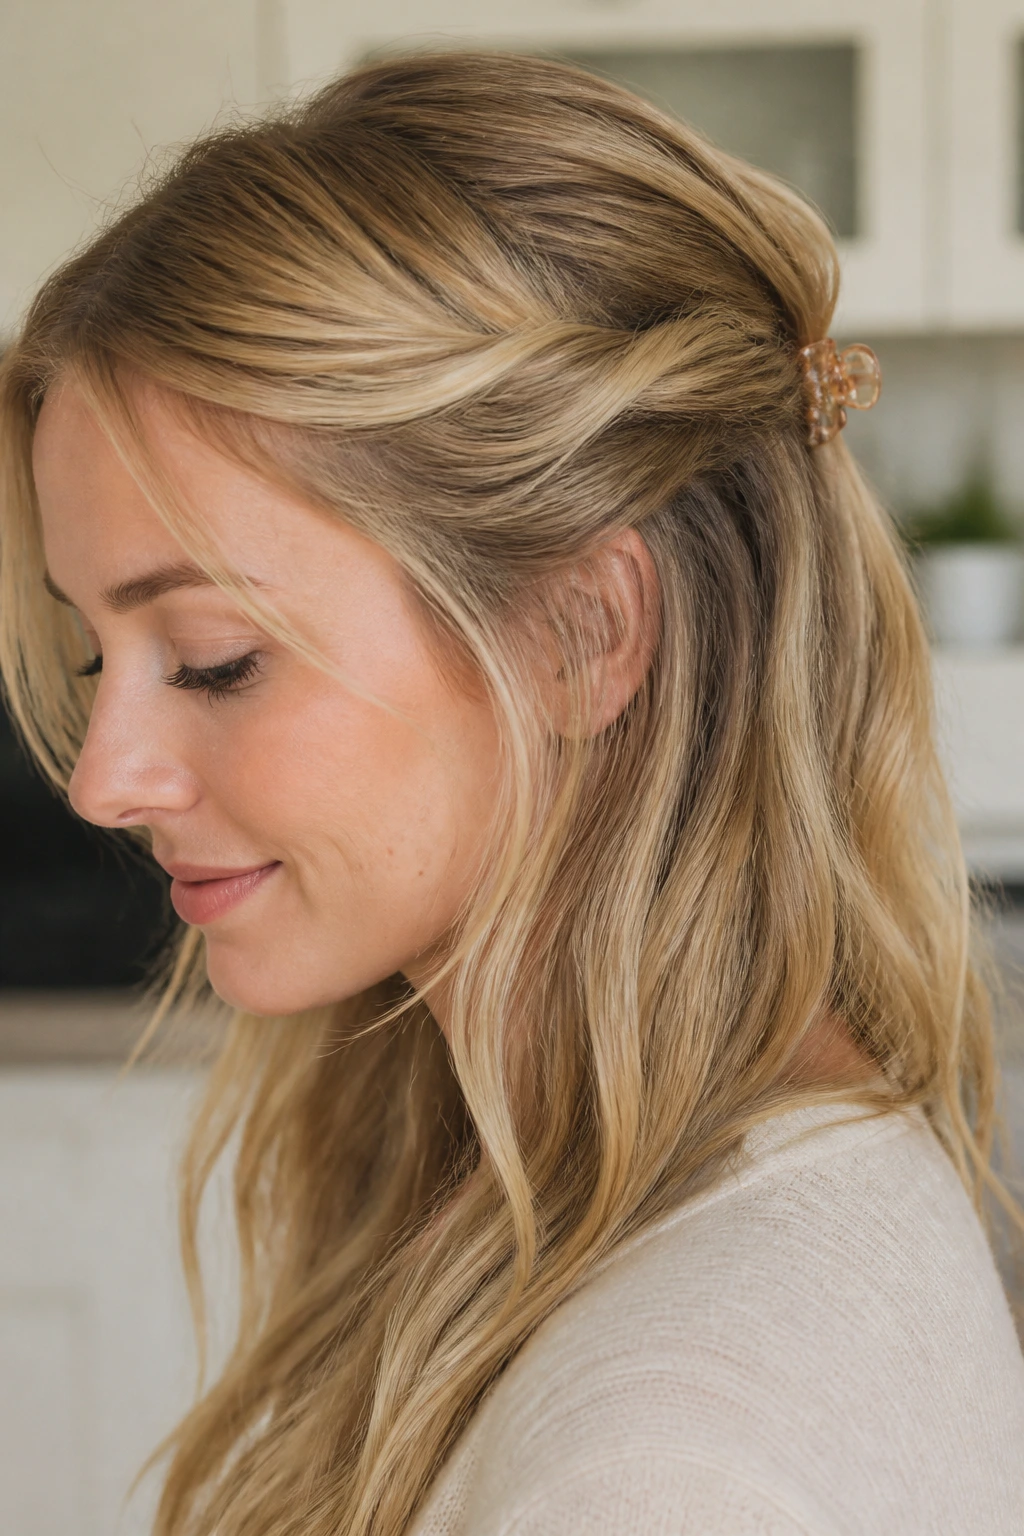
22. The Twisted Crown With Hidden Elastics
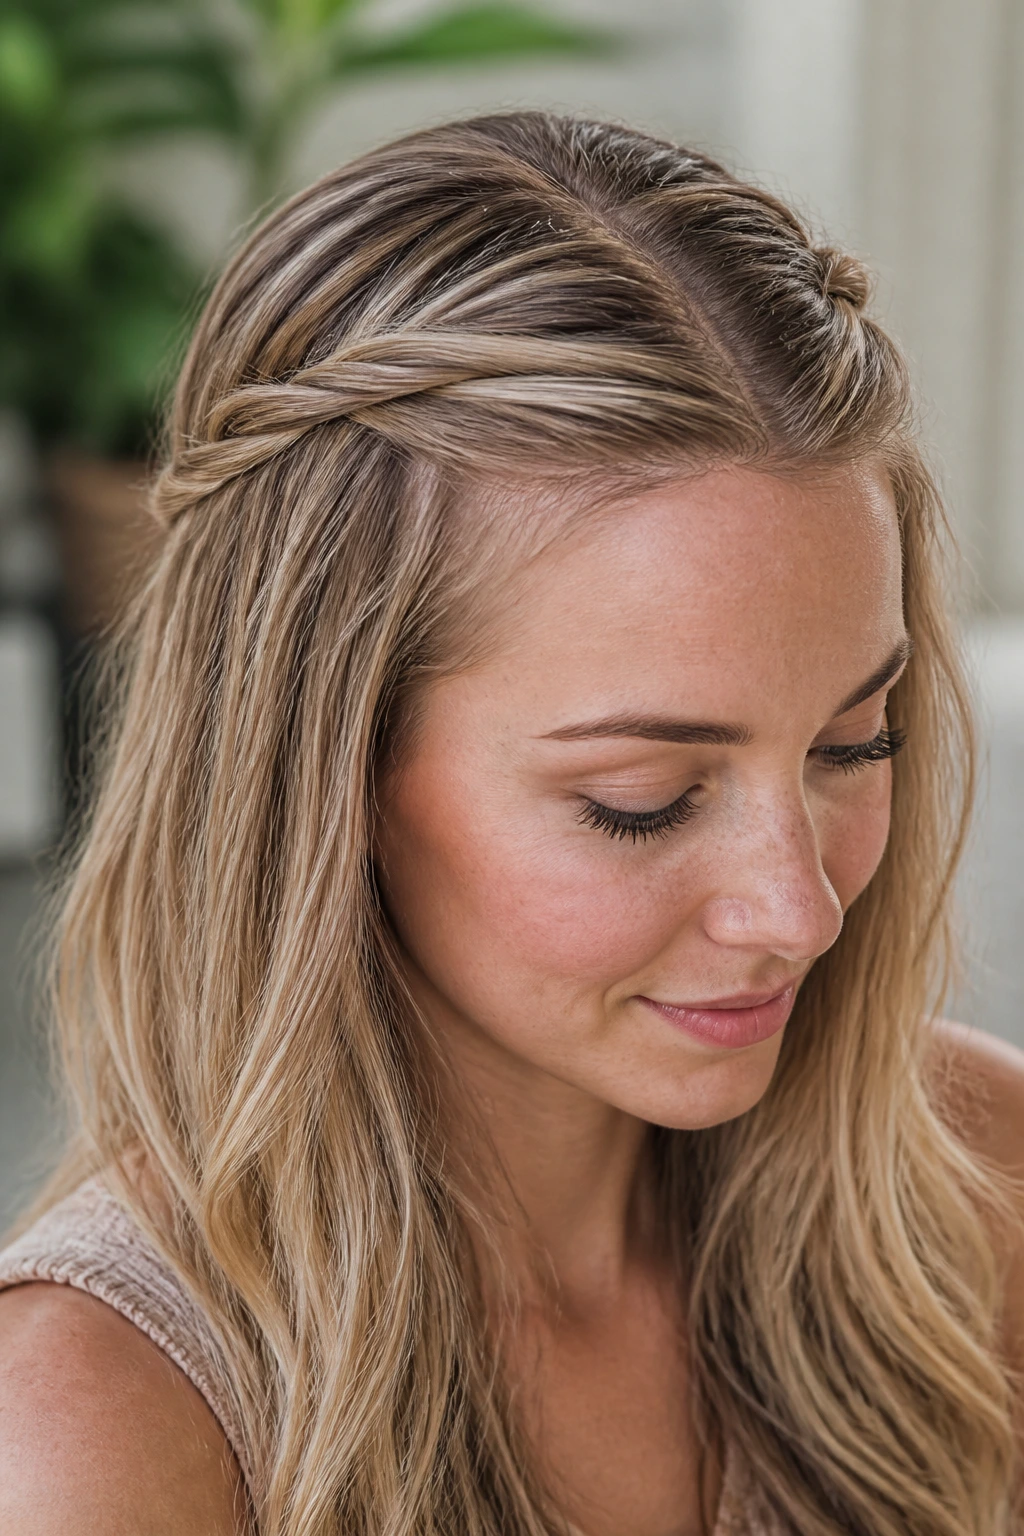
If you want hair off the face but don’t want a full updo, the twisted crown gives you just enough control. It uses two small twists from the front and keeps the rest free, which is often the sweet spot for fine hair.
Take a section from each side of the head, twist them back toward the crown, and tie them together with a tiny clear elastic or secure them with crossed pins. Hide the elastic under the top layer if you can. Let the rest of the hair stay down, or gather it into a low pony if you want more containment.
This style works because it focuses structure at the front, where fine hair tends to fall apart first. The back can stay soft. The crown gets shape. The whole thing looks more thoughtful than the time it actually took.
If the twists are short, use smaller sections instead of fighting for more hair. Fine hair often looks better when the style respects its size instead of stretching it thin.
Why a Light Hand Wins on Fine Hair

A lot of bad hair advice treats fine hair like it needs to be bullied into submission. It usually doesn’t. It needs grip, yes. It needs shape, yes. But it also needs air. Heavy creams, aggressive backcombing, and giant accessories can make fine hair look smaller, not bigger.
The styles above all do one of three things: they redirect the hair, they compress it into a clean shape, or they create the illusion of density with segments, twists, and parts. That’s why they work on rushed mornings. They don’t ask for a perfect blowout or a thick cloud of volume spray. They ask for a small, smart move.
Essential Tools for Fine-Hair Styling
- Mini clear elastics: Best for braids, twists, and half-up styles where a thick hair tie would create a lump.
- Small bobby pins: Fine hair holds better with narrow pins, especially if you crisscross two of them.
- Medium claw clip: A medium clip usually grips fine hair better than a huge one that slides around.
- French pin or U-pin: Handy for low twists and buns that need one strong anchor.
- Tail comb: Useful for creating clean parts and lifting the crown a few millimeters.
- Boar-bristle brush or smoothing brush: Helps smooth the top without over-brushing the lengths.
- Texturizing spray: Adds grit to silky fine hair so clips and braids stay put.
- Dry shampoo: Good for second-day roots and for removing a little slickness before styling.
- Lightweight mousse: Gives root lift without the heavy feel of cream-based products.
- 1-inch curling iron or flat iron: Enough to flip ends or bend front pieces without making them look overdone.
- Velcro rollers: Great for a quick crown lift or face-framing bend while you get dressed.
- Wide fabric headband and a silk scarf: Both can hide small problems and add shape without much effort.
Smart Product Shopping for Fine Hair
The shelf can get crowded fast, and fine hair pays the price when you pick the wrong things. Heavy oils, dense curl creams, and rich butters tend to sit on top of the hair instead of sinking in, which leaves the crown flat and the ends greasy-looking by noon. Look for lightweight, flexible, or volumizing formulas rather than anything promising intense moisture unless your hair is also very dry.
Mousse is usually a better buy than thick styling cream for this hair type. A golf-ball-sized puff is enough for most styles if you’re working it into damp roots. Dry shampoo should disappear into the hair, not leave a gray cast. If the can says it adds texture and lift, that’s useful; if it only promises oil control, it can be a little too chalky on very fine strands.
Texturizing sprays are worth the drawer space if your hair slips out of everything. Look for a finish that feels dry, not sticky. And if you use gel, choose one that stays flexible instead of turning hard. Fine hair shows crunch fast. That stiff, shiny helmet look is the enemy.
One more thing: a matte clip or accessory often grips better than a slick one. Pretty doesn’t matter if it slides out in ten minutes.
How to Wear These Looks Without Fiddling All Day
The styles that last longest on fine hair usually start with a little prep and end with a refusal to touch them every five minutes. Touching the crown is what flattens it. Tugging on the braid is what loosens it at the wrong time. So the best all-day habit is leaving the top alone after you’ve set it.
If you’re leaving the house for a full day, carry two bobby pins and one mini elastic in your bag. That’s enough to rescue most of these styles. A low pony can be tightened, a braid can be re-pinned, and a half-up twist can be anchored again if the clip slides. You do not need a full emergency kit.
Windy days are easier if you choose styles with a low anchor point — ponytails, nape buns, side tucks, or French pins. If you know you’ll be outside a lot, skip styles that rely on soft crown volume alone. They’ll be pretty for about 20 minutes and then become a problem.
For hats and hoods, go with a low knot, loose braid, or sleek pony. The first thing a hat flattens is the crown, so a style that already lives low has a better chance of surviving the commute.
Extra Tips That Make Fine Hair Look Fuller
Root Lift: Flip your head upside down, mist the roots lightly with texture spray, and use a cool shot from the dryer for 10 seconds. That tiny blast gives the crown more shape than piling on product.
Grip Boost: If your hair is silky, sprinkle a little texturizing powder at the part and under the crown before you style. Not much. A pinch is enough.
Polish Without Flattening: Smooth only the top layer with a brush and use your fingers for the rest. Fine hair often looks better when it keeps a little movement in the lower lengths.
Make-It-Yours: If you wear bangs, let them lead the style. If you have a bob, use pins and clips near the ear instead of forcing a full ponytail. If your hair is shoulder-length, braids and half-up styles usually give the best return on effort.
Serving Suggestion: A small barrette or ribbon near one temple can make a simple style feel deliberate in about two seconds. That matters on mornings when you don’t have the energy for more.
Common Mistakes That Flatten Fine Hair
The first mistake is using too much product at the roots. Fine hair loves a little help and hates a thick coating. The symptom is obvious: hair that looks shiny at the scalp but limp at the crown. Fix it by starting with a smaller amount than you think you need, then add only if the style slips.
Another common problem is over-teasing. A few gentle strokes at the crown can create lift. A rat’s nest can’t be brushed out cleanly later, and it usually falls flat in a weird way anyway. If you need volume, work underneath the top layer and smooth the surface back over it.
The third issue is choosing oversized accessories. Huge claw clips, thick scrunchies, and giant barrettes can overwhelm fine hair and drag it down. Smaller hardware usually grips better and sits closer to the head.
And then there’s the fresh-wash trap. Extremely clean, soft hair can be too slippery for braids, twists, and clips. If your style keeps falling apart, don’t assume your hair is impossible. It may just need a little dry shampoo or texture spray to make the surface less slick.
Variations and Adaptations to Try
The Bob-Friendly Edit: Swap any ponytail-heavy style for a tucked ear, a side pin, or a mini half-up. Shorter fine hair usually looks best when the outline stays visible.
The No-Heat Morning: Use clips, braids, and scarf wraps instead of rollers or irons. A little overnight braid texture can do more for fine hair than a full hot-tool session.
The Wind-Resistant Version: Choose low ponies, French pins, or nape buns and keep the anchors close to the scalp. Styles that sit high tend to whip around and unravel faster.
The Office-Polished Version: Use cleaner parts, fewer loose pieces, and a small barrette or wrapped elastic. Fine hair often looks sharper when the style is neat rather than fluffy.
The Soft-Texture Version: Let a few face-framing pieces fall out and add a small bend to the ends. This works well if your hair tends to look too severe when fully pulled back.
The Second-Day Fix: Add dry shampoo at the roots, then pick a style that uses the texture you already have — bubble pony, low braid, or twisted crown. That usually takes less time than fighting for a fresh blowout.
How to Reset Fine Hair When the Day Goes Long
Fine hair rarely needs a full overhaul at midday. It usually needs one smart fix. If the crown flattens, lift it with your fingertips and add a small puff of dry shampoo underneath the top layer, not just on the visible part. If a ponytail slips, tighten the elastic and wrap a strand around it again. If a braid loosens, pinch the top two sections for a little more hold and stop there.
The overnight game matters too. A silk or satin pillowcase cuts down on friction, which helps preserve the shape of low ponies, twists, and loose waves. If you know you’ll want a style to last, sleep with it in a loose braid or a low pony, never in a tight elastic that leaves a dent. The next morning, a quick finger-rework is usually enough.
Washing too often can make fine hair harder to style because it returns to that slippery, squeaky state. Washing too rarely can make roots oily and lifeless. Most people with fine hair land somewhere in the middle, then adjust based on how much product and texture they used the day before. There isn’t a magic number, but there is a clear pattern: the more slip, the less hold.
Frequently Asked Questions
What is the fastest spring hairstyle for fine hair on a busy morning?
The claw-clip roll-up or the sleek low pony usually wins here. Both take about 2 to 4 minutes and work better when the hair has a little texture from the day before. If you’re running late, skip anything that needs perfect sectioning.
Can I do these styles on freshly washed hair?
Yes, but you’ll usually need dry shampoo, texture spray, or a tiny amount of mousse first. Fresh fine hair can be too soft and slippery for braids and clips, so adding grip makes a big difference.
Do braids make fine hair look thinner?
Not if you loosen them a little and keep the sections soft. Tiny braids at the hairline or a loose side braid often look fuller than a plain ponytail because the shape is easier to read.
What’s the best tool if my fine hair slips out of everything?
A medium claw clip, small bobby pins, and texturizing spray are the best trio. If you only buy one thing, make it the pins first. They solve more slipping problems than most people expect.
How do I keep volume at the crown without teasing it to death?
Lift the roots with a tail comb, mist lightly with texture spray, and use a cool shot from the dryer for 10 seconds. That gives you hold without the rough, frayed look that heavy backcombing can cause.
Are these hairstyles good for short fine hair?
Several are. The tucked bob, pixie with paste, side-swept tuck, and curtain bang shortcut all work well on shorter lengths. Short fine hair usually needs direction more than height.
What should I avoid if my hair gets oily fast?
Heavy creams, thick oils, and too much smoothing product. They sit on top of fine strands and make the roots collapse sooner. Dry shampoo at the roots and light product through the ends usually works better.
How can I make a style last until evening?
Start with texture at the roots, keep your hands off the crown, and choose a style with a real anchor point — pins, a clip, or a low elastic. If you need to refresh it, fix the base first. Chasing flyaways everywhere else is a waste of time.
Easy Hair, Better Mornings
Fine hair does not need a dramatic morning routine to look put together. It needs the right kind of pressure in the right place, a few smart tools, and a refusal to drown it in heavy product. That’s the whole philosophy behind these looks: less effort, more shape.
The styles that hold best are usually the quiet ones — the low pony, the twist, the braid, the pin, the small clip that sits where it should. Keep them light, keep them anchored, and let a little softness stay in the length. That softness is part of the appeal.
Try one style for a week and notice which one survives your actual day, not the mirror test at 7:12 a.m. That’s the one worth keeping.