A curly shag haircut with face-framing layers does something a blunt cut never quite manages: it lets the curl pattern do the talking without turning the sides into a puffed-up triangle. The front pieces can land at the cheekbone, brush the jaw, or skim the collarbone, and that small shift changes the whole read of the face. On the right curls, it looks airy. On the wrong cut, it looks like a haircut that lost a fight with humidity.
The thing people underestimate is shrinkage. A curl that sits at the lip when wet may spring to the cheekbone once it dries, and a shag that looks soft in the chair can come home looking completely different if the layering map was guessed instead of planned. That is why curly shag haircuts for women with face-framing layers tend to work best when the stylist cuts with the dry curl in mind, not just the stretched strand.
And that’s the fun part. Some versions are softer and more polished, some lean wolf-cut and edgy, some keep length while carving out movement around the face, and some go short enough that the curls seem to bounce off the shoulders. The cuts below cover the range, from gentle and wearable to a little wild in the best possible way.
Why These Curly Shags Earn Their Place
-
Shrinkage gets respected, not ignored: The best versions are built around where the curl actually lands after it dries, so the front pieces frame the face instead of floating above it.
-
The face shape changes without heavy styling: Cheekbone, jawline, and collarbone layers can widen, soften, or sharpen the look of the face with almost no extra effort in the morning.
-
Bulk moves out of the wrong places: A good shag takes weight off the sides and back so the curls can spring, but it does not strip the ends so much that they go see-through.
-
They grow out with a little grace: When the layers settle, they usually soften into a layered curly shape instead of turning into a shelfy mess that demands an emergency appointment.
-
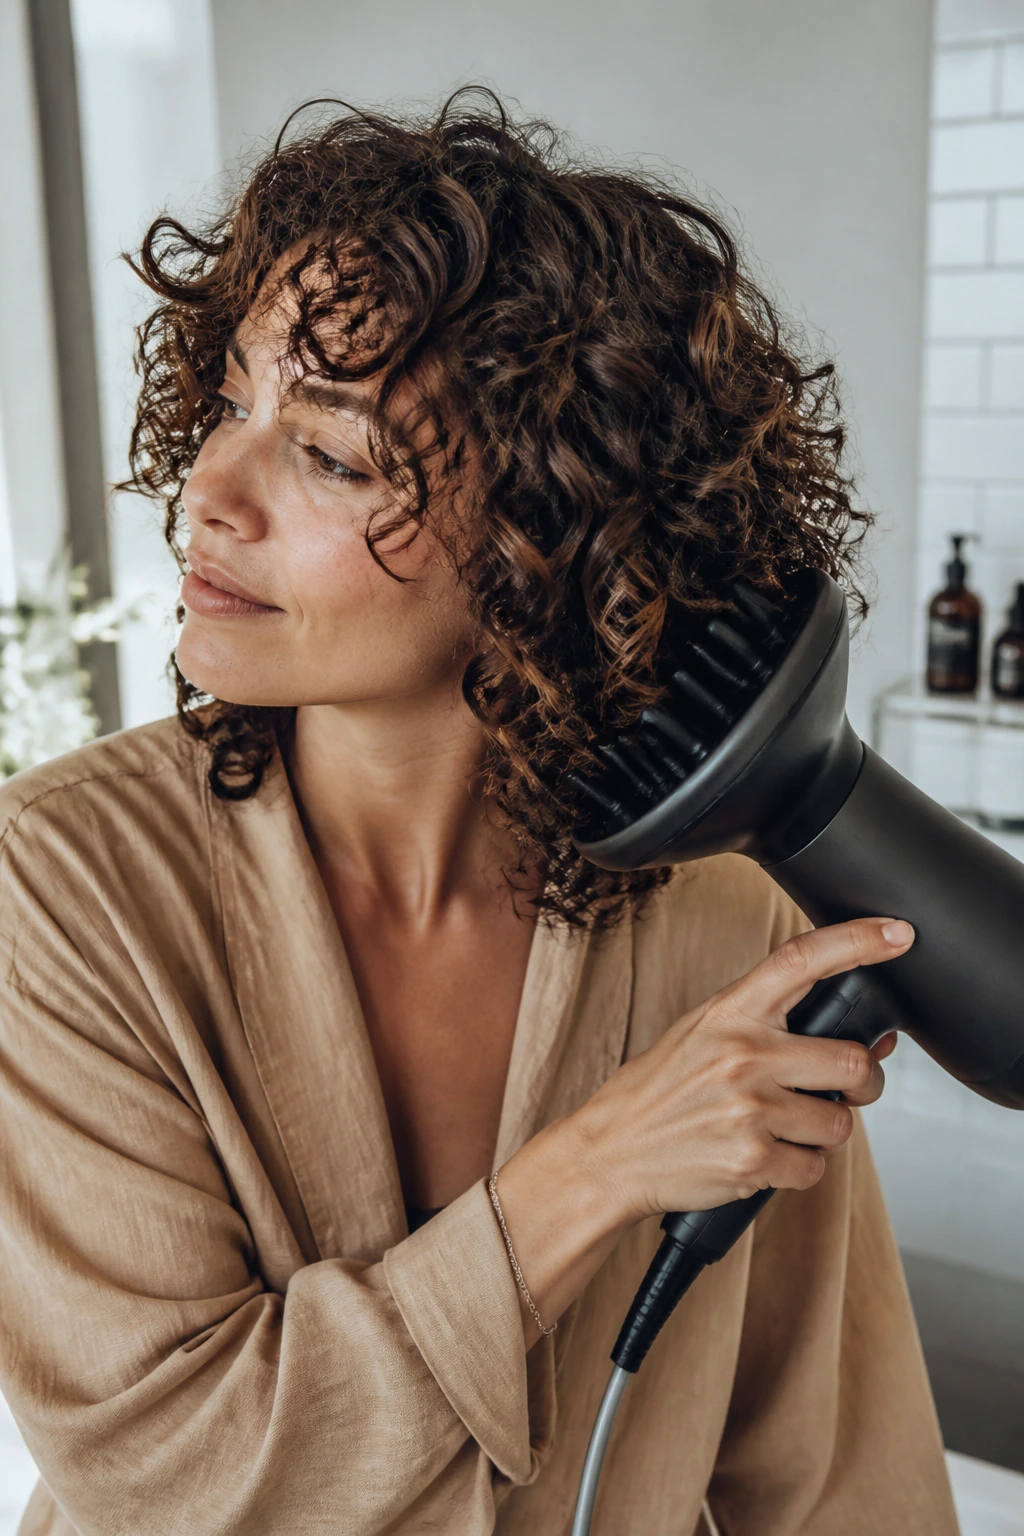
They work with diffusing or air-drying: Some cuts love a diffuser and some barely need one, but the face-framing pieces still do the visual work either way.
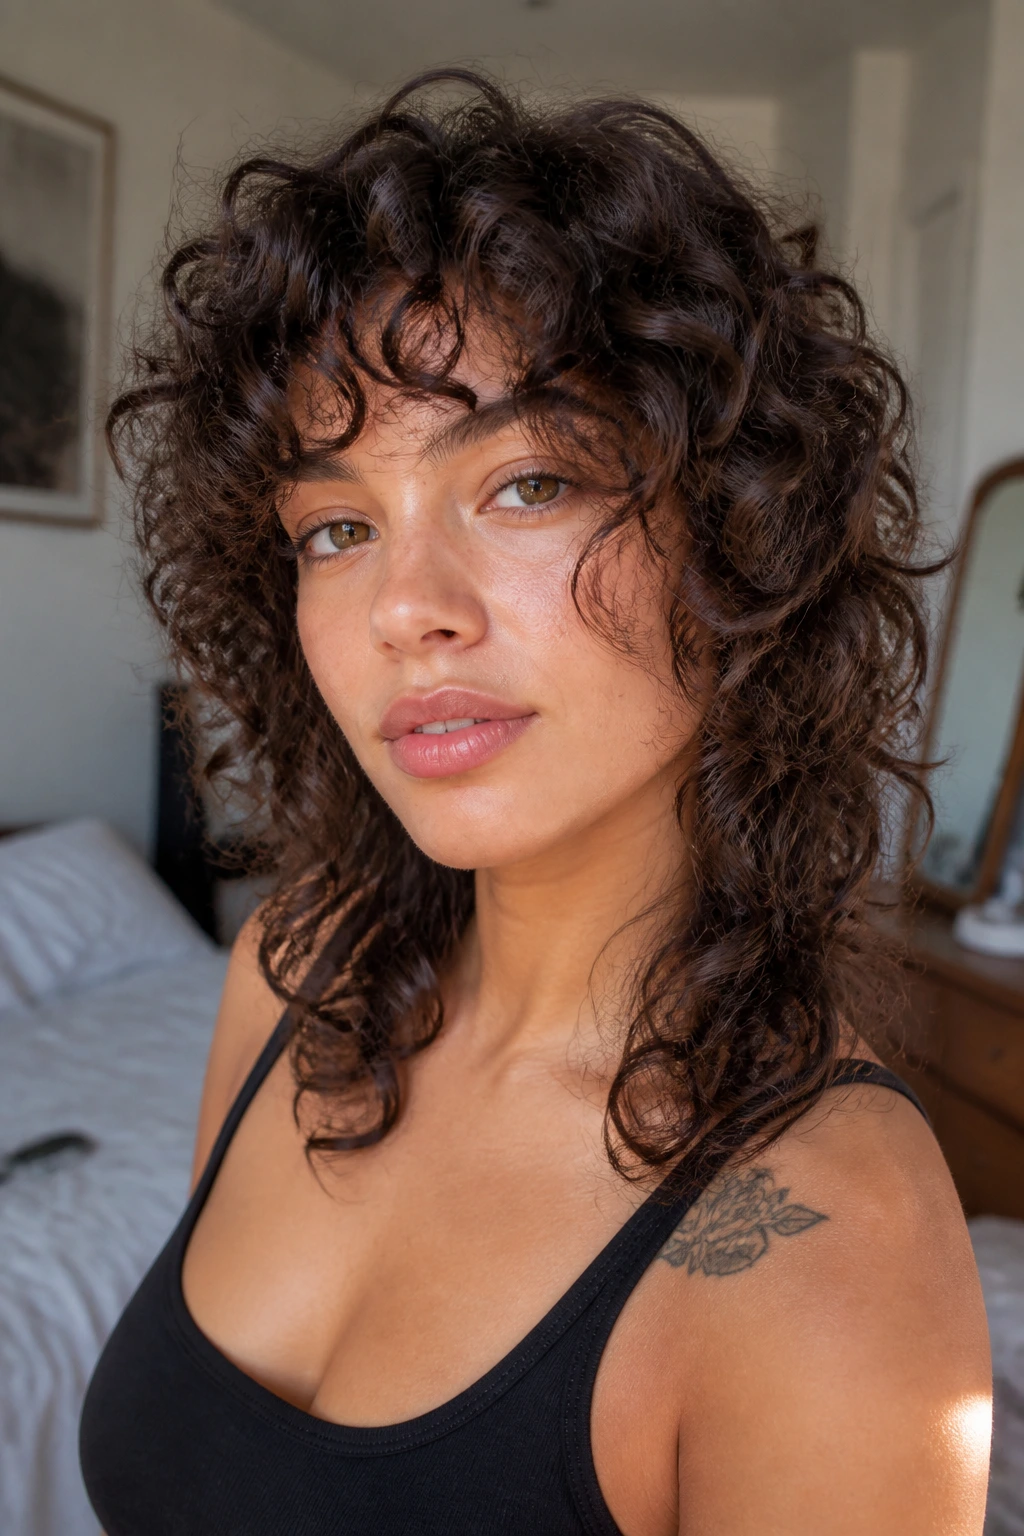
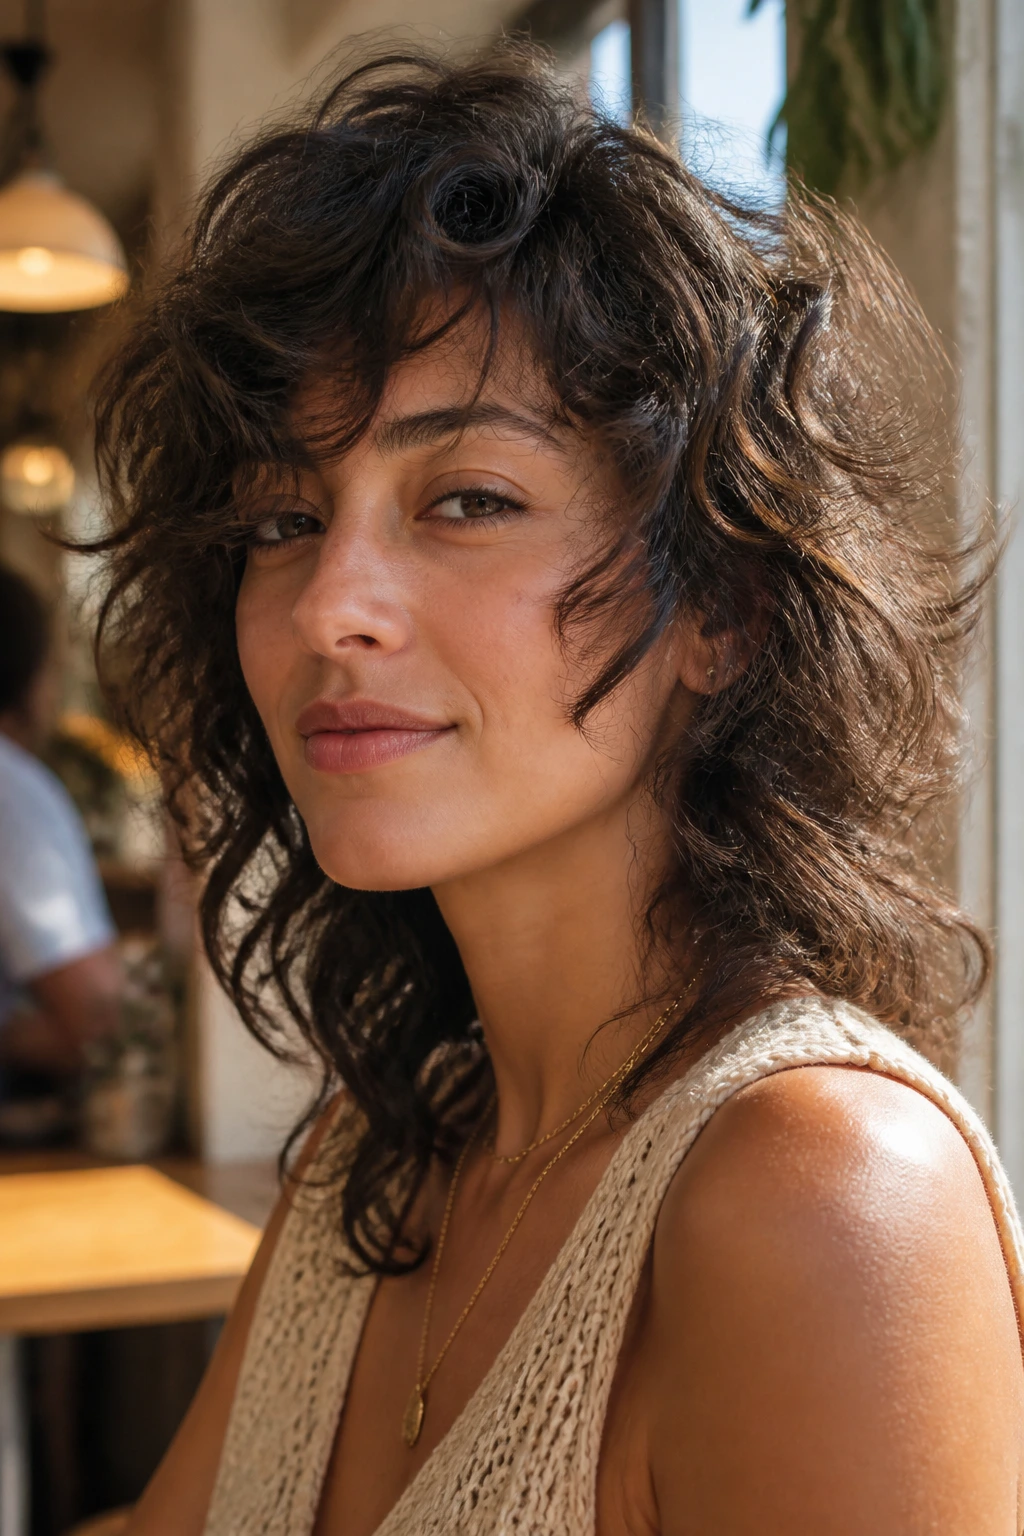
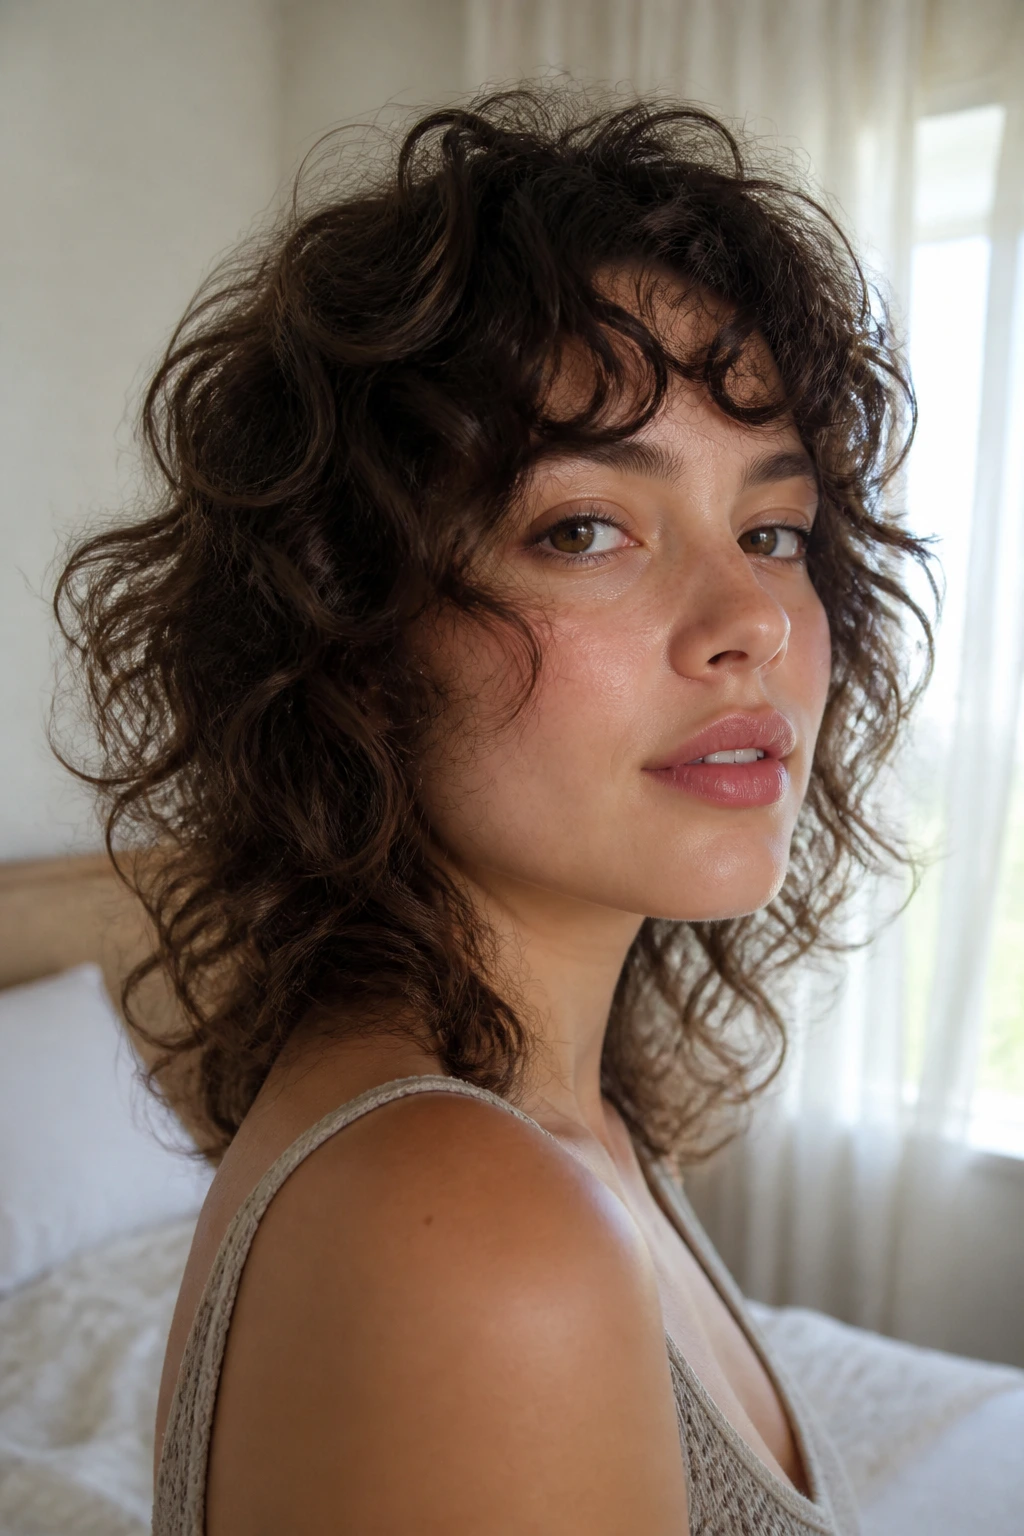
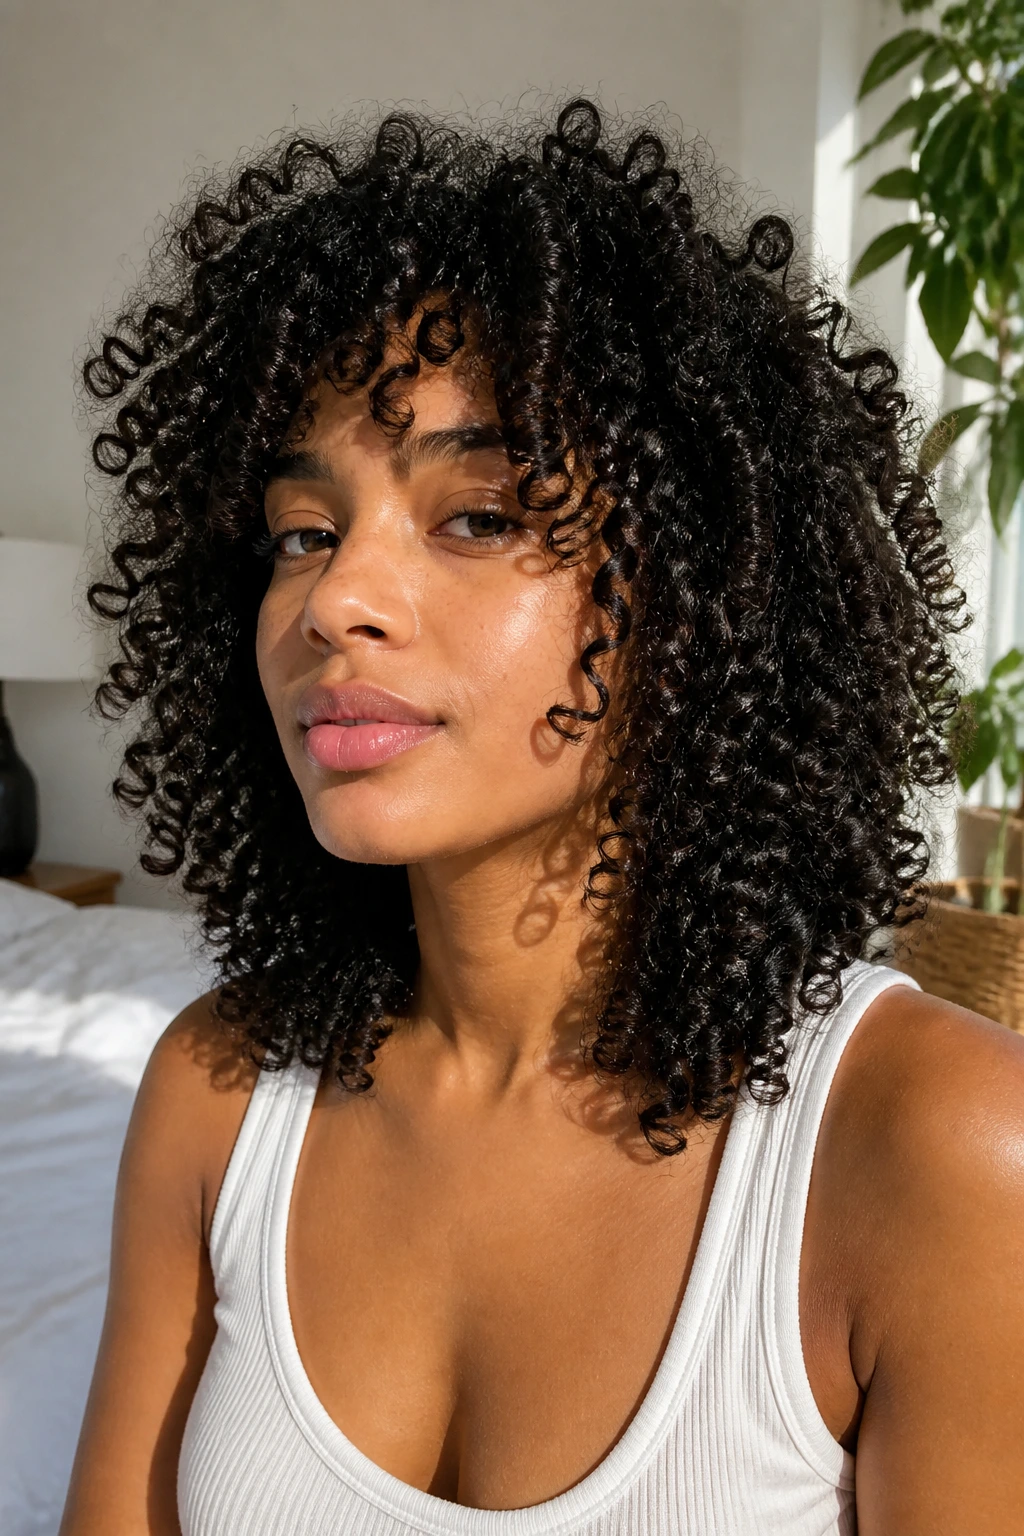
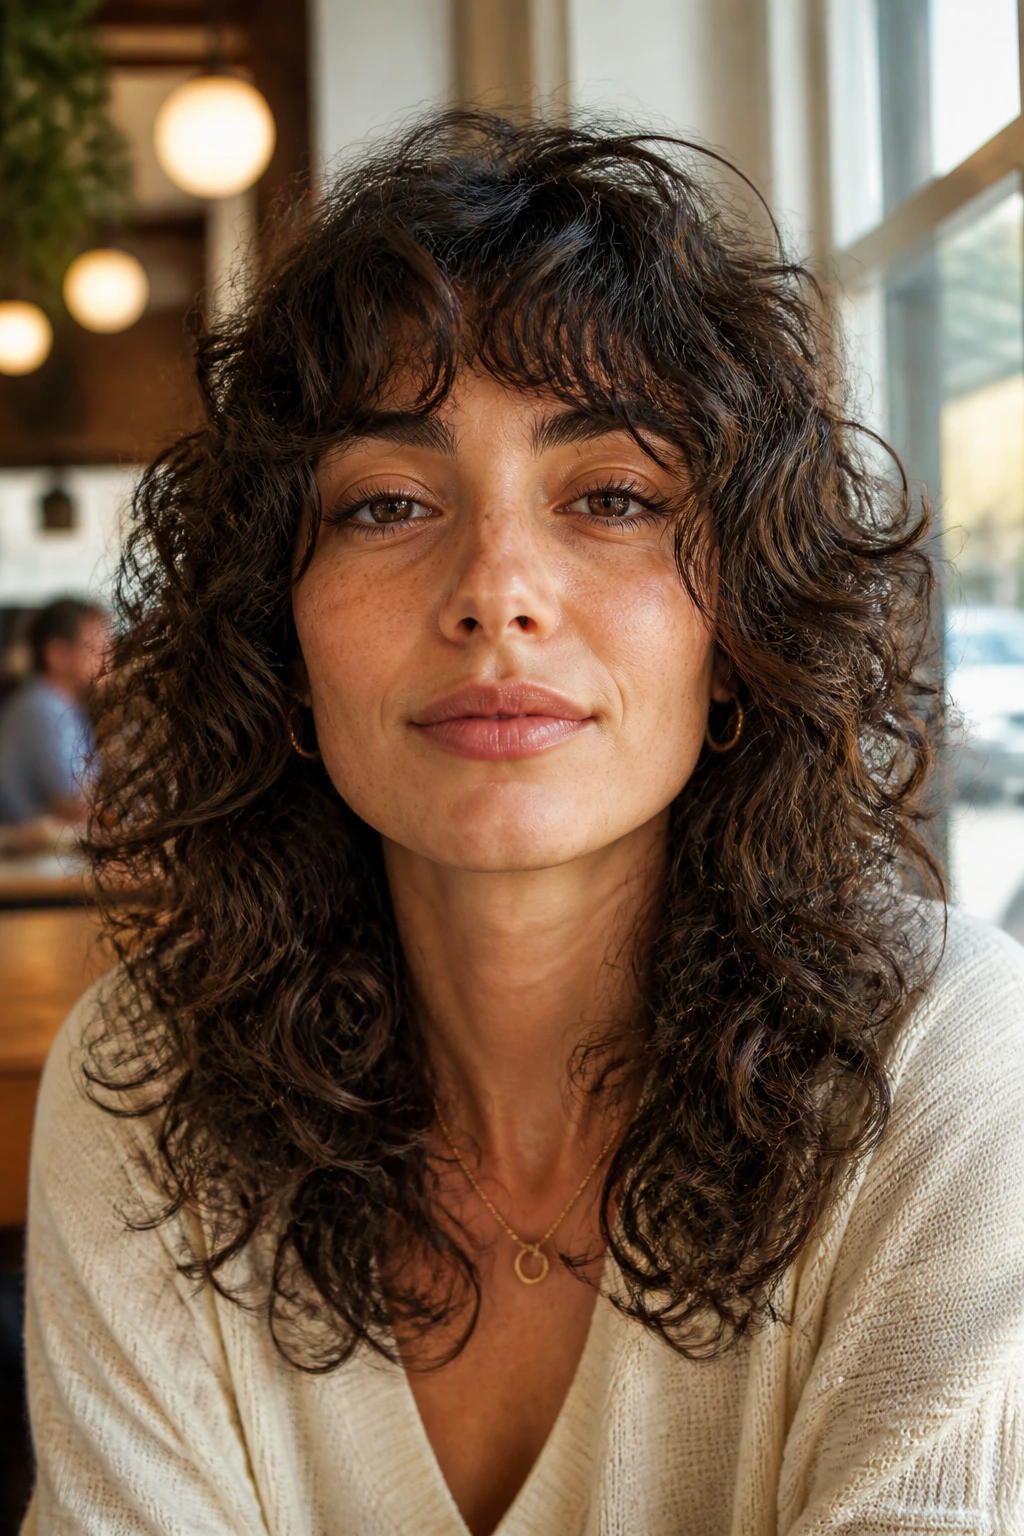
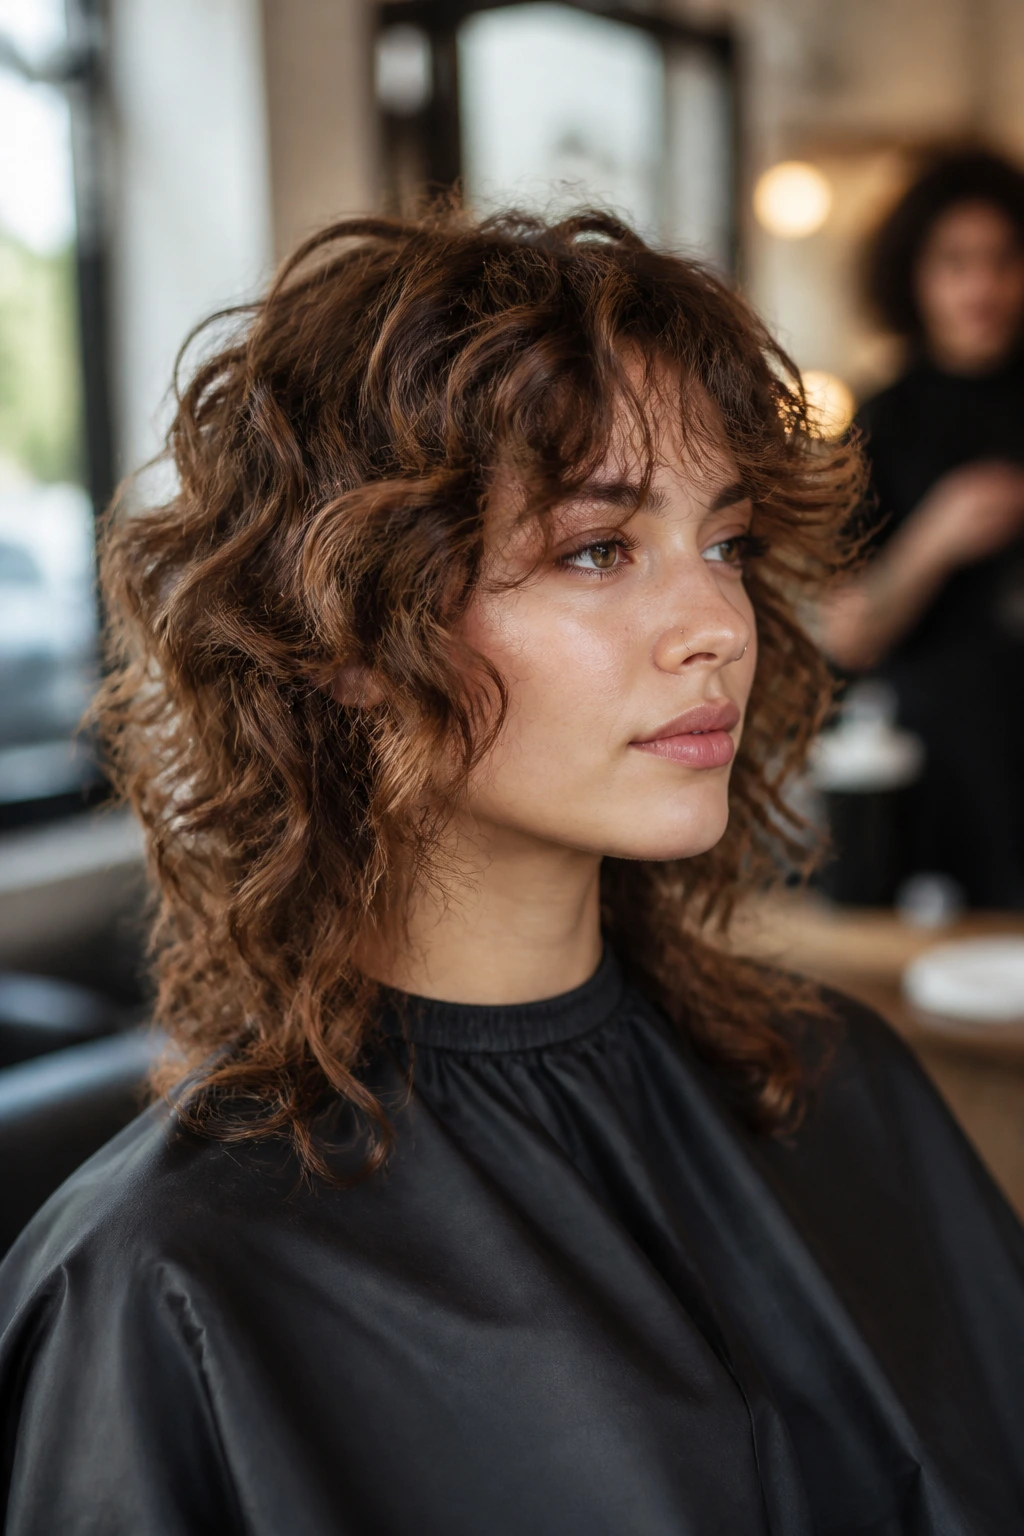
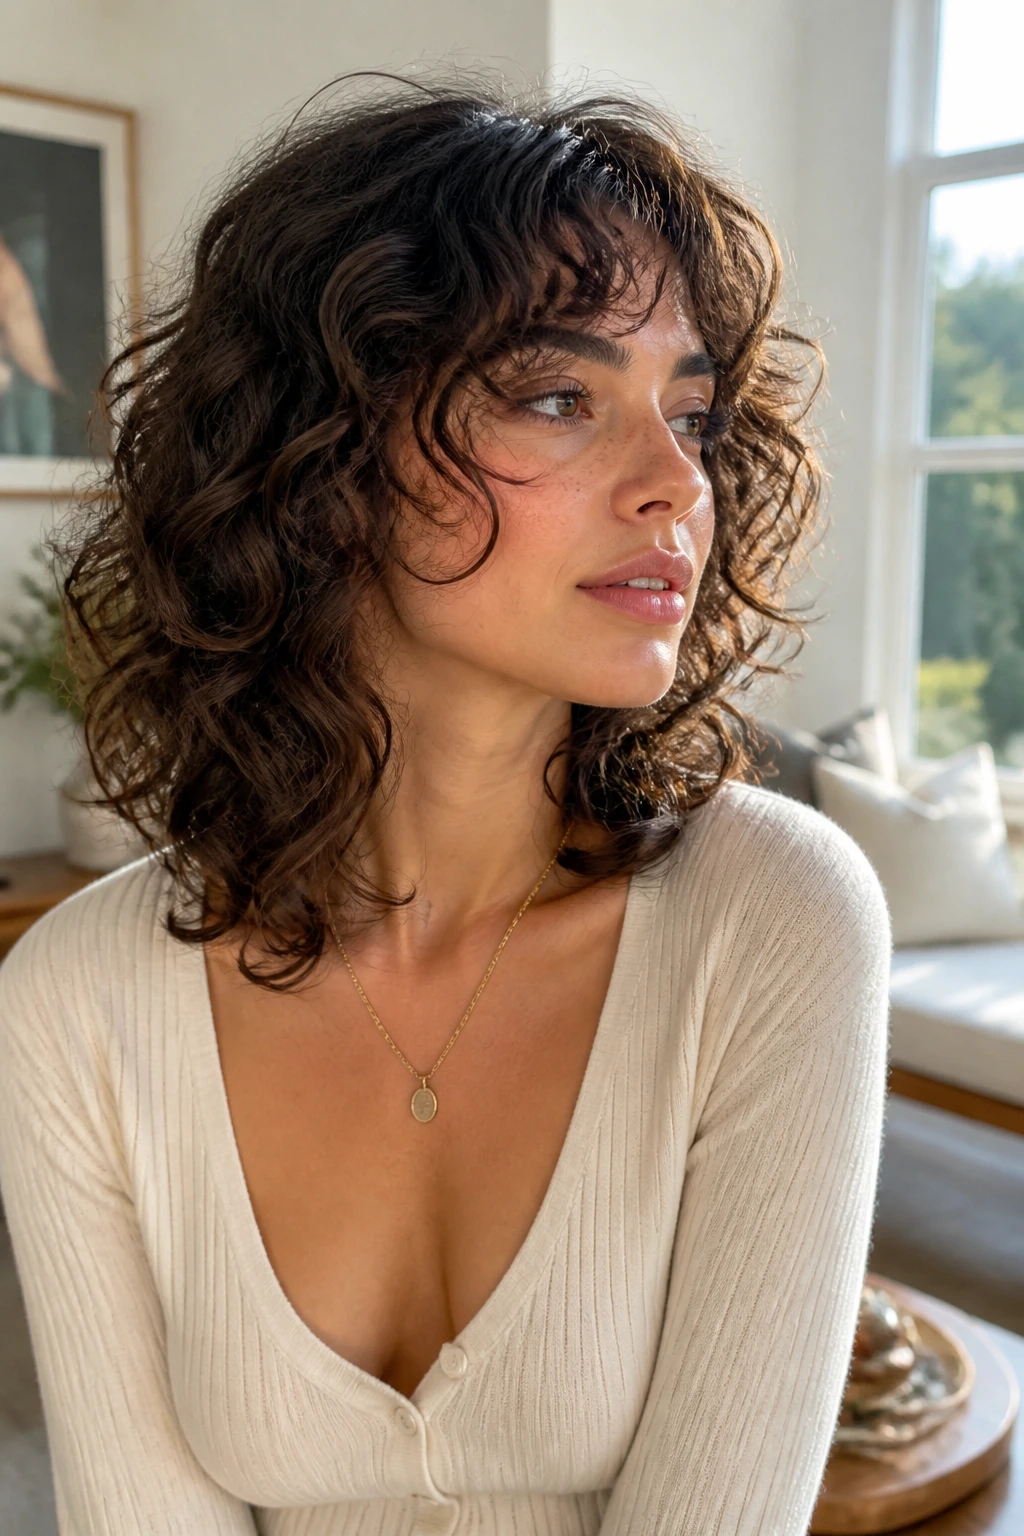
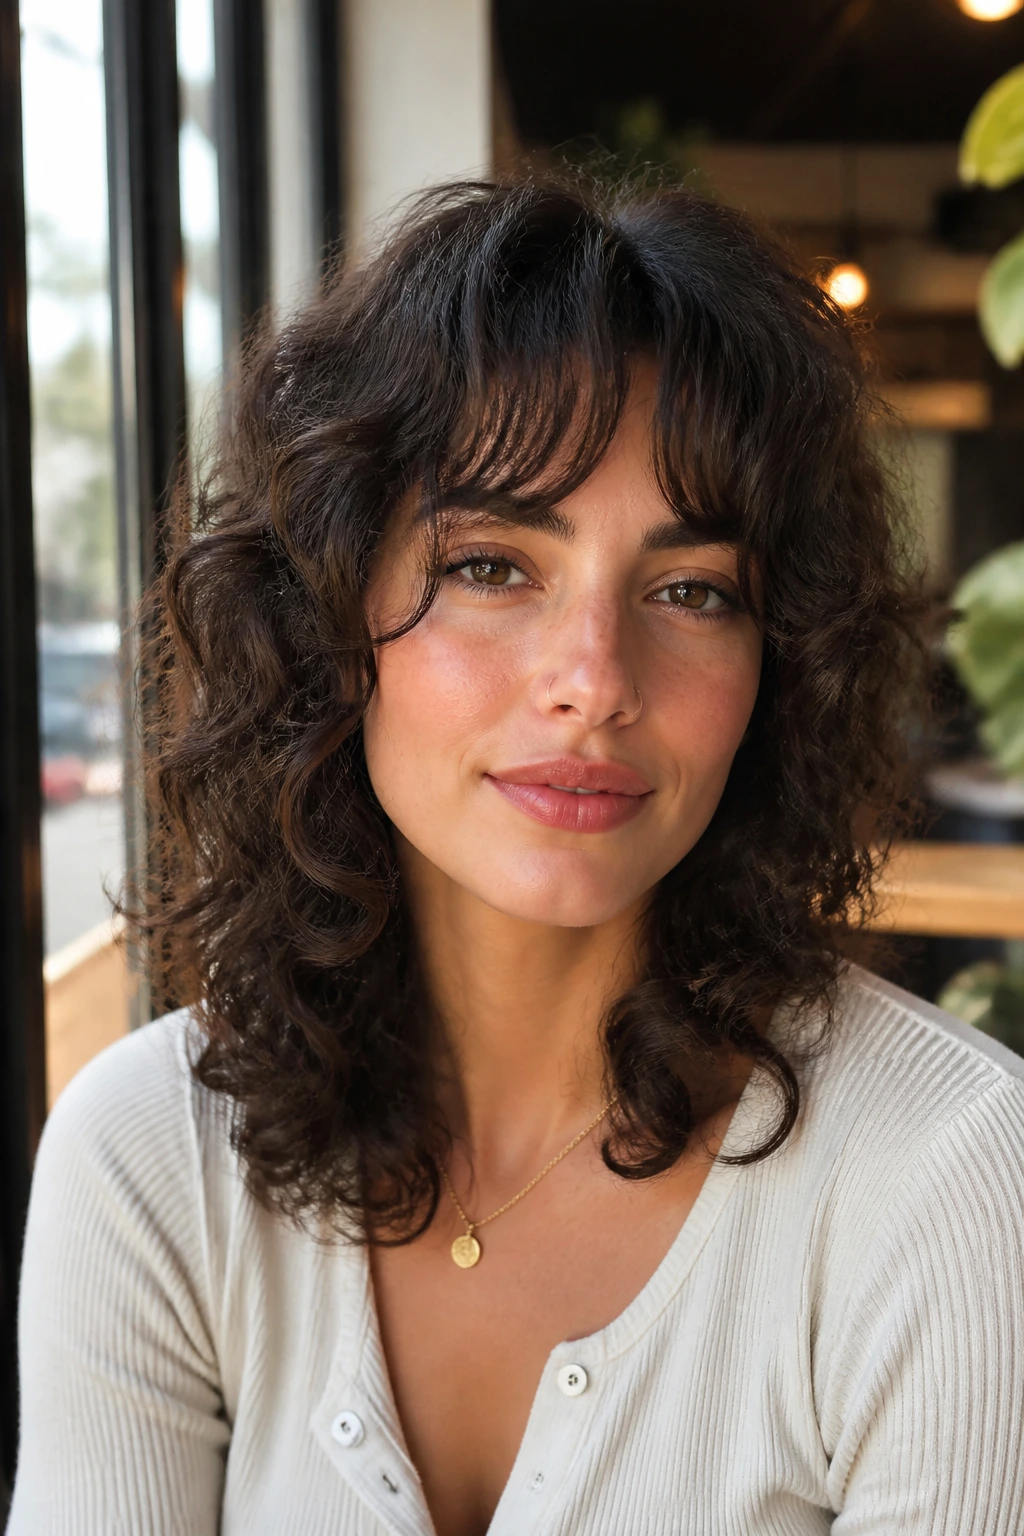
1. Soft Collarbone Curly Shag With Cheekbone Layers
This is the version I reach for when someone wants movement without losing the sense of length. The collarbone keeps enough weight at the bottom to stop the curls from blooming too wide, while the cheekbone layers lift the front and give the face a cleaner outline. On medium curls, it feels light without getting fluffy.
Why It Flatters
The cut opens the face without shouting about it. If your curls have a little spring but not a ton of shrinkage, those front pieces can sit at the lip in the chair and land right at the cheekbone after drying. That little jump is the whole point.
It works especially well on round and heart-shaped faces because the cheekbone layers pull attention upward, while the collarbone length keeps the silhouette grounded. I like this one for people who want something they can wear to work, then scrunch a little more and wear to dinner without changing the cut itself.
Best Styling Note
Use a light curl cream at the mids and a firmer gel near the front pieces so the face-framing layers don’t puff out into fuzzy wings. A diffuser on low heat helps the top dry with lift while the ends keep their shape.
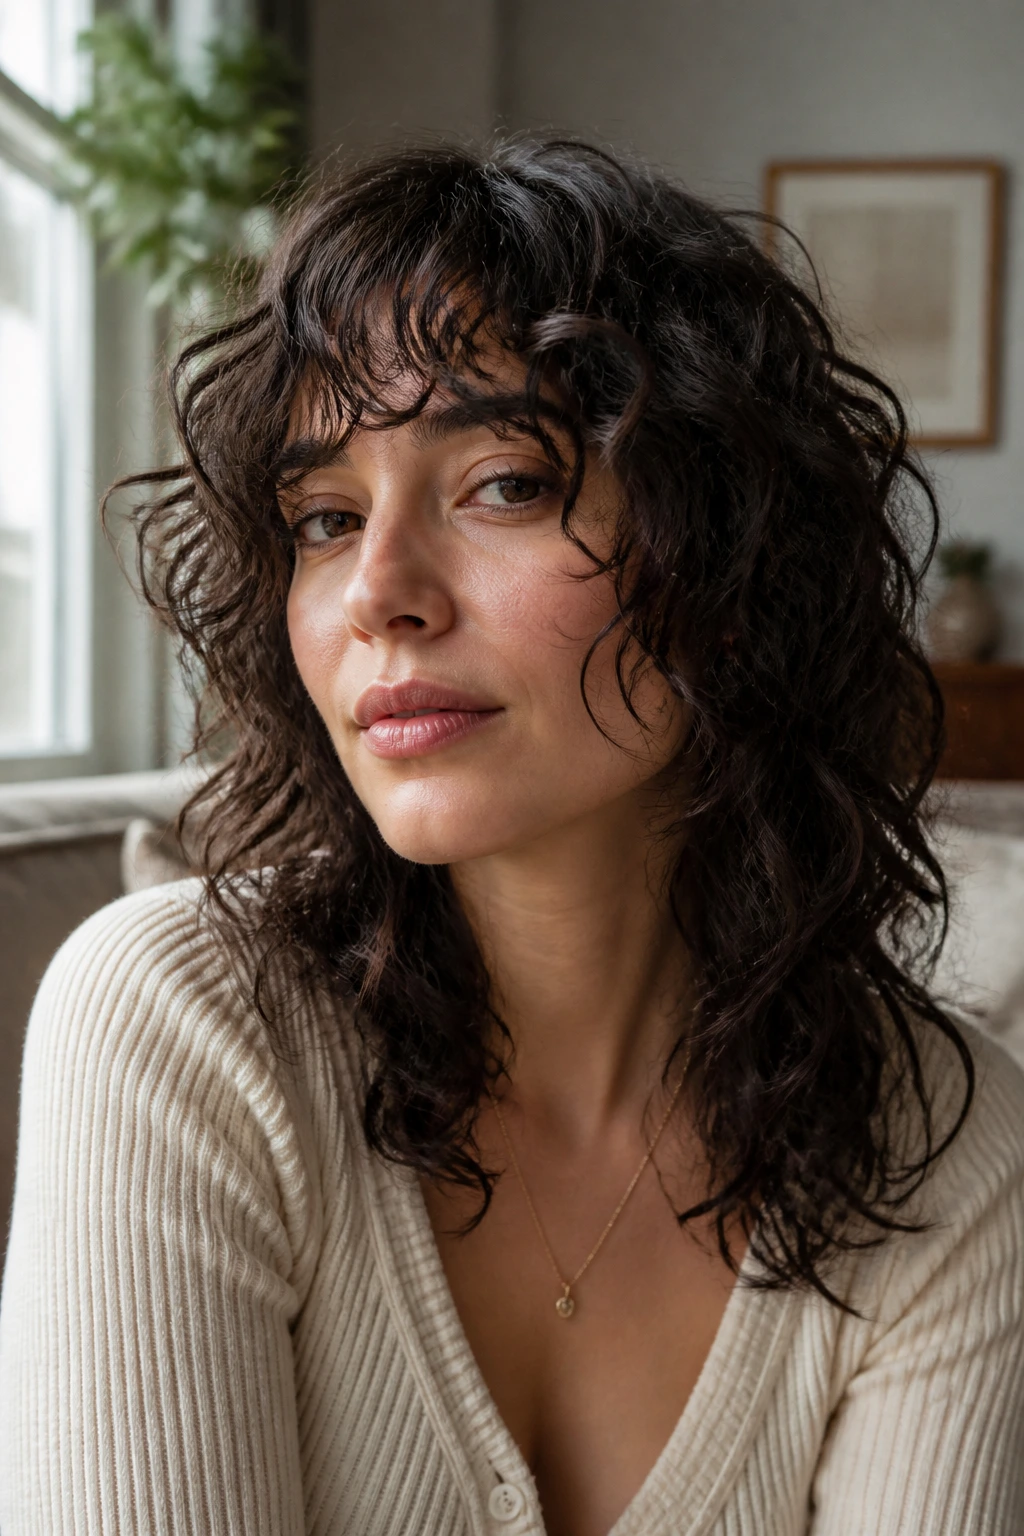
2. Curly Wolf Cut With Wispy Fringe
If you want more edge, this is the cut with some bite. The crown sits a little shorter, the back drops longer, and the fringe stays light enough that it doesn’t turn into a heavy curtain. It’s shag-adjacent, but with a sharper contrast between the top and the ends.
A wispy fringe on curls has to be handled with restraint. Too much density and the bangs sit like a shelf. Too little and they disappear. The sweet spot is a sparse front section that breaks into soft pieces at the brow and then bends into the rest of the face-framing layers.
Who It Suits
This one makes sense if you like shape at the crown and a bit of attitude around the jaw. It’s also kinder to hair that needs lift, because the shorter top layers help the curls stack instead of hanging flat.
Styling Note
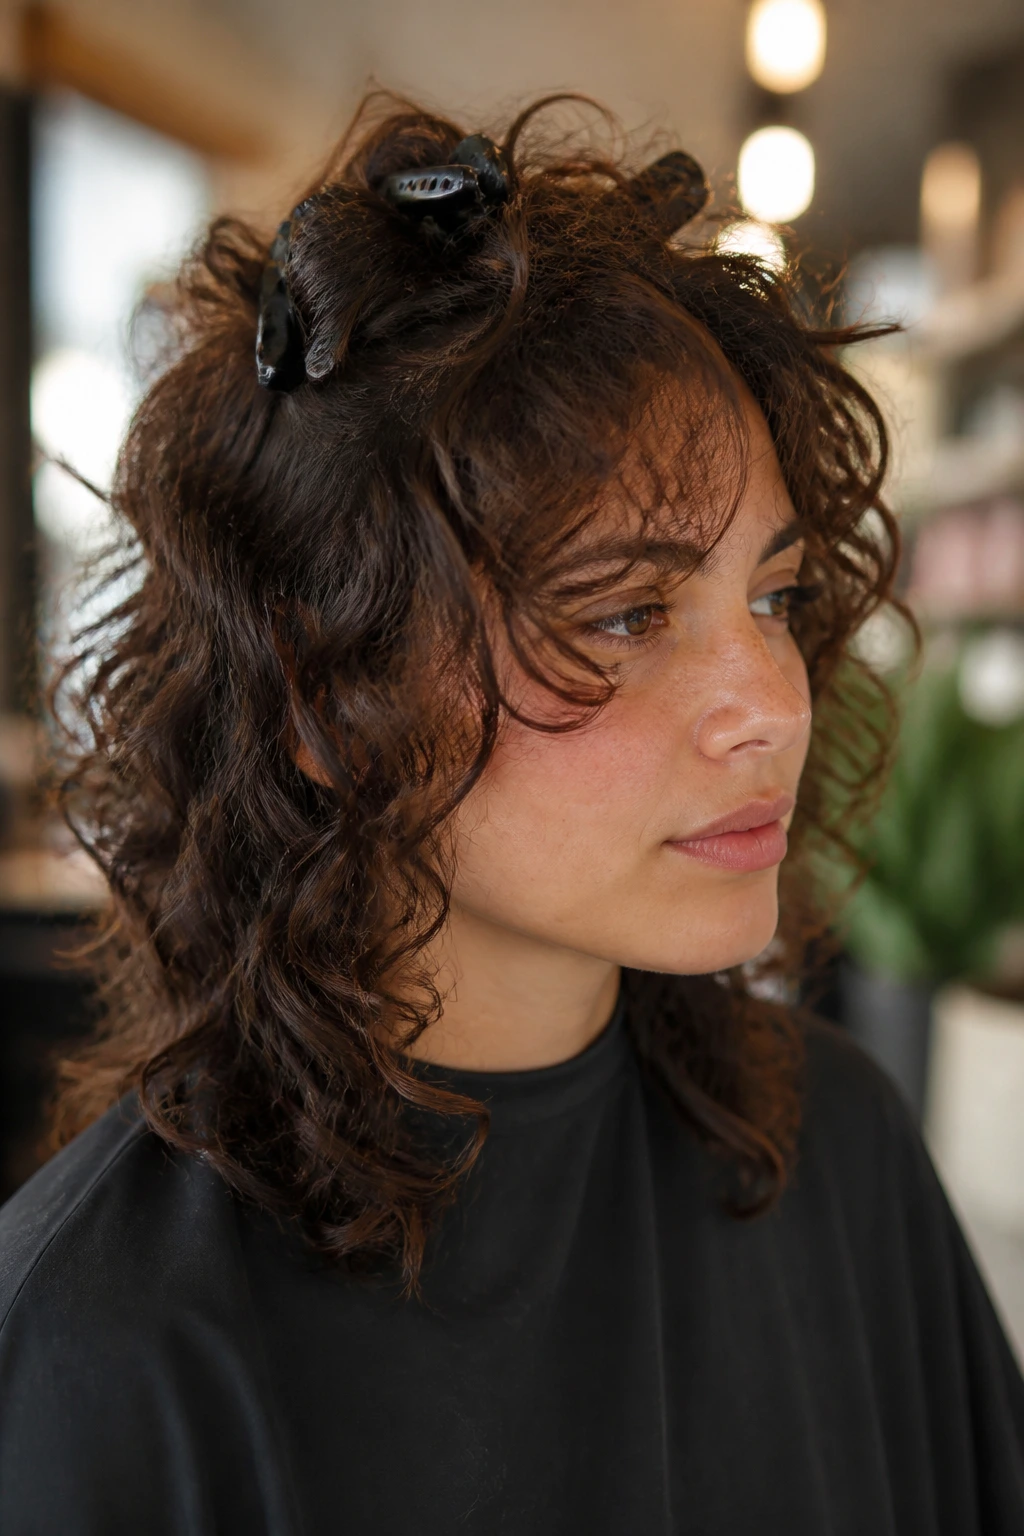
Keep the fringe separate while styling. I’d clip the rest of the hair up, define the bangs first, then release the sides so the front doesn’t get drowned in product.
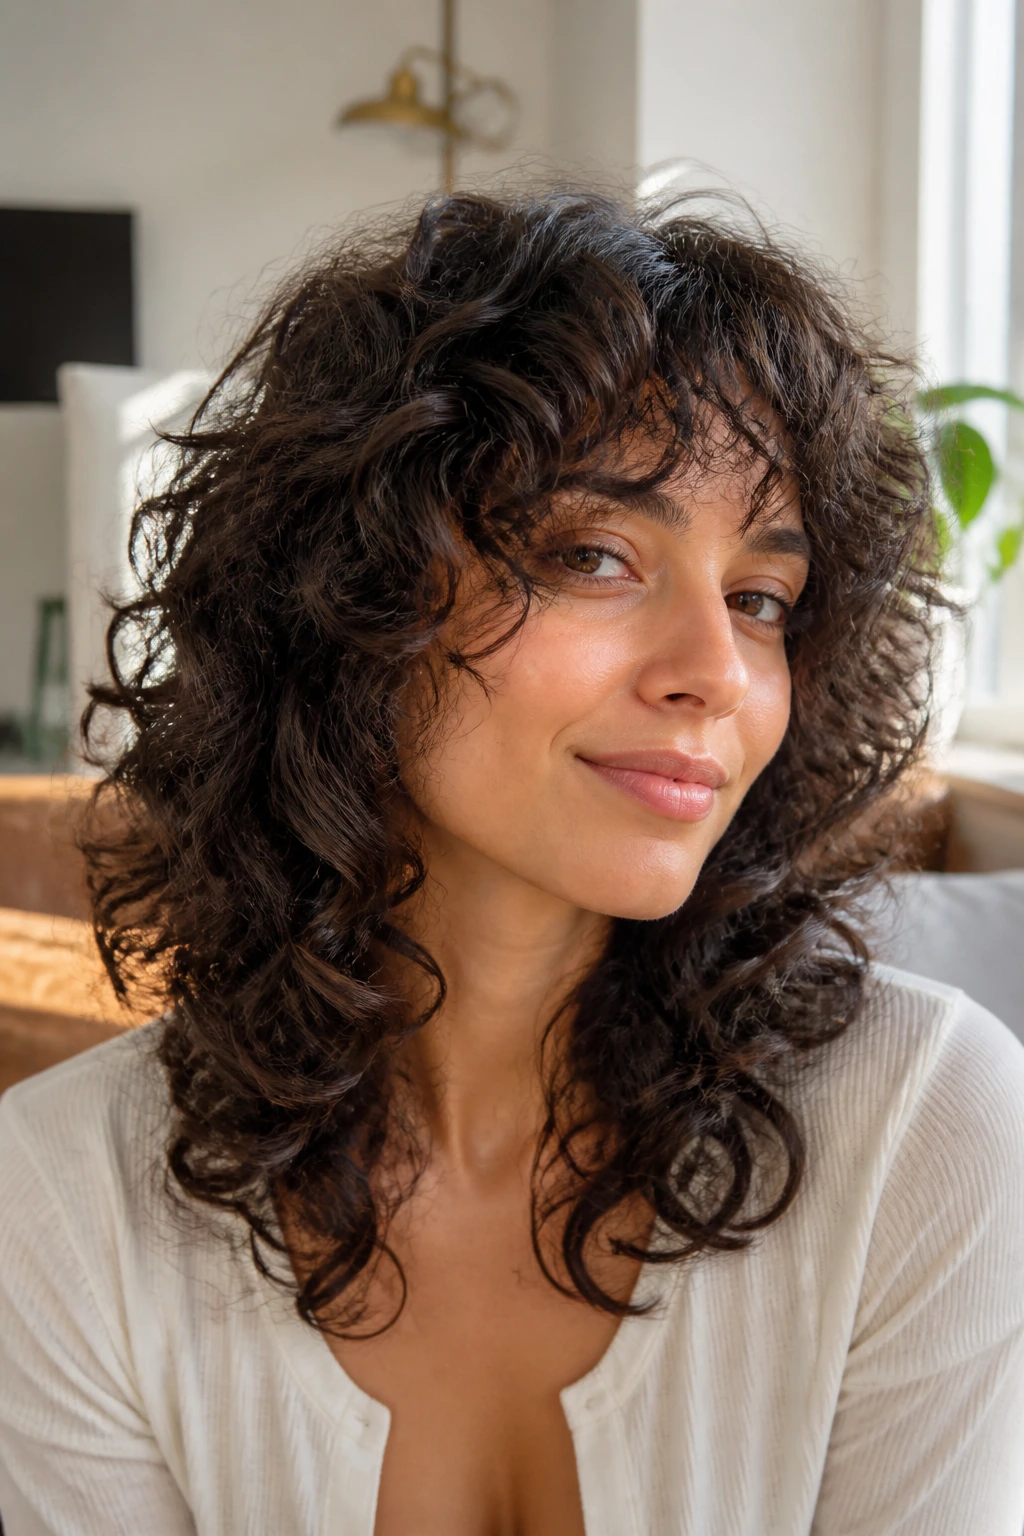
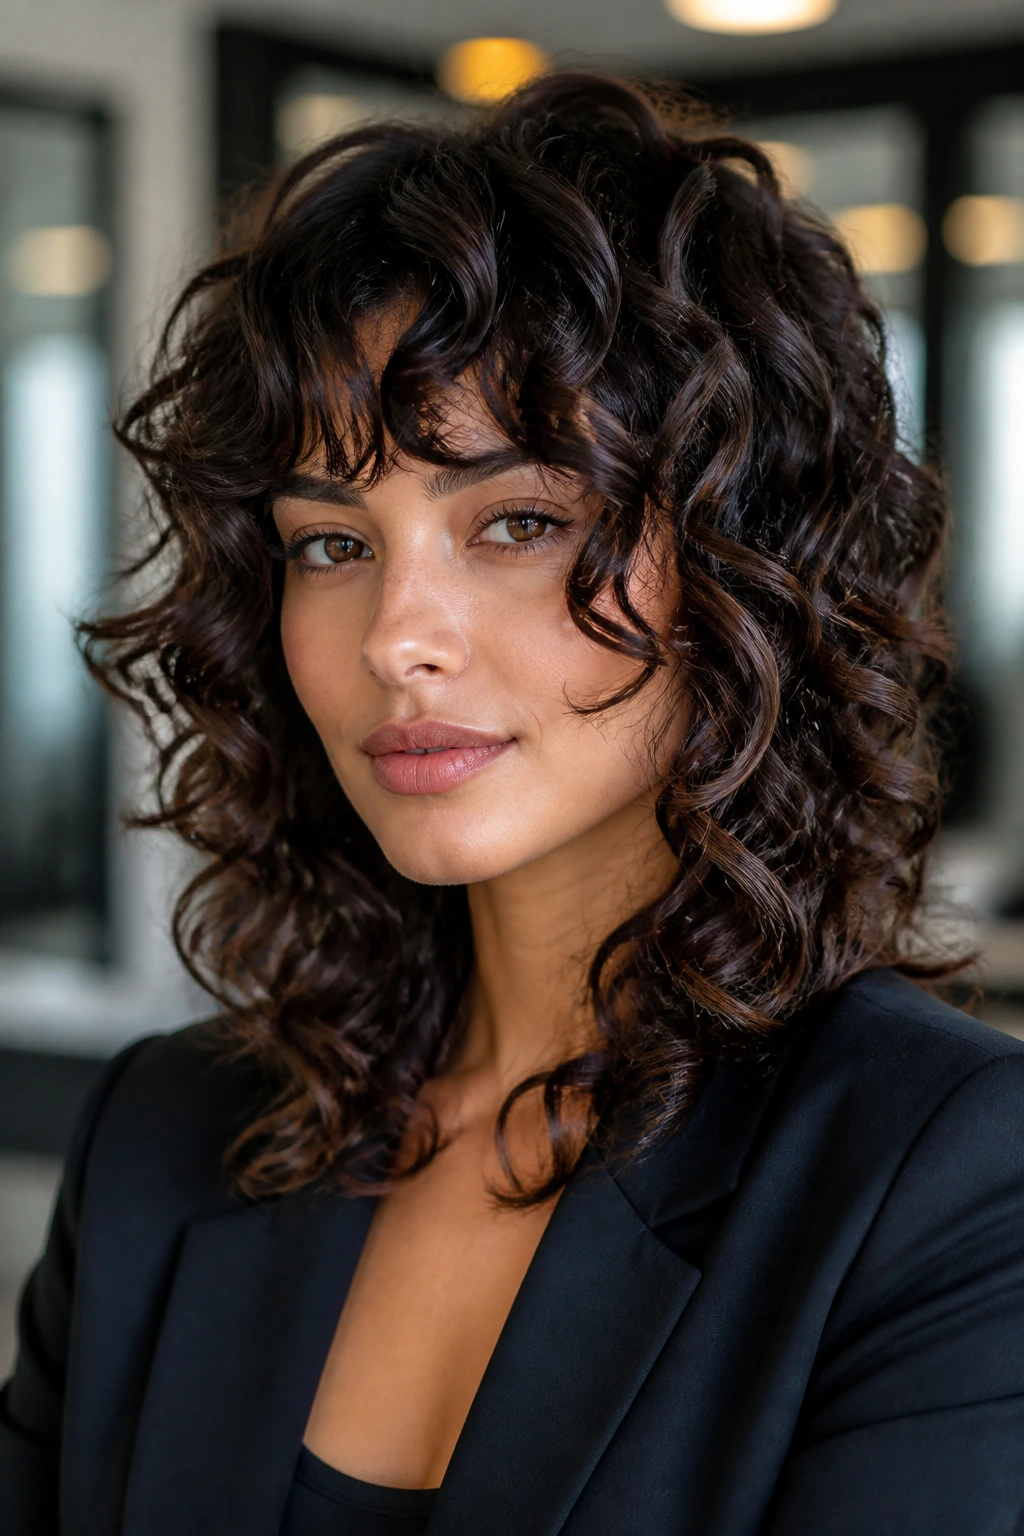
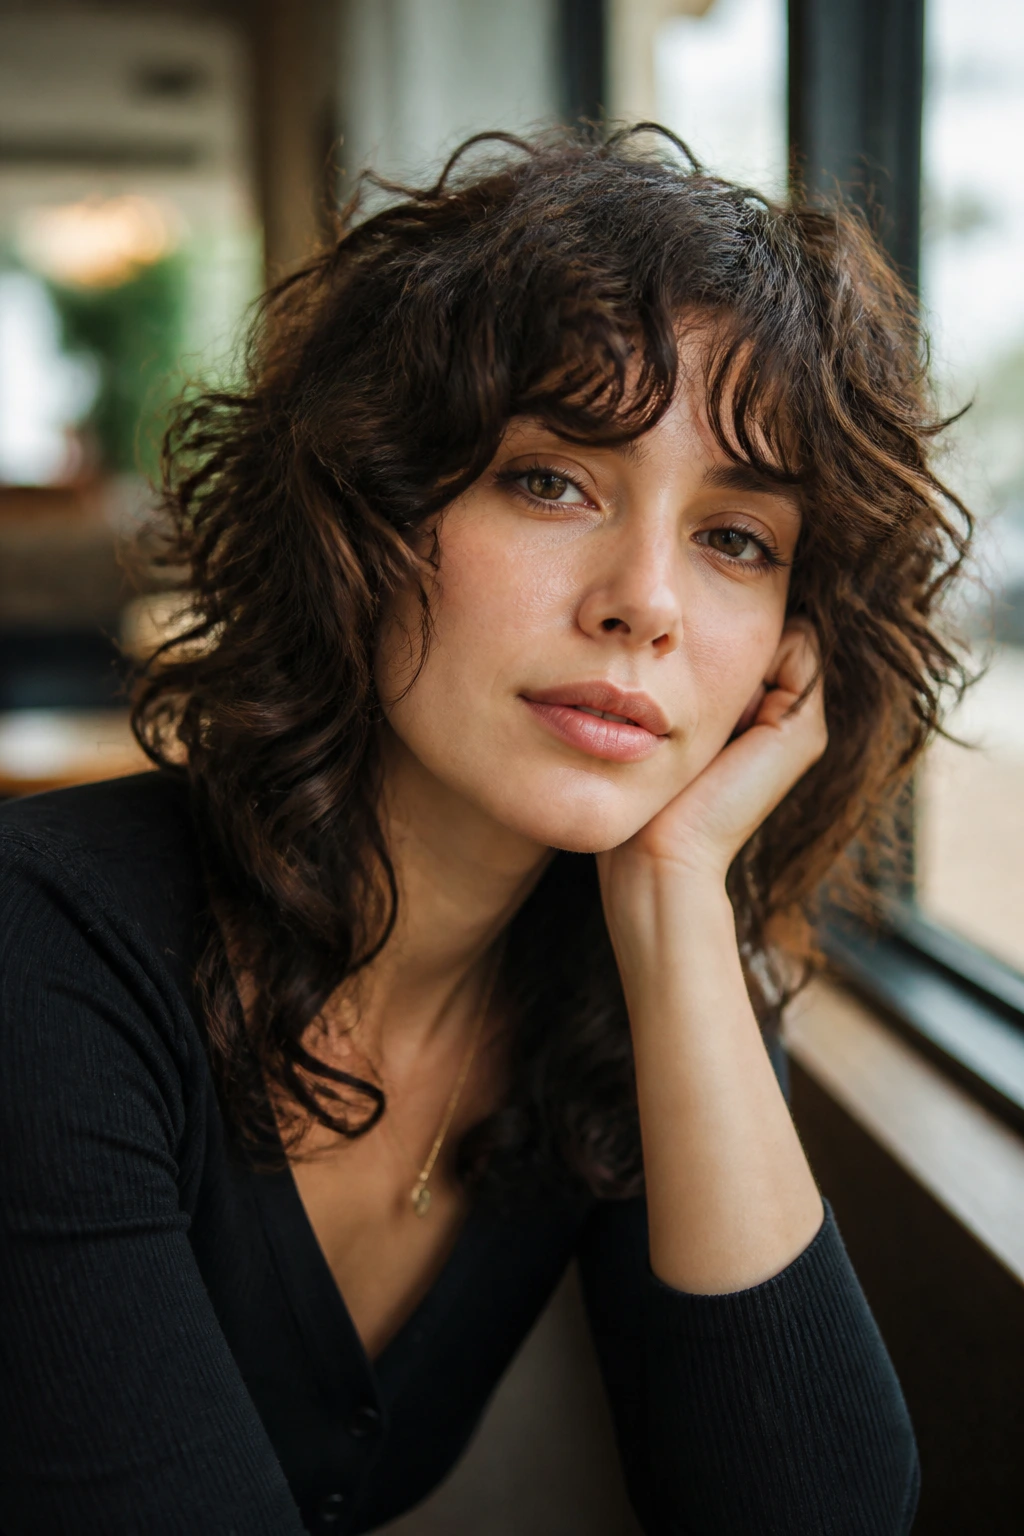
3. Rounded Curly Shag With Curtain Bangs
Why do curtain bangs keep showing up on curly shags? Because they solve a real problem. They break up the front without boxing the face in, and on curls they can split into two soft arcs instead of one dense wall.
This version is fuller through the sides than the wolf cut above, so the whole shape reads rounder and more balanced. It’s especially good on long faces or narrow chins, because the curtain fringe and cheek-length layers create a wider visual line through the middle of the face.
Styling Note
Ask for the shortest bang point to land around the bridge of the nose when stretched. Curls rise, and if the front is cut too short, the bangs can sit too high and lose their swing. A center part or a soft off-center part both work here.
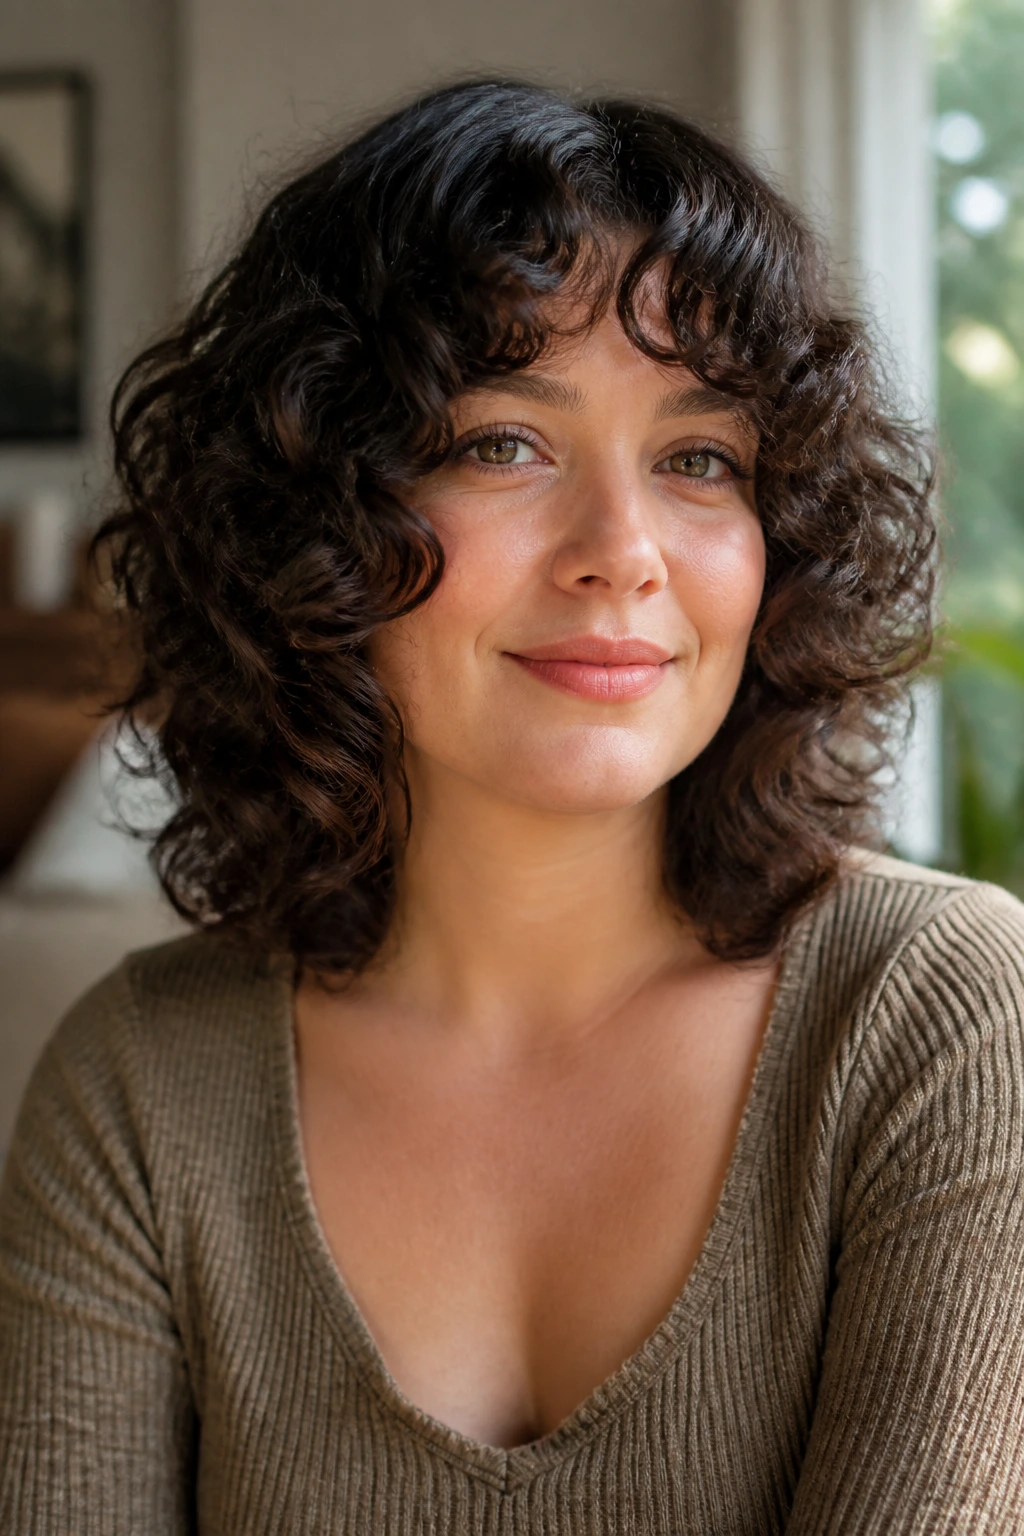
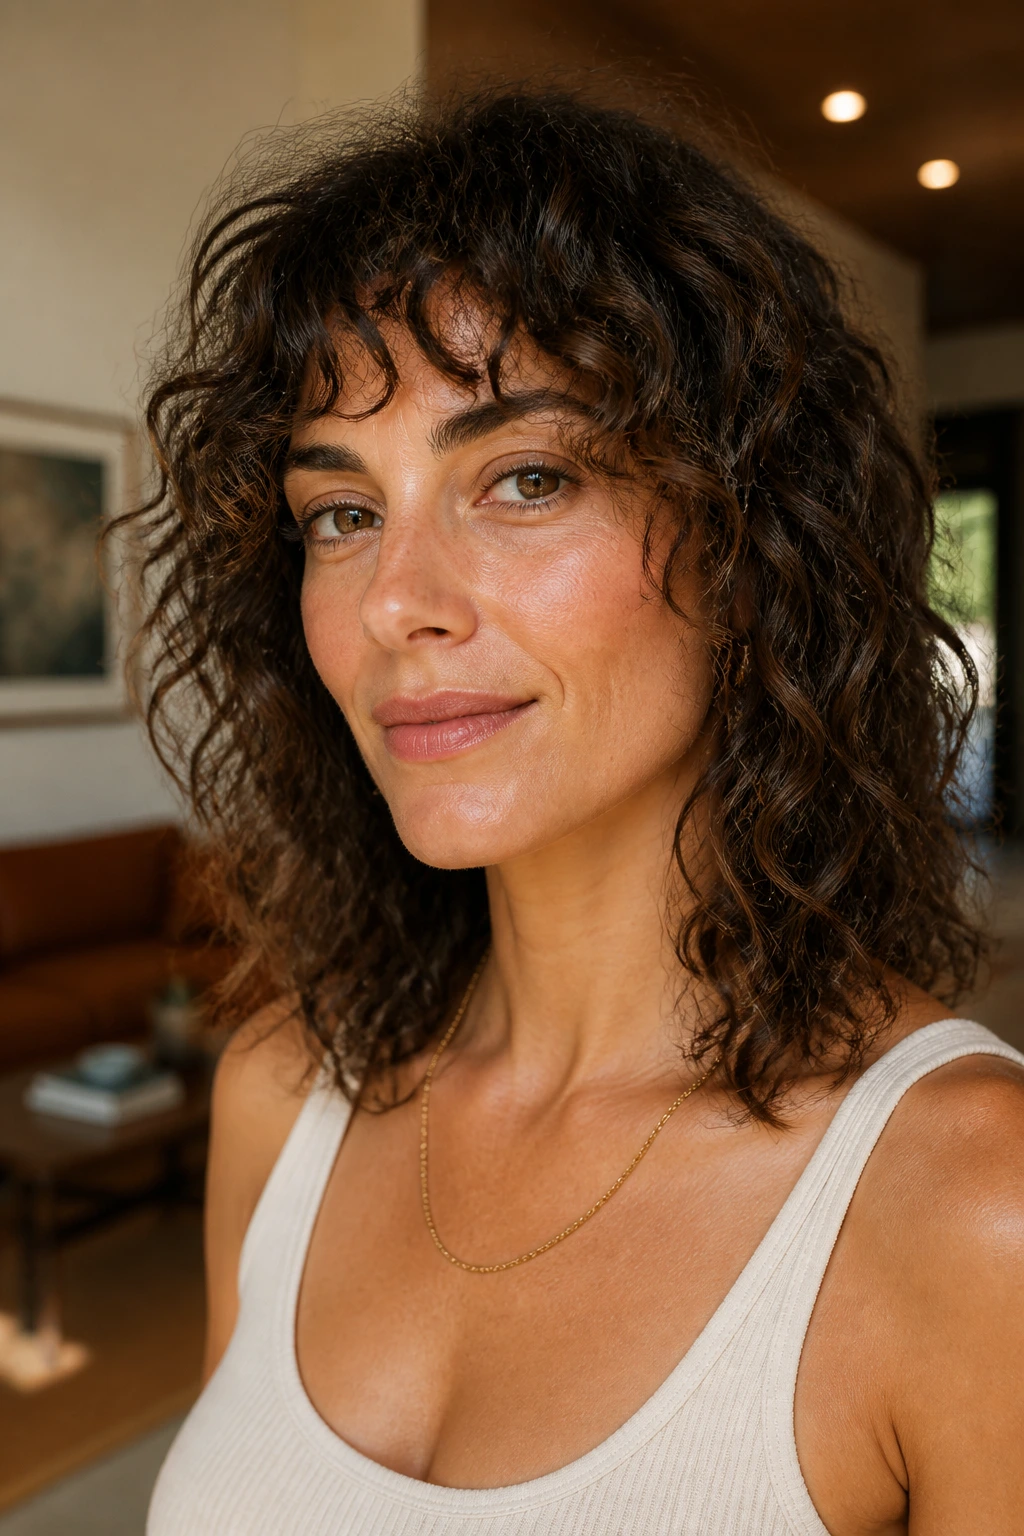
4. Chin-Length Curly Shag With Jaw-Skimming Pieces
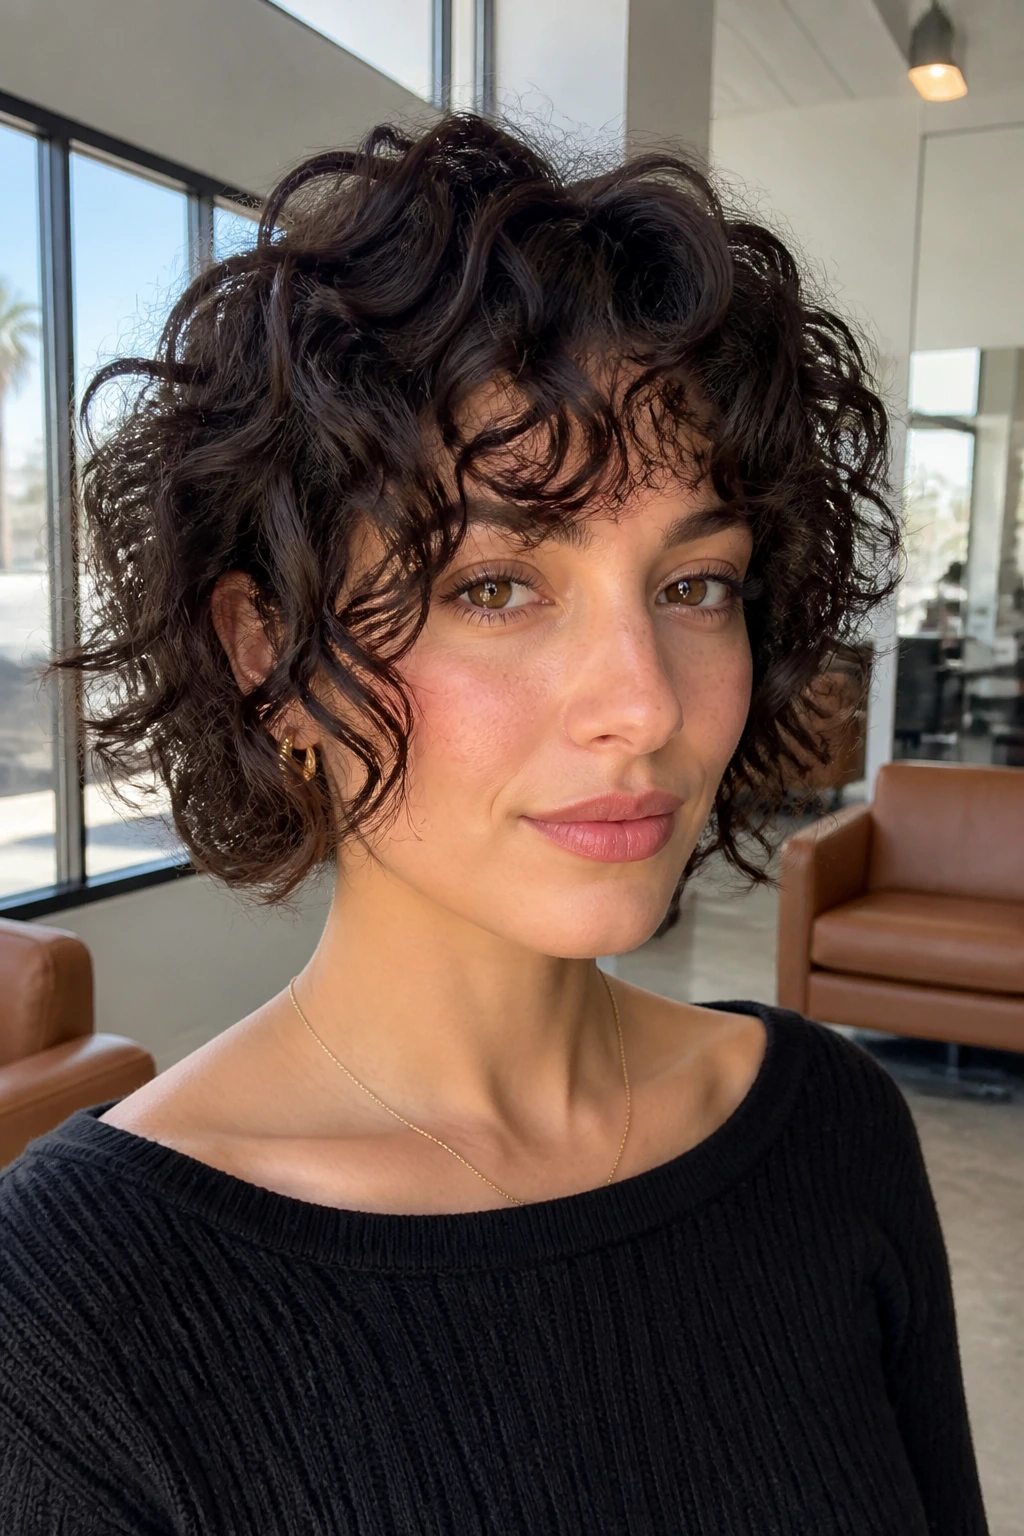
A chin-length shag is one of those cuts that looks simple until you see it move. Then it starts to make sense. The curls bounce around the jaw, the face-framing pieces skim the chin, and the whole shape feels alert rather than heavy.
This is a strong choice if you want volume without the weight of longer hair. It can be fantastic on springy 3A to 3B curls, especially if the perimeter is kept slightly softer instead of blunt. The jawline pieces matter here. They stop the cut from turning into a tidy little helmet.
What To Watch
If your curls are very tight or very dense, chin length can shrink higher than you expect. That can be lovely, but it needs a stylist who actually understands curl fall. I would not ask for this as a dry guess.
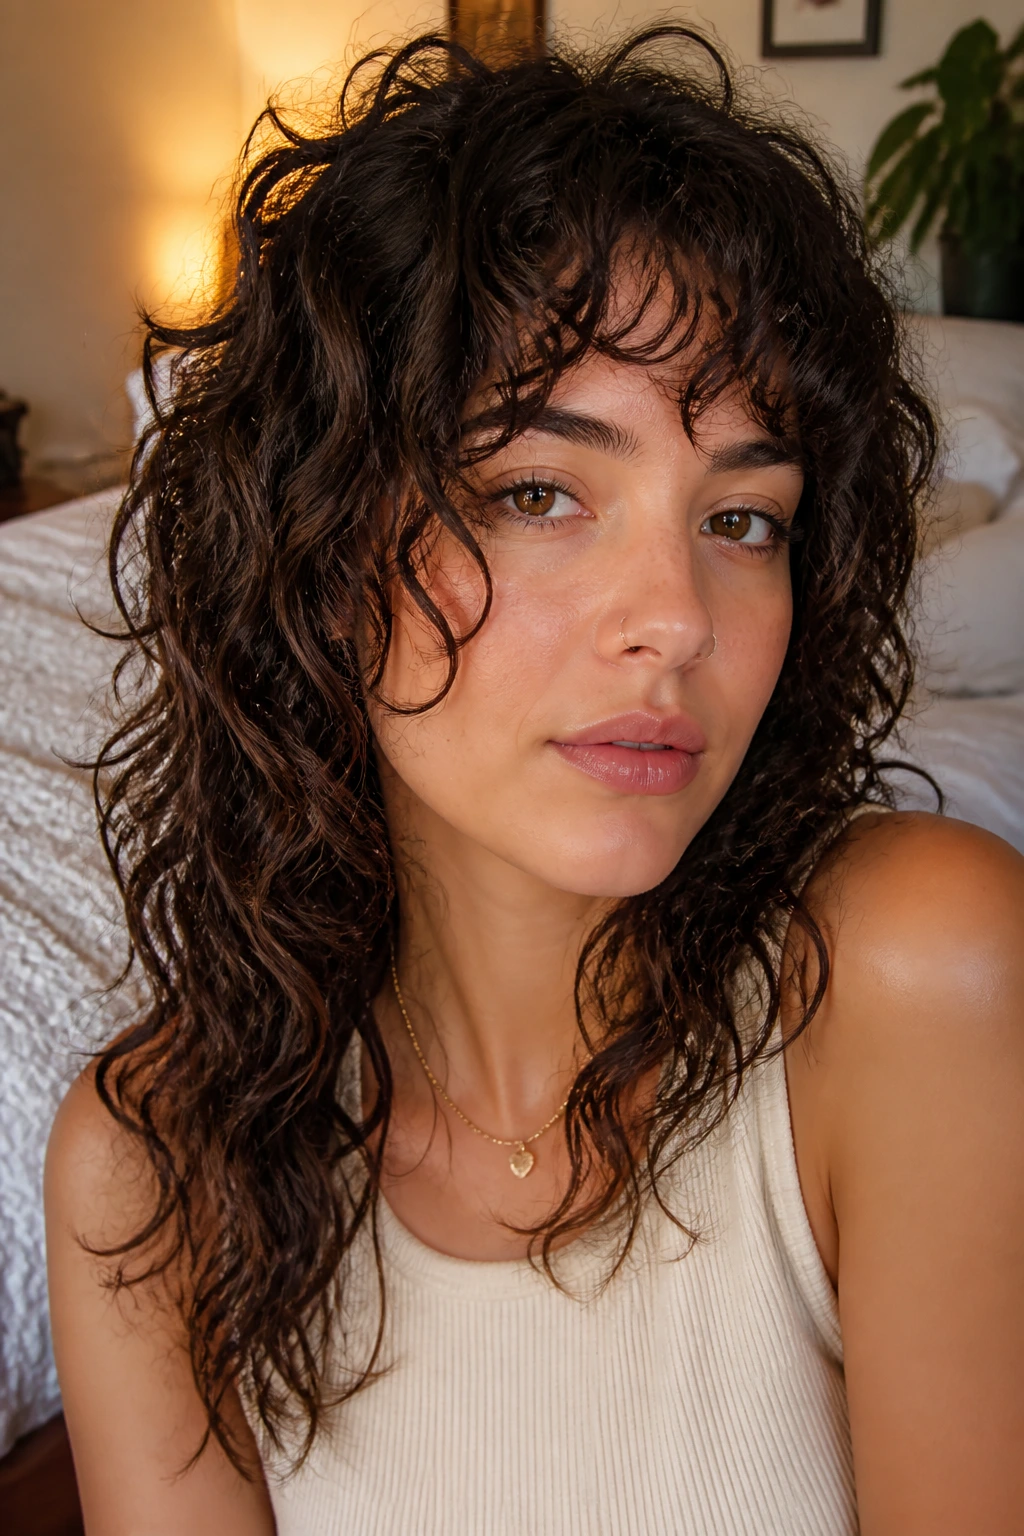
5. Long Curly Shag With Invisible Layers
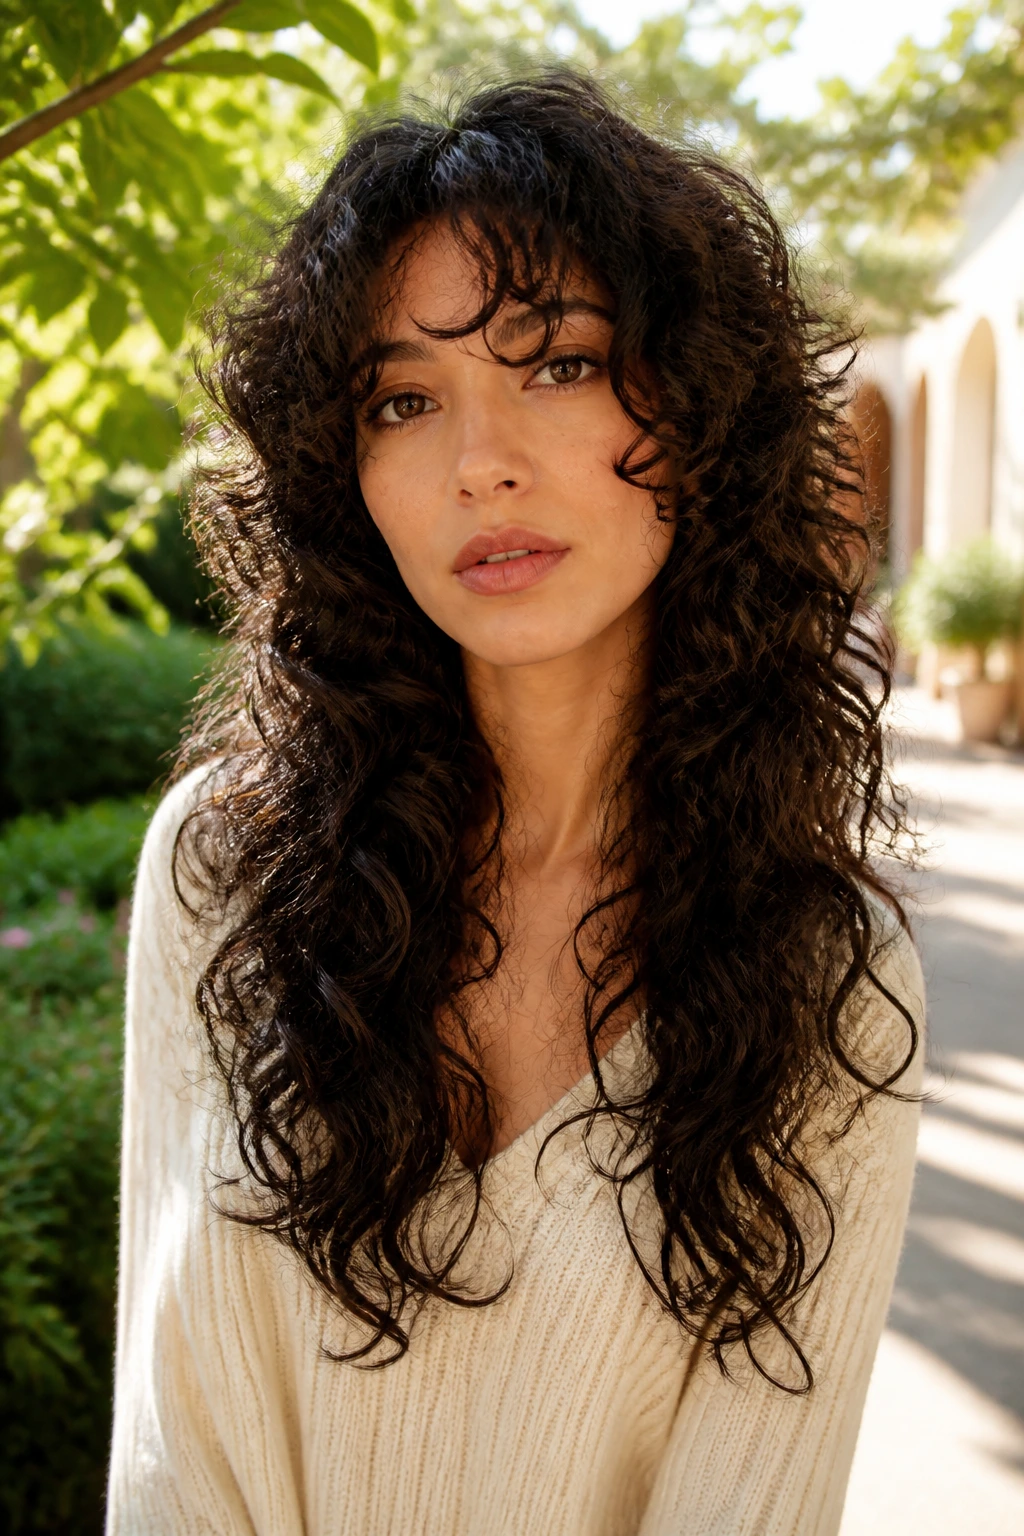
Long curls do not need to give up length to get movement. That’s the entire appeal of this version. The layers sit inside the shape rather than shouting from the outside, which means the front can frame the face while the back still hangs with weight.
It’s a smart choice if you love your length but hate the way long curls sometimes fall into one dull curtain. The face-framing layers can start around the lip or chin, then blend into the longer lengths so the haircut still feels soft when it’s pulled forward. This one is quietly useful. Not flashy. Useful.
Styling Note
This cut likes a light hand. Too much cream will make the internal layers collapse, and then you lose the movement you were paying for. I’d use a foam or milk on the roots, then a medium-hold gel from mid-length to ends.
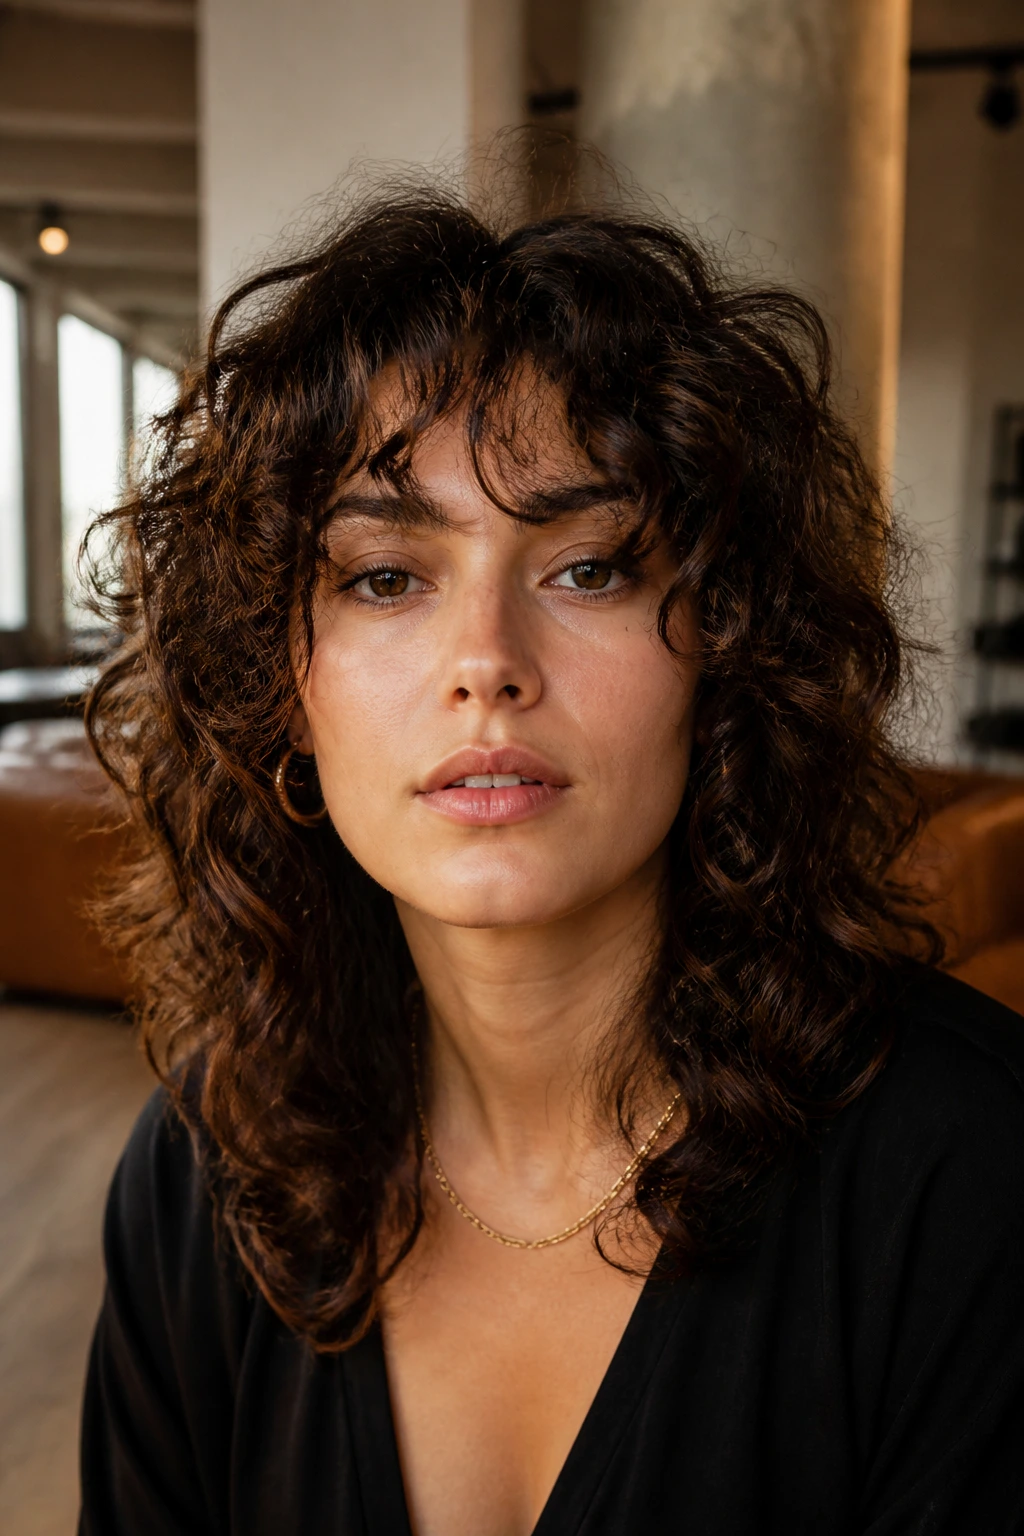
6. Heavy Fringe Curly Shag With Eye-Grazing Pieces
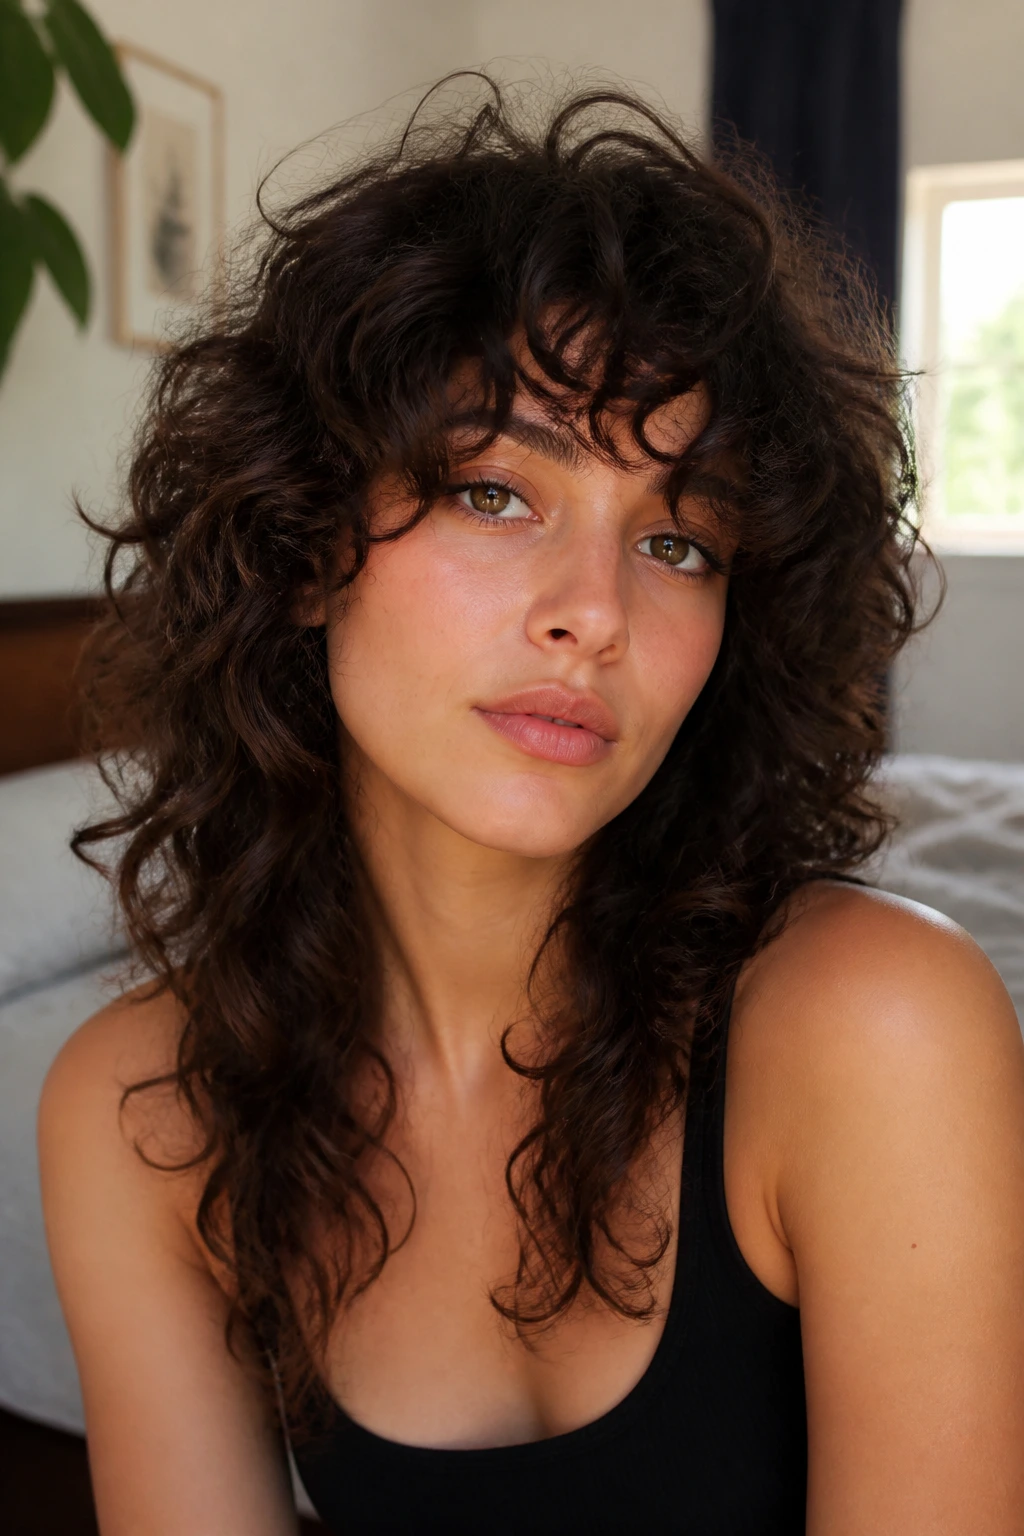
Full fringe changes the mood immediately. A heavy curly fringe draws the eye straight to the face, and the rest of the shag becomes a frame instead of the headline. When the curl pattern clumps well, this can look polished in a slightly rebellious way.
The key is length. Curly bangs need to be longer than straight bangs because they bounce up when they dry. If the fringe is cut exactly at the eyebrow in the chair, it may land several centimeters higher once it settles. Eye-grazing pieces are safer, and they look better when they break into a few defined curls rather than one solid mat.
Best For
This version suits people with a higher forehead or anyone who likes the feeling of being partly hidden by hair. It’s also good if you wear glasses, because the fringe can sit above the frames without fighting them.
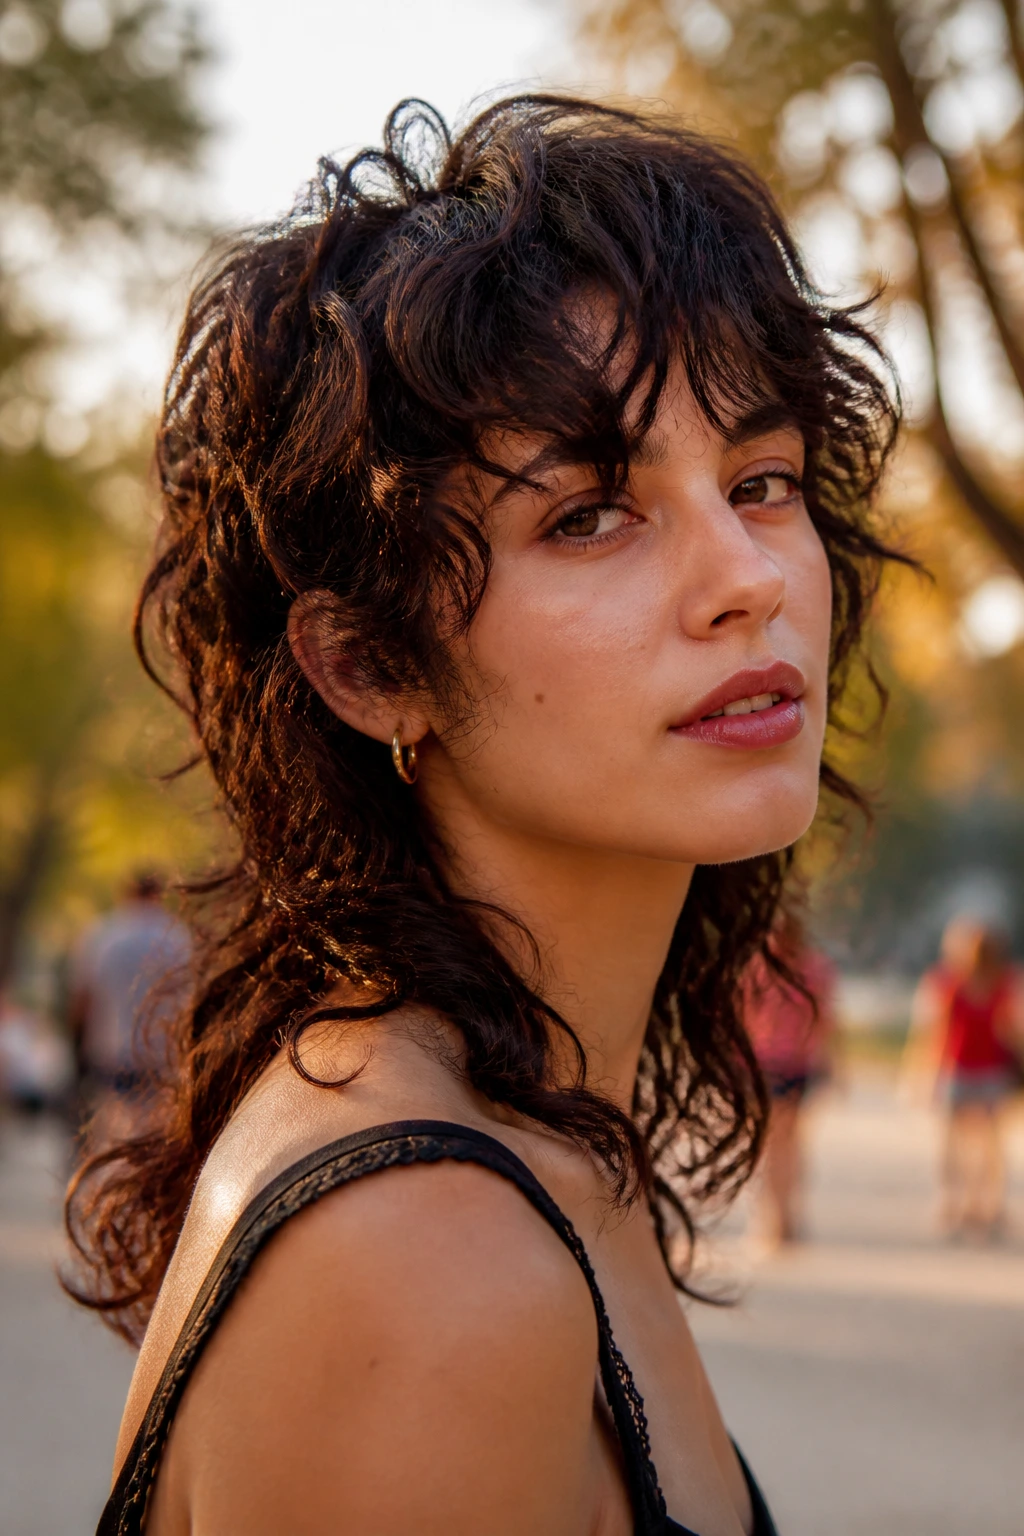
7. Side-Swept Curly Shag With Asymmetrical Layers
Side-swept layers are underrated. They shift the weight of the haircut off the center line, and that can do a lot for rounder faces or curls that need a little direction. One side lands fuller, the other side stays a touch longer, and the result feels alive even on a simple air-dry.
This cut is also a nice option when you do not want a strict middle-part look. Some curls naturally fall off-center anyway, and this shape works with that habit instead of trying to train it away. The asymmetry gives the face a slimmer line without cutting the hair into a severe shape.
Styling Note
Create the part while the hair is soaking wet. Once curls start setting, they hold the shape you gave them, and fighting the part later usually just creates a flattened root on one side and a weird bend on the other.
8. Big 70s Curly Shag With Crown Lift
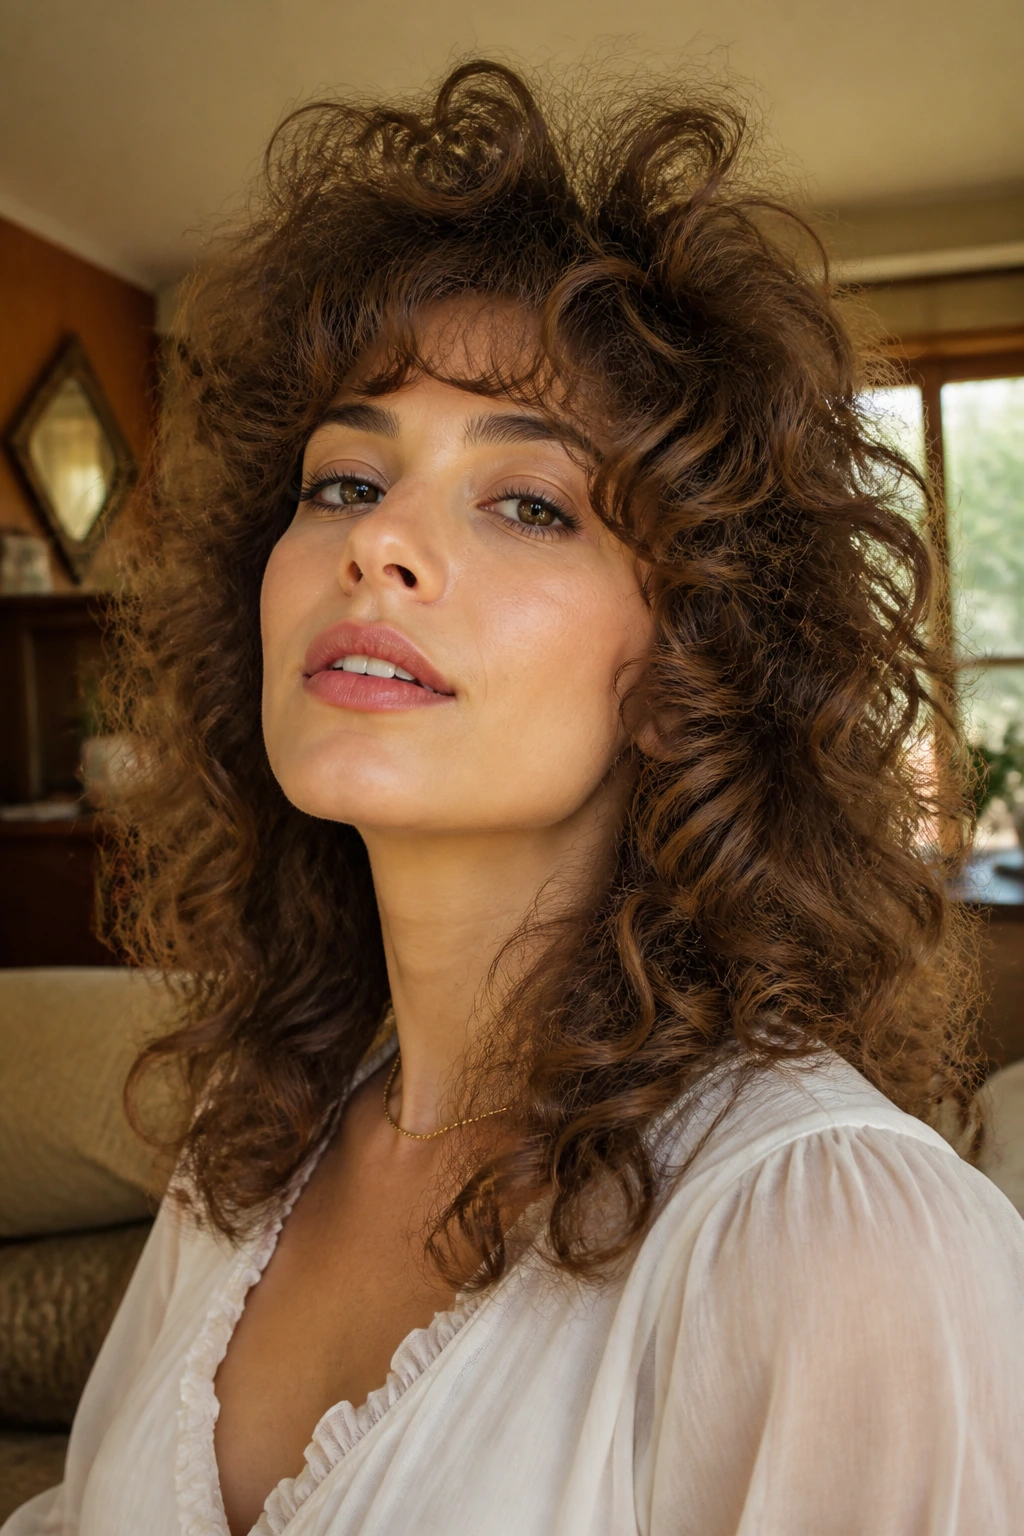
Some cuts whisper. This one doesn’t. The 70s-inspired curly shag wants height at the crown, softness through the sides, and a face frame that flicks out a little at the ends. It’s the kind of haircut that makes a simple T-shirt look intentional.
The trick is not to over-layer the perimeter. You want the top to rise and the sides to fan, but the end line still needs enough weight that the curls don’t separate into frizz. On thick or medium-dense hair, that balance gives you volume without the dreaded mushroom shape.
Pro Tip
Use root clips at the crown while the hair dries. Tiny metal clips, placed right at the root and removed when the hair is about 80 percent dry, can make the top stand up without needing a ton of product.
9. Curly Mullet Shag With Tapered Nape
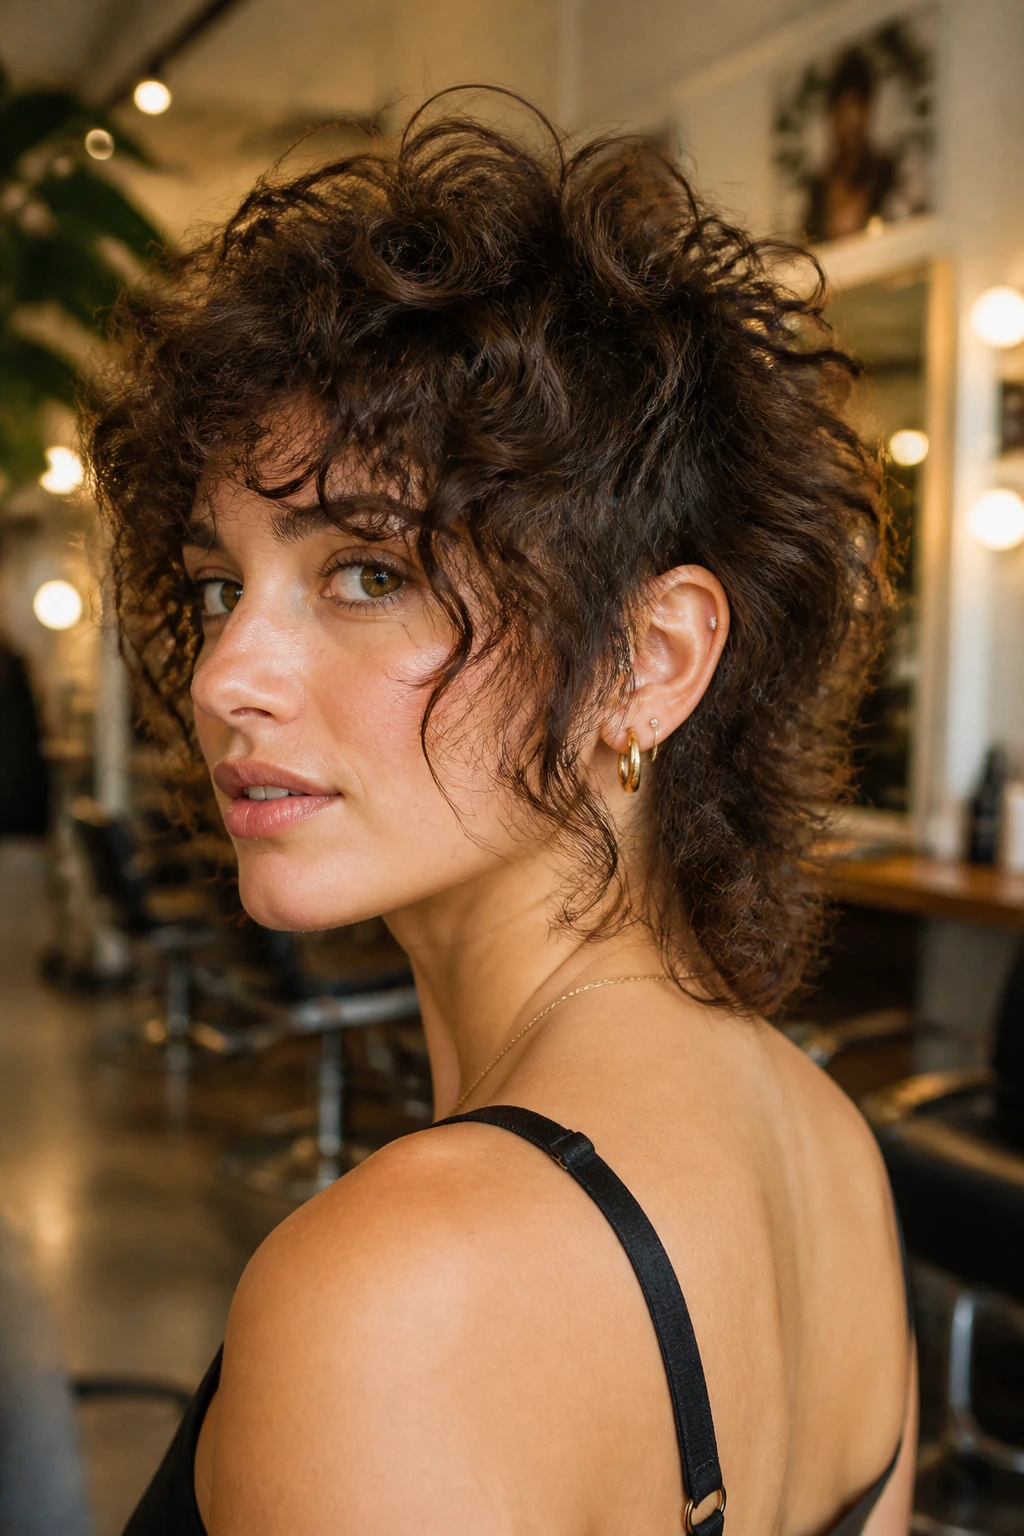
This is the bolder one in the group. The back stays shorter and more tapered, while the front and sides carry more length and softness. On curls, that contrast can look cleaner than it does on straight hair because the texture helps blend the transition.
The face-framing layers are doing a lot of work here. They keep the cut from reading as all business in the back and all chaos in the front. If the nape is too blunt, the mullet part can look dated in a bad way. If it’s tapered well, it feels sharp and current without needing styling gymnastics.
Best For
This cut suits dense curls, strong personalities, and anyone who gets bored with symmetrical hair fast. It is not the quiet option. That’s the point.
10. Bottleneck Bang Curly Shag
Bottleneck bangs are one of the smartest choices for curls because they start narrow at the center and widen as they move toward the cheekbones. On a curly shag, that means the fringe opens the face without swallowing it.
I like this version on heart and oval faces, especially when the layers around the temples are kept soft. The front has enough shape to count, but not so much density that it becomes fussy. It’s one of those cuts that looks carefully designed even when the styling is loose and imperfect.
Styling Note
Ask for the center fringe to be a little longer than your stylist thinks is safe. On curly hair, “safe” often means “too short once it dries.” The side pieces should graze the cheekbone and blend into the rest of the shape instead of stopping abruptly.
11. Fine-Hair Curly Shag With Airy Ends
Fine curls can wear a shag beautifully, but only if the layers are controlled. Too many short pieces and the haircut goes wispy fast. This version keeps the ends airy while preserving enough density through the mid-lengths so the hair still looks full when it moves.
The face frame should begin lower than you might expect, usually around the mouth or chin. That keeps the front from looking sparse. On fine hair, the shag should create the feeling of movement, not a shredded outline.
What To Ask For
Tell your stylist you want soft lift, not aggressive texturizing. That phrase matters. Fine curls usually need a cleaner cut line with a few deliberate layers, not a lot of thinning that makes the ends fray.
12. Dense-Hair Curly Shag With Bulk-Removing Layers
Dense hair needs room to breathe. Otherwise it turns into a big, heavy wall that hides the face-framing layers entirely. This cut removes bulk through the interior while leaving the outline strong enough to hold shape.
I’m picky about this one. I do not love razor-thinned curly hair unless the curl pattern is loose and forgiving. On denser curls, the safer move is shaping with scissors and leaving the ends healthy. That gives you swing without the shredded halo that some stylists mistake for texture.
Styling Note
Use a lightweight leave-in and skip heavy butters unless your hair is very dry. Dense curls can take a lot of product, but product load and shape are not the same thing. Too much cream in the front will flatten the face-framing pieces before they have a chance to do their job.
13. 3A Curl Shag With Bouncy Ends
Loose curls tend to show off layers in a way tighter curls sometimes hide. That’s why a 3A shag can look so fresh: the bounce is visible, the pieces separate cleanly, and the face frame can land right where you want it.
This version likes movement through the ends more than bulk at the roots. If the layering is done well, the curls at the chin and collarbone flip outward in a way that feels playful rather than overstyled. I like it when the front pieces are long enough to spiral, not chopped into little bits that vanish.
Styling Note
A mousse under a light gel works well here. Mousse gives the root lift, while the gel keeps the face-framing layers from puffing apart in dry air. The cut does half the work; the product just keeps the shape honest.
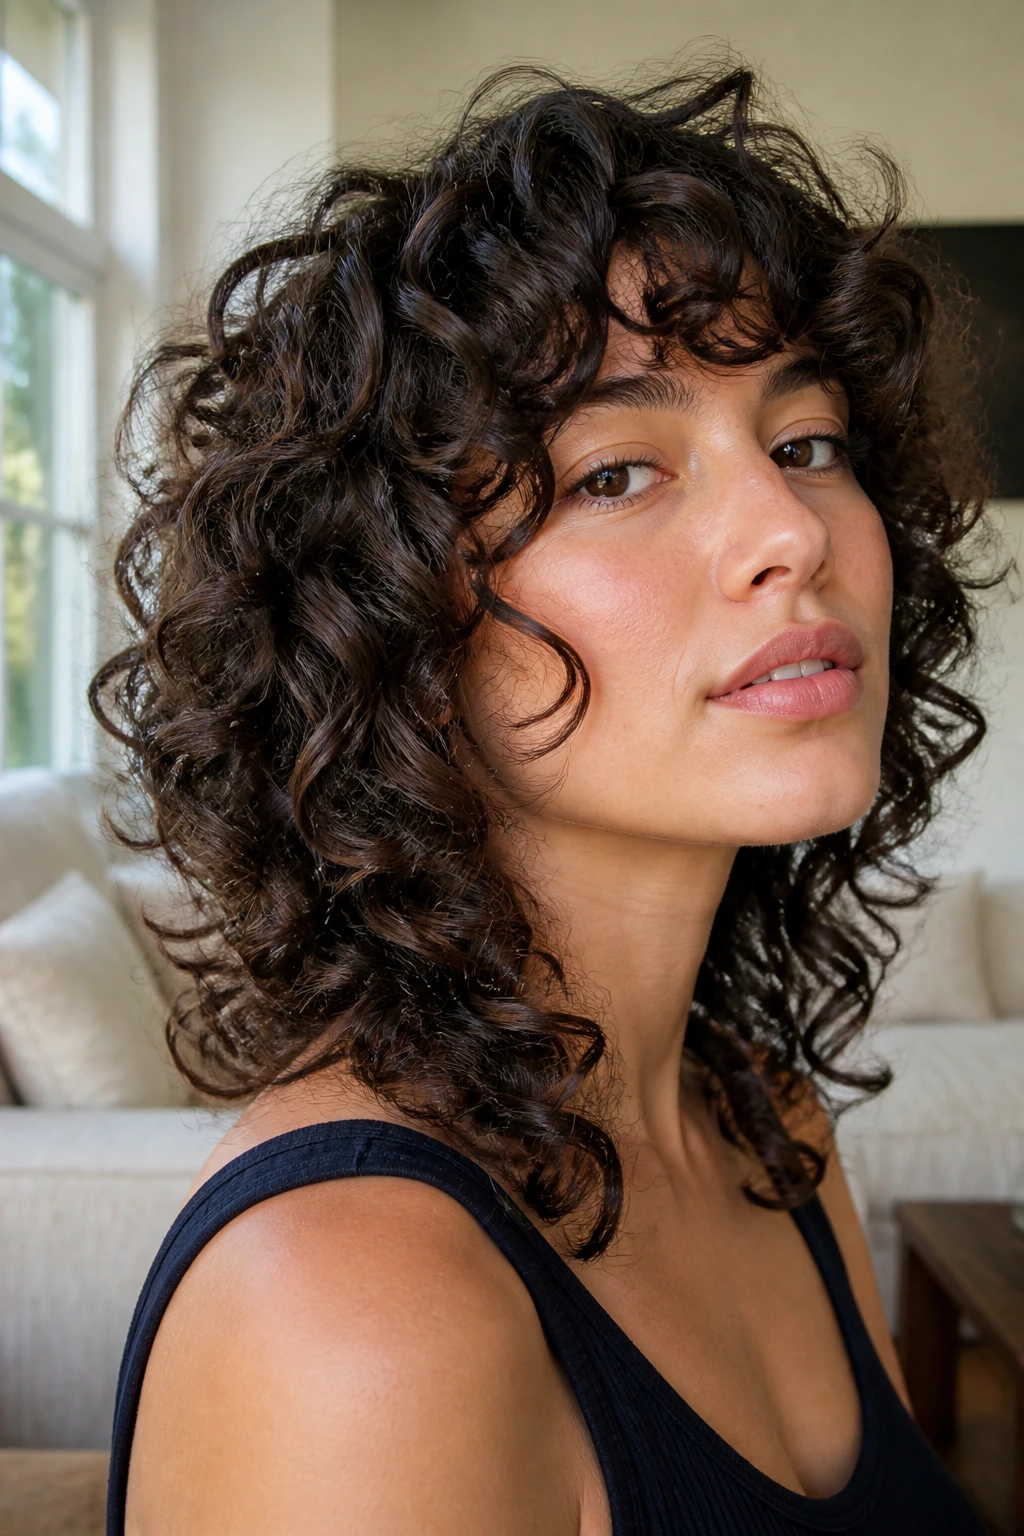
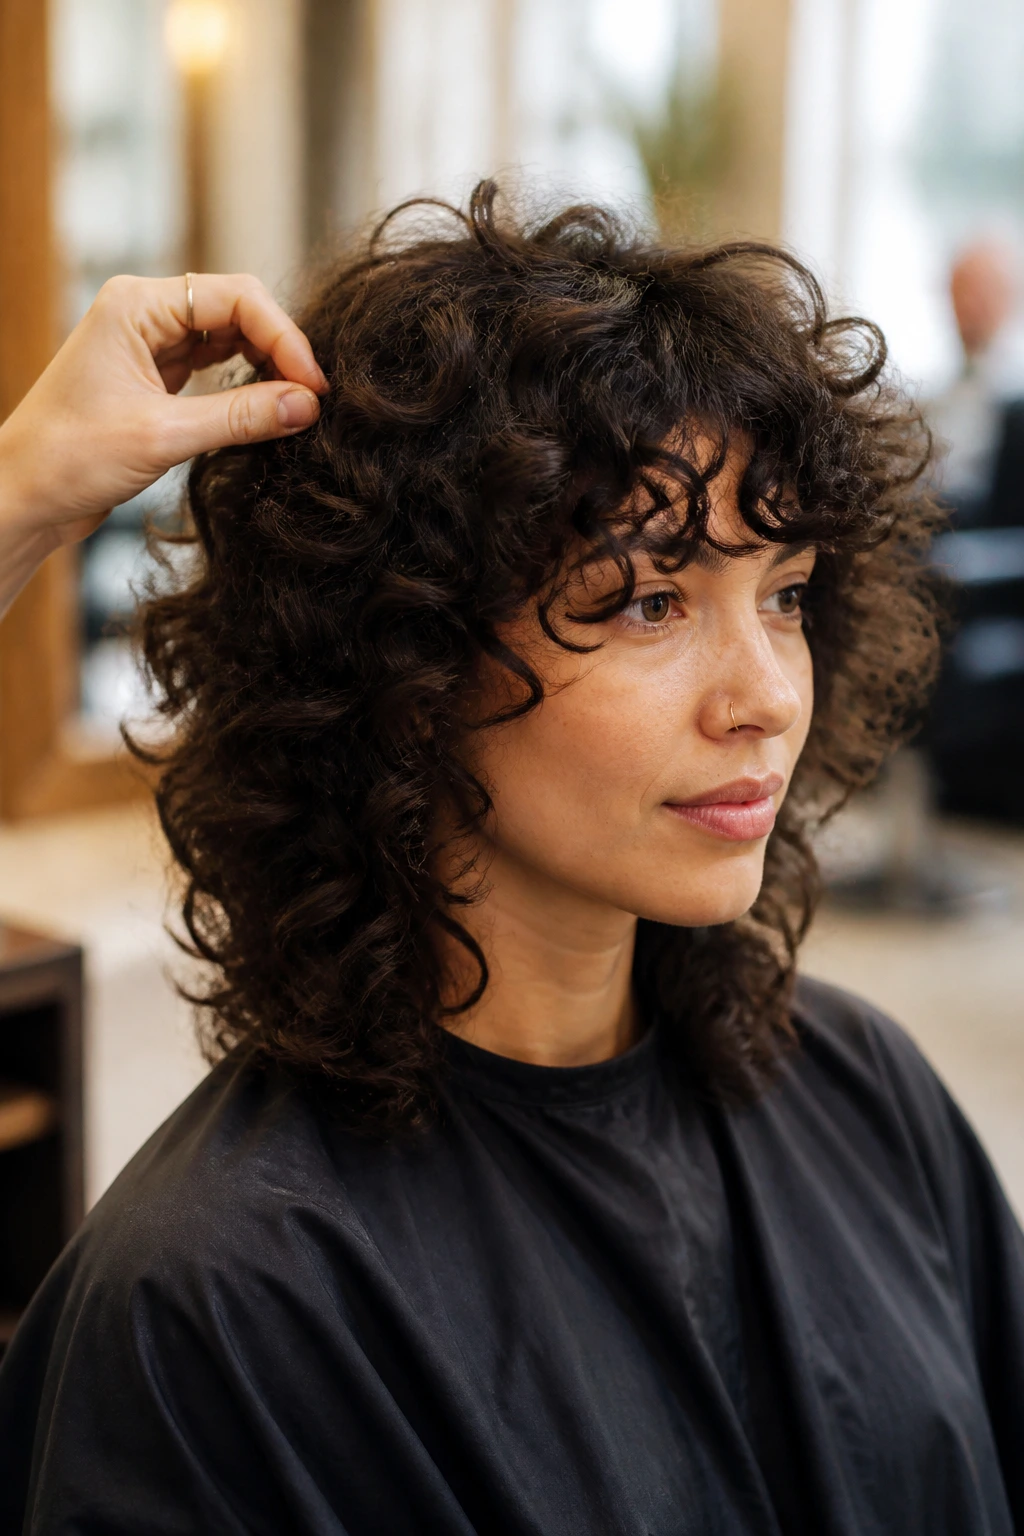
14. 3B Curl Shag With Defined Ringlet Shape
Ringlets love a layered cut when the layers respect the curl family. This version keeps the ringlets distinct, so the haircut looks structured without being stiff. The face frame sits in clean arcs around the cheeks and jawline, which makes the whole shape feel balanced.
The main thing here is not over-cutting the top. 3B curls can already spring a lot, and if the crown layers are too short, the shape can balloon upward while the front disappears. Keep the shortest face-framing pieces long enough to curl into themselves.
Pro Tip
Diffuse in sections. If you pile all the curls onto the diffuser at once, the ringlets can merge at the front and lose that clean separation that makes this version shine.
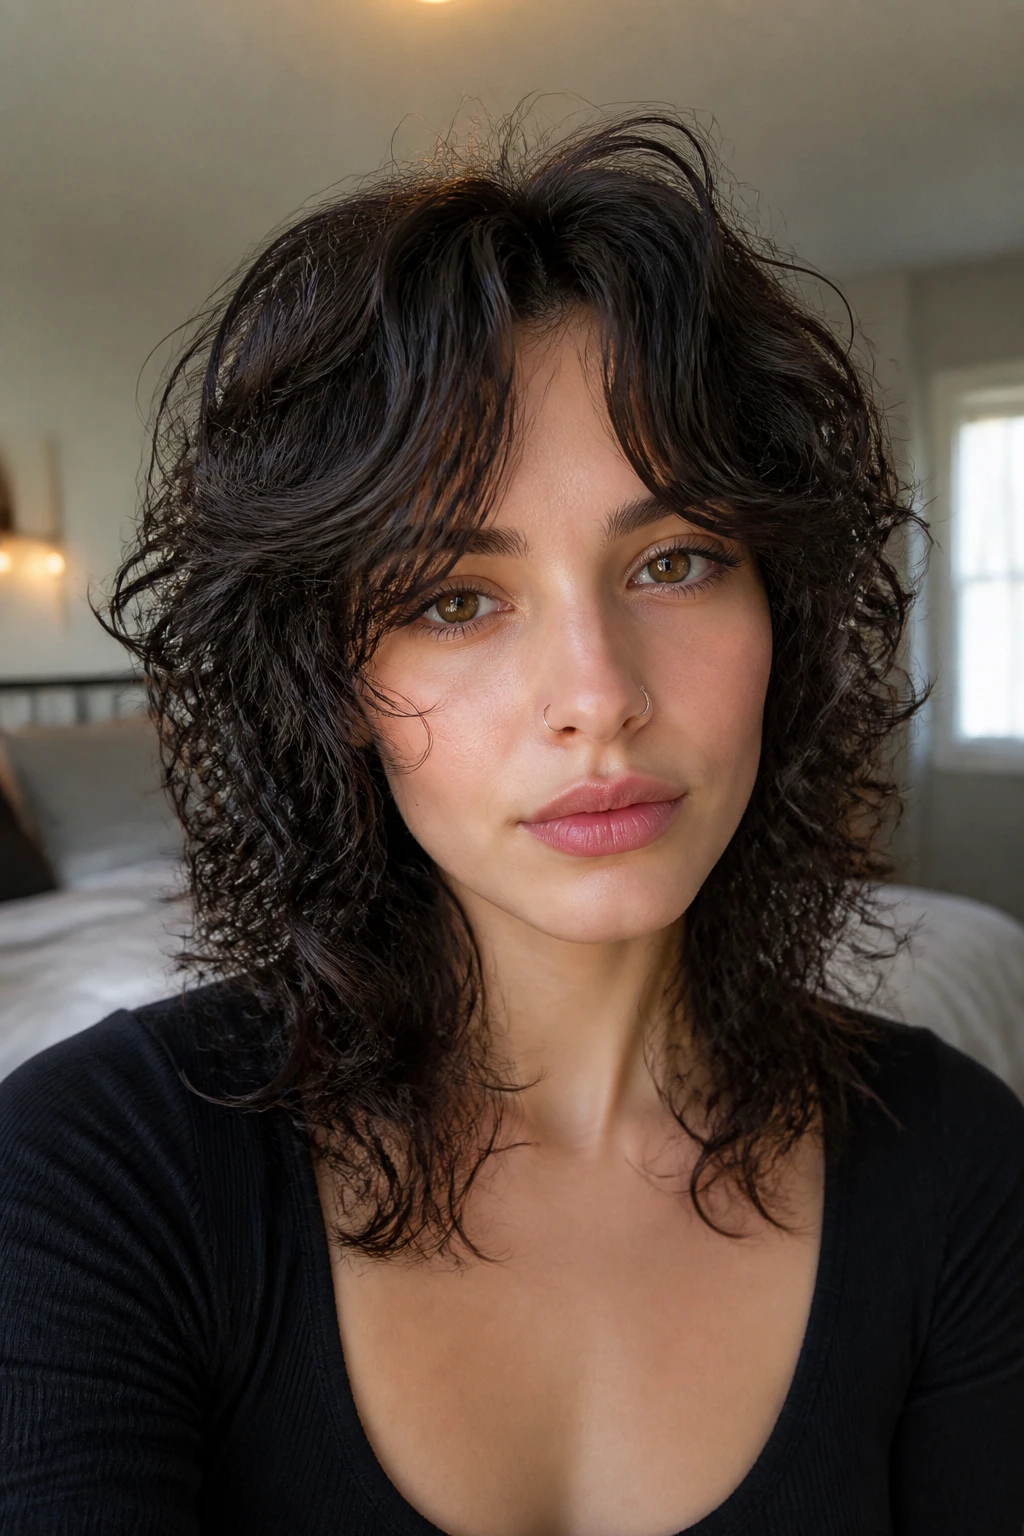
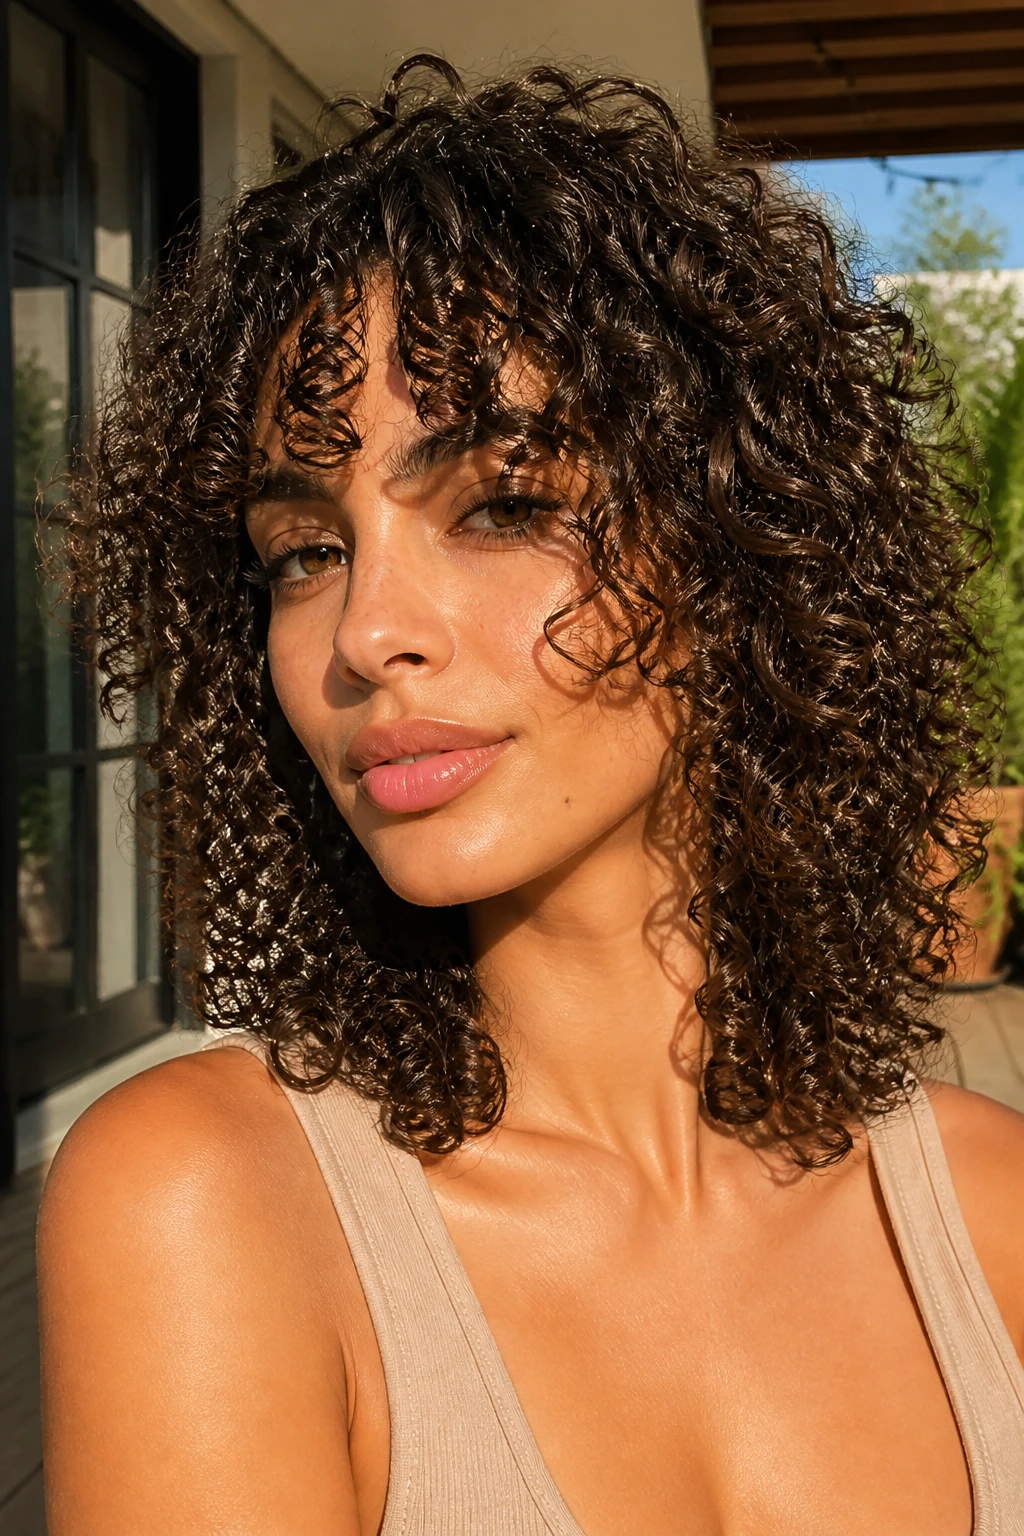
15. 3C Curl Shag With Shrinkage-Friendly Layers
Tighter curls need more respect for shrinkage than almost anything else on this list. A 3C shag can be gorgeous, but the cutting line has to stay longer than your instinct tells you. The face-framing pieces that look chin-length in the chair may sit around the cheekbone once they dry.
This version works best when the layers are built to hold shape without stripping away density. I like a strong perimeter with enough internal movement to keep the silhouette from going boxy. If the front is cut with care, the curls can fall along the face in little curves that feel intentional rather than accidental.
Styling Note
Use more water than you think during styling. 3C curls often clump better when they stay wet while product is applied, and the face-framing pieces stay smoother when they’re not disturbed too much during drying.
16. Air-Dry Curly Shag With Soft Separation
Not every curly shag needs a diffuser to look finished. Some cuts are built for air-drying, and this is one of them. The layers are soft enough to settle on their own, and the face-framing pieces have enough length to hang into place without being handled constantly.
This is the cut for people who want the hair to look like hair, not a carefully engineered studio shape. It still needs a clean layering map, though. Air-dry cuts fail when the front is chopped too high, because then the curl settles into a puff instead of a frame.
What To Watch
Keep your hands off it while it dries. Seriously. Air-drying curly shags look better when the front pieces are left alone after scrunching, because repeated touching breaks the curl clump and frizzes the face-framing sections first.
17. Glossy Curly Shag With Polished S-Curves
Some shag haircuts lean rough and airy. This one leans smooth. The curls still have movement, but the finish is more polished, with visible S-curves that sweep around the face instead of fraying out at the edges.
I like this version for people who want a shag that can sit next to a blazer without looking too undone. The front layers are usually a little longer, which helps the curls bend softly across the cheek and jaw. It’s less punk, more satin.
Styling Note
Use a cream that adds slip, then seal with a small amount of serum on the ends only. Too much oil at the roots will flatten the crown, and then the whole shape loses the lift that makes the shag feel fresh.
18. Round-Face Curly Shag With Wide Cheek Layers
Round faces usually look better when the layers build width slightly higher on the face instead of sitting right at the jaw. That’s what this cut does. The cheek layers create a gentle horizontal line near the middle of the face, which makes the overall silhouette feel more balanced.
The crown stays controlled, not flat, and the front pieces should start around the cheekbone rather than the chin. That placement matters. If the shortest layers stop too low, they can make the face look fuller than intended. If they start too high, the haircut can lose its softness.
Best Styling Move
Part the hair a touch off-center and encourage the front pieces to fall outward rather than inward. The goal is width at the cheekbones, not a curtain that hides them.
19. Long-Face Curly Shag With Width at the Sides
Long faces need a little breadth through the midsection, and a shag can give it without looking like you’re trying hard. The best versions widen the sides and keep the top from getting too tall. That way, the face reads a little shorter and the curls feel more settled.
Curtain bangs or a soft fringe help here, but the side layers matter just as much. They should sit around the cheek and jaw to interrupt the vertical line of the face. I prefer this version when the curl pattern is loose enough to fan sideways instead of just dropping straight down.
Styling Note
Avoid too much root lift at the top if your face is already long. A touch of crown volume is fine. A mountain on top is not.
20. Shoulder-Grazing Curly Shag With Micro-Layers
This is the transitional cut. If you are growing out a bob, or you want something that sits between short and long, shoulder-grazing length gives you room to play. The micro-layers add movement without making the whole shape vanish into frizz.
The face-framing pieces can be very subtle here, and that’s a good thing. Not every shag needs dramatic layers at the front. A few carefully placed pieces near the cheekbone can change the silhouette enough, especially when the curls are strong and the shoulder length gives them space to spring.
Why I Like It
It feels easy to live with. The cut moves, but it does not demand a complete styling ritual every time you wash it. For a lot of women, that balance matters more than an aggressively fashion-forward shape.
21. DevaCut-Inspired Curly Shag

A DevaCut-inspired shag takes the curl pattern seriously from the start. The hair is usually cut in its natural state, curl by curl, so the shape follows how the curls actually sit rather than how they stretch in a wet line. That makes it especially useful for face-framing layers, because the front can be tailored to the exact curl fall.
This is the version for people who wear their curls natural most of the time and want the haircut to work with them instead of against them. It tends to produce a very individualized shape, which is exactly why it can look so good. No two heads land the same way.
Styling Note
Bring inspiration photos of your curls, not someone else’s straight blowout. A stylist can only read the cut properly if they can see the curl pattern you live with every day.
22. Rezo-Inspired Curly Shag
Rezo-inspired cutting is useful when you want balance around the whole head instead of a heavier top or a stronger back. On curls, that balance can produce a very clean face frame, especially if you like a center part and a rounded silhouette.
This version is less about a dramatic mullet or wolf-cut edge and more about even distribution. The front layers blend into the sides, the crown keeps enough lift, and the shape tends to feel symmetrical without looking stiff. It’s a smart choice for women who want curly shag haircuts with face-framing layers that still feel neat from every angle.
Best For
If you hate the feeling of one side looking too heavy or one section drying oddly flat, this cut is worth a hard look. It’s the most composed option in the bunch, and sometimes that is exactly what curly hair needs.
Why Curly Shags Need a Different Cutting Mindset
Wet curls lie. They stretch, clump, and swing in ways that make a straight-line perimeter almost meaningless, which is why a curly shag has to be planned around shrinkage and density, not just length. A layer that looks gentle when it is damp can turn aggressive once it dries, and a face-framing piece that seems long in the chair can jump three inches higher than expected.
That is why dry cutting or curl-by-curl shaping matters so much here. The stylist can see where the curl actually lands and decide whether the shortest pieces should hit the cheekbone, the jaw, or the collarbone. On some heads, that difference is tiny. On others, it changes the entire haircut.
The other reason this cut family works is that curls already bring their own texture. You do not need to manufacture movement with razor-thin ends or overworked layers. In fact, that usually backfires. The best curly shags keep enough weight in the ends to look rich, then carve out enough around the face to keep the shape from going boxy or top-heavy.
What To Tell Your Stylist Before the First Snip
Bring photos, yes. But bring photos of hair that behaves like yours. A loose wave on thick hair is not the same as a ringlet on fine hair, and a shag that looks perfect on one curl pattern can fall apart on another.
Tell them where you want the shortest front pieces to land when dry. Say cheekbone, jawline, or collarbone. That gives the cut a real target instead of a vague “face frame” request that can mean almost anything.
Mention your styling habit. If you air-dry 90 percent of the time, the layers should be left softer and longer. If you diffuse and like height at the crown, the top can be shaped more assertively.
Be honest about maintenance. Fringe and very short face-framing layers need more trims. If you only want to visit the salon a few times a year, ask for longer pieces around the face and keep the perimeter less drastic.
Say the words “dry curl placement.” Stylists who cut curls well will understand what you mean. You want the haircut shaped around the curl’s dry position, not guessed from a stretched strand.
Styling Tools That Actually Help
-
Microfiber towel or cotton T-shirt: Takes out water without roughing up the curl clump, which matters most around the face.
-
Wide-tooth comb or fingers: Good for detangling in the shower before the curl pattern sets; don’t rake through dry curls with it.
-
Leave-in conditioner: Adds slip at the mids and ends, especially useful if the face-framing pieces frizz first.
-
Curl cream: Best for softer, more touchable shags that need a little control without a hard cast.
-
Gel or custard: Helps the front stay defined and keeps the layers from puffing apart in humidity.
-
Diffuser attachment: Optional, but useful if you want more crown lift or faster drying with less disruption.
-
Duckbill clips: Great for root lift at the crown or for setting front pieces away from the face while they dry.
-
Satin pillowcase or bonnet: Keeps the face-framing layers from getting smashed overnight, which saves time in the morning.
How to Style a Curly Shag on Wash Day
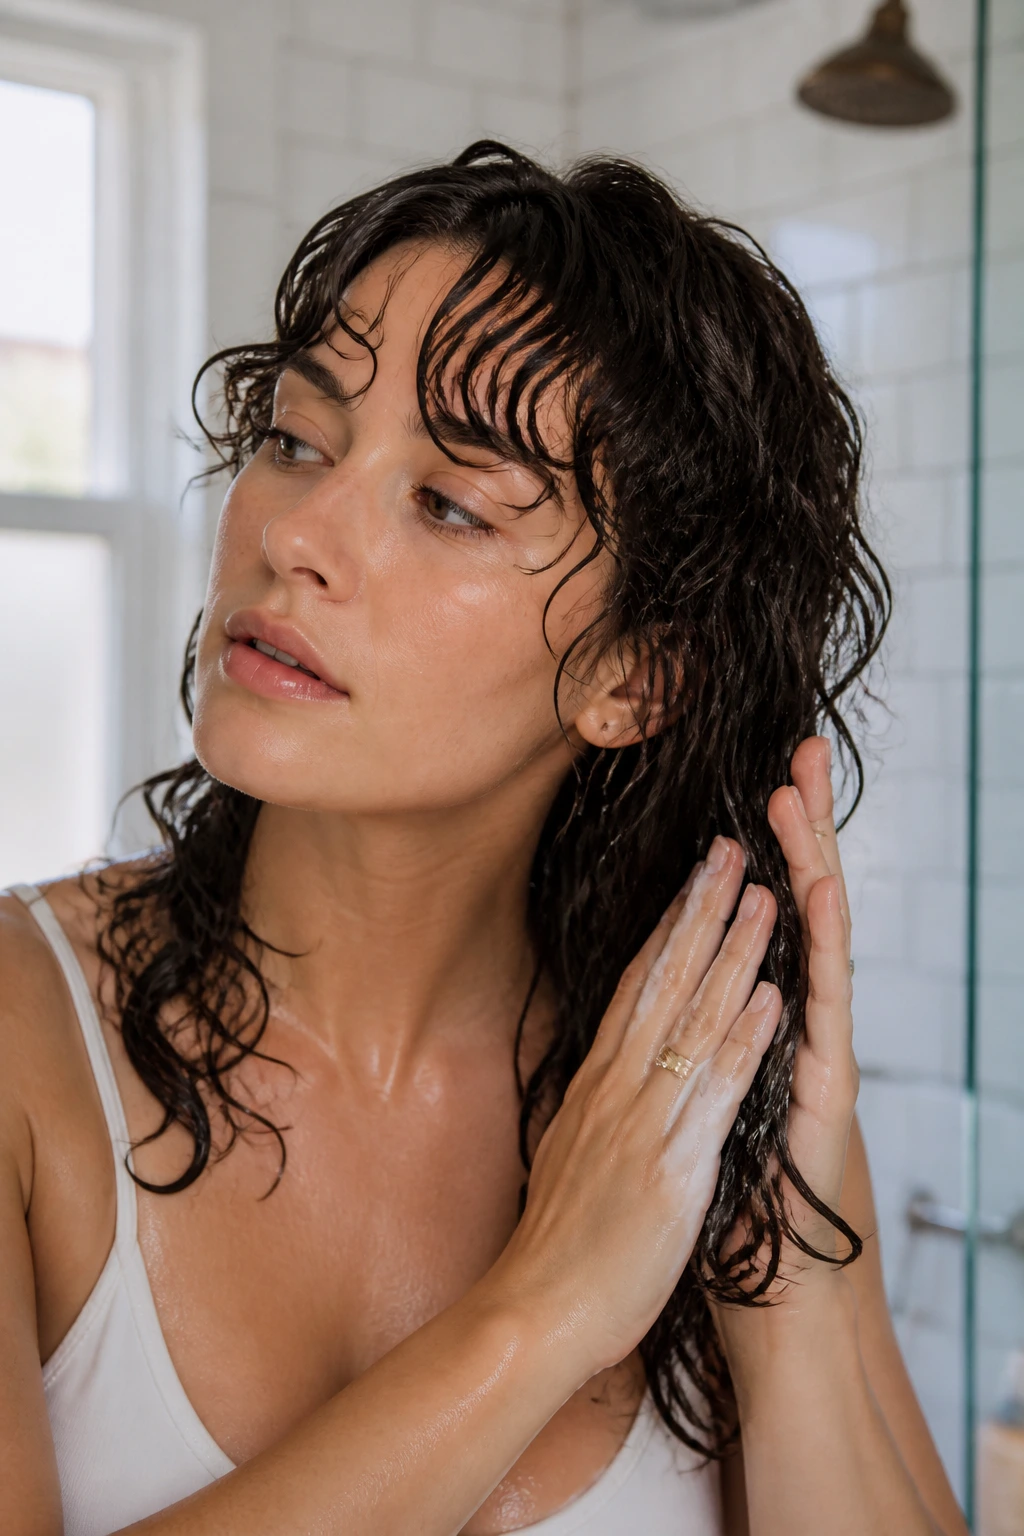
Start with soaking wet hair. Not damp. Wet enough that the product glides through without grabbing. That is usually the difference between smooth face-framing layers and ones that dry in rough little zigzags.
Apply product from the ends upward, then smooth the front pieces away from the face with your fingers. I like to separate the bang area or fringe zone first, because it tends to frizz before the rest of the haircut does. Once the front is coated, scrunch upward and let the curls begin to set.
If you diffuse, keep the heat low and the airflow gentle. High heat can puff the front before the curl has time to form. If you air-dry, resist the urge to keep fixing the part or touching the cheek pieces. They settle better when they are left alone.
When the hair is about 80 percent dry, you can break any cast with a tiny bit of oil on your hands. Tiny. Not enough to weigh the front down. The goal is soft separation, not slick roots.
Additional Tips and Shape Boosters
Root Lift: Clip the crown at the roots while the hair is drying if the top tends to collapse. Two or three clips are usually enough; more than that starts to create odd dents.
Shape Booster: If the side layers look too flat, flip the part to the opposite side for one wash day and let the front pieces fall differently. That alone can wake up a tired shag.
Frizz Control: Smooth a pea-sized amount of gel over the face-framing layers after scrunching. The front picks up frizz first, so a tiny bit of extra hold there helps.
Make-It-Yours: If you wear glasses, keep the shortest front pieces a touch longer so they don’t fight the frames. If you have a strong jaw, ask for pieces that start around the cheekbone and slide longer toward the chin.
Common Mistakes That Flatten the Shape
The biggest mistake is cutting curly layers too short in the front. The bounce will move them higher, and then the whole face frame sits above the point you wanted. The fix is simple: leave more length than you think you need, then adjust after the curls dry.
Another common problem is over-thinning dense hair. It can look lighter in the chair, but at home it often turns frizzy and uneven, especially at the ends. A better move is shape removal through careful layering, not aggressive thinning with tools that shred the curl.
Heavy cream at the roots is another one. It makes the crown collapse and leaves the face-framing layers stuck to the head. Put richer product through the mids and ends instead, then use a lighter mousse or foam near the scalp if you need lift.
And yes, over-handling during drying ruins a lot of good shags. If you keep pulling the front pieces forward, checking the part, or smoothing them every few minutes, the curl clump breaks apart. Touch it less. The hair usually wins when you stop trying to micromanage it.
Variations and Adaptations to Try
Soft Office Shag: Keep the layers longer, skip the shortest fringe pieces, and let the face frame start at the chin. It still has movement, but it reads cleaner and less edgy.
Wolf-Cut Edge: Shorten the crown slightly and keep the nape leaner. This version gives you more contrast and works best if you already like a little chaos in your hair.
Low-Maintenance Air-Dry Shape: Ask for softer layers and a longer front so the haircut can settle with minimal styling. This is the one that behaves best when you do not want to diffuse.
Fringe-Forward Version: Add curtain bangs or bottleneck bangs and keep the rest of the layers moderate. Good if you want your face frame to do the talking.
Glossy Curl Finish: Use fewer short layers and keep the perimeter fuller. It gives you the shag movement without the airy, piecey finish that some people find too undone.
Keeping the Shape Between Haircuts
Short face-framing layers need more upkeep than long ones. If you wear bangs or a very short fringe, plan on a trim every 4 to 6 weeks so they do not poke into your eyes or spring into odd little hooks. Longer face-framing pieces can usually go 8 to 12 weeks before they need a reshape.
For the overall cut, most curly shags stay neat with a shape refresh every 8 to 12 weeks. If your hair grows quickly or your curl pattern shrinks a lot, you may need to move that closer. A shag grows out better than a blunt bob, but it still loses its face shape if you leave it too long.
At home, sleep on satin or silk. That is the boring answer, and it is still the right one. It keeps the front pieces from getting flattened into a weird bend and protects the crown from friction. In the morning, mist the face frame lightly with water, add a thumbprint of leave-in if needed, and scrunch the curls back into place.
If product buildup starts to make the front droop, clarify every 2 to 4 weeks, depending on how much gel and cream you use. Clean roots hold lift better. Dirty roots do not. That part is annoyingly simple.
Curly Shag FAQ
Will a curly shag make my hair look shorter?
Usually, yes, at least a little. Curl shrinkage makes the layers rise, especially around the face, so the cut often looks shorter than the length you see when it is wet. That is why asking for the front pieces to land lower in the chair is safer than cutting them exactly where you want them to finish.
Are face-framing layers good for round faces?
They can be, if the shortest pieces start high enough to create shape and not low enough to widen the jaw. Cheekbone layers and a little crown lift usually work better than a blunt front that stops at the chin.
Should curly shag layers be cut dry or wet?
Dry is usually better for precision, because the stylist can see the curl pattern as it lives on your head. Wet cutting can still work for some people, but it is easier to misread shrinkage and end up too short around the face.
How often should I trim curly shag bangs?
Bang trims often need attention every 4 to 6 weeks, especially if the curls are springy. Longer curtain pieces can go a bit longer, but once they start sitting in your eyes or flipping weirdly, they are past their best shape.
What is the difference between a shag and a wolf cut on curly hair?
A shag usually feels softer and more blended, while a wolf cut leans toward a shorter crown, longer back, and sharper contrast. On curls, the difference can be subtle, but the wolf cut usually has more edge and a bit more attitude through the nape.
Can fine curly hair wear a shag without looking thin?
Yes, if the layers are kept long enough and the ends are not over-thinned. Fine curls need movement, but they also need density to stay full at the ends, especially around the face.
How do I keep the crown from going flat?
Use root clips while the hair dries, and choose lighter products near the scalp. Heavy cream at the roots is one of the fastest ways to squash the top of a shag.
What if my stylist over-thins the ends?
You can usually improve the shape with better product placement and less manipulation, but the real fix is a cleaner cut at the next appointment. Ask for stronger ends and softer internal layering, not more texturizing.
The Shape That Stays With You
The best curly shag haircut is not the one that looks the most dramatic in a photo. It is the one that still makes sense on day two, in humid air, with a little dry shampoo at the roots and a front section that falls where it should. Face-framing layers matter because they change the whole read of the cut, even when the rest of the style is quietly doing its job.
If you pick a version that matches your curl pattern, your density, and your actual routine, the haircut stops being something you fight. It starts acting like structure. And that is the part worth chasing: a shape that lets the curl lead, but never lets the haircut disappear.