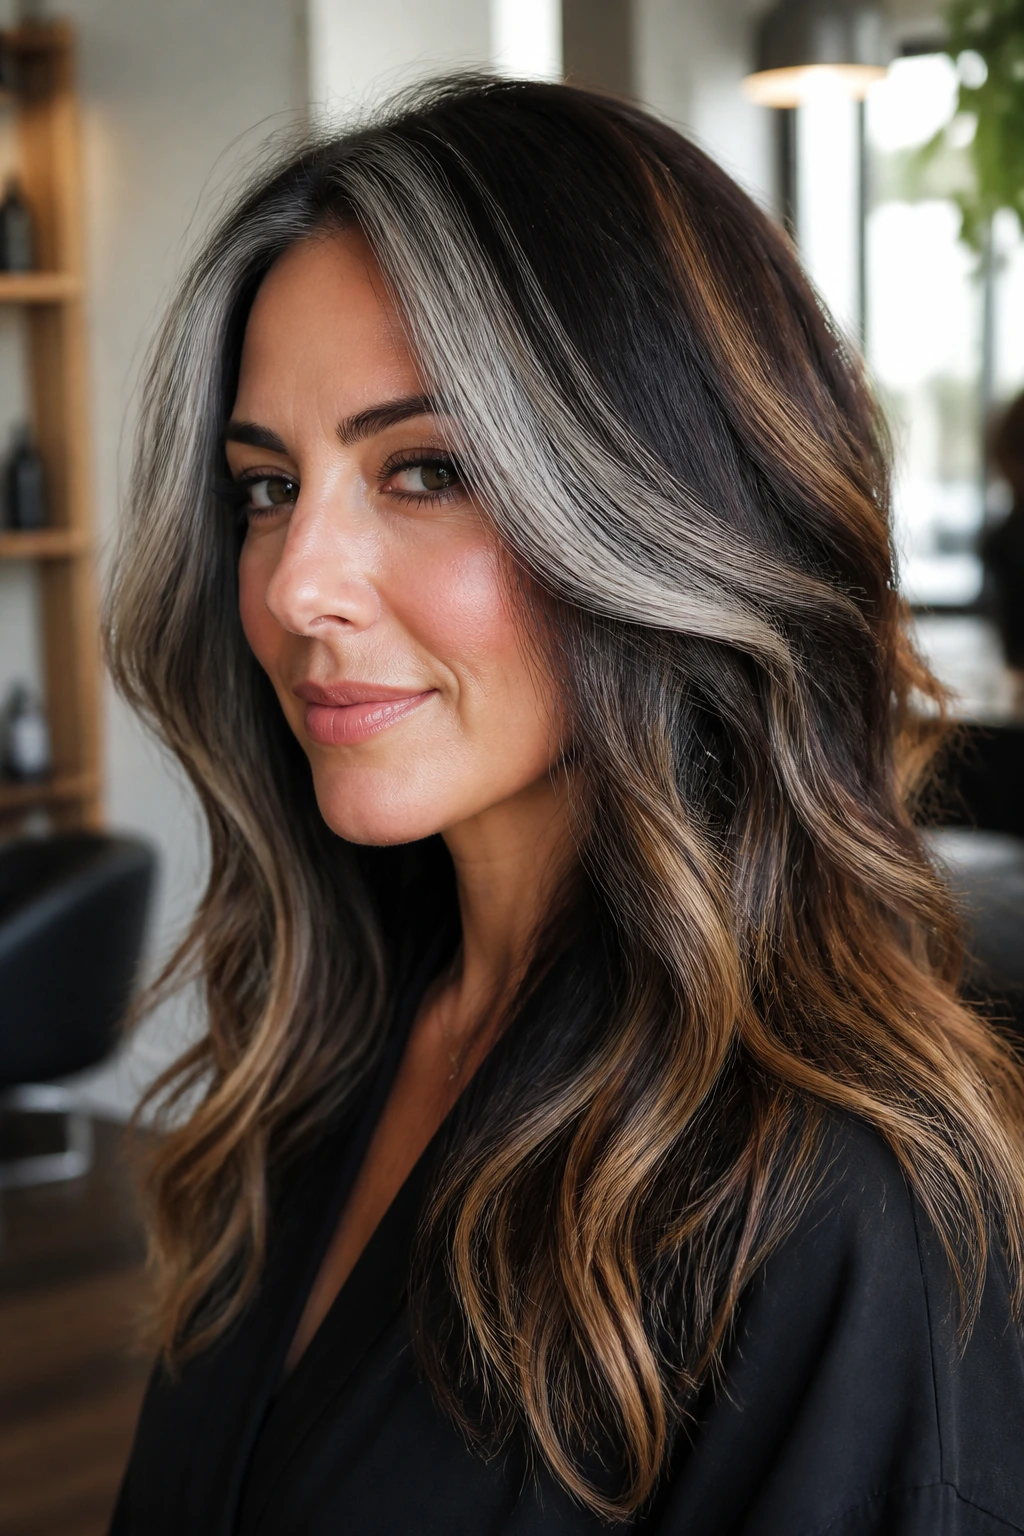
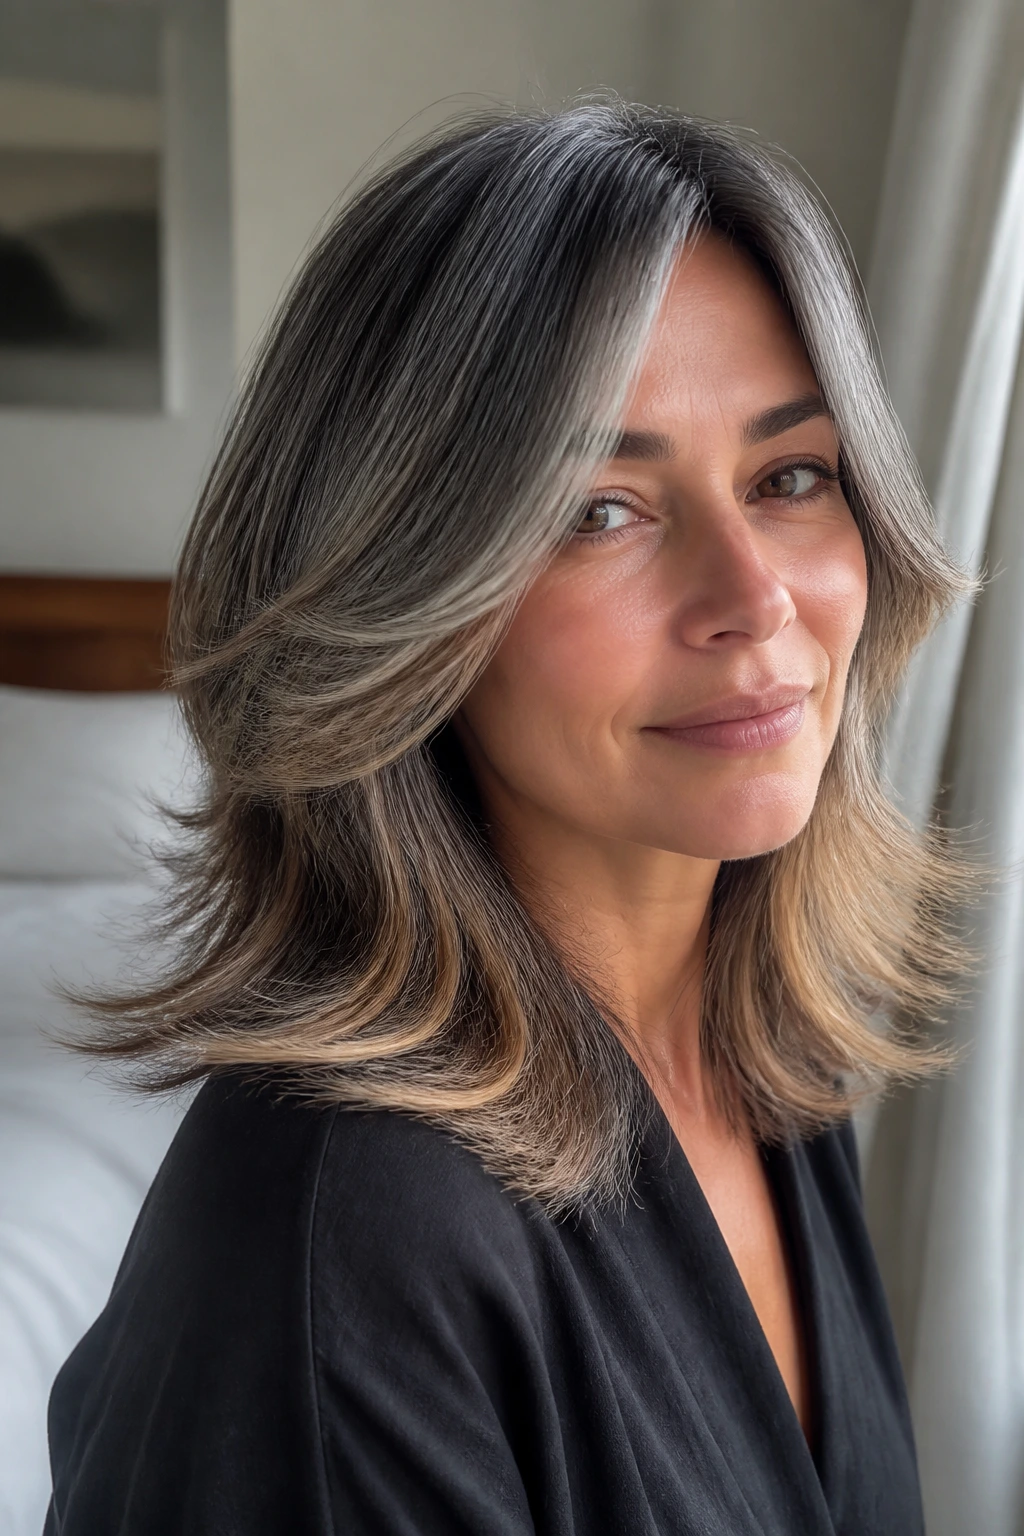
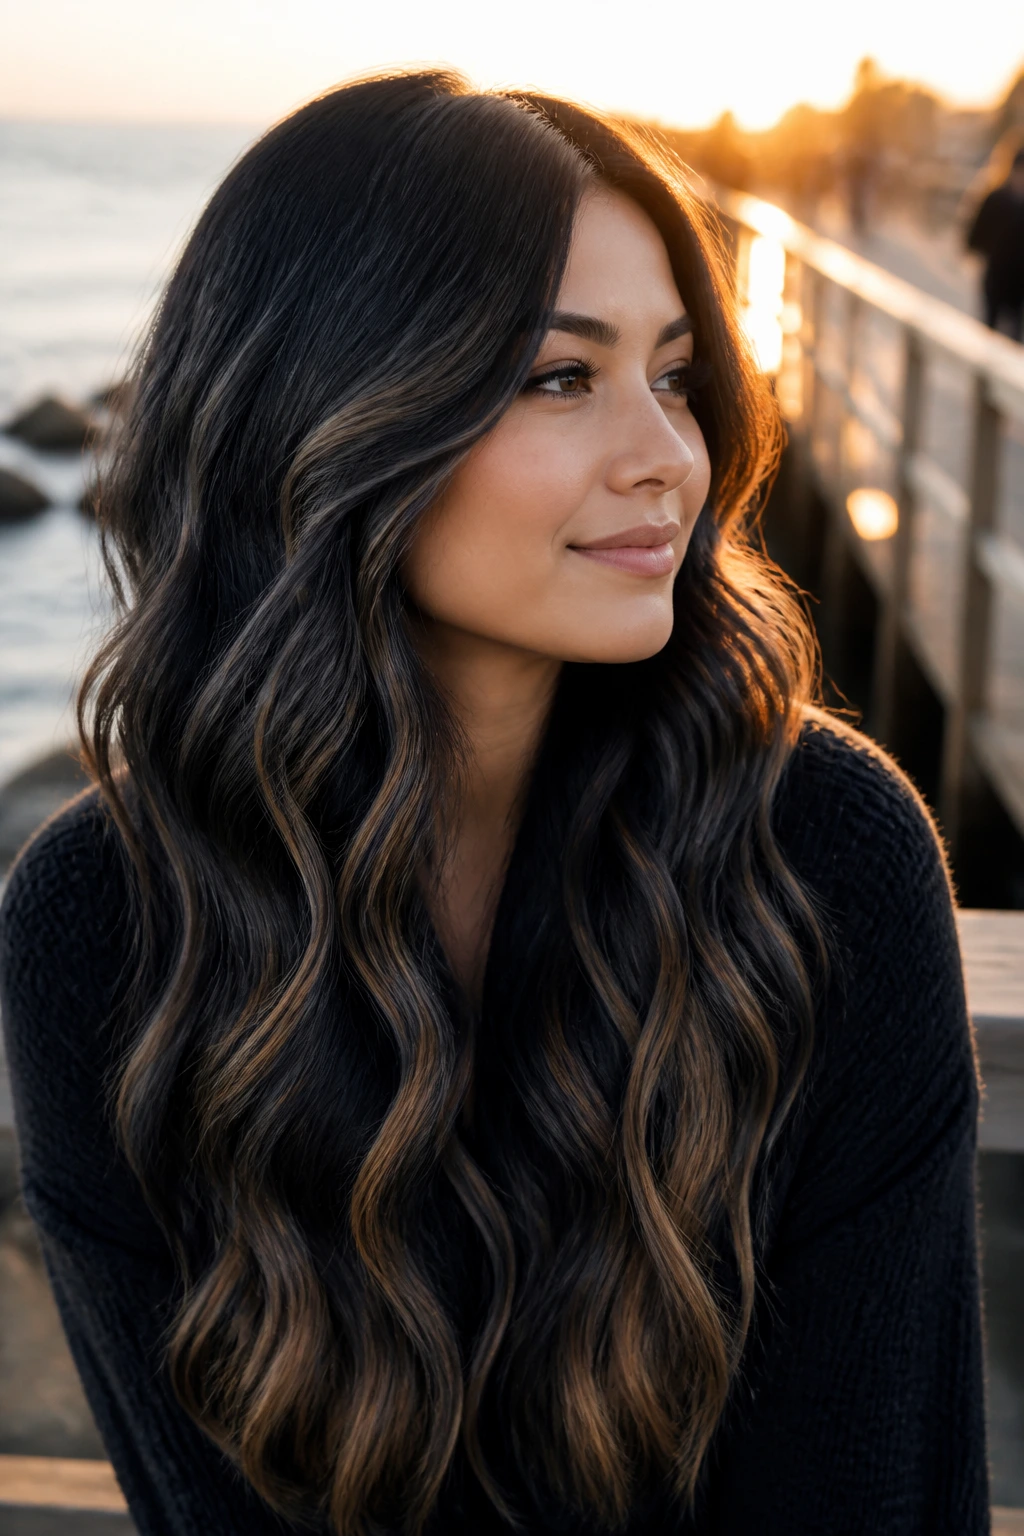
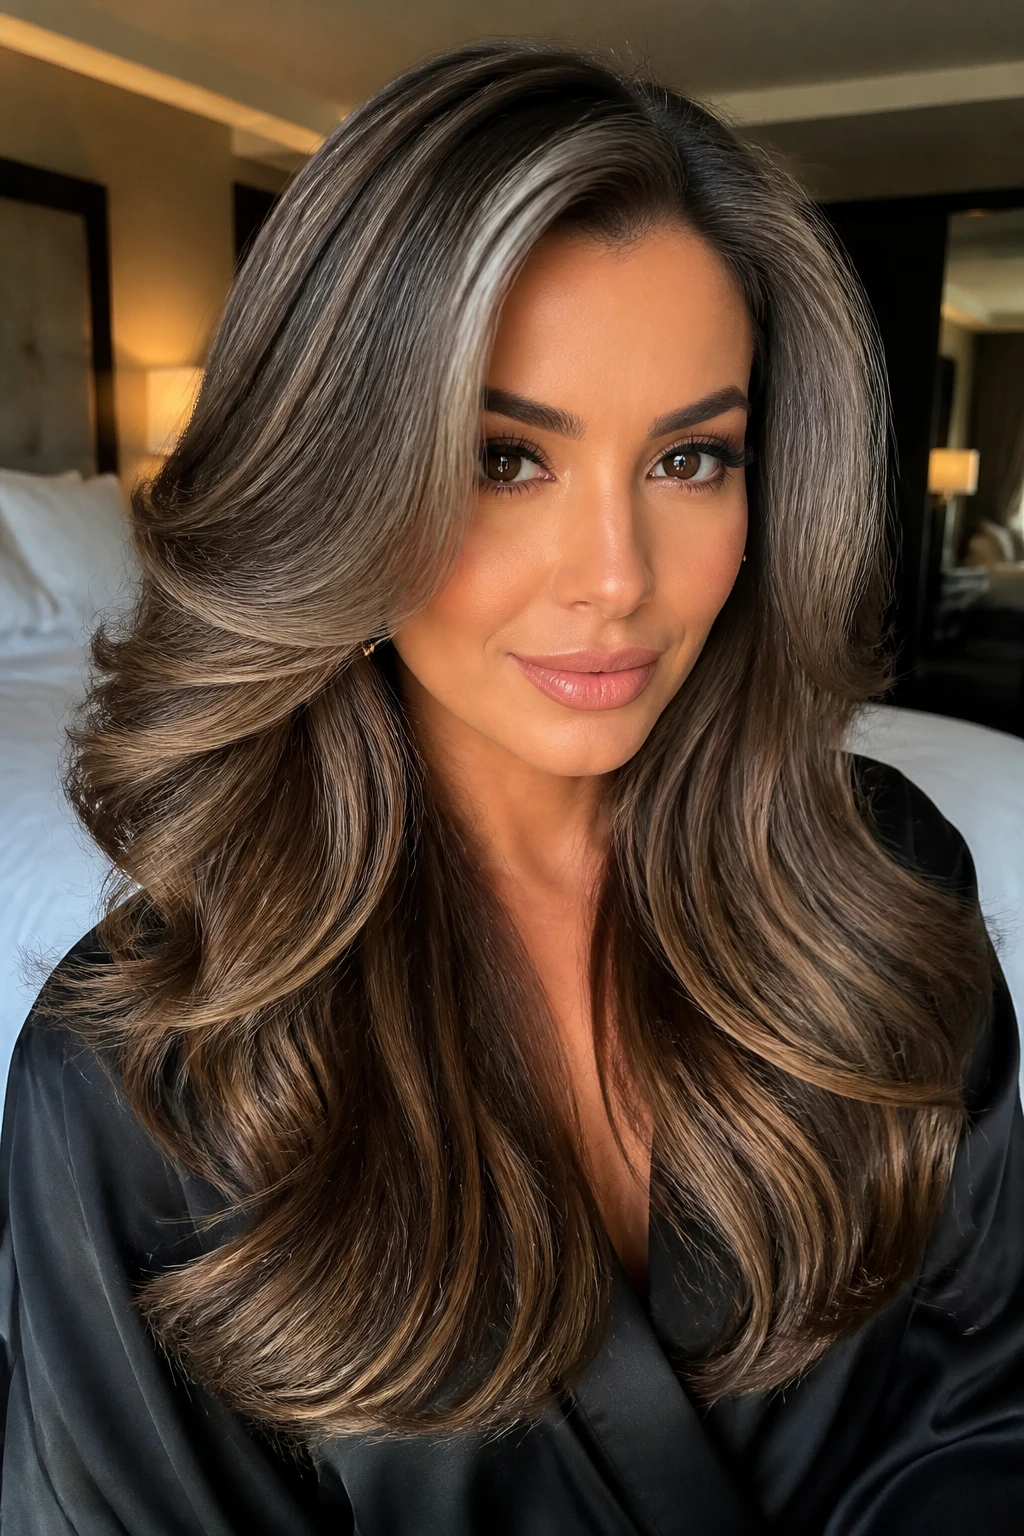
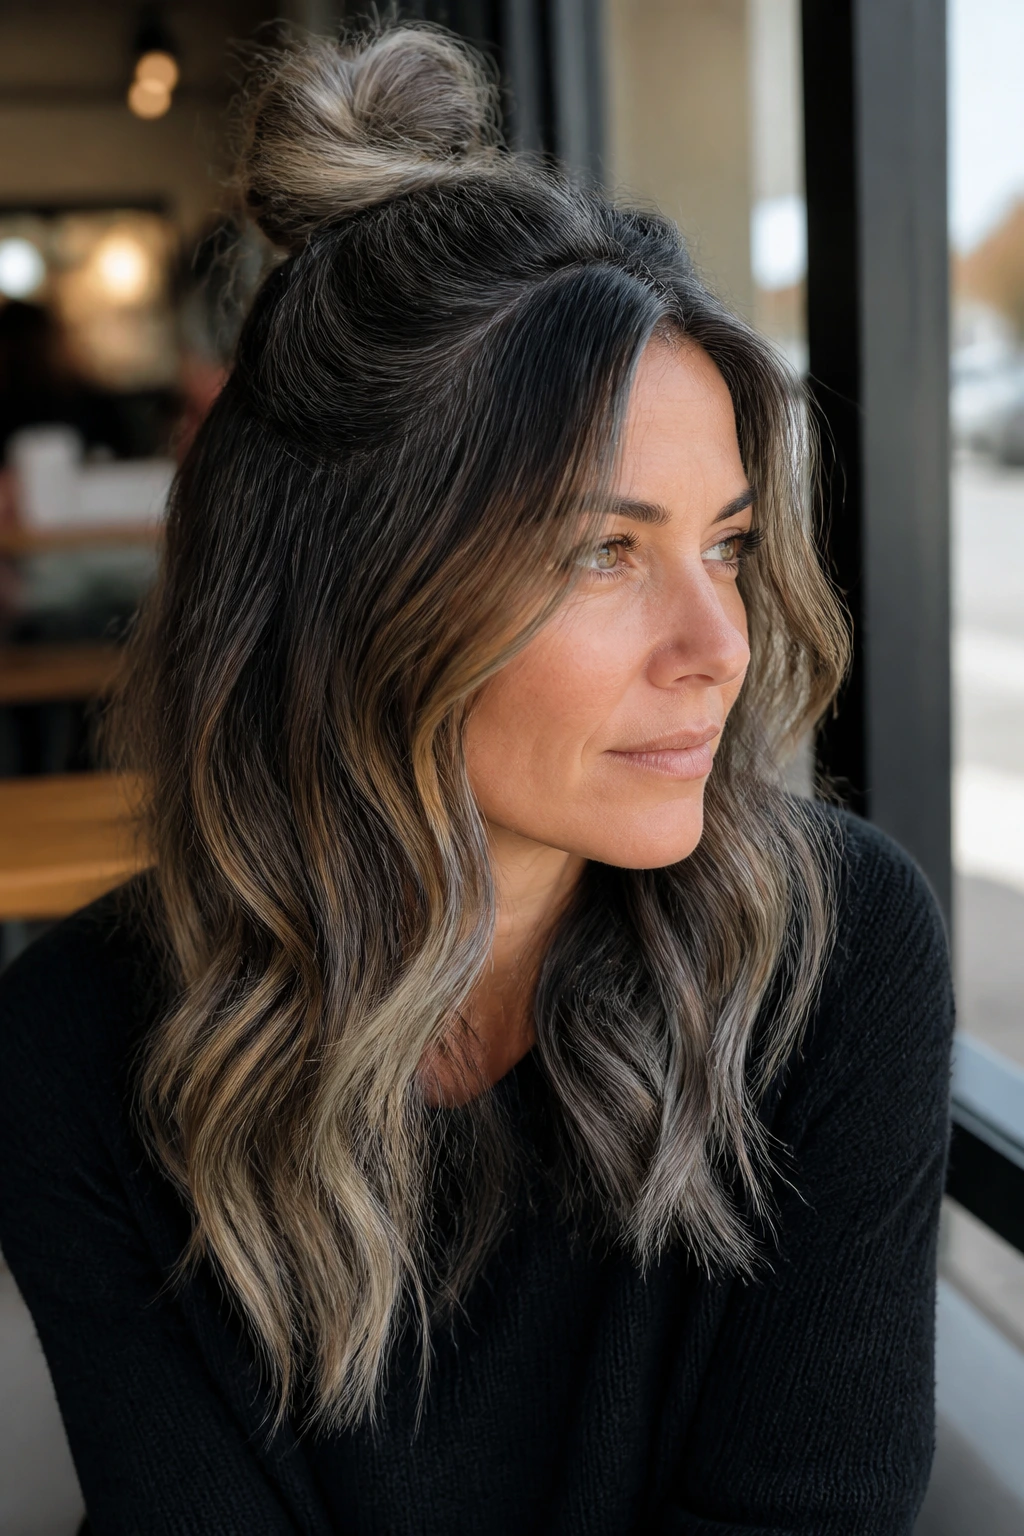
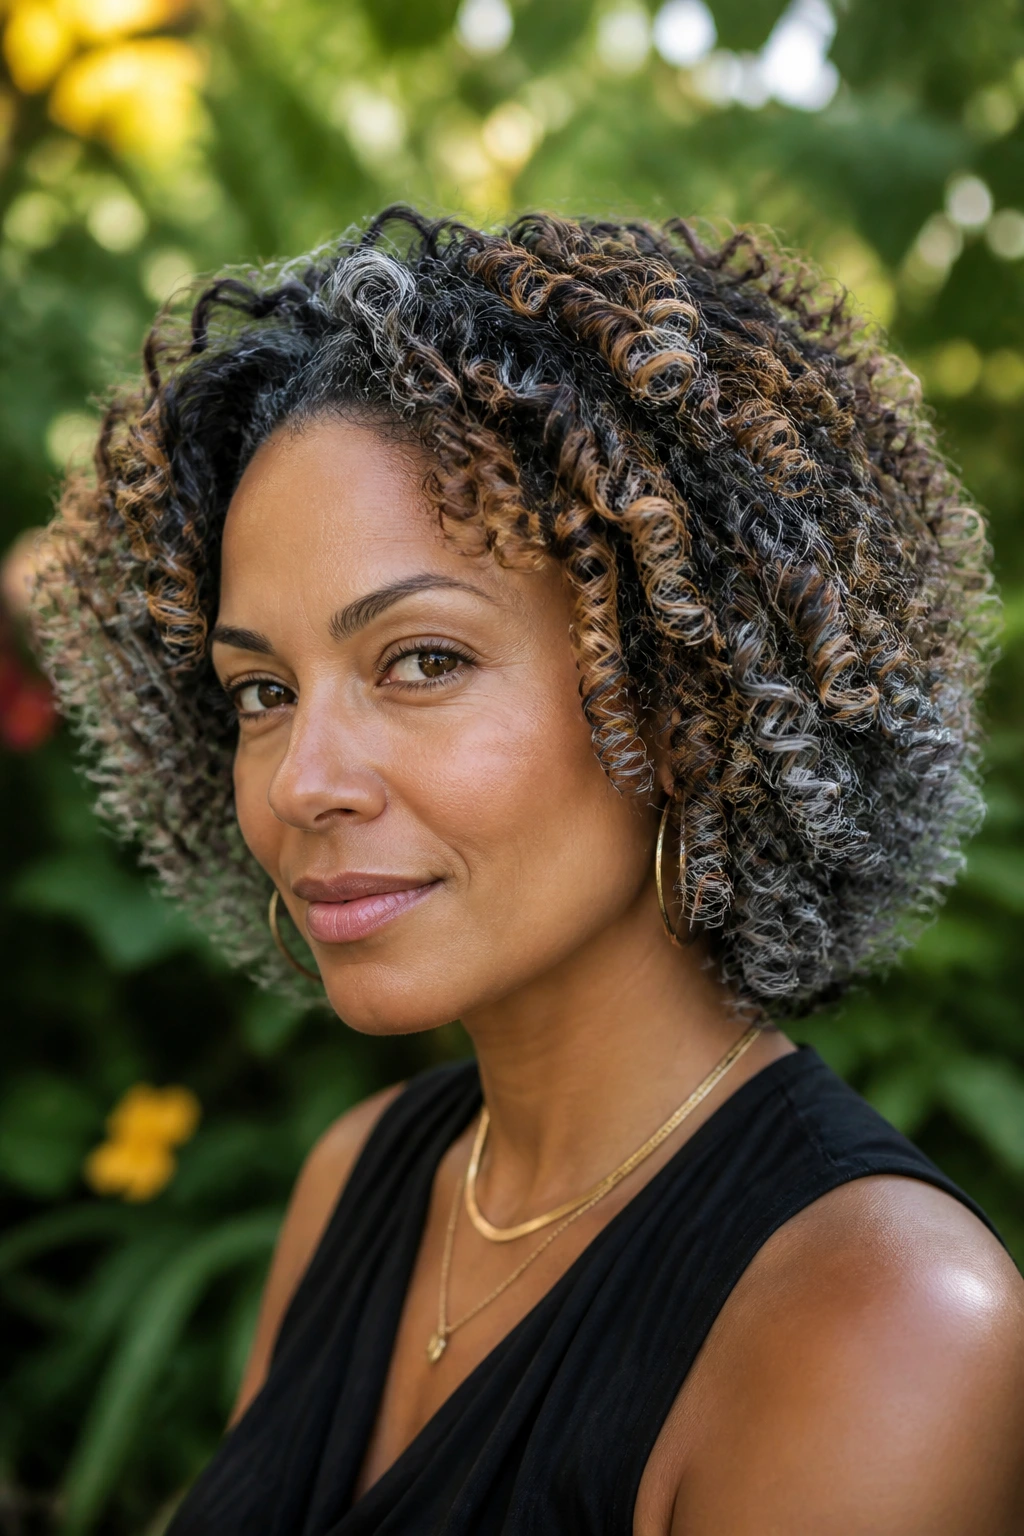
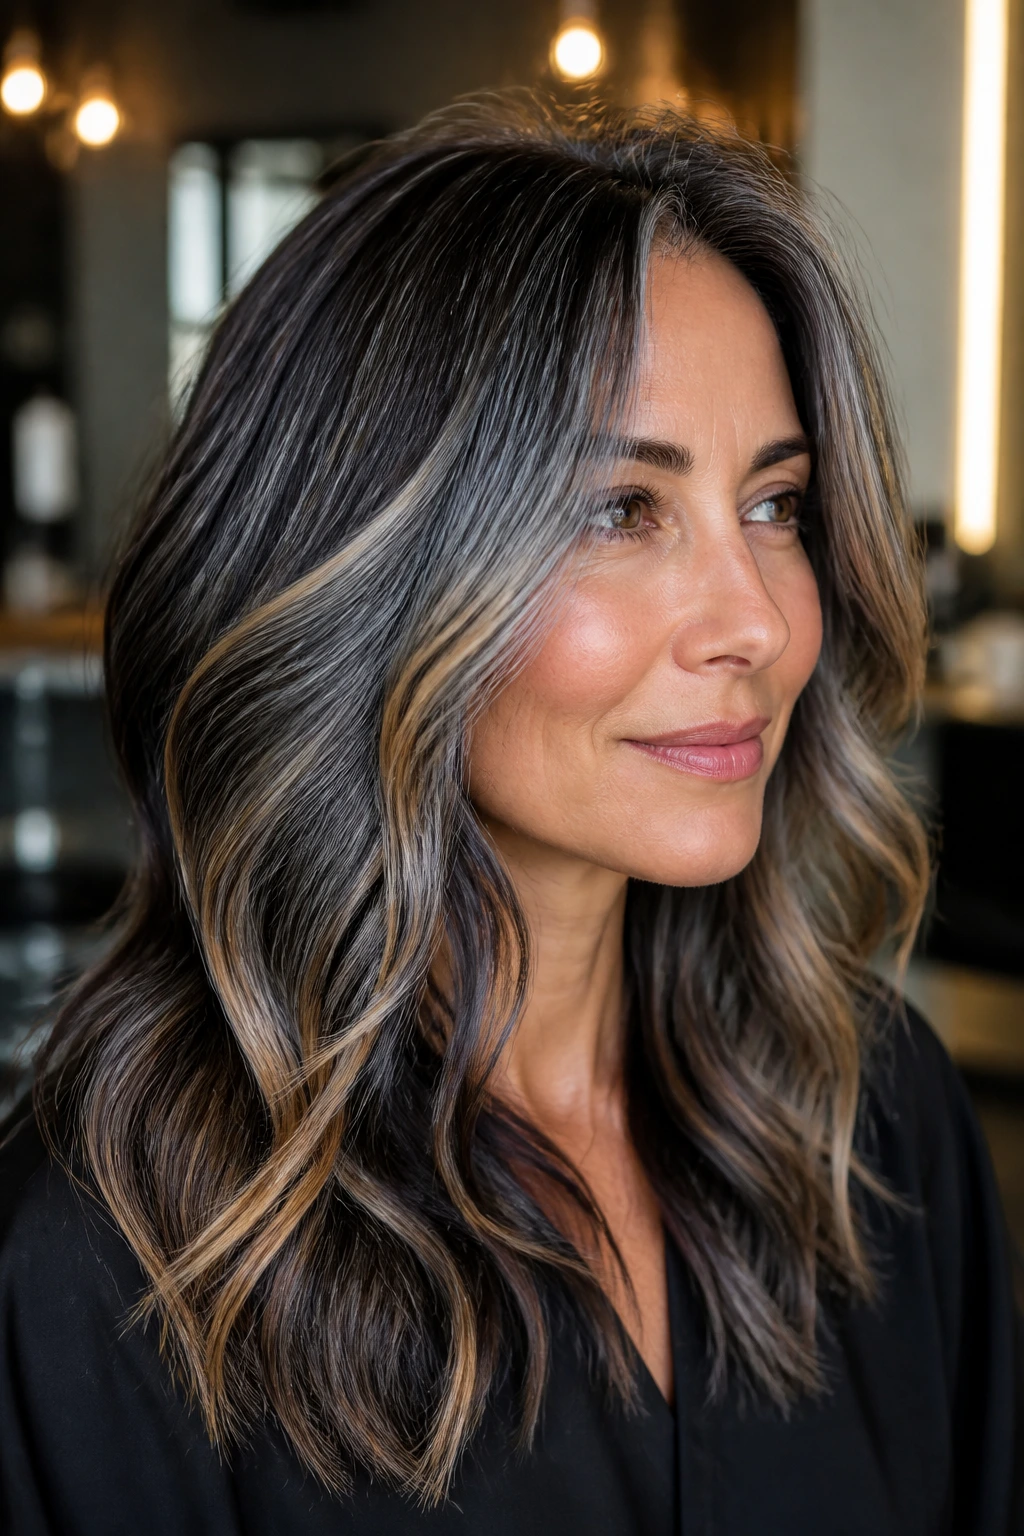
Grey hairstyles for dark hair with caramel highlights work because they give you two kinds of light at once. The grey brings smoke, steel, and a little edge; the caramel keeps the whole thing from going chalky or cold. On a deep brunette base, that contrast can look expensive in the plain, old-fashioned sense of the word: rich, layered, and intentional. Not flat. Never flat.
The mistake people make with dark hair is thinking grey has to take over the entire head to read. It doesn’t. A few carefully placed silver pieces, a warm caramel ribbon near the face, and a root shadow that stays in the same family as your base can do more work than a full-head blast of icy tone. When the placement is right, the cut does half the styling for you, and the color keeps catching the eye as the hair moves.
I’ve always liked this pairing most on cuts with swing and shape — lobs, layered waves, blunt bobs with attitude, even textured pixies. The grey gives the silhouette structure. The caramel keeps it human. That combination matters more than people think, because dark hair can swallow detail fast if every strand is the same tone. The good versions don’t shout. They shift when you turn your head.
Why Grey and Caramel Stop Dark Hair From Looking Flat
Contrast is doing the heavy lifting here. Dark bases need something to break up the depth, and grey gives you that break without turning the whole look gold. Caramel keeps the transition soft, which matters when the base is espresso, chestnut, or almost-black.
Grey on dark hair can go muddy if it sits alone. Caramel fixes that by warming the in-between spaces — around the cheekbones, through the ends, or under the top layer where the light hits at a bend. That’s why this combo looks better in motion than in a static swatch.
Placement beats saturation. A clean silver panel around the face, a caramel veil under the crown, and a few smoky ribbons through the back can make a haircut look more expensive than a heavy all-over tone ever will. The eye reads shape first, color second.
If your hair is very dark, the grey usually needs a lifted canvas to show up properly. If that canvas stops too orange, the grey can slip toward beige-brown instead of silver. That’s where the caramel earns its keep: it gives the lifted pieces somewhere to live between warm and cool.
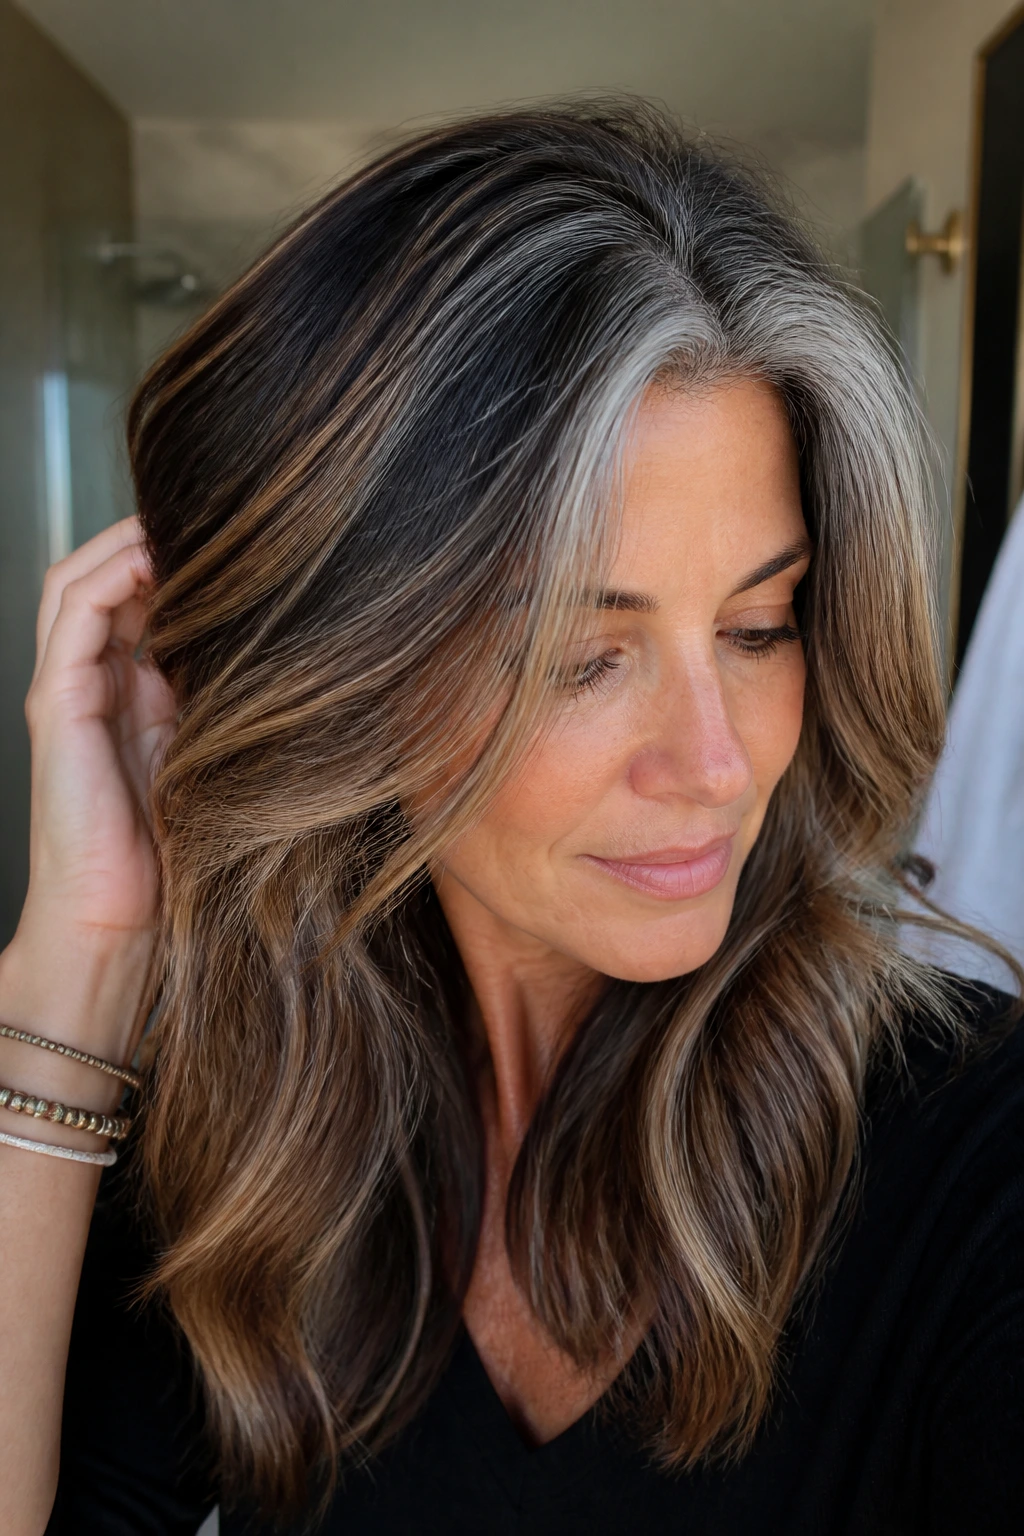
Grow-out is easier when the root stays dark. A soft shadow root keeps the color from looking like a hard stripe after six weeks. It also makes the caramel and grey look deliberate rather than bolted on.
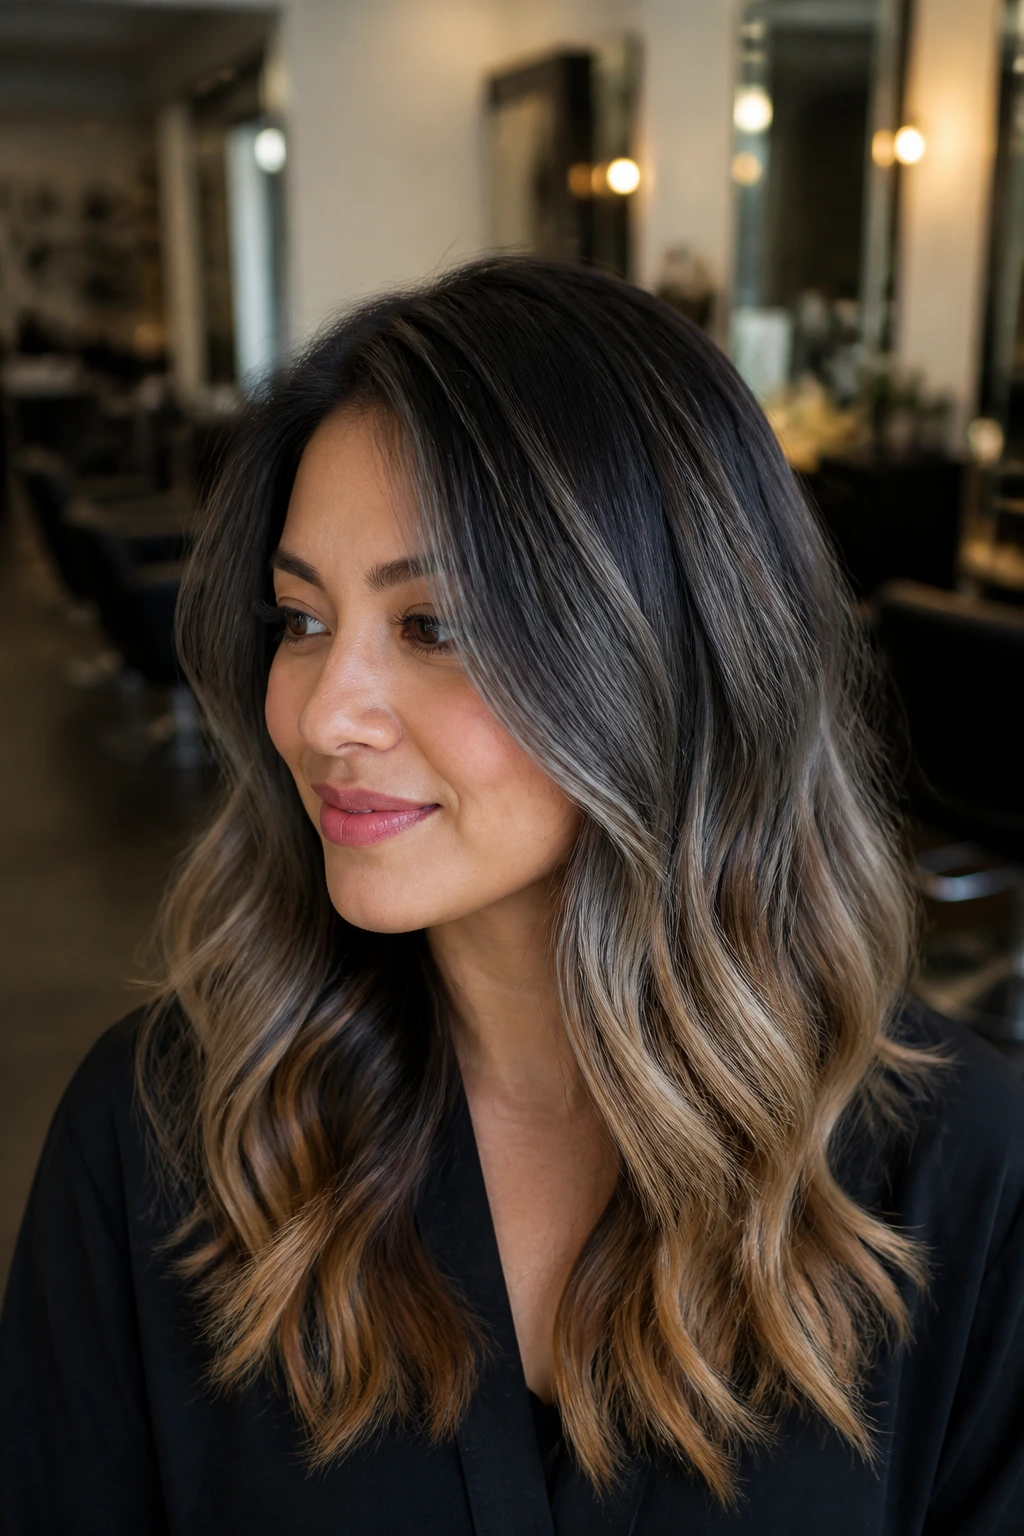
1. Smoky Silver Lob with Caramel Face-Framing Ribbons
A collarbone lob gives grey somewhere tidy to land, and the face-framing caramel pieces keep the shape from feeling severe. I like this cut when the hair is straight to softly waved, because the blunt edge under the chin makes the color placement look even sharper. The grey sits through the mid-lengths and ends; the caramel stays close to the face, where it can soften the contrast with dark eyes and brows.
This is one of the easiest grey hairstyles for dark hair with caramel highlights to wear if you want polish without a lot of styling time. A 1.25-inch curling iron or a quick bend with a flat iron is enough. The ribbons do the rest.
Best for: fine to medium hair that needs more movement at the perimeter.
Ask for: a soft root shadow, grey-balancing toner, and two brighter caramel ribbons at the front edge.
Skip the chunky streaks if your hair is thin; they can look striped instead of dimensional.
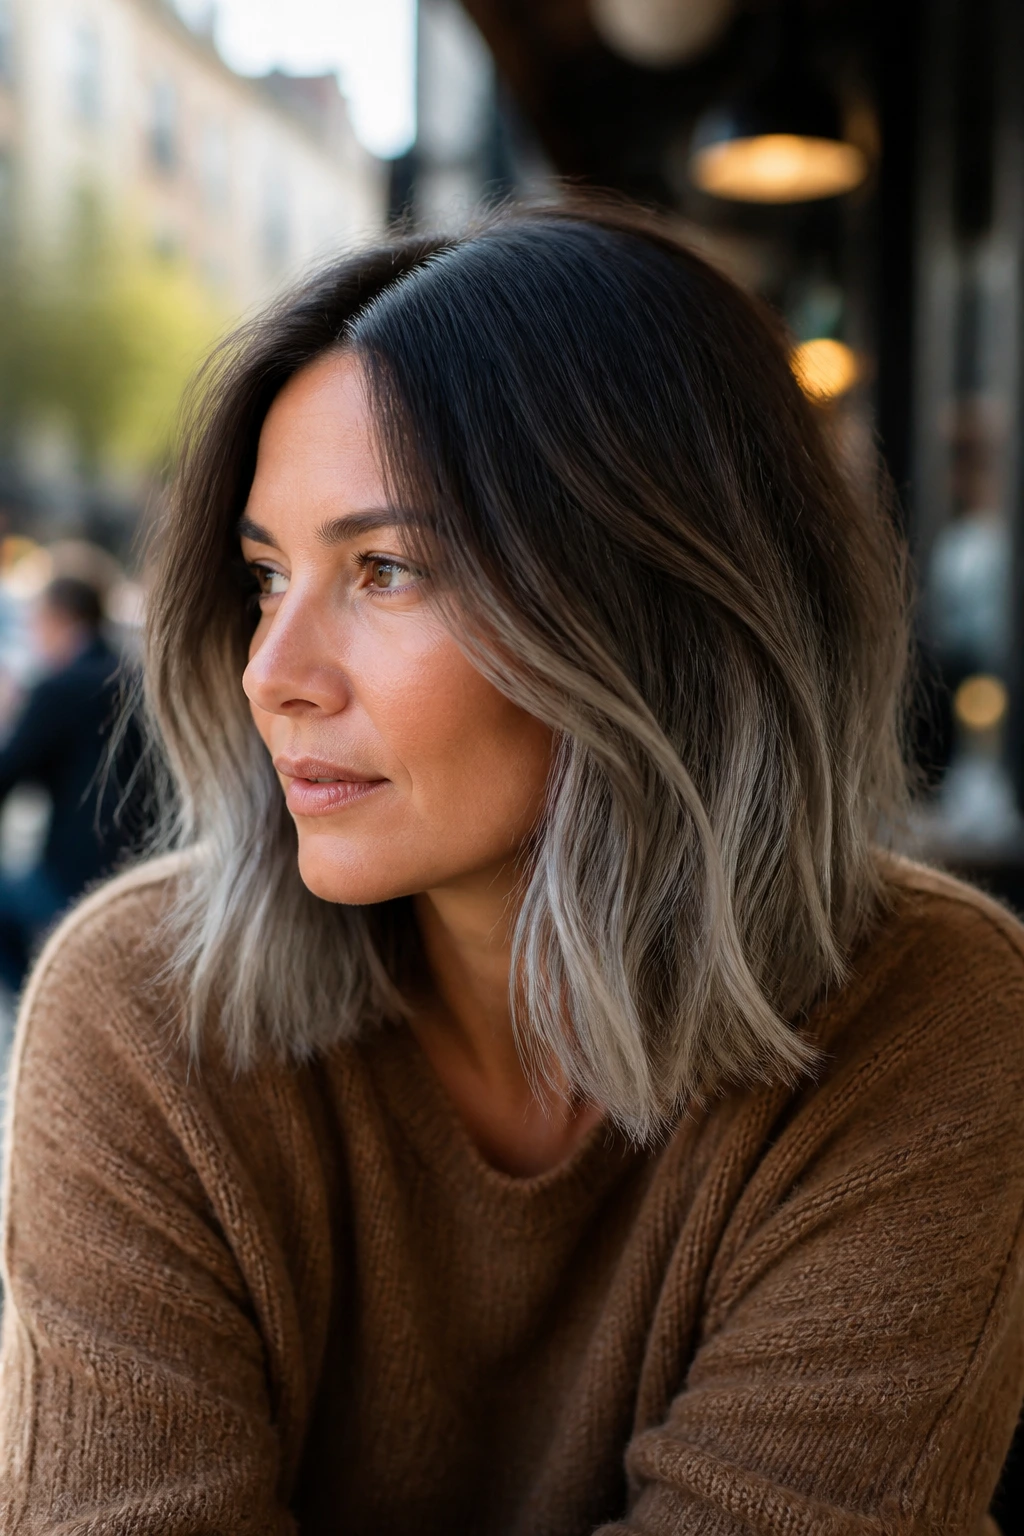
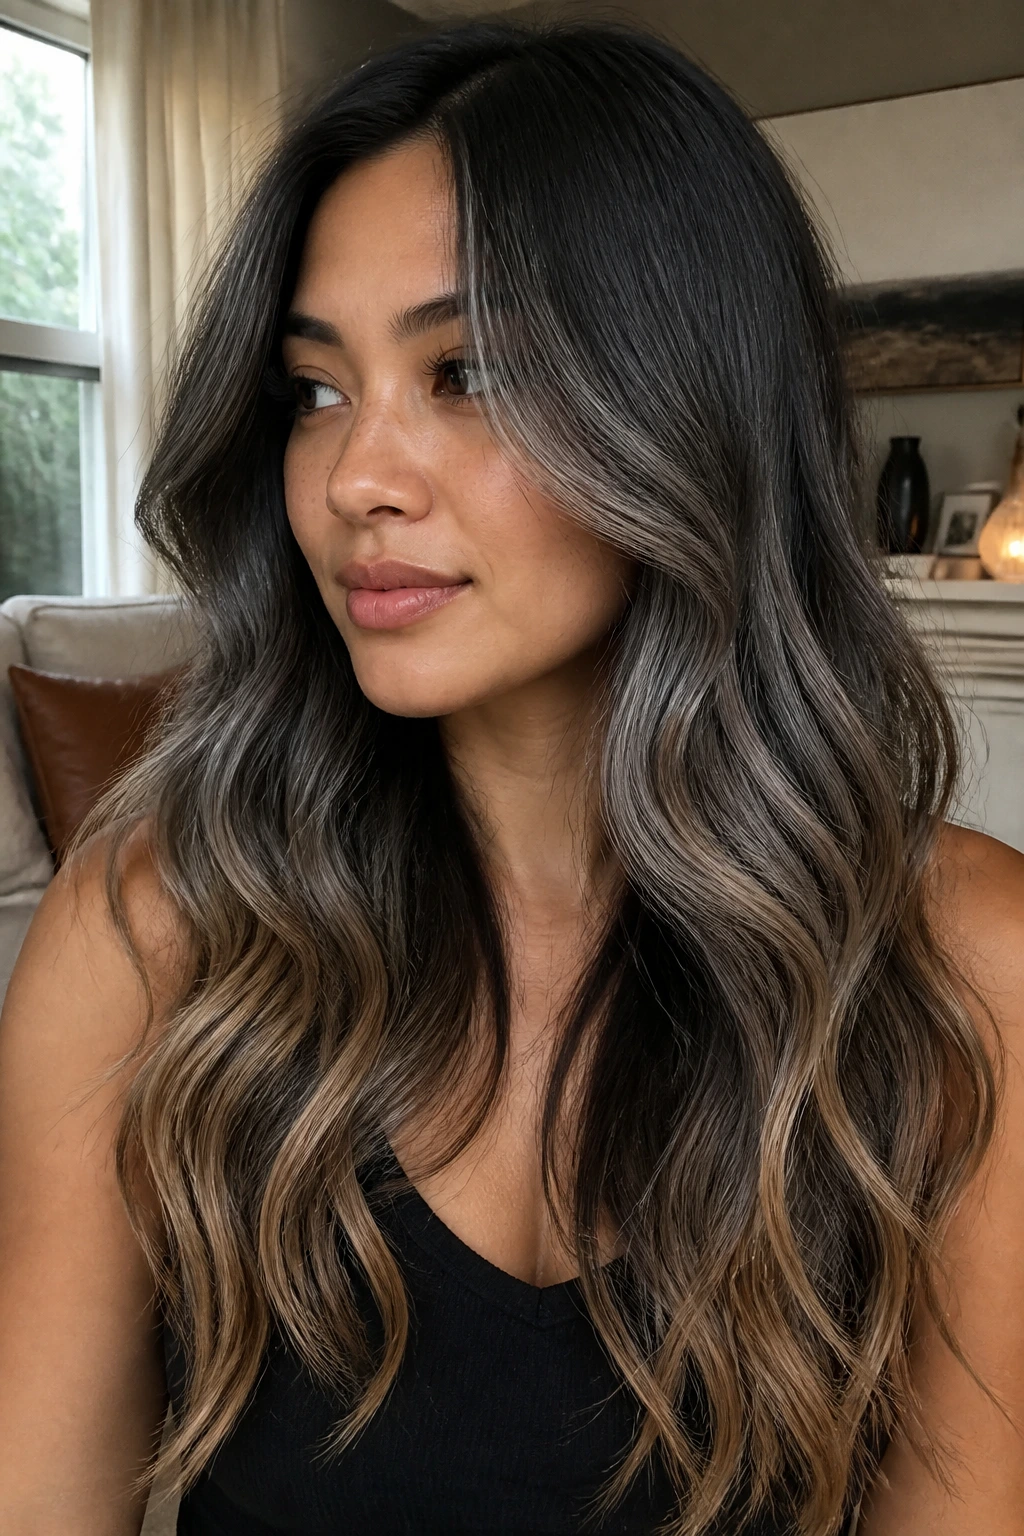
2. Long Layered Waves with Ash Grey Balayage
Long layers are the safest place to put ash grey, because the movement keeps the tone from reading as a single sheet. The caramel can live in the lower half of the hair — not everywhere, just enough to catch the bend of each wave. On dark hair, that mix reads richer than a full silver transformation, and honestly, less fussy too.
What I like here is the way the waves separate the colors. You get one ribbon of grey, then a softer brown-gold piece, then the dark base underneath. It behaves almost like fabric. If the layers are too heavy, though, the highlights sink and you lose the whole point, so the cut matters as much as the color.
3. Curly Shag with Caramel Peekaboo Panels
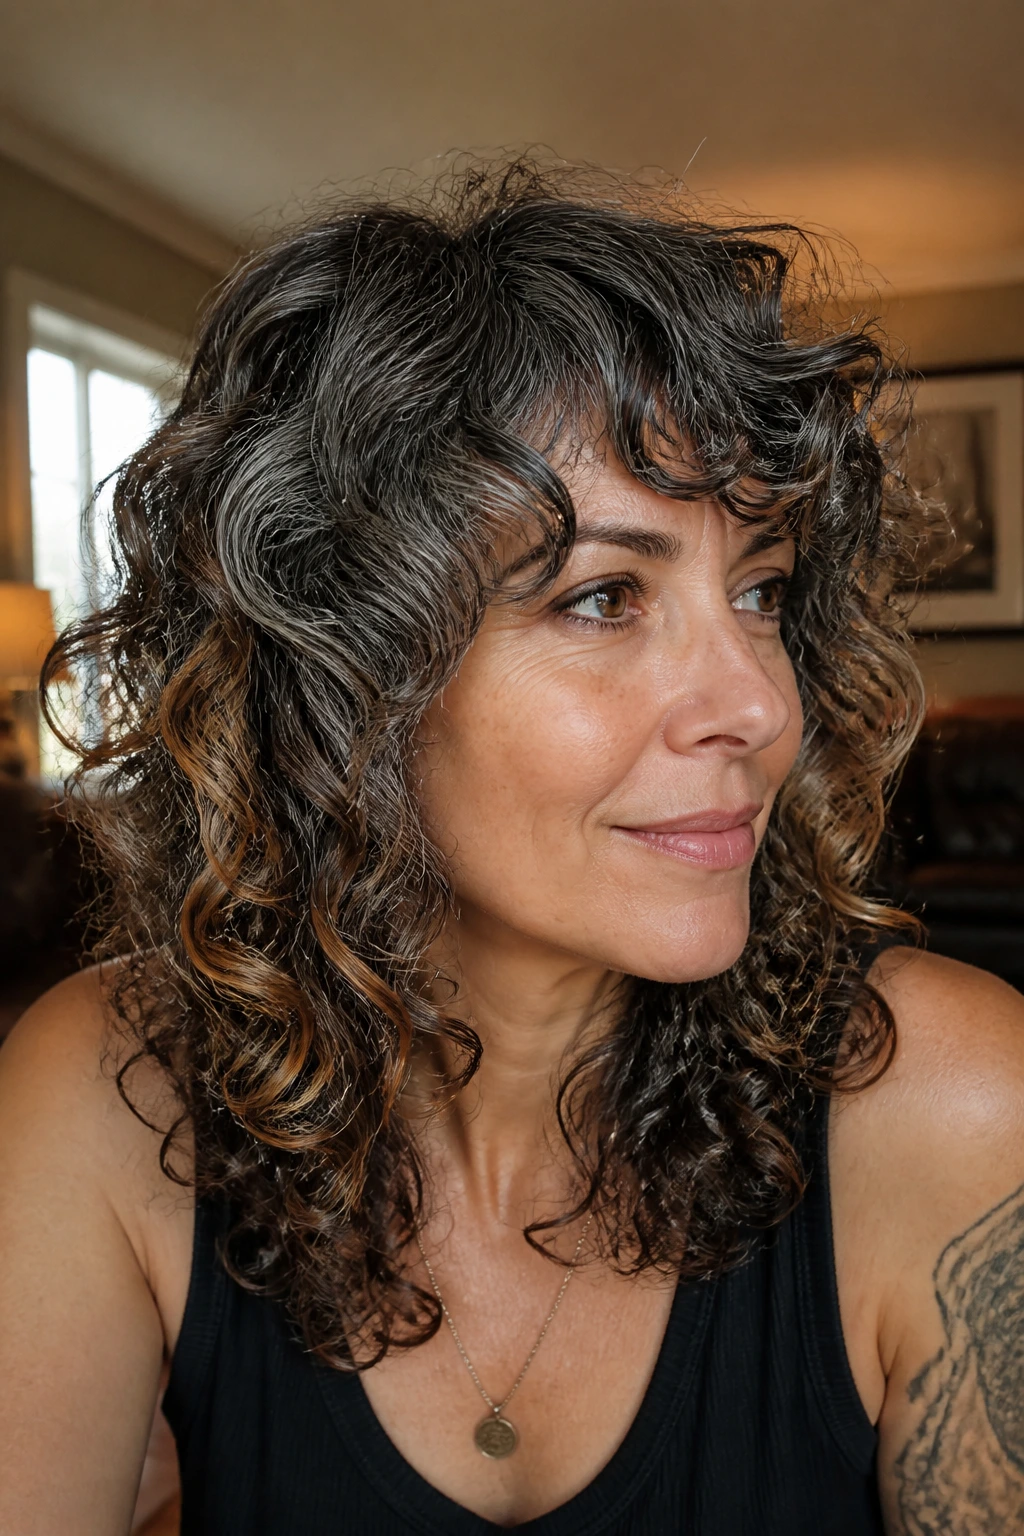
Why do curls take this combo so well? Because the shape already creates pockets of shadow and light. A shagged curl cut gives the grey a place to sit on the outer surface while the caramel hides underneath, flashing only when the hair moves or lifts away from the face.
That peekaboo placement is smarter than people give it credit for. Dark hair often looks richest when warmth is hidden, not broadcast. You get the payoff in a twist, a toss, or a half-up style, and the color stays interesting even when the hair is tied back.
Pro move: keep the caramel pieces wider near the ears and narrower at the nape. That makes the color feel intentional instead of random.
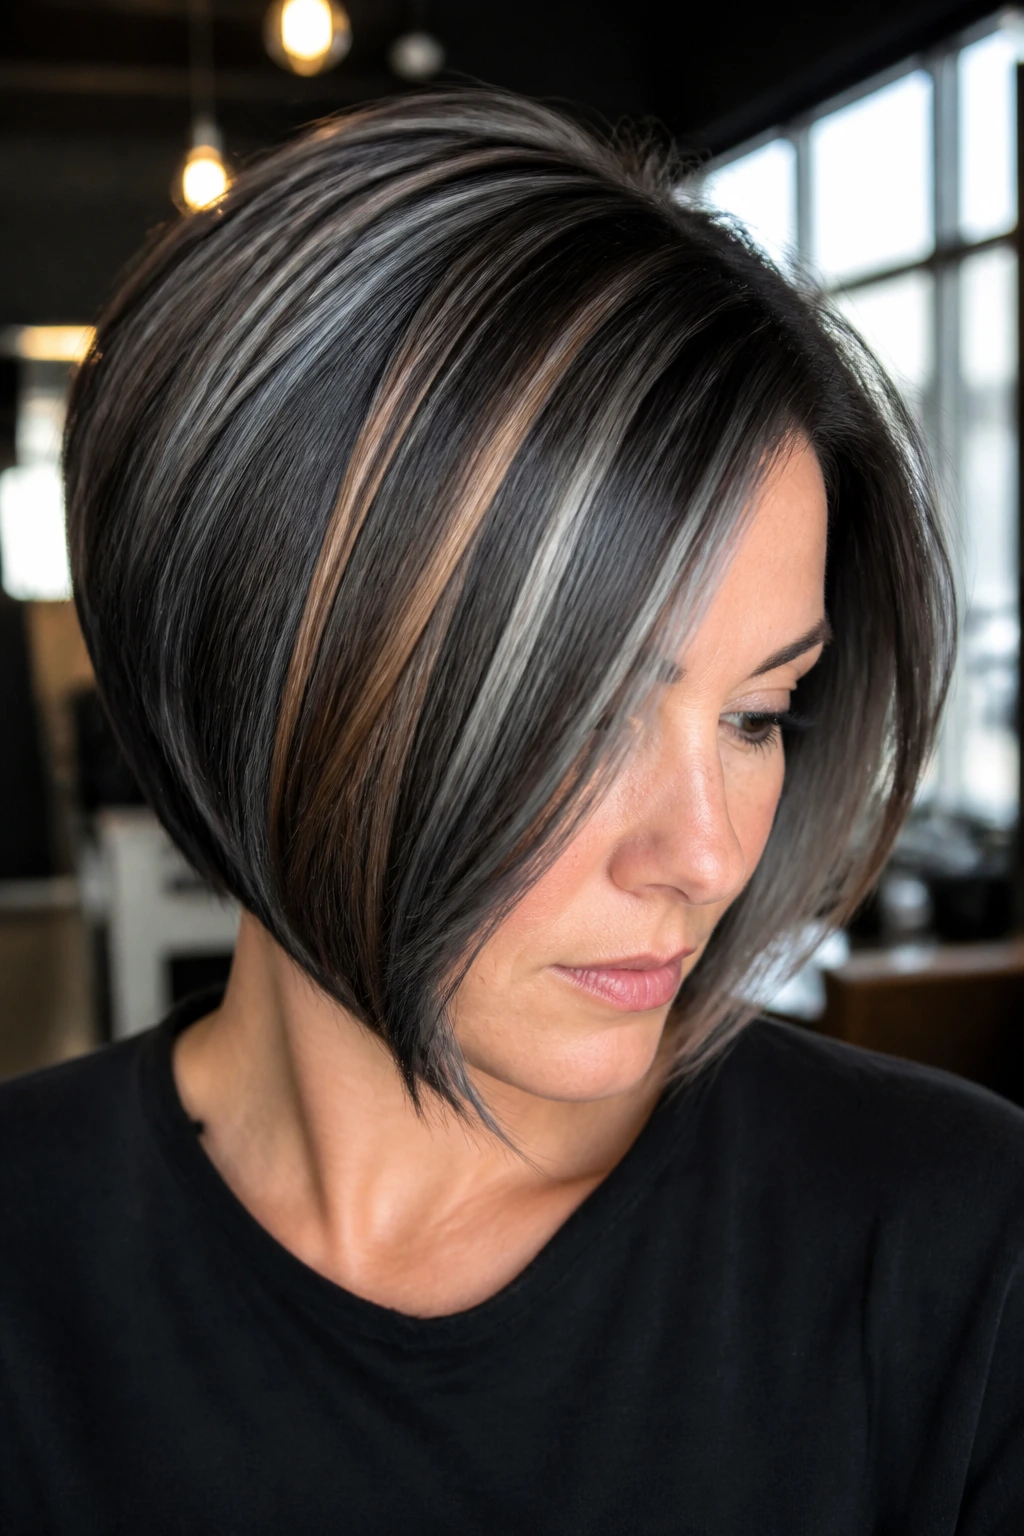
4. Blunt Angled Bob with a Soft Grey Money Piece
A blunt bob can look strict in the wrong tone. Put a soft grey money piece in front and suddenly the whole cut loosens up. The angle — slightly shorter at the back, a touch longer at the front — gives the caramel somewhere to warm the edges, especially if the base is deep brown or black-brown.
I’d keep the front pieces thin enough that they frame, not dominate. Too much grey near the face can harden the expression. A narrow caramel veil next to the cheekbone keeps the look readable in sunlight and indoor lighting alike.
This one is for people who want the color to be visible even when the hair is tucked behind one ear. It does not hide. That’s the appeal.
5. Waist-Length V-Cut with Grey Ends and Caramel Ribbons
Long hair needs a plan, or it turns into a curtain. A V-cut creates a point at the back and lets grey collect toward the ends in a way that feels sleek rather than bulky. Caramel ribbons through the mid-lengths break up the depth of the dark base, so the whole head doesn’t go one-note.
The end result is a slow fade from dark root to smoky length to warm flickers at the tips. I like it on thick hair most of all, because density gives the color something to sit inside. On very fine hair, the same placement can disappear unless the pieces are wide enough to show.
Keep the grey a little softer than platinum. On long hair, icy silver can start to look harsh if every inch is the same. A smoky pearl tone ages better on the eye.
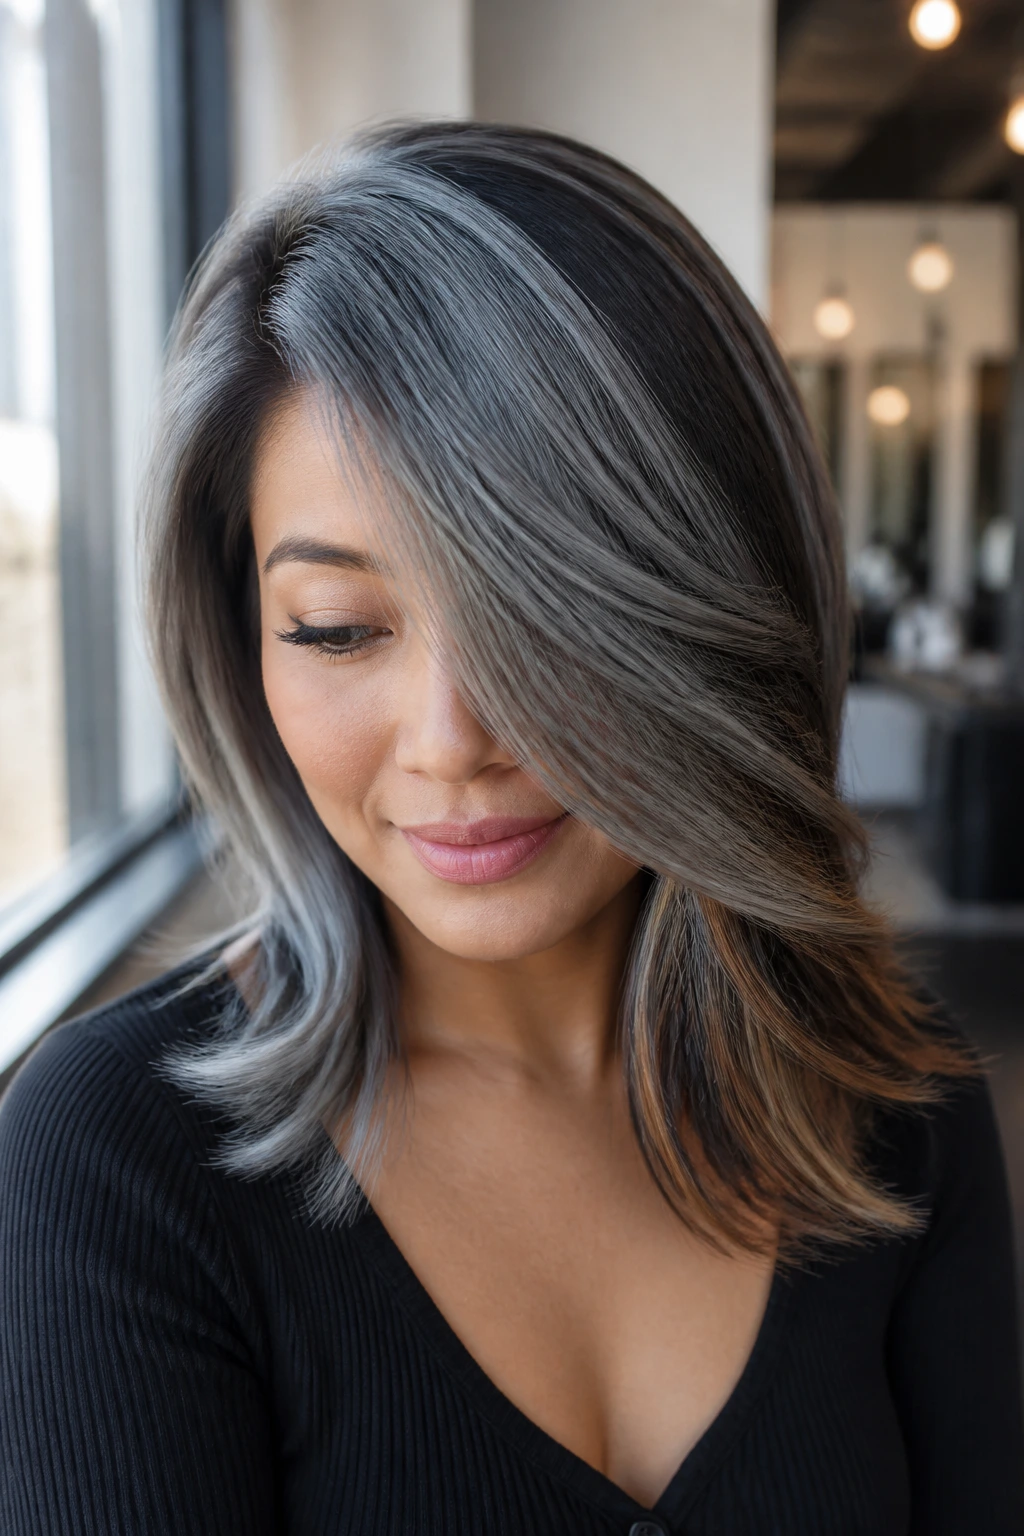
6. Feathered Mid-Length Cut with a Soft Silver Glaze
Feathered layers do one thing really well: they make color move. A silver glaze over a dark base looks much better when the ends are lightened and the outer layers are cut to flip away from the face. The caramel then slips in under the top layer and gives the finish a little warmth at the bend.
This is a quieter look than the big ribbon styles. Less drama. More sheen. It works especially well if you like to blow out your hair with a round brush, because the feathering lifts the grey and caramel into separate planes.
If your hair has a lot of natural texture, ask the colorist to keep the caramel pieces narrow near the crown. That keeps the top from getting busy.
7. Textured Pixie with Caramel Crown Lights
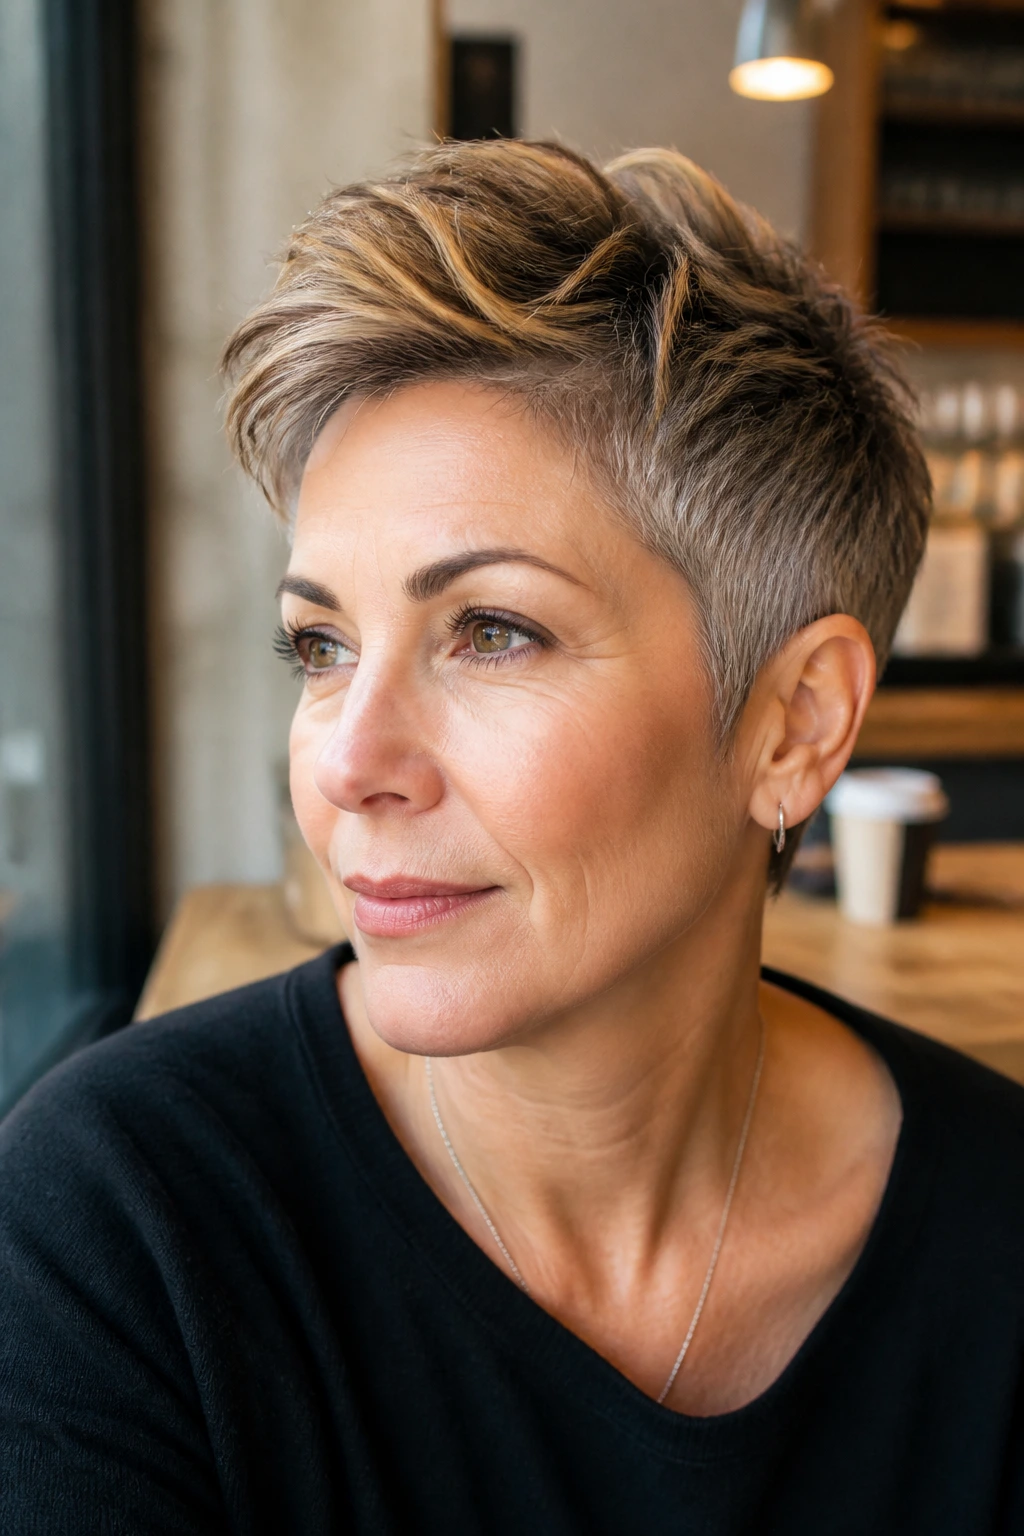
A pixie with grey on the sides and caramel up top sounds a little rebellious, and that’s exactly why it works. Short hair needs contrast fast, or the color vanishes into the cut. Caramel crown lights create lift at the root area, while the grey through the sides and nape keeps the shape crisp.
This is one of the few styles on the list where the highlights matter less than the direction of the cut. Piecey bangs, a slightly longer top, and a matte paste are enough to make the color pop. If you want the grey to look modern rather than dusty, keep the finish textured, not glossy.
Best on: strong bone structure, or anyone who wants the color to do the talking.
Avoid: over-lightening the crown too much. A little warmth is useful; a pale halo can flatten the whole thing.
8. Curtain Bangs with Silver Waves
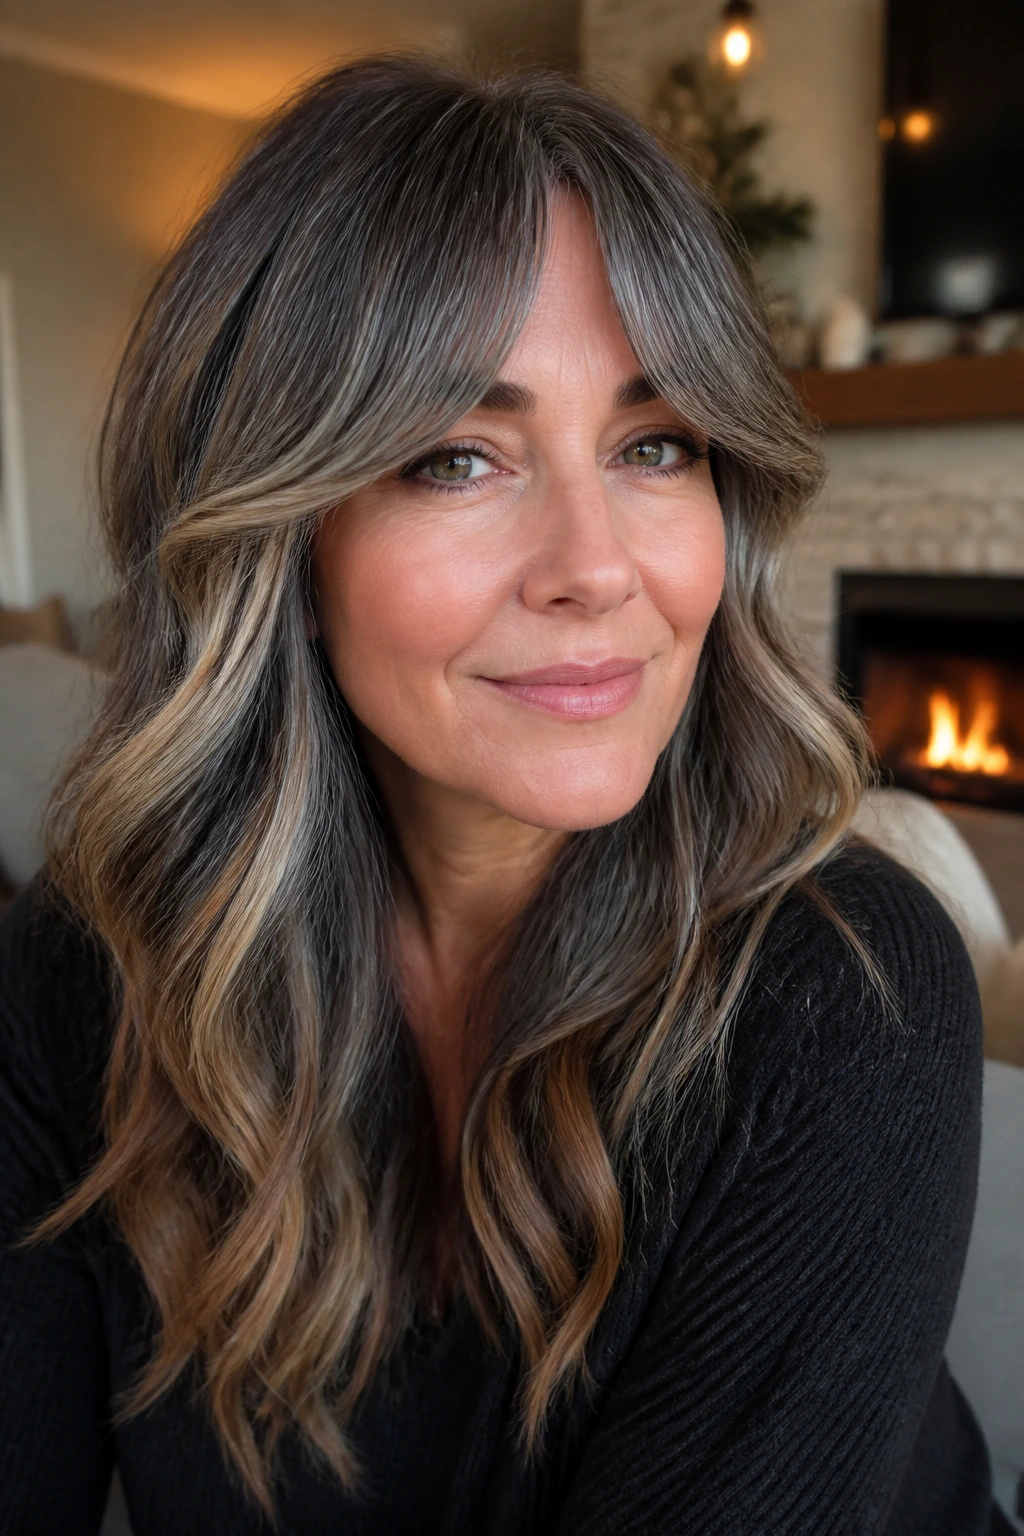
Curtain bangs change the mood of grey hair immediately. They split the face in a soft way, which is handy when the silver tone sits close to the hairline. Caramel through the length keeps the fringe from looking too cool against dark brows, and the waves below give the color room to breathe.
The best version of this look is not uniform. The bangs should hold a little more grey, almost like a whisper of ash, while the rest of the hair carries caramel ribbons through the outer layers. That difference keeps the eye moving. It also saves you from that too-perfect, salon-board finish that looks better in a photo than on a real head.
If you wear glasses, this one is especially good. The bangs frame the frames. That sounds obvious, but it matters.
9. Collarbone Blunt Cut with Grey Underlights
Here’s the quieter cousin of the money-piece bob: keep the surface layer dark, and put the grey and caramel underneath. Underlights are underrated because they change when the hair moves, which is when good color usually shows its face.
This is a smart choice if you want the idea of grey without committing to a bright front panel. A little flick of caramel at the ends of the hidden layer keeps the grey from looking cold, and the blunt cut above it makes the reveal feel cleaner. Tuck the hair behind the ear, and the dimension appears. Let it fall forward, and it disappears again. That’s the fun of it.
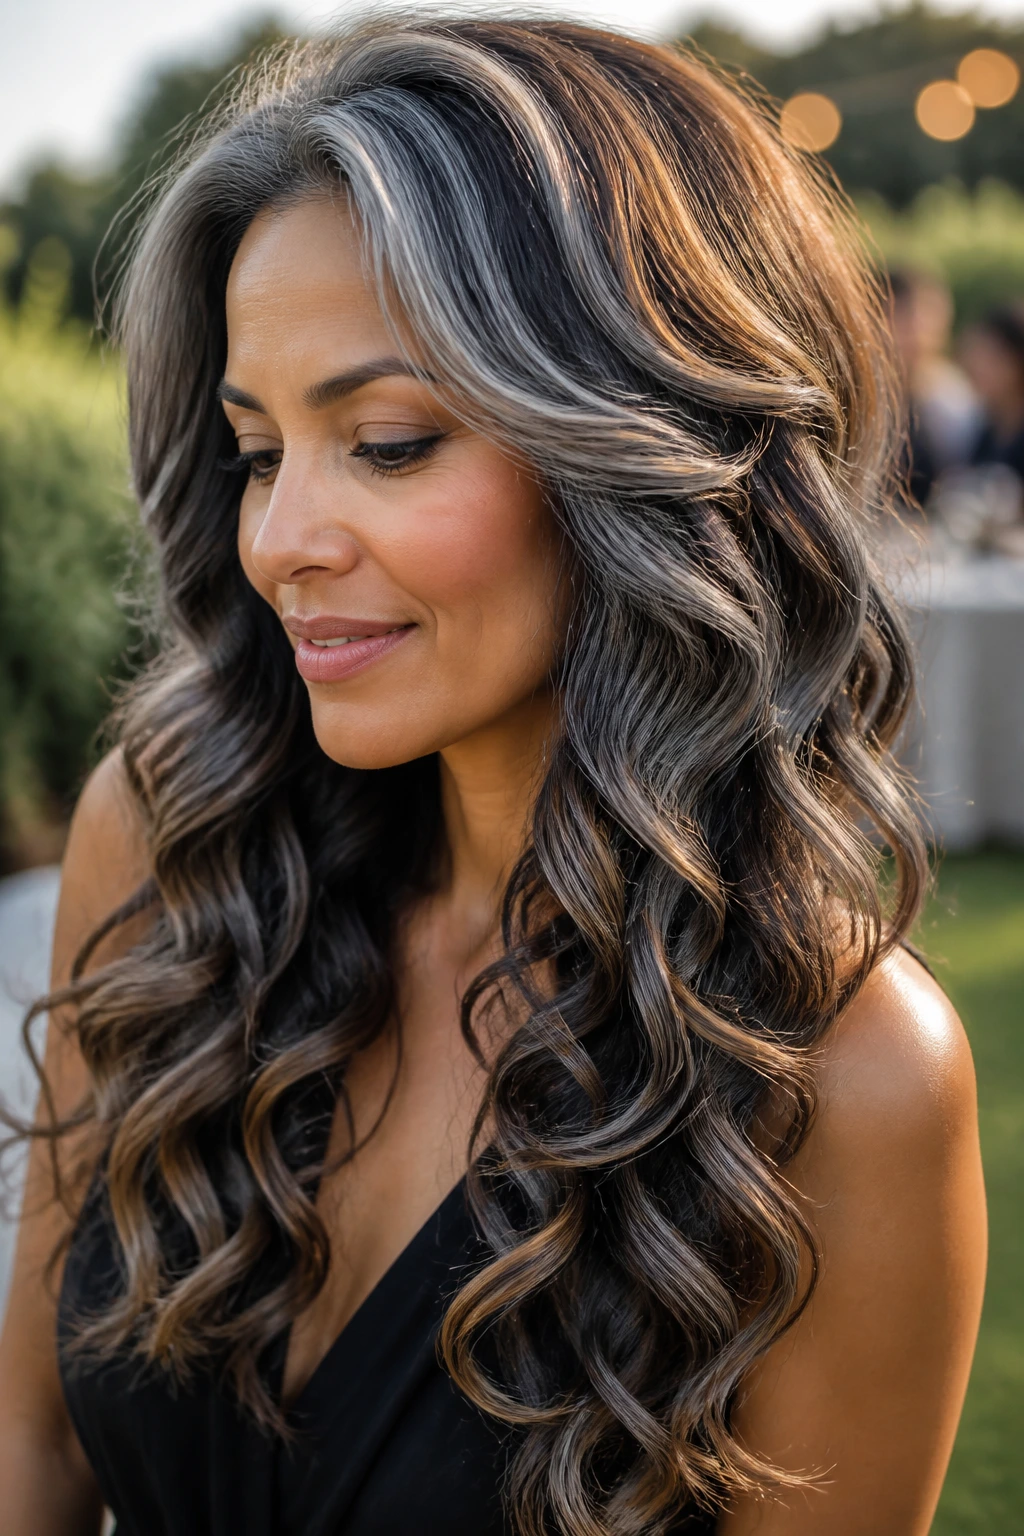
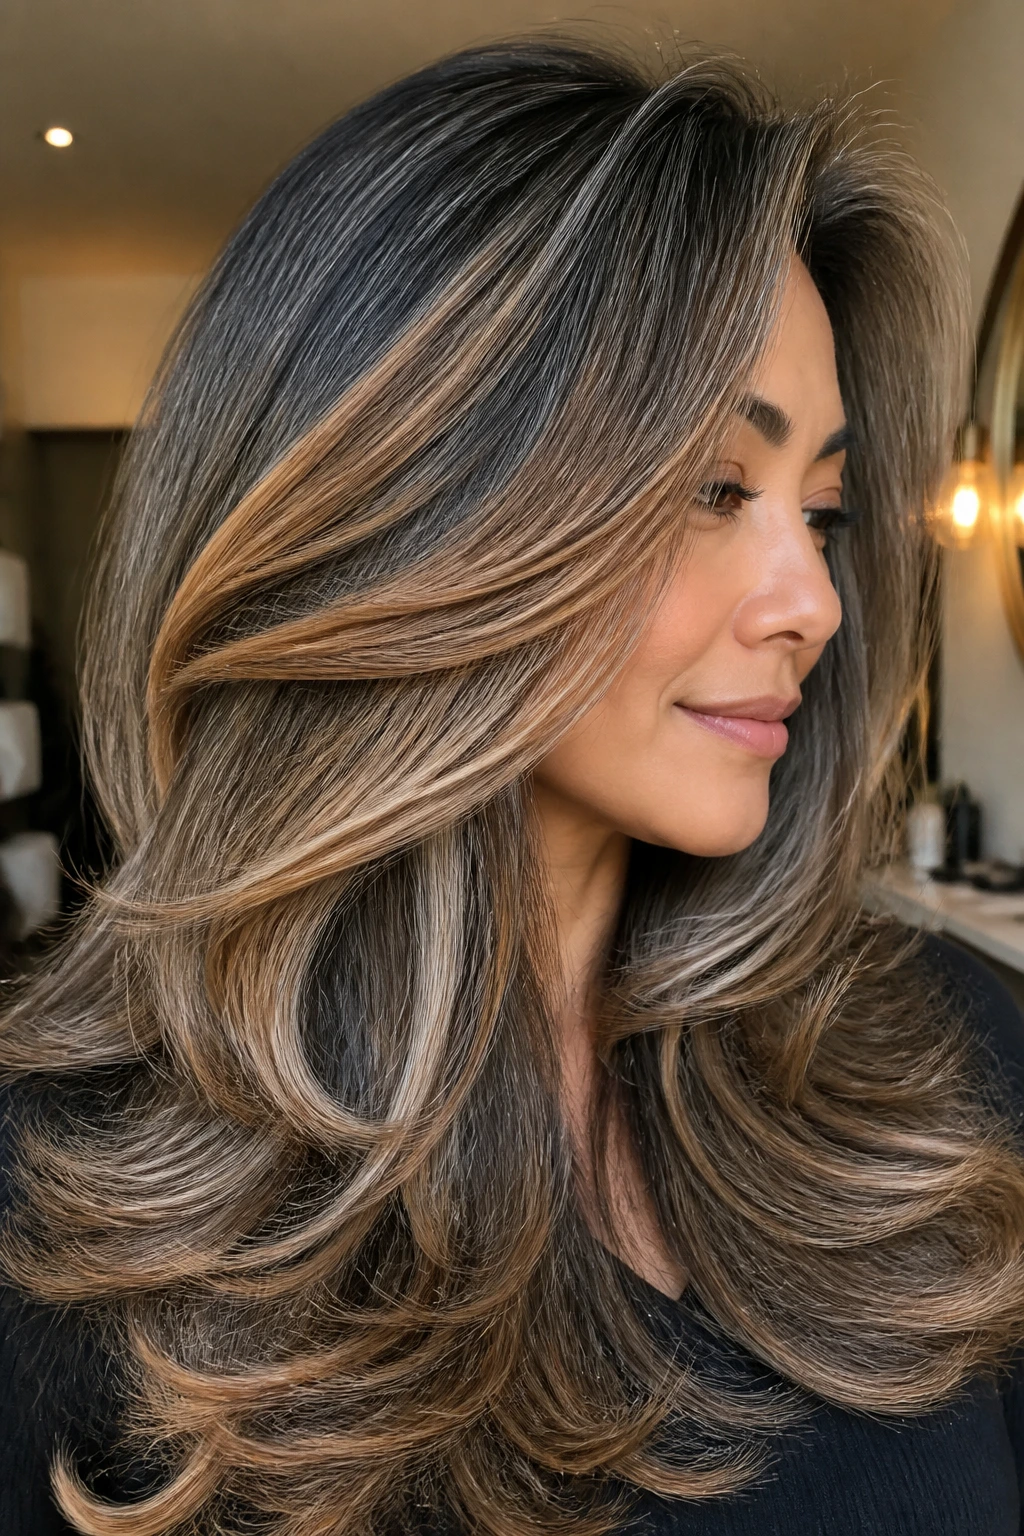
10. Mermaid Waves with Caramel Streaks Over a Charcoal Base
This style needs length and wave, or it loses its voice. Mermaid waves on dark hair let charcoal grey sit like smoke across the surface, while caramel streaks thread through the lower bends and catch light at the curve of each wave. The effect is dramatic, but not in a costume way if the colors stay close enough in value.
I’d use wider panels here, not tiny foil lines. Thin pieces get swallowed in long hair. The caramel should feel like a current running through the waves, not confetti.
Works best when: the hair is thick enough to hold shape after curling.
Looks best with: a wide barrel and brushed-out finish.
One quick note: if the ends are porous, tone them separately. Long lengths can grab grey faster than roots.
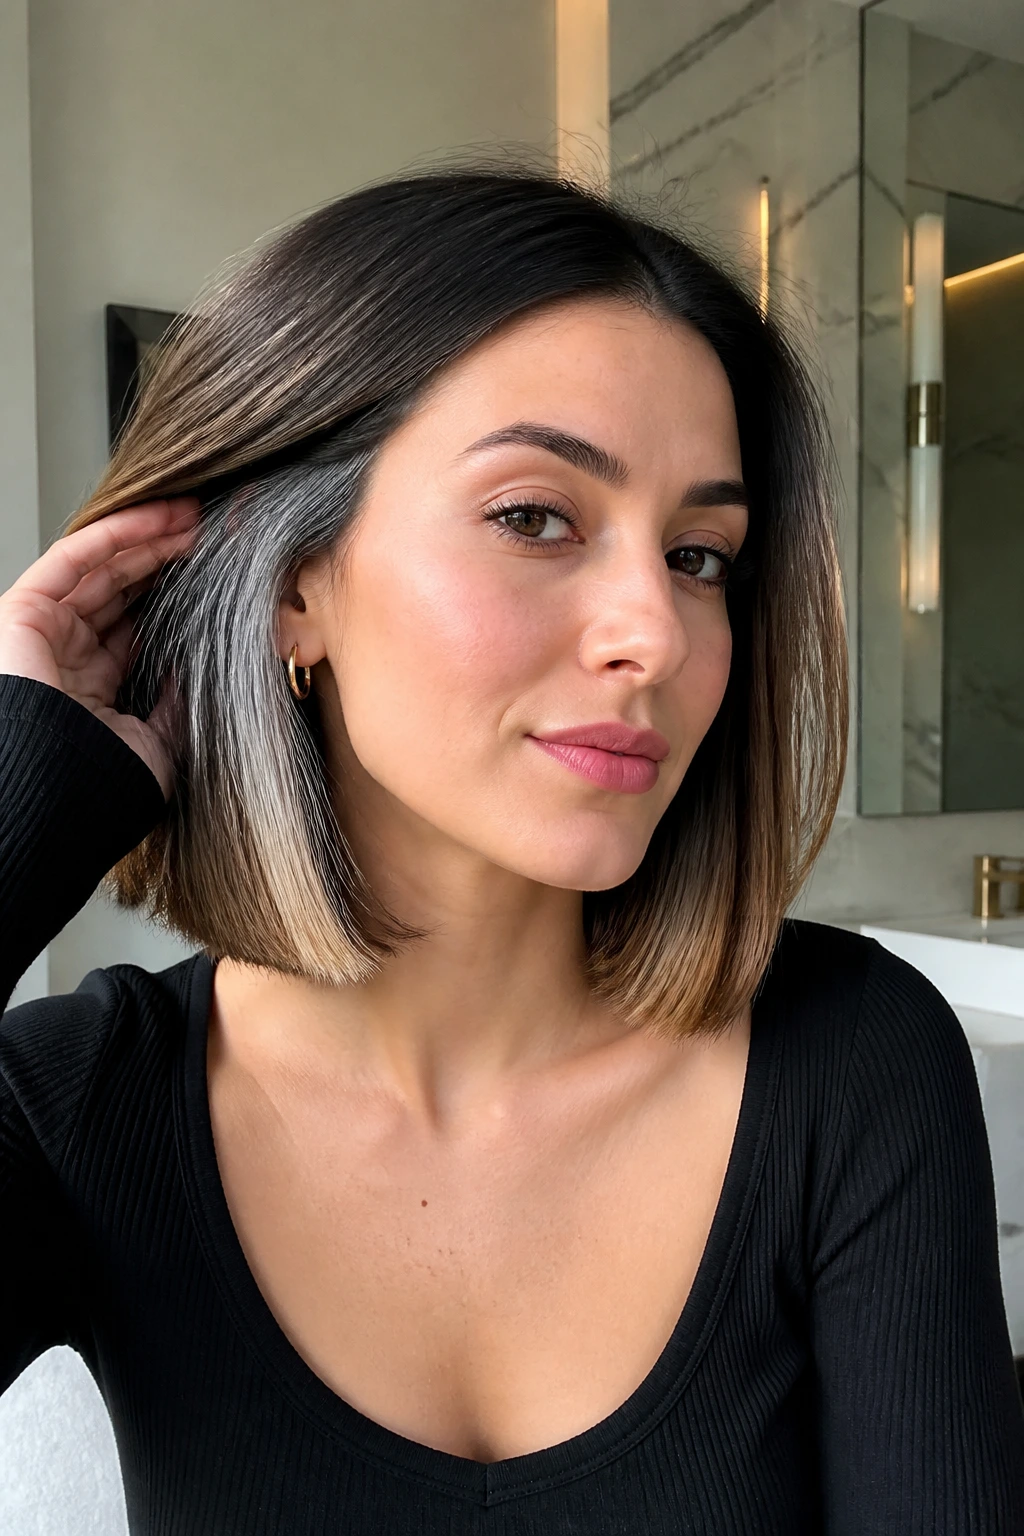
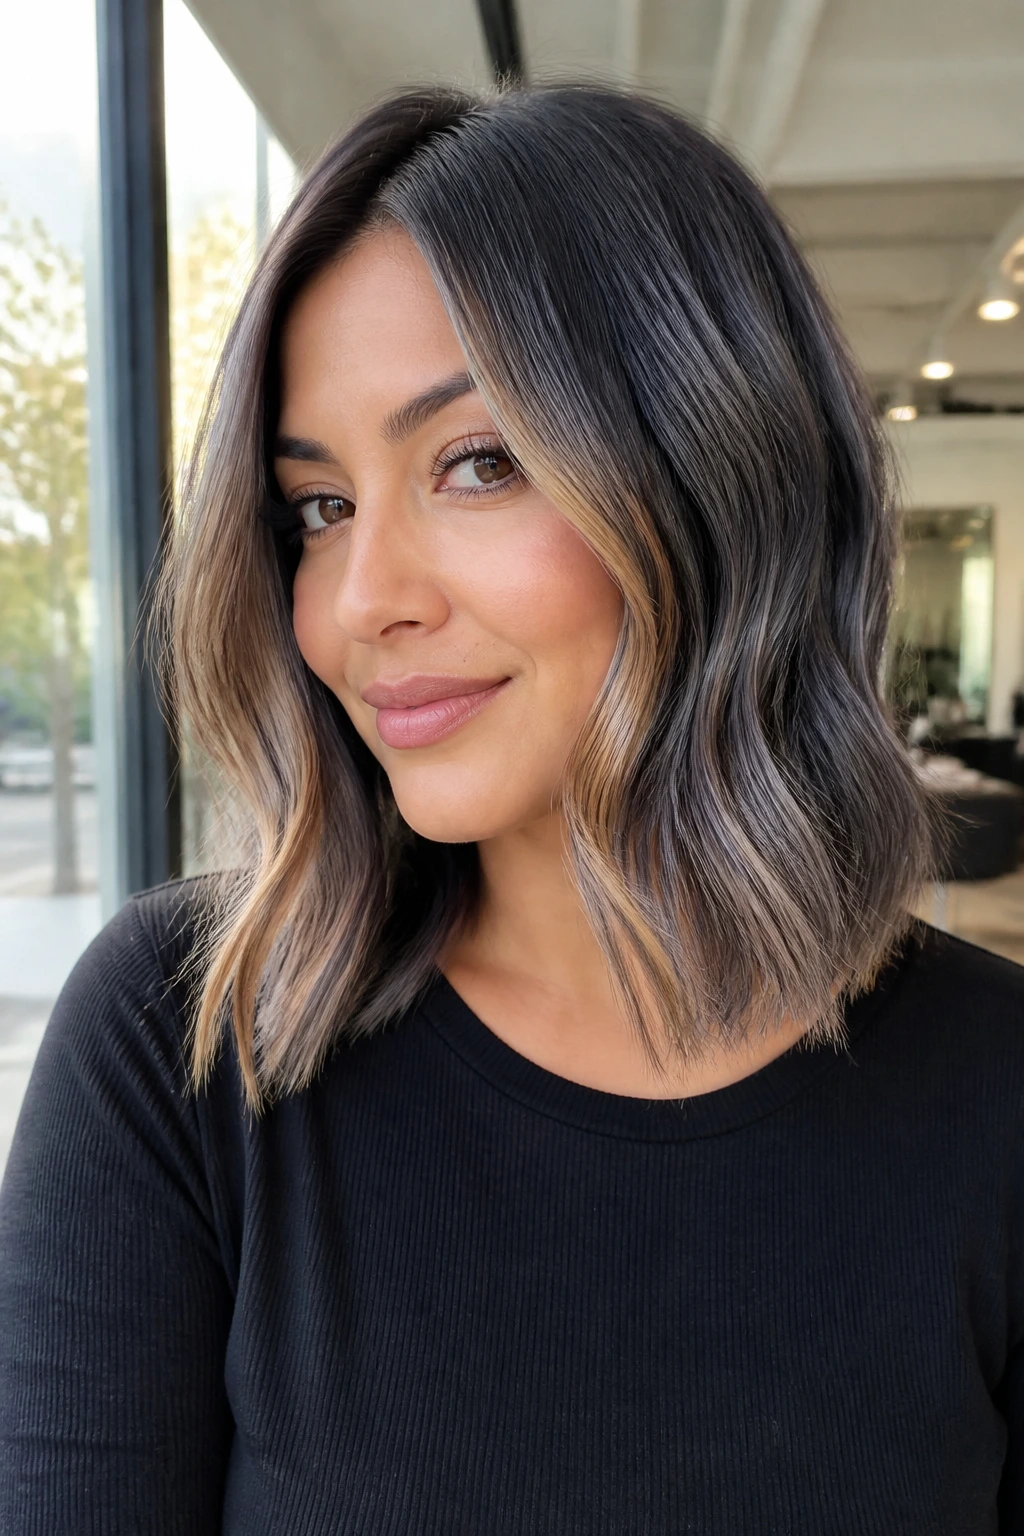
11. Chin-Length French Bob with Grey Tips
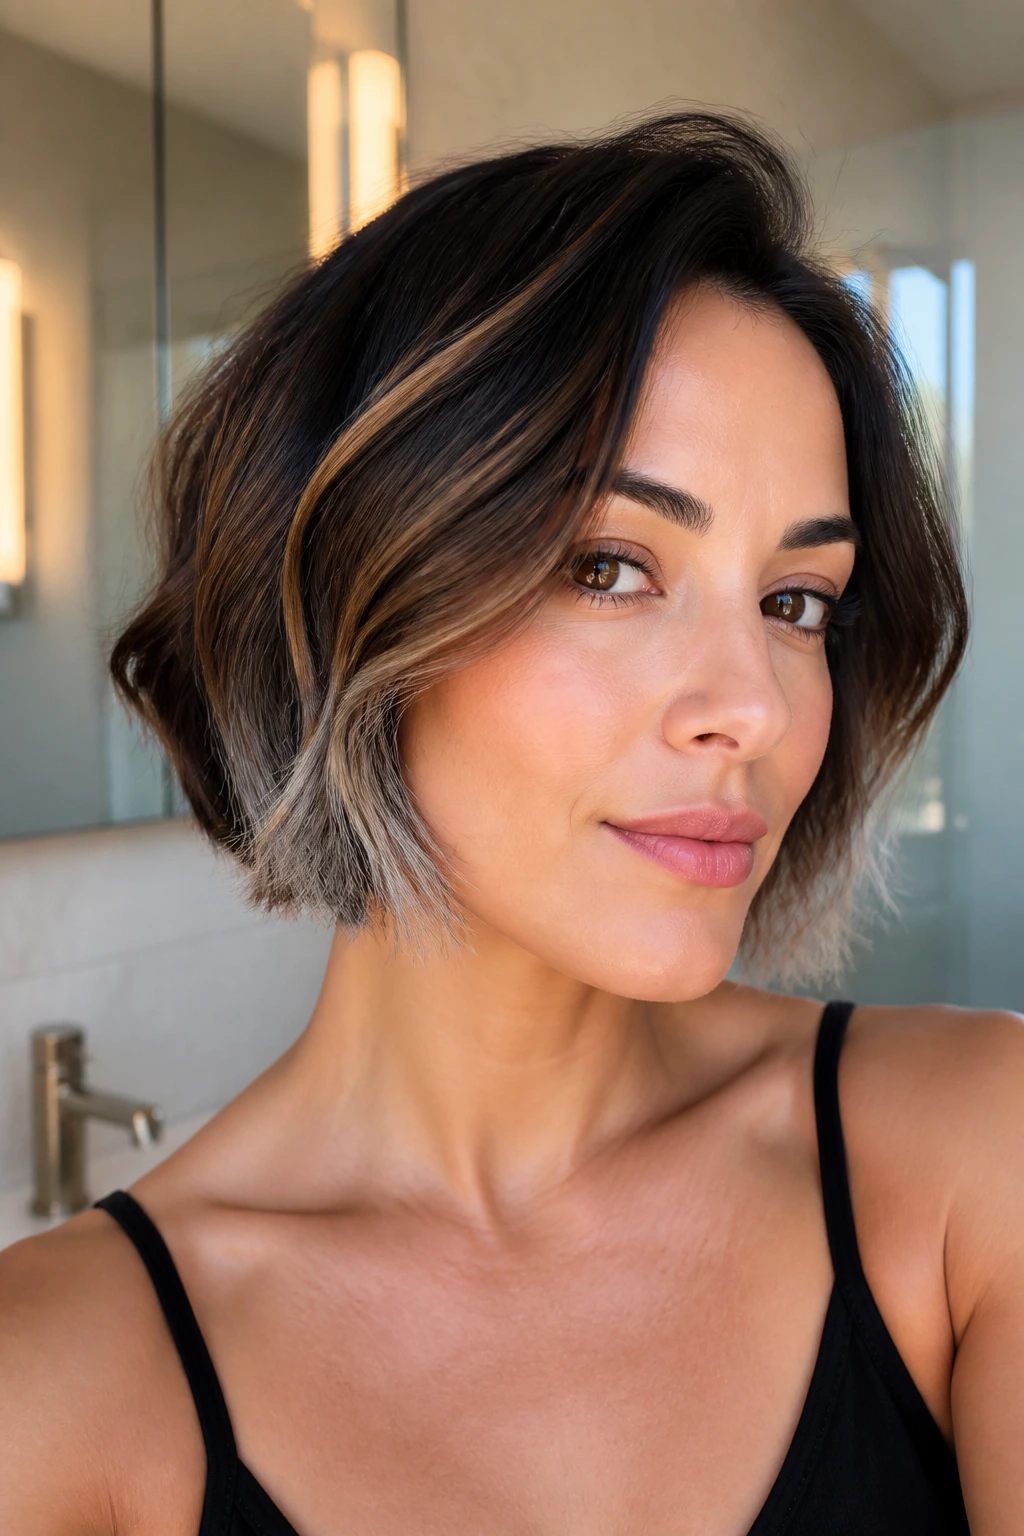
A French bob is all about cheekbones and clean edges, so the color needs to stay lean. Grey tips add just enough edge to keep the short length from looking sweet, and a little caramel near the temples softens the face where the cut stops. On dark hair, that contrast can be sharp in the best way.
I prefer this look slightly undone. Not perfectly curled. A touch of bend at the ends, maybe a side part that isn’t exact. The grey tips do not need to shout; they only need to show that the cut has shape. Caramel around the front keeps the silhouette from collapsing into a single dark block.
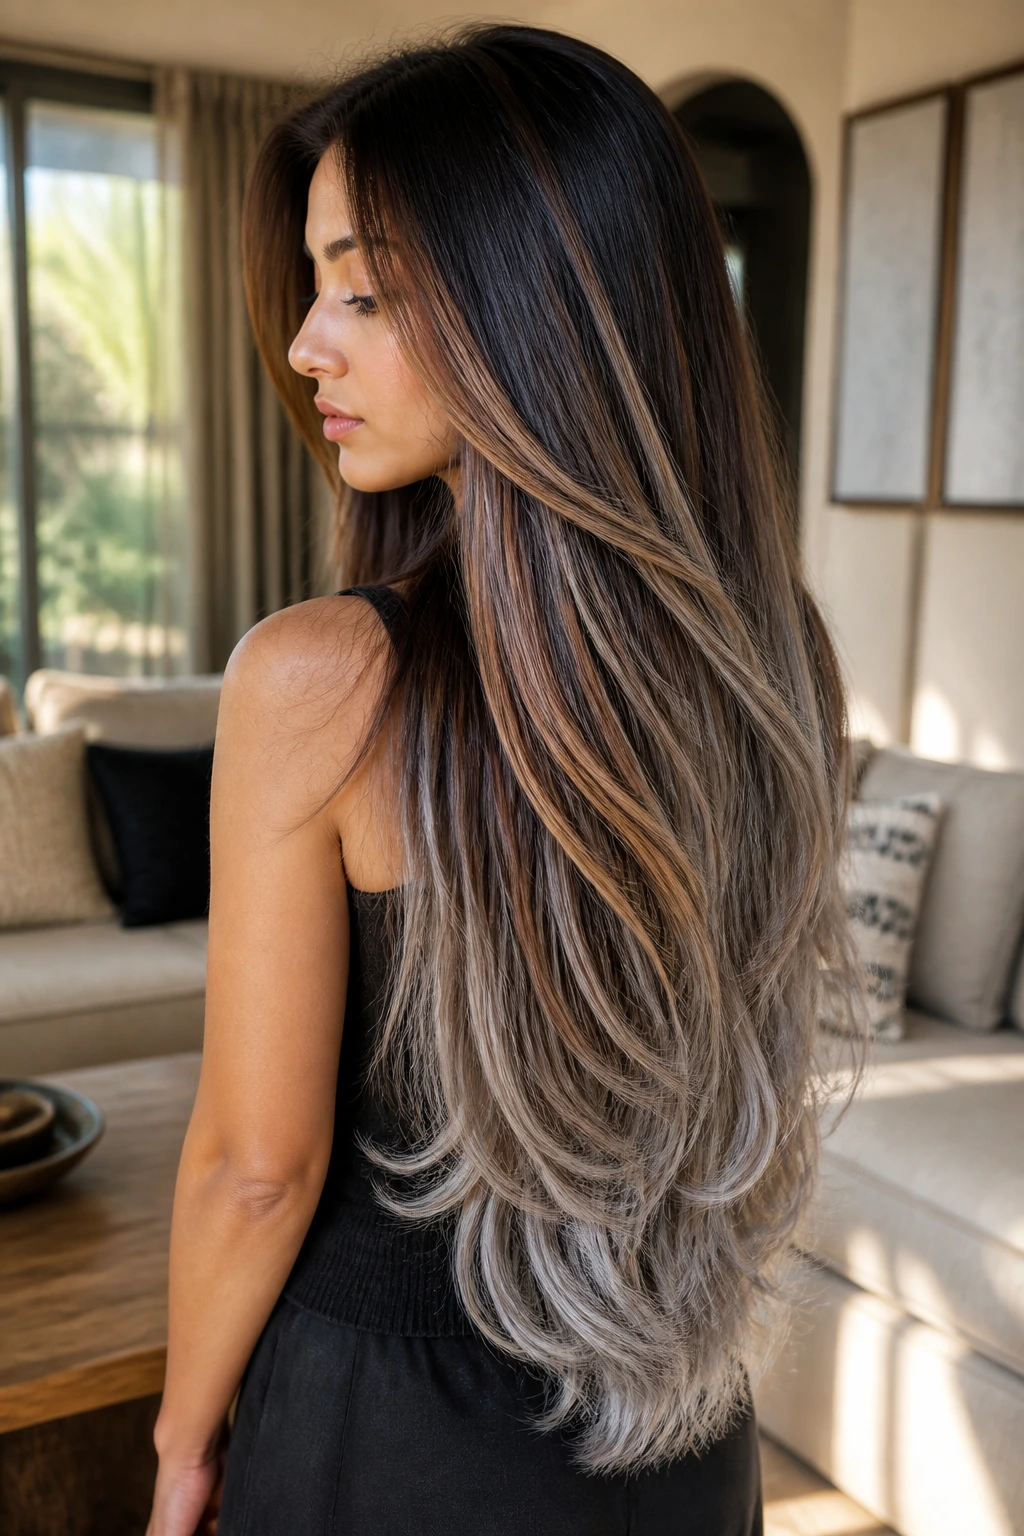
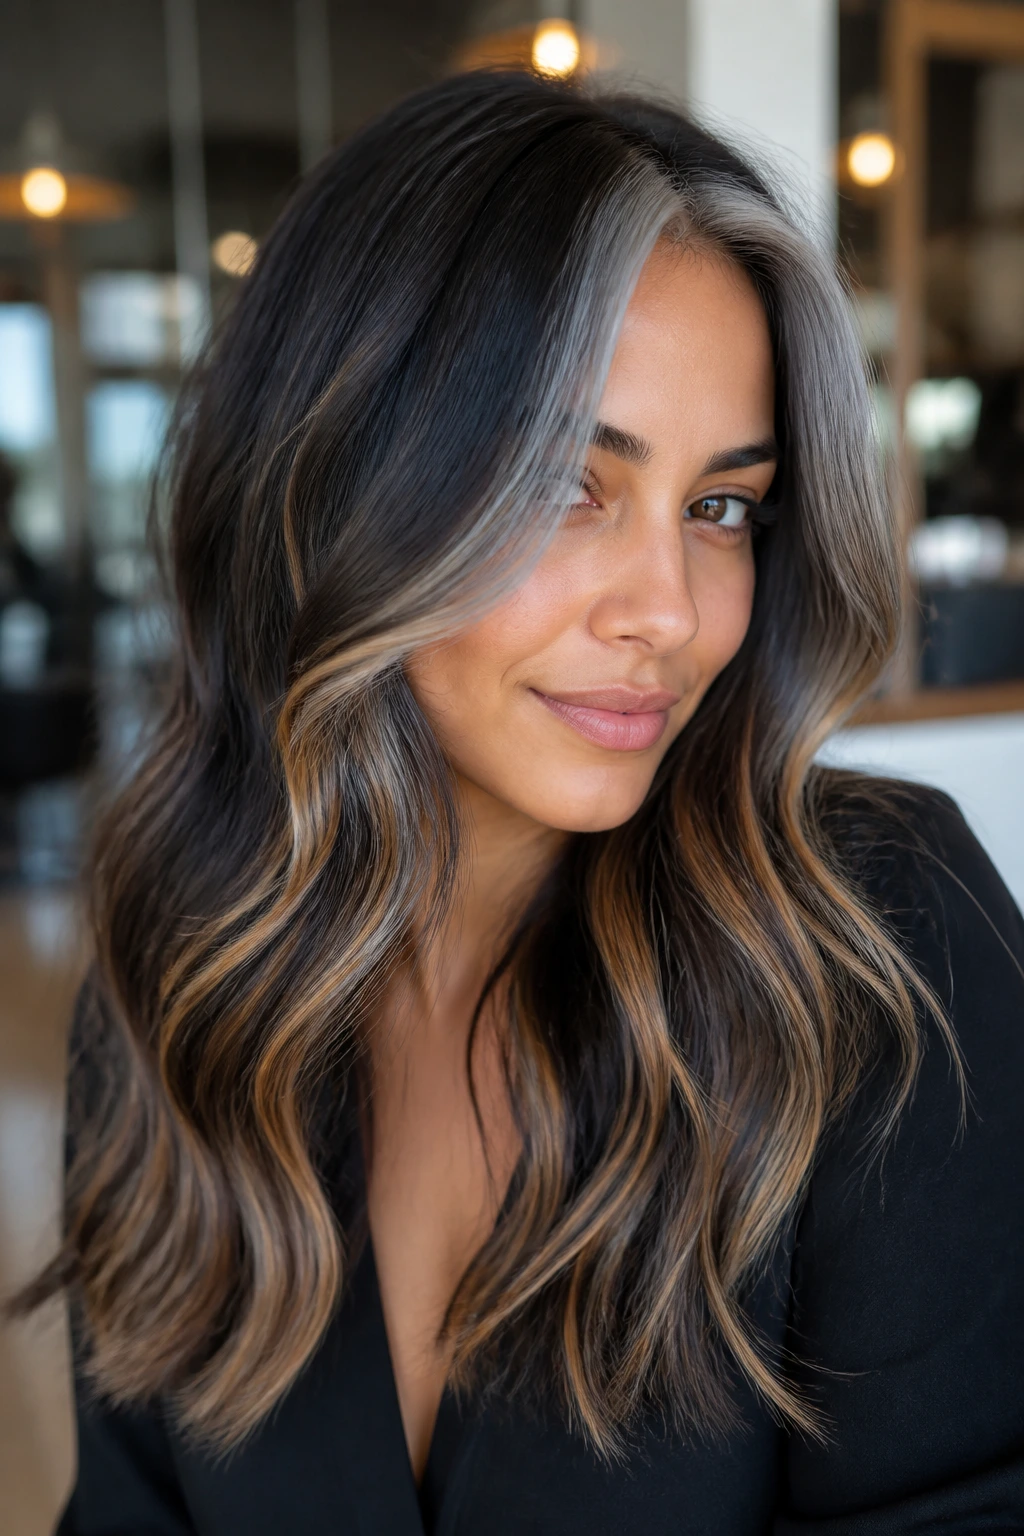
12. V-Cut Layers with Dimensional Grey and Caramel
Long layers cut into a V shape give you one advantage most other cuts don’t: the color falls in distinct planes. Grey can live on the outer curtain of the hair, while caramel threads run diagonally through the mid-lengths. The result is dimensional without becoming busy.
This is the style I’d choose for someone who likes a blowout but does not want a lot of visible streaking at the root. The V cut keeps the length dramatic, and the color shows up most where the hair moves over the shoulders. If the hair is naturally straight, the contrast is even cleaner. If it’s wavy, the color becomes softer and more blended.
Tip: ask for the grey to be smudged slightly into the darker base so the transitions don’t look sliced.
13. Side-Swept Layers with Metallic Grey Overlay
A deep side part changes everything. Suddenly, one side of the face carries more lift, and the metallic grey can sit there like a spotlight, while caramel threads soften the opposite side and keep the style from going cold. This is a strong look, almost tailored.
I like it on medium-length layers because the side sweep has enough weight to stay in place. A light serum or a smoothing cream is enough to keep flyaways down. The color should never be flat on both sides; the asymmetry is the whole point.
If you want a little drama without adding more lightness, this is the move. It feels grown-up. Sharp, but not severe.
14. Braided Crown with Grey and Caramel Dimension

Braids show mixed color in a way loose hair never quite does. A braided crown pulls the grey and caramel together into one visible pattern, and the weave makes the contrast look richer because every crossover strand reveals a different tone. Dark hair underneath keeps the braid from floating away visually.
This works especially well on second-day hair, when the texture has a little grip. Pull a few caramel strands loose around the face, let some grey pieces stay visible in the braid itself, and the style stops looking formal in the stiff sense. It becomes lived-in.
Best for: weddings, events, or any day when you want the color to read from the front and back.
Useful trick: mist the braid lightly with texturizing spray before weaving. Fine hair needs the extra grip.
15. Hollywood Blowout with Smoke-Grey Ribbons
Nothing beats a proper blowout for showing off multi-tonal color. When dark hair is brushed smooth and rolled at the ends, smoke-grey ribbons sit across the top like satin, and the caramel pieces underneath warm the shape without taking over. It’s polished, but not flat.
The ribbon placement matters more than the curl size. You want the grey pieces to land where the light hits — the top of the head, the outer curve of the wave, and the first few inches around the face. Caramel can stay lower, where it gives the blowout depth and stops the grey from looking stark.
This is a style that rewards good brushing. Messy blowouts can hide the color. A clean one shows every panel.
16. Waterfall Curls with a Caramel Halo
Waterfall curls are one of those styles that make color look more expensive than it really is. The curl pattern falls over itself, so grey can sit on the upper curve while caramel forms a halo around the crown and outer perimeter. Dark hair underneath keeps the whole shape grounded.
I’d use this for longer layers or mid-back length hair. The curls need room to cascade. If the caramel is too dense, the style loses that soft halo effect and starts looking streaky. Keep the warm pieces near the outside of the curl bundle, not buried at the base.
It’s a good event style, yes, but it also works for people who wear their hair down most days and want the color to do the work.
17. Grown-Out Lob with Dark Roots and Grey Ends
A grown-out lob is for people who like color that behaves. Dark roots make the grey and caramel look intentional as they soften into the mids, and the ends carry most of the lighter tone. That gives the style a natural fade instead of a harsh grow-out line.
This one is forgiving. Very forgiving. If you do not want to touch up roots every month, start with a shadow root and keep the grey concentrated below the chin. Caramel near the lower half keeps the ends from looking dry or over-bleached, which is a real risk on dark hair that has been lifted hard.
The best versions have a lived-in bend, not a stiff curl. The color should look worn, not made up.
18. Soft Mullet with Silver Texture and Caramel Accent
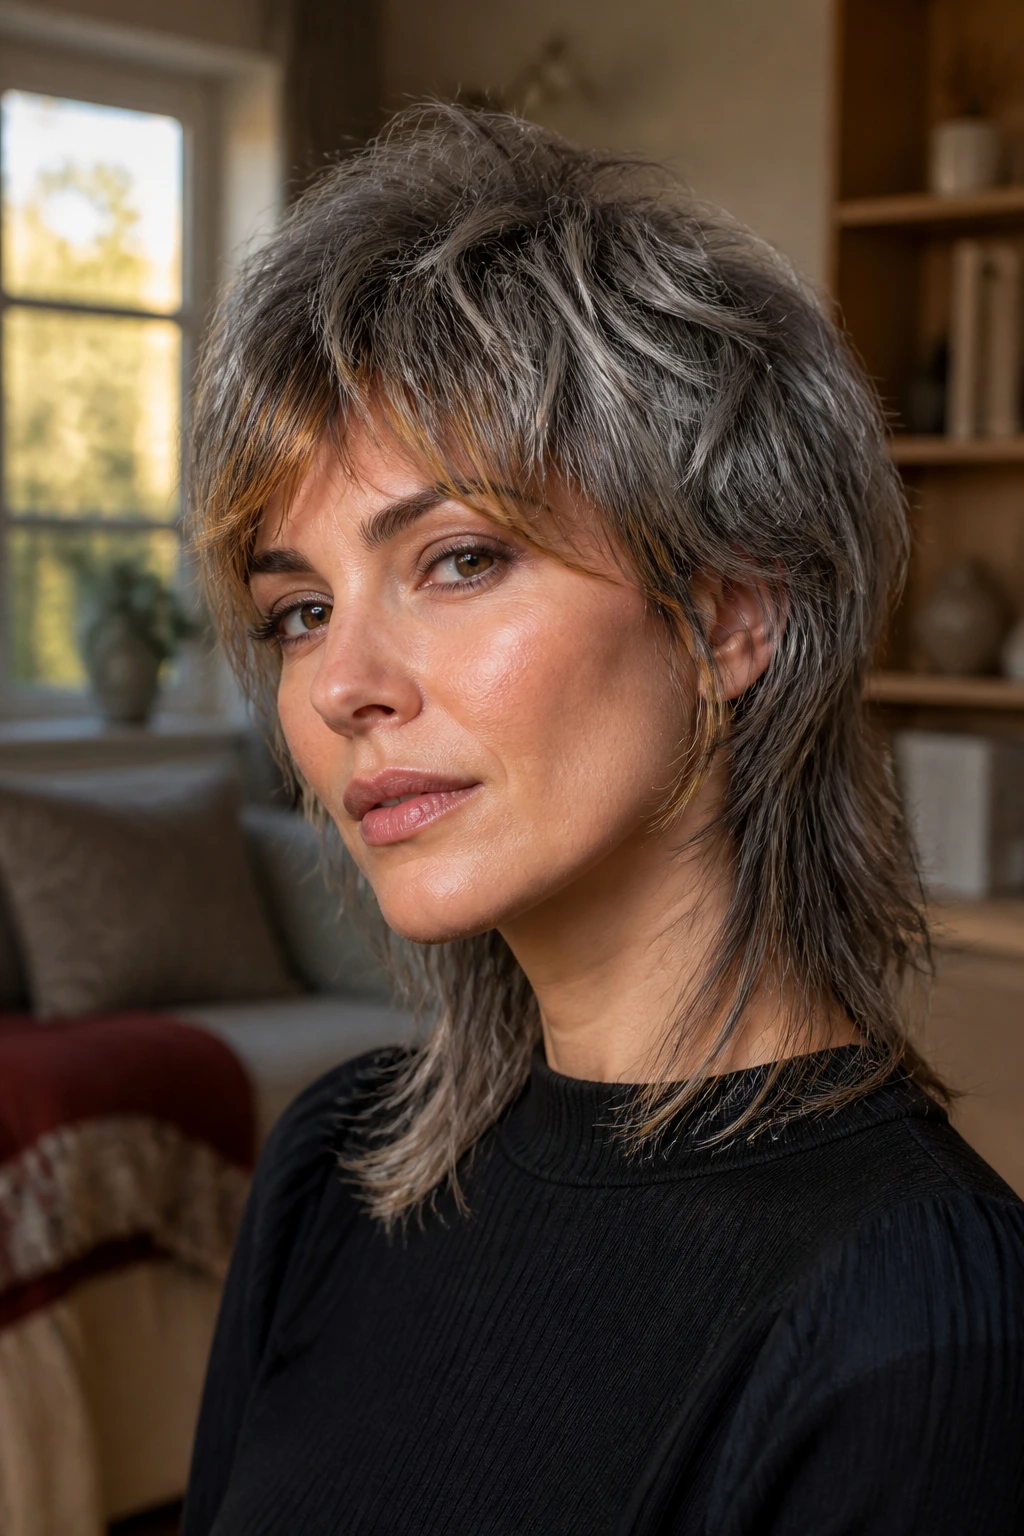
A soft mullet sounds bold because it is bold, but the right color keeps it wearable. Silver through the top and crown sharpens the shape, while caramel at the fringe and around the side pieces adds enough warmth to keep the cut from feeling icy. The longer nape gives the lighter tones somewhere to trail off.
This works best with texture. Not precision. A little pieceiness at the ends makes the grey look deliberate, and the caramel accent prevents the whole thing from reading like a single grey block. If your hair is naturally wavy, you’re already halfway there.
I’d call this one the most attitude-heavy entry on the list. Not for everyone. Very much for someone who likes hair with a point of view.
19. Half-Up Knot with Grey Ends and Caramel Threads
A half-up knot is a useful style because it shows off the top color and the bottom color at the same time. When the ends are grey and the mid-lengths carry caramel threads, the knot creates a kind of color spill: dark root at the top, warmth in the middle, smoke at the ends. That order matters.
This is especially good on longer hair that tends to look heavy when worn down. Pulling the top half back opens the face and lets the highlights sit where they’ll be seen. The knot doesn’t need to be perfect. A little looseness around the crown keeps the caramel visible and stops the grey from feeling too formal.
20. Straight Long Hair with Glossy Grey Panels
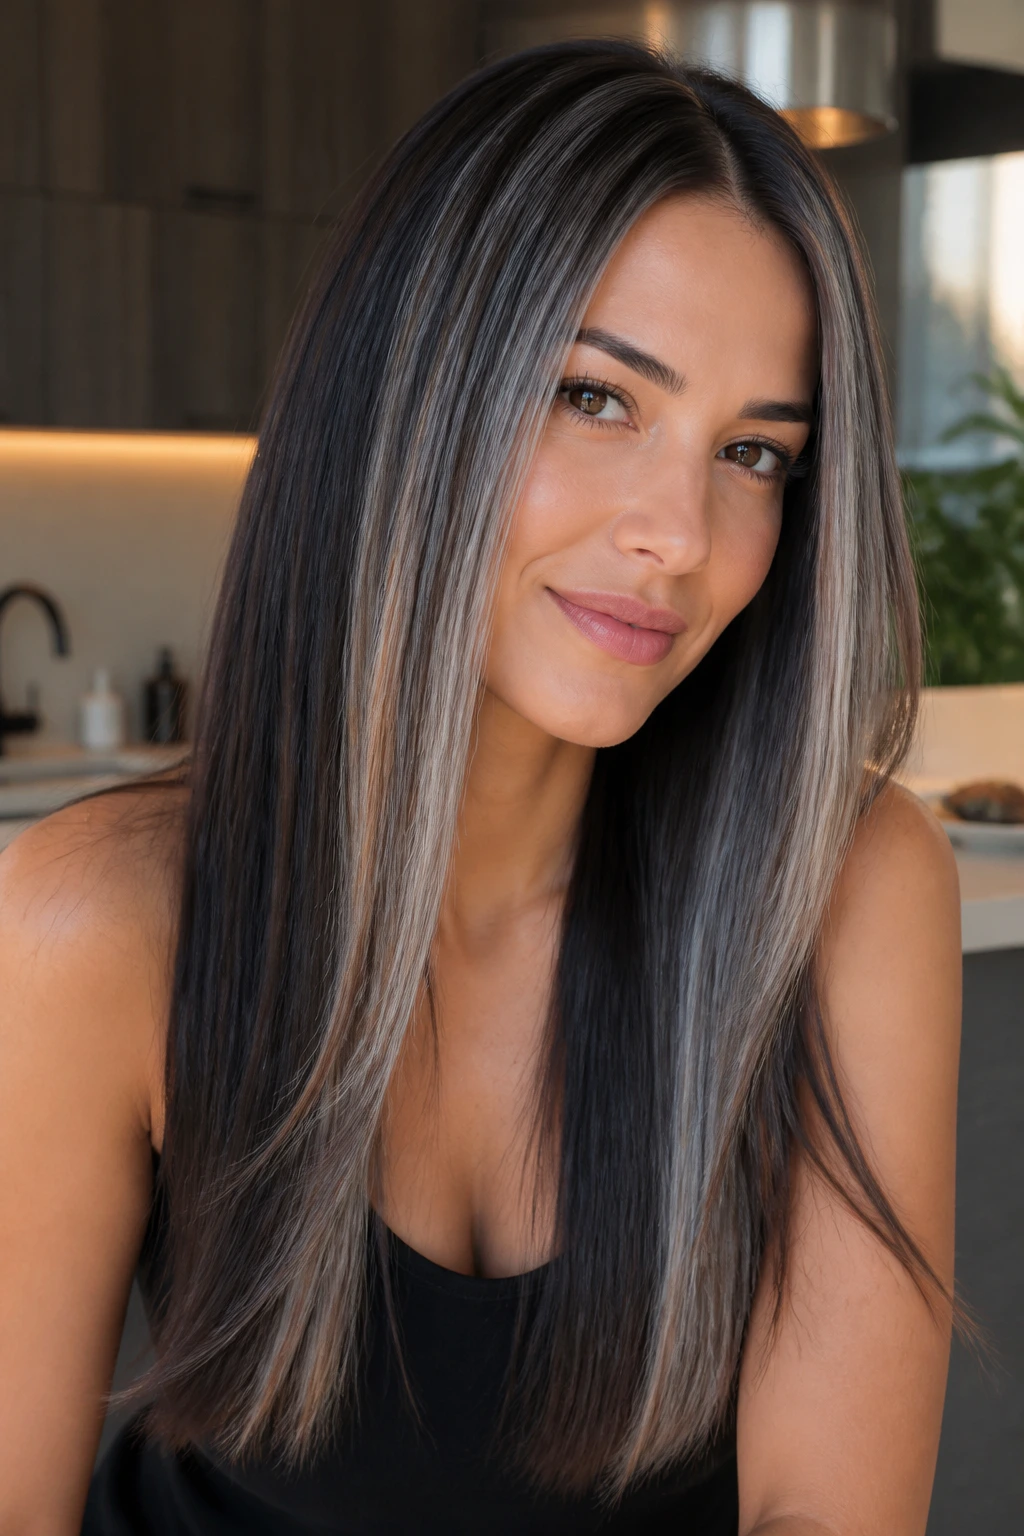
Straight hair is honest. It shows everything. That is the problem and the gift. When you place glossy grey panels into very straight dark hair, every section reads cleanly, and the caramel panels in between act like a softer bridge so the whole look doesn’t become too sharp.
I’d be careful with this one if the hair is heavily layered or frizzy, because the color blocks need a smooth surface to show up properly. A heat protectant, a flat iron, and a finish serum are not optional here. The shine is part of the look. Without it, the grey can go dull and the caramel can look duller than it should.
Best for someone who likes a polished finish and has the patience to maintain it.
21. Deep Side-Part Curls with Caramel Lowlights
A deep side part does more for curls than most people expect. It lifts one side, creates a clear line, and gives the grey and caramel somewhere to separate. I prefer caramel as a lowlight here, tucked underneath the grey, because that keeps the curls from turning too bright on the surface.
The lowlights matter. They add depth beneath the curl rather than on top of it, which is why this style looks rich even in soft indoor light. If the curls are dense, use wider sections so the color doesn’t vanish inside the texture. If the curls are loose, keep the placement finer and the overall tone softer.
This is a good choice when you want movement without going all the way into a dramatic cut.
22. Butterfly Cut with Grey and Honey Caramel
The butterfly cut gives you short face layers and longer back length, which is a gift for mixed tone coloring. Grey can live in the shorter top layers, where it frames the eyes, while honey caramel warms the longer sections and keeps the overall effect from feeling too cool. Dark hair beneath it all gives the cut some weight.
What makes this style work is the bounce. Blow it out or curl it large, and the layers separate just enough for the different tones to show. If the hair is very thick, ask for slightly wider face-framing pieces so the grey doesn’t get lost. If the hair is medium density, a lighter hand is enough.
This is one of the best options if you want a cut that feels airy but still substantial.
23. Sculpted Curls with Sterling Grey Tips
Sculpted curls need moisture first, color second. Once the curl pattern is healthy, sterling grey tips can make the shape look crisp, and caramel lowlights inside the curl keep the tone from reading too cold. On dark hair, that contrast creates a little halo effect around each coil.
The tip placement is the key. Too much grey at the ends, and the curl can look frosted in a way that drains the bounce out of it. A small amount, applied where the curl closes at the edge, is enough. Caramel tucked into the interior gives the coil depth when light passes through.
I like this look on hair with real definition, not stretched-out texture. The curl shape does the showing off.
24. Disconnected Bob with Grey Slice Highlights
A disconnected bob is all about edges and contrast, so slice highlights fit it better than soft feathering. Grey slices can be placed in broader sections, with caramel slices alternating between them, creating a pattern that looks deliberate rather than blended into nothing. Dark hair is the anchor. The color is the punctuation.
This style is best when the cut itself has a little drama — shorter back, longer front, or a visible weight line. If the slices are too thin, the whole thing turns wispy. Give them room. Let them read.
Ask for: clean sectional placement, not random foils.
That one detail changes everything. The bob becomes graphic instead of fuzzy.
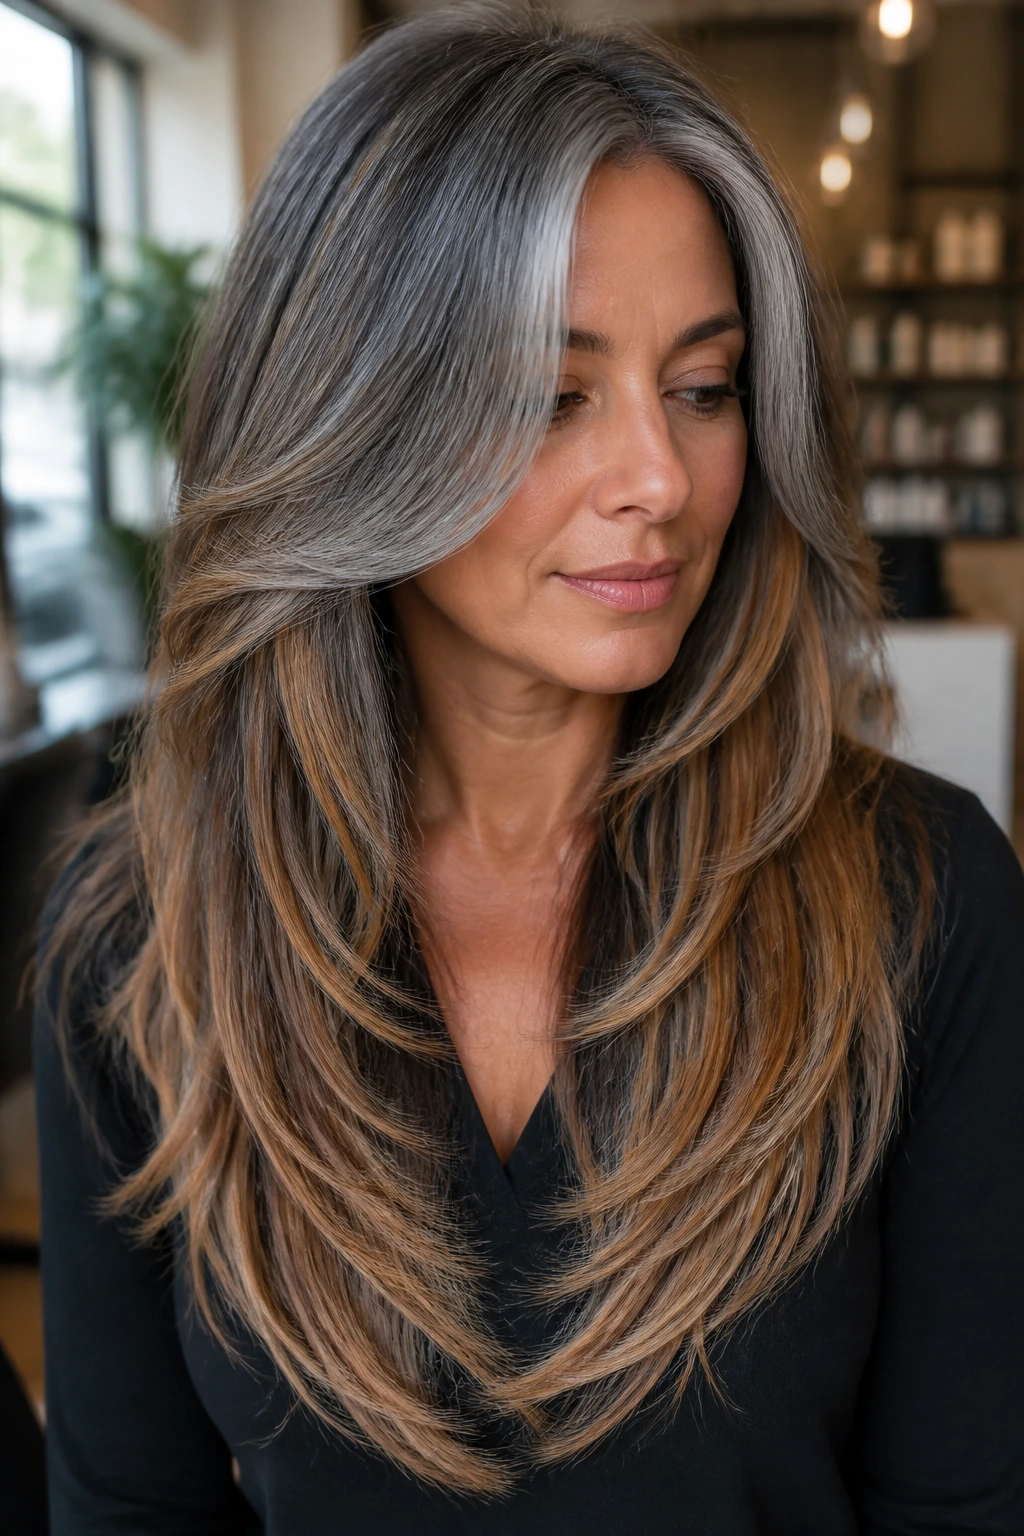
25. Voluminous Layers with Mushroom Grey and Caramel Finish
Mushroom grey is the quietest member of the grey family, and that’s why it works so well on dark hair. It keeps the tone earthy, while caramel finish pieces brighten the outer layers and prevent the whole look from sinking into brown again. On voluminous layers, the two tones alternate as the hair moves, which is the real appeal.
I’d choose this if you want grey that feels wearable rather than icy. It’s softer around the face, easier to grow out, and less likely to clash with warm skin tones. The finish should stay airy — a little root lift, a little bend at the ends, and no overdone shine. Too much gloss can flatten the mushroom tone. A matte spray or light texture spray keeps it interesting.
This is the calm ending to the group, and maybe the smartest one.
How Grey and Caramel Should Be Placed on Dark Hair
The color map matters more than the trend. If grey sits everywhere, dark hair can lose its depth and start looking chalky. If caramel sits everywhere, the whole thing turns warm and the grey loses the point. The sweet spot is where the two tones separate just enough to show shape: grey where the eye should pause, caramel where the hair bends.
That usually means the front panel, a few upper layers, and the ends if the cut has enough movement. On straight cuts, wider ribbons read better because there isn’t much texture to break them up. On curls and waves, finer placement works because the pattern does the separation for you. I’d never use the same map on a pixie that I’d use on a waist-length V-cut. That sounds obvious, but a lot of color work ignores it.
Root depth matters too. A level 4 or 5 shadow root lets the grey and caramel sit on top instead of fighting the base. If the root is pushed too light, the whole look can go soft in the wrong way. You want depth under the light, not flatness under the toner.
How to Ask for This Color at the Salon
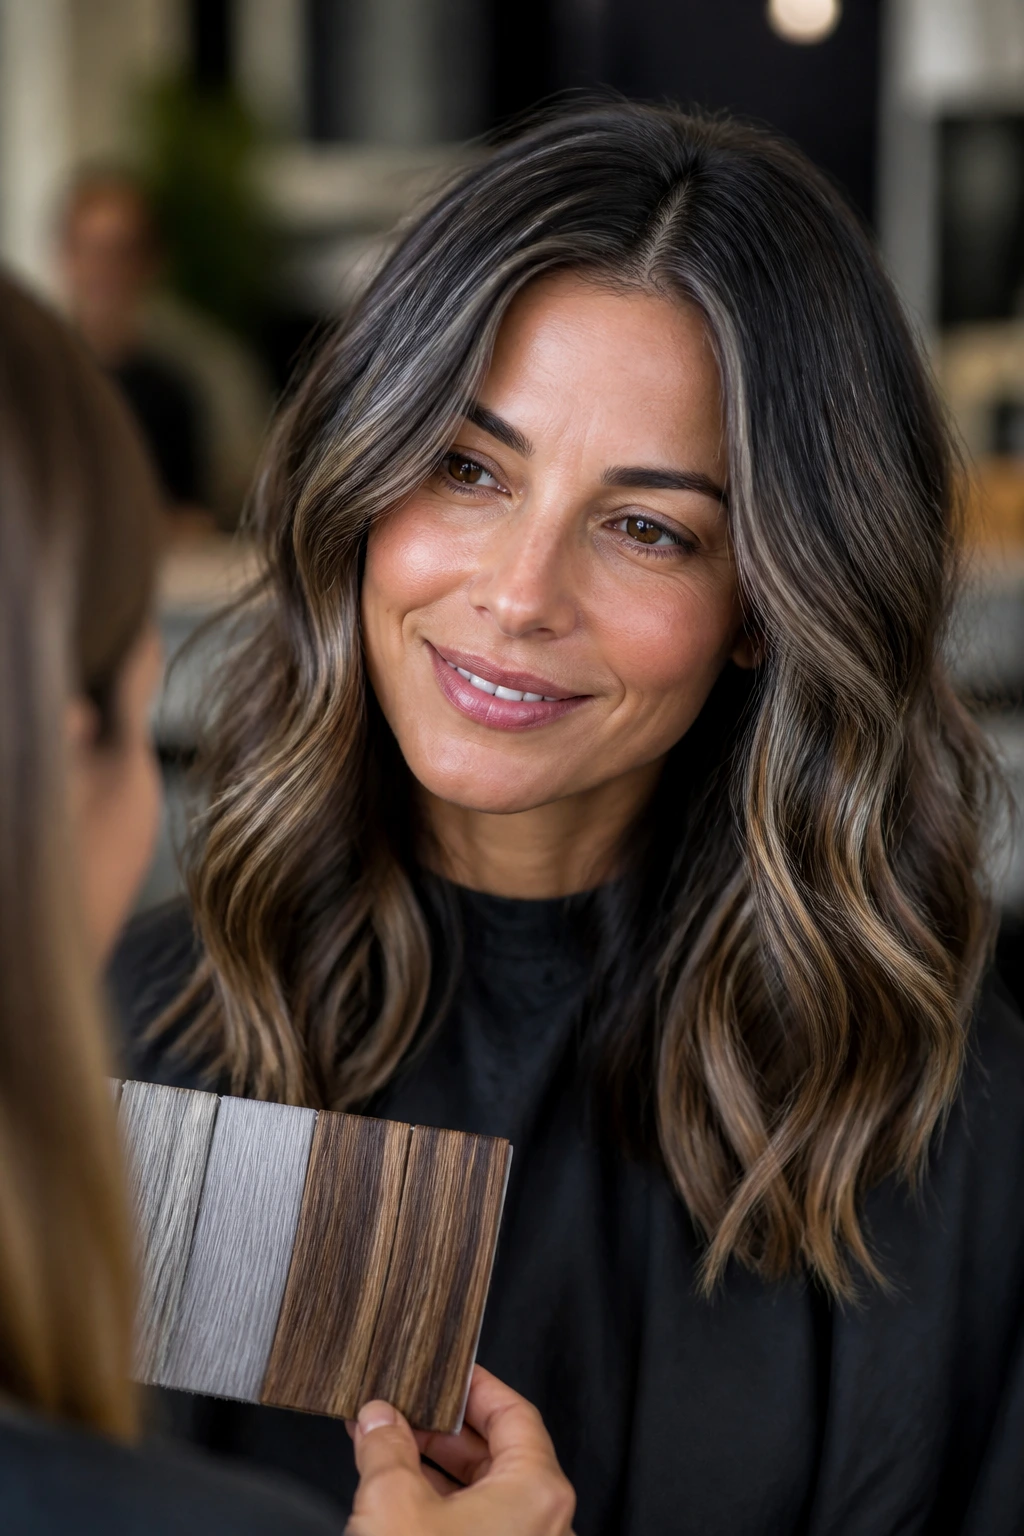
Bring photos, but bring the right kind. You want one image that shows the overall cut, one that shows the color placement, and one that shows the tone in indoor light. Grey looks cleaner in bright sun than it does under warm bulbs, and caramel reads darker under both, so seeing the look in multiple settings saves a lot of regret.
Say what you do and do not want. If you want grey to stay smoky, say that. If you want caramel only near the face or in the lower half, say that too. I’d also mention whether you want a sharp money piece, a softer balayage, or underlights that hide until the hair moves. Those are not interchangeable.
Useful salon language: root shadow, grey toner, silver-beige finish, caramel ribbons, face-framing pieces, lowlights, and gloss. If your hair is dark, ask how much lift is needed before the grey will actually read grey. That question alone can save you from a muddy result.
Essential Tools for Styling and Maintenance
- Color-safe sulfate-free shampoo — Helps keep grey and caramel from fading too fast and leaves the dark base less stripped.
- Purple or blue shampoo — Purple helps mute yellow on grey pieces; blue is useful if the caramel gets too orange, but use it sparingly.
- Leave-in conditioner — Keeps lightened ends from drying out, which matters more than most people think.
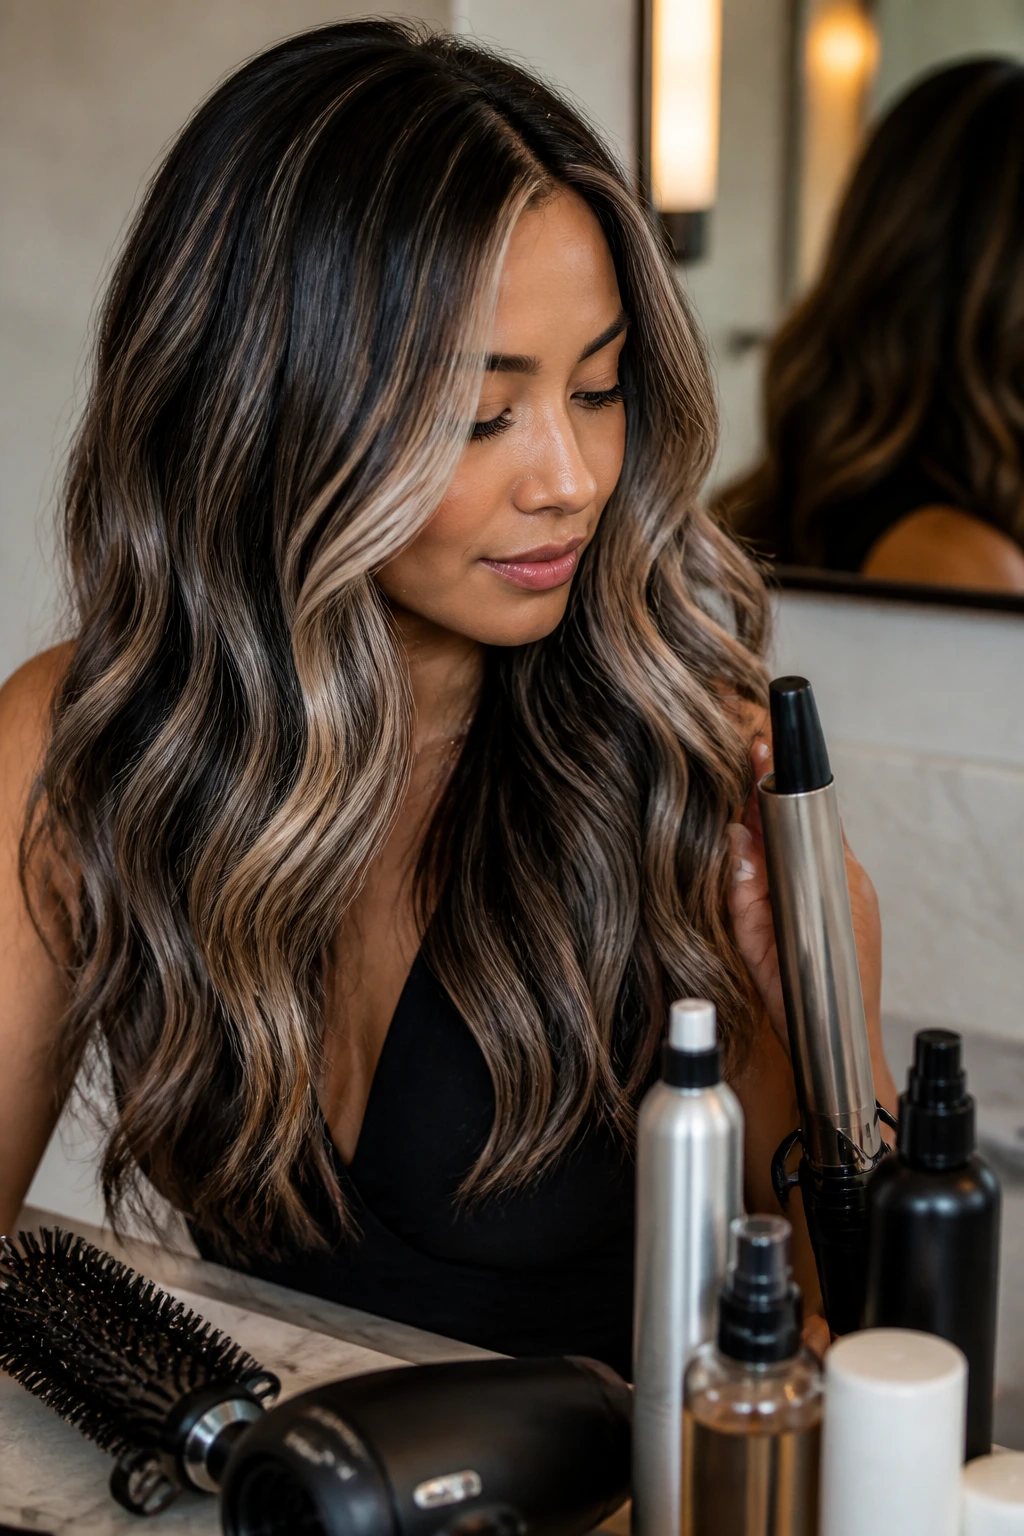
- Heat protectant spray — Non-negotiable if you use a curling iron or flat iron on blonde-lifted sections.
- 1-inch curling iron and 1.25-inch iron — One gives tighter definition, the other gives softer waves that show color ribbons better.
- Round brush and blow dryer nozzle — Useful for smoothing the cut so the color placement reads cleanly.
- Wide-tooth comb — Better than a brush on damp, lightened hair.
- Glossing serum or light oil — Adds shine without making grey look greasy.
- Sectioning clips — Handy for styling, especially if the color lives in layers.
Keeping Grey, Caramel, and Dark Roots Looking Fresh
Grey and caramel need different kinds of care, and pretending otherwise is how people end up with tired-looking color. Grey pieces usually need a little toning every 3 to 5 weeks if they start turning yellow or dull. Caramel pieces need a gentler hand; overusing purple shampoo on them can mute the warmth you actually want.
Wash less often if you can. Two or three shampoos a week is plenty for most color-treated hair, and dry shampoo is useful on the in-between days because it keeps the root area from looking greasy without stripping the toner. If your hair is porous at the ends, a deep-conditioning mask once a week helps the grey sit smoother and keeps caramel from looking dry and brassy.
Heat is the silent killer here. A blow dryer on high every day can dull grey faster than you expect, and repeated flat-ironing can make caramel turn rough at the edges. Use lower heat, keep the nozzle moving, and let the hair cool before brushing it out. That cooling step sounds small. It isn’t.
If the hair is long, book a gloss or toner refresh every 6 to 8 weeks. If it’s short, a trim every 6 weeks keeps the shape clean so the color doesn’t drift into frizz. Dark roots can stay visible longer than you’d think, and that’s a good thing. The shadow is part of the design.
Common Mistakes That Make the Color Look Muddy
- Trying to make the grey too pale on a dark base. If the hair isn’t lifted enough, the grey can turn beige or muddy instead of smoky. The fix is better pre-lightening, not more toner.
- Pushing the caramel too orange. Orange ribbons fight the grey and make the whole style look brassy. Ask for caramel that lands in golden-brown, not copper.
- Putting highlights everywhere. When every strand is light, the cut loses its shape. Leave some dark base showing so the color has somewhere to breathe.
- Ignoring the root shadow. A hard line at the scalp makes the look feel grown out too quickly. A soft shadow root keeps the blend cleaner.
- Using too much purple shampoo. It can flatten the caramel pieces and make the grey look dull. Use it only when the grey needs correction.
- Styling too stiffly. Tight curls or a rigid blowout can hide the weave of the color. A little movement usually shows the contrast better.
Variations for More Warmth, More Edge, or Less Upkeep
Smoked Espresso Blend
Go heavier on the grey, lighter on the caramel, and keep the root shadow deep. This is the best option if you want the cool side of the palette to lead without turning the hair icy from root to tip. It reads sleek on straight cuts and polished waves.
Honey Halo Placement
Push the caramel closer to the face and along the upper outer layers. The grey stays through the back and lower sections, which gives you brightness where it matters most. This version suits warmer skin tones and anyone who wants less contrast near the scalp.
Chunky Ribbon Contrast
Use wider grey panels and a few thicker caramel ribbons. It’s bolder, more graphic, and better for long layers, bobs with movement, or anyone who likes the color to be visible from across a room. Fine hair can handle it too, as long as the slices are clean.
Soft Grow-Out Shadow
Keep the dark root obvious on purpose and let the grey start lower on the shaft. Caramel sits in the mids and ends, so the style stays wearable longer between salon visits. This one is the least fussy of the group.
Curly Definition Map
Place grey on the outer curl pattern and caramel inside the curl cluster, where it peeks through as the hair moves. That keeps the tone dimensional without losing the coil shape. It’s especially good if your curls are medium to tight and need visual separation.
Frequently Asked Questions
Will grey and caramel work on naturally black hair?
Yes, but black hair usually needs enough lift first for the grey to show up as grey rather than brown. A good colorist will protect the depth with a shadow root and place caramel where it can soften the contrast instead of fighting it.
Do I need full bleach to get this look?
Not always. If you only want a few face-framing pieces, balayage or partial lightening may be enough. Full bleach is more likely when you want bright grey through long lengths or a very silver finish.
Which skin tones look best with this pairing?
Smokier grey flatters cooler or neutral undertones, while caramel near the face helps warm complexions avoid looking washed out. That said, the placement matters as much as the tone, so even warm skin can wear grey if the caramel stays visible around the front.
How often will I need touch-ups?
Root shadow can usually stretch 6 to 8 weeks, while toner or gloss may need refreshing a bit sooner if the grey loses its clean edge. Caramel pieces stay nicer longer if you avoid over-washing and too much heat.
Can I wear this look on curly hair?
Absolutely. Curly hair often shows the contrast better than straight hair because the bends create natural light and shadow. The key is to place the grey and caramel in broader sections so the pattern doesn’t disappear inside the curl.
What if the grey turns yellow or dull?
Use a purple shampoo once, not five times. Leave it on for the time the bottle recommends, then follow with a conditioner or mask. If the tone still looks off, it may need a salon gloss rather than more at-home product.
Can I keep my roots dark on purpose?
Yes, and I’d argue that’s one of the best parts of the look. A visible dark root makes grey and caramel feel intentional and gives you a cleaner grow-out line.
Does this style need heat styling every day?
No, but the color usually reads better with a little bend or texture. Even a loose braid overnight or a large roller set can give the highlights enough movement to show their pattern.
The Shade Story That Holds Up
The best grey hairstyles for dark hair with caramel highlights do not try to erase the base. They use it. Dark roots give the color depth, grey adds the smoke, and caramel keeps the whole thing from drifting into cold territory. That balance is what makes the look feel rich rather than processed.
If you’re saving photos for a salon visit, look past the color first and study the placement. Where does the grey start? How wide are the caramel pieces? Is the root shadow obvious or soft? Those little decisions change everything, and they’re the reason one grey-and-caramel style looks lived-in while another looks like a tone chart gone wrong.
Start with the cut you already wear well, then place the color where the hair moves. That’s the version that lasts.